10
REMOTE PUNCH EQ (Optional)
NOTE:Previous (prior to 2007) Punch Bass and Para-Punch
remotes will not work with these amplifiers.
NOTE:Use the instructions that came with the
remote for a variety of mountings that fit
your preference.
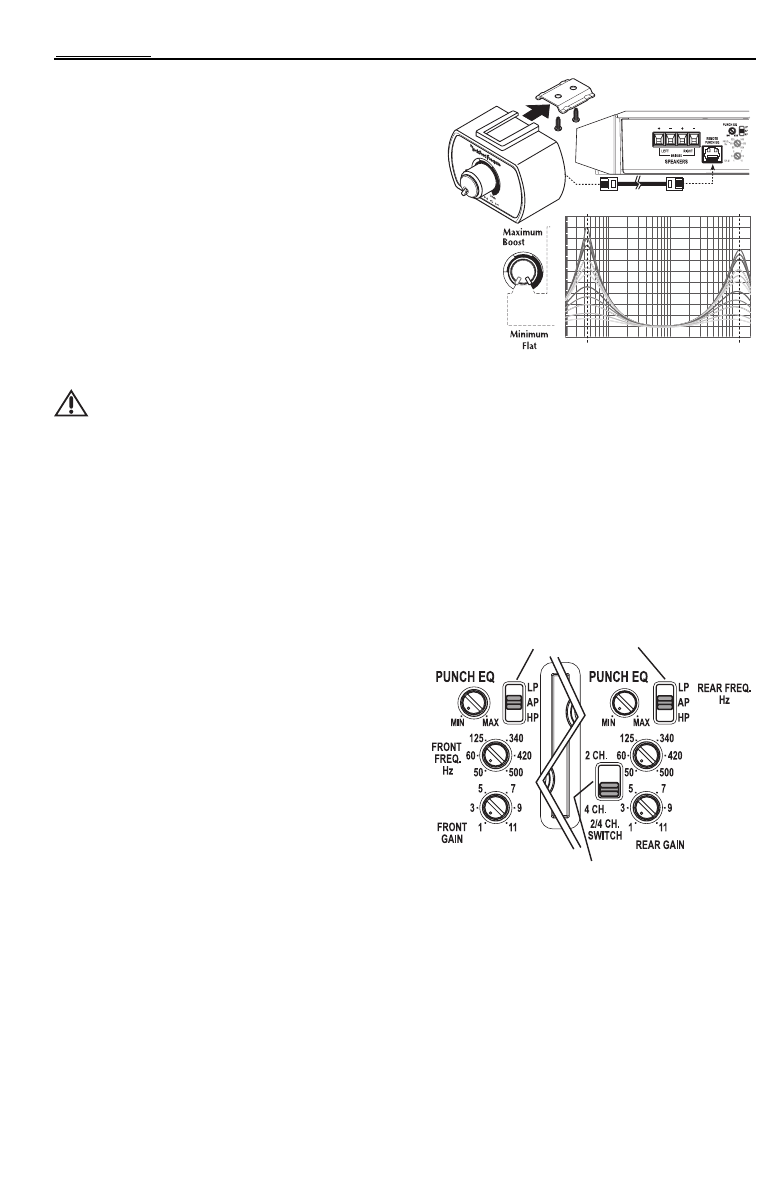
Quick Install
1. Using the screws supplied, install the mounting clip.
2. Slip the remote onto the mounting clip until it snaps into place.
3. Route and connect the cable to the remote and amplifier.
Operation
4. Operation works the same as Punch EQ, see below.
NOTE:Connecting the optional remote overrides the Punch EQ rear channel control on the amplifier.
CAUTION:Overexcursion and subsequent damage may occur at high levels of boost.
PUNCH EQ
This works along with the crossover switch on the amplifier.
When set to Low-Pass (LP) operation, this is a variable Bass Boost.
When set to High-Pass (HP) operation, this is a variable Mid-Bass and Treble Boost.
When set to All Pass (AP) operation,both the Bass and Treble frequencies are boosted.
Set this to your personal preference while listening to the system.
NOTE:Connecting the optional remote overrides the Punch EQ rear channel control on the amplifier.
ADJUSTING CROSSOVER FREQUENCY
Do the following individually for each channel.
Placing the crossover switch in the HP position sets
the amplifier to the High Pass mode, enabling
frequencies above the cut-off point to pass, adjustable
between 50-500Hz.
Placing the crossover switch in the AP position sets
the amplifier to the All Pass mode, preventing any
crossover adjustment, allowing all frequencies to pass.
Placing the crossover switch in the LP position sets
the amplifier to the Low Pass mode, enabling
frequencies below the cut-off point to pass, adjustable
between 50-500Hz.
Turn the crossover adjustment knob all the way down.With the system playing, turn the crossover
adjustment knob up slowly until the desired crossover point is achieved.
2/4 CHANNEL SWITCH
Setting this switch to the 2CH. position, switches the inputs to a 2-channel mode, allowing connection to
only the front inputs with a 4-channel output.
Output controls function the same as if the amplifier was in 4-channel mode.
All “ACTIVE” inputs must have RCA jacks connected.
Switch in 2CH. position,“ACTIVE” - Front channel inputs only.
Switch in 4CH. position,“ACTIVE” - All Front and Rear channel inputs.
NOTE:When connecting to the 4-Channel inputs, be sure to route both front and rear RCA cables
tightly together.