654112
11
Zoom out
Zoom in
Previous page
1/22
Next page
1
3-in-1 Mini Camera
User’s Guide
16-3868
2
G
G
E
E
T
T
T
T
I
I
N
N
G
G
S
S
T
T
A
A
R
R
T
T
E
E
D
D
About the 3-in-1 Mini Camera
Congratulations on your purchase of the 3-in-1 Mini Camera. Your Mini Camera has been ergonomically
designed to let you quickly and easily capture quality digital images and short video clips without the trouble
and expense of buying and developing film.
With a 1.3 Mega-Pixel image sensor, you are assured of clear images that can be printed, displayed on a
web site, or sent to friends and family through e-mail. The 1.3 Mega-Pixel image sensor is capable of
capturing digital still images and streaming snapshots. Using the Picture Manager interface software, the
streaming Snapshots from your camera will automatically converted into digital video clips. You can also use
your mini camera as a PC/web camera, taking real-time images when connected to your PC with the
supplied USB cable.
The included software enables you to easily download your images and video to your PC. With Arcsoft
PhotoImpression 5 and VideoImpression 2 software you can edit your images and video with ease. For more
information on how to use Arcsoft PhotoImpression 5 and VideoImpression 2, you may visit their website at
www.Arcsoft.com
.
What’s Included
Open the 3-in-1 Mini Camera package and examine the contents. Your package should contain the
following items:
3 in 1 Mini Camera
Neck Strap
USB Cable
Two Color Faceplates
Quick Start Guide
Software CD containing:
Picture Manager (TWAIN driver)
Arcsoft PhotoImpression5
Arcsoft VideoImpression2
This User’s Guide (in the CD)
Adobe Reader 7.0
Trademark Recognition
Windows (an abbreviated term referring to the Microsoft Windows Operation System), NetMeeting, and Media Player are
registered trademarks and products of Microsoft Corporation registered in the USA and other countries. Arcsoft
PhotoImpression5 and Arcsoft VideoImpression2 are products and trademarks of Arcsoft Inc. Other corporate, product
names, or trade references are trademarks or registered trademarks of their respective companies.
3
Table of Contents
GETTING STARTED .................................................................................................................................................2
ABOUT THE 3-IN-1 MINI CAMERA .......................................................................................... 2
What’s Included ............................................................................................................ 2
CAMERA FEATURES ............................................................................................................. 4
Front View .................................................................................................................... 4
Rear View ..................................................................................................................... 4
INSTALLING A BATTERY AND CHANGING A FACEPLATE.............................................................. 5
FASTENING THE NECK STRAP ............................................................................................... 5
CAPTURING IMAGES ..............................................................................................................................................6
TURNING THE CAMERA ON AND OFF ...................................................................................... 6
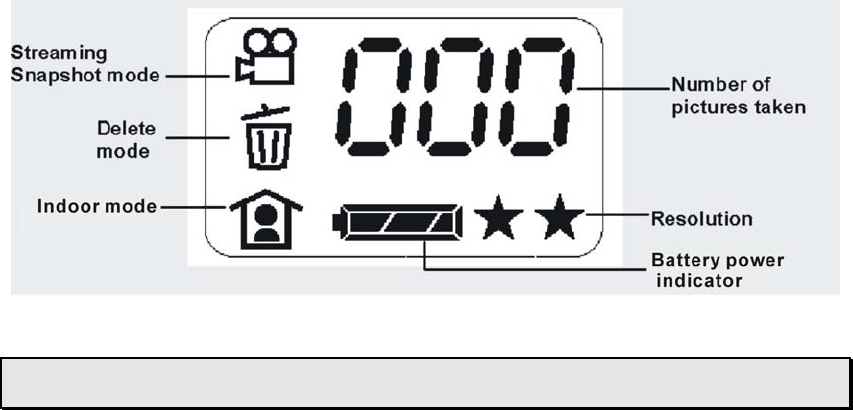
LCD INFORMATION/STATUS DISPLAY ..................................................................................... 6
CAMERA ICONS AND DESCRIPTIONS ....................................................................................... 7
CAPTURING DIGITAL STILL IMAGES........................................................................................ 8
CAPTURING STREAMING SNAPSHOTS (VIDEO CLIPS) ................................................................ 8
DELETING IMAGES AND VIDEOS ............................................................................................. 9
SOFTWARE INSTALLATION ..............................................................................................................................10
SYSTEM REQUIREMENTS .................................................................................................... 10
SOFTWARE OVERVIEW & FEATURES..................................................................................... 10
Picture Manager (TWAIN) ...........................................................................................10
Arcsoft PhotoImpression5...........................................................................................10
Arcsoft VideoImpression2............................................................................................10
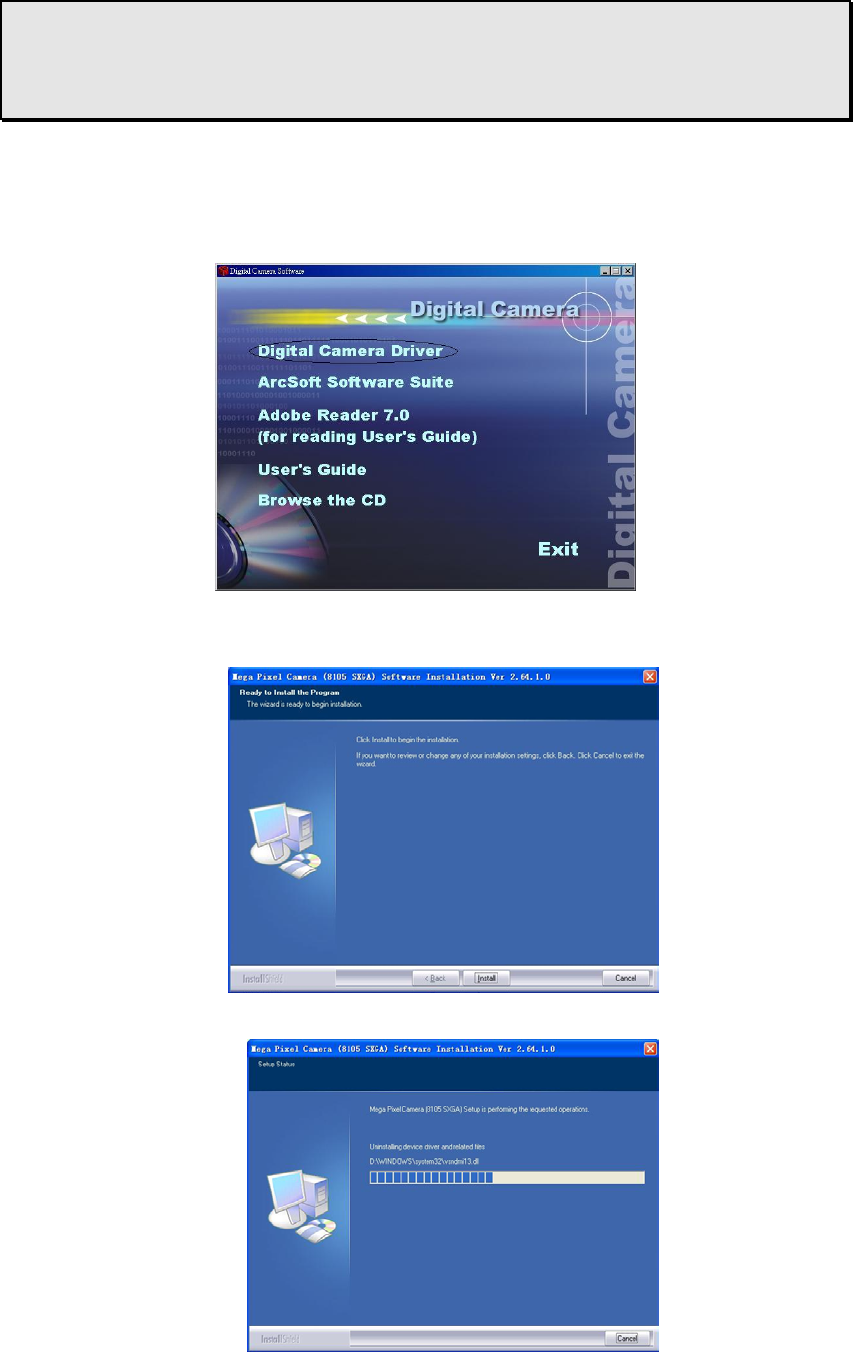
INSTALLING THE DIGITAL CAMERA DRIVER SOFTWARE............................................................ 11
INSTALLING THE PHOTOIMPRESSION 5 AND VIDEOIMPRESSION 2 ............................................. 12
CONNECTING TO YOUR PC...............................................................................................................................13
CONNECTING YOUR MINI CAMERA TO YOUR PC .................................................................... 13
DOWNLOADING IMAGES AND VIDEOS TO YOUR PC ...........................................................................15
USING THE TWAINAPP TO TRANSFER IMAGES AND VIDEOS ...................................................... 15
USING PHOTOIMPRESSION 5 TO TRANSFER IMAGES ............................................................... 16
USING YOUR MINI CAMERA AS A PC/WEB CAMERA ...........................................................................17
VIEWING VIDEO CLIPS WITH WINDOWS MEDIA PLAYER .............................................................. 17
VIDEO CONFERENCING WITH NETMEETING...........................................................................................18
HOW TO USE YOUR MINI CAMERA WITH MICROSOFT NETMEETING ............................................ 18
QUICK TIPS................................................................................................................................................................19
CAPTURING IMAGES INDOORS – GENERAL TIPS ..................................................................... 19
CAPTURING IMAGES OUTDOORS – GENERAL TIPS .................................................................. 19
SPECIFICATIONS ....................................................................................................................................................20
TROUBLESHOOTING.............................................................................................................................................21
FCC DECLARATION OF CONFORMITY.................................................................................... 21
THE FCC WANTS YOU TO KNOW......................................................................................... 22
4
Camera Features
Front View
Rear View
6
C
C
A
A
P
P
T
T
U
U
R
R
I
I
N
N
G
G
I
I
M
M
A
A
G
G
E
E
S
S
Turning the Camera On and Off
To turn on the camera, hold down the Power/Mode button until on displays briefly. The camera beeps once,
and then 000 appears. To turn off the camera, hold down the Power/Mode button again.
Note: Your Mini Camera automatically turns off after 60 seconds of inactivity.
LCD Information/Status Display
The following icons are used in the Information/Status LCD display to present mode and setting options.
Note: When scrolling through the modes, an icon blinks when it is selected.
7
Camera Icons and Descriptions
To select your desired setting, press the Power/Mode button to scroll through the different modes. The
icons will display in the status LCD. Press the Shutter button to select a function while it is displayed. The
camera is now ready to capture an image or streaming snapshots according to your selected preferences.
Note: If you do not press any button within five seconds, the LCD screen automatically returns to
the operational mode screen – ready to capture an image.
Icon Description
Number of images and videos captured
High Resolution mode (HI and two-stars)
1280 x 1008 pixels for still images
LOW Resolution mode (LO and one-star)
640 x 480 pixels for still images
Indoor mode to capture images indoors, or in darker environments
Outdoor mode to capture images outside
Streaming Snapshot
mode for capturing Video Clips
The Movie Icon with one-star indicates 320 x 240 video resolutions.
The Movie Icon and no-star indicates 160 x 120 video resolutions.
ERASE ALL - to erase ALL images and videos saved in the camera
ERASE LST - to erase the LAST image saved in the camera
Full Battery Level indicator
Low battery indicator
Displays when the camera is connected to a computer
Displays the camera’s memory size is full
HI
LO
8
Capturing Digital Still Images
Note: Be sure the camera has enough battery power before taking pictures. Observe the battery power
indicator and replace the battery when its power is low.
1. Hold down the Power/Mode button until on displays briefly. The camera beeps once and the function
screen displays.
Default
Setting
(No images, indoor light, full battery, highest resolution)
2. Repeatedly press the Power/Mode button until the desired resolution setting displays, and then press the
Shutter button to confirm the setting. The main screen displays.
HI and
Select the 1280 x 1008 pixel resolution for the best image quality.
LO and
Select the 640 x 480 pixel resolution for fair image quality, but you can capture
more images using the built-in memory.
3. Repeatedly press the Power/Mode button until the desired indoor or outdoor setting displays, and then
press the Shutter button to confirm the setting. The main screen displays.
Indoor: Use when inside a building or the ambient light is low.
Outdoor: Use when capturing images outdoors.
4. Look through the viewfinder and focus on the image you want to capture. Hold the camera still and press
the Shutter button to take a picture. A short beep sounds when a picture is taken. The photo number in
the photo counter increases.
Capturing Streaming Snapshots (Video Clips)
1. Hold down the Power/Mode button to turn on the camera.
2. Repeatedly press the Power/Mode button to select the desired streaming snapshot mode. Then, press
the Shutter button. The function screen displays.
3. Repeatedly press the Power/Mode button to select the desired movie resolution setting. Then, press the
Shutter button to confirm the setting. The function screen displays.
320 x 240
[No Icon]
160 x 120
4. Repeatedly press the Power/Mode button to select the indoor or outdoor setting, and then press the
Shutter button.
Indoor: Use when inside a building or when the ambient light is low.
Outdoor: Use when outdoors
.
5. Look through the viewfinder and hold down the Shutter button to capture streaming snapshots. You will
hear continuous beeps as the images are recorded. When you finish, release the Shutter button. The
digit on the display counter advances.
9
Deleting Images and Videos
The Delete function allows you delete images or video clips saved in the internal memory of your mini
camera.
Repeatedly press the Power/Mode button until the desired Delete mode displays.
Delete ALL images and Videos:
To delete all images and video clips, hold down the Shutter button until you hear 2 beeps.
Delete the LAST image or video capture:
To delete the last image or video clip, hold down the Shutter button until you hear 2 beeps.
10
S
S
O
O
F
F
T
T
W
W
A
A
R
R
E
E
I
I
N
N
S
S
T
T
A
A
L
L
L
L
A
A
T
T
I
I
O
O
N
N
S
S
y
y
s
s
t
t
e
e
m
m
R
R
e
e
q
q
u
u
i
i
r
r
e
e
m
m
e
e
n
n
t
t
s
s
Windows
Windows 98, 98SE, ME, 2000, or XP
200 MHz Pentium or better
64MB RAM
310MB available Hard Drive space
CD-ROM
USB Port
Software Overview & Features
The supplied CD includes the following software and applications to enhance your digital imaging
experience. The Picture Manager (TWAIN) software helps you download the images and video from your
digital camera to your computer. The Arcsoft PhotoImpression 5 and Arcsoft VideoImpression 2 are photo
and video editing applications.
Picture Manager (TWAIN)
The Picture Manager works with TWAIN-compliant third-party software. The Picture Manager allows you to
quickly view, edit the images (e.g., crop, rotate, flip), and save them to your computer.
Arcsoft PhotoImpression5
Acquire, organize, view, browse and share photos fast
Provides powerful tools for photo editing and enhancing
Create slideshows with music, calendars and greeting cards
Arcsoft VideoImpression2
Create 360° and Wide-angle panoramas in just 3 steps
Helpful Wizard simplifies project setup
Automated warping, aligning, and blending deliver great results fast
Directly output to e-mail, the Web, office documents, screen savers and printers
11
Installing the Digital Camera Driver Software
Note: (For Windows 98SE users ONLY!)
You may encounter a message during software installation due to an old version of DirectX
installed on your computer. Select “No” and continue with the installation. This will not affect
the operation of your computer.
1. Insert the DIGITAL CAMERA software CD into your CD-ROM drive. The CD runs automatically, and the
DIGITAL CAMERA installation menu displays. Click “Digital Camera Driver”.
Note: If the CD does not run automatically, click “Start”, “Run”, then type “D:\autorun.exe” in the Run
Dialog text box (where D:\ is your CD-ROM drive).
2. “Start InstallShield Wizard” displays briefly. Then, the following screen displays. Click “Install” to start the
installation.
3. The installation begins and the setup status displays.
11


Need help? Post your question in this forum.

Forumrules


Report abuse

Libble takes abuse of its services very seriously. We're committed to dealing with such abuse according to the laws in your country of residence. When you submit a report, we'll investigate it and take the appropriate action. We'll get back to you only if we require additional details or have more information to share.

Product:

For example, Anti-Semitic content, racist content, or material that could result in a violent physical act.

For example, a credit card number, a personal identification number, or an unlisted home address. Note that email addresses and full names are not considered private information.

Forumrules

To achieve meaningful questions, we apply the following rules:

Register

Register getting emails for RadioShack 3-in-1 Mini Camera - Go Vision at:


You will receive an email to register for one or both of the options.


Get your user manual by e-mail

Enter your email address to receive the manual of RadioShack 3-in-1 Mini Camera - Go Vision in the language / languages: English as an attachment in your email.

The manual is 1,72 mb in size.


You will receive the manual in your email within minutes. If you have not received an email, then probably have entered the wrong email address or your mailbox is too full. In addition, it may be that your ISP may have a maximum size for emails to receive.

The manual is sent by email. Check your email

If you have not received an email with the manual within fifteen minutes, it may be that you have a entered a wrong email address or that your ISP has set a maximum size to receive email that is smaller than the size of the manual.

The email address you have provided is not correct.

Please check the email address and correct it.

Your question is posted on this page

Would you like to receive an email when new answers and questions are posted? Please enter your email address.


Info