32
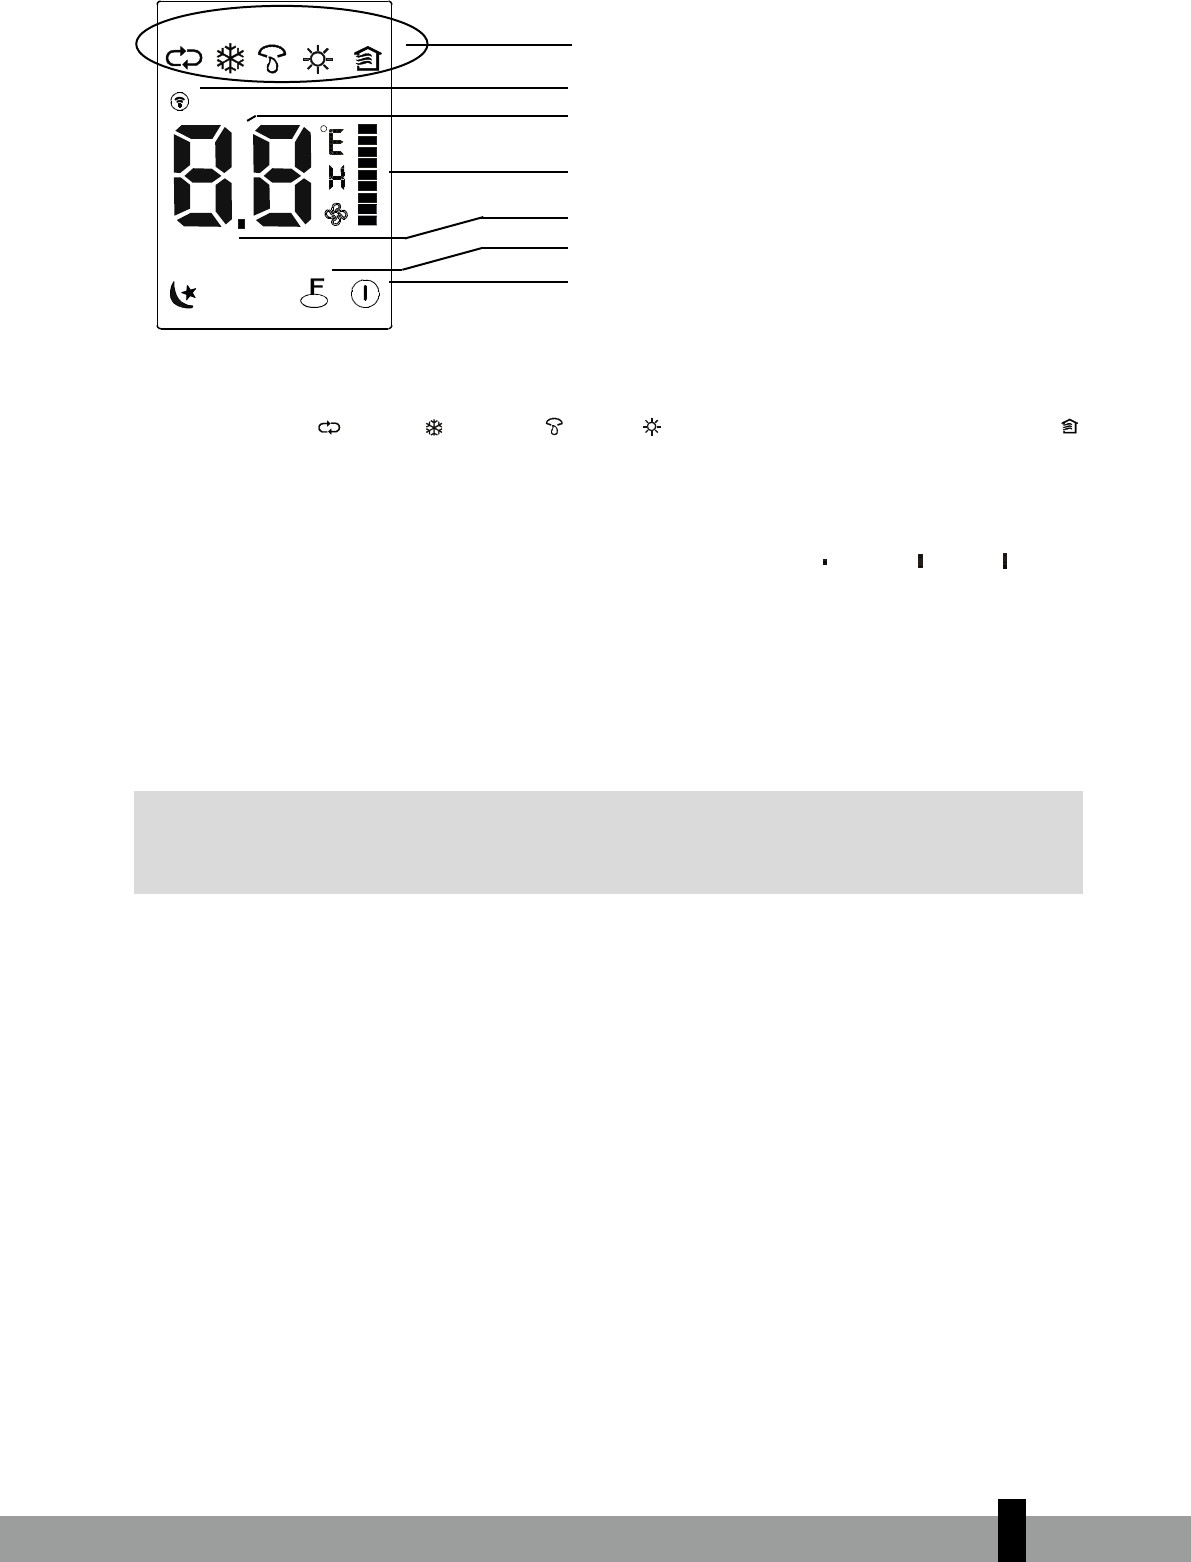
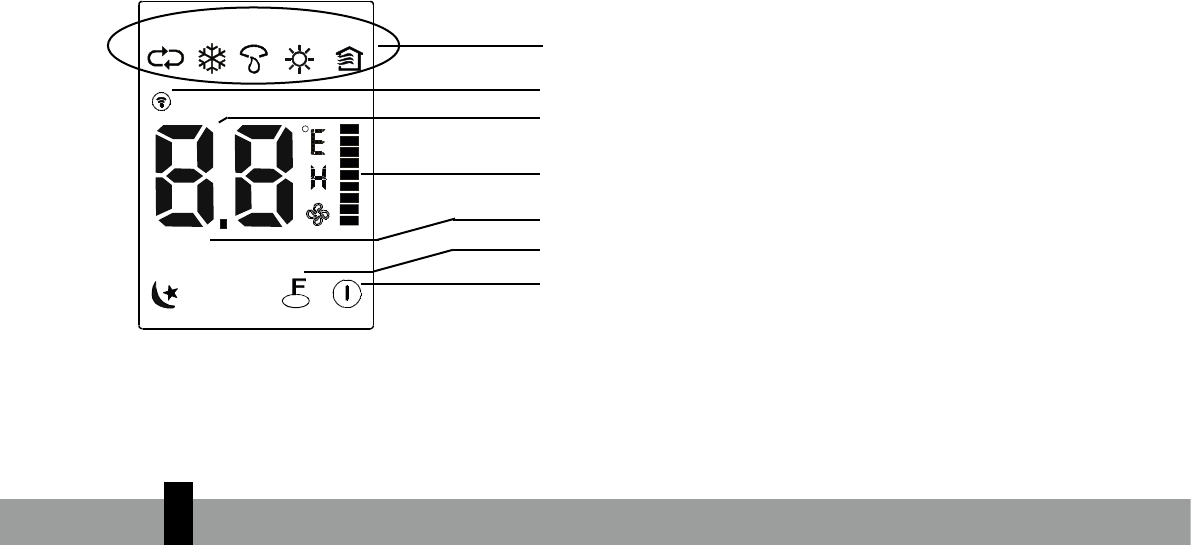
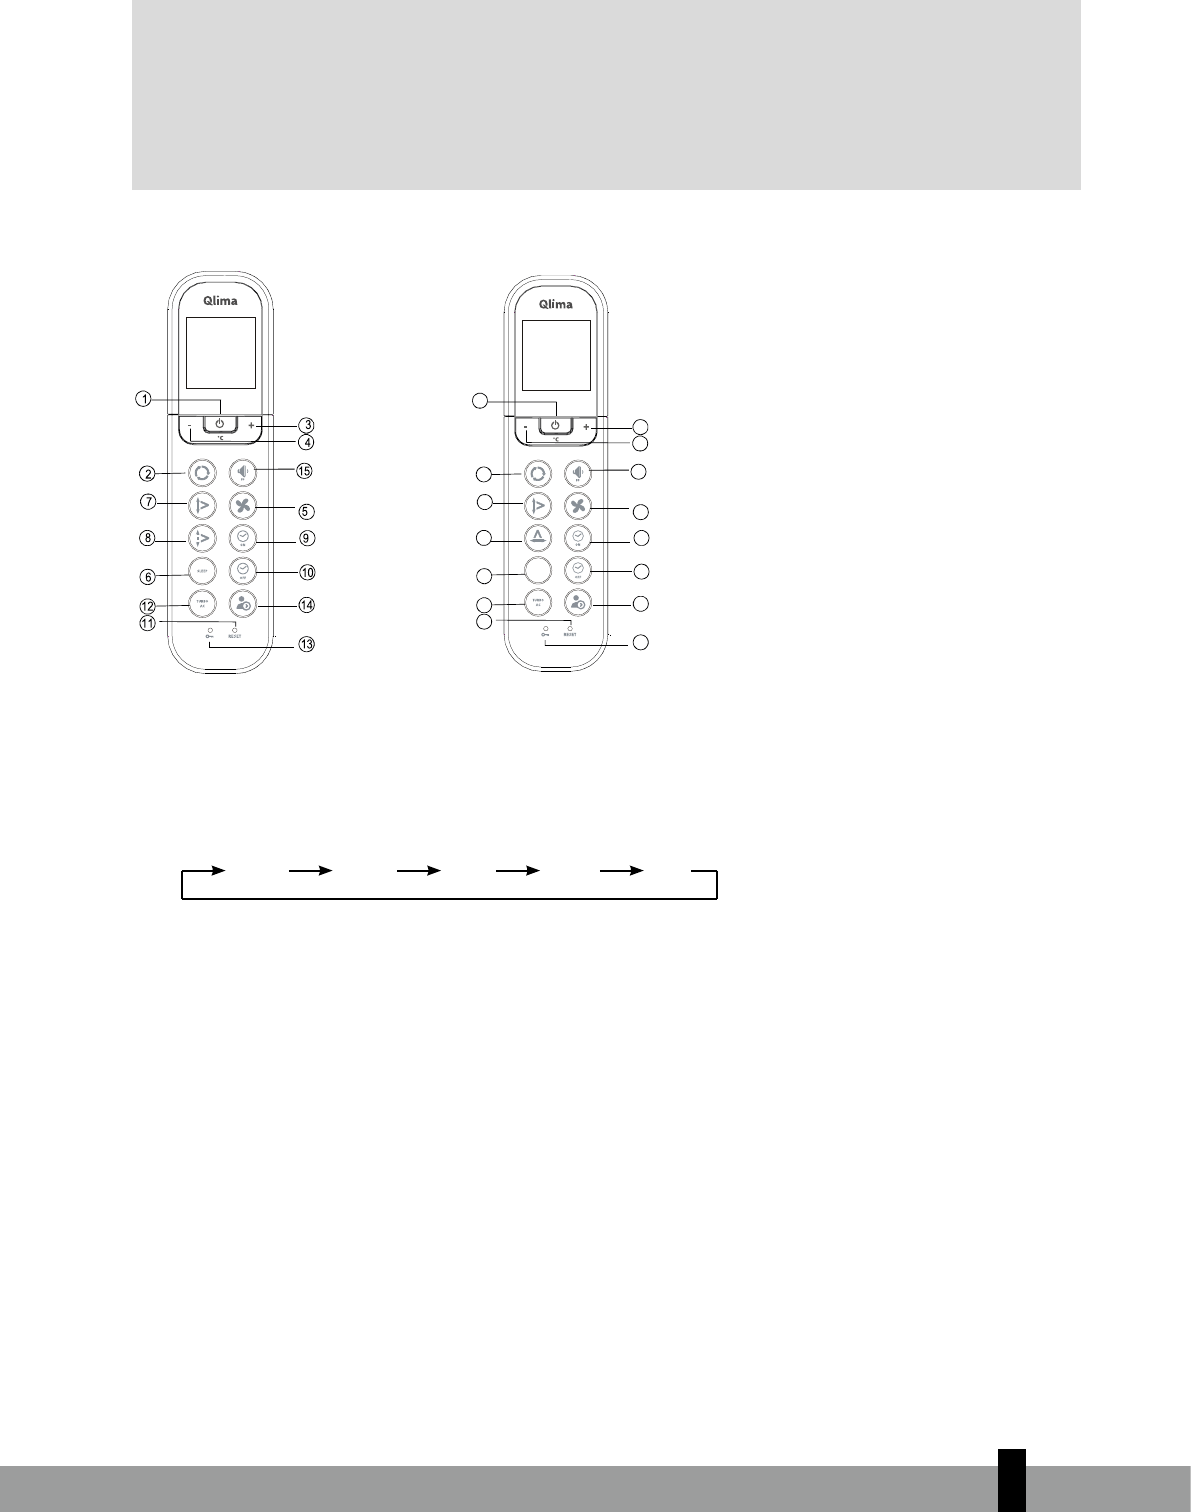
PANEL DE INDICADORES LUMINOSOS EN LA UNIDAD INTERIOR
Page 6
Unit Specifications and Featur
1
Unit
Specifications
and Features
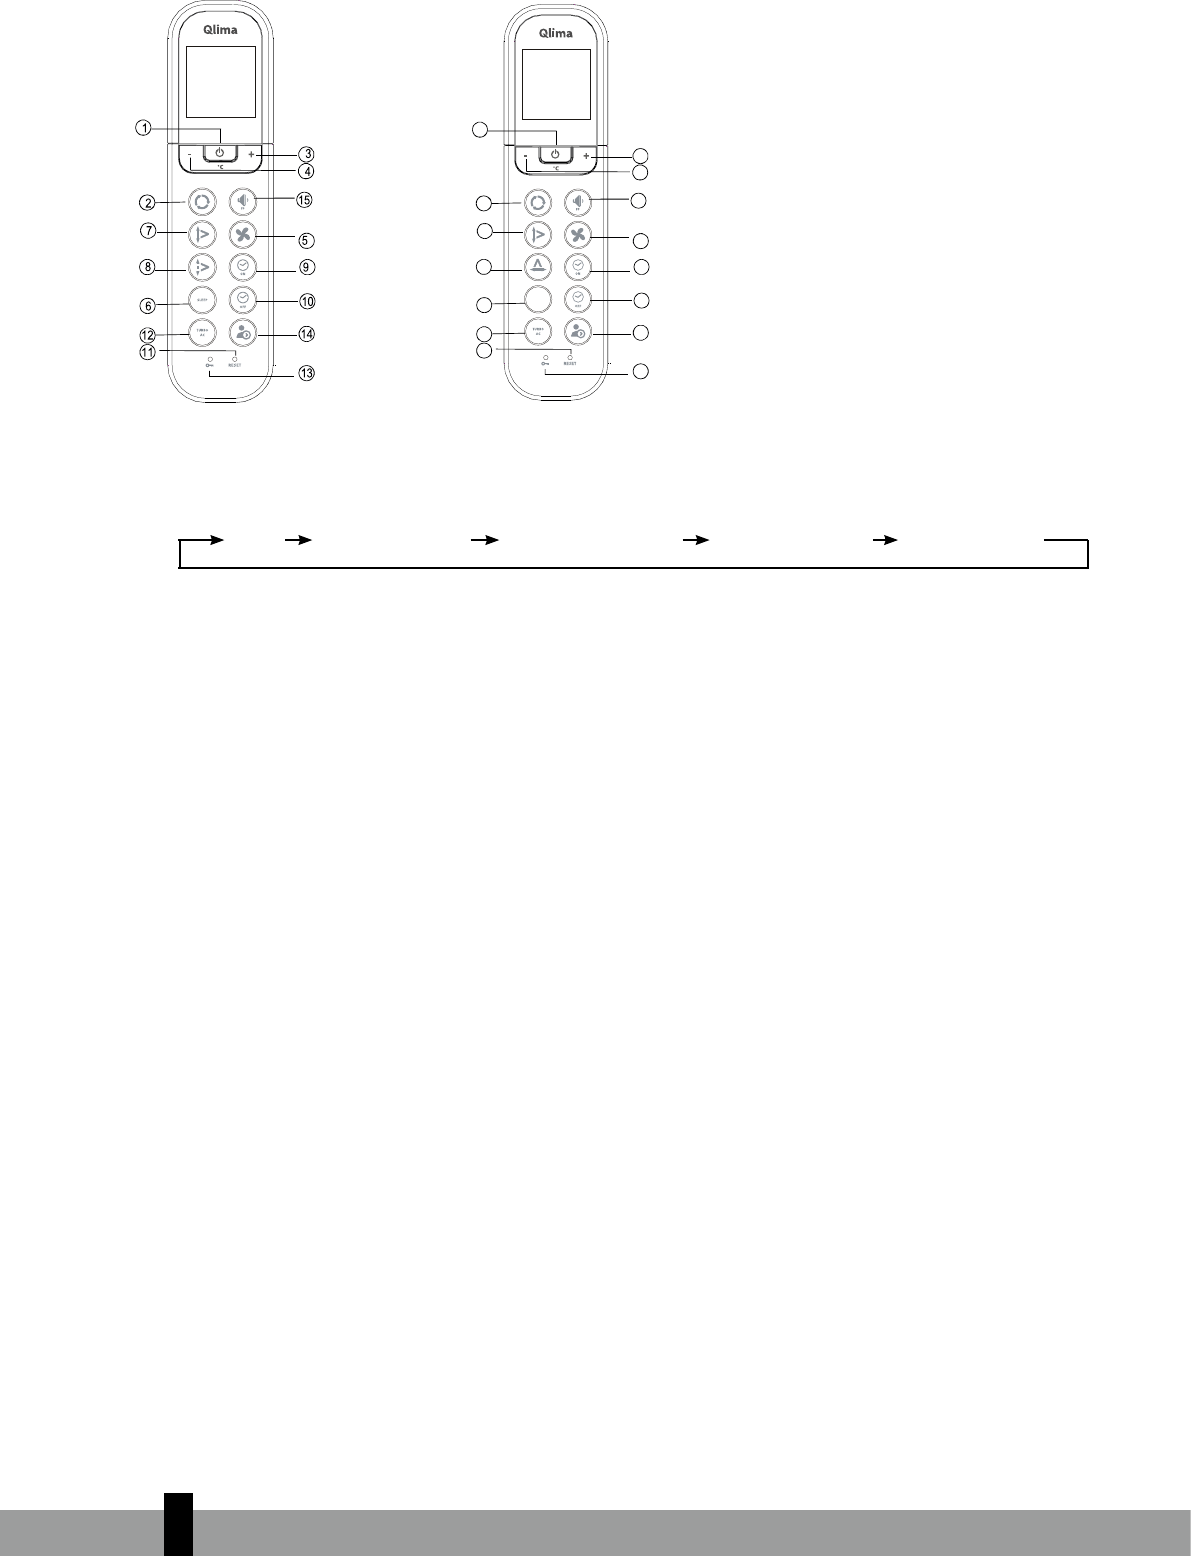
NOTE:
A guide on using the infrared remote is not included
in this literature package.
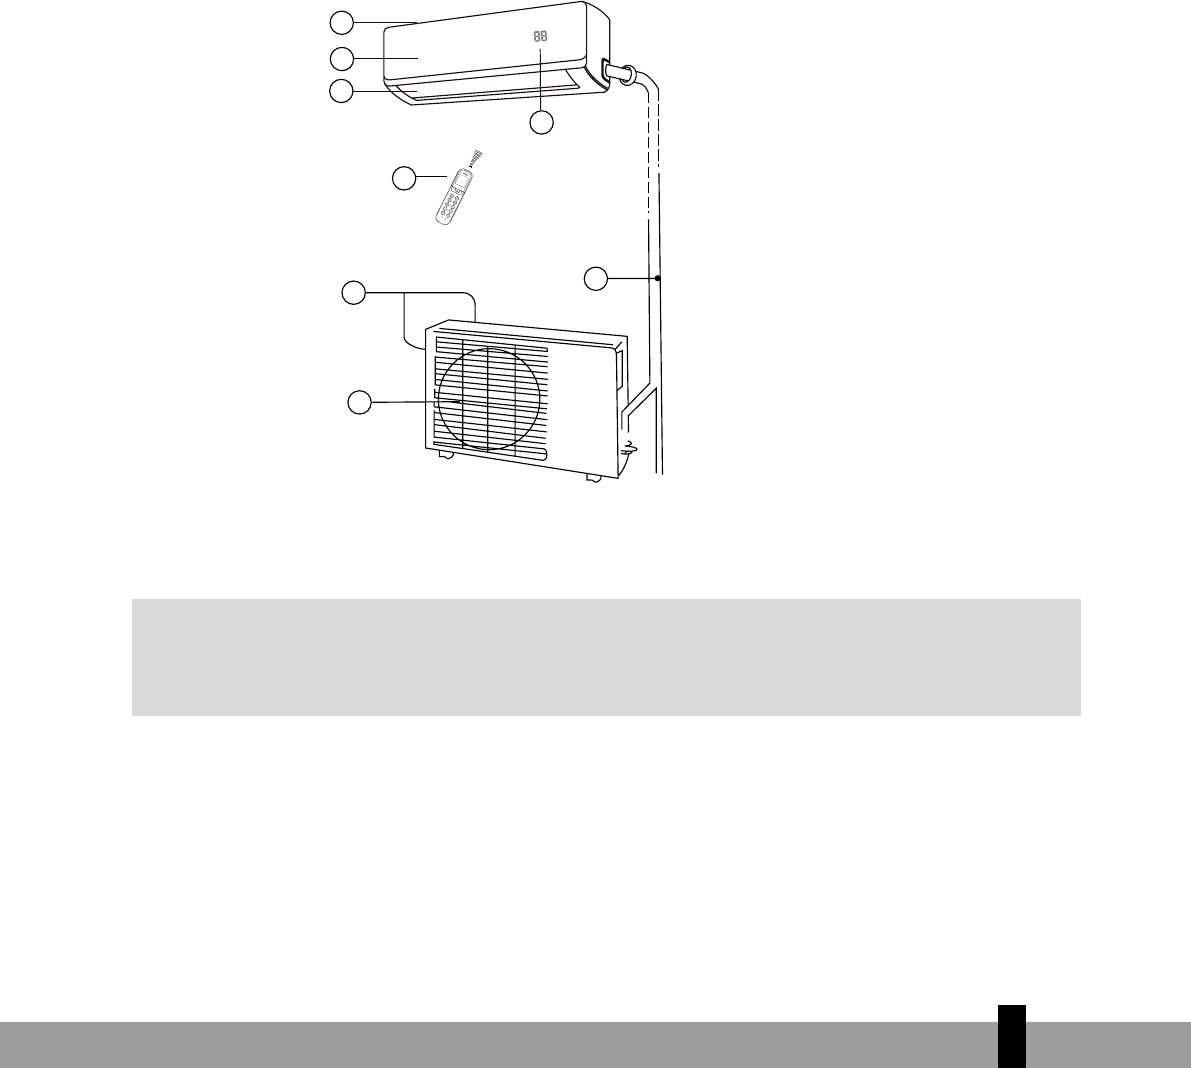
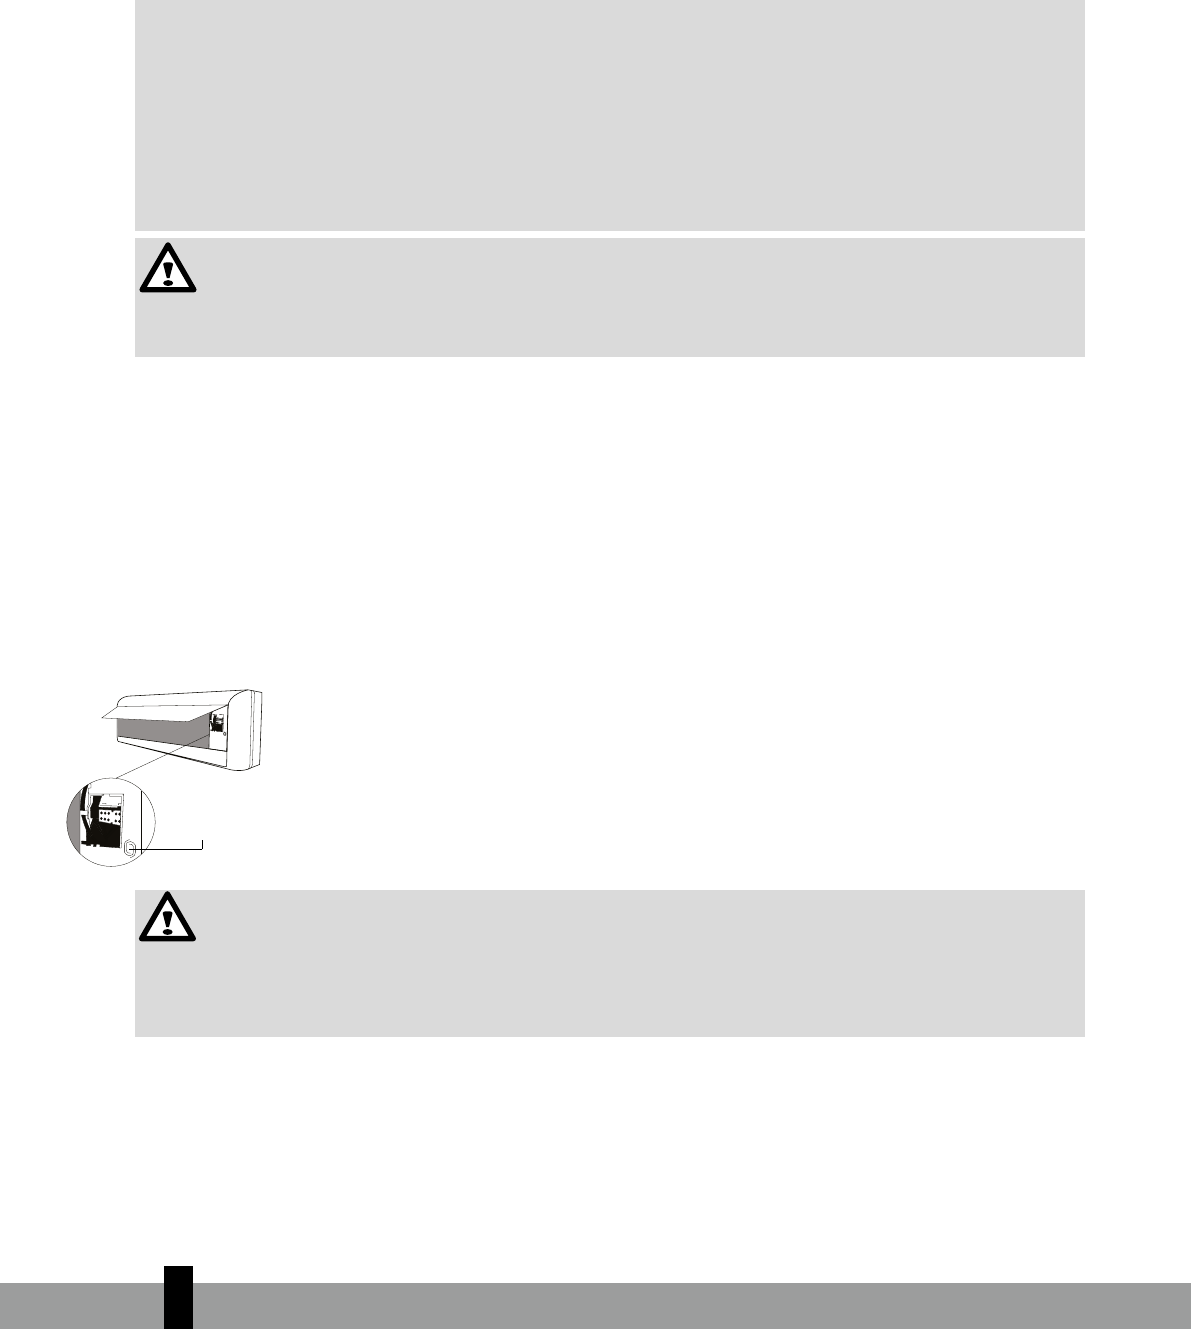
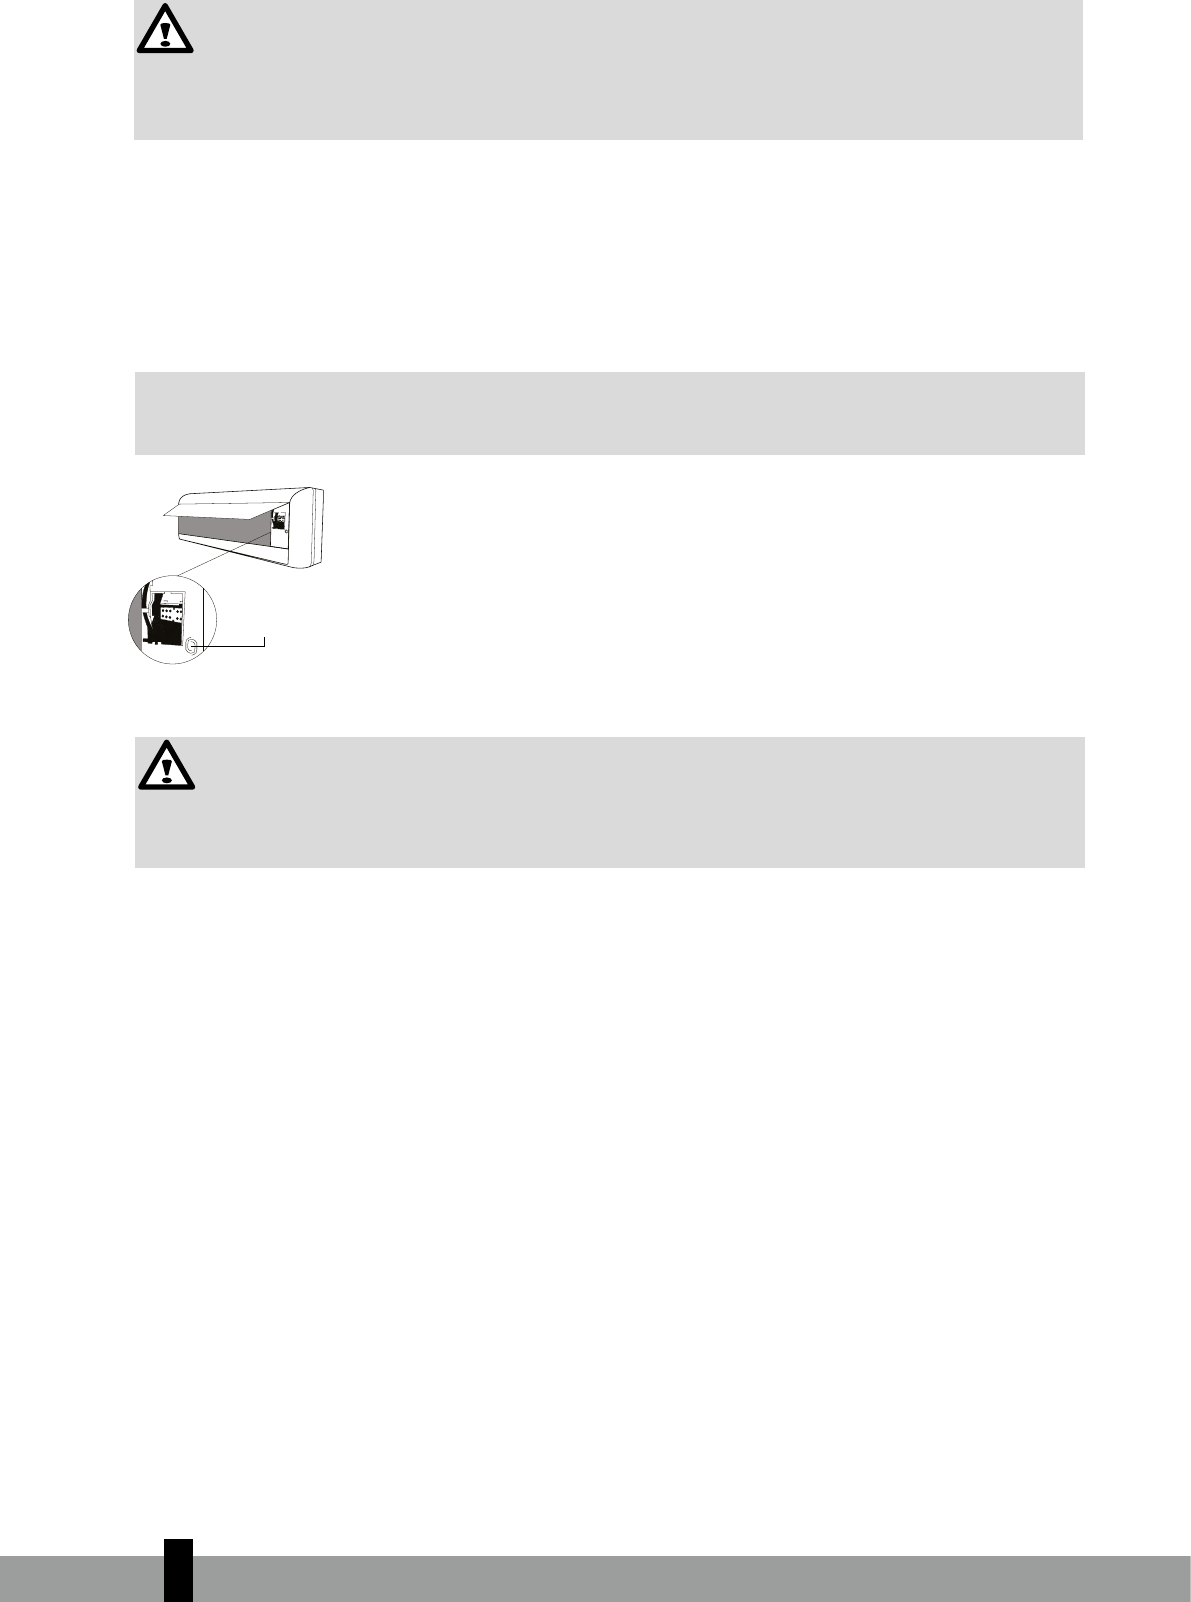
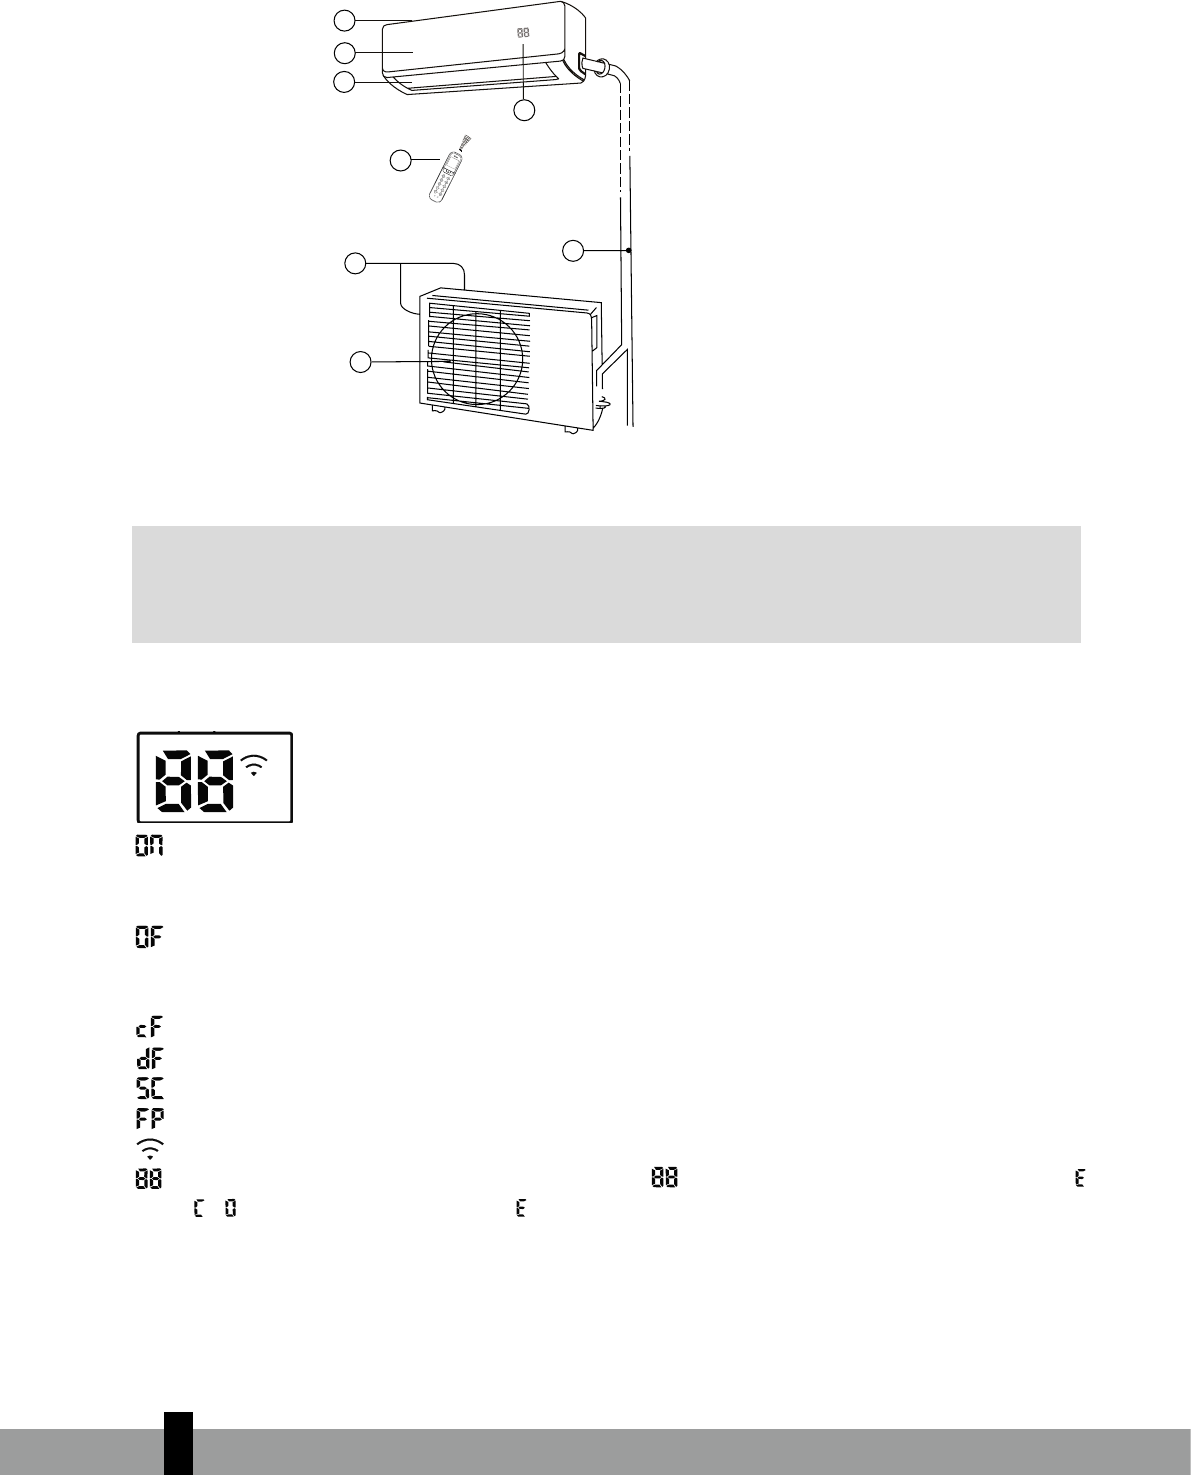
Unit Parts
Power Cable (Some Units)
Remote Control
Remote Control
Holder (Some Units)
Louver
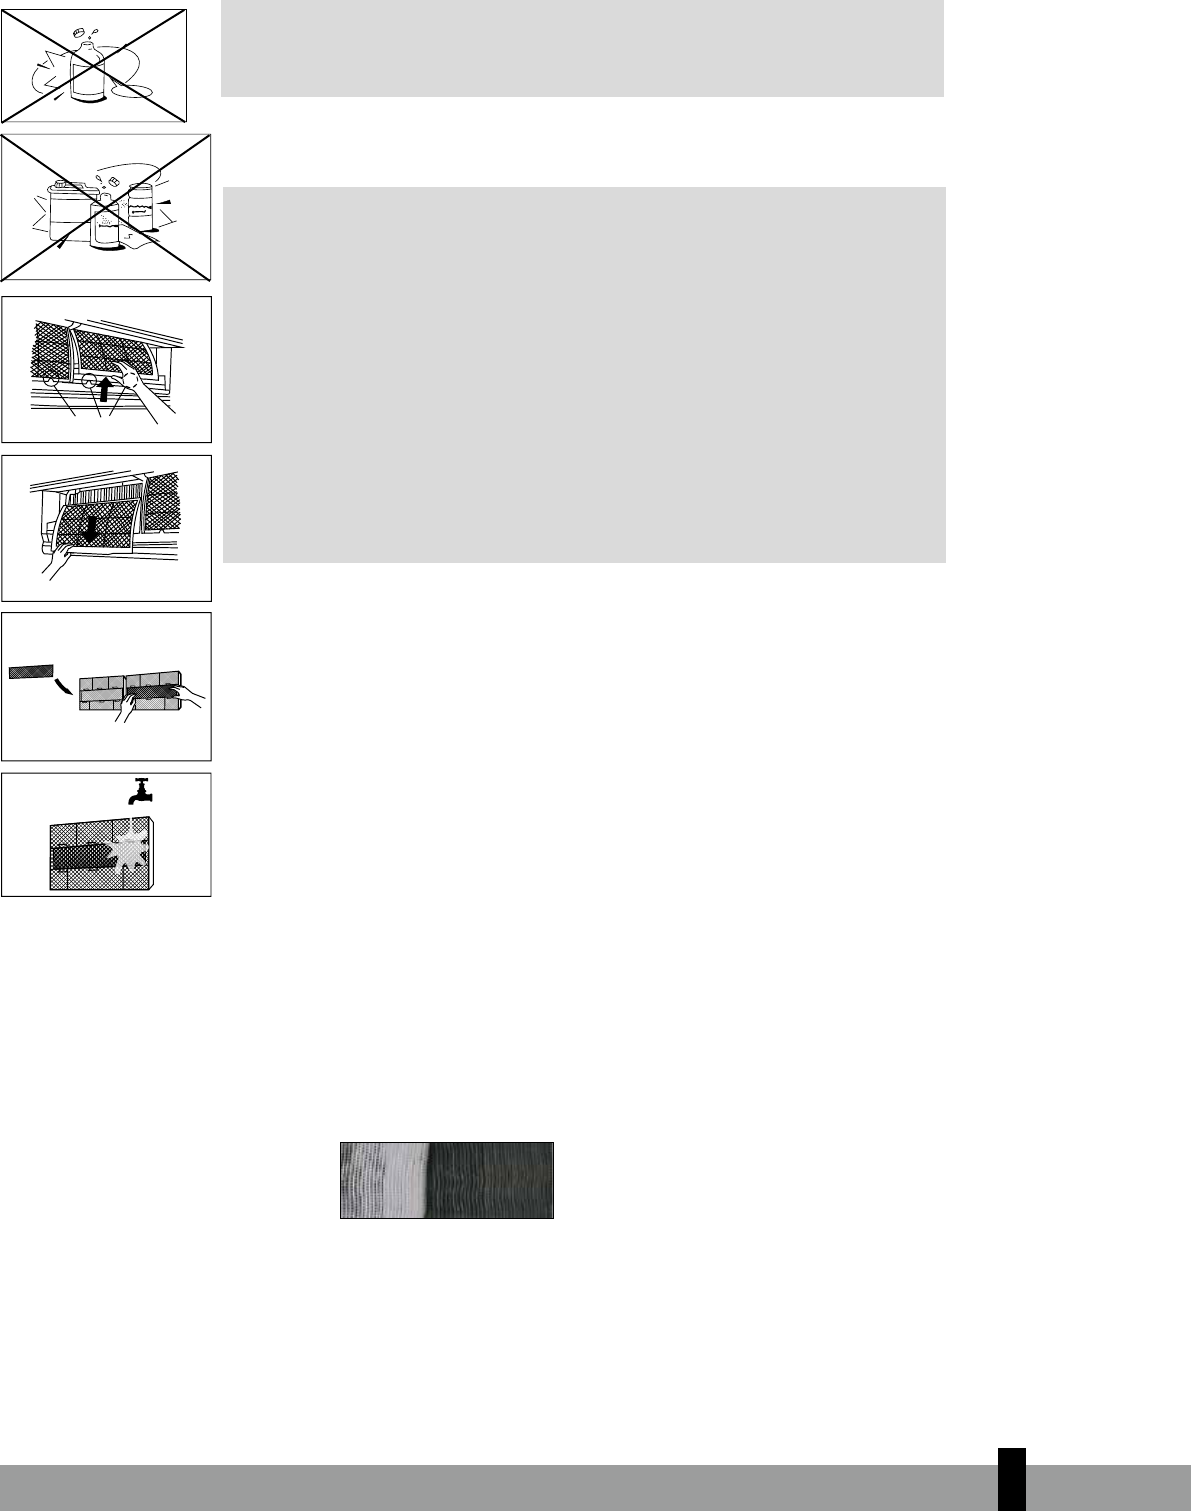
Front Panel
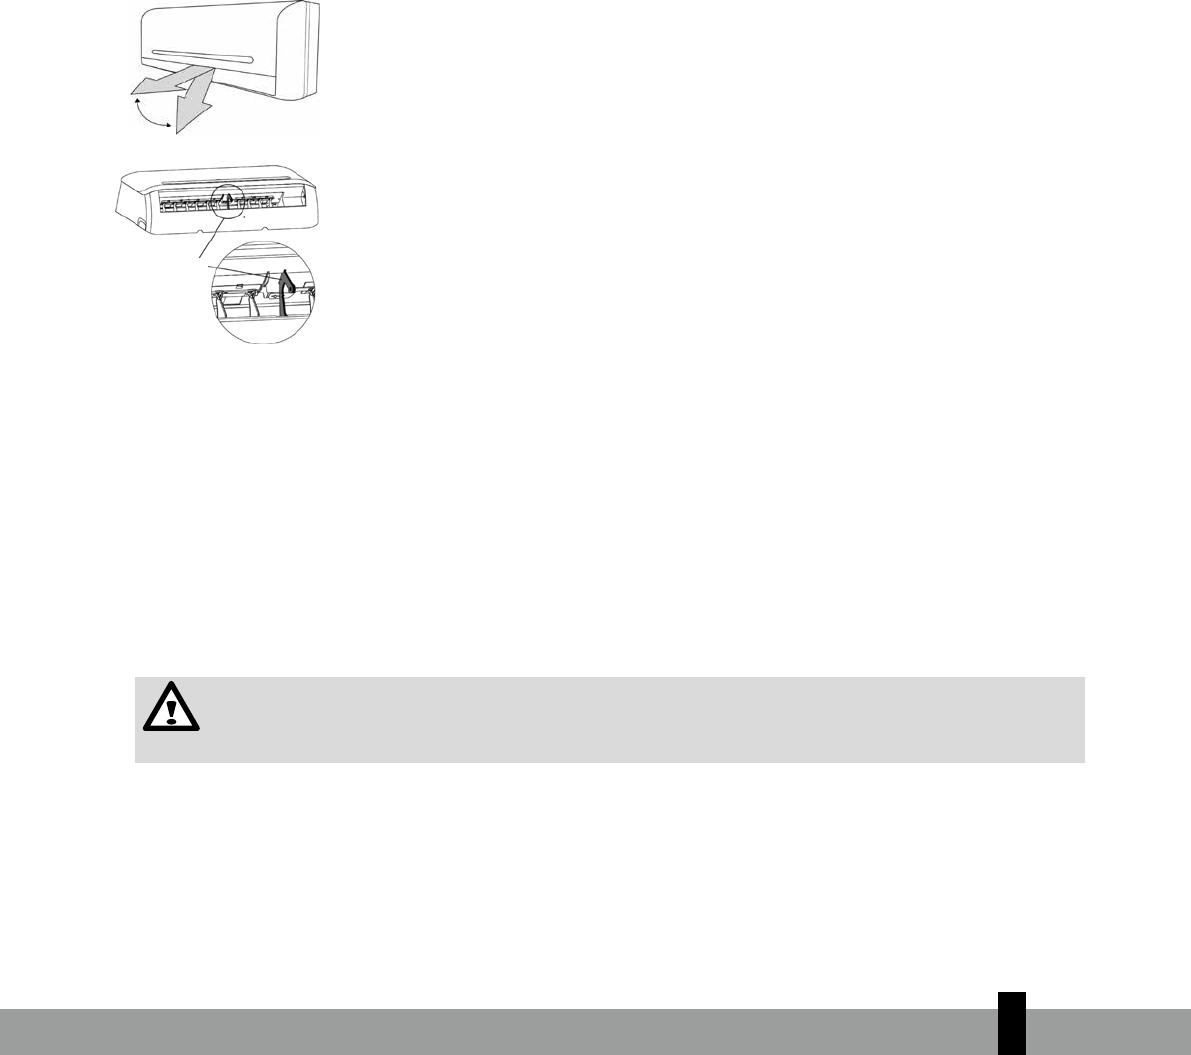
Air Filter
(pull out)
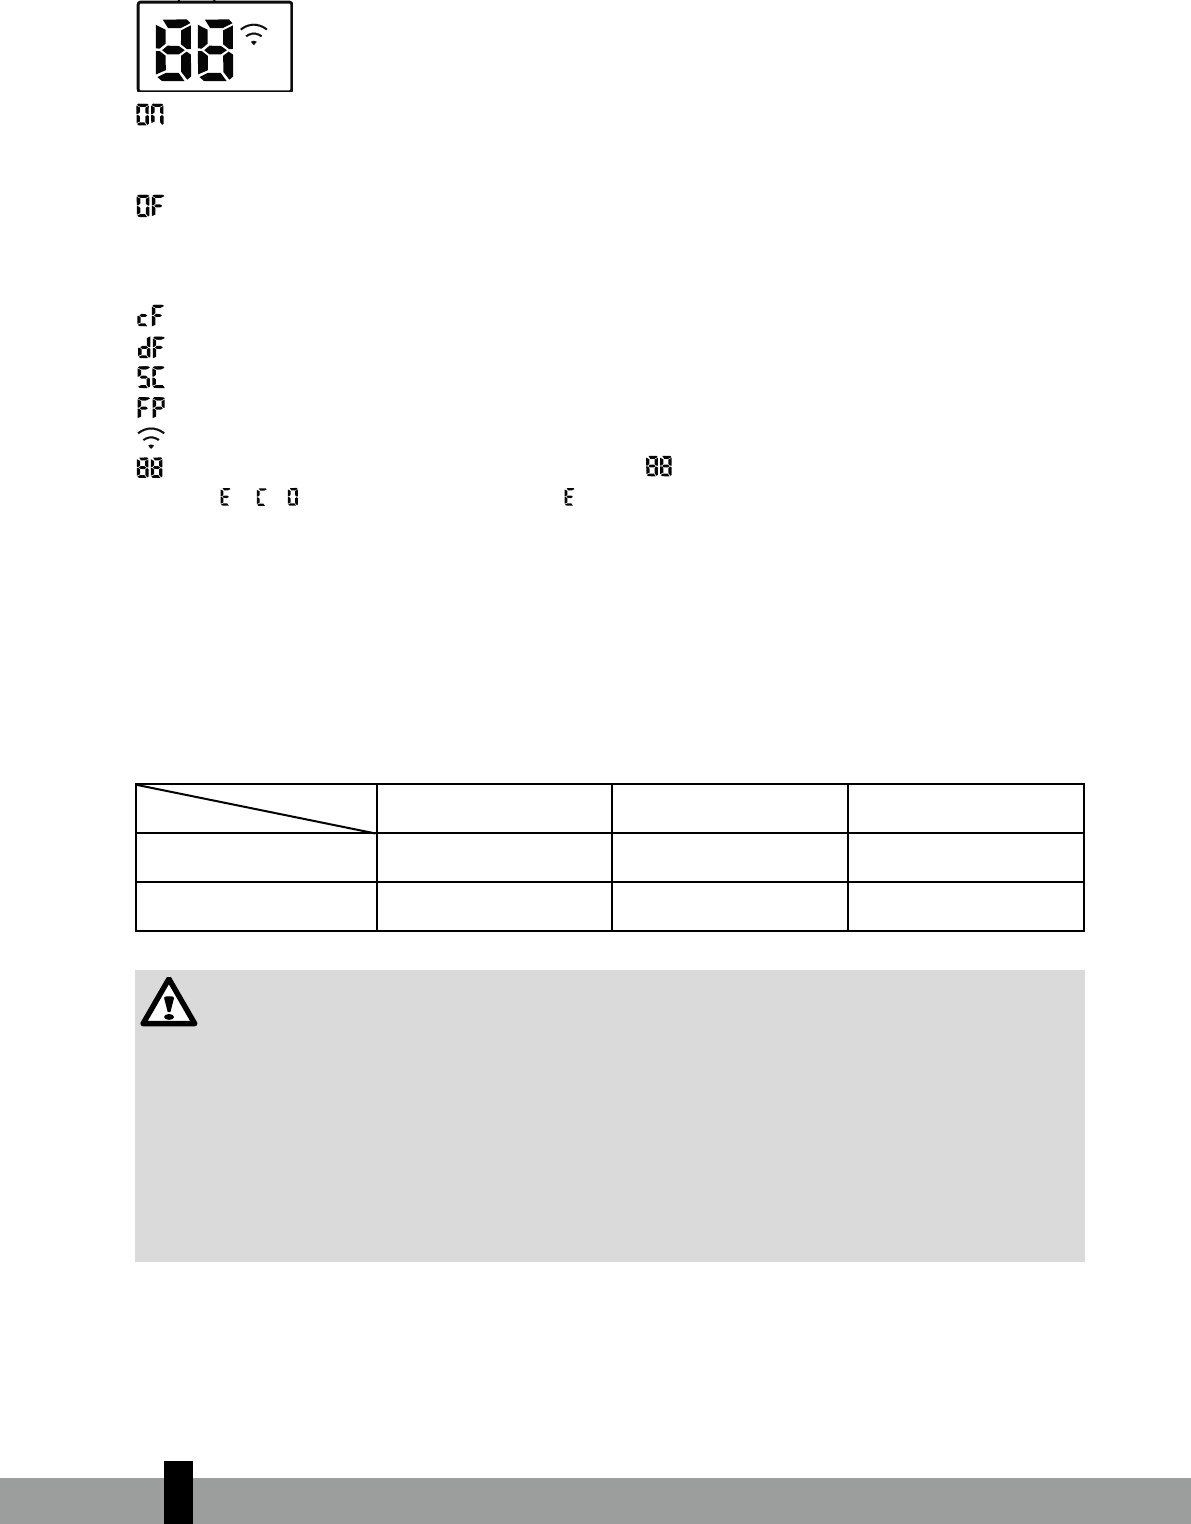
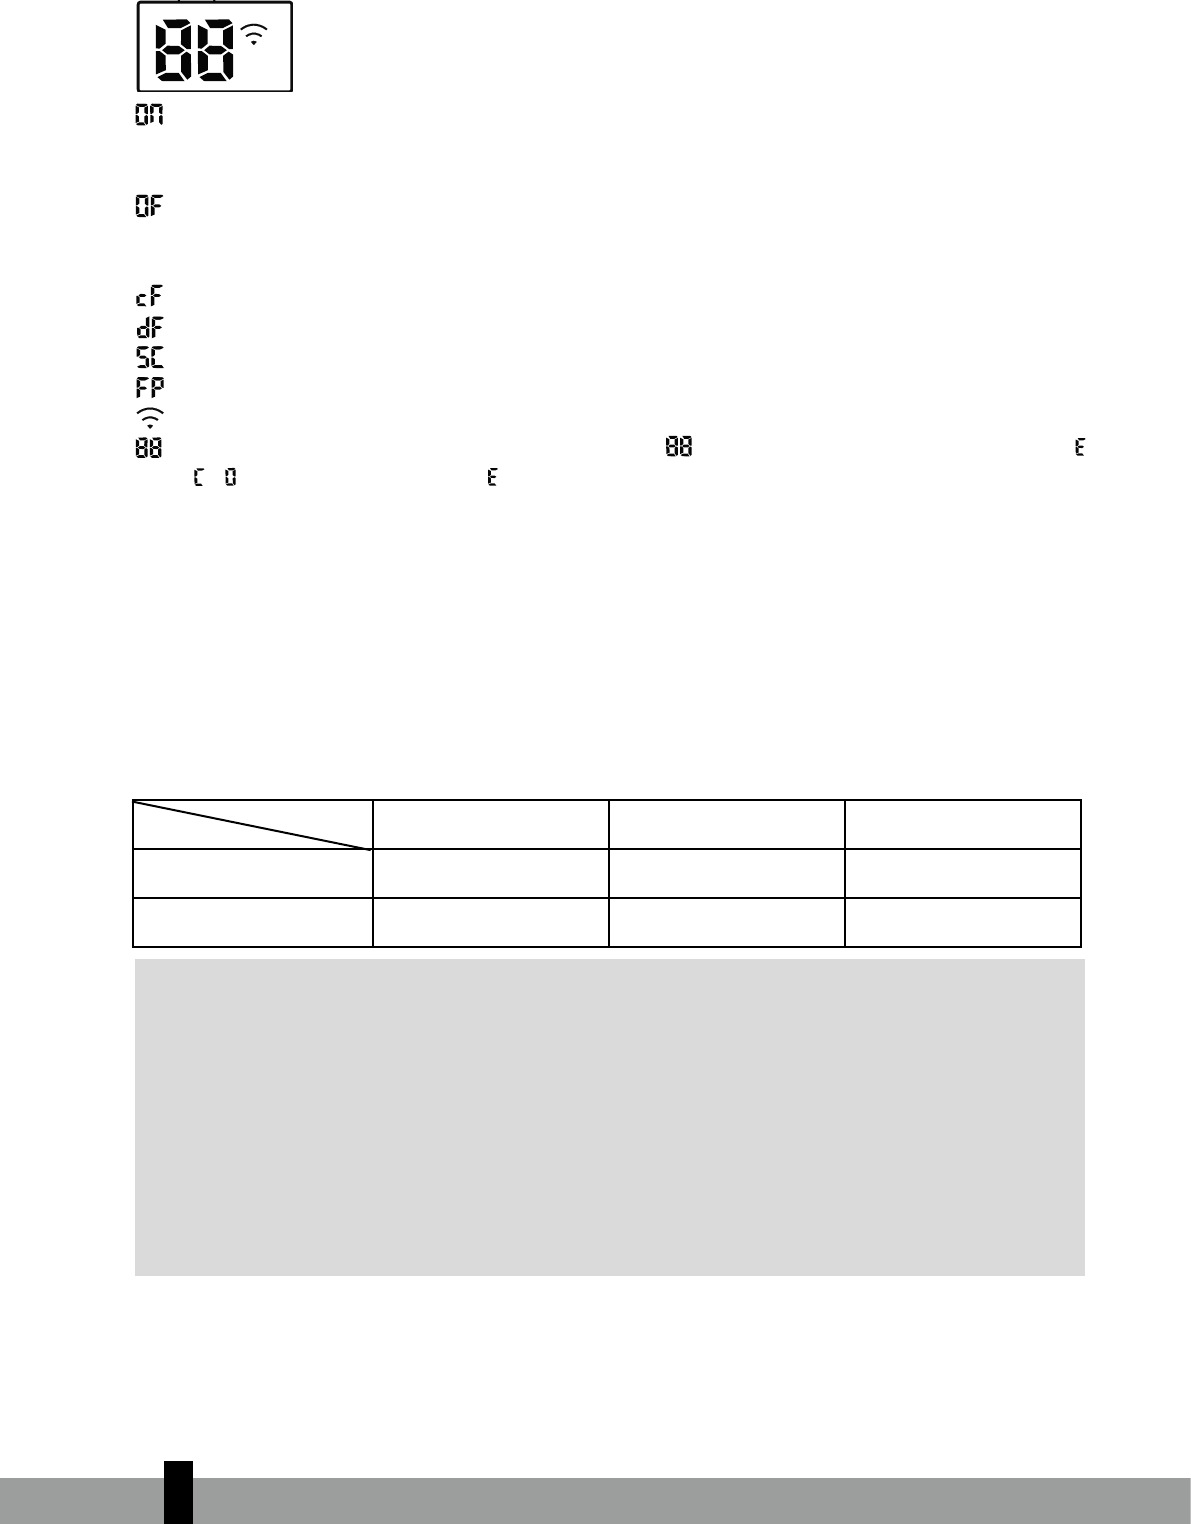
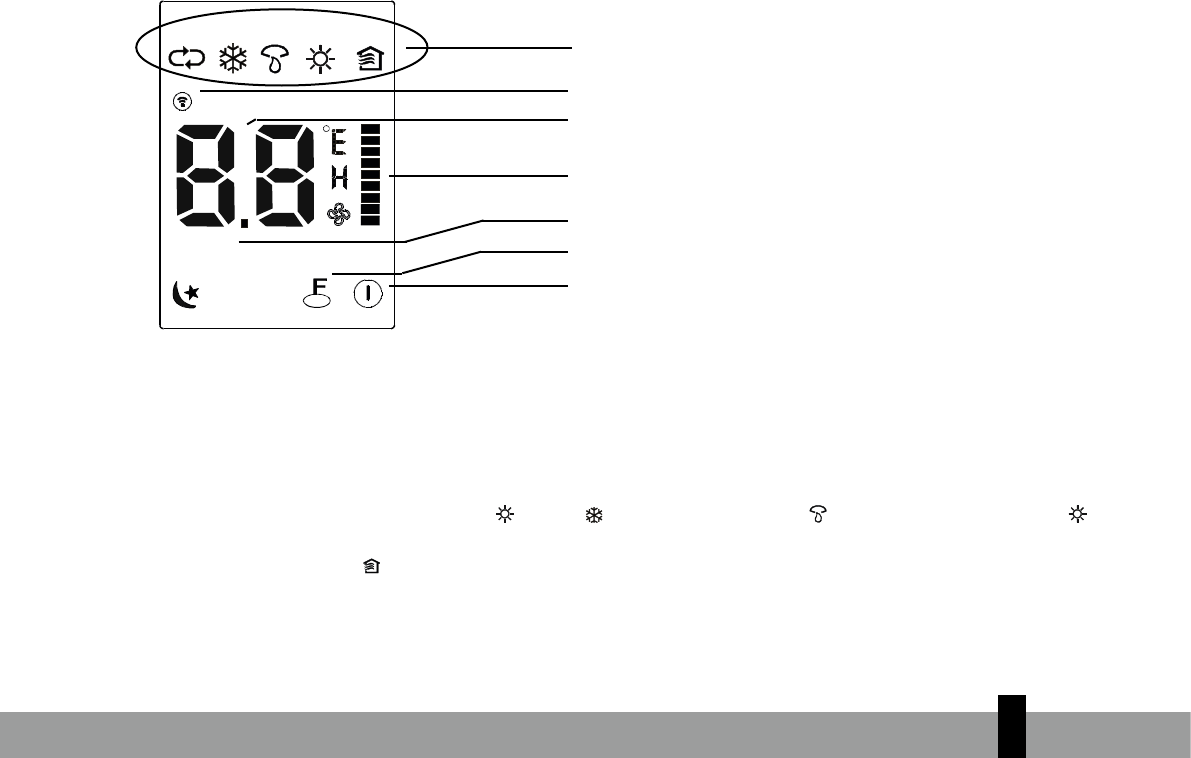
Display window
“ ” for 3 seconds when:
• TIMER ON is set
• FRESH, SWING, TURBO, or SILENCE features are turned on
“ ” for 3 seconds when:
• TIMER OFF is set
• FRESH, SWING, TURBO, or SILENCE features are turned off
“ ” when defrosting(cooling & heating units)
“ ” when anti-cold air feature is turned on(cooling & heating units)
“ ” when unit is self-cleaning(some units)
“ ” when freeze protection is turned on(some units)
“ ” when Wireless Control feature is activated(some units)
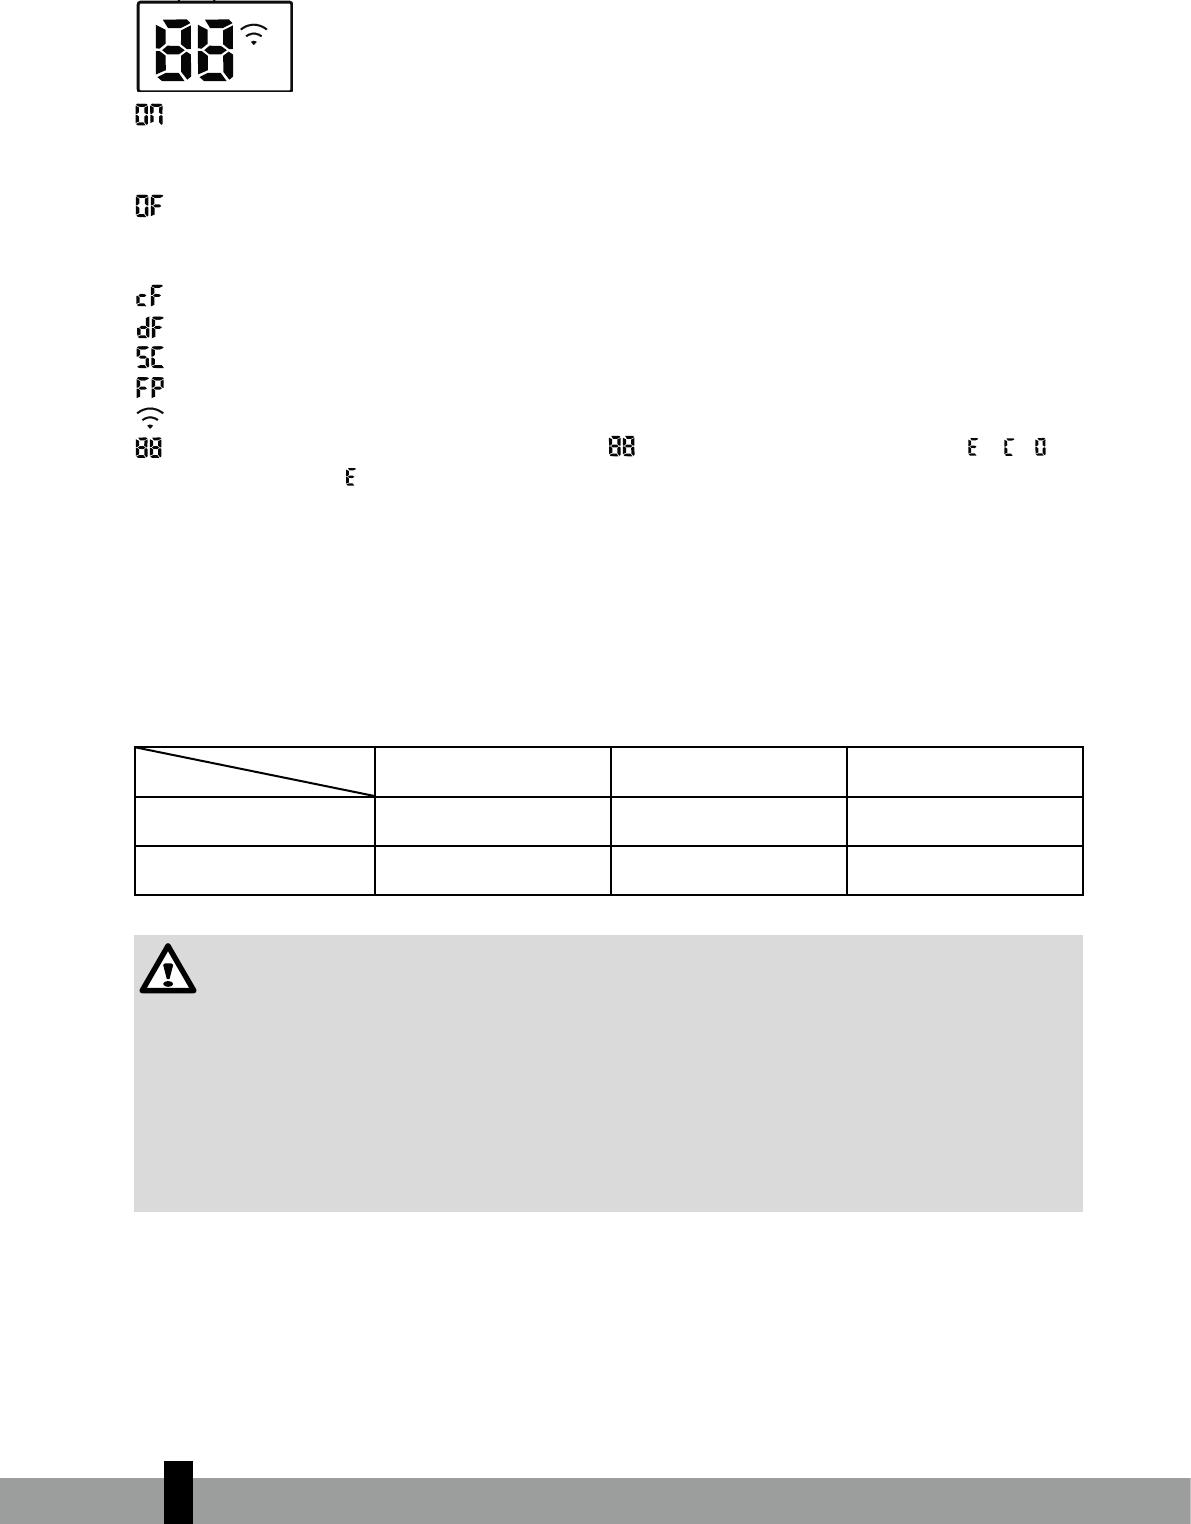
Display Code
Meanings
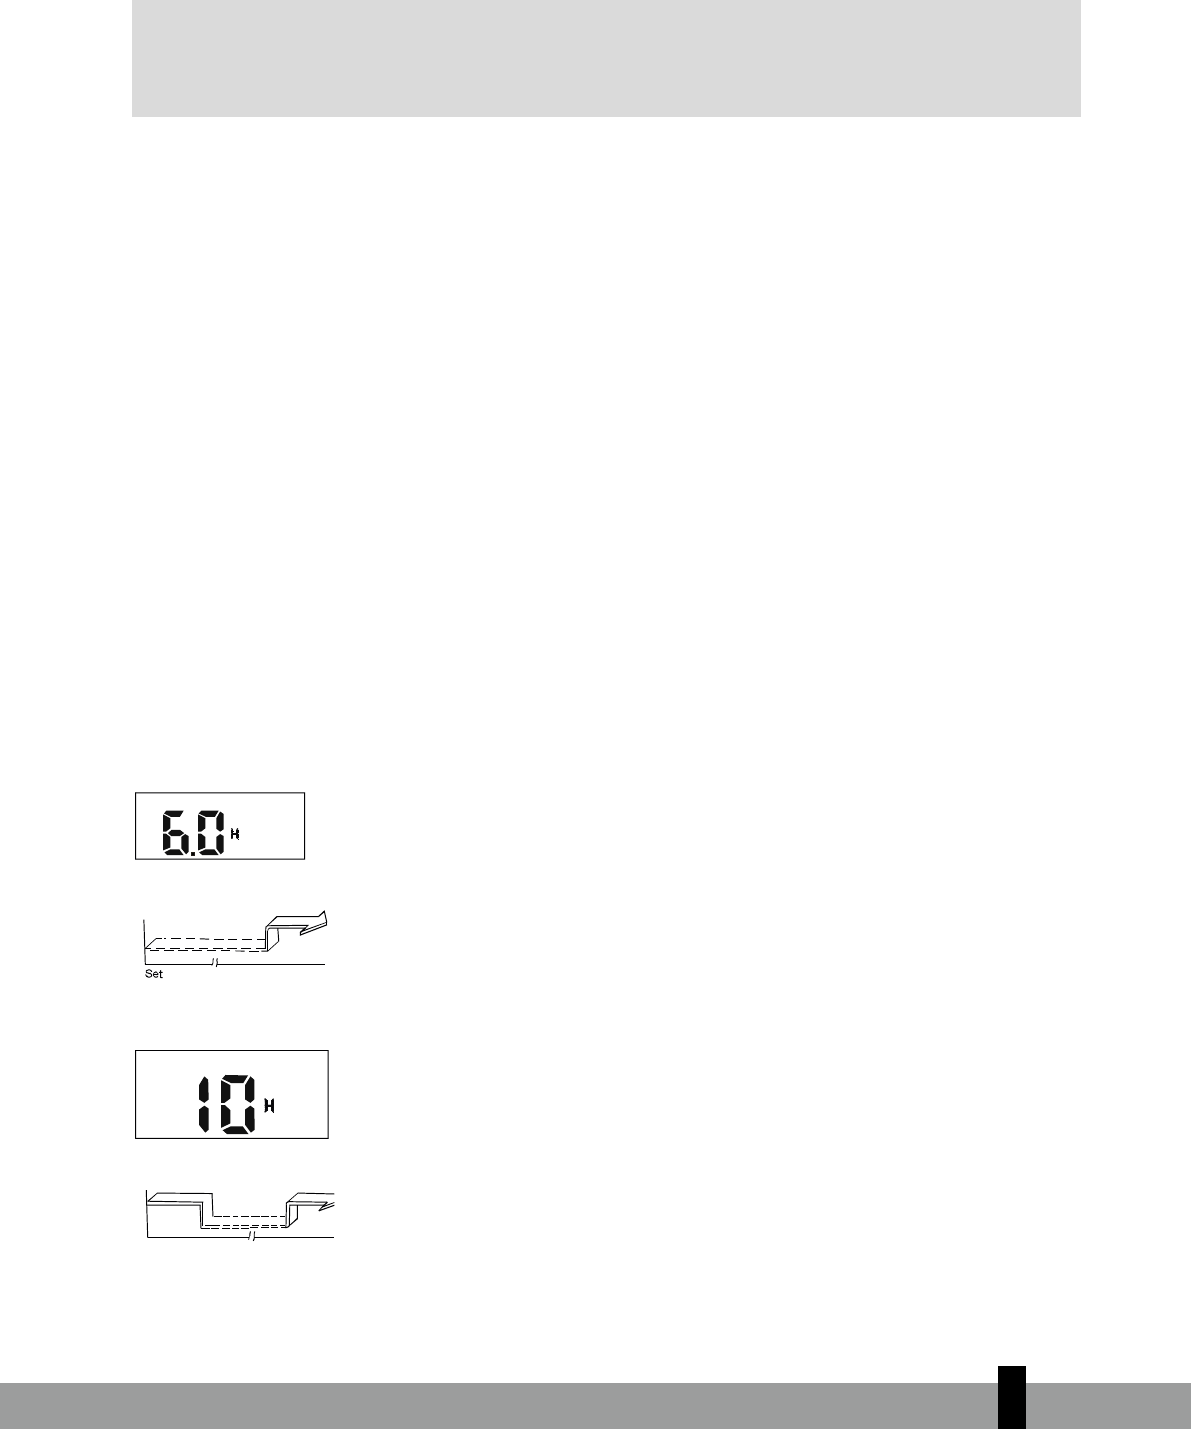
In Fan and Dry mode, the unit will display the room temperature.
In other modes, the unit will display your temperature setting.
,
,
“ ”
When ECO function(some units) is activated, the
illuminates gradually one by one as --
-- --set temperature-- ...... in one second interval.
Page 6
Unit Specifications and Featur
1
Unit
Specifications
and Features
NOTE:
A guide on using the infrared remote is not included
in this literature package.
Unit Parts
Power Cable (Some Units)
Remote Control
Remote Control
Holder (Some Units)
Louver
Front Panel
Air Filter
(pull out)
Display window
“ ” for 3 seconds when:
• TIMER ON is set
• FRESH, SWING, TURBO, or SILENCE features are turned on
“ ” for 3 seconds when:
• TIMER OFF is set
• FRESH, SWING, TURBO, or SILENCE features are turned off
“ ” when defrosting(cooling & heating units)
“ ” when anti-cold air feature is turned on(cooling & heating units)
“ ” when unit is self-cleaning(some units)
“ ” when freeze protection is turned on(some units)
“ ” when Wireless Control feature is activated(some units)
Display Code
Meanings
In Fan and Dry mode, the unit will display the room temperature.
In other modes, the unit will display your temperature setting.
,
,
“ ”
When ECO function(some units) is activated, the
illuminates gradually one by one as --
-- --set temperature-- ...... in one second interval.
por 3 segundos cuando:
• TIMER ON está configurado
• Las funciones FRESH, SWING, TURBO o SILENCE están activadas
Page 6
Unit Specifications and Featur
1
Unit
Specifications
and Features
NOTE:
A guide on using the infrared remote is not included
in this literature package.
Unit Parts
Power Cable (Some Units)
Remote Control
Remote Control
Holder (Some Units)
Louver
Front Panel
Air Filter
(pull out)
Display window
“ ” for 3 seconds when:
• TIMER ON is set
• FRESH, SWING, TURBO, or SILENCE features are turned on
“ ” for 3 seconds when:
• TIMER OFF is set
• FRESH, SWING, TURBO, or SILENCE features are turned off
“ ” when defrosting(cooling & heating units)
“ ” when anti-cold air feature is turned on(cooling & heating units)
“ ” when unit is self-cleaning(some units)
“ ” when freeze protection is turned on(some units)
“ ” when Wireless Control feature is activated(some units)
Display Code
Meanings
In Fan and Dry mode, the unit will display the room temperature.
In other modes, the unit will display your temperature setting.
,
,
“ ”
When ECO function(some units) is activated, the
illuminates gradually one by one as --
-- --set temperature-- ...... in one second interval.
por 3 segundos cuando:
• TIMER OFF está configurado
• Las funciones FRESH, SWING, TURBO o SILENCE están desactivadas
Page 6
Unit Specifications and Featur
1
Unit
Specifications
and Features
NOTE:
A guide on using the infrared remote is not included
in this literature package.
Unit Parts
Power Cable (Some Units)
Remote Control
Remote Control
Holder (Some Units)
Louver
Front Panel
Air Filter
(pull out)
Display window
“ ” for 3 seconds when:
• TIMER ON is set
• FRESH, SWING, TURBO, or SILENCE features are turned on
“ ” for 3 seconds when:
• TIMER OFF is set
• FRESH, SWING, TURBO, or SILENCE features are turned off
“ ” when defrosting(cooling & heating units)
“ ” when anti-cold air feature is turned on(cooling & heating units)
“ ” when unit is self-cleaning(some units)
“ ” when freeze protection is turned on(some units)
“ ” when Wireless Control feature is activated(some units)
Display Code
Meanings
In Fan and Dry mode, the unit will display the room temperature.
In other modes, the unit will display your temperature setting.
,
,
“ ”
When ECO function(some units) is activated, the
illuminates gradually one by one as --
-- --set temperature-- ...... in one second interval.
al descongelar (unidades de refrigeración y calefacción)
Page 6
Unit Specifications and Featur
1
Unit
Specifications
and Features
NOTE:
A guide on using the infrared remote is not included
in this literature package.
Unit Parts
Power Cable (Some Units)
Remote Control
Remote Control
Holder (Some Units)
Louver
Front Panel
Air Filter
(pull out)
Display window
“ ” for 3 seconds when:
• TIMER ON is set
• FRESH, SWING, TURBO, or SILENCE features are turned on
“ ” for 3 seconds when:
• TIMER OFF is set
• FRESH, SWING, TURBO, or SILENCE features are turned off
“ ” when defrosting(cooling & heating units)
“ ” when anti-cold air feature is turned on(cooling & heating units)
“ ” when unit is self-cleaning(some units)
“ ” when freeze protection is turned on(some units)
“ ” when Wireless Control feature is activated(some units)
Display Code
Meanings
In Fan and Dry mode, the unit will display the room temperature.
In other modes, the unit will display your temperature setting.
,
,
“ ”
When ECO function(some units) is activated, the
illuminates gradually one by one as --
-- --set temperature-- ...... in one second interval.
cuando la función de aire antihielo está activada (unidades de refrigeración y calefacción)
Page 6
Unit Specifications and Featur
1
Unit
Specifications
and Features
NOTE:
A guide on using the infrared remote is not included
in this literature package.
Unit Parts
Power Cable (Some Units)
Remote Control
Remote Control
Holder (Some Units)
Louver
Front Panel
Air Filter
(pull out)
Display window
“ ” for 3 seconds when:
• TIMER ON is set
• FRESH, SWING, TURBO, or SILENCE features are turned on
“ ” for 3 seconds when:
• TIMER OFF is set
• FRESH, SWING, TURBO, or SILENCE features are turned off
“ ” when defrosting(cooling & heating units)
“ ” when anti-cold air feature is turned on(cooling & heating units)
“ ” when unit is self-cleaning(some units)
“ ” when freeze protection is turned on(some units)
“ ” when Wireless Control feature is activated(some units)
Display Code
Meanings
In Fan and Dry mode, the unit will display the room temperature.
In other modes, the unit will display your temperature setting.
,
,
“ ”
When ECO function(some units) is activated, the
illuminates gradually one by one as --
-- --set temperature-- ...... in one second interval.
cuando la unidad se autolimpia (algunas unidades)
Page 6
Unit Specifications and Featur
1
Unit
Specifications
and Features
NOTE:
A guide on using the infrared remote is not included
in this literature package.
Unit Parts
Power Cable (Some Units)
Remote Control
Remote Control
Holder (Some Units)
Louver
Front Panel
Air Filter
(pull out)
Display window
“ ” for 3 seconds when:
• TIMER ON is set
• FRESH, SWING, TURBO, or SILENCE features are turned on
“ ” for 3 seconds when:
• TIMER OFF is set
• FRESH, SWING, TURBO, or SILENCE features are turned off
“ ” when defrosting(cooling & heating units)
“ ” when anti-cold air feature is turned on(cooling & heating units)
“ ” when unit is self-cleaning(some units)
“ ” when freeze protection is turned on(some units)
“ ” when Wireless Control feature is activated(some units)
Display Code
Meanings
In Fan and Dry mode, the unit will display the room temperature.
In other modes, the unit will display your temperature setting.
,
,
“ ”
When ECO function(some units) is activated, the
illuminates gradually one by one as --
-- --set temperature-- ...... in one second interval.
cuando la protección contra congelación está activada (algunas unidades)
Page 6
Unit Specifications and Featur
1
Unit
Specifications
and Features
NOTE:
A guide on using the infrared remote is not included
in this literature package.
Unit Parts
Power Cable (Some Units)
Remote Control
Remote Control
Holder (Some Units)
Louver
Front Panel
Air Filter
(pull out)
Display window
“ ” for 3 seconds when:
• TIMER ON is set
• FRESH, SWING, TURBO, or SILENCE features are turned on
“ ” for 3 seconds when:
• TIMER OFF is set
• FRESH, SWING, TURBO, or SILENCE features are turned off
“ ” when defrosting(cooling & heating units)
“ ” when anti-cold air feature is turned on(cooling & heating units)
“ ” when unit is self-cleaning(some units)
“ ” when freeze protection is turned on(some units)
“ ” when Wireless Control feature is activated(some units)
Display Code
Meanings
In Fan and Dry mode, the unit will display the room temperature.
In other modes, the unit will display your temperature setting.
,
,
“ ”
When ECO function(some units) is activated, the
illuminates gradually one by one as --
-- --set temperature-- ...... in one second interval.
cuando la característica de control inalámbrico está activada (algunas unidades)
Page 6
Unit Specifications and Featur
1
Unit
Specifications
and Features
NOTE:
A guide on using the infrared remote is not included
in this literature package.
Unit Parts
Power Cable (Some Units)
Remote Control
Remote Control
Holder (Some Units)
Louver
Front Panel
Air Filter
(pull out)
Display window
“ ” for 3 seconds when:
• TIMER ON is set
• FRESH, SWING, TURBO, or SILENCE features are turned on
“ ” for 3 seconds when:
• TIMER OFF is set
• FRESH, SWING, TURBO, or SILENCE features are turned off
“ ” when defrosting(cooling & heating units)
“ ” when anti-cold air feature is turned on(cooling & heating units)
“ ” when unit is self-cleaning(some units)
“ ” when freeze protection is turned on(some units)
“ ” when Wireless Control feature is activated(some units)
Display Code
Meanings
In Fan and Dry mode, the unit will display the room temperature.
In other modes, the unit will display your temperature setting.
,
,
“ ”
When ECO function(some units) is activated, the
illuminates gradually one by one as --
-- --set temperature-- ...... in one second interval.
cuando se activa la función ECO (algunas unidades), se
Page 6
Unit Specifications and Featur
1
Unit
Specifications
and Features
NOTE:
A guide on using the infrared remote is not included
in this literature package.
Unit Parts
Power Cable (Some Units)
Remote Control
Remote Control
Holder (Some Units)
Louver
Front Panel
Air Filter
(pull out)
Display window
“ ” for 3 seconds when:
• TIMER ON is set
• FRESH, SWING, TURBO, or SILENCE features are turned on
“ ” for 3 seconds when:
• TIMER OFF is set
• FRESH, SWING, TURBO, or SILENCE features are turned off
“ ” when defrosting(cooling & heating units)
“ ” when anti-cold air feature is turned on(cooling & heating units)
“ ” when unit is self-cleaning(some units)
“ ” when freeze protection is turned on(some units)
“ ” when Wireless Control feature is activated(some units)
Display Code
Meanings
In Fan and Dry mode, the unit will display the room temperature.
In other modes, the unit will display your temperature setting.
,
,
“ ”
When ECO function(some units) is activated, the
illuminates gradually one by one as --
-- --set temperature-- ...... in one second interval.
ilumina gradualmente una por una como
Page 6
Unit Specifications and Featur
1
Unit
Specifications
and Features
NOTE:
A guide on using the infrared remote is not included
in this literature package.
Unit Parts
Power Cable (Some Units)
Remote Control
Remote Control
Holder (Some Units)
Louver
Front Panel
Air Filter
(pull out)
Display window
“ ” for 3 seconds when:
• TIMER ON is set
• FRESH, SWING, TURBO, or SILENCE features are turned on
“ ” for 3 seconds when:
• TIMER OFF is set
• FRESH, SWING, TURBO, or SILENCE features are turned off
“ ” when defrosting(cooling & heating units)
“ ” when anti-cold air feature is turned on(cooling & heating units)
“ ” when unit is self-cleaning(some units)
“ ” when freeze protection is turned on(some units)
“ ” when Wireless Control feature is activated(some units)
Display Code
Meanings
In Fan and Dry mode, the unit will display the room temperature.
In other modes, the unit will display your temperature setting.
,
,
“ ”
When ECO function(some units) is activated, the
illuminates gradually one by one as --
-- --set temperature-- ...... in one second interval.
--
Page 6
Unit Specifications and Featur
1
Unit
Specifications
and Features
NOTE:
A guide on using the infrared remote is not included
in this literature package.
Unit Parts
Power Cable (Some Units)
Remote Control
Remote Control
Holder (Some Units)
Louver
Front Panel
Air Filter
(pull out)
Display window
“ ” for 3 seconds when:
• TIMER ON is set
• FRESH, SWING, TURBO, or SILENCE features are turned on
“ ” for 3 seconds when:
• TIMER OFF is set
• FRESH, SWING, TURBO, or SILENCE features are turned off
“ ” when defrosting(cooling & heating units)
“ ” when anti-cold air feature is turned on(cooling & heating units)
“ ” when unit is self-cleaning(some units)
“ ” when freeze protection is turned on(some units)
“ ” when Wireless Control feature is activated(some units)
Display Code
Meanings
In Fan and Dry mode, the unit will display the room temperature.
In other modes, the unit will display your temperature setting.
,
,
“ ”
When ECO function(some units) is activated, the
illuminates gradually one by one as --
-- --set temperature-- ...... in one second interval.
-- ajustar la temperatura --
Page 6
Unit Specifications and Featur
1
Unit
Specifications
and Features
NOTE:
A guide on using the infrared remote is not included
in this literature package.
Unit Parts
Power Cable (Some Units)
Remote Control
Remote Control
Holder (Some Units)
Louver
Front Panel
Air Filter
(pull out)
Display window
“ ” for 3 seconds when:
• TIMER ON is set
• FRESH, SWING, TURBO, or SILENCE features are turned on
“ ” for 3 seconds when:
• TIMER OFF is set
• FRESH, SWING, TURBO, or SILENCE features are turned off
“ ” when defrosting(cooling & heating units)
“ ” when anti-cold air feature is turned on(cooling & heating units)
“ ” when unit is self-cleaning(some units)
“ ” when freeze protection is turned on(some units)
“ ” when Wireless Control feature is activated(some units)
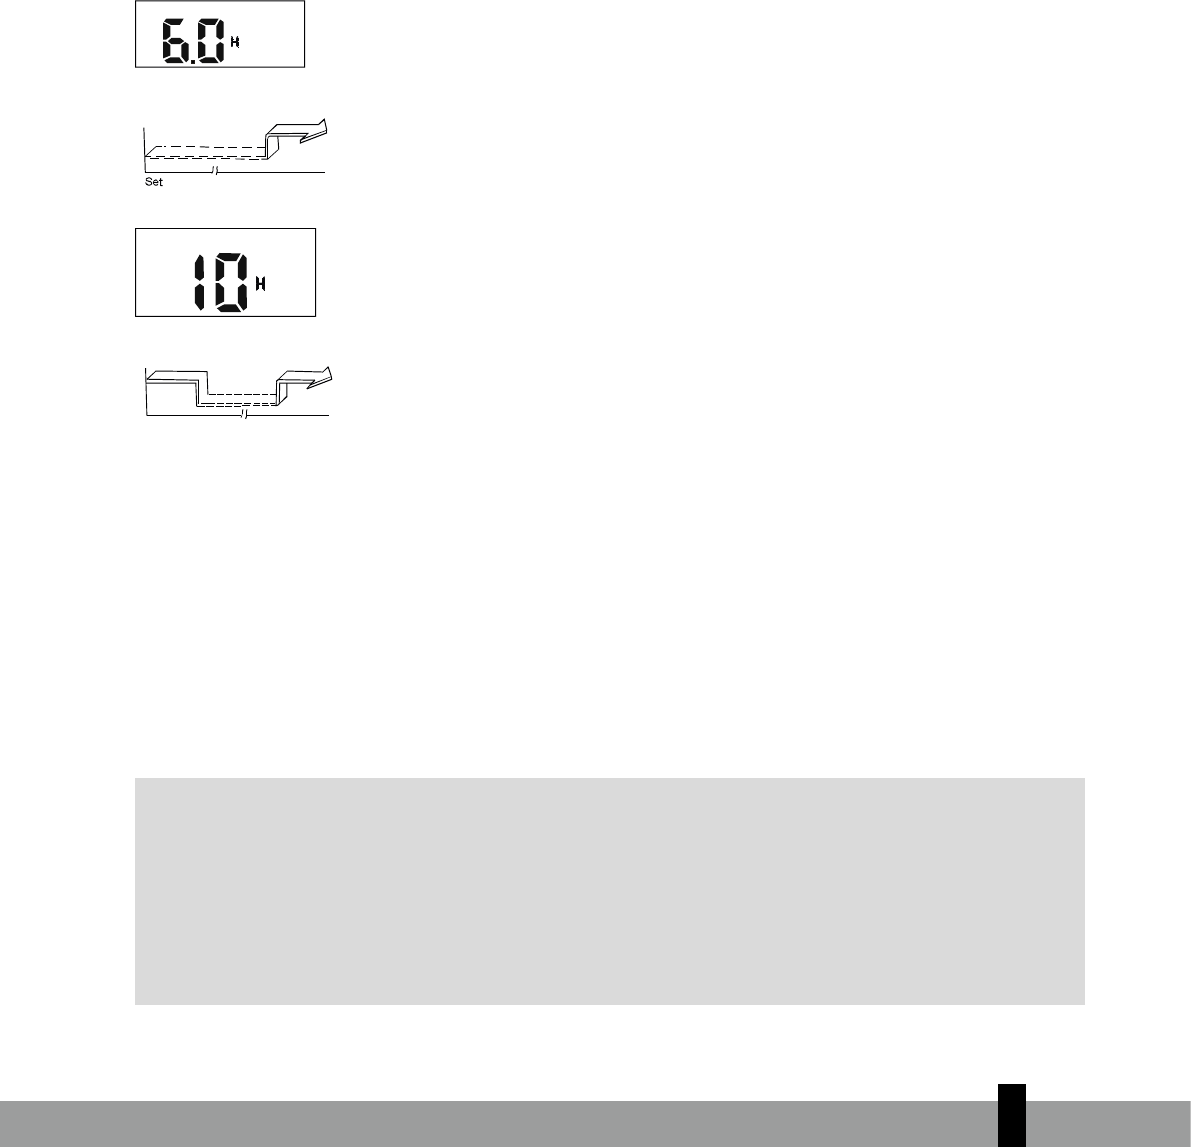
Display Code
Meanings
In Fan and Dry mode, the unit will display the room temperature.
In other modes, the unit will display your temperature setting.
,
,
“ ”
When ECO function(some units) is activated, the
illuminates gradually one by one as --
-- --set temperature-- ...... in one second interval.
...... en un segundo intervalo
En otros modos, la unidad mostrará la configuración de temperatura.
En el modo Fan y Dry, la unidad mostrará la temperatura ambiente.
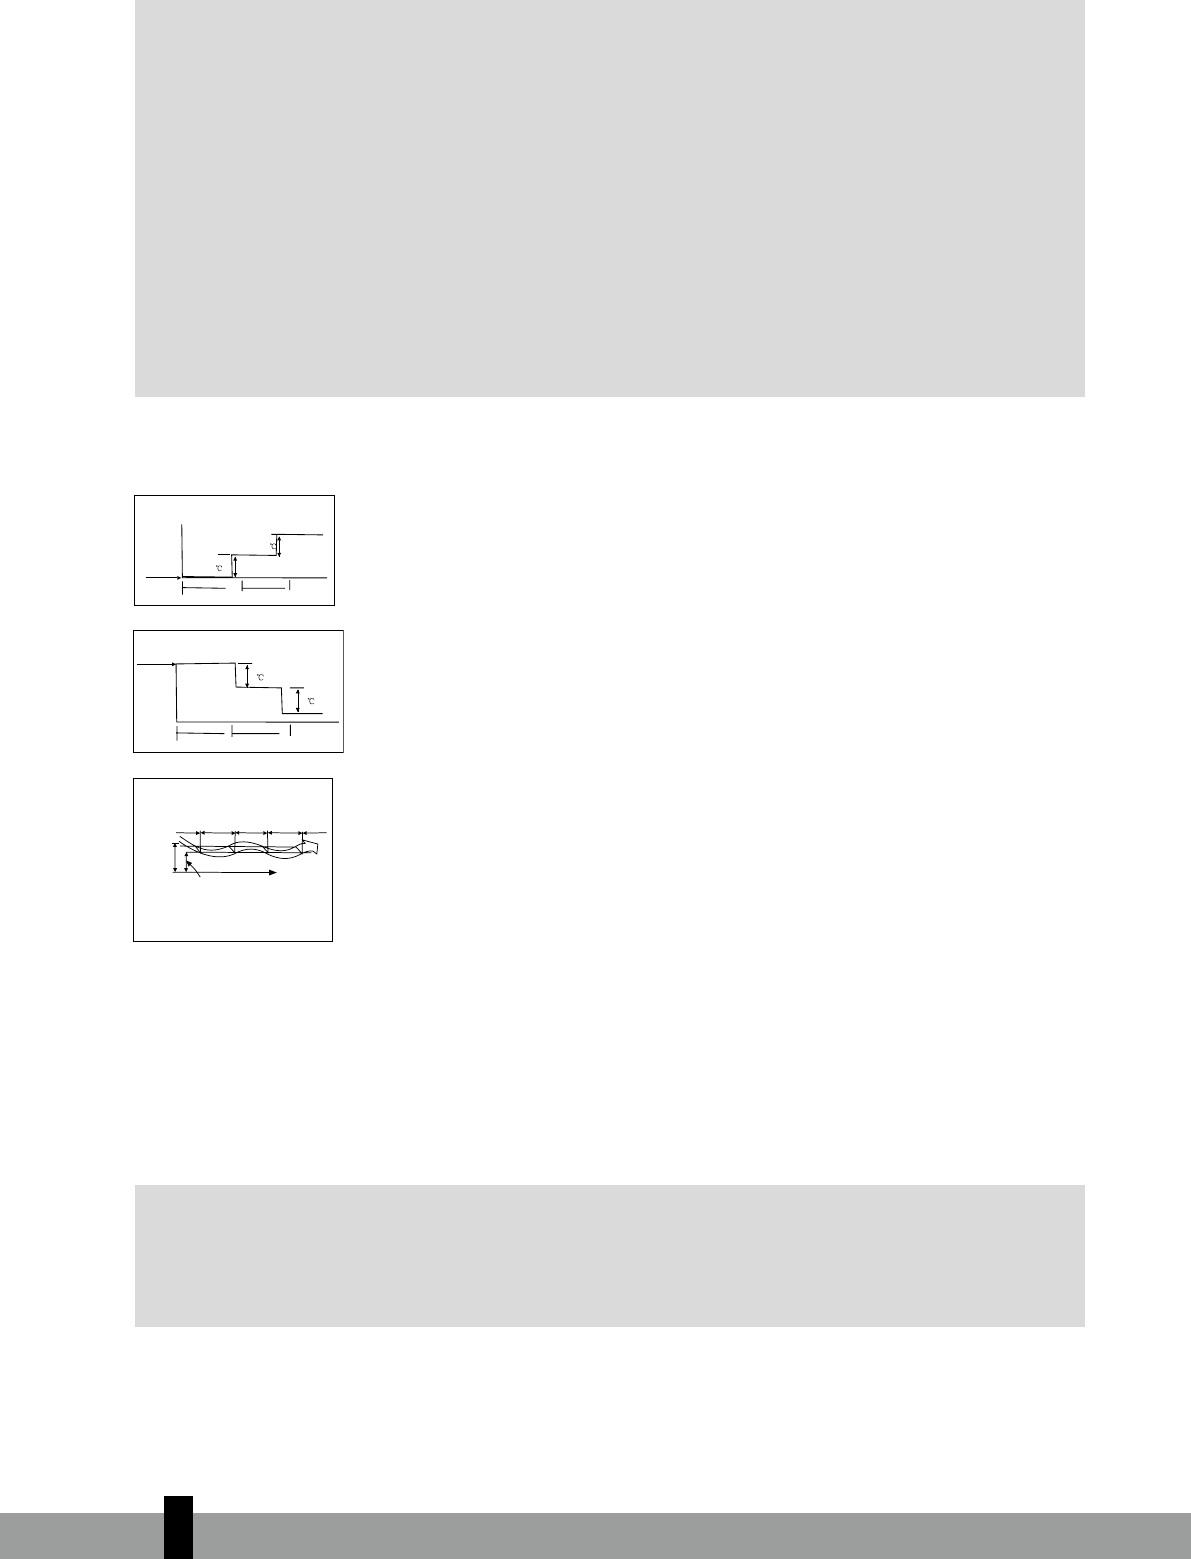
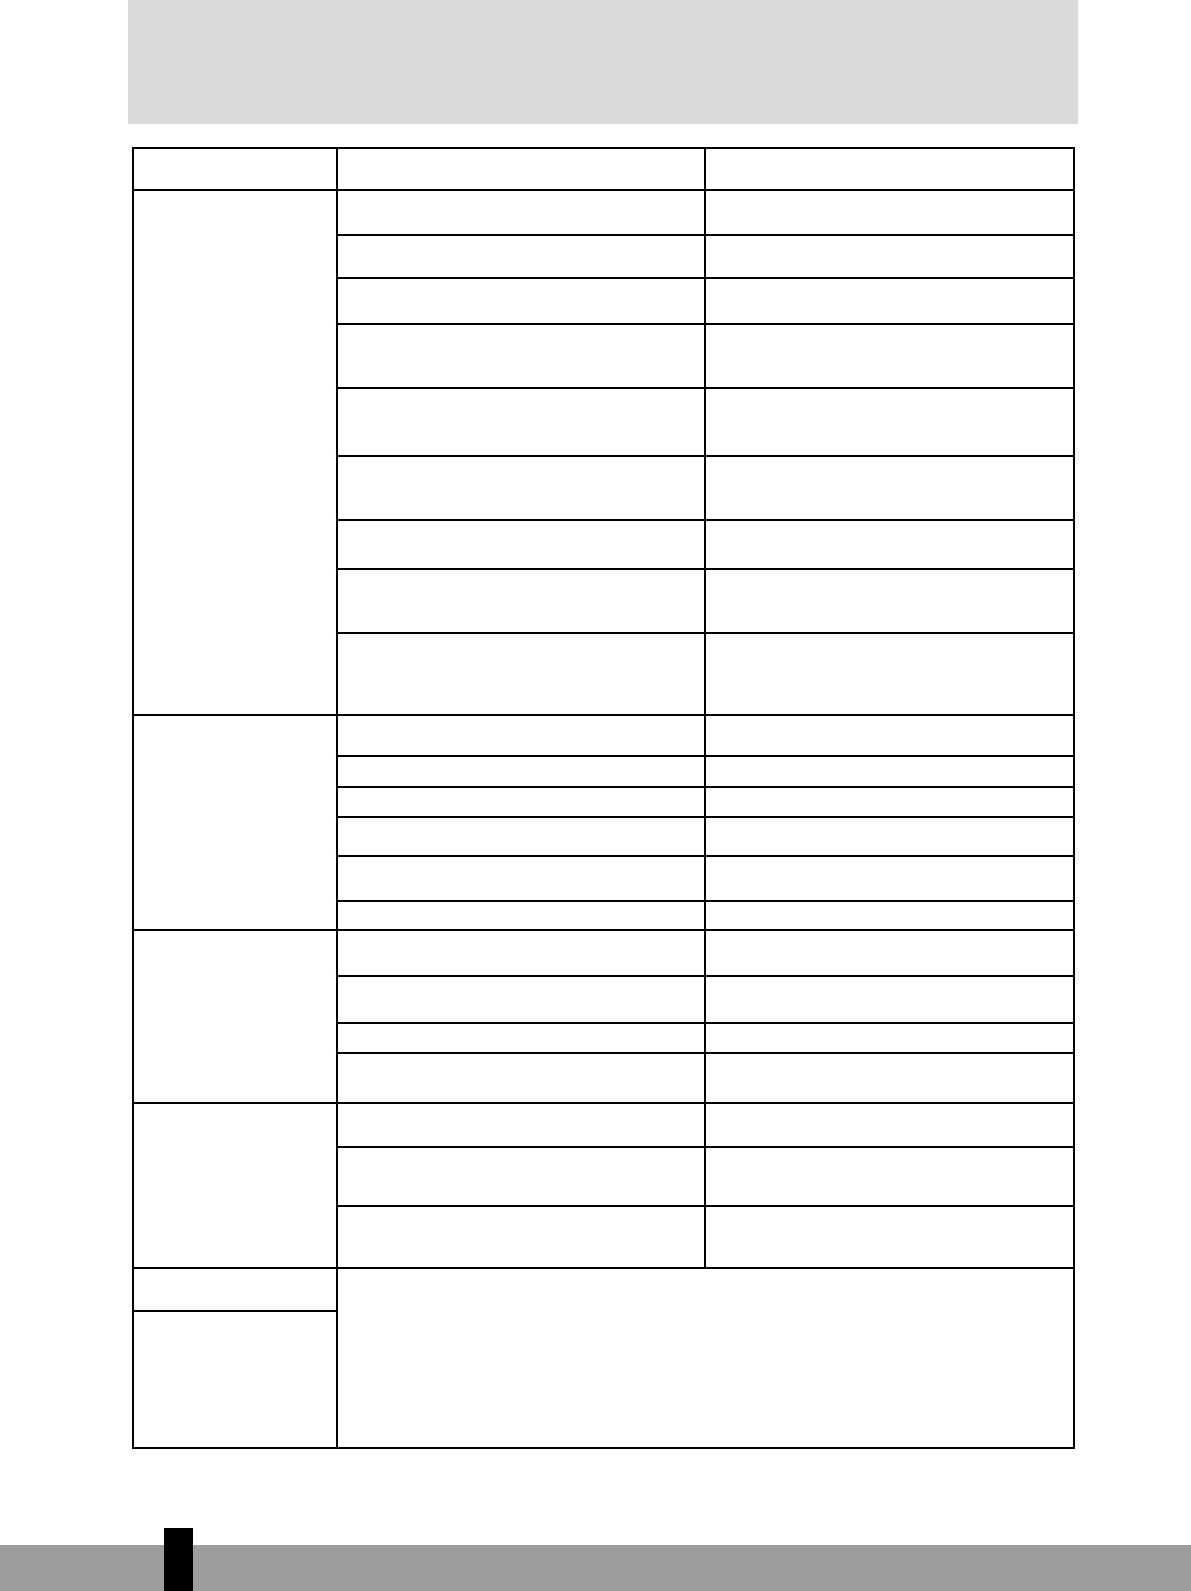
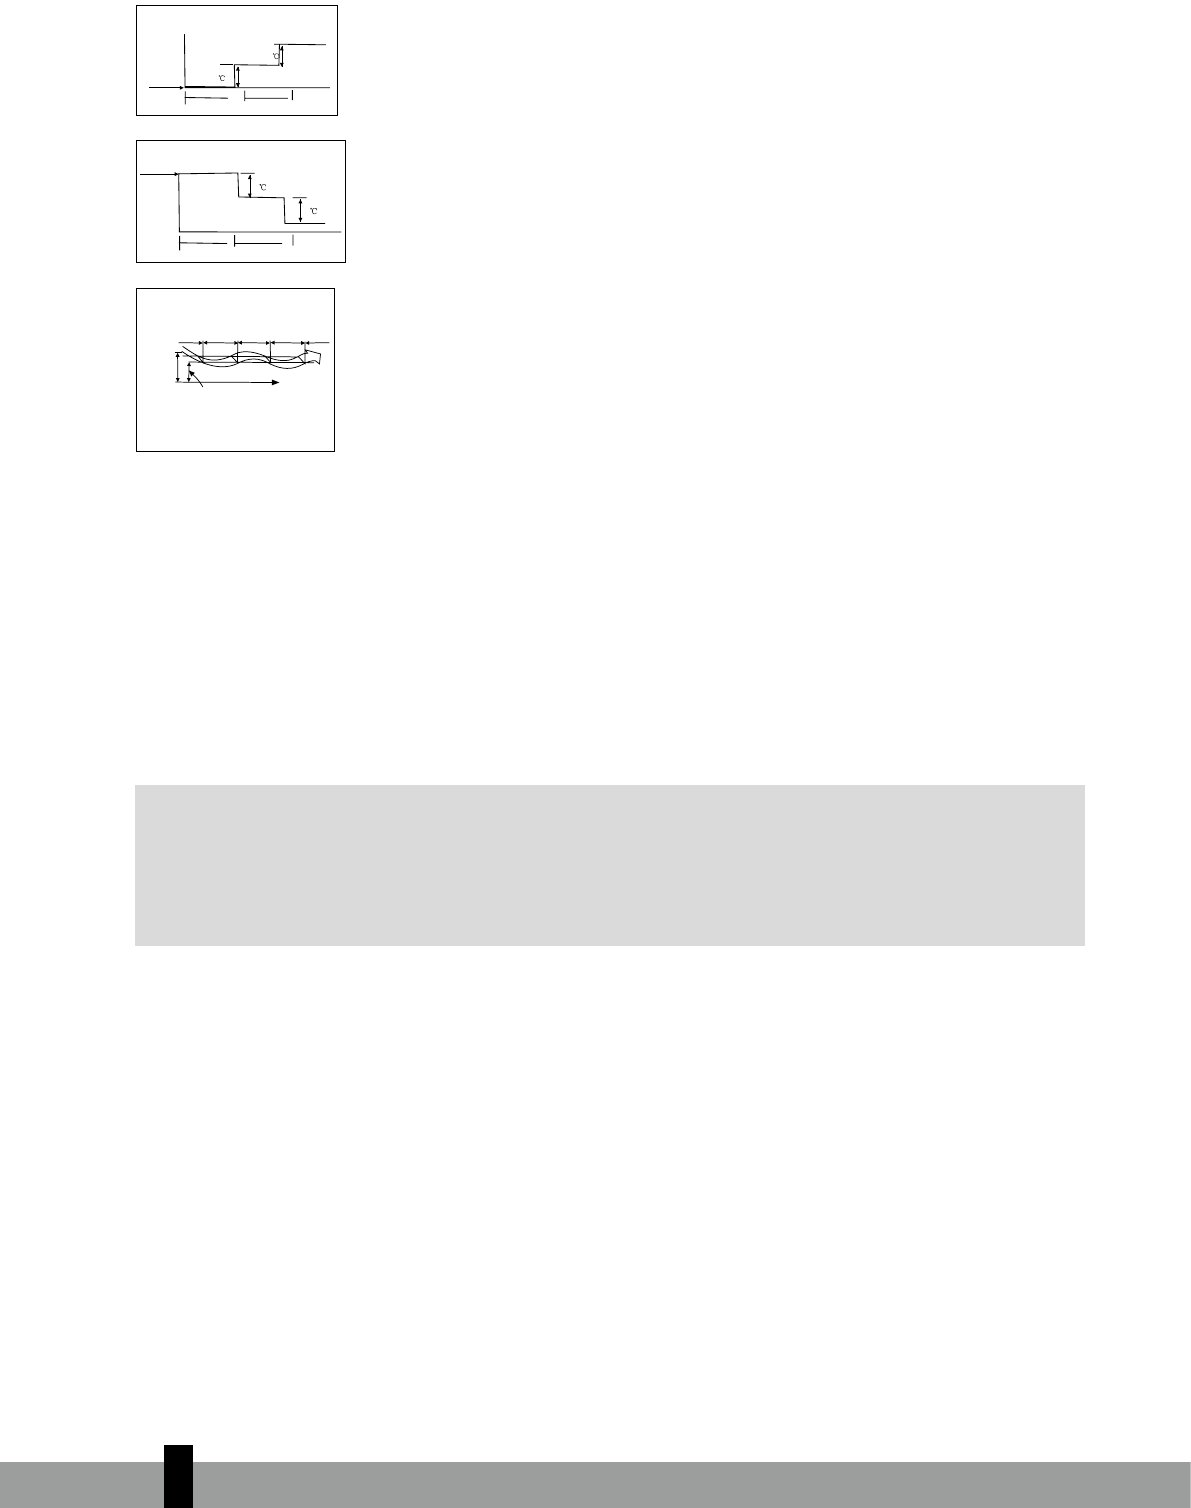
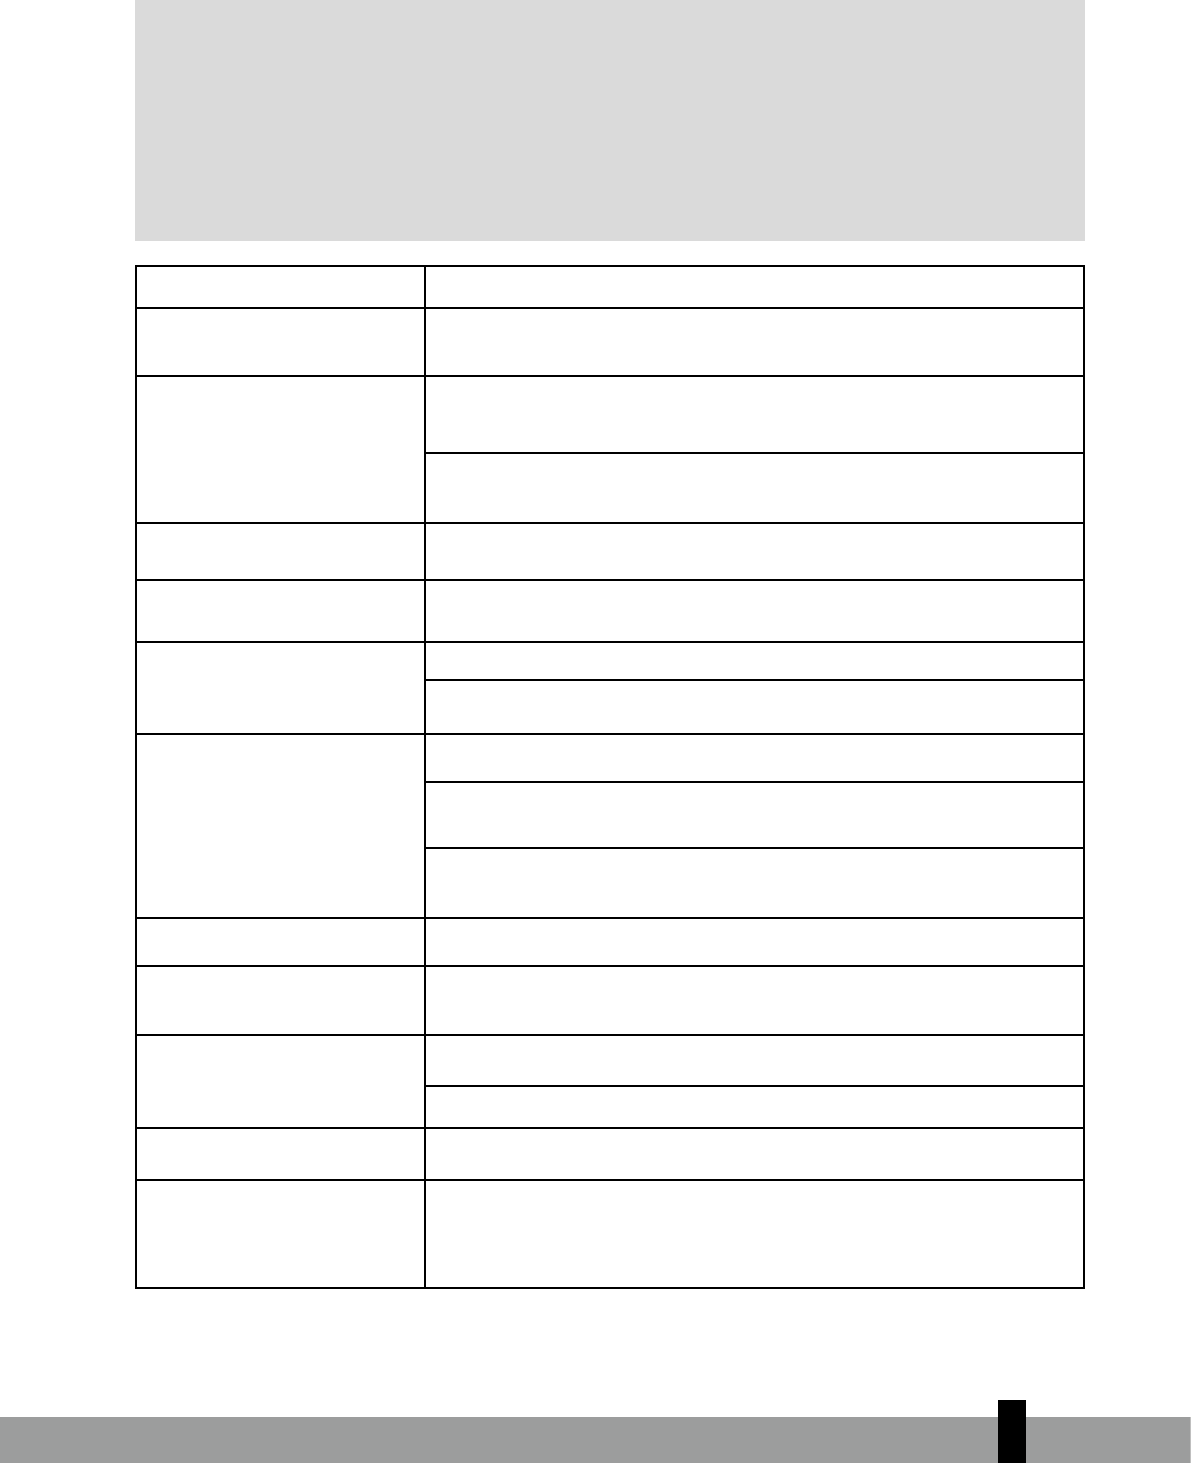
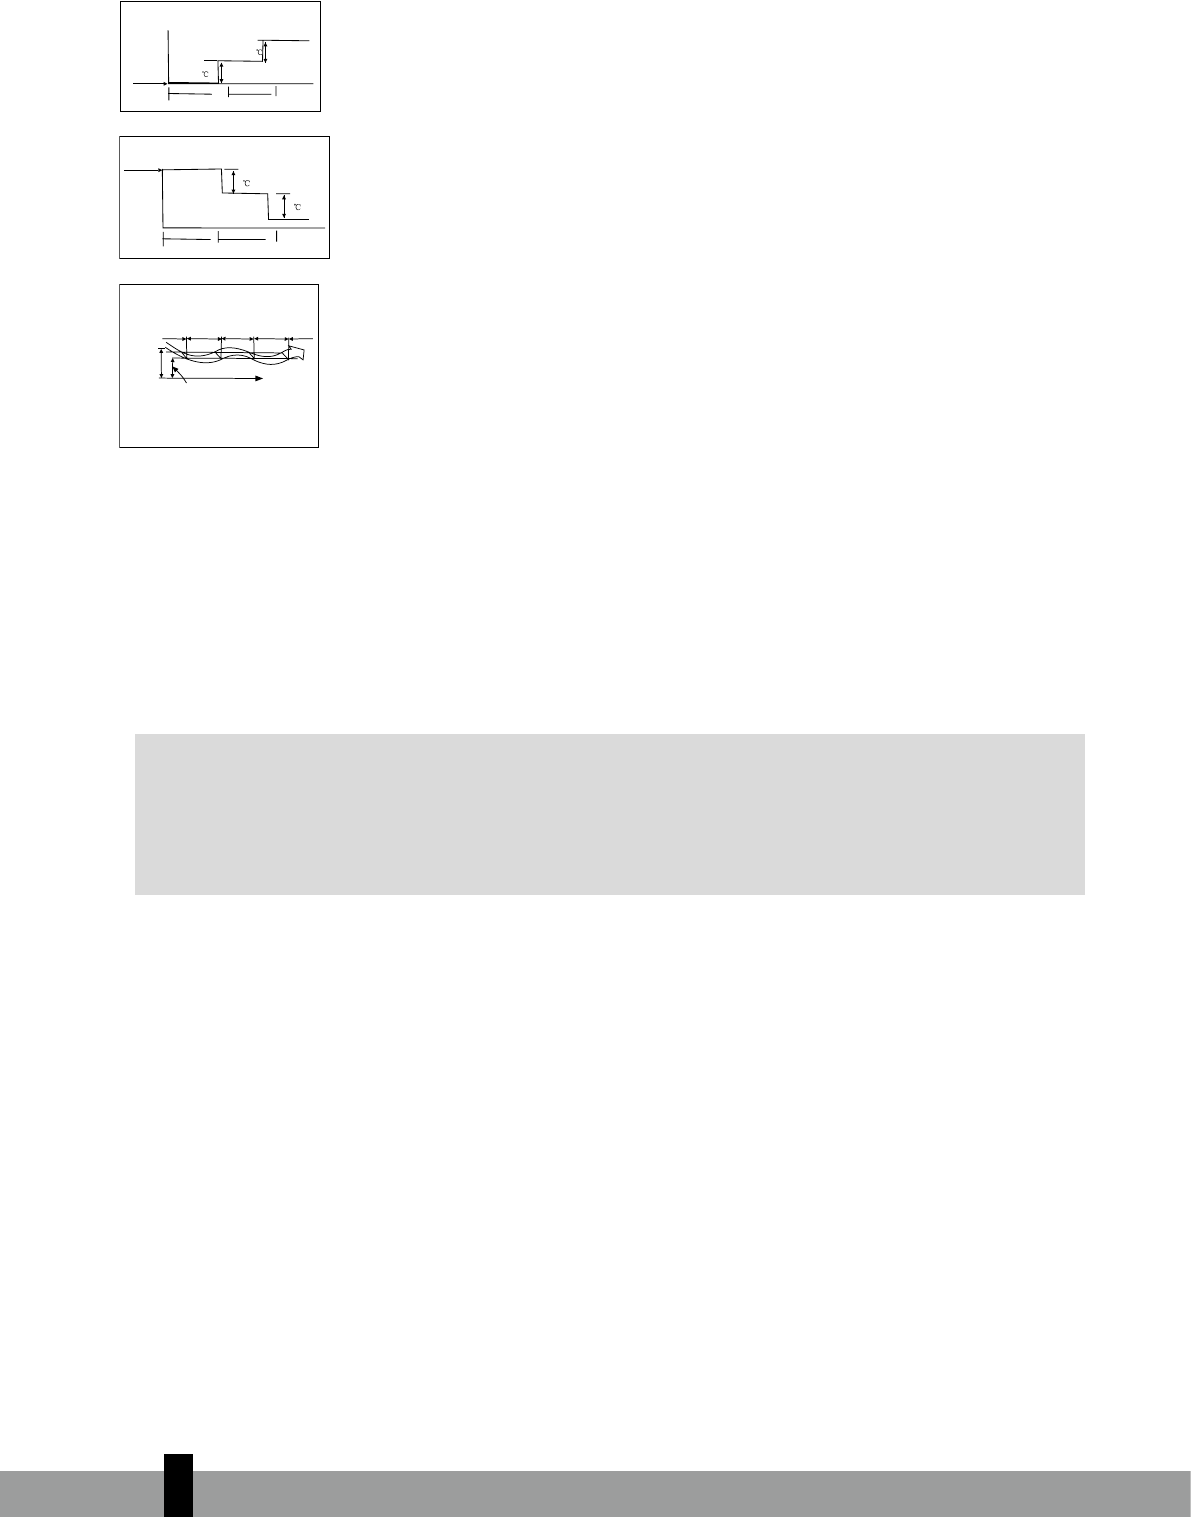
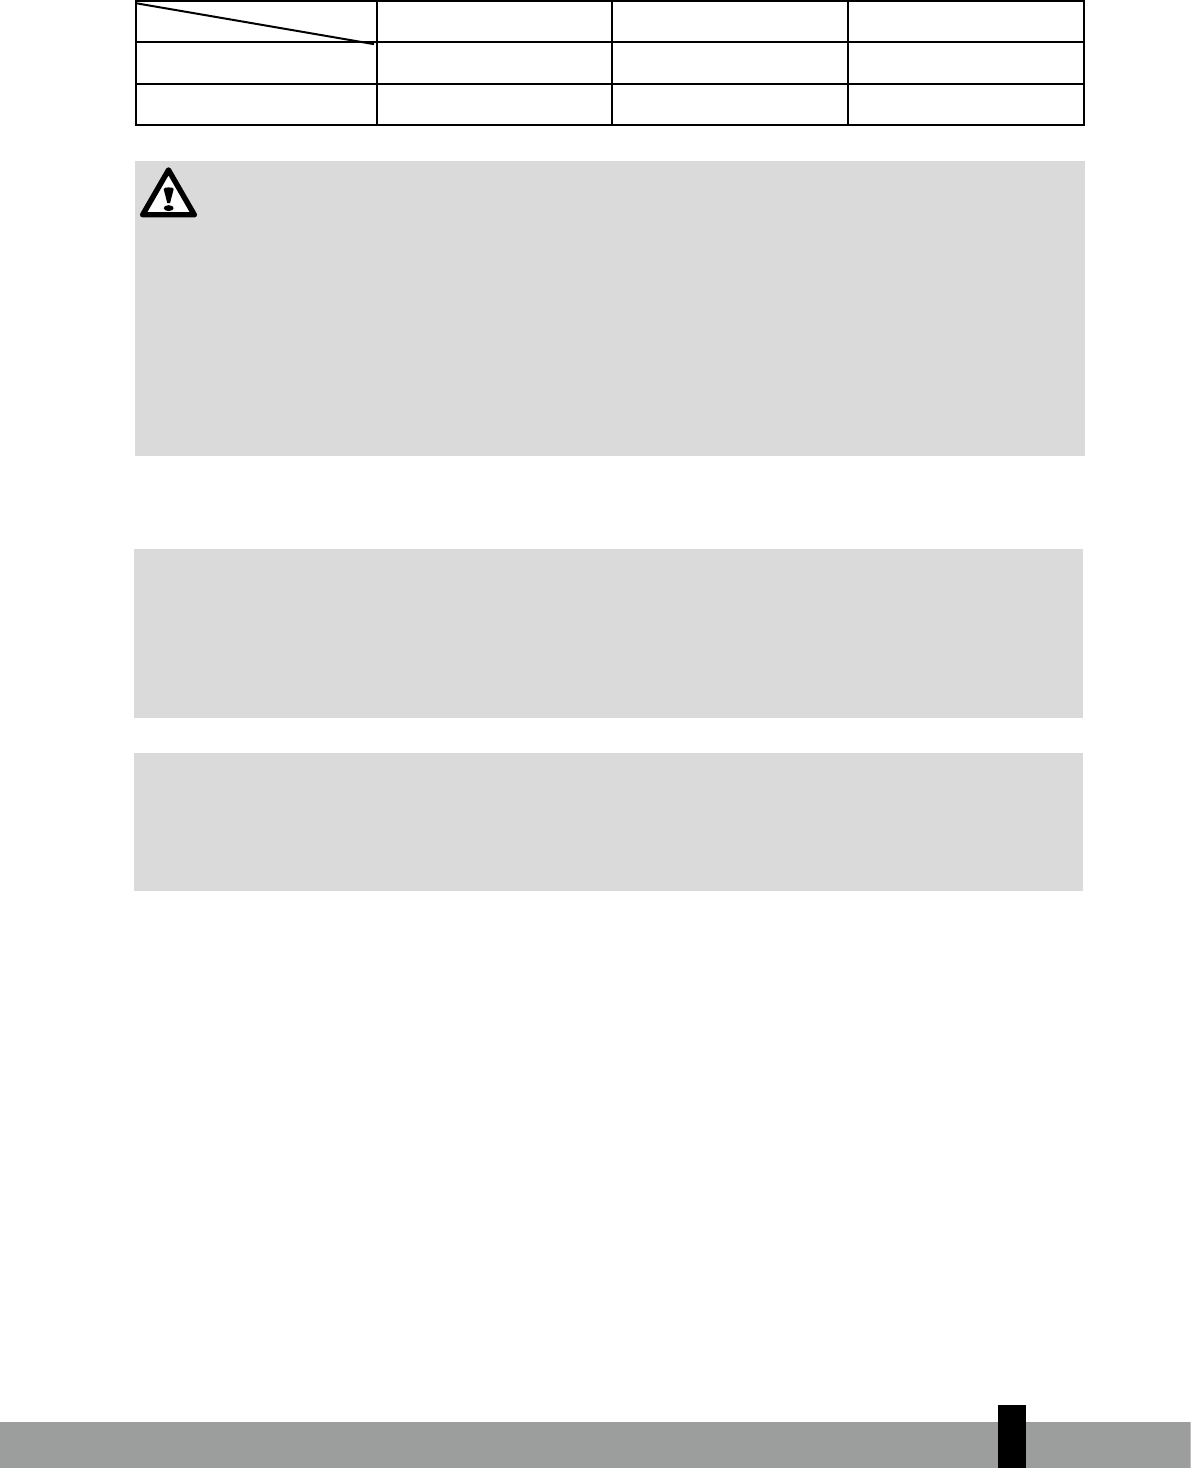
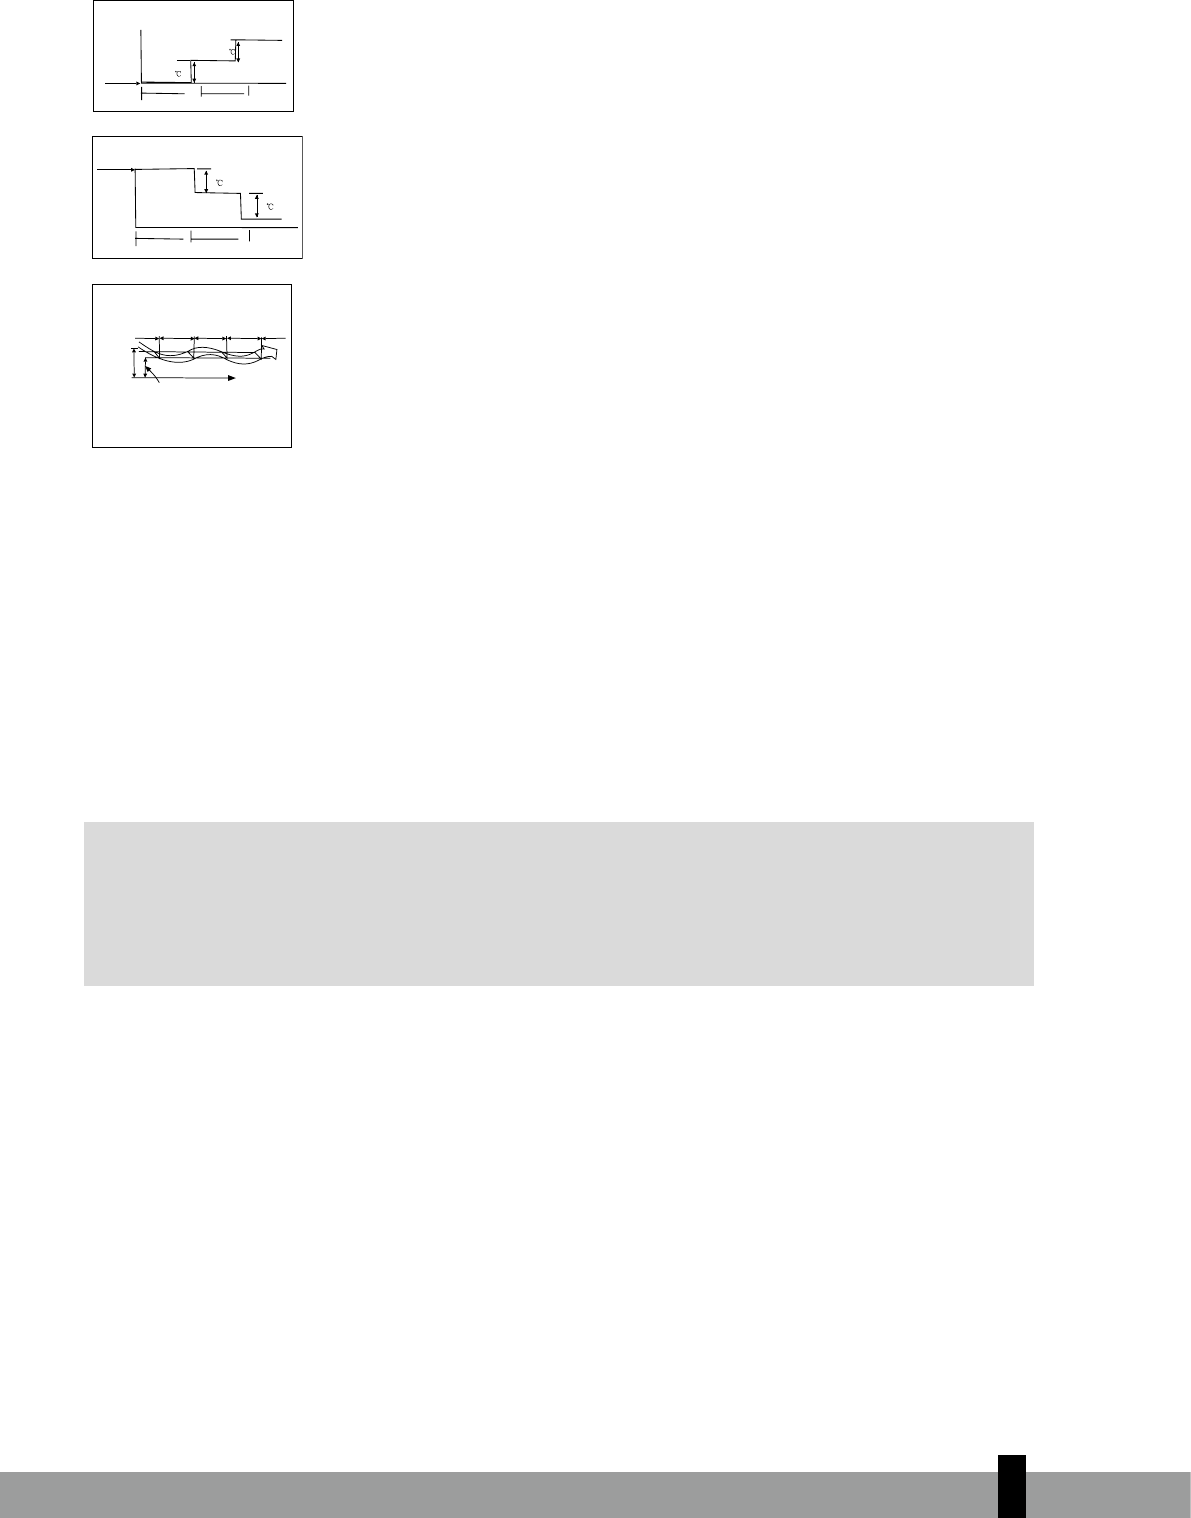
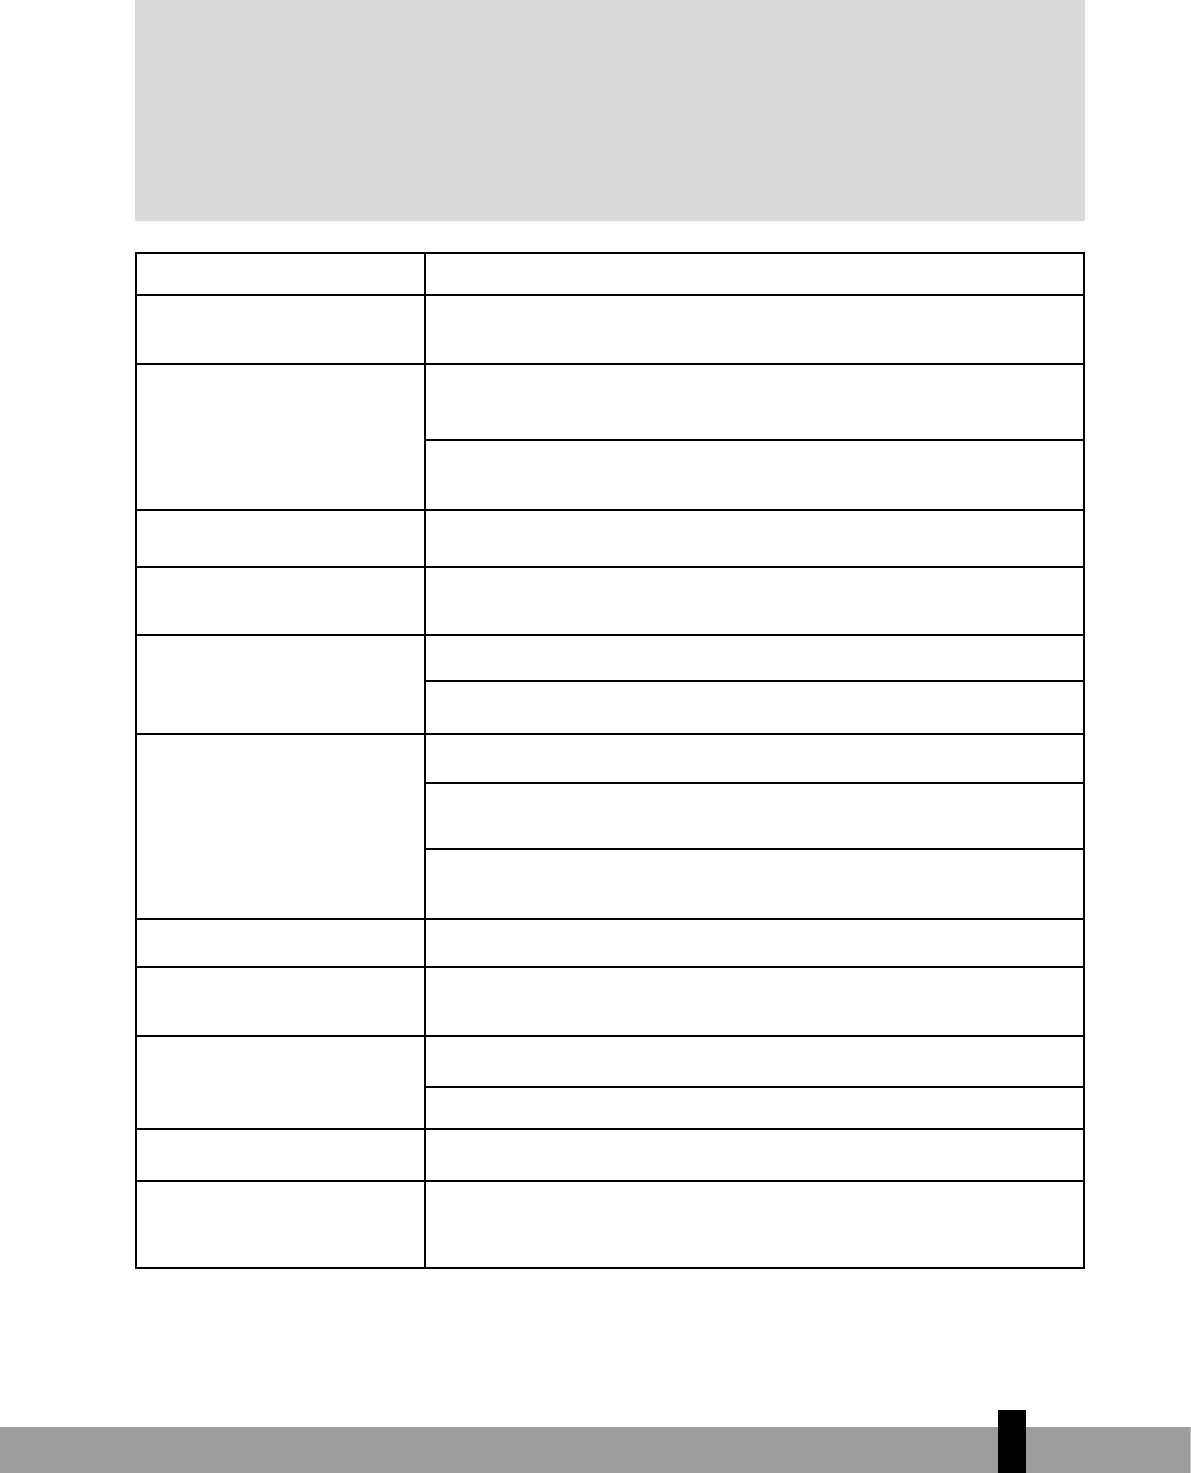
C TEMPERATURA DE UTILIZACIÓN
Refrigeración, calefacción y/o deshumidificación son adecuados para las siguientes temperaturas interiores
y exteriores:
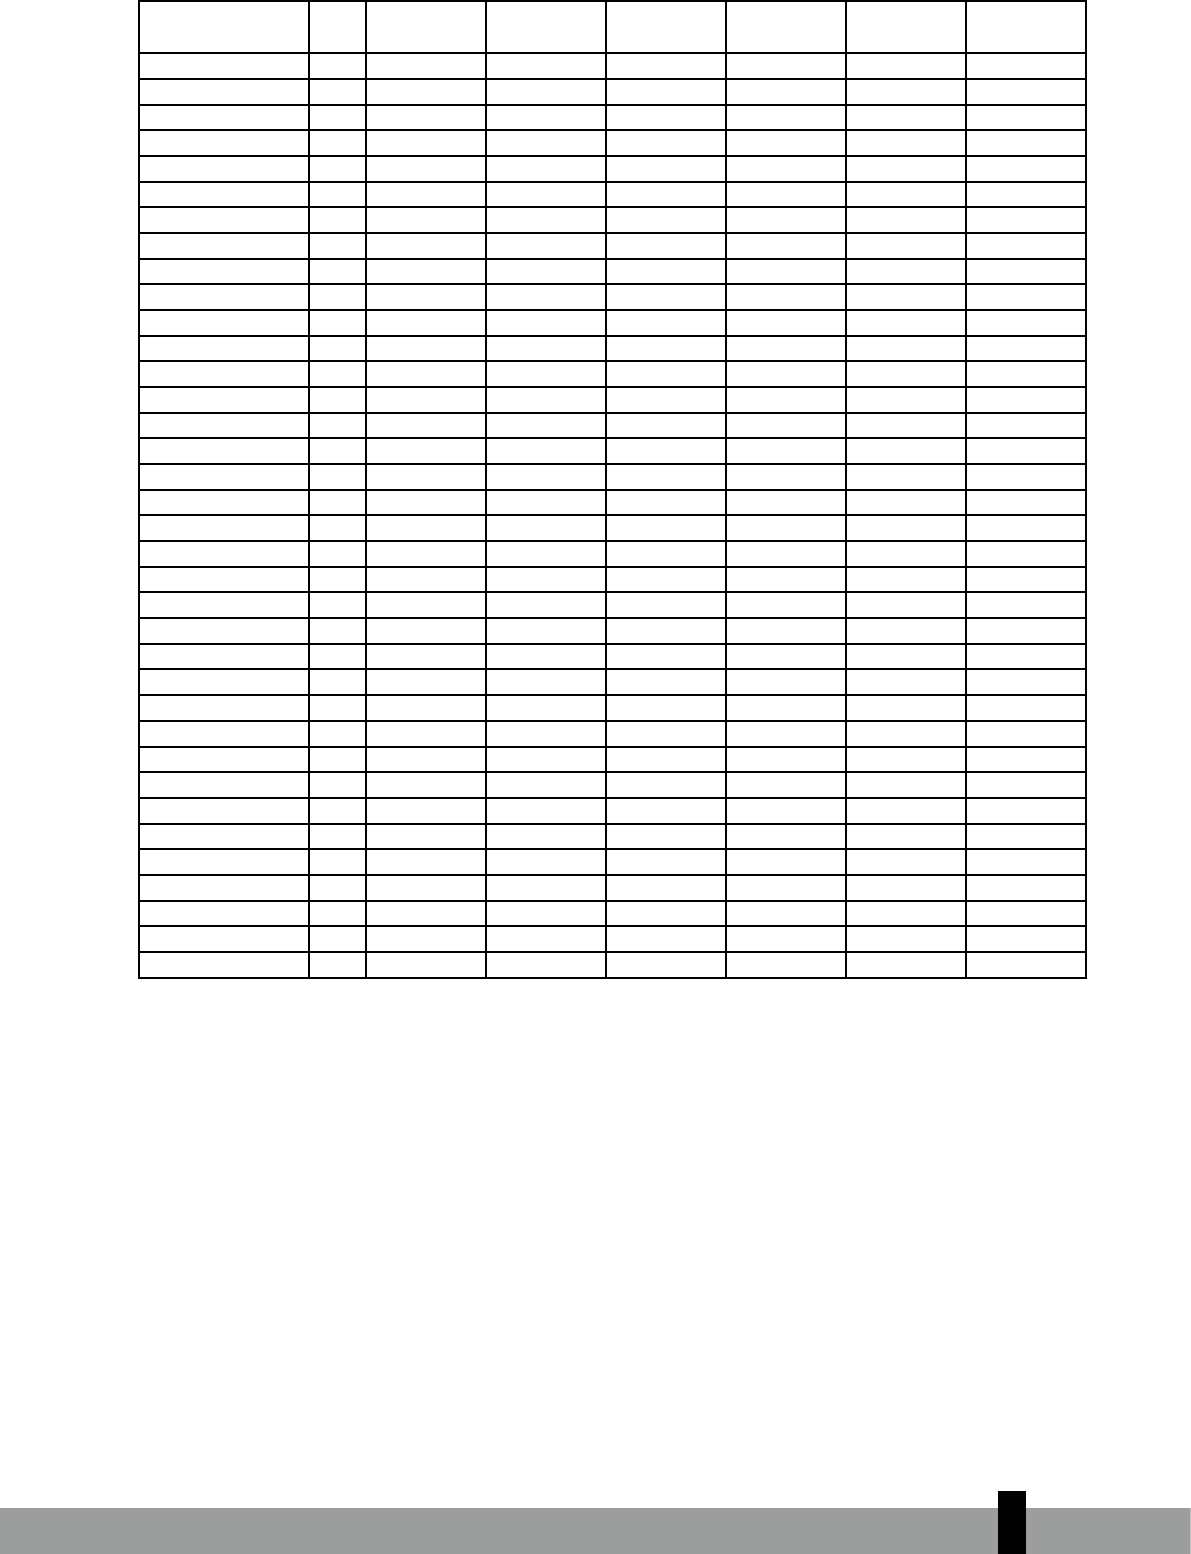
Temperatura
Modo Refrigeración Calefacción Deshumidificación
Temperatura ambiente 17ºC - 32ºC 0ºC - 30ºC 10ºC - 32ºC
Temperatura en el exte-
rior
-25ºC - 50ºC -15ºC - 30ºC 0ºC - 50ºC
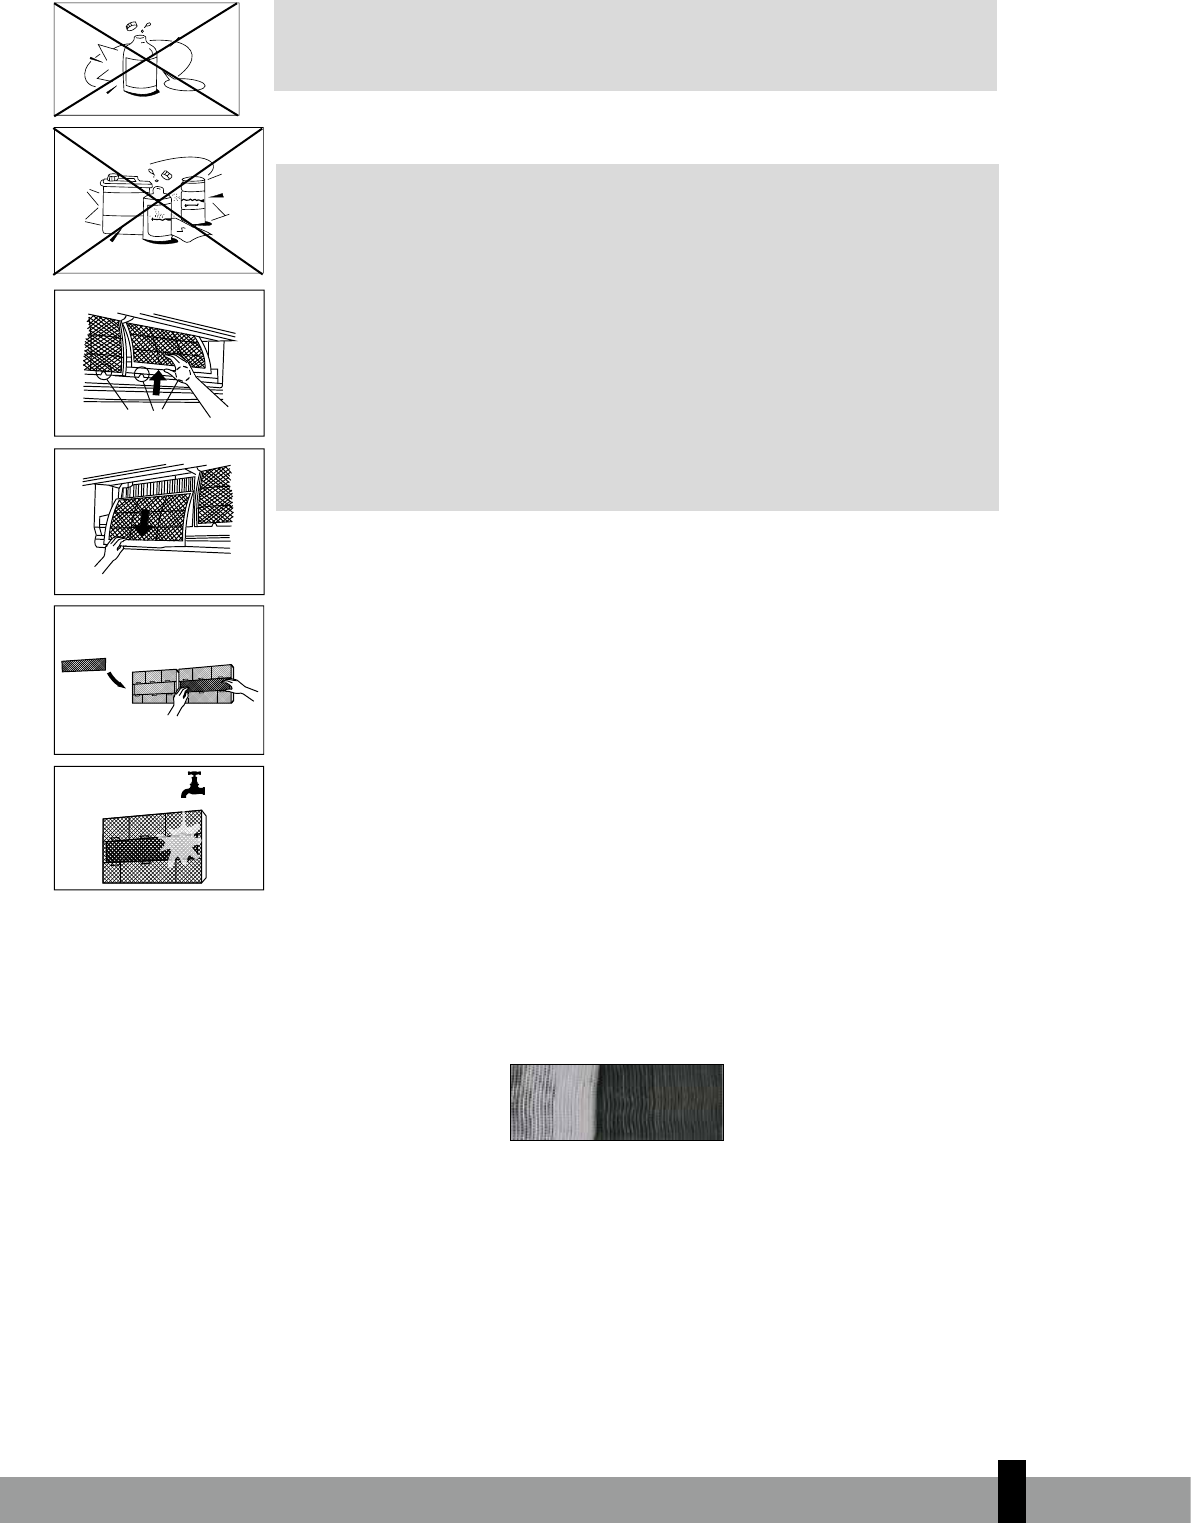
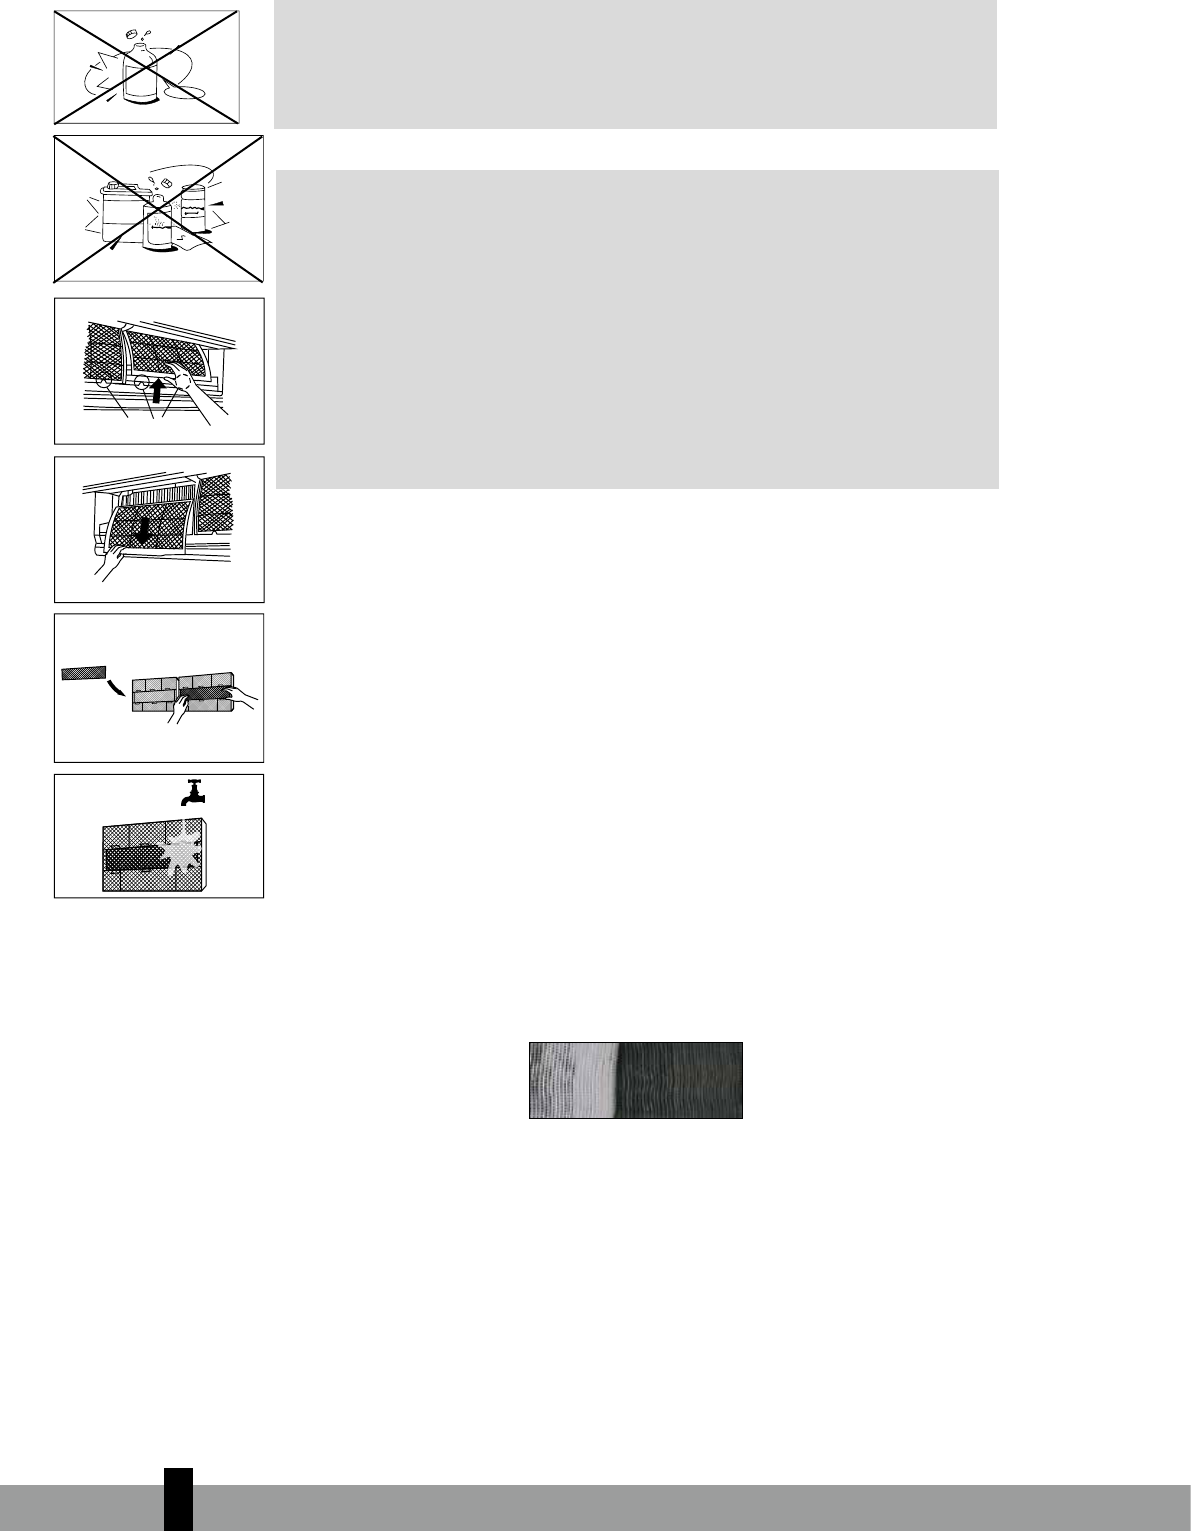
G
ATENCIÓN
•
podrían activarse dispositivos de protección y de seguridad y causar un funcionamiento anormal
de la unidad.
•
puede que en la superficie de la unidad se forme condensación. Si este es el caso, mueva la aleta
del flujo vertical hasta la posición de máxima apertura de la salida de aire (verticalmente al
suelo), y ajuste la velocidad del ventilador a HIGH (alta)
•
puertas y ventanas cuando el aparato refrigere o caliente.
5