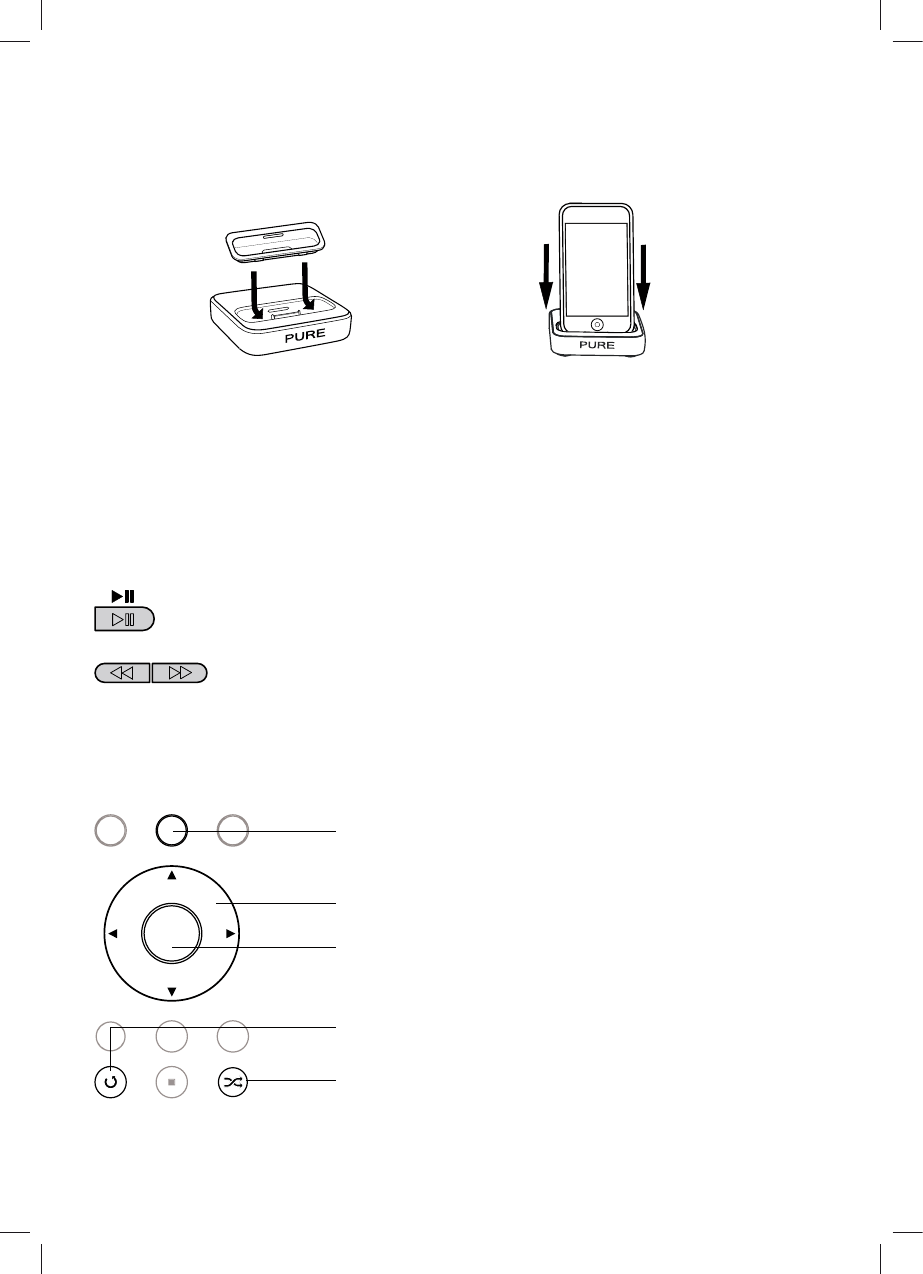
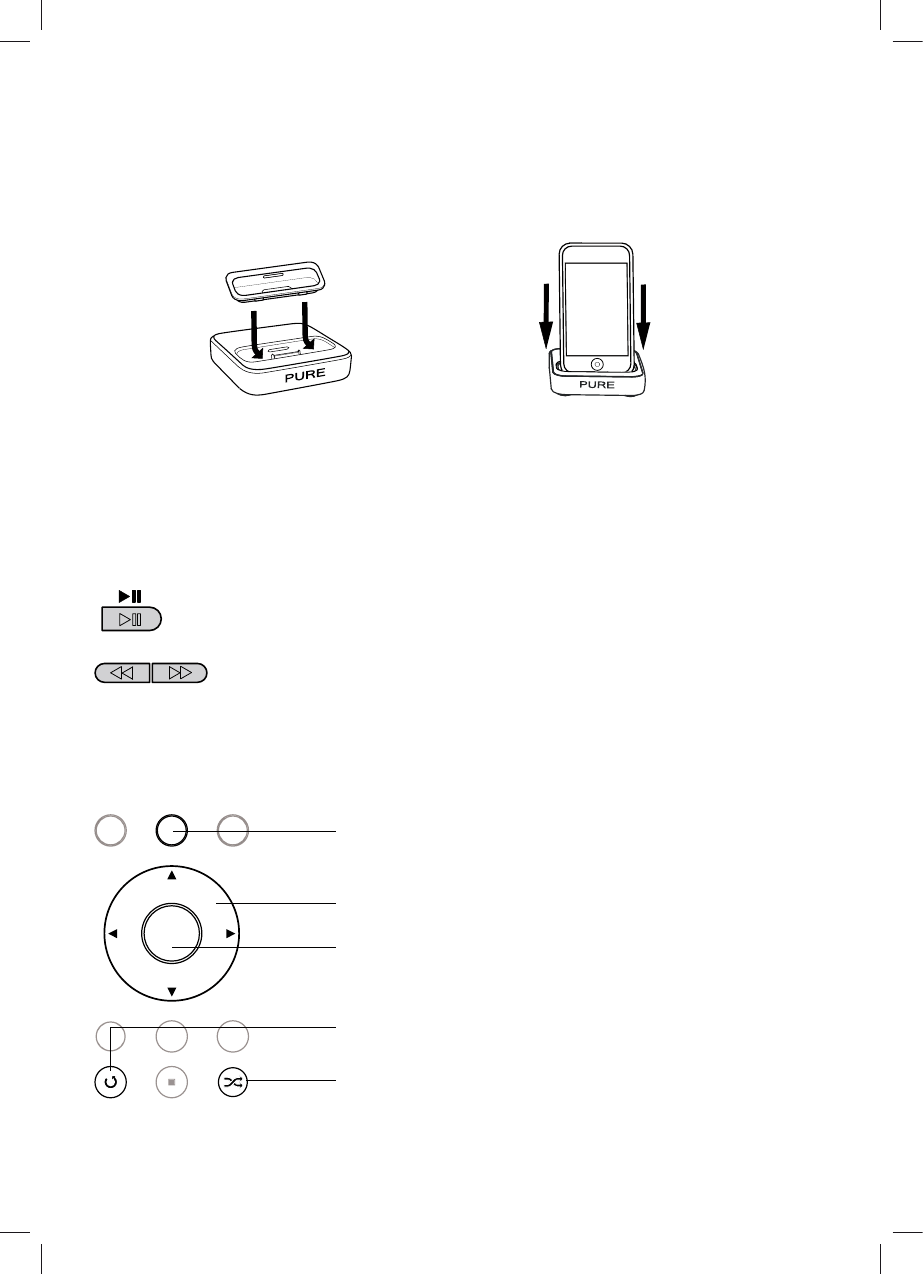
Repeat - Cycles repeat modes: off, single track, playlist
Shuffle - toggle shuffle (random) mode on and off
9
EN
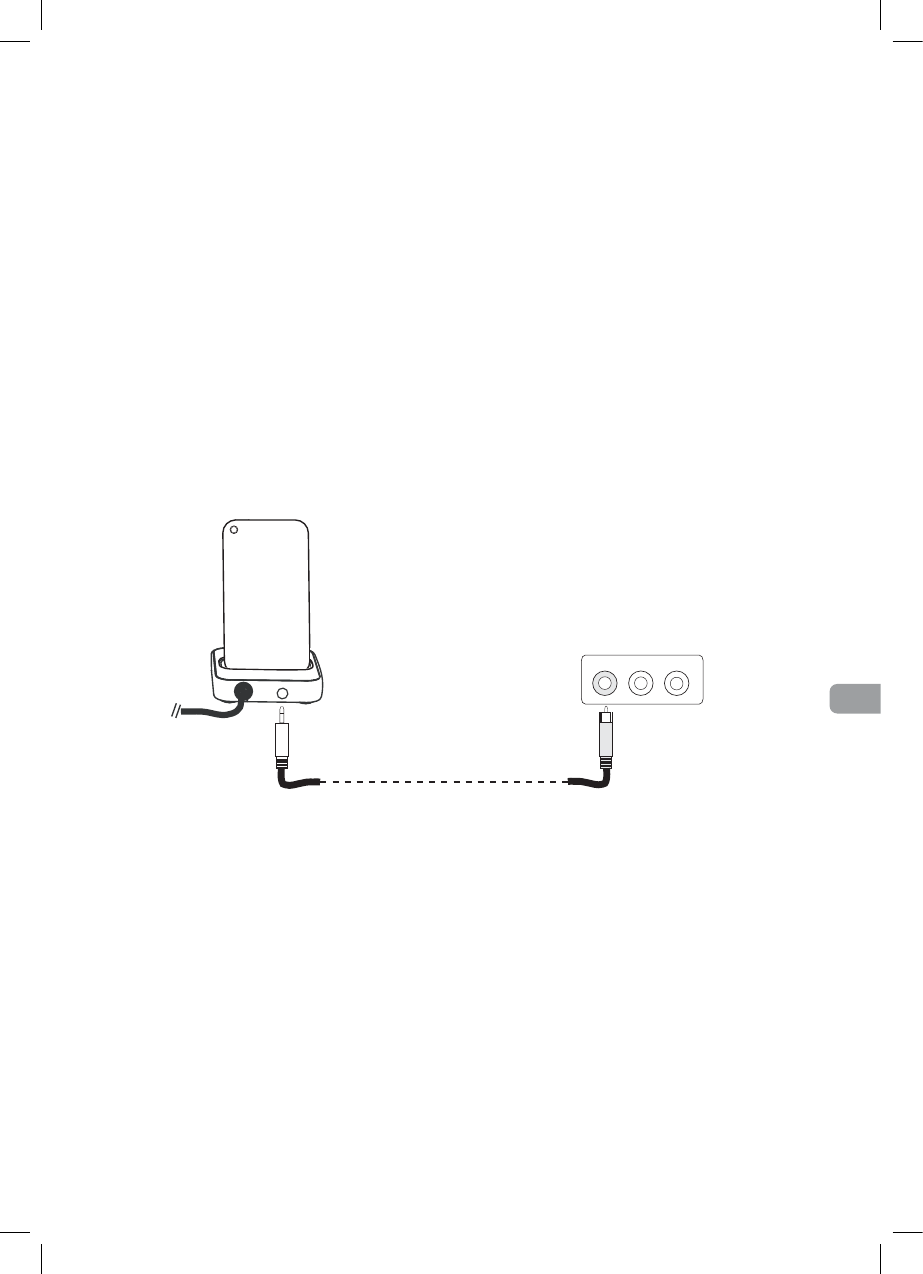
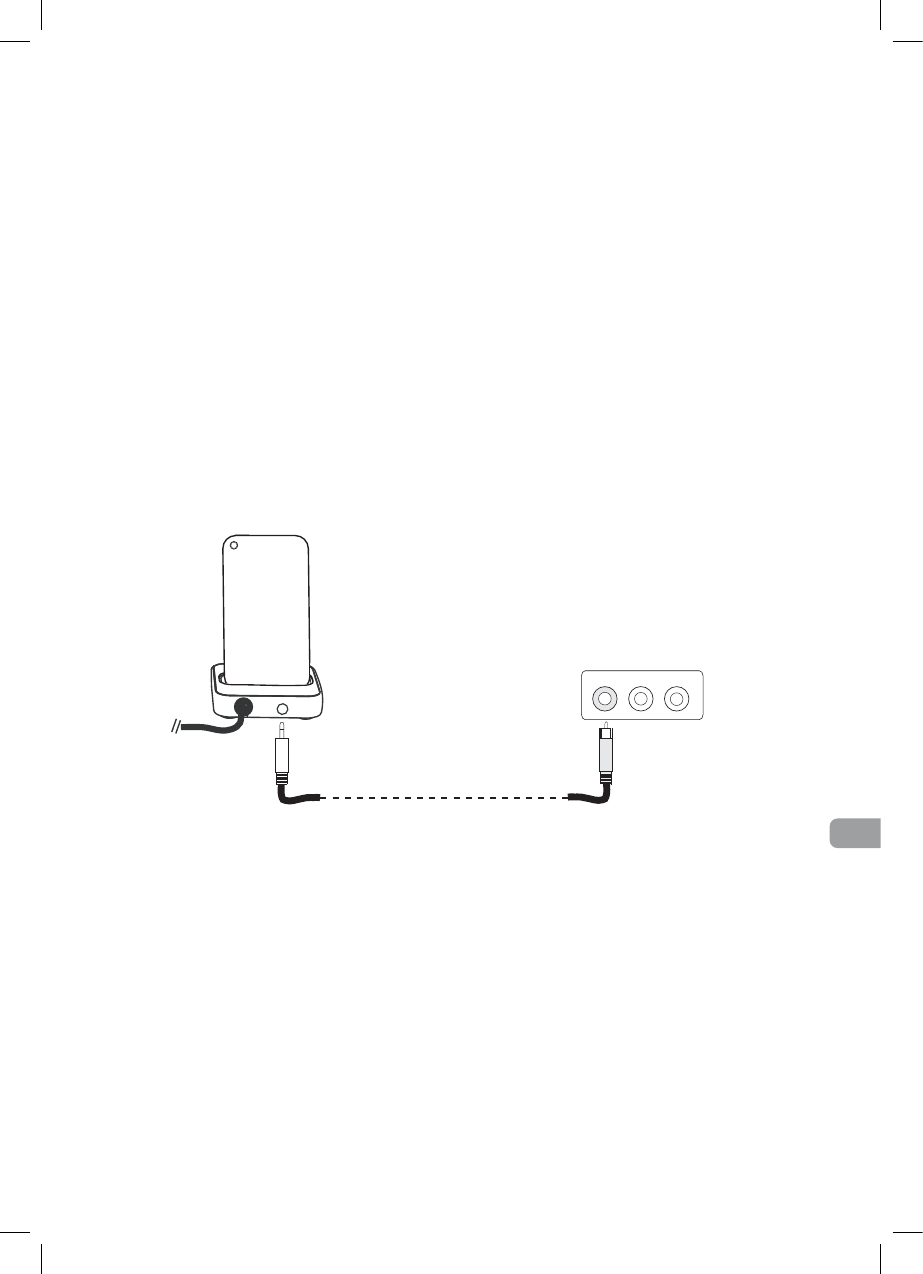
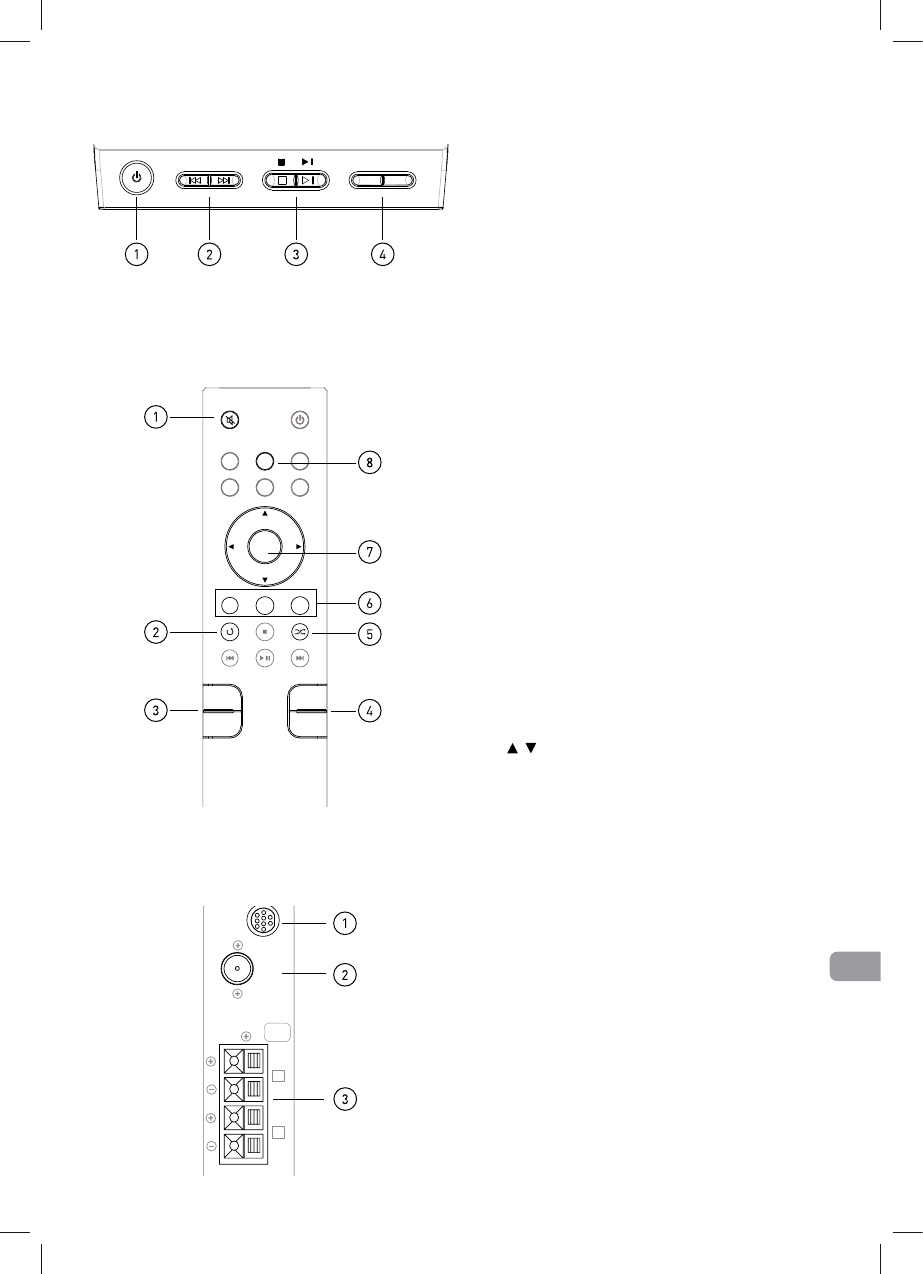
Using the video out socket*
The iPod dock is able to output video from you iPod or iPhone to a suitable television or monitor,
using the PURE3.5mm to Phono video out cable (available separately from your PURE dealer).
Please note that this is only the video signal; all audio will play through your Sirocco 150 speakers.
Connecting to your display
Video Out
Video
Audio R
Audio L
Rear view of dock, with iPhone inserted.
Typical composite input layout.
Before connecting your iPod dock to your display, please ensure that the ‘TV-Out’ settings on your
iPod or iPhone are correct (see the user guide for your iPod model for specific instructions).
*Video output is only available on iPod and iPhone models with video playback.
You can use the remote control during video playback as you would during audio playback, or if
you wish, you can navigate using the controls on your iPod itself.
Controlling video playback
Dock adapter compatibility
Insert the 3.5mm jack (black) of your 3.5mm to Phono video out cable into the video out socket on
the rear of the dock.
Connect the RCA jack (yellow) into the video socket of your display. This is usually coloured yellow,
and is usually located next to Left and Right audio sockets (red and white) as part of a composite
input. Tune your display to the correct input, for example, ‘Composite’ or ‘AV’.
If your iPod model is not listed here, You may have received the correct adapter in the box with it.
If not, we recommend purchasing the correct one from Apple.
Adapter Model Capacity
9 iPod Classic 80 / 120 GB
10 iPod Classic 160 GB
15 iPhone 3G 8 / 16 / 32 GB
16 iPod Touch 2nd gen 8 / 16 / 32 GB
17 iPod Nano 4th gen 8 / 16 GB
10
A set timer is indicated by the ‘TIMER’ symbol on the screen.
To toggle the timer on and off, press the Timer button once.
Setting the time and date
Your Sirocco 150 automatically adjusts the time using a DAB signal. However, If you have a poor
signal or simply wish to set the clock yourself, you can do so from the menu.
Please note: When a DAB time signal is received, Sirocco 150 will default to this automatically.
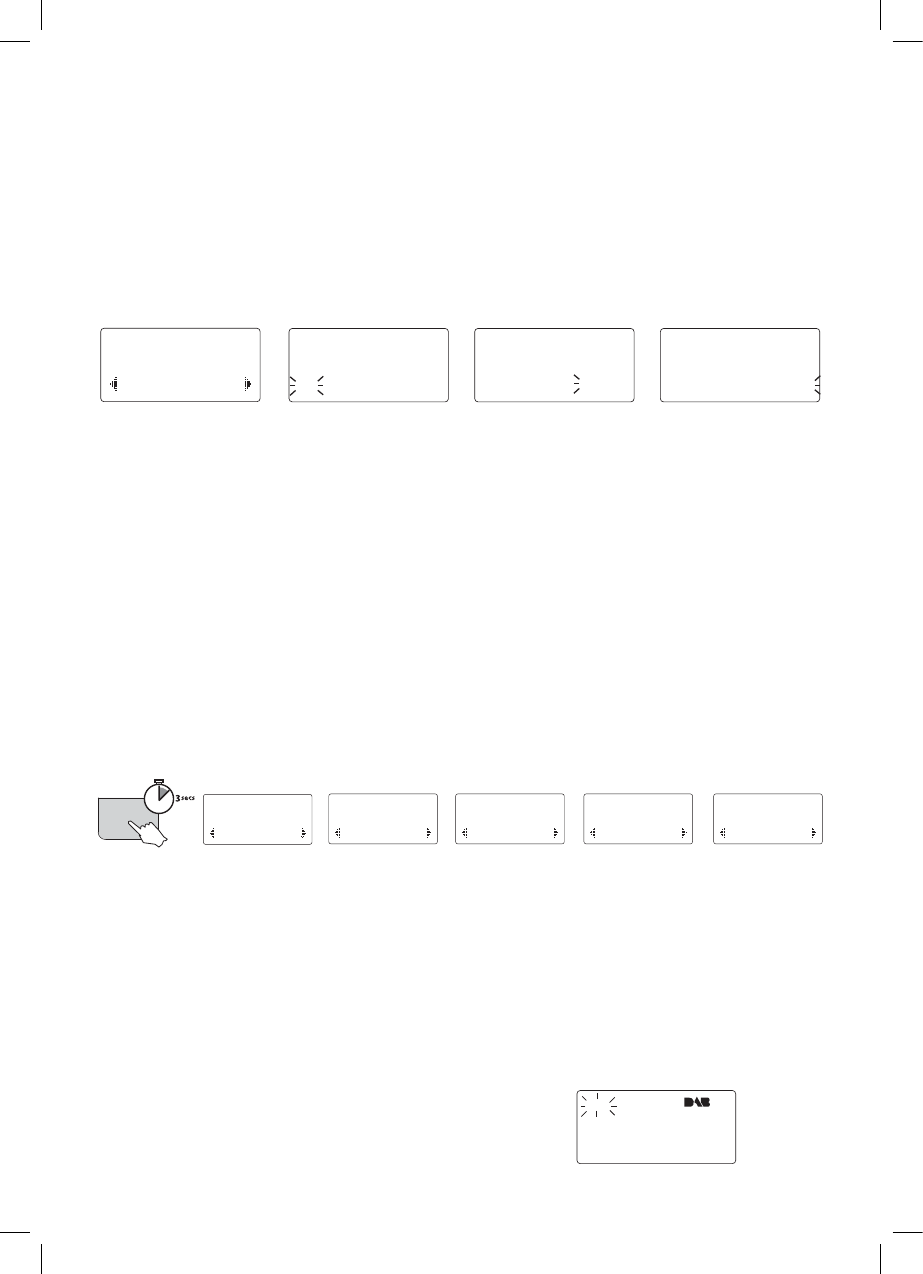
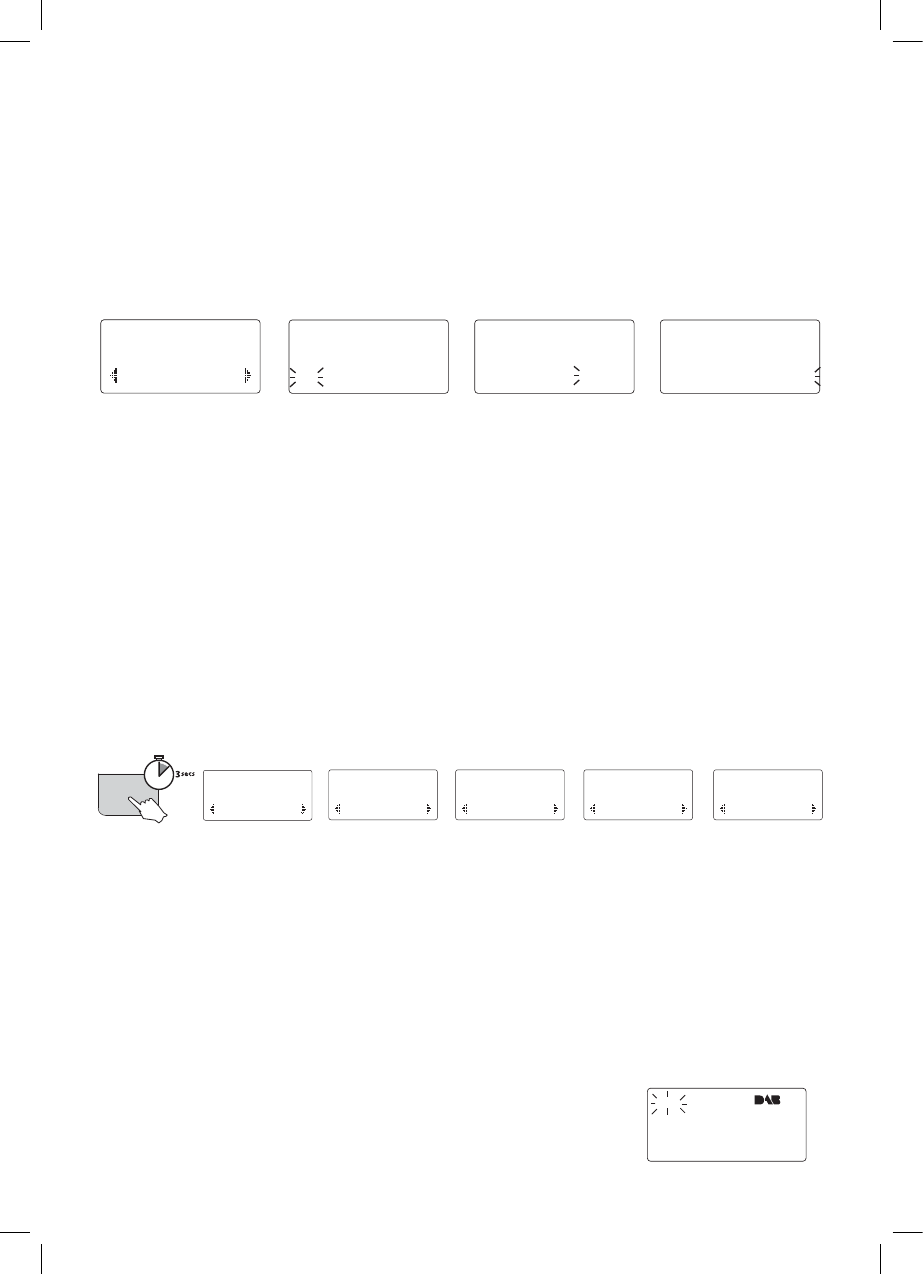
To set the time
1. Press Menu, then select ‘Clock’
2. You will now see the Set time screen. Using the navigation dial, select 12 or 24-hour clock
3. Set the hours
4. Set the minutes
BTccX\T
!#W^da)
BTccX\T
!#7^da)
BTccX\T
!#7^da $)
Setting the timer
The timer function allows you to set your Sirocco 150 to switch on to your preferred source, and
then switch off again at specifed times.
To set the timer
1. Press and hold Timer to enter the
Set timer
screen. You can also accees Timer from the main menu.
2. Using the navigation dial, set the times you wish your Sirocco 150 to switch on, then off
3. Select how frequently you want the timer to go off (Once Only or Daily)
4. Select the source you would like your Sirocco 150 to play when it switches on - DAB, FM, CD, iPod, USB,
SD Card or Tone.
5. Finally, set your preferred volume level for the timer.
2[^RZ
1.
2.
4.
3.
After setting the time, you will be asked to set the date. Use the navigation dial as before.
>UU
BTccX\Ta
Timer
)
BTccX\T^]
3PX[h
BTcSPhb
301
BTc\^ST
%
BTce^[d\T
112APSX^
^f_[PhX]V)HTPW
TIMER
2.
3.
4.5.
11
EN
You can quickly set your Sirocco 150 to automatically switch off after a set length of time.
Press the Sleep button repeatedly to cycle through 90, 60, 45, 30 or 15 minutes until switch-
off. To show the remaining time press Sleep once. Press and hold to cancel the timer.
Options
Press the Menu button to access the following options. You can also access the Clock, Timer and
Energy saving settings
DAB-only options
Autotune
Scans all DAB frequencies for stations and adds any new ones to the station list. To stop an
Autotune press Select.
DRC value
DRC (Dynamic Range Control) can make the quieter sounds in a DAB broadcast easier to hear
at low volume or in a noisy environment. DRC is not broadcast by all stations, please check
your preferred station’s broadcast information.
DRC off Any DRC level broadcast will be ignored.
DRC half DRC level is set to half that sent with the broadcast.
DRC full (default) Applies the DRC level as sent with the broadcast.
Manual tune
Shows DAB signal level which can help you find the best position for your radio.
Station Order
Alphanumeric Lists all stations in alphanumeric order.
Active station Lists active stations first on the station list.
Multiplex Lists stations in groups according to their multiplex.
FM-only options
FM stereo mode
Switch between Stereo and Mono sound.
May improve sound quality in poor FM signal areas
Audio options
EQ settings (remote control only)
Apply one of five equalisation presets (FLAT, POP, CLASSIC, ROCK or JAZZ) to the audio.
Sleep
SLEEP
B[TT_^]
AT\PX] $\X]b
Menu
Using the sleep timer
12
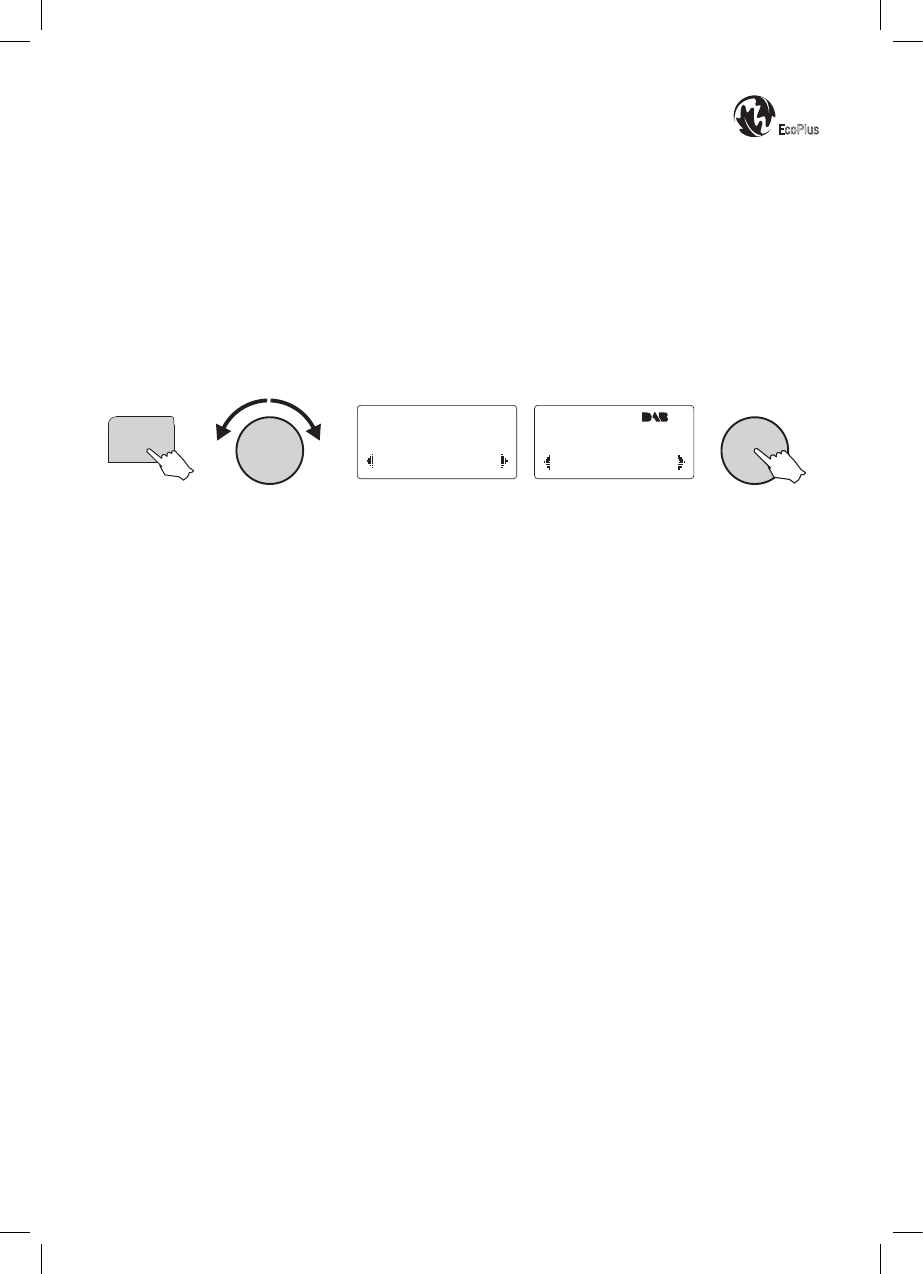
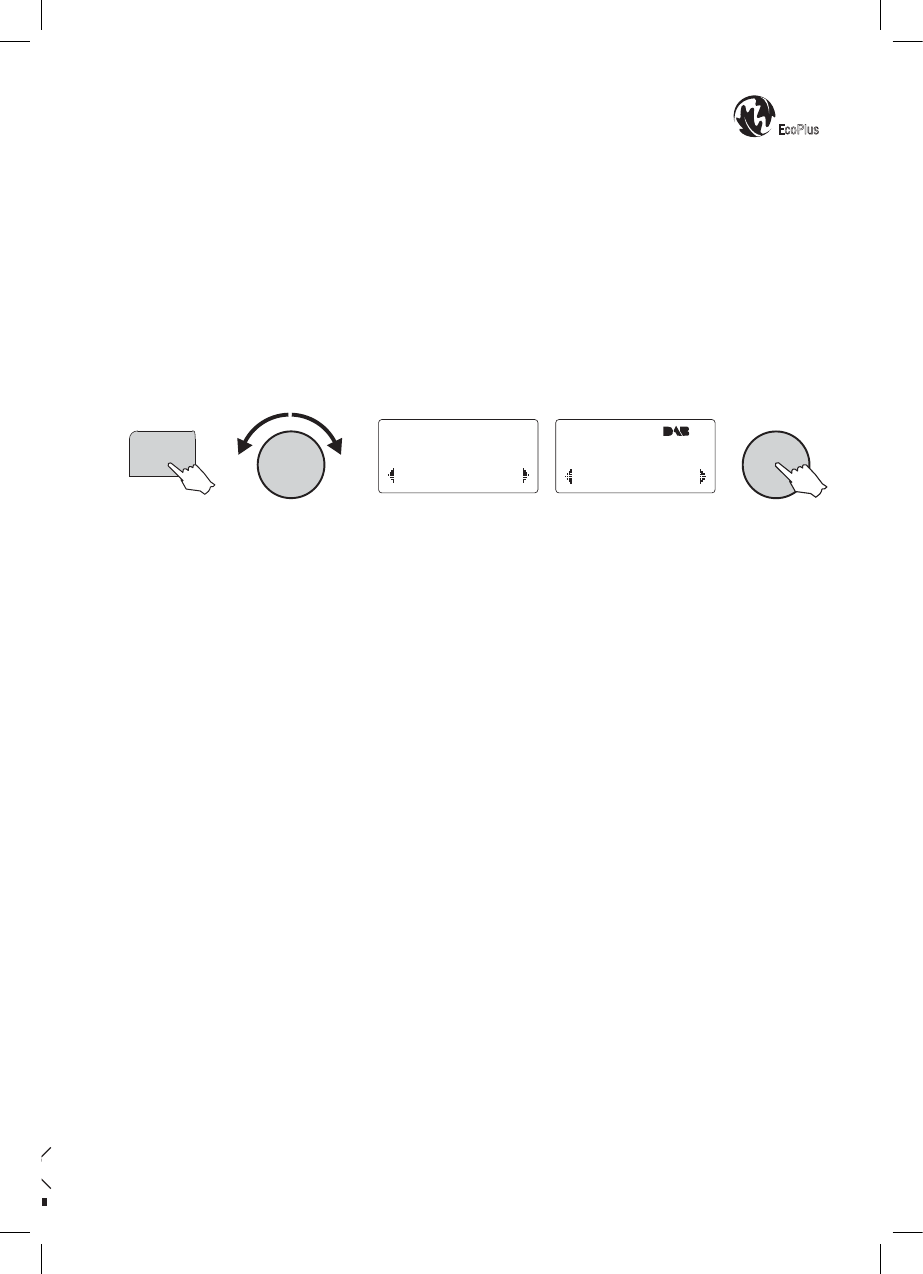
Energy saving
Sirocco 150 is part of the PURE EcoPlus product family and has an energy-saving standby
mode.
In energy-saving standby mode, the screen and clock will be switched off and any iPod or
iPhone in the dock will not be charged. The standby indicator light will be lit to show that the
unit is in standby, and power consumption will be greatly reduced.
In standby mode, the screen is illuminated and the time is shown. Any iPod or iPhone that is
docked will be charged
To switch energy saving on or off, press Menu then rotate the tune dial and select ‘Energy
Saving’, then ‘On’ or ‘Off’.
EcoPlus
4]TaVhBPeX]V
>UU
>]
Menu
Please note: When entering energy saving standby, there is a short delay while Sirocco 150 shuts
down. ‘Powering off’ will be shown on screen during this time.
Hints and Tips
(?) Inactive or unavailable DAB stations
Inactive or unavailable stations are those which appear on the station list but are not currently
available. Inactive stations have a ‘?’ before their name on the station list. If you select a station
which has this symbol, your radio tries to tune in or returns to the previous station.
Screen shows ‘No stations available’
Check that your aerial is fully extended. Use Autotune to search for stations. Try adjusting your
aerial or radio position.
Clock hasn’t adjusted for summer/winter daylight saving
Switch the unit on to DAB to acquire the time from the DAB signal – there may be a delay in
broadcasters updating the time signal.
Resetting your radio
Resetting your radio
removes all presets, stored stations and favourite station settings and resets
all options to defaults. To reset:
1. Press and hold the Menu button for three seconds
2. Press the navigation dial to confirm the reset.
13
EN
Technical Specifications
TunerStereo digital radio with full Band III and FM reception. ETS 300 401
compliant and capable of decoding all DAB and DAB
+
transmission
modes 1-4 up to and including 384 kbps. Supports FM RDS.
Frequency rangeDAB – Band III (174-240 MHz), FM – 87.5-108 MHz.
CD playerCD-R and CD-RW playback compatible. MP3 & WMA playback,
Multiple playback modes (repeat, random, etc.).
Support for 60 WMA/MP3 or CD track playlist.
Speakers 4 Ohms (nominal) impedance. 10W RMS power handling. Two-way
design. Treated paper mid-bass driver. Custom tuned crossover.
Input connectors3.5mm Aux-in socket for auxiliary devices. USB host port for memory
drives up to 32GB. SD memory card slot (supports cards up to 2GB).
Output connectors3.5 mm stereo socket for headphones. 9-pin socket for iPod/iPhone
dock. 3.5mm video out socket on rear of dock.
Remote control Infrared remote control.
Aerial Removable wire dipole DAB/FM aerial.
Mains power supply240V Euro/UK power socket adapter.
ApprovalsCE marked. Compliant with the EMC and Low Voltage Directives
(2004/108/EC and 2006/95 EC).
Dimensions (mm)Unit – 145 wide x 164 high x 203 deep.
Speakers – 142 wide x 213 high x 160 deep.
Trademarks
Sirocco 150, PURE, the PURE logo, Imagination Technologies, and the Imagination Technologies logo are trademarks or registered trademarks of Imagination
Technologies Limited. “Made for iPod” means that an electronic accessory has been designed to connect specifically to iPod and has been certified by the
developer to meet Apple performance standards. “Works with iPhone” means that an electronic accessory has been designed to connect specifically to iPhone
and has been certified by the developer to meet Apple performance standards. Apple is not responsible for the operation of this device or its compliance with
safety and regulatory standards. iPod is a trademark of Apple Computer, Inc., registered in the U.S. and other countries. iPhone is a trademark of Apple Inc. All
other product names are trademarks of their respective companies. Version 1 July 2009.
Warranty information
Imagination Technologies Ltd. warrants to the end user that this product will be free from defects in materials and workmanship in the course of normal use for
a period of two years from the date of purchase. This guarantee covers breakdowns due to manufacturing or design faults; it does not apply in cases such as
accidental damage, however caused, wear and tear, negligence, adjustment, modification or repair not authorized by us. Please visit www.pure.com/register to
register your product with us. Should you have a problem with your unit please contact your supplier or contact PURE Support at the address shown on the rear
of this manual.
Disclaimer
Imagination Technologies Limited makes no representation or warranties with respect to the content of this document and specifically disclaims any implied
warranties of merchantability or fitness for any particular purpose. Further, Imagination Technologies Limited reserves the right to revise this publication and
to make changes in it from time to time without obligation of Imagination Technologies Limited to notify any person or organization of such revisions or changes.
Copyright
Copyright 2009 by Imagination Technologies Limited. All rights reserved. No part of this publication may be copied or distributed, transmitted, transcribed,
stored in a retrieval system, or translated into any human or computer language, in any form or by any means, electronic, mechanical, magnetic, manual or
otherwise, or disclosed to third parties without the express written permission of Imagination Technologies Limited.
14
Disposal of Waste Electrical & Electronic Equipment
This symbol on the product or on its packaging indicates that this product should not be treated as household waste. Instead it should be handed
over to a suitable collection point for the recycling of electrical and electronic equipment. By ensuring this product is disposed of correctly, you will
help prevent potential negative consequences for the environment and human health, which could otherwise be caused by inappropriate waste
handling of this product. The recycling of materials will help to conserve natural resources. For more detailed information about recycling of this
product, please contact your local council office, your household waste disposal service or the shop where you purchased the product.
2
Source
Info
Presets
Menu
Sleep
Timer
Aux in
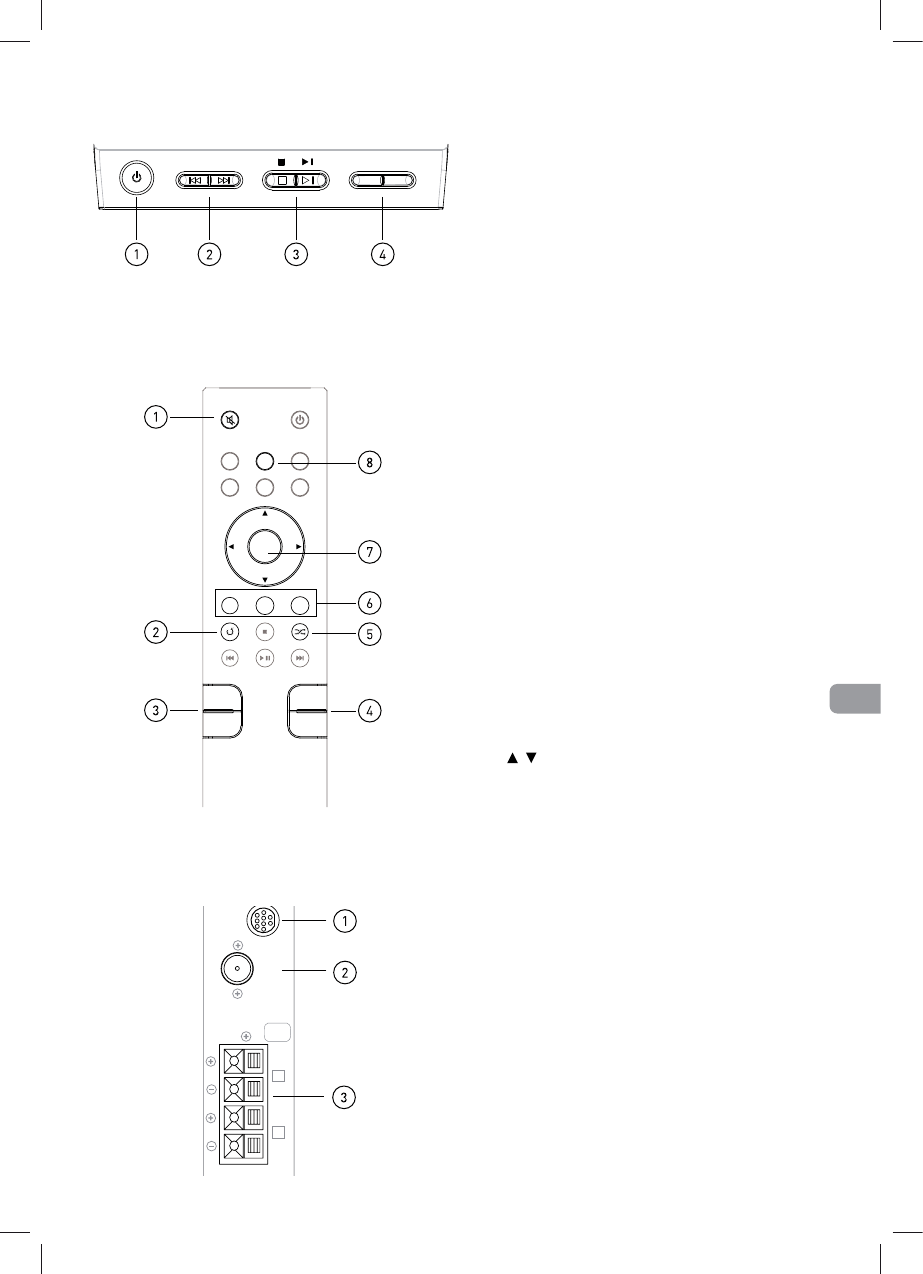
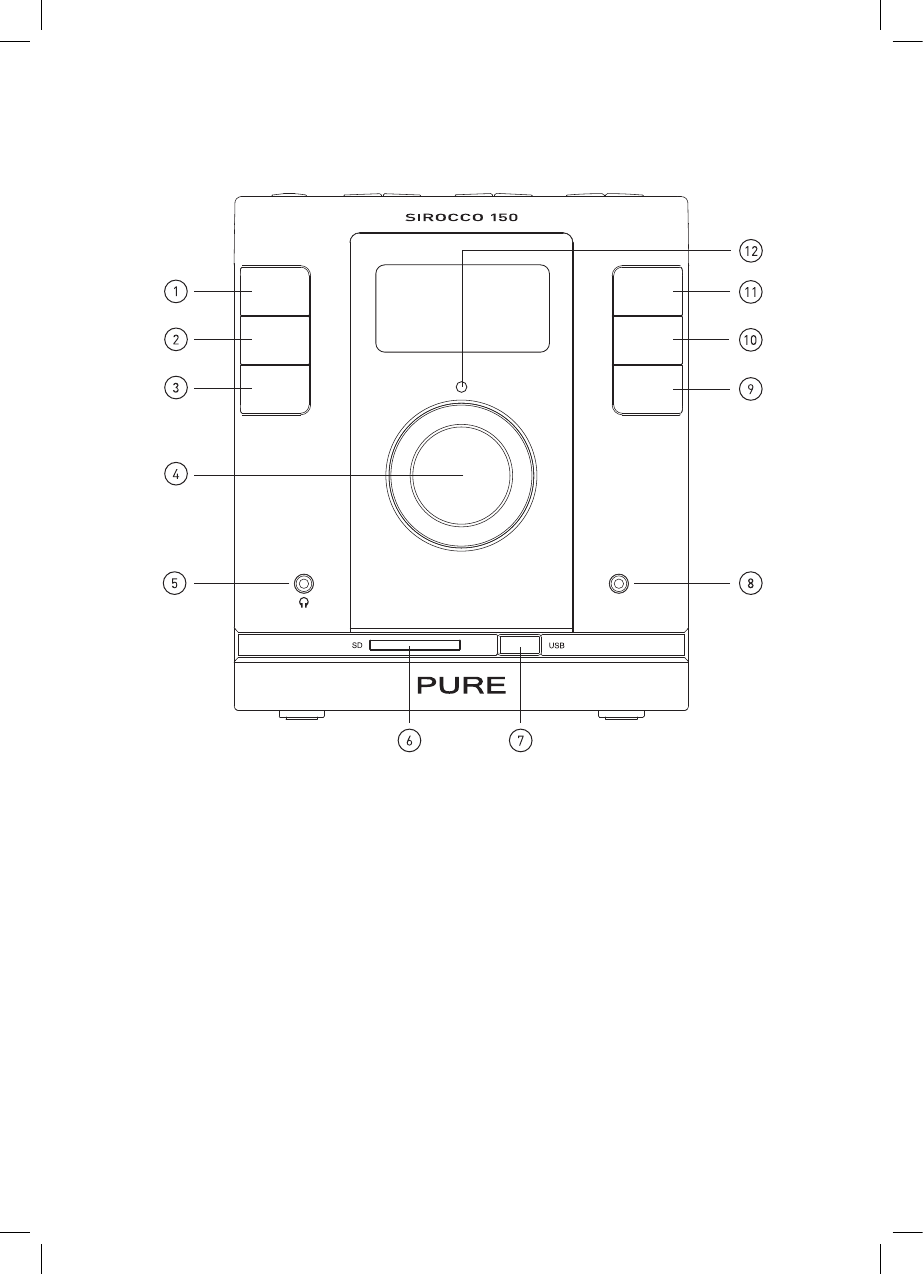
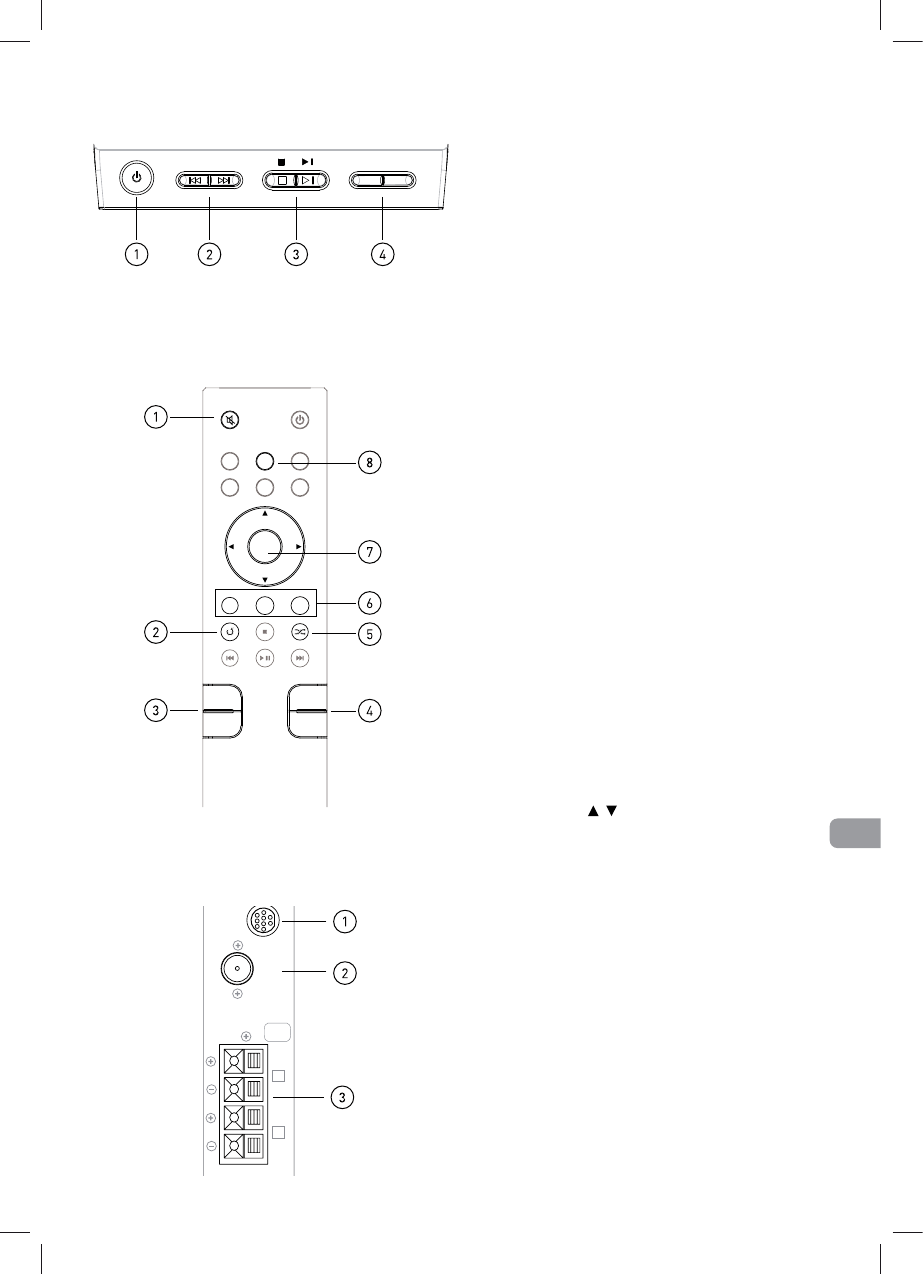
1. Umschalter für Signalquelle (DAB, UKW, iPod, CD, SD-Karte, USB oder AUX-Eingang).
2. Drücken Sie diese Taste, um zu bestimmen, welche Informationen auf dem Display angezeigt werden sollen.
3. Drücken Sie diese Taste, um die Sender-Voreinstellungen zu verändern bzw. voreingestellte Sender
aufzurufen oder um eine Wiedergabeliste für CDs, SD-Karten oder USB-Speichermedien einzurichten.
4. Navigationsrad - Zur Lautstärkeregelung drehen. Drücken Sie das Rad, um eine Senderliste bei DAB-,
eine Frequenzliste bei UKW- oder eine Titelliste bei CD-, SD-Karten- und USB-Signalquellen angezeigt
zu bekommen. Drehen Sie das Rad zur Navigation durch die Menüs und drücken Sie es zur Bestätigung
Ihrer Auswahl.
5. 3,5-mm-Stereoausgang für Kopfhörer.
6. SD-Karten-Einschub für SD-Wiedergabe.
7. USB-Anschluss für USB-Wiedergabe.
8. 3,5-mm-Stereoeingang für Zusatzgeräte wie etwa CD-Player.
9. Drücken Sie diese Taste, um den Timer ein- oder auszuschalten. Halten Sie die Taste gedrückt, um die
Timer-Einstellungen aufzurufen.
10. Drücken Sie diese Taste, um die aktuellen Sleep-Timer-Einstellungen anzuzeigen. Drücken Sie sie
mehrmals, um die verschiedenen Optionen aufzurufen (Aus, 90/60/45/30/15 Minuten).
11. Drücken Sie diese Taste, um die Einstellungen und Optionen aufzurufen. Halten sie die Taste 3 Sekunden
lang gedrückt, um das Gerät auf die Standard-Einstellungen zurückzusetzen.
12. Stand-by-Anzeige.
Beschreibung der Bedienelemente
Vorderseite
4
SEARCH
STOPPLAY/PAUSE
+
-
+
-
OPEN/CLOSE
FOLDER
STANDBY/ON
OPEN/CLOSE
Search
+
-
+
-
Folder
Standby
DAB
ANT.
SPEAKERS
IMPEDANCE4Ω
L
R
iDock
SPEAKERS
IMPEDANCE4Ω
L
R
FM/DAB
Band
III Ant.
iDock
SPEAKERS
IMPEDANCE4Ω
L
R
?DA4B8A>22> $
2. Legen sie die Batterien ein.
3. Schließen sie die Lautsprecher an.
Erste Schritte
1. Entfernen Sie das Klebeband vom CD-Einschub. Drücken Sie auf die Einkerbung
vorne rechts an der CD-Schublade, um diese zu öffnen, und entfernen Sie die
Transportsicherungskarte aus dem CD-Fach.
4. Schließen Sie die Antenne an, ziehen Sie sie aus und schließen Sie
das Gerät an das Stromnetz an.
5. Drücken Sie gegebenenfalls die Stand-by-Taste, um das Gerät einzuschalten. Über den
automatischen Sendersuchlauf werden die verfügbaren DAB-Sender gesucht und einer
davon ausgewählt.
6. Drücken Sie das Navigationsrad und drehen Sie es, um alle verfügbaren Sender
angezeigt zu bekommen. Drücken Sie es erneut, um den Sender zu wechseln.
7. Drücken Sie mehrmals die Taste Source (Signalquelle), um zwischen den verschiedenen
Signalquellen UKW, iPod, CD, SD-Karte, USB, AUX-Eingang und DAB umzuschalten.
5
DE
Verwendung des DAB- und UKW-Radios
Senderwechsel (grundlegende Funktionen des Navigationsrads)
DAB
UKW
ODER
Diese Tasten drücken, um sich in Schritten von -/+ 0,05 MHz fortzubewegen.
Festhalten und loslassen, um nach dem nächsten Sender zu suchen.
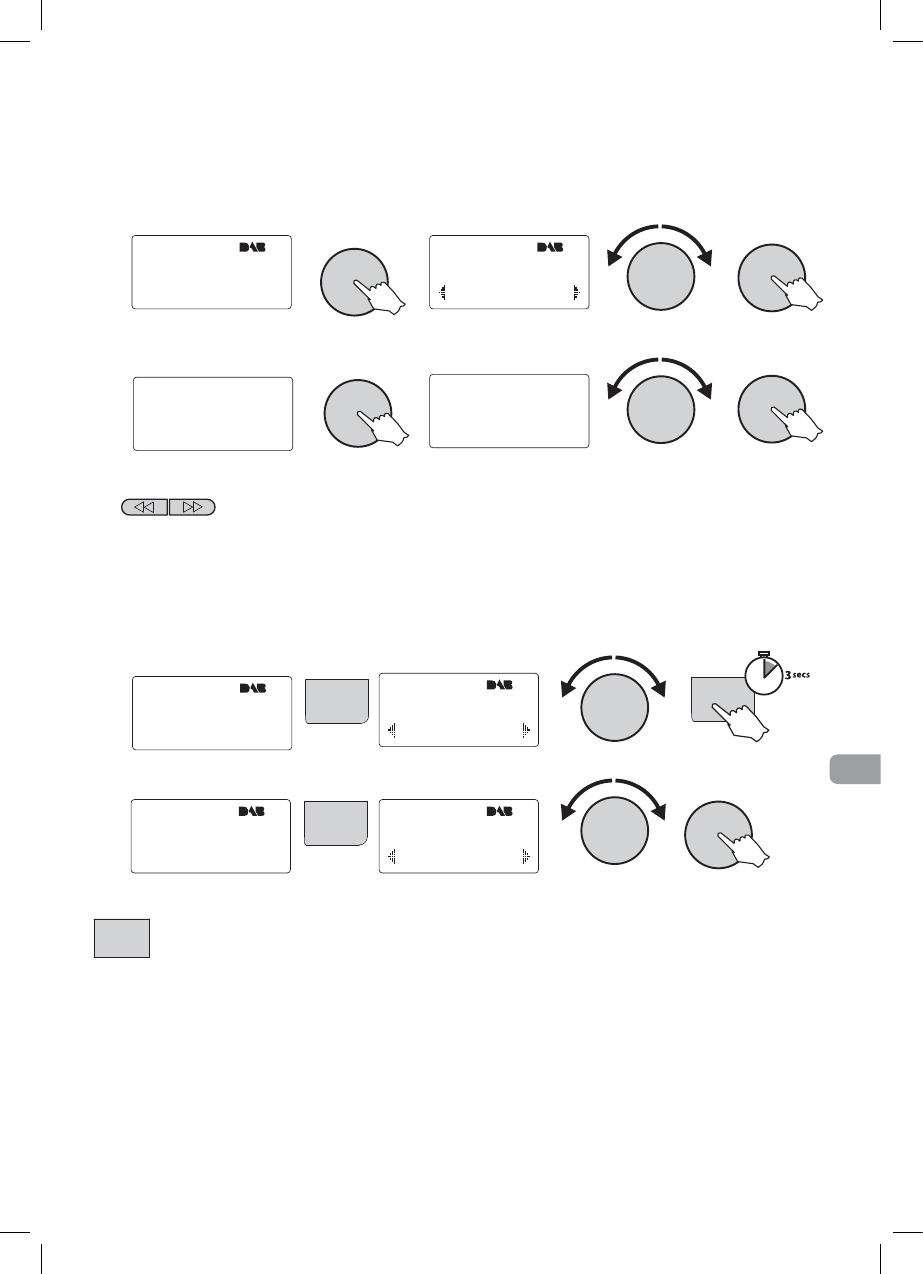
Speichern und Abrufen von Sender-Speicherplätzen
Speichern Sie bis zu 30 leicht abrufbare Radiosender (UKW- oder DAB-Sender) auf
Speicherplätzen.
Sender speichern
Aufrufen eines gespeicherten Senders
Angezeigte Display-Informationen ändern
Drücken Sie mehrmals die Info-Taste, bis die gewünschten Informationen auf dem Display
angezeigt werden.
DAB
1. Von DAB-Sendern übertragener Lauftext.
2. DAB-Multiplex des aktuellen Senders und Sendefrequenz.
3. DAB-Signalqualität: 85 bis 100 gut, 70 bis 84 passabel, 0 bis 69 schlecht.
4. Uhrzeit und Datum
UKW-RDS
1. Lauftext.
2. PTY-Angaben
3. Uhrzeit und Datum
112APSX^
^f_[PhX]V)HTPW
112APSX^
APSX^
Info
STEREO
BT[TRcUaT`dT]Rh
(%%5<
STEREO
<4A2DAH
ccTaP]S5aTbWT
Search
+
-
?[P]TcA^RZ
ÀaT[XbcT]X]Vc^
Presets
APSX^
?aTbTc
Presets
112APSX^
^f_[PhX]V)HTPW
?aTbTc
4\_ch_aTbTc
Presets
6
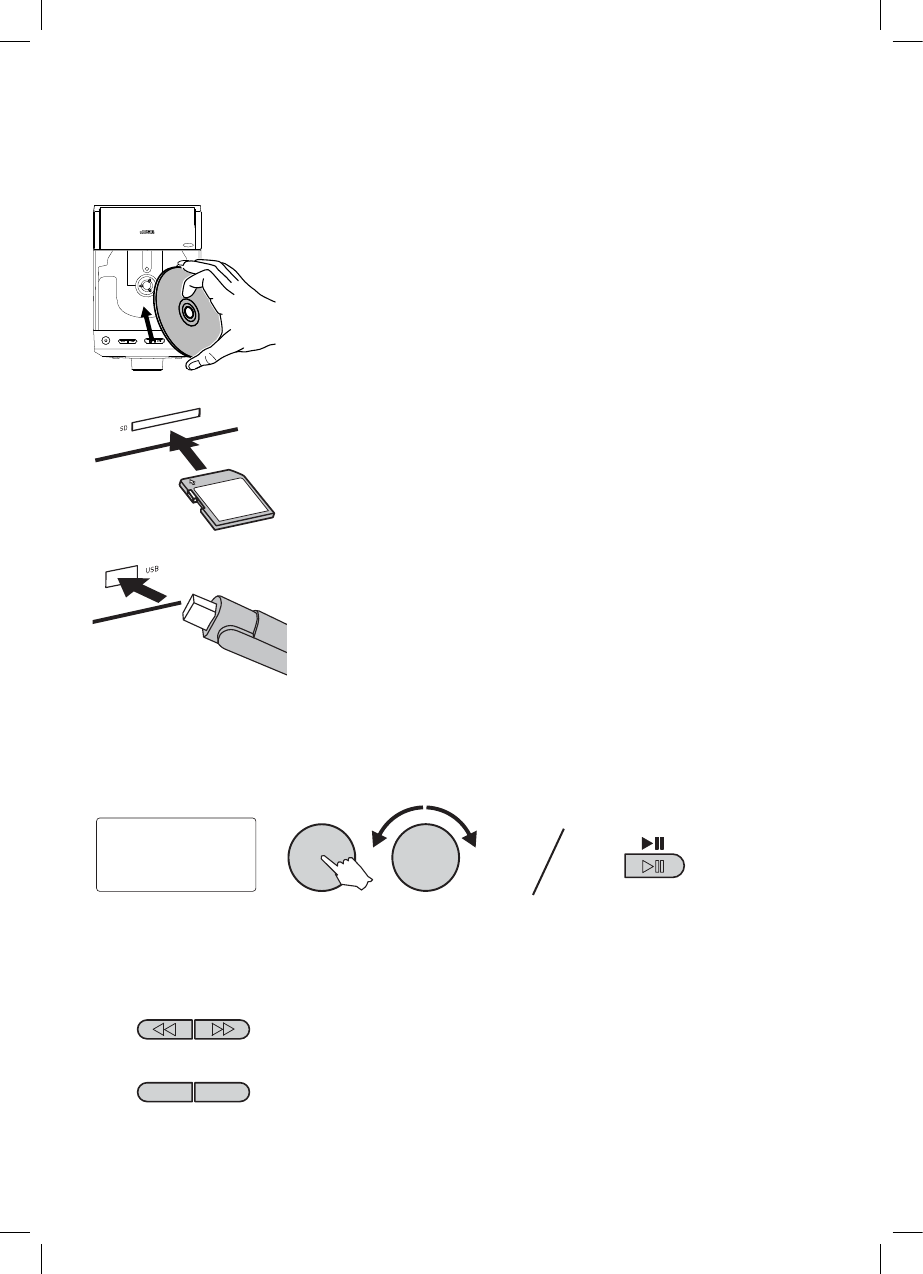
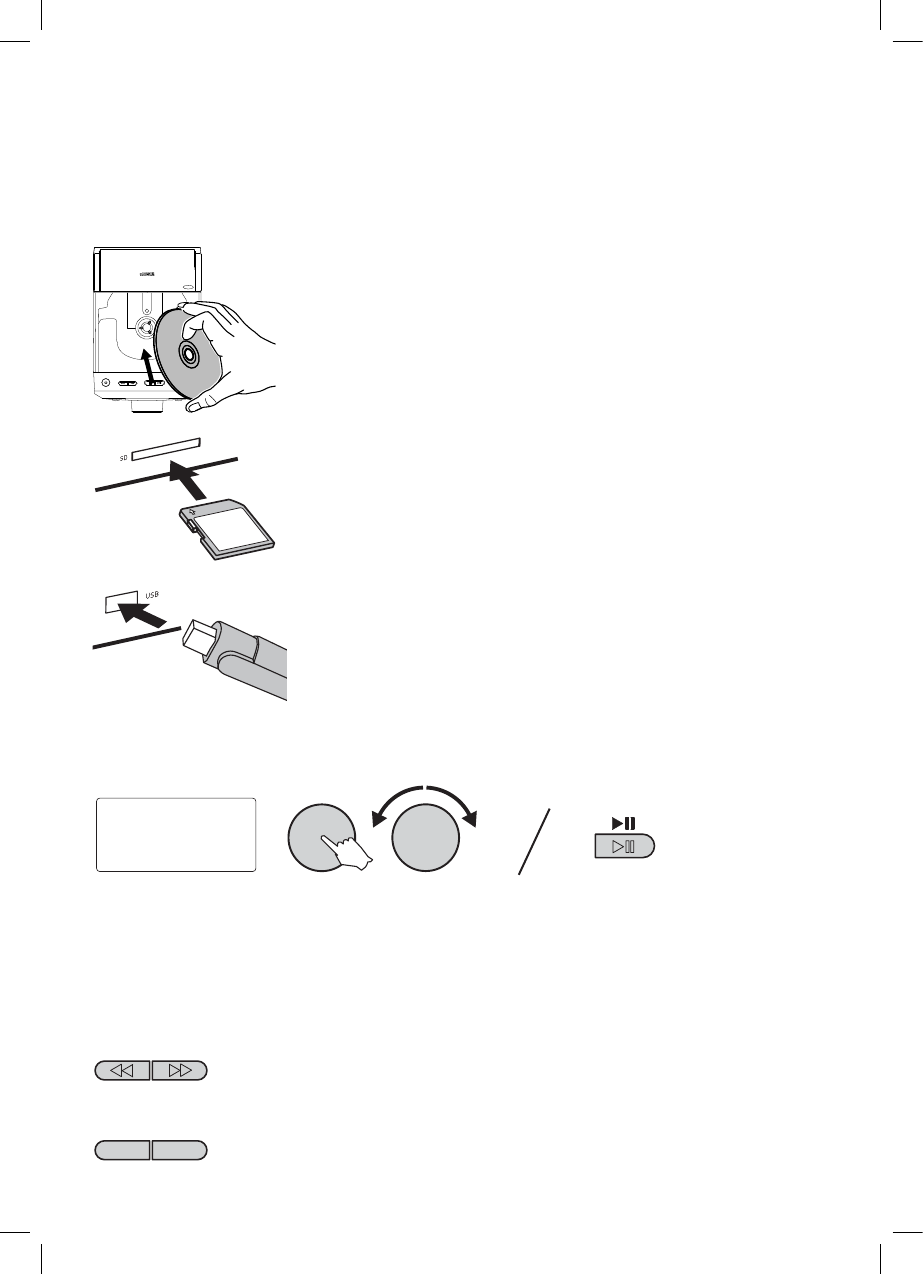
Auswahl und Wiedergabe von Titeln
Verwendung von CDs, SD-Karten und USB-
Speichersticks
Mit dem Sirocco 150 können Sie nicht nur gewöhnliche Audio-CDs sowie CD-R- und CD-RW-Medien
wiedergeben, sondern auch MP3- und WMA-Dateien von CDs, SD-Karten und USB-Speichersticks.
Um eine CD wiederzugeben, drücken Sie auf die Einkerbung unten rechts,
um die CD-Schublade zu öffnen, und drücken Sie die CD vorsichtig auf den
Zentrierzapfen.
Um eine SD-Speicherkarte einzulegen, schieben Sie die Karte mit dem
Etikett nach oben und den Goldkontakten zuerst in den Einschub an der
Frontseite. Ziehen Sie die Karte heraus, um sie zu entnehmen.
Es wird davon abgeraten, SD-Speicherkarten bei laufendem Betrieb zu
entnehmen.
Um ein USB-Speichermedium an Ihr Sirocco 150 anzuschließen, stecken
Sie den USB-Stecker in die USB-Buchse auf der Vorderseite Ihres
Geräts. Ziehen Sie den USB-Stecker heraus, um das Speichermedium
abzunehmen.
Es wird davon abgeraten, USB-Speichermedien bei laufendem Betrieb zu
entnehmen.
Titel überspringen Drücken Sie die Taste, um schnell vor- oder
zurückzuspulen.
Search
+
-
Folder
+
-
OPEN/CLOSE
STANDBY/ON
SEARCH
STOPPLAY/PAUSE
+
-
+
-
FOLDER
CaPRZJ L
B4;42C^a?;0H
Drücken Sie auf das
Navigationsrad und drehen Sie
es zur Auswahl des gewünschten
Titels. Drücken Sie es erneut, um
mit der Wiedergabe zu beginnen.
Oder drücken Sie die
Wiedergabe-/Pause-Taste, um
die Wiedergabe mit dem ersten
Titel des Speichermediums zu
beginnen.
Ordner/Album überspringen
10
Wenn der Timer eingestellt ist, wird dies über das ‘TIMER’-Symbol
auf dem Display angezeigt. Drücken Sie die Timer-Taste einmal, um
den Timer ein- oder auszuschalten.
Einstellung von Uhrzeit und Datum
Über ein von den Sendern übertragenes DAB-Signal wird die Uhrzeit Ihres Sirocco 150 automatisch
angepasst. Wenn Sie allerdings einen schlechten Empfang haben oder die Uhrzeit selbst einstellen
möchten, können Sie dies über das Menü tun.
Anmerkung: Sobald ein DAB-Zeitsignal empfangen wird, wird die betreffende Uhrzeit von Ihrem
Sirocco 150 automatisch übernommen.
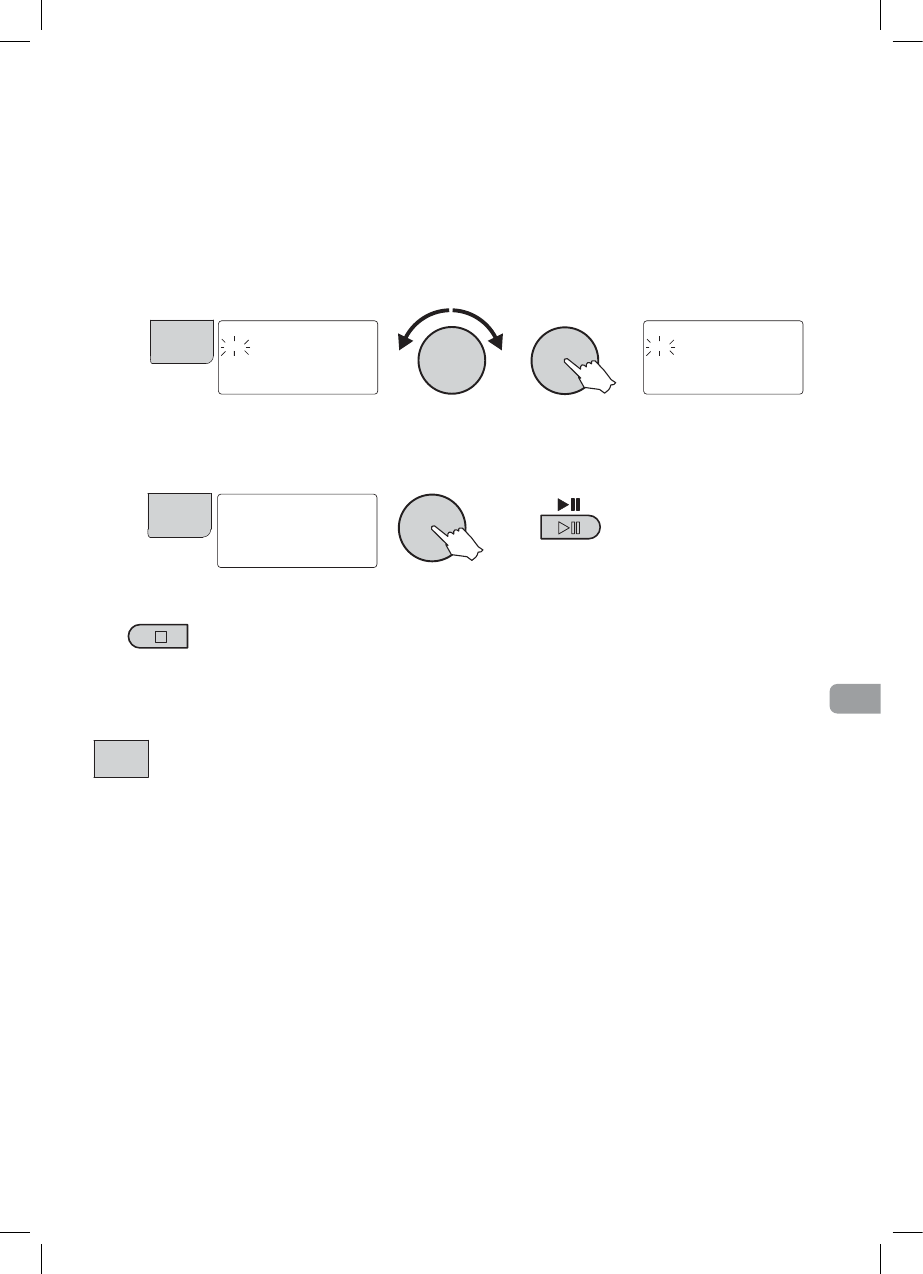
Einstellung der Uhrzeit
1. Drücken Sie die Taste Menü und wählen Sie den Eintrag ‘Clock’ (Uhr) aus.
2. Der Uhrzeiteinstellungs-Bildschirm wird angezeigt. Wählen Sie über das Navigationsrad zwischen einer
12- und 24-Stunden-Anzeige aus.
3. Stellen Sie die Stunden ein.
4. Stellen Sie die Minuten ein.
BTccX\T
!#W^da)
BTccX\T
!#7^da)
BTccX\T
!#7^da $)
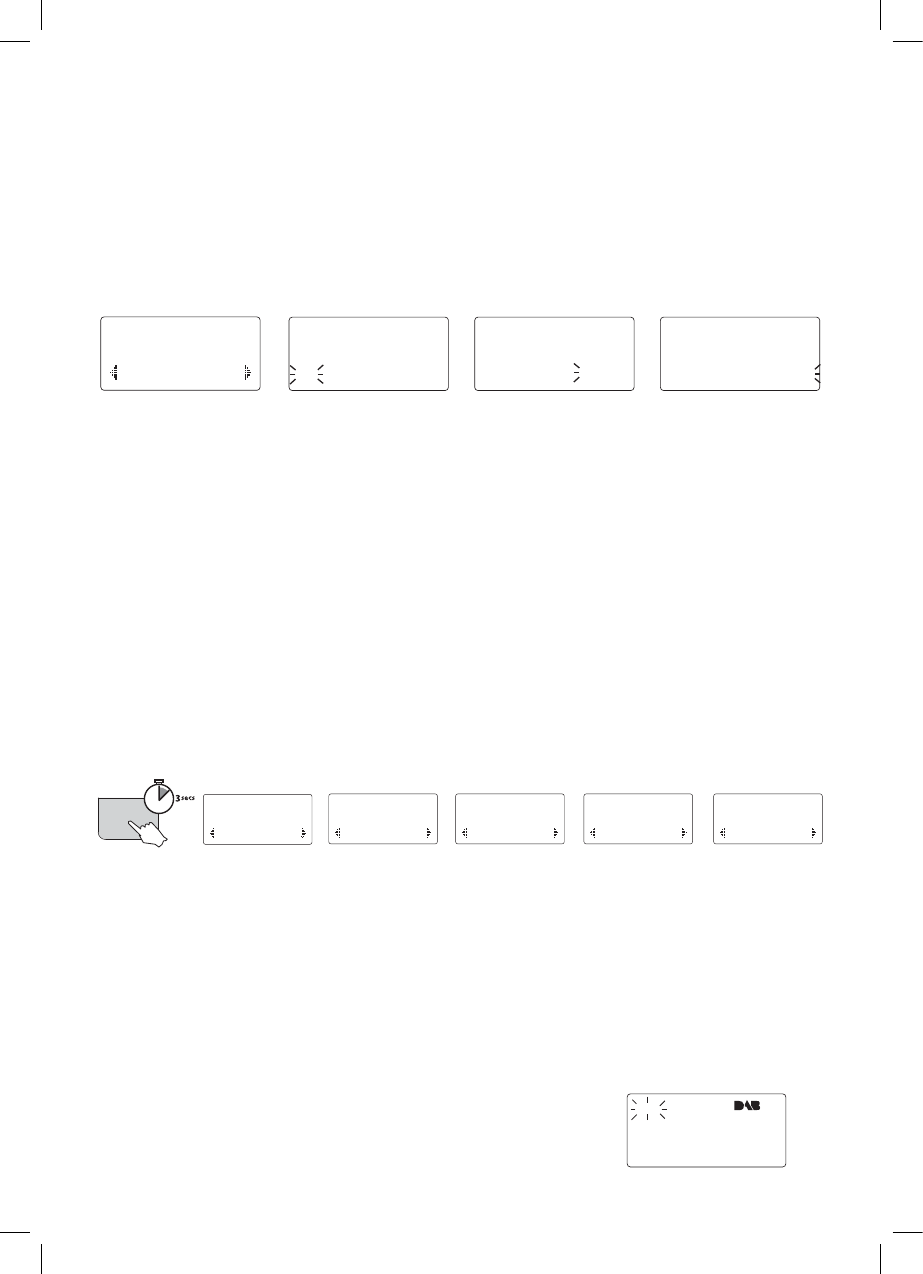
Einstellung des Timers
Mit der Timerfunktion können Sie festlegen, dass Ihr Sirocco 150 zu bestimmten Uhrzeiten
automatisch ein- oder ausgeschaltet wird.
Einstellung des Timers
1. Drücken Sie die Timer-Taste und halten Sie sie gedrückt, bis der Timer-Einstellungs-Bildschirm angezeigt
wird. Sie können den Timer auch über das Hauptmenü aufrufen.
2. Verwenden Sie das Navigationsrad zur Einstellung der Uhrzeiten, zu denen Ihr Sirocco 150 ein- und
ausgeschaltet werden soll.
3. Wählen Sie aus, wie oft der Timer ausgelöst werden soll (nur einmal oder täglich)
4. Wählen Sie die Signalquelle für die Wiedergabe Ihres Sirocco 150 aus - DAB, UKW, CD, iPod, USB, SD-
Karte oder Tonsignal.
5. Stellen Sie schließlich die gewünschte Lautstärke für den Timer ein.
2[^RZ
1.
2.
4.
3.
Nach der Einstellung der Uhrzeit werden Sie aufgefordert, das Datum einzustellen. Verwenden
sie hierzu das Navigationsrad in der gleichen Weise wie bei der Einstellung der Uhrzeit.
>UU
BTccX\Ta
Timer
)
BTccX\T^]
3PX[h
BTcSPhb
301
BTc\^ST
%
BTce^[d\T
112APSX^
^f_[PhX]V)HTPW
TIMER
2.
3.
4.5.
11
DE
Sie können mühelos festlegen, dass Ihr Sirocco 150 nach einer bestimmten Zeitspanne
automatisch abgeschaltet wird. Drücken Sie hierzu mehrmals die Sleep-Taste um die Optionen
für die automatische Abschaltung aufzurufen: 90, 60, 45, 30 oder 15 Minuten bis zur
automatischen Abschaltung. Drücken Sie die Sleep-Taste einmal, um die bis zur Abschaltung
verbleibende Zeit angezeigt zu bekommen. Zur Abschaltung des Timers halten Sie die Taste
gedrückt.
Optionen
Drücken Sie die Menü-Taste, um die folgenden Optionen aufzurufen. Über diese Taste lassen
sich auch Einstellungen für die Uhr, den Timer und die Energiesparfunktionen aufrufen.
Spezielle DAB-Optionen
Autotune (Automatischer Sendersuchlauf)
Durchsucht alle DAB-Frequenzen nach Sendern und fügt gegebenenfalls neue Sender zur
Senderliste hinzu. Um die Autotune-Funktion anzuhalten, drücken Sie die Auswahltaste SELECT.
DRC value (DRC-Wert)
DRC (Dynamic Range Control) macht bei DAB-Übertragungen leise Töne bei niedriger
Lautstärke oder in lauter Umgebung besser hörbar. Da nicht alle Sender DRC übertragen,
sollten Sie sich über die Sendedaten Ihrer bevorzugten Sender informieren.
DRC off (aus) Eventuell übertragene DRC-Werte werden ignoriert.
DRC half Der DRC-Wert wird um die Hälfte reduziert.
DRC full (Standard) Der DRC-Wert ist identisch mit dem des übermittelten Signals.
Manual tune (manueller Suchlauf)
Zeigt die DAB-Signalstärke an und kann Sie damit beim Auffinden des besten Standorts
für Ihr Radio unterstützen.
Station order (Senderreihenfolge)
Alphanumeric Zeigt alle Sender in alphabetischer/numerischer Reihenfolge an.
Active station Zeigt aktive Sender auf der Liste oben an.
Multiplex Listet die Sender in Gruppen nach Ihrem Multiplex auf.
Spezielle UKW-Optionen
FM stereo mode (UKW-Stereomodus)
Umschaltung zwischen Stereo- und Monowiedergabe. Bei einem schwachen UKW-
Signalempfang lässt sich die Klangqualität eventuell durch eine Monowiedergabe verbessern.
Audiooptionen
EQ settings (Equalizer-Einstellungen - nur Fernbedienung)
Wählen Sie zwischen fünf Standard-Equalizer-Einstellungen aus (FLAT, POP, CLASSIC, ROCK
oder JAZZ).
Sleep
SLEEP
B[TT_^]
AT\PX] $\X]b
Menu
Verwendung des Sleep-Timers
14
Warenzeichen
Sirocco 150, PURE, das PURE-Logo, Imagination Technologies und das Imagination-Technologies-Logo sind Warenzeichen oder eingetragene Warenzeichen von
Imagination Technologies Limited. “Made for iPod” bedeutet, dass elektronisches Zubehör eigens für den Anschluss an einen iPod entwickelt wurde und der
Entwickler die Erfüllung der Leistungsstandards von Apple bestätigt. “Works with iPhone” bedeutet, dass elektronisches Zubehör eigens für den Anschluss an
ein iPhone entwickelt wurde und der Entwickler die Erfüllung der Leistungsstandards von Apple bestätigt. Apple trägt keine Verantwortung für das Funktionieren
dieses Geräts oder seine Erfüllung der gesetzlichen Vorschriften und Sicherheitsnormen. iPod ist ein Warenzeichen von Apple Computer, Inc., das in den USA
und anderen Staaten eingetragen wurde. iPhone ist ein Warenzeichen von Apple Inc. Alle anderen Produktbezeichnungen sind Warenzeichen der betreffenden
Unternehmen. Version: 1. Juli 2009.
Garantieerklärung
Imagination Technologies Ltd. garantiert dem Endverbraucher, dass dieses Gerät frei von Material- und Herstellungsfehlern im Rahmen des normalen
Gebrauchs ist. Diese Garantie gilt für einen Zeitraum von zwei Jahren ab Kaufdatum. Die Garantie umfasst Störungen aufgrund von Herstellungs- oder
Ausführungsfehlern. Sie gilt jedoch nicht für Unfallschäden jeglicher Art und Schäden, die auf Verschleiß, Fahrlässigkeit oder von uns nicht autorisierten
Anpassungen, Änderungen oder Reparaturen zurückzuführen sind. Bitte registrieren Sie Ihr Produkt unter www.pure.com/register. Sollten Probleme mit Ihrem
Gerät auftauchen, wenden Sie sich bitte an Ihren Händler oder an den PURE-Support unter der Adresse, die auf der Rückseite dieses Handbuchs aufgeführt
wird.
Haftungsausschluss
Imagination Technologies Limited übernimmt keine Verantwortung oder Garantie bezüglich des Inhalts dieses Dokuments und weist insbesondere alle
konkludenten Zusagen der Marktgängigkeit und der Eignung für einen bestimmten Zweck zurück. Weiterhin behält sich Imagination Technologies Limited das
Recht vor, diese Veröffentlichung zu überarbeiten und von Zeit zu Zeit Änderungen vorzunehmen, ohne dass Imagination Technologies Limited dazu verpflichtet
ist, Personen oder Organisationen über solche Überarbeitungen oder Änderungen zu benachrichtigen.
Copyright
Copyright 2009, Imagination Technologies Limited. Alle Rechte vorbehalten. Ohne ausdrückliche schriftliche Zustimmung durch Imagination Technologies
Limited ist jede Vervielfältigung dieser Publikation auch auszugsweise sowie ihre Verbreitung, Übermittlung, Abschrift, Speicherung in einem
Datenverarbeitungssystem oder Übersetzung in eine natürliche Sprache oder Programmiersprache in jeglicher Form, sei sie elektronisch, mechanisch,
magnetisch, manuell oder anderweitig, und jegliche Offenlegung an Dritte verboten.
Entsorgung von gebrauchten elektrischen und elektronischen Geräten
Das Symbol auf dem Produkt oder seiner Verpackung weist darauf hin, dass dieses Produkt nicht als normaler Haushaltsabfall zu behandeln ist,
sondern an einer Annahmestelle für das Recycling von elektrischen und elektronischen Geräten abgegeben werden muss. Durch Ihren Beitrag zum
korrekten Entsorgen dieses Produkts schützen Sie die Umwelt und die Gesundheit Ihrer Mitmenschen. Umwelt und Gesundheit werden durch falsches
Entsorgen gefährdet. Materialrecycling hilft den Verbrauch von Rohstoffen zu verringern. Weitere Informationen über das Recycling dieses Produkts
erhalten Sie von Ihrer Gemeinde, den kommunalen Entsorgungsbetrieben oder dem Geschäft, in dem Sie das Produkt gekauft haben.
1
FR
Table des matières
Détail des commandes et de la connectique ............................2
Préparation à l’emploi .............................................................4
Utilisation en mode radio DAB et FM .......................................5
Changement de station (fonction de base de la molette de navigation) .................................5
Programmation et sélection des présélec tions .....................................................5
Sélection des informations affichées à l'écran ......................................................5
Lecture à partir d'un CD, d'une carte SD ou d'une clé USB ......6
Lecture et sélection de pistes ................................................................................6
Libble takes abuse of its services very seriously. We're committed to dealing with such abuse according to the laws in your country of residence. When you submit a report, we'll investigate it and take the appropriate action. We'll get back to you only if we require additional details or have more information to share.
Product:
Forumrules
To achieve meaningful questions, we apply the following rules:
First, read the manual;
Check if your question has been asked previously;
Try to ask your question as clearly as possible;
Did you already try to solve the problem? Please mention this;
Is your problem solved by a visitor then let him/her know in this forum;
To give a response to a question or answer, do not use this form but click on the button 'reply to this question';
Your question will be posted here and emailed to our subscribers. Therefore, avoid filling in personal details.
Register
Register getting emails for Pure sirocco 150 at:
new questions and answers
new manuals
You will receive an email to register for one or both of the options.
Get your user manual by e-mail
Enter your email address to receive the manual of Pure sirocco 150 in the language / languages: English, German, Danish, French, Italian, Spanish as an attachment in your email.
The manual is 1,82 mb in size.
You will receive the manual in your email within minutes. If you have not received an email, then probably have entered the wrong email address or your mailbox is too full. In addition, it may be that your ISP may have a maximum size for emails to receive.
The manual is sent by email. Check your email
If you have not received an email with the manual within fifteen minutes, it may be that you have a entered a wrong email address or that your ISP has set a maximum size to receive email that is smaller than the size of the manual.
The email address you have provided is not correct.
Please check the email address and correct it.
Your question is posted on this page
Would you like to receive an email when new answers and questions are posted? Please enter your email address.