13
RENGÖRING
TA FÖRST UT KONTAKTEN
Använd aldrig frätande eller slipande rengöringsmedel. Motorbasen kan torkas ren med en fuktig trasa.
SÄNK ALDRIG NED MOTORBASEN I VATTEN ELLER NÅGON ANNAN VÄTSKA.
PRINCESS-TIPS
- Placera apparaten på en robust, stabil yta.
- Endast för hushållsbruk.
- Sänk aldrig ned apparaten i vatten eller någon annan vätska.
- Se till att apparaten inte står så nära bordets eller arbetsytans kant att den kan puttas ner av någon.
Kontrollera även att kabeln inte ligger någonstans där någon kan snubbla på den.
- Använd inte apparaten om den är skadad eller om kabeln är skadad. Skicka den istället till vår
serviceavdelning. Skadade sladdar hos den här typen av apparater ska bara bytas ut av vår
serviceavdelning med användning av speciella verktyg.
- Ta alltid ur kontakten innan apparaten rengörs eller om något fel uppstår.
- Använd inte utomhus.
- Använd apparaten endast i enlighet med instruktionerna.
- Håll god tillsyn på apparaten om det finns barn i närheten.
PRINCESS CLASSIC VACUUM SEALER ART. 2965
Læs brugervejledningen omhyggeligt igennem og gem den, hvis du skulle få brug for at slå noget op.
PRINCESS CLASSIC VAKUUM PAKKER er yderst praktisk til hurtigt at vakuumpakke alle slags
madvarer til fx opbevaring i dybfryseren.
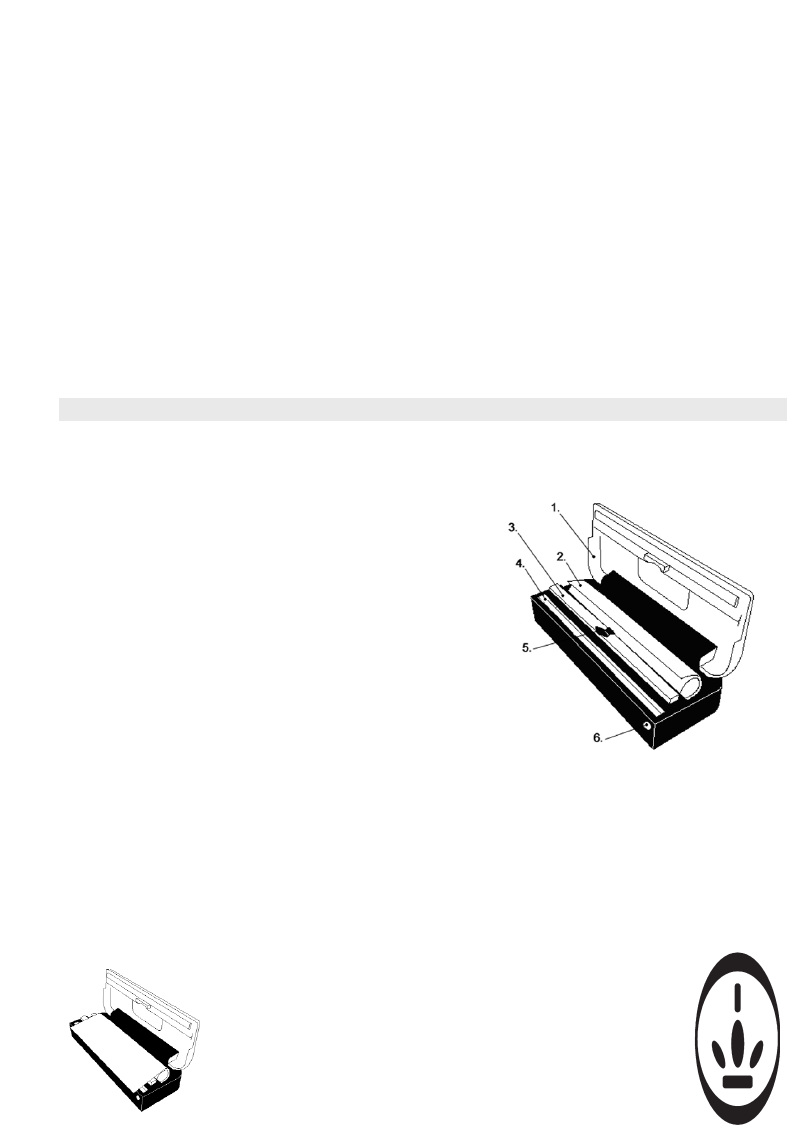
BESKRIVELSE
1. Låg
2. Poserulle
3. Skumliste
4. Svejse-/skæreskinne
5. Vakuummundstykke
6. Kontrollampe TÆND/SLUK
BRUGERTIPS
Følg følgende fremgangsmåde:
1. Vælg den ønskede posestørrelse
2. Svejs posen
3. Luk posen hermetisk
Tip: for at opnå optimal vakuumpakning svejses alle posens sider to gange. Svejs den anden lukning ca. 1
cm ved siden af den første.
SÅDAN PAKKER DU VAKUUMPAKKEREN UD AF EMBALLAGEN
Tag vakuumpakkeren ud af emballagen og fjern beskyttelsesfolien. Løft låget og fjern de to stykker poly-
styren emballagemateriale.
Tag poserullen ud og fjern tapen – men pas på ikke at beskadige selve rullen. Læg poserullen tilbage i
holderen. Rul ledningen ud og stik stikket i stikkontakten.
1 LAV EN POSE
Træk et stykke plast ud, indtil det falder ca. 1cm over svejse-/
skæreskinnen (4).
Luk låget (1) og tryk det godt ned i begge sider, indtil kontrollampen
(6) lyser.
Hold låget (1) nede, indtil lyset går ud (maks.15 sekunder).
Når lyset går ud, løftes låget og fjernes plaststykket fra svejse-/
skæreskinnen.
Det er den første kant!