480919
6
Zoom out
Zoom in
Previous page
1/14
Next page
POWX180 EN
Copyright © 2019 VARO P a g e | 6 www.varo.com
To do this, pull the handle towards yourself and turn the screw clockwise using the
screwdriver.
Insert the securing screw (7) in the saw bench (6) again and tighten it. Ensure that the
wing nut on the securing screw (7) is below the saw bench (6).
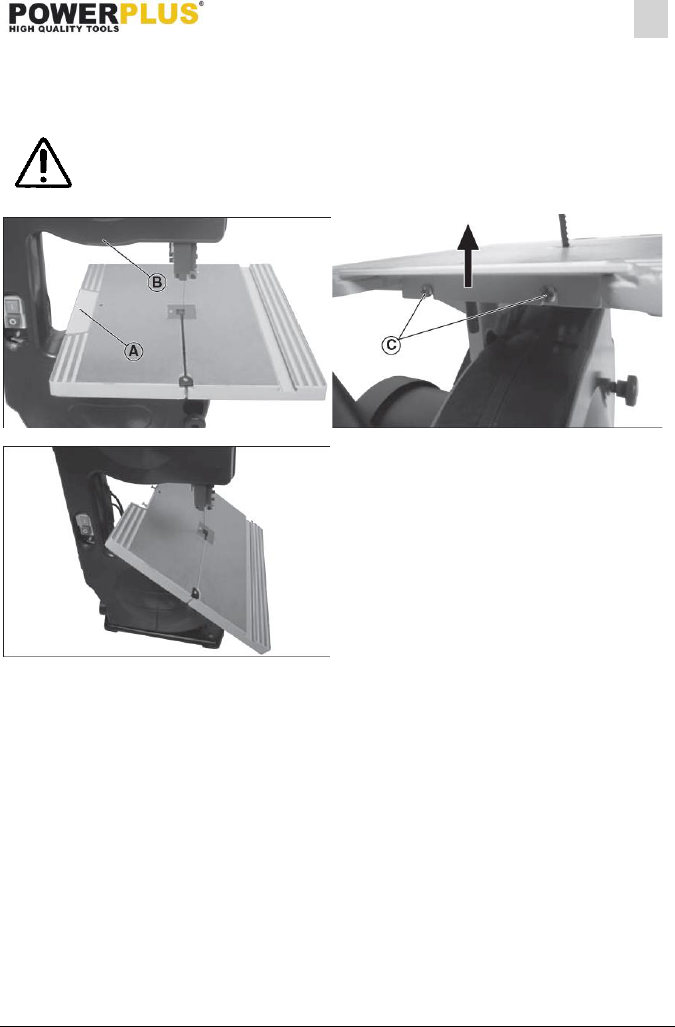
WARNING! You must remove the plate (A) via loosening the two screws (C)
with the screwdriver when tiliting the working table up to 35 degree. If not,
the frame (B) will interfere with the working table (Fig. a-c)
Fig. a Fig. b
Fig. c
6.2 Tension the saw band
Important. If the machine is at a standstill for a lengthy period of time, the tension in the saw
band (4) must be released. It is therefore important that you check the saw band tension
before switching on the machine.
First of all undo the lock nut (11) on the setting screw (12) for the top saw band roller (17)
(Fig. 8).
Turn the clamping screw (13) clockwise to tension the saw band (Fig. 9).
You can find the correct tension for the saw band (14) by pressing both saw band rollers
against the saw band (14) approximately in the centre.
It should only be possible to press the saw band (14) a maximum of 1 2 mm (Fig. 10).
Important. If the tension is too high, the saw band (14) may tear. Danger of injury!
If the tension is too low, the saw band roller (17) may simply turn whilst the saw band (14)
remains at a standstill.
Tighten the lock nut (11) for the top saw band roller (17) again (Fig. 8).
6


Need help? Post your question in this forum.

Forumrules


Report abuse

Libble takes abuse of its services very seriously. We're committed to dealing with such abuse according to the laws in your country of residence. When you submit a report, we'll investigate it and take the appropriate action. We'll get back to you only if we require additional details or have more information to share.

Product:

For example, Anti-Semitic content, racist content, or material that could result in a violent physical act.

For example, a credit card number, a personal identification number, or an unlisted home address. Note that email addresses and full names are not considered private information.

Forumrules

To achieve meaningful questions, we apply the following rules:

Register

Register getting emails for Powerplus POWX180 at:


You will receive an email to register for one or both of the options.


Get your user manual by e-mail

Enter your email address to receive the manual of Powerplus POWX180 in the language / languages: English as an attachment in your email.

The manual is 0,48 mb in size.


You will receive the manual in your email within minutes. If you have not received an email, then probably have entered the wrong email address or your mailbox is too full. In addition, it may be that your ISP may have a maximum size for emails to receive.

Others manual(s) of Powerplus POWX180

Powerplus POWX180 User Manual - German - 14 pages

Powerplus POWX180 User Manual - Dutch - 14 pages

Powerplus POWX180 User Manual - French - 14 pages

Powerplus POWX180 Additional guide - All languages - 8 pages


The manual is sent by email. Check your email

If you have not received an email with the manual within fifteen minutes, it may be that you have a entered a wrong email address or that your ISP has set a maximum size to receive email that is smaller than the size of the manual.

The email address you have provided is not correct.

Please check the email address and correct it.

Your question is posted on this page

Would you like to receive an email when new answers and questions are posted? Please enter your email address.


Info