For more information visit our website at www.polkaudio.com
12
FIGURE 11
FIGURE 11
Adhesive-backed rubber pads: peel and stick in corners of speaker enclosure.
Tampons autoadhésifs en caoutchouc: retirez la pellicule protectrice et appliquez
les tampons aux quatre coins des enceintes.
Almohadillas adhesivas por ambos lados: quíteles el recubrimiento y péguelas
en las esquinas de la caja de altavoz.
Selbstklebenden Gummifüßchen: abziehen und an den Ecken des Lautsprecherge-
häuses befestigen.
Piedini in gomma con striscia adesiva: staccare la striscia e attaccare i piedini
agli angoli della cassa.
Suportes de borracha com adesivo: retire a proteção da superfície com adesivo
e cole nos cantos da base da caixa acústica.
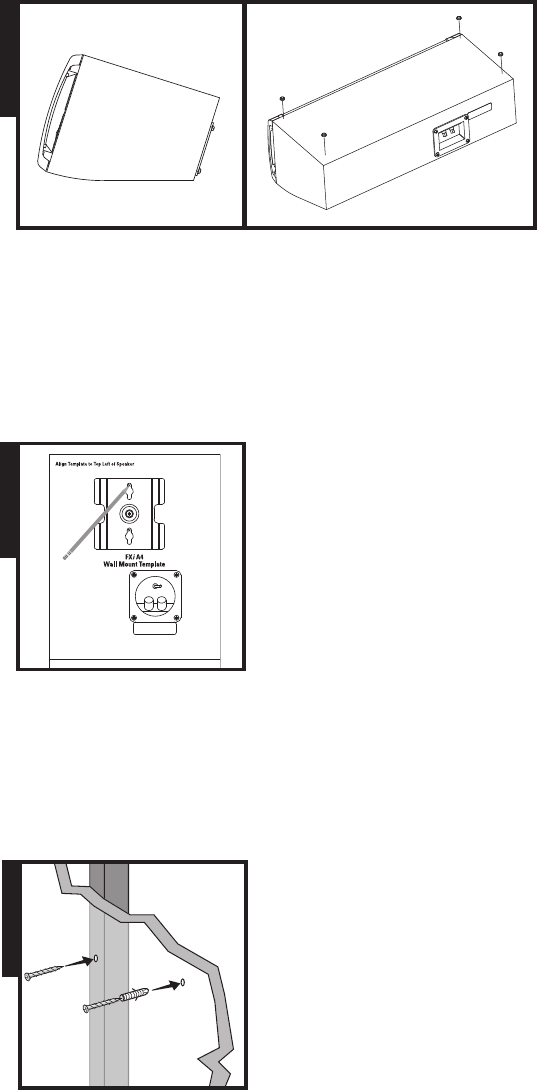
FIGURE 13a & 13b
Use #10 panhead screw for wall stud (13a), use #10 wall anchors with appropriate
weight rating + screw for no wall stud (13b). Leave screws 1/4"-1/8"(4mm) exposed.
Utilisez des vis #10 à tête cylindrique pour fixation sur un montant de mur (13a). Utilisez des ancres de fixation
#10 à portance appropriée avec vis conforme s’il n’y a pas de montant à l’endroit choisi (13b). Laissez les vis
dépasser de 1/4" (6mm) à 1/8" (4mm).
Utilice tornillos n° 10 con cabeza troncocónica en paredes con parales internos (13a). Utilice tornillos y anclas de
pared n° 10 con valor nominal de peso adecuado en paredes sin parales internos (13b). Deje que el tornillo sobresalga
de 1/4 de plg. a 1/8 de plg. (6mm a 4mm).
Verwenden Sie eine Flachkopfschraube (Nr. 10) für Wände mit Ständerprofil (13a), bzw. Dübel und Schrauben
ausreichender Stärke für Wände ohne Ständerprofil (13b). Lassen Sie die Schrauben 4 mm herausstehen.
Se la parete è di legno, usare viti a testa tronco-conica N. 10 (13a), altrimenti usare viti e tasselli N. 10 (13b)
adatti al peso da sostenere. Lasciare le viti da 1/4" - 1/8" (4 mm) esposte.
Use um parafuso de cabeça cilíndrica no 10 para viga de parede (13a); use buchas de parede no 10 com classificação
de peso apropriada + parafuso para locais sem viga de parede (13b). Deixe 4 mm dos parafusos expostos.
[a]
[b]
FIGURE 13
FIGURE 12
Use template to mark mounting location.
Utilisez le gabarit pour marquer le lieu de fixation.
Marque la ubicación de montaje con la plantilla.
Verwenden Sie die Schablone zur Markierung
der Befestigungsstelle.
Usare la dima per contrassegnare il punto di fissaggio.
Use o modelo para marcar a localização da instalação.
FIGURE 12