IT ACCESSORI
ACCESSORI INCLUSI
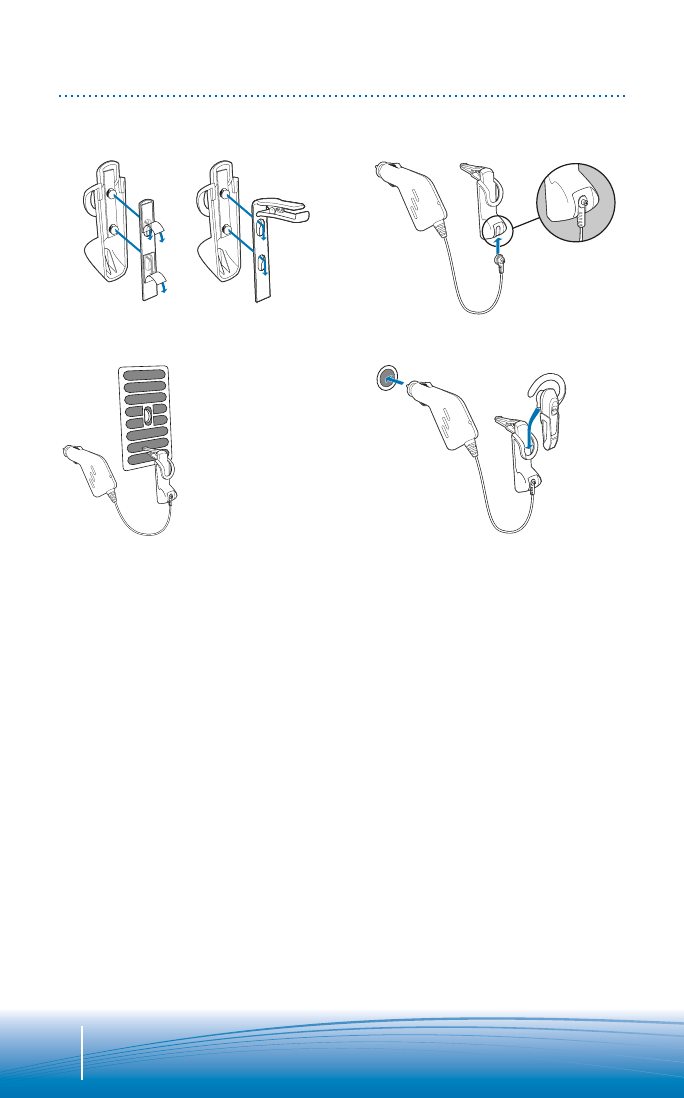
Supporto di ricarica per automobile e adattatore di
ricarica per automobile — solo per Explorer 350
1. Scegliere l’opzione clip per bocchetta di
ventilazione o staffa di montaggio su cruscotto.
Collegare l’apparecchio al retro del supporto di
ricarica per automobile.
NOTA: selezionare l’opzione di montaggio in grado
di assicurare la maggiore libertà di movimento per
il controllo dell’automobile.
2. Inserire la spina nel foro posto sulla parte inferiore
del supporto di ricarica, assicurandosi di farla
scorrere verso la parte superiore del foro.
3. Collegare il supporto di ricarica alla staffa di
montaggio su cruscotto o al clip per la bocchetta di
ventilazione.
IMPORTANTE: agganciarlo all’apertura di
ventilazione situata più in basso. Assicurarsi che
l’auricolare non sia esposto al flusso di aria della
bocchetta di ventilazione. Se non è possibile
impedire l’esposizione dell’auricolare al flusso di
aria, utilizzare la staffa di montaggio su cruscotto.
4. Posizionare il cuscinetto come illustrato nella
parte superiore del supporto. Premere con cautela
la parte inferiore dell’auricolare in modo da
inserire l’adattatore di ricarica nell’apposita presa
jack. Inserire, quindi, l’adattatore di ricarica per
automobile nell’apposita presa di alimentazione.
NL ACCESSOIRES
MEEGELEVERDE ACCESSOIRES
Oplader/houder en oplaadadapter voor in de auto —
alleen voor Explorer 350
1. Neem de klem voor het ventilatierooster, of de
dashboardbevestiging. Bevestig deze aan de
achterkant van de oplader/houder in de auto.
OPMERKING Kies de bevestigingsoptie waarmee
de oplader/houder niet in de weg zit.
2. Plaats de laadstekker in de sleuf aan de onderkant
van de oplader/houder. Zorg ervoor dat u deze
stekker naar de bovenkant van de sleuf schuift.
3. Bevestig de oplader/houder aan de
dashboardvestiging of aan het ventilatierooster.
BELANGRIJK Klem deze aan de onderste spleet
van het ventilatierooster vast. Controleer of de
headset zich niet direct in de luchtstroomopening
bevindt. Als de headset niet buiten de luchtstroom
kan worden geplaatst, gebruikt u in plaats daarvan
de dashboardbevestiging.
4. Plaats het oordopje zoals aangegeven in de
bovenkant van de houder. Druk voorzichtig op de
onderkant van de headset zodat u de
oplaadadapter in de aansluiting voor de oplader
kunt steken. Steek dan de oplaadadapter in het
voertuig in de voeding van het voertuig.
ACCESSORIES
1.
3.
2.
4.
INCLUDED ACCESSORIES
34