!Prima di fare o modificare collegamenti, non mancare di spegnere l’apparecchio e di scollegare il cavo di alimentazione.
!Consultare le istruzioni per l’uso del componente da collegare.
!Collegare il cavo di alimentazione dopo che tutti i collegamenti fra dispositivi sono stati fatti.
!Se si usa un cavo LAN per i collegamenti, non mancare di fare uso del cavo LAN accluso al prodotto o un cavo STP (shielded twisted pair).
!Non scollegare il cavo LAN quando file musicali e/o informazioni vengono condivisi usando PRO DJ LINK.
Stile di base
La riproduzione con questa unità viene fatta principalmente con brani preparati con rekordbox installato su di un computer.
!Per le modalità d’uso di rekordbox, vederne le istruzioni per l’uso di rekordbox (Mac/Windows). Le istruzioni per l’uso di rekordbox (Mac/Windows)
sono accessibili dal menu [Aiuto] di rekordbox (Mac/Windows) stesso.
!Inoltre, per i lettori DJ e mixer DJ, è possibile collegare fino a quattro lettori compatibili con PRO DJ LINK usando cavi LAN (CAT5e) e connessioni
PRO DJ LINK.
!Con certe combinazioni di modelli, potrebbe anche essere necessario uno switching hub (da acquistarsi separatamente). Usare uno switching hub
da 100 Mbps o più. Alcuni switching hub potrebbero non funzionare correttamente.
!Per collegarsi ad un mixer dotato di una sola porta LAN è necessario uno switching hub (da acquistarsi separatamente). Con mixer dotati di porte
LAN sufficienti per tutti i lettori DJ e computer del sistema, collegarli direttamente alle porte LAN del retro del mixer, senza usare hub.
!Utilizzare un router wireless (disponibile in commercio) e punto di accesso (disponibile in commercio) conforme alle norme IEEE802.11n o
IEEE802.11g. La connessione PRO DJ LINK potrebbe non funzionare correttamente in certe condizioni del segnale o a causa del router o access
point.
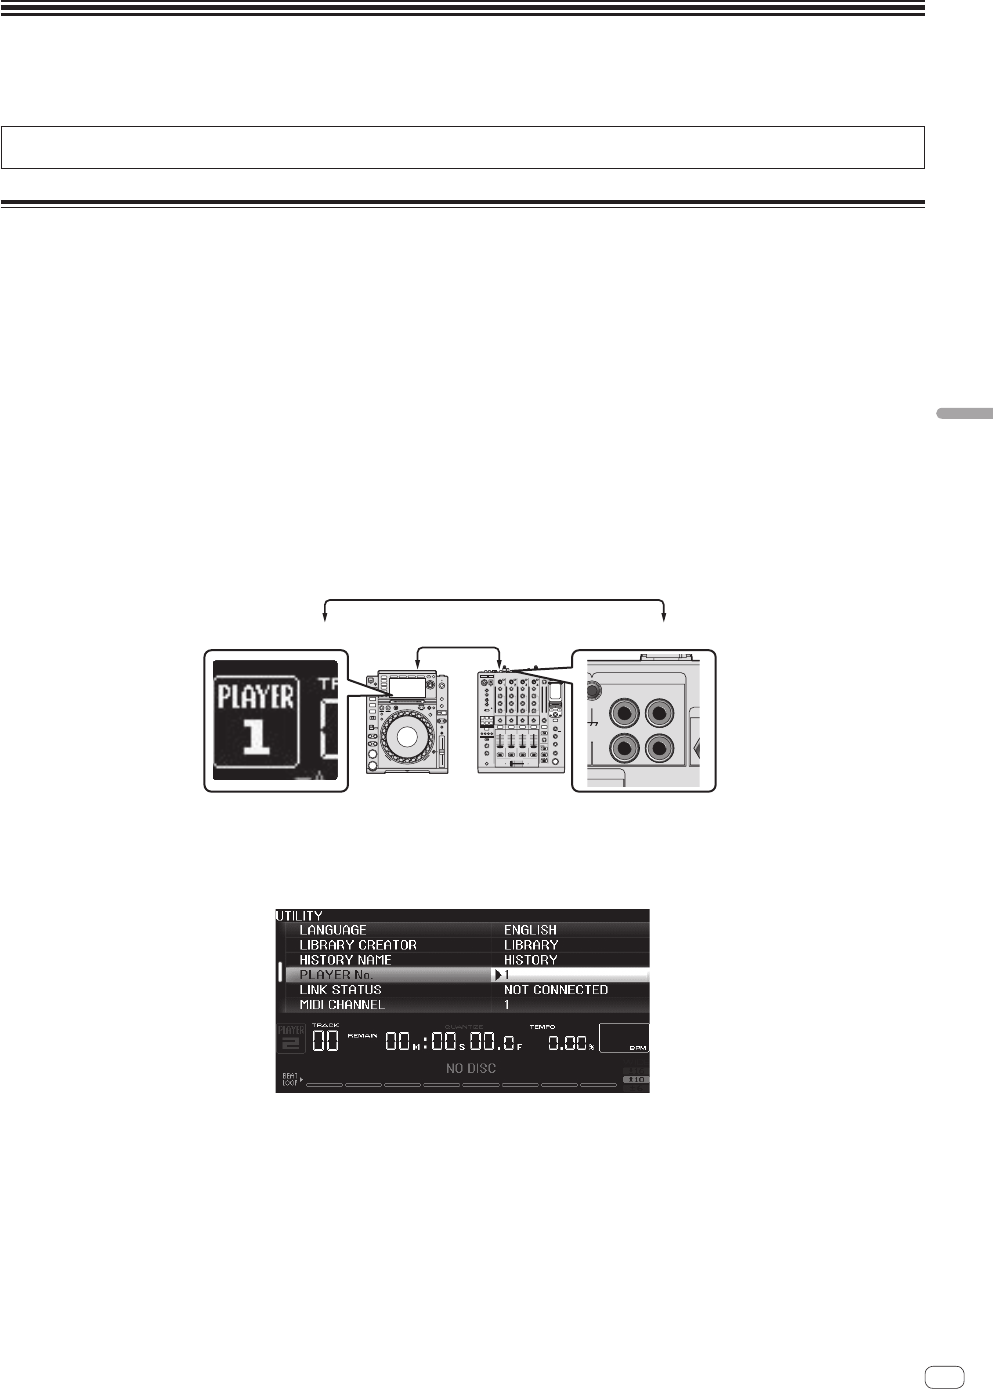
Collegamento con un mixer dotato di una sola porta LAN
Se ci si collega ad un mixer che possiede una sola porta LAN usando uno switching hub, per sfruttare al massimo le funzioni di gestione dei file musi-
cali di rekordbox, impostare il numero del canale del mixer a cui è collegato un cavo o cavo coassiale digitale ed il numero del lettore visualizzato in
basso a destra sul display dell’unità principale sullo stesso valore.
(Ad es.: Se il cavo audio è collegato al canale 1)
L
R
PHONO
CH 1
CD/LINE
N
AL GND
PLAYER 1CH 1
Cavo audio
Per cambiare il numero del lettore, fare quanto segue.
1Scollegare il dispositivo di memoria di massa (SD, USB) ed il cavo LAN.
2Premere il pulsante [MENU/UTILITY] per oltre un secondo per far comparire la schermata [UTILITY].
3Girare la manopola selettrice scegliendo [PLAYER No.] e premerla.
4Girare la manopola selettrice per scegliere il numero del lettore, poi premerla per finalizzare la scelta.
5Premere il pulsante [MENU/UTILITY] per terminare l’impostazione.
Libble takes abuse of its services very seriously. We're committed to dealing with such abuse according to the laws in your country of residence. When you submit a report, we'll investigate it and take the appropriate action. We'll get back to you only if we require additional details or have more information to share.
Product:
Forumrules
To achieve meaningful questions, we apply the following rules:
First, read the manual;
Check if your question has been asked previously;
Try to ask your question as clearly as possible;
Did you already try to solve the problem? Please mention this;
Is your problem solved by a visitor then let him/her know in this forum;
To give a response to a question or answer, do not use this form but click on the button 'reply to this question';
Your question will be posted here and emailed to our subscribers. Therefore, avoid filling in personal details.
Register
Register getting emails for Pioneer CDJ-2000NXS at:
new questions and answers
new manuals
You will receive an email to register for one or both of the options.
Get your user manual by e-mail
Enter your email address to receive the manual of Pioneer CDJ-2000NXS in the language / languages: English, German, Dutch, French, Italian, Portuguese, Spanish as an attachment in your email.
The manual is 12,26 mb in size.
You will receive the manual in your email within minutes. If you have not received an email, then probably have entered the wrong email address or your mailbox is too full. In addition, it may be that your ISP may have a maximum size for emails to receive.
If you have not received an email with the manual within fifteen minutes, it may be that you have a entered a wrong email address or that your ISP has set a maximum size to receive email that is smaller than the size of the manual.
The email address you have provided is not correct.
Please check the email address and correct it.
Your question is posted on this page
Would you like to receive an email when new answers and questions are posted? Please enter your email address.