Indice
1. Introduzione . . . . . . . . . . . . . . . . . . . . . . . . . . . . . . . . . . . . . . . . . . . . 68
2. Installazione del telecomando . . . . . . . . . . . . . . . . . . . . . . . . 68-71
Sostituzione della batteria . . . . . . . . . . . . . . . . . . . . . . . . . . . . . . . . . . . 68
Collaudo del telecomando . . . . . . . . . . . . . . . . . . . . . . . . . . . . . . . . . . 69
Impostazione del telecomando . . . . . . . . . . . . . . . . . . . . . . . . . . . . 69-71
3. Tasti e funzioni . . . . . . . . . . . . . . . . . . . . . . . . . . . . . . . . . . . . . . . . . . 72
4. Funzioni aggiuntive . . . . . . . . . . . . . . . . . . . . . . . . . . . . . . . . . . . 73-74
Modificazione della selezione d‘apparecchio (selettore di modalità) . . 73
Aggiungere una funzione al telecomando . . . . . . . . . . . . . . . . . . . . . . . 73
Assegnazione del comando del volume ad un’altra modalità . . . . . . . . 74
Ripristino delle impostazioni originali del telecomando . . . . . . . . . . . . 74
5. Ricerca dei Guasti . . . . . . . . . . . . . . . . . . . . . . . . . . . . . . . . . . . . . . . 75
6. Bisogno di aiuto? . . . . . . . . . . . . . . . . . . . . . . . . . . . . . . . . . . . . . . . . 75
Lista dei codici di tutte le marche/apparecchi . . . . . . . . . . . . . . . . 92-113
1. Introduzione
Congratulazioni per l’acquisto del telecomando universale Philips SRU740.
Dopo aver installato il telecomando potete utilizzarlo per azionare fino a
4 apparecchi diversi: una TV, il modo SAT (scatola settop, decodificatore
satellite o cable), un lettore/registratore di DVD o un VCR ed un
amplificatore/ricevitore. Nel capitolo ‘Installazione del telecomando’ troverete
le informazioni necessarie per preparare il telecomando all’uso.
2. Installazione del telecomando
• Una batteria è già installata nel vano batteria dell’SRU740.
Basta rimuovere la stagnola protettiva dalla batteria e l’SRU740 è
pronto per l’uso.
•
Se gli indicatori (TV, SAT, DVD/VCR e AMP) lampeggiano quattro volte dopo
ogni volta che si preme un tasto, il telecomando indica che la batteria si sta
scaricando. Sostituite la vecchia batteria con una batteria nuova al litio
CR2025. Consultate ‘Sostituzione della batteria’.
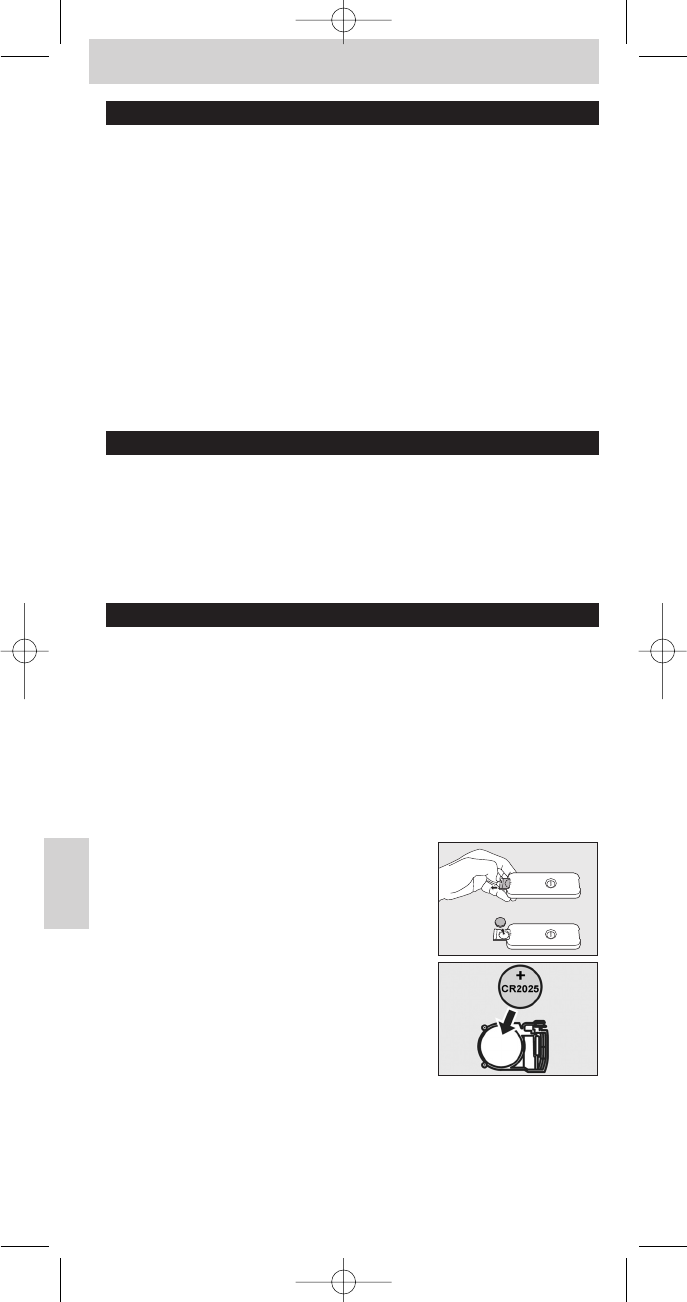
Sostituzione della batteria
L’SRU740 viene consegnato con una batteria di scorta nella confezione.
1 Premete il bordo del vano batteria come
illustrato.Tenete premuto il bordo e fate
scorrere il vano verso l’esterno.
2 Inserite la batteria di scorta CR2025 al litio
nel vano, come illustrato. Assicuratevi di
posizionare il lato con testo della batteria
rivolto verso l’alto.
3 Fate scorrere il coperchio in posizione e fatelo scattare fermamente.
68
Instruzioni per l'uso
Italiano
Instruzioni per l'usoInstruzioni per l'uso Instruzioni per l'usoInstruzioni per l'uso Instruzioni per l'usoInstruzioni per l'uso Instruzioni per l'usoInstruzioni per l'uso