19
There is a wide range of audio and video equipment that can be connected to your TV.
The following connection diagrams show you how to connect them.
Bemerkung:
EXT1 ist geeignet für CVBS und RGB; EXT2 CVBS, Y/C und RGB; EXT3 CVBS; DVI für VGA, SVGA, XGA (nicht für 42PF9966)
und 480p, 576p, 720p, 1080i und 1152i.
Peripheriegeräte mit einem RGB Ausgang sollen an
EXT1 oder 2 angeschlossen werden, da RGB eine bessere Bildqualität liefert.
Bemerkung:Wenn Ihr Recorder mit einer EasyLink-Funktion ausgestattet ist, sollte er an
EXT2 angeschlossen werden, um die EasyLink-Funktionalität
benutzen zu können.
& Die Antennenkabel 1, 2 und 3 so anschließen, wie gezeigt wird (nur
wenn Ihr Peripheriegerät TV-Antennen-Ein-/Ausgang hat). Ihr Gerät mit
einem Eurokabel 4 oder 5 an einen von den Eurosteck-verbindungen
EXT1, 2 oder 3 anschließen, um eine bessere Bildqualität zu erhalten.
é Suchen Sie das Testsignal Ihres peripheren A/V-Gerätes auf dieselbe Weise,
wie bei einem Recorder.
“ Machen Sie eine Auswahl unter Konfiguration, Menü Quelle, S. 9.
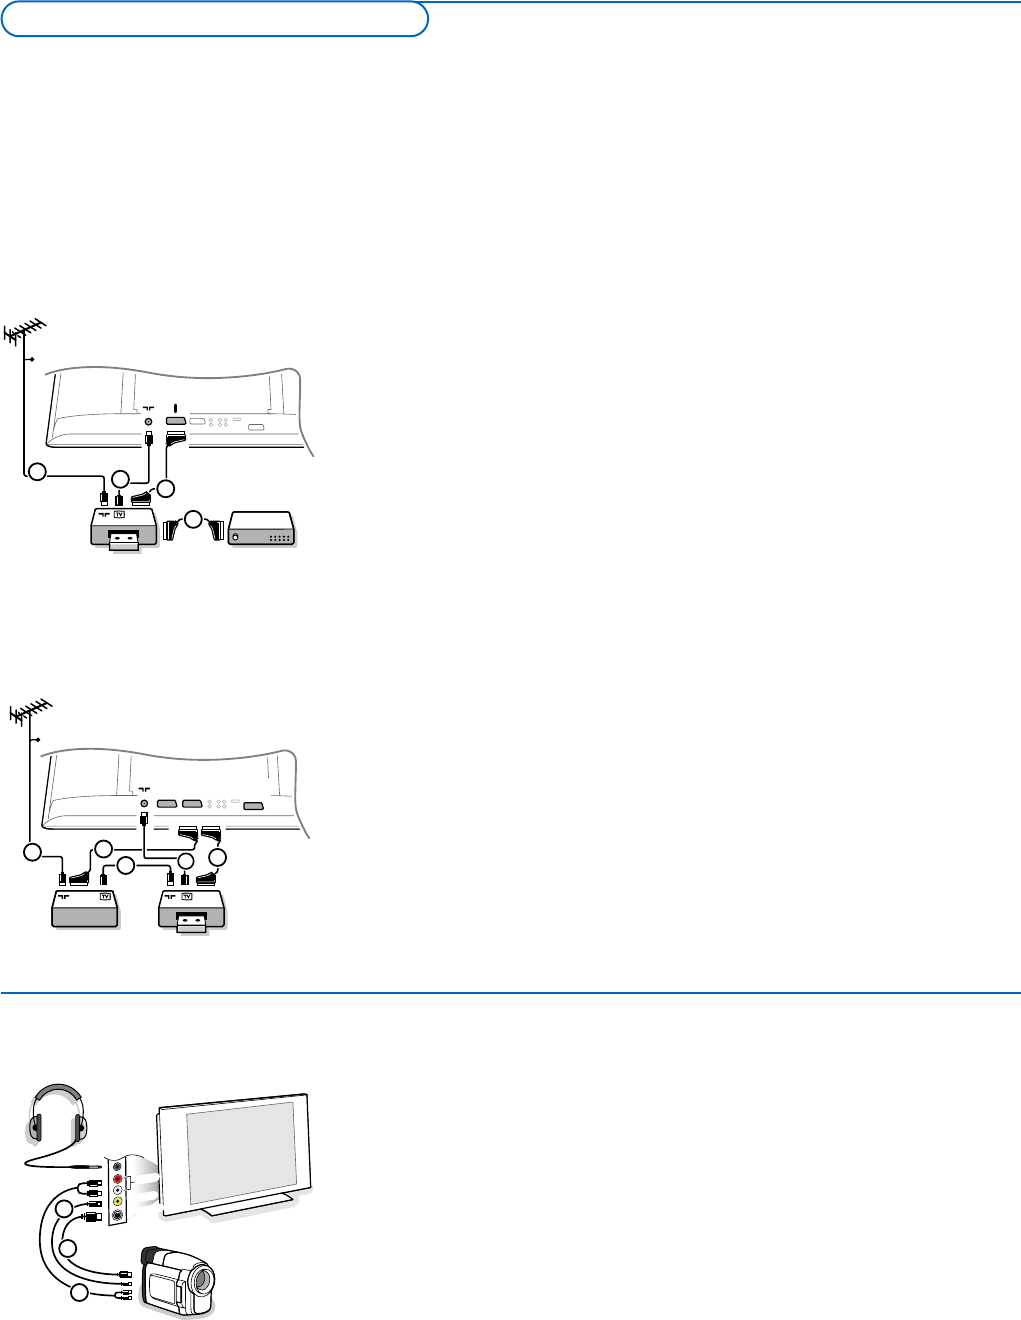
Kamera, Camcorder und Videospiele
& Ihre Gerät so anschließen, wie gezeigt wird.
é Verbinden Sie das Gerät mit VIDEO 2 und AUDIO L 3, wenn es sich
um ein Mono-Gerät handelt. Schließen Sie auch
AUDIO R 3 an, wenn Sie
ein Stereo-Gerät besitzen.
S-VHS Qualität wird bei einem Camcorder erreicht, wenn die S-VHS-Kabel
an die Ausgänge
S-VIDEO 1 und AUDIO 3 angeschlossen werden.
Schließen Sie Kabel 1 und 2 niemals gleichzeitig an. Dieses kann zur
Beeinträchtigung der Bildqualität führen !
Kopfhörer
& Den Stecker in den Kopfhöreranschluss L so einstecken, wie gezeigt wird.
é Drücken Sie die Taste ¬, um die internen Lautsprecher Ihres
Fernsehgerätes auszuschalten.
Der Kopfhörer sollte eine Impedanz von 8 bis 4000 Ohm und einen 3,5 mm
Klinkenstecker haben.
Lautst. Kopfhörer im Tonmenü wählen, um die Lautstärke des Kopfhörers
zu regeln.
Zusatzanschlüsse
Andere periphere Geräte
(Satellitenempfänger, Decoder, DVD, Spiele usw.)
Schließen Sie die Antennenkabel 1, 2 und, um eine bessere Bildqualität zu
bekommen, das Euro-A/V-Kabel 3, so wie gezeigt an. Wenn Ihr Recorder
nicht über eine Eurosteckverbindung verfügt, ist der einzig mögliche Anschluss
über das Antennenkabel. Dazu müssen Sie das Testsignal des Recorders
einstellen und ihm die Programmnummer 0 zuweisen oder das Testsignal unter
einer Programmnummer zwischen 90 und 99 speichern, siehe Manuelle
Einstellung, S. 6. Schauen Sie zunächst in der Bedienungsanleitung Ihres
Recorders nach.
Decoder und Recorder
Schließen Sie ein Euro-A/V-Kabel 4 an die Euro-A/V-Buchse Ihres Decoders
und an die spezielle Euro-A/V-Buchse Ihres Recorders an. Beachten Sie auch die
Betriebs-anleitung Ihres Recorders. Siehe auch Decoder, S. 10. Sie können
ebenfalls Ihren Decoder sofort an
EXT1 oder 2 anschließen mittels des Euro-
A/V-Kabel.
Recorder (VCR-
DVD+
RW)
Bemerkung : Stellen Sie Ihren Videorecorder nicht zu nahe an den Bildschirm, weil bestimmte Videorecorder für Signale aus dem Display empfindlich
sein können. Beachten Sie einen Mindestabstand von 0,5 m vom Bildschirm.
Periphere A/V-Geräte anschließen