… / Cleaning and Care / Information about warranty and service processing… / Before use / Start-up / After initial use / Changing spare parts / Maintenance
Ensure not to exceed the maximum pressure
specified on the machine.
Never carry pneumatic tools by the hose.
Before use
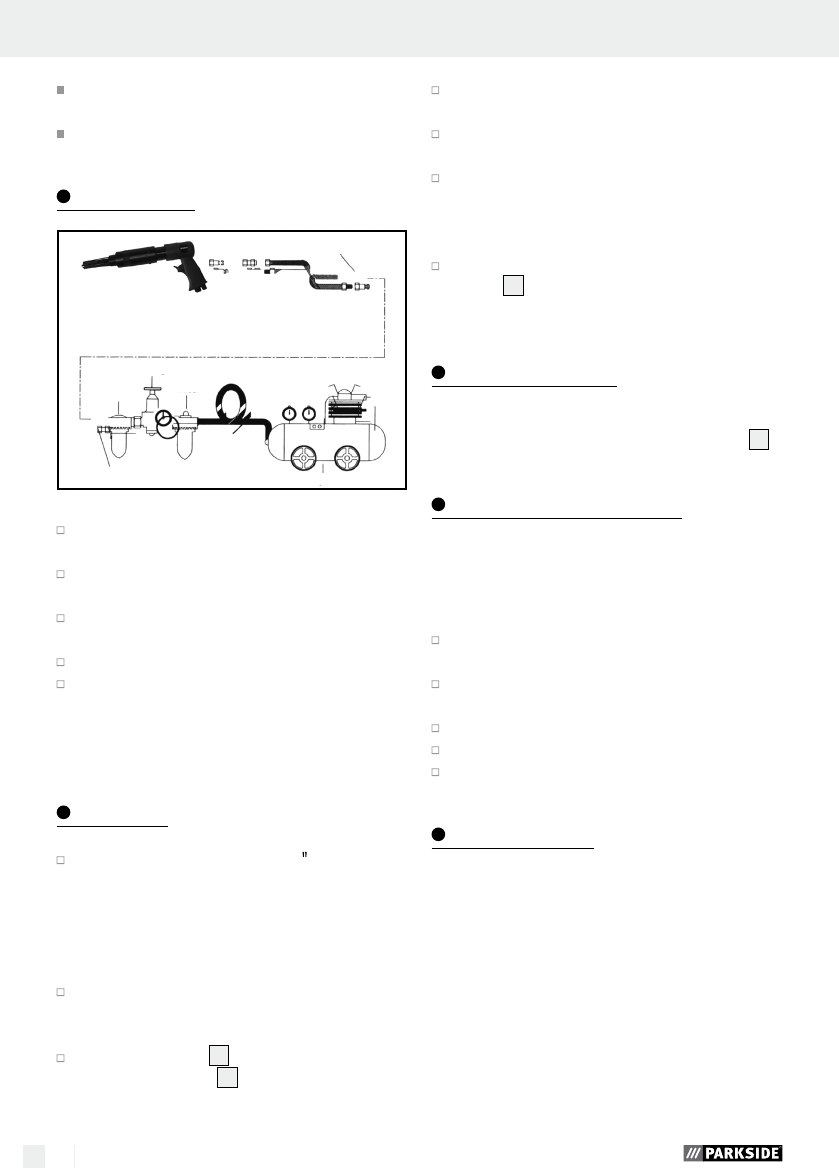
Quick-release socket
Compressed air hose
Quick-release socket
Pressure regulator
Oils
Filter
Quick-opening sleeve
Compressor
ATTENTION! Never start up the air tool with-
out oiling it.
Verify the compressor is positioned on solid
ground.
Check if all hose connections are connected
and secured correctly.
Connect the tool with the air hose.
If no function is detected after switching on de-
spite reaching the maximum pressure, switch the
device back off. Immediately contact the ser-
vice hotline.
Start-up
Screw a threaded plug fitting ¼ (6.35 mm)
into the air tool.
Note: We recommend using Teflon tape to
achieve maximum leak-tightness. Otherwise the
equipment may potentially be unable to produce
its full capacity.
To connect the device to the air hose, never point
the front end (needle head) of the tool at your-
self or others.
Pulling the trigger
6
will start the device.
Release the trigger
6
to stop the device.
Use the needle scaler to remove rust, paint,
lacquier and similar items (see Fig. A).
Never use excess force to push the equipment
onto the tool, as this may cause damage.
Applying the equipment at a slight angle and
sliding it across the surface to be cleaned with
a little pressure across the area to be cleaned
for optimal results.
Regulate the air pressure using the air adjusting
screw
4
(next to the air inlet at the bottom of
the device) for optimal results.
After initial use
Once the task has been finished the equipment must
be disconnect from the compressed air supply
5
.
Changing spare parts
The head of the needle scaler must be replaced if
it shows damage or is severely worn. Proceed as
follows:
Using the included hexagon socket screw, loosen
the 4 screws for the head (see Fig. B).
Unscrew the old head using minimal force (see
Fig. C).
Properly dispose of the old head.
Screw in the new head hand tight (see Fig. F).
tighten the 4 screws on the head (see Fig. G).
Maintenance
Following the maintenance information specified
here will ensure a long service life for the product
Libble takes abuse of its services very seriously. We're committed to dealing with such abuse according to the laws in your country of residence. When you submit a report, we'll investigate it and take the appropriate action. We'll get back to you only if we require additional details or have more information to share.
Product:
Forumrules
To achieve meaningful questions, we apply the following rules:
First, read the manual;
Check if your question has been asked previously;
Try to ask your question as clearly as possible;
Did you already try to solve the problem? Please mention this;
Is your problem solved by a visitor then let him/her know in this forum;
To give a response to a question or answer, do not use this form but click on the button 'reply to this question';
Your question will be posted here and emailed to our subscribers. Therefore, avoid filling in personal details.
Register
Register getting emails for Parkside IAN 275683 PDNE 4000 A1 at:
new questions and answers
new manuals
You will receive an email to register for one or both of the options.
Get your user manual by e-mail
Enter your email address to receive the manual of Parkside IAN 275683 PDNE 4000 A1 in the language / languages: English, German, Dutch as an attachment in your email.
The manual is 1,07 mb in size.
You will receive the manual in your email within minutes. If you have not received an email, then probably have entered the wrong email address or your mailbox is too full. In addition, it may be that your ISP may have a maximum size for emails to receive.
Others manual(s) of Parkside IAN 275683 PDNE 4000 A1
If you have not received an email with the manual within fifteen minutes, it may be that you have a entered a wrong email address or that your ISP has set a maximum size to receive email that is smaller than the size of the manual.
The email address you have provided is not correct.
Please check the email address and correct it.
Your question is posted on this page
Would you like to receive an email when new answers and questions are posted? Please enter your email address.