List of Bread Types and Baking Options ······························································································································· GB10
When adding extra ingredients ··········································································································································· GB14
STAGE 2 Making Rustic Sourdough Dough ··························································································································GB20
p
Making Dough ································································································································································ GB21
p
Making Brioche Dough ····················································································································································· GB22
p
Making Rustic Artisan Dough ············································································································································· GB23
Making Jam ··································································································································································· GB27
p
Making Compote ····························································································································································· GB28
Jam Recipes ·································································································································································· GB37
Care & Cleaning ····························································································································································· GB39
To Protect the Non-stick Finish
p
To protect the non-stick finish ············································································································································ GB40
Stellen Sie die Backform in das Gerät, und stecken Sie den Netzstecker ein.
1
Wählen Sie Menü ‘32’
O
Für Menü 32 ist keine Zeitvorwahl verfügbar.
(Mit der Zeitvorwahltaste wird nur die Dauer der
Kochzeit festgelegt.)
O
Für eine gute, ausreichend gelierte Marmelade ist
eine ausreichende Menge von Zucker, Säure und
Pektin erforderlich.
O
Früchte mit einem hohen Pektinanteil gelieren leicht.
Früchte mit weniger Pektin gelieren nicht so leicht.
O
Verwenden Sie frische, reife Früchte. Überreife
oder unreife Früchte gelieren nicht so gut.
O
Die Rezepte in diesem Buch ergeben leicht
gelierte Marmelade.
Grund ist der geringe Zuckergehalt.
O
Beachten Sie die Mengenangaben für jede Zutat
in den Rezepten.
•
Verändern Sie nicht die Menge der Früchte.
Dadurch könnte die Marmelade überkochen
oder anbrennen.
•
Erhöhen Sie die Zuckermenge nicht auf mehr
als die Hälfte der Früchtemenge. Dadurch
könnte die Marmelade überkochen oder
anbrennen. Wenn Sie die Zuckermenge
reduzieren, geliert die Marmelade nicht richtig.
* Bei Früchten mit hohem Säuregehalt können
Sie die Menge des Zitronensafts reduzieren.
Bei zu starker Reduzierung geliert die
Marmelade jedoch nicht richtig.
O
Bei zu kurzer Kochzeit können Fruchtstücke
verbleiben und die Marmelade wässrig werden.
•
Die Marmelade geliert beim Abkühlen weiter.
Achten Sie darauf, sie nicht zu lange zu kochen.
O
Füllen Sie die fertige Marmelade so schnell wie
möglich in die Behälter. Achten Sie darauf, dass
die Marmelade beim Entnehmen nicht anbrennt.
O
In der Backform verbleibende Marmelade kann
anbrennen.
O
Bewahren Sie die Marmelade kühl und dunkel
auf. Aufgrund des geringeren Zuckergehalts
ist die Marmelade nicht so lange haltbar
wie gekaufte Marmelade. Bewahren Sie die
Marmelade nach dem Öffnen gekühlt auf, und
verbrauchen Sie sie so schnell wie möglich.
2
Stellen Sie die Kochzeit ein
3
Starten Sie die Maschine
Geschätzte Zeit bis das gewählte Programm fertig ist
O
Die Start-Lampe leuchtet auf.
4
Drücken Sie ‘Stop’, und entnehmen Sie
die Marmelade
wenn das Gerät 8 Mal piept und der Balken unter ‘End’ (Ende) blinkt.
O
Die blinkende Start-Lampe erlischt.
Q
Wenn der Kochvorgang noch nicht abgeschlossen ist
£
Wiederholen Sie Schritte 1 bis 3
(Die Backzeit/Kochzeit kann zweimal verlängert werden. Jede Verlängerung
kann zwischen 10 und 40 Minuten sein. Wenn das Gerät heiß ist, startet
die Zeitvorwahl von 1 Minute. Erhöhen Sie die Zeitdauer durch Drücken der
Zeitvorwahltaste.)
6'B%HOLQGE
DE34
Glutenfreie Rezepte
Die Herstellung von glutenfreiem Brot unterscheidet sich stark von der normalen Brotherstellung.
Es ist sehr wichtig, daß Sie sich, wenn Sie glutenfreies Brot aus gesundheitlichen Gründen backen wollen, von Ihrem Arzt beraten lassen und
die folgenden Richtlinien beachten.
• Dieses Programm wurde speziell für bestimmte glutenfreie Brotmischungen entwickelt; bei Verwendung eigener Rezepturen kann es
vorkommen, daß Sie keine guten Ergebnisse erzielen.
• Wenn “glutenfrei” gewahlt ist, müssen die unten stehenden Angaben für jedes Rezept genau befolgt werden.
(Andernfalls kann es sein, daß das Brot nicht gut wird.)
Es gibt zwei Typen glutenfreier Backmischungen; Backmischungen auf Weizenmehl basierend mit “niedrigem Glutengehalt” und
Backmischungen, die “glutenfrei” sind und nicht aus Weizenmehl bestehen.
Falls Sie eine Spezialdiät einhalten müssen und dieses Backprogramm aus Gesundheitsgründen verwenden möchten, sprechen Sie bitte
zuvor mit Ihrem Arzt.
• Die unten stehenden glutenfreien Rezepte wurden mit kommerziell hergestellten Brotmischungen wie das Backmix-Weissbrot von
Hammermühle entwickelt.
Es ist ratsam, diese Mischungen für beste Ergebnisse zu verwenden.
Sie sind in Drogerien, Reformhäusern und gelegentlich in großen Supermärkten erhältlich.
Hammermühle
Brotbackmischungen sind auch im Internet www.hammermuehle.de zu bestellen.
• Die Backergebnisse und das Aussehen des Brotlaibes kann sich je nach Backgemisch verändern.
Gelegentlich kann auf der Oberfläche eines Laibs etwas Mehl anhaften.
• Warten Sie, bis sich das Brot abgekühlt hat, bevor Sie es schneiden. So geht es besser.
• Das Brot sollte an einem trockenen kühlen Ort gelagert und innerhalb von 2 Tagen verzehrt werden. Wenn Sie den gesamten Laib nicht
innerhalb dieser Zeit verzehren können, kann er in einen Tiefkühlbeutel gelegt, in praktische Teile geschnitten und eingefroren werden.
Warnung für Personen welche dieses Programm aus gesundheitlichen Gründen verwenden:
Wenn Sie ein glutenfreies Programm verwenden, holen Sie zuvor medizinischen Rat ein und verwenden Sie nur Zutaten die sich
für Ihren Gesundheitszustand eignen.
Panasonic haftet nicht für Konsequenzen welche aus der Verwendung von Zutaten entstanden sind, die ohne professionellen Rat
verwendet wurden.
Es ist sehr wichtig, Mischungen mit glutenhaltigen Mehlen zu vermeiden, wenn das Brot aus gesundheitsbedingten Gründen verwendet wird.
Besondere Aufmerksamkeit muß der Reinigung der Backform und des Knethakens ebenso wie aller anderen verwendeten Utensilien gewidmet
werden.
GLUTENFREIES WEISSBROT
Wählen Sie Menü ‘14’
Wasser430 g
Esslöffel Öl1
Hammermühle Back-Mix Weissbrot500 g
Teelöffel Trockenhefe2
6'B%HOLQGE
DE35
Deutsch
NORMAL TEIG
Wählen Sie Menü ‘19’
Teelöffel Trockenhefe1
Weizenmehl, Typ 550500 g
Teelöffel Salz1
1
»2
Esslöffel Zucker1
1
»2
Butter30 g
Wasser310 mL
BREZEL
6 Stück: Wählen Sie Menü ‘19’
Teelöffel Trockenhefe1
Weizenmehl, Typ 550150 g
Weizenmehl, Typ 1050150 g
Teelöffel Salz1
Teelöffel Zucker
1
»2
Butter20 g
Wasser180 mL
RESTLICHE ZUTATEN :
etwas Ö l
Esslöffel grobes Salz1
Weiterverarbeitung:
Anschließend den Teig auf einer bemehlten Arbeitsfläche durchkneten und in 6
gleichgroße Stücke teilen. Aus den Teigstücken jeweils ca. 50 cm lange Rollen
drehen und Brezeln daraus formen, auf ein gefettetes Backblech legen und bei
Zimmertemperatur ca. 1 Std. gehen lassen.
Brezeln mit Ö l bestreichen, mit Salz bestreuen und im vorgeheizten Backofen bei
200°C (Ober-/Unterhitze) in ca. 30 Min. backen.
HEFEZOPF
Wählen Sie Menü ‘19’
Teelöffel Trockenhefe1
1
»2
Weizenmehl, Typ 405500 g
Teelöffel Salz
1
»2
Zucker70 g
Butter50 g
Ei, Größe L1
Vanillezucker1 P.
Wasser200 mL
RESTLICHE ZUTATEN :
Butter zum Bestreichen
Hagelzucker30 g
Weiterverarbeitung:
Anschließend den Teig auf einer bemehlten Arbeitsfläche durchkneten und in
3 gleichgroße Stücke teilen. Daraus jeweils ca. 50 cm lange Rollen drehen und einen
Zopf flechten. Auf ein gefettetes Backblech legen und bei Zimmertemperatur ca.
1 Std. gehen lassen.
Hefezopf mit Butter bestreichen, mit Hagelzucker bestreuen und im vorgeheizten
Backofen bei 200°C (Ober-/Unterhitze) in ca. 25 Min. backen. Nach 15 Min.
Backzeit den Hefezopf mit Alufolie abdecken.
NORMAL ROSINEN TEIG
Wählen Sie Menü ‘20’
Teelöffel Trockenhefe1
Weizenmehl, Typ 550500 g
Teelöffel Salz1
1
»2
Esslöffel Zucker1
1
»2
Butter30 g
Wasser310 mL
ZUGABE (Rosinen-Nuss-Verteiler) :
Rosinen
100 g
TEIG FÜR PIKANTES SCHLEMMERBROT
Wählen Sie Menü ‘21’
Teelöffel Trockenhefe1
Weizenmehl, Typ 550500 g
Teelöffel Salz1
1
»2
Esslöffel Zucker1
1
»2
Butter30 g
Wasser350 mL
ZUGABE (Rosinen-Nuss-Verteiler) :
gekochter Speck65 g
Zusätzlicher Käse (in 1 cm große Würfel
schneiden)
60 g
VOLLWERT TEIG
Wählen Sie Menü ‘22’
Teelöffel Trockenhefe1
1
»2
Vollkornweizenmehl500 g
Teelöffel Salz2
Esslöffel Zucker1
1
»2
Butter30 g
Wasser340 mL
KÜRBISKERNBRÖTCHEN
Wählen Sie Menü ‘22’
Teelöffel Trockenhefe1
Vollkorndinkelmehl450 g
Teelöffel Salz
1
»2
Esslöffel Zucker1
Butter30 g
Esslöffel Kürbiskerne3
Wasser290 mL
RESTLICHE ZUTATEN :
Wasser zum Bestreichen
Esslöffel Kürbiskerne3
Weiterverarbeitung:
Anschließend den Teig auf einer bemehlten Arbeitsfläche durchkneten und in
12 gleichgroße Stücke teilen.
Runde Brötchen formen, auf ein gefettetes Backblech setzen und bei
Zimmertemperatur ca. 1 Std. gehen lassen.
Brötchen mit Wasser bestreichen, kreuzweise einschneiden und mit Kürbiskernen
bestreuen. Im vorgeheizten Backofen bei 200°C (Ober-/Unterhitze) in ca. 20 Min.
backen.
FRANZÖSISCHER TEIG
Wählen Sie Menü ‘25’
Teelöffel Trockenhefe
3
»4
Weizenmehl, Typ 550300 g
Teelöffel Salz1
Butter20 g
Wasser180 mL
TEIG FÜR SAUERTEIGBROT (STANDARD)
Stufe 1 Sauerteig Starterkultur
Menu ‘27’: Gehen Sie zur S. DE18 und S. DE36 für das Rezept der Sauerteig-
Starterkultur.
Stufe 2 : Menü ‘26’
Weizenmehl, Typ 550400 g
Teelöffel Salz1
Teelöffel Trockenhefe
3
»4
Wasser150 mL
TEIG FÜR SAUERTEIGBROT (ROGGEN)
Stufe 1 Sauerteig Starterkultur
Menu ‘27’: Gehen Sie zur S. DE18 und S. DE36 für das Rezept der Sauerteig-
Starterkultur.
Stufe 2 : Menü ‘26’
Weizenmehl, Typ 550360 g
Roggenmehl40 g
Teelöffel Salz1
Teelöffel Trockenhefe
3
»4
Wasser150 mL
PIZZA TEIG
Wählen Sie Menü ‘28’
Teelöffel Trockenhefe1
Weizenmehl, Typ 550450 g
Teelöffel Salz2
Esslöffel Pflanzenöl4
Wasser240 mL
Teigrezepte
6'B%HOLQGE
DE37
Deutsch
Marmeladenrezepte
ERDBEERMARMELADE
Wählen Sie Menü ‘32’
Erdbeeren, fein gehackt600 g
Zucker400 g
Pektinpulver13 g
1
Füllen Sie die Hälfte der Früchte in die Backform, und fügen Sie
die Hälfte des Zuckers hinzu. Wiederholen Sie diesen Schritt
mit den verbleibenden Früchten und dem verbleibenden Zucker.
2
Streuen Sie das Pektin auf die Zutaten in der Backform.
3
Wählen Sie Menü 32 aus, und geben Sie 1 Stunde und
40 Minuten für die Zeitvorwahl ein.
BLAUBEERMARMELADE
Wählen Sie Menü ‘32’
Blaubeeren700 g
Zucker400 g
1
Füllen Sie die Hälfte der Früchte in die Backform, und fügen Sie
die Hälfte des Zuckers hinzu. Wiederholen Sie diesen Schritt
mit den verbleibenden Früchten und dem verbleibenden Zucker.
2
Wählen Sie Menü 32 aus, und geben Sie 1 Stunde und
50 Minuten für die Zeitvorwahl ein.
PFLAUMENMARMELADE
Wählen Sie Menü ‘32’
Pflaumen, fein gehackt700 g
Zucker350 g
Pektinpulver6 g
1
Füllen Sie die Hälfte der Früchte in die Backform, und fügen Sie
die Hälfte des Zuckers hinzu. Wiederholen Sie diesen Schritt
mit den verbleibenden Früchten und dem verbleibenden Zucker.
2
Streuen Sie das Pektin auf die Zutaten in der Backform.
3
Wählen Sie Menü 32 aus, und geben Sie 1 Stunde und
40 Minuten für die Zeitvorwahl ein.
APRIKOSENMARMELADE
Wählen Sie Menü ‘32’
Aprikosen, fein gehackt500 g
Zucker250 g
Pektinpulver6 g
1
Füllen Sie die Hälfte der Früchte in die Backform, und fügen Sie
die Hälfte des Zuckers hinzu. Wiederholen Sie diesen Schritt
mit den verbleibenden Früchten und dem verbleibenden Zucker.
2
Streuen Sie das Pektin auf die Zutaten in der Backform.
3
Wählen Sie Menü 32 aus, und geben Sie 1 Stunde und
30 Minuten für die Zeitvorwahl ein.
6'B%HOLQGE
DE40
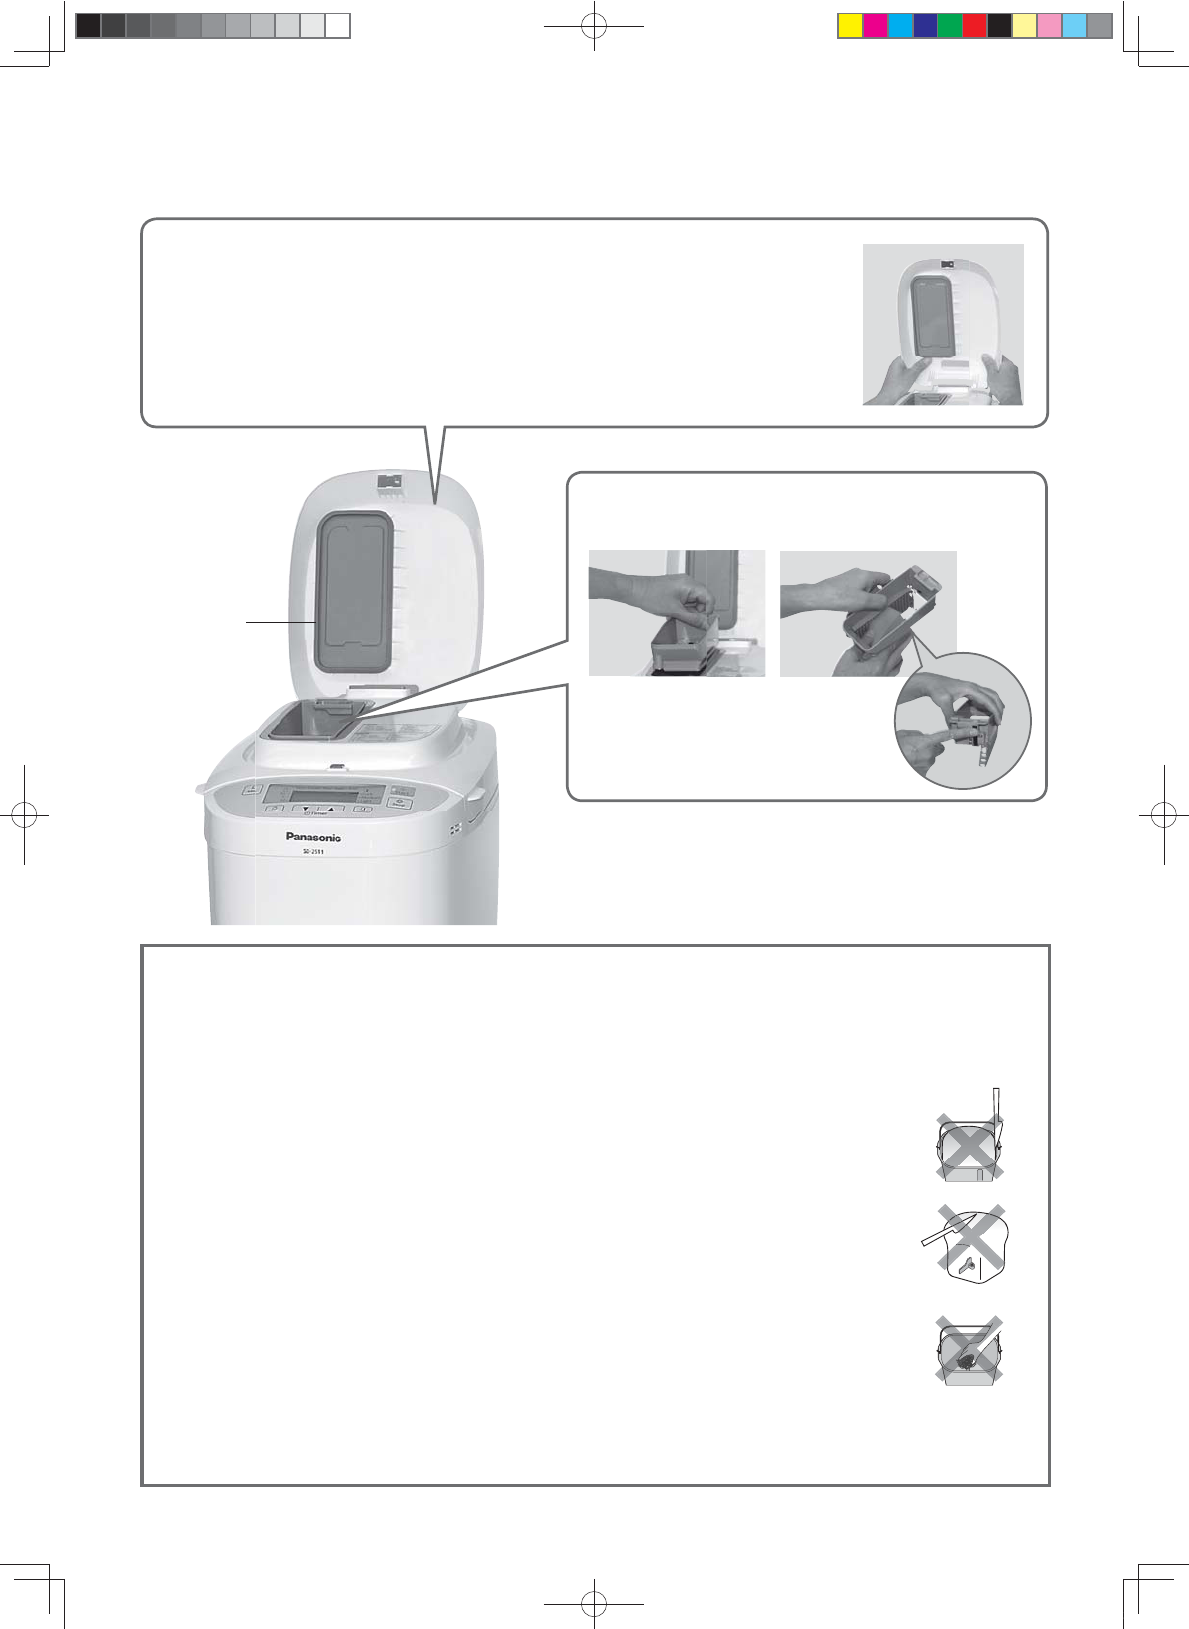
Pflege & Reinigung
Schutz der Antihaftbeschichtung
Brotbehälter und Knethaken sind mit einer Antihaftbeschichtung versehen, die der Vermeidung von Flecken und
dem einfachen Entnehmen des Brotes dient.
Um eine Beschädigung dieser Beschichtung zu vermeiden, beachten Sie folgende Anweisungen.
• Verwenden Sie zum Entfernen des Brotes aus dem Behälter keine harten Gegenstände wie z.B. Messer oder Gabel.
Wenn sich das Brot nur schwer aus der Backform entnehmen lässt, schlagen Sie auf Seite DE43 nach.
•
Vergewissern Sie sich, dass der Knethaken sich nicht im Brotlaib befindet, bevor Sie diesen anschneiden.
Befindet er sich im Brotlaib, dann lassen Sie diesen vor dem Entfernen des Knethakens abkühlen.
(Keine harten Gegenstände wie Messer oder Gabel verwenden.)
Vorsicht vor Verbrennungen durch den möglicherweise noch heißen Knethaken.
•
Reinigen Sie Brotbehälter und Knethaken mit einem weichen Schwamm.
Verwenden Sie keine Scheuermittel, Reiniger usw.
p
Harte, grobe oder große Zutaten, wie Mehl mit ganzen oder gemahlenen Körnern, Zucker, oder die Zugabe von Nüssen und Kernen
können die Antihaftbeschichtung der Backform beschädigen. Sollen große Klumpen einer Zutat verwendet werden, brechen Sie diese
in kleine Stücke auf. Bitte befolgen Sie die Mengenangabe in Rezepten.
Verteilerdeckel
Entfernen und mit Wasser waschen
p
Den Verteilerdeckel auf einen Winkel von ca. 75 Grad anheben. Die Halterungen ausrichten und zum
Entfernen auf sich zu ziehen bzw. zum Anbringen im gleichen Winkel wieder vorsichtig zurückschieben.
(Erst warten bis die Maschine abgekühlt ist, weil sie sofort nach der Verwendung sehr heiß ist)
p
Achten Sie darauf, die Dichtung weder zu beschädigen noch zu ziehen. (Eine Beschädigung führt zum
Entweichen von Dampf, Kondensation oder Verformung)
Rosinen-Nuss-Verteiler
Entfernen und mit Wasser waschen
p
Nach jeder Verwendung waschen, um alle
Rückstände zu entfernen
Dichtung
6'B%HOLQGE
DE43
Deutsch
Problem
Ursache
«
Abhilfe
Die Kruste knittert und wird beim
Abkühlen weich
p
Der nach dem Backen im Brot verbliebene Dampf kann in die Kruste gelangen und sie leicht
aufweichen.
«
Um die Dampfmenge zu reduzieren, versuchen Sie es mit 10–20 mL weniger Wasser oder
mit der halben Menge Zucker.
Wie bleibt meine Kruste
knusprig?
p
Damit das Brot knuspriger wird, können Sie das Menü 9 oder die Option ‘Dark’ (Dunkel) für die
Krustenbräunung verwenden. Sie können das Brot auch bei 200°C/Gas Stufe 6 weitere 5 bis
10 Minuten im Backofen backen.
Mein Brot ist klebrig und die
Scheiben bröslig
p
Es war beim Aufschneiden zu heiß.
«
Lassen Sie Ihr Brot vor dem Schneiden abkühlen, damit der Dampf entweichen kann.
Extra-Zutaten werden in der
Brioche nicht richtig vermischt.
p
Bei manchen Brotmischungsteigen lassen sich Extra-Zutaten nur schwer untermischen oder
herausnehmen.
«
Verringern Sie die Extra-Zutaten auf die Hälfte.
Überschüssiges Öl haftet an der
Unterseite der Brioche.
Die Kruste ist ölig.
Mein Brot hat große Löcher.
p
Haben Sie Butter innerhalb von 5 Minuten nach dem Piepton hinzugefügt?
«
Butter nicht hinzugeben, wenn das Display die Restzeit bis zur Fertigstellung anzeigt.
(S. DE15)
Der Buttergeschmack ist evtl. schwach, aber Backen ist möglich.
Meine Brioche ist bei
Verwendung von Brotmischung
nicht gut gelungen.
p
Versuchen Sie Folgendes.
«
Bei Verwendung von Menü 13 oder 29 kann eine reduzierte Hefemenge zu besseren
Backergebnissen führen. (bei getrennter Zugabe von Hefe).
«
Folgen Sie dem Rezept auf der Brotmischung, aber die Brotmischung sollte zwischen
350-500 g betragen.
«
Zuerst die abgemessene Hefe (bei getrennter Zugabe von Hefe) in die Backform geben,
dann Trockenmischung, Butter und Flüssigkeit hinzugeben. Extra-Zutaten sind später
hinzuzufügen. (S. DE15 oder DE22)
«
Die Fertigstellung hängt vom Rezept der jeweiligen Brotmischung ab.
Das Brot lässt sich nicht
entnehmen.
p
Wenn das Entfernen des Brotes aus dem Brotbehälter Schwierigkeiten bereitet, lassen Sie den
Brotbehälter 5 bis 10 Minuten abkühlen, jedoch nicht unbeaufsichtigt, falls die Gefahr besteht,
dass andere Personen oder Gegenstände Verbrennungen erleiden können.
Danach den Behälter mit Topflappen anfassen und ein paar Mal schütteln.
(Den Griff dabei nach unten halten, so dass er dem Brot nicht im Weg ist.)
Beim Kochen von Marmelade ist
die Marmelade angebrannt oder
der Knethaken sitzt fest und
lässt sich nicht entfernen.
p
Die Fruchmenge war zu gering oder die Zuckermenge zu hoch.
«
Stellen Sie die Backform in die Spüle, und füllen Sie sie zur Hälfte mit warmem Wasser.
Lassen Sie die Backform einweichen, bis sich die angebrannte Mischung oder der
Knethaken lösen lässt. Wenn das Angebrannte gelöst ist, waschen Sie es mit einem
weichen Schwamm ab. Lassen Sie bei heißem Wasser die nötige Vorsicht walten.
Die Marmelade ist übergekocht.
p
Es wurden zu viele Früchte oder Zucker verwendet.
«
Verwenden Sie nur die in den Rezepten auf Seite DE37 angegebenen Mengen von Früchten
und Zucker.
Marmelade ist zu flüssig und
nicht richti geliert.
p
Die Früchte waren unreif oder überreif.
p
Die Zuckermenge wurde zu stark reduziert.
p
Die Kochzeit hat nicht ausgereicht.
p
Früchte mit einem geringen Pektingehalt wurden verwendet.
«
Verwenden Sie die flüssige Marmelade als Dessertsauce.
«
Lassen Sie die Marmelade vollständig abkühlen. Die Marmelade geliert beim Abkühlen
weiter.
Können gefrorene Früchte
verwendet werden?
p
Sie können verwendet werden.
6'B%HOLQGE
DE44
Fehlerbehebung
Vor der Verständigung des Kundendienstes, bitte diesen Abschnitt überprüfen.
Problem
Ursache
«
Abhilfe
Welche Zuckersorten können für
Marmelade verwendet werden?
p
Weißer Streuzucker oder Kristallzucker kann verwendet werden.
Verwenden Sie keine braunen Zucker, Diätzucker, Zucker mit reduziertem Kaloriengehalt oder
künstlichen Süßstoff.
Können zum Kochen von
Marmelade in Alkohol eingelegte
Früchte verwendet werden?
p
Sie sollten nicht verwendet werden. Die Qualität ist nicht ausreichend.
Die Früchte sind beim
Kochen von Früchten in Sirup
zusammengefallen.
p
Die Kochzeit war zu lang. Die Früchte waren möglicherweise überreif.
Zusätzliche Zutaten sind im
pikantes Schlemmerbrot nicht
richtig untergemischt.
p
Haben Sie zusätzliche Zutaten vor dem Signalton in den Rosinen-Nuss-Verteiler gegeben?
«
Zusätzliche Zutaten müssen in den Rosinen-Nuss-Verteiler bevor ‘’ blinkt im Display.
Extra Zutaten fallen nicht von
Rosinen-Nuss-Verteiler in. die
Backform.
p
Ist die Oberfläche der extra Zutaten höher als die Kante des Rosinen-Nuss-Verteilers?
«
Verteilen Sie die extra Zutaten so, dass sie nicht über den Rand des Rosinen-Nuss-
Verteilers hinaus ragen. (S. DE14)
Der Behälter des Rosinen-Nuss-Verteilers umfasst eine maximale Kapazität von 150 g - ist
jedoch abhängig von der Art bzw. vom Volumen der Zutat.
erscheint auf dem
Anzeigefeld.
p
Es gab eine Stromunterbrechung für ca. 10 Minuten (der Stecker wurde versehentlich gezogen,
oder eine Sicherung hat sich gelöst) oder ein anderes Problem mit der Stromversorgung.
«
Der Betrieb wird nicht beeinflusst, wenn das Problem der Stromversorgung nur kurzzeitig ist.
Der Brotbackautomat arbeitet weiter, wenn die Stromversorgung innerhalb von 10 Minuten
wieder hergestellt ist, aber die Qualität könnte beeinträchtigt werden.
1 erscheint auf dem Anzeigefeld
p
Es gab für eine bestimmte Zeit einen Stromausfall (abhängig von den Umständen z.B.
Netzausfall, Stecker gezogen, defekte Sicherung).
«
Entfernen Sie den Teig und starten Sie mit neuen Zutaten erneut.
H01–H02 wird auf dem Display
angezeigt.
p
Das Display weist auf ein Problem mit dem Brotbackautomat hin.
«
Wenden Sie sich an den Verkäufer oder ein Panasonic Servicecenter.)
U50 erscheint auf dem
Anzeigefeld
p
Das Gerät ist heiß (über 40°C/105°F). Dies tritt bei wiederholtem Bebrauch auf.
«
Lassen Sie Ihr Gerät auf unter 40°C/105°F abkühlen, bevor Sie es erneut verwenden
(U50 verschwindet).
Entsorgung von Altgeräten
Nur für die Europäische Union und Länder mit Recyclingsystemen
Dieses Symbol, auf den Produkten, der Verpackung und/oder den Begleitdokumenten, bedeutet, dass gebrauchte elektrische
und elektronische Produkte nicht in den allgemeinen Hausmüll gegeben werden dürfen.
Bitte führen Sie alte Produkte zur Behandlung, Aufarbeitung bzw. zum Recycling gemäß den gesetzlichen Bestimmungen den
zuständigen Sammelpunkten zu.
Indem Sie diese Produkte ordnungsgemäß entsorgen, helfen Sie dabei, wertvolle Ressourcen zu schützen und eventuelle
negative Auswirkungen auf die menschliche Gesundheit und die Umwelt zu vermeiden.
Für mehr Informationen zu Sammlung und Recycling, wenden Sie sich bitte an Ihren örtlichen Abfallentsorgungsdienstleister.
Gemäß Landesvorschriften können wegen nicht ordnungsgemäßer Entsorgung dieses Abfalls Strafgelder verhängt werden.
Für Geschäftskunden in der Europäischen Union
Bitte treten Sie mit Ihrem Händler oder Lieferanten in Kontakt, wenn Sie elektrische und elektronische Geräte entsorgen möchten. Er hält
weitere Informationen für sie bereit.
Informationen zur Entsorgung in Ländern außerhalb der Europäischen Union
Dieses Symbol ist nur in der Europäischen Union gültig.
6'B%HOLQGE
NL4
Veiligheidsinstructies
Houdt u zich aan de volgende instructies.
Waarschuwing
Maak de stekker regelmatig schoon.
(Door een smerige stekker kan onvoldoende isolatie ontstaan vanwege het vocht en
de ophoping van stof en pluizen, waardoor brand kan ontstaan.)
«
Trek de stekker uit het contact en veeg het schoon met een droge doek.
Gebruik het apparaat niet meer en strek de stekker uit het
stopcontact in het onwaarschijnlijke geval dat dit apparaat
niet naar behoren functioneert.
(Dit kan rook, brand, elektrische schokken of brandwonden veroorzaken.)
bijvoorbeeld bij abnormale werking of demontage.
Ɣ
De stekker en het netsnoer kunnen abnormaal heet worden.
Ɣ
Het netsnoer is beschadigd of er is een stroomstoring.
Ɣ
Het hoofdgedeelte is misvormd of abnormaal heet.
Ɣ
Het apparaat maakt tijdens gebruik abnormaal geluid tijdens draaien.
«
Ontkoppel het apparaat direct en neem contact op met de verkoper of een servicecentrum
van Panasonic om het te laten controleren of repareren.
Raak de luchtgaten voor stoom niet aan en blokkeer of bedek
deze niet tijdens het gebruik.
(Dit kan brandwonden veroorzaken.)
Ɣ
Let vooral op kinderen.
Dit apparaat niet repareren, demonteren of wijzigen.
(Dit kan brand, elektrische schokken of letsel veroorzaken.)
«
Neem contact op met de verkoper of een servicecentrum van Panasonic.
Zet het apparaat niet in water en zorg dat er geen water op komt.
(Dit kan een elektrische schok veroorzaken, of brand vanwege kortsluiting.)
Dit apparaat kan gebruikt worden door kinderen vanaf 8 jaar en
ouder en personen met verminderde lichamelijke, zintuiglijke of
geestelijke vermogens, of gebrek aan ervaring en kennis, indien
dit onder toezicht gebeurt of na instructie over het gebruik op
een veilige manier van het apparaat en ze de betrokken gevaren
begrijpen. Kinderen mogen niet met het apparaat spelen. Reiniging
en onderhoud door de gebruiker mag niet worden uitgevoerd door
kinderen, tenzij ze ouder zijn dan 8 en onder begeleiding. Houd het
apparaat en het snoer buiten bereik van kinderen jonger dan 8 jaar.
(Dit kan brandwonden, letsel of elektrische schokken veroorzaken.)
Let op
Houd de stekker vast als u het uit het stopcontact trekt.
(Anders kan er een elektrische schok of brand ontstaan, vanwege kortsluiting.)
6'B%HOLQGE
Nederlands
NL5
Let op
Trek de stekker uit het stopcontact als het apparaat niet in gebruik is.
(Anders kan er een elektrische schok of brand ontstaan, vanwege lekstroom.)
Trek de stekker uit het stopcontact en laat het apparaat voor
reiniging afkoelen.
(Dit kan brandwonden veroorzaken.)
Laat de stekker niet over een tafel hangen of in aanraking
komen met een heet oppervlak.
(Dit kan brandwonden of letsel veroorzaken.)
Tijdens het gebruik mag het bakblik niet verwijderd worden of
de stekker uit het stopcontact getrokken worden.
(Dit kan brandwonden of letsel veroorzaken.)
Gebruik het apparaat niet op de volgende plaatsen.
Ɣ
Plaats de broodbakmachine op een stevig, droog, schoon
en hittebestendig werkvlak, niet te dicht bij de rand maar
minstens 10 cm (4 inches) er vandaan.
(Het apparaat kan glijden en van het werkblad vallen.)
Ɣ
Nooit neerzetten op een onstabiele ondergrond, op textiel
zoals een tafellaken, of bovenop elektrische apparaten zoals
een koelkast. (Het apparaat kan vallen of brand veroorzaken.)
Ɣ
Tijdens het bakken wordt de buitenkant van de machine warm. Er moet ten
minste 5 cm (2 inches) afstand zijn tussen de Broodbakoven en muren of andere
voorwerpen. (Dit kan verkleuring of misvorming veroorzaken.)
Raak geen hete delen aan zoals het bakblik, de binnenkant
van het apparaat, het verwarmingselement of de deksel, als
het apparaat in gebruik is of net gebruikt is.
De temperatuur van bereikbare oppervlakken kan hoog zijn
als het apparaat in werking is.
(De oppervlakken worden heet tijdens gebruik, wat brandwonden kan veroorzaken.)
«
Gebruik altijd ovenhandschoenen als u het bakblik en het gemaakte brood uit de
machine neemt om te voorkomen dat u zich brandt.
(Gebruik geen natte ovenwanten.)
Let ook goed op tijdens het verwijderen van het gebakken brood of kneedmes.
Belangrijke informatie
p
Gebruik de machine niet buiten, in de directe nabijheid van warmtebronnen en in ruimtes met een
hoge luchtvochtigheid.
(Dit kan een storing of misvorming veroorzaken.)
p
Gebruik geen excessieve kracht op de onderdelen zoals rechts staat afgebeeld.
(Dit kan een storing of misvorming veroorzaken.)
p
Dit toestel is niet geschikt voor bediening door middel van een externe timer of een
afzonderlijk afstandsbedieningssysteem.
Temperatuurmeter
Verwarmingselement
Binnenkant van het deksel
6'B%HOLQGE
NL6
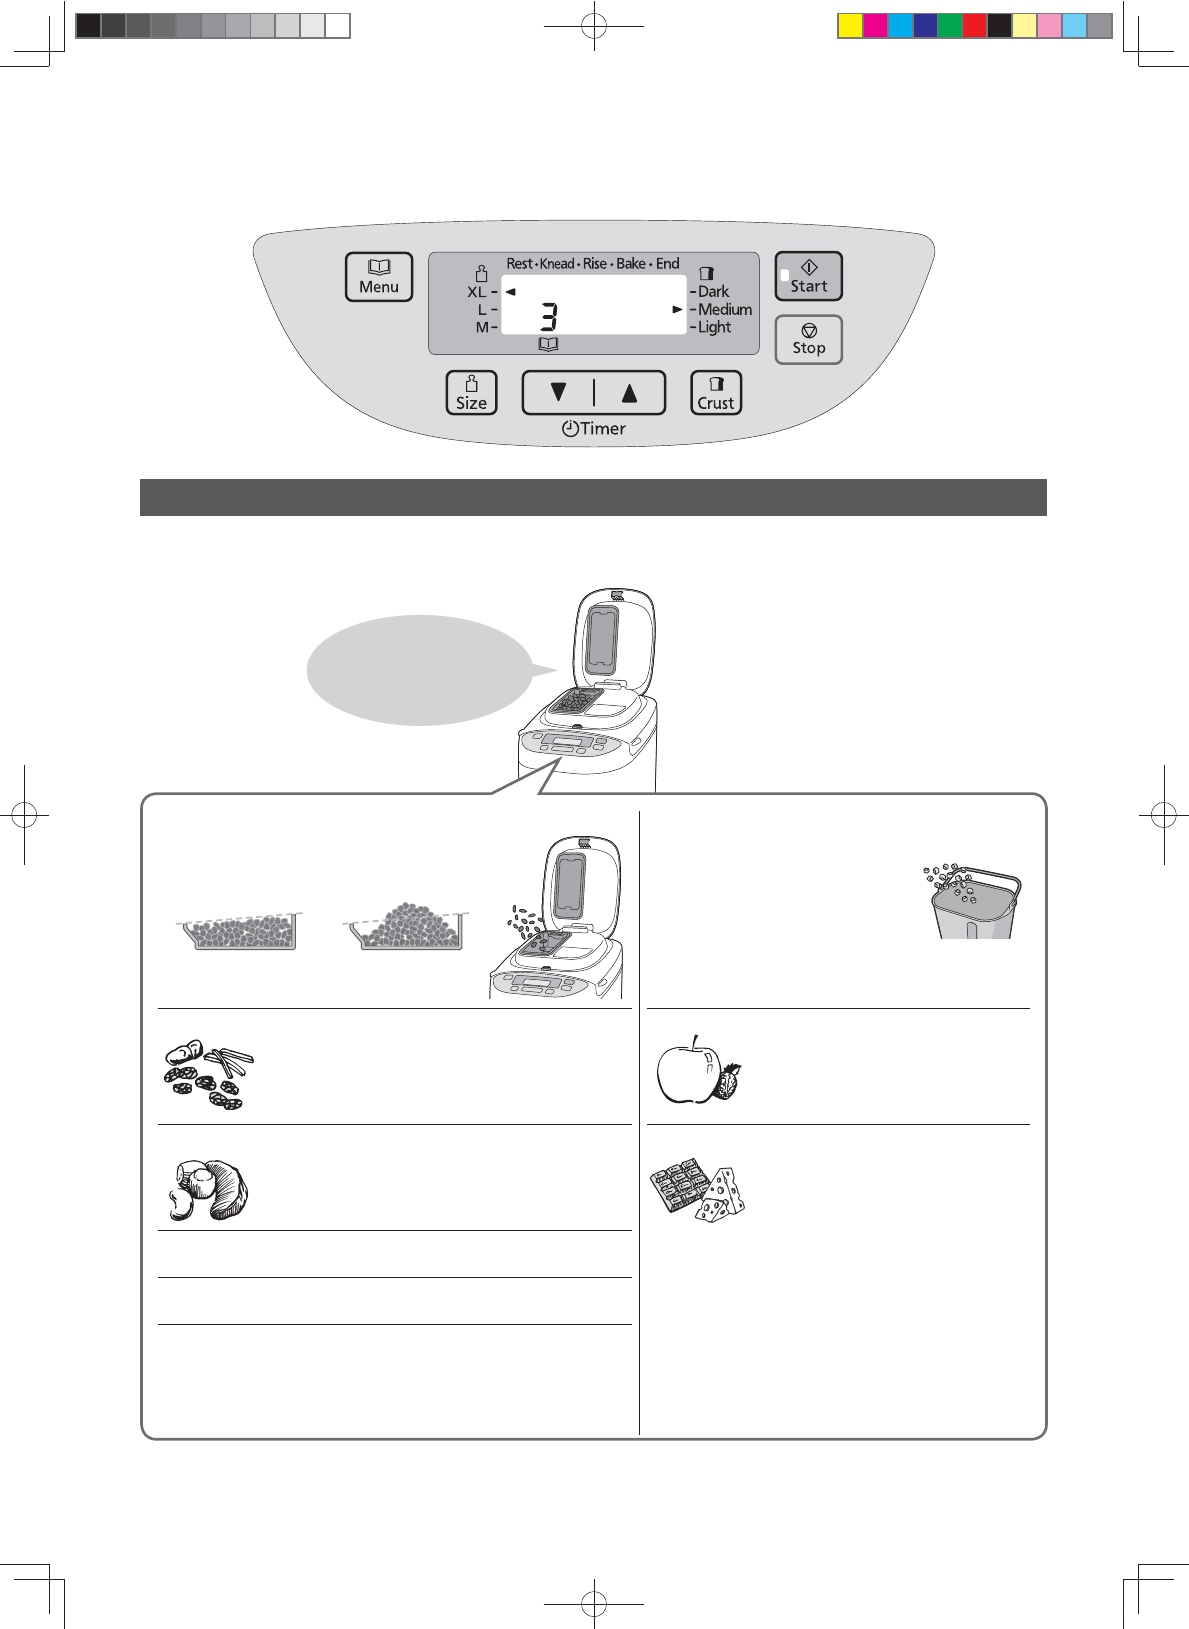
Rozijnen-notenstrooier
De ingrediënten die in de rozijnen-notenstrooier zijn gestopt vallen in het bakblik, nadat het menu met rozijnen is
gekozen (3, 4, 7, 16, 20, 21, 23 en 31).
Op pag. NL14 ziet u welke ingrediënten in de rozijnen-notenstrooier gedaan kunnen worden.
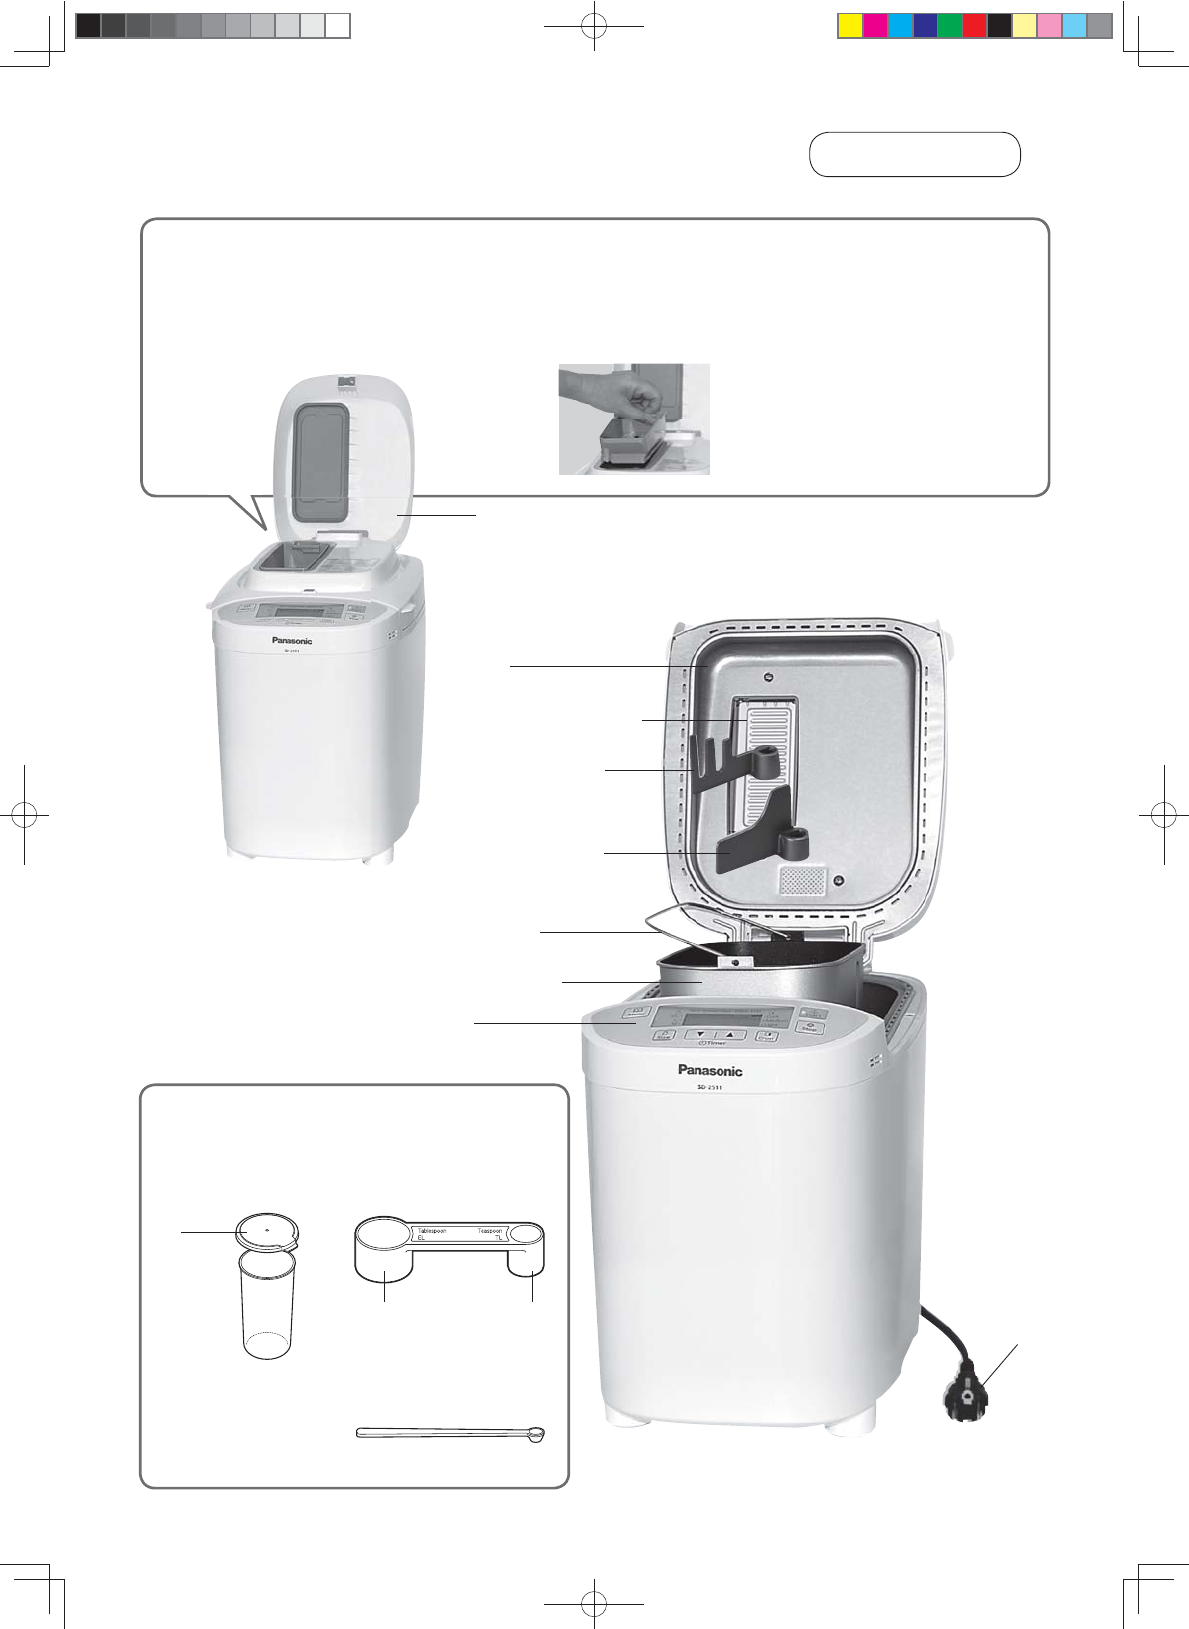
Accessoires/Onderdelen
Hoofdgedeelte
Stekker
Deksel van strooier
Bakblik
Bedieningspaneel
Deksel
Handvat
Klepje van rozijnen-
notenstrooier
Kneedmes
(roggebrood)
Kneedmes
(volkorenbrood)
Accessoires
Zuurdesem maatbeker
× 2
Om vloeistoffen te meten,
zuurdesem starter te maken
Maatlepeltje
Voor het afpassen van suiker, zout, gist etc.
•
10 mL -maatstreepjes
(max. 550 mL)
Deksel
(15 mL)(5 mL)
Eetlepel
•
1
»2-maatstreepje
Theelepel
•
1
»4,
1
»2,
3
»4-
maatstreepjess
Zuurdesem starterlepeltje
Voor het afmeten van de zuurdesem
startergist
ca. 0,1 g
6'B%HOLQGE
Nederlands
NL7
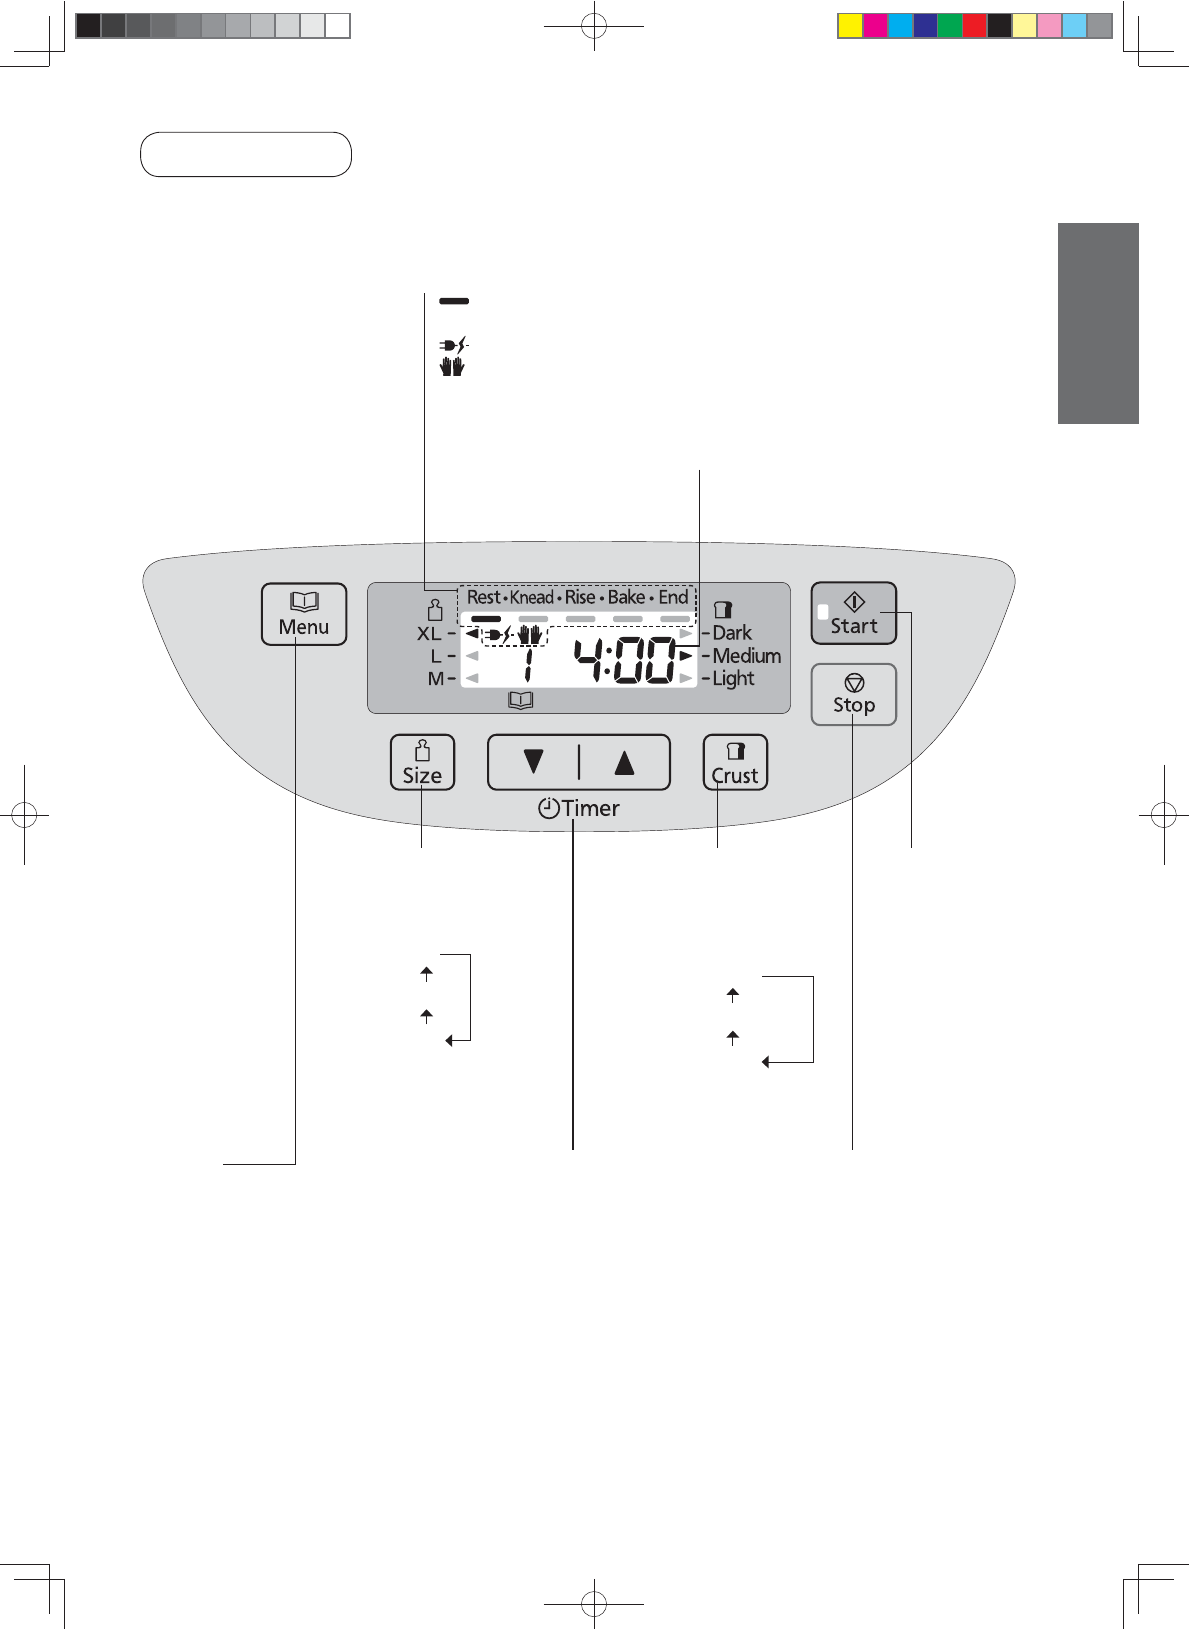
Op deze afbeelding worden alle termen en symbolen weergegeven maar tijdens het gebruik van de machine worden alleen de relevante termen en symbolen weergegeven.
Bedieningspaneel
Menu
Druk op deze knop om een menu te kiezen. Het
menunummer wordt getoond en iedere keer
als deze knop wordt ingedrukt veranderd het
menunummer naar de volgende keuze.
(Houd de knop ingedrukt om sneller naar de
volgende keuze te gaan)
Zie pag. NL10 en NL11 voor het menunummer.
Q
Gebruiksstatus
: weergegeven voor de huidige stap van het programma. Ingrediënten worden voor
het kneden gereguleerd bij de stap ‘Rest’ (Rust).
: Wordt weergegeven als er een probleem is met de stroomtoevoer.
: weergegeven bij het toevoegen van ingrediënten bij menu 4, 13, 21 en 29.
Q
Resterende tijd totdat het product gereed is
Ook als ingrediënten manueel worden bijgevoegd,
zal de display de tijd tonen tot de extra ingrediënten
in het programma zijn bijgevoegd.
Formaat
Druk op deze knop om
het formaat te kiezen.
Zie pag. NL10 voor het
beschikbare menu.
•
XL
•
L
•
M
Korst
Druk op deze knop
om de kleur van de
korst te kiezen. Zie
pag. NL10 voor het
beschikbare menu.
•
Dark (Donker)
•
Medium (Medium)
•
Light (Lichtbruin)
Start
Druk op deze knop
om het programma te
starten.
Stop
Druk op deze knop om het
programma te annuleren/stoppen.
(Het programma wordt geannuleerd/
gestopt als de toets langer dan 1
seconde ingedrukt blijft.)
Timer
Stel de vertragingstimer in (tijd
totdat het brood klaar is) of stel de
bak/kooktijd in voor menu 18, 32
en 33.
µŸ¶'UXNRSGH]HNQRSRPKHW
programma te verlengen.
µź¶'UXNRSGH]HNQRSRPGHWLMG
te verkorten.
6'B%HOLQGE
NL12
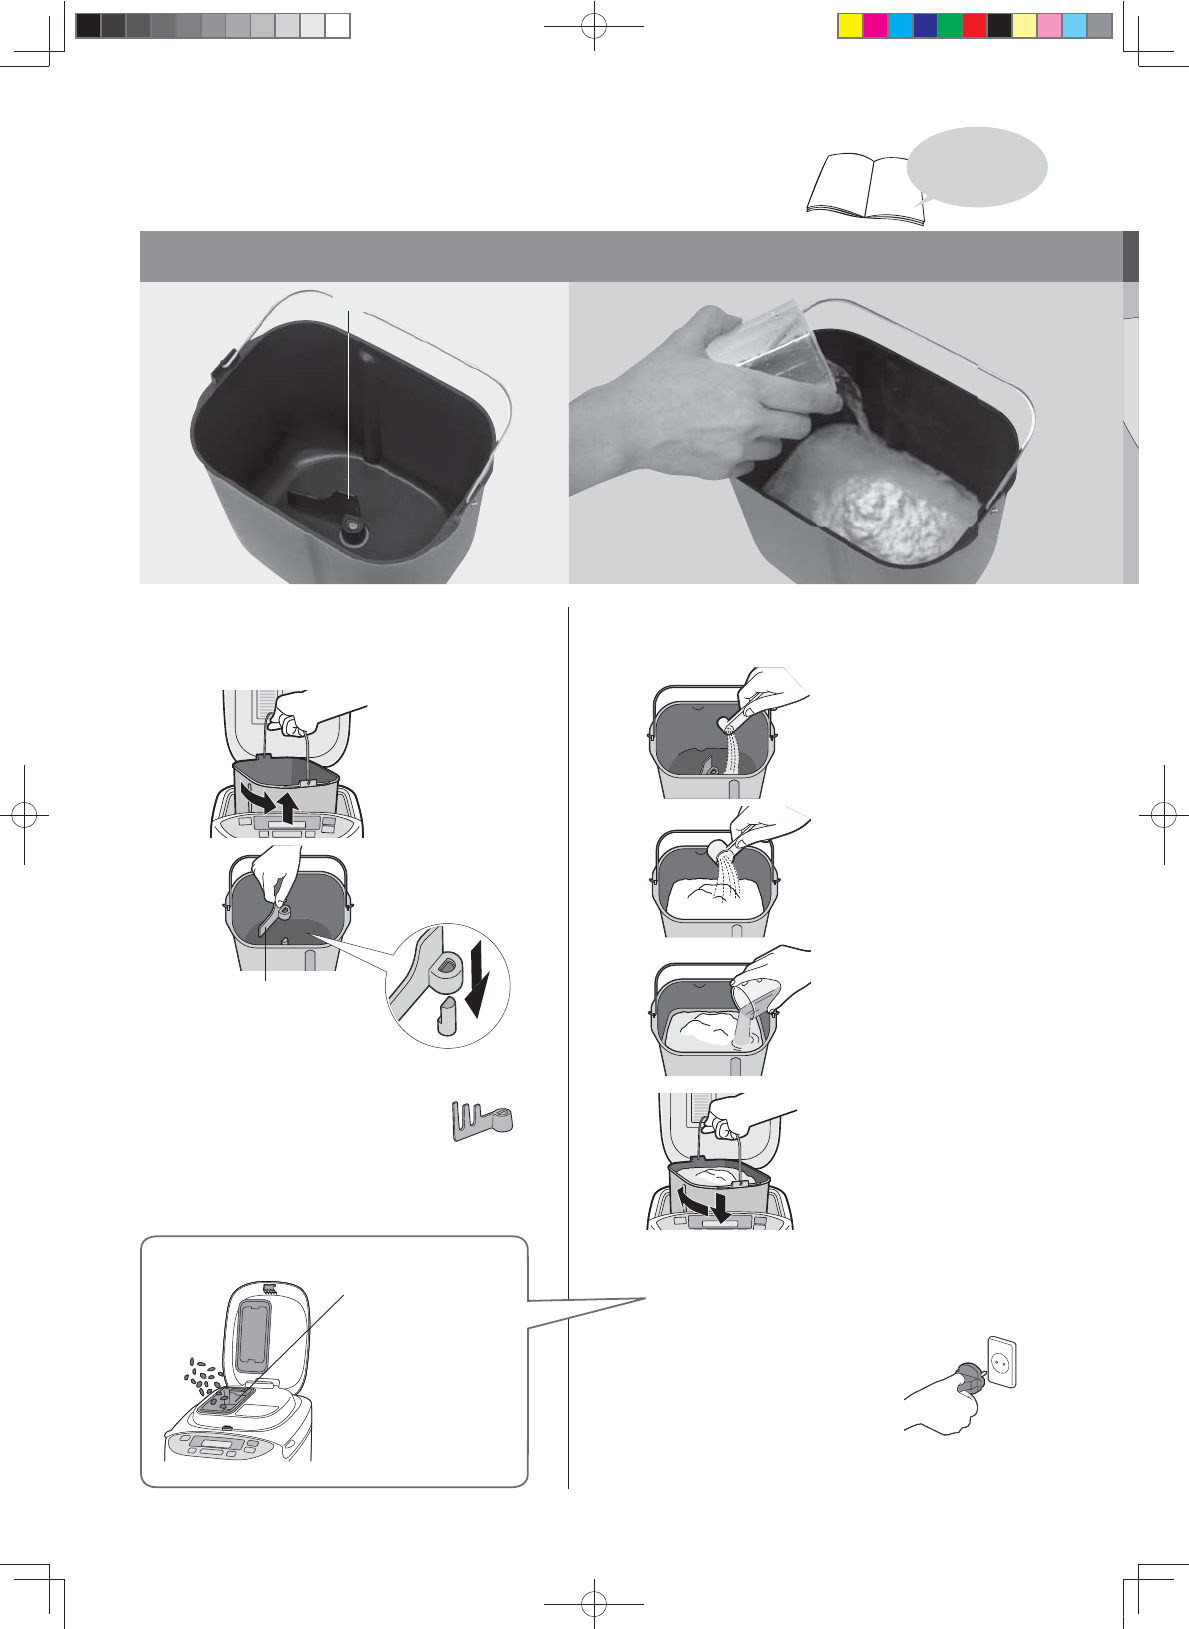
Doe de ingrediënten in het bakblik
Kneedmes
1
Neem het bakblik uit de machine en
plaats het kneedmes
Draai het bakblik een slag.
Neem het bakblik uit de
machine.
Plaats het kneedmes
stevig op de houder.
Controleer of het gedeelte
rondom de houder en de
binnenkant van het
kneedmes schoon zijn. (P. NL39)
•
Als u roggebrood gaat maken, moet
u het speciale kneedmes gebruiken.
• Het mes zit losjes op de houder maar moet wel de
bodem van het bakblik raken.
2
Doe de afgepaste ingrediënten
in het bakblik
Doe de droge gist onderin
(zodat het later niet in contact
komt met de vloeistof).
Bedek de gist met alle droge
ingrediënten. (bloem, suiker,
zout etc.).
• Bloem moet worden
afgewogen met een
weegschaal.
Voeg het water en eventuele
andere vloeistoffen toe.
Verwijder eventueel vocht en
bloem die op de buitenkant van
het bakblik is terechtgekomen.
Plaats het bakblik in de
Broodbakoven door het een
beetje van rechts naar links te
kantelen. Klap het handvat naar
beneden.
Sluit het deksel.
• Open het deksel pas als het
brood klaar is (anders gaat
het ten koste van de kwaliteit
van het brood)
3
Sluit de Broodbakoven
aan op een stopcontact van 230 V
Brood bakken met extra ingrediënten
(P. NL14)
Eerst schoonmaken
en droog maken
Open het deksel van de
strooier.
Doe de ingrediënten erin.
Sluit het deksel.
Brood bakken
Ga naar pag.
NL29–NL31 voor brood
recepten
6'B%HOLQGE
NL24
Sodabrood bakken
Ga naar pag. NL31
voor brood recepten
Q
Annuleren/
stoppen nadat het
programma is gestart
(langer dan 1 seconde
ingedrukt houden)
1
72, 4, 6
Voorbereiding
(P. NL12)
Plaats het kneedmes in het bakblik.
Plaats de ingrediënten in deze volgorde in het bakblik:
Plaats het bakblik in de machine en sluit deze aan op het stopcontact.
1
Selecteer menu ‘17’
O
Sodabrood is anders dan een brood met droge
gist.
O
Timer is niet beschikbaar bij menu 17.
(De timerknop stelt alleen de baktijd in.)
O
U kunt uw favoriete ingrediënten mengen (noten,
rozijnen, chocoladestukjes, etc.) en samen met
de andere ingrediënten in het bakblik plaatsen.
(Gebruik niet meer dan 150 gram aan extra
ingrediënten)
2
Start de machine
O
Na 3 minuten
3
Bij de pieptoon het deksel openen en de
bloem binnen 3 minuten afschrapen
Bakblik
Rubberen
spatel
O
Gebruik de rubberen spatel om het bakblik met
anti-aanbaklaag niet te beschadigen. Gebruik
geen metalen spatel.
O
Nadat 3 minuten in stap 3 zijn verstreken, klinkt
de pieptoon en het ‘Knead’ (Kneden) start
automatisch.
4
Druk nogmaals op de ‘Start’
O
Druk niet op ‘Stop’.
O
Na 1 minuut
6'B%HOLQGE
NL34
Recepten zonder gluten
Brood zonder kleefstoffen maken is zeer verschillend van de normale manier waarop u brood bakt.
Het is zeer belangrijk dat u uw arts raadpleegt en de volgende richtlijnen opvolgt indien u dieetbrood zonder kleefstoffen voor uw gezondheid
maakt.
• Dit programma is speciaal ontworpen voor bepaalde ‘gluten free’ mix en daardoor kan bij gebruik van uw eigen mengsel of mix het resultaat
niet optimaal zijn.
• Met ‘gluten free’ (zonder kleefstoffen) gekozen, moeten de details van ieder recept exact worden opgevolgd. (Het brood zal anders niet goed
zijn.)
Er zijn twee soorten mix zonder kleefstoffen; een ‘laag kleefstoffen’ mix die gebaseerd is op granenmeel en een ‘zonder kleefstoffen’ mix,
gebaseerd op meel zonder granen.
U dient uw arts te raadplegen welke mix voor u de juiste is indien u een speciaal dieet volgt en dit programma gebruikt voor het bakken van
brood om gezondheidsredenen.
• Het resultaat is afhankelijk van de mix die u gebruikt.
Het is mogelijk dat er wat bloem aan de kant van het brood overblijft.
• Voor een beter resultaat, wacht tot het brood afgekoeld is voor het snijden.
• Het brood moet op een koele droge plaats worden bewaard en binnen 2 dagen worden gebruikt.
U kunt het brood in diepvrieszakjes of doosjes invriezen indien u het brood niet binnen twee dagen gaat gebruiken.
Waarschuwing als u dit programma uit gezondheidsoverwegingen gebruikt:
Als u het kleefstoffenvrije programma gebruikt, raadpleeg dan eerst uw arts of de Coeliakie Vereniging en gebruik alleen ingrediënten
die geen schade kunnen toebrengen aan uw gezondheid.
Panasonic is niet verantwoordelijk voor eventuele schade als gevolg van het gebruik van ingrediënten waarvoor niet van tevoren
toestemming is gevraagd aan een arts.
U moet het mengen met bloem die wel kleefstoffen bevat voorkomen indien u het brood voor uw dieet zonder kleefstoffen moet maken. Let
vooral op dat het bakblik, kneedmes en andere te gebruiken voorwerpen goed schoon zijn.
Voor klanten die in België woonachtig zijn
Voor de kleefstoffenvrije recepten hieronder zijn commercieel klaargemaakte kleefstoffenvrije broodmixen van AVEVE gebruikt.
Deze zijn verkrijgbaar bij de drogist, bij natuurvoedingswinkels en soms bij grote supermarkten.
Voor meer informatie over AVEVE producten, kunt u het op 0800/0229210.
BROOD ZONDER GLUTEN
Selecteer menu ‘14’
water320 mL
eetlepel olie1
meel zonder kleefstoffen500 g
theelepel met gist2
OPMERKING
Voor dit programma is er geen mogelijkheid om het formaat te bepalen.
BROOD ZONDER GLUTEN MET EIEREN
Selecteer menu ‘14’
water100 mL
melk180 mL
eieren2
eetlepel olie1
meel zonder kleefstoffen500 g
theelepel met gist2
6'B%HOLQGE
FR11
Français
OptionsProcessus
Numéro
de menu
Menu
TailleCroûte
Départ
différé
Repos
Pétrissage
LeveeCuissonTotal
Pâte
19Basique
———
30 min–
50 min
15–30 min
^
4
1 h 10 min–
1 h 30 min
—
2 h 20 min
20
Basique
raisins secs
———
30 min–
50 min
15–30 min
^
4
1 h 10 min–
1 h 30 min
—
2 h 20 min
21
Pain morceaux
entiers
———
30 min–
50 min
25–30 min
^
4
1 h 5 min–
1 h 20 min
—
2 h 20 min
22Pain complet
———
55 min–
1 h 25 min
15–25 min
^
4
1 h 30 min–
2 h
—
3 h 15 min
23
Pain complet
raisins secs
———
55 min–
1 h 25 min
15–25 min
^
4
1 h 30 min–
2 h
—
3 h 15 min
24Seigle
———
45 min–
60 min
env.
10 min
——
2 heures
25Pain croûté
———
40 min–
1 h 45 min
10–20 min
1 h 35 min–
2 h 40 min
—
3 h 35 min
26
Pain au
levain
———
0–40 min45–55 min
1 h 5 min–
1 h 35 min
—
2 h 30 min
27Levain
—————
24 heures
—
24 heures
28Pizza
——
O
(Pétrissage)
10–18 min
(Levee)
7–15 min
(Pétrissage)
env. 10 min
(Levee)
env. 10 min
45 min
29Brioche
———
30 min
25–45 min
^
4
35 min
—
1 h 50 min
30Spécialité
———
30 min–
1 h 5 min
15–30 min
^
4
1 h 10 min–
1 h 55 min
—
2 h 45 min
31
Spécialité
aux raisins
———
30 min–
1 h 5 min
15–30 min
^
4
1 h 10 min–
1 h 55 min
—
2 h 45 min
32Confiture
———————
1 h 30 min–
2 h 30 min
33Compote
———————
1 h–
1 h 40 min
6'B%HOLQGE
FR12
Placez les ingrédients dans le moule à pain
Bras pétrisseur
1
Sortez le moule à pain et
installer le bras pétrisseur
Faites pivoter le moule à
pain.
Enlevez le moule.
Placez le bras
pétrisseur fermement
sur l’axe.
Contrôlez l’axe et
l’intérieur du bras pour
vous assurer qu’ils sont
bien propres. (P. FR39)
•
Pour la cuisson de pain de seigle,
utilisez le bras pétrisseur spécial.
• Le bras pétrisseur n’est pas bloqué mais il doit toucher
le fond du moule.
2
Versez les ingrédients dosés
dans le moule à pain
Versez la levure au fond (de
telle sorte qu’elle ne soit pas
en contact avec le liquide par
la suite).
Recouvrez la levure avec tous
les ingrédients secs. (farine,
sucre, sel etc.)
• La farine doit être pesée avec
une balance.
Versez l’eau et les autres
liquides éventuels.
Essuyez l’humidité et la farine
résiduelles sur le pourtour du
moule.
Placez le moule à l’intérieur
de l’appareil en le tournant
légèrement de droite à gauche.
Abaissez la poignée.
Fermez le couvercle.
• N’ouvrez pas le couvercle
pendant la cuisson du pain
(la qualité du pain en serait
affectée).
3
Branchez l’appareil
dans une prise 230 V
Cuisson du pain avec ajout d’ingrédients
(P. FR14)
Veillez d’abord à
nettoyer et à essuyer
Ouvrez le couvercle du
distributeur.
Placez les ingrédients.
Fermez le couvercle.
Cuisson du pain
Reportez-vous
P. FR29–FR31 pour les
recettes de pain
6'B%HOLQGE
FR13
Français
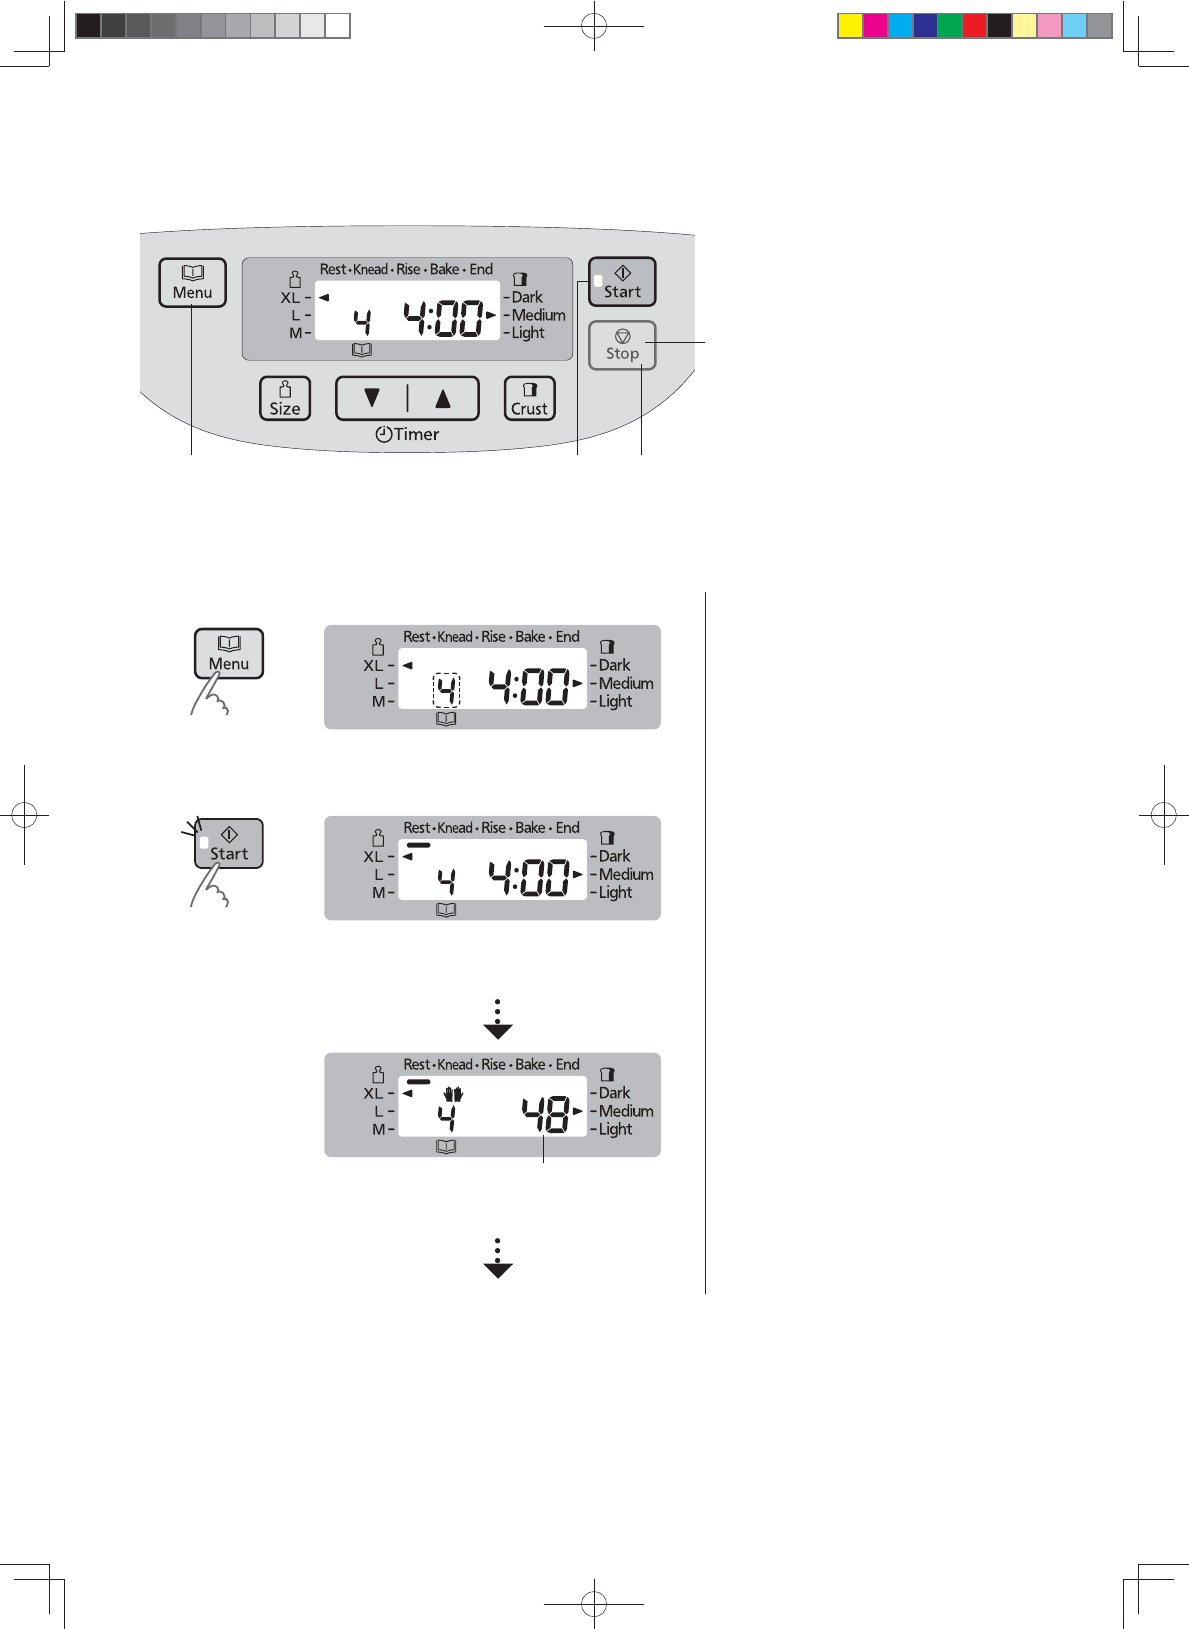
Sélectionnez le programme et démarrez
Enlevez le pain
.
4
Choisissez un menu de cuisson
(L’affichage montre quand le menu ‘1’ est choisi.)
Q
Modifier la taille
Q Modifier la couleur de la croûte
O
Aller à la P. FR10 pour le menu, la disponibilité de taille et la croûte.
Q
Régler le départ différé (facultatif)
«
par ex. Il est 21:00, et vous voulez que le pain soit prêt à 6:30 le lendemain
matin.
«
Réglez la durée sur ‘9:30’ (9 heures 30 minutes à compter de
maintenant).
12
9
6
3
12
9
6
3
9h 30m
à compter de maintenant
Heure actuelleHeure pain prêt
•
Une pression sur le bouton rallonge la durée de 10 minutes (maintenez-le
enfoncé pour avancer plus vite)
•
Peut être réglé jusqu’à 9 heures en utilisant le menu 10.
5
Pressez ‘Start’ (Marche)
Durée prévue avant la fin du programme sélectionné
p
Quand ‘Start’ (Marche) a été pressé au début, le menu 1 commence.
6
Eteignez l’appareil
quand le pain est prêt
[la machine fait bip-bip 8 fois et la barre sur
‘End’ (Fin) clignote.]
7
Enlevez le pain
immédiatement,
Moule à
pain
Gant de
protection
laissez refroidir, par exemple sur une grille
8
Débranchez l’appareil
(en tirant sur la fiche)
après utilisation
p
Si vous n’appuyez pas sur ‘Stop’ (Arrêt)
et ne sortez pas le pain de l’appareil
pour le refroidir, la machine à pain
le gardera au chaud pour réduire la
condensation de vapeur dans la miche.
p
Cependant, la croûte deviendra de
plus en plus foncée. Une fois que
le pain est cuit, il convient donc de
débrancher l’appareil et de sortir le pain
immédiatement pour le refroidir.
p
Si vous laissez le pain refroidir dans le
moule, de la condensation se produira.
C’est pourquoi il est conseillé de laisser
la miche refroidir sur une grille pour
assurer un pain d’une qualité optimale.
6'B%HOLQGE
FR19
Français
ÉTAPE 2 Cuisson de pain au levain
Voir P. FR29 pour les
recettes de pain
Q
Pour annuler/arrêter
après le démarrage
(maintenez enfoncé plus
de 1 seconde)
1
32
Préparations
(P. FR12)
Placez le bras pétrisseur dans le moule à pain.
Versez le levain dans le moule à pain.
Placez les ingrédients dans le moule à pain dans l’ordre suivant :
farine à pain blanche à base de blé dur ĺ sel ĺ levure sèche (tenir éloigné du sel) ĺ eau (tenir éloigné de la levure,
versez l’eau autour de la farine à pain blanche à base de blé dur).
eau
levain
levure sèche
sel
farine à pain blanche
à base de blé dur
Placez le moule à pain dans l’appareil et branchez la machine.
1
Sélectionnez le menu ‘10’
O
Quand la température ambiante dépasse 30°C, la
qualité du pain s’amoindrit.
2
Pressez Marche
Durée prévue avant la fin du programme sélectionné
O
Le voyant ‘Start’ (Marche) s’allume.
3
Appuyez sur ‘Stop’ (Arrêt) et retirez le
pain
quand la machine fait bip-bip 8 fois et la barre sur ‘End’ (Fin) clignote
O
Le voyant ‘Start’ (Marche) clignotant s’éteint.
6'B%HOLQGE
FR23
Français
Préparation de pâte pour pain morceaux entiers
Voir P. FR32 pour les
recettes de pâtes
Q
Pour annuler/arrêter
après le démarrage
(maintenez enfoncé plus
de 1 seconde)
1
42, 3
Préparations
(P. FR12)
Placez le bras pétrisseur dans le moule à pain.
Placez les ingrédients dans le moule à pain dans leur ordre d’apparition dans la recette.
Placez le moule à pain dans l’appareil et branchez la machine.
1
Sélectionnez le menu ‘21’
O
Le départ différé n’est pas disponible avec les
menus Pâte (sauf menu 28).
2
Pressez Marche
Temps restant avant l’ajout des ingrédients supplémentaires.
* L’affichage ci-dessus s’applique pour les cas à haute température.
‘58’ s’affiche pour les cas à basse température.
O
Le voyant ‘Start’ (Marche) s’allume.
3
Ajoutez les ingrédients supplémentaires
lorsque le signal sonore retentit, puis
appuyez de nouveau sur le ‘Start’ (Marche)
Finissez d’ajouter les ingrédients supplémentaires pendant que ‘’ clignote.
‘Knead’ (Pétrissage) et ‘Bake’ (Cuisson) démarrent automatiquement au bout de
5 min, même sans l’ajout d’ ingrédients supplémentaires et sans pression sur le
bouton Start.
Une fois le bouton
Start pressé
L’affichage indique le temps restant jusqu’à la fin du programme
* L’affichage ci-dessus s’applique pour les cas à haute température.
Le temps restant varie selon la température ambiante.
Basse température: 1:20–1:22
Haute température: 1:10–1:12
O
Pour les ingrédients, utilisez maximum 100 g pour
la taille M, 125 g pour la taille L ou 150 g pour la
taille XL.
O
Même sans presser le bouton Start, le pétrissage
continuera après 5 mn. Il ne continue pas à
pétrir immédiatement, même si le bouton Start
est pressé après avoir ajouté le beurre ou des
ingrédients.
O
N’ajoutez plus d’ingrédients une fois que le temps
restant est affiché à l’écran. (P. FR43)
O
Consultez P. FR17 pour l’Ajout automatique et
manuel d’une liste d’ingrédients supplémentaires.
4
Appuyez sur ‘Stop’ (Arrêt) et retirez le pâton
quand la machine fait bip-bip 8 fois et la barre sur ‘End’ (Fin) clignote
O
Le voyant ‘Start’ (Marche) clignotant s’éteint.
p
Donnez forme à la pâte terminée et laissez-la
lever une deuxième fois selon la recette, puis
cuisez-la au four.
6'B%HOLQGE
IT7
Italiano
Questa immagine mostra tutti i termini e i simboli. Tuttavia durante il funzionamento dell’apparecchio verranno visualizzati soltanto quelli pertinenti.
Pannello di controllo
Menu
Premere questo tasto per selezionare i menu. Verrà
visualizzato il numero del menu che cambierà ad
ogni pressione di questo tasto per mostrare quello
successivo. (tenere premuto il tasto per avanzare
più rapidamente)
Fare riferimento alle P. IT10 e IT11 per i numeri dei
menu.
Q
Stato di funzionamento
: indica la fase attuale del programma. Gli ingredienti sono nella fase ‘Rest’ (Riposo)
prima dell’impastatura.
: viene visualizzato in caso di problemi di alimentazione.
:
viene visualizzato quando si aggiungono ingredienti manualmente con il menu 4, 13, 21 e 29.
Q
Tempo rimanente alla fine della cottura
Inoltre, quando si aggiungono gli ingredienti
manualmente, il display indicherà il tempo rimanente
fino al momento del programma in cui sarà possibile
introdurre gli ingredienti aggiuntivi.
Dimensioni
Premere questo tasto per
selezionare le dimensioni.
Fare riferimento alla P. IT10
per i menu disponibili.
•
XL
•
L
•
M
Crosta
Premere questo tasto
per selezionare il
colore della crosta.
Fare riferimento alla
P. IT10 per i menu
disponibili.
•
Dark (Scura)
•
Medium (Media)
•
Light (Dorata)
Avvio
Premere questo
tasto per avviare il
programma.
Arresto
Premere questo tasto
per cancellare/arrestare il
programma.
(per cancellare/arrestare il
programma, tenere premuto il
tasto per più di 1 secondo).
Timer
Impostazione del delay timer
(tempo rimanente fino a cottura
ultimata del pane) o impostazione
del tempo di cottura per i menu
18, 32 e 33.
µŸ¶3UHPHUHTXHVWRWDVWRSHU
aumentare il tempo.
µź¶3UHPHUHTXHVWRWDVWRSHU
diminuire il tempo.
6'B%HOLQGE
IT8
Ingredienti per la preparazione del pane
Farina
E’ l’ingrediente principale del pane, contiene glutine (che favorisce
la lievitazione del pane donandogli una consistenza solida)
p
Utilizzare farina di semola di grano duro. Non utilizzare farina di grano tenero
tipo ‘0’ o ‘00’.
p
La farina deve essere pesata sulla bilancia.
La farina di semola di grano duro viene
prodotta dalla macinazione del grano duro
e presenta un elevato contenuto di proteine
necessarie per la formazione del glutine.
L’anidride carbonica prodotta
durante la fermentazione viene
intrappolata nel tessuto
elastico del glutine e consente
all’impasto di lievitare.
Farina bianca
Viene prodotta macinando
il chicco del grano, esclusa
crusca e germe. Il tipo
migliore di farina per la
preparazione del pane è la
farina ‘speciale per pane’.
p
Non utilizzare farina tipo ‘0’ o farina autolievitante in
sostituzione della farina per pane.
Farina integrale
Viene prodotta macinando il chicco intero del grano,
inclusi crusca e germe. Da questa farina si ottiene un
pane molto salutare.
Questo pane è più basso e più pesante rispetto a
quello ottenuto con la farina bianca.
Farina di segale
Viene prodotta macinando il chicco di segale. Rispetto alla farina
bianca contiene una maggiore quantità di ferro, magnesio e
potassio, elementi indispensabili per la salute dell’uomo. Non
contiene però una quantità sufficiente di glutine. Da questo tipo di
farina si ottiene un pane denso e pesante. Non utilizzare quantità
superiori rispetto a quelle specificate (altrimenti si rischia di
sovraccaricare il motore).
Prodotti caseari
Maggior sapore e valore nutrizionale.
p
Se si utilizza il latte al posto dell’acqua, il valore
nutrizionale del pane sarà maggiore; in tal caso non
utilizzare l’impostazione ‘in timer’ poiché non potrebbe
mantenersi fresco per tutta la notte.
«
Ridurre la quantità di acqua in misura proporzionale
rispetto a quella del latte.
Farina di farro
Il farro appartiene alla famiglia delle graminacee ma dal punto di vista genetico è una specie completamente diversa.
Pur contenendo glutine risulta in genere digeribile dai celiaci. (Consultare il proprio medico.)
Da questo tipo di farina si ottengono pagnotte con una crosta piatta, leggermente incavata.
Il pane preparato con farina di farro integrale risulta più basso e denso rispetto a quello preparato con farina di farro bianco.
Si consiglia di utilizzare la farina di farro bianco in quantità superiori alla metà della farina totale.
p
In commercio vengono vendute indistintamente come farro due qualità diverse: il farro grande (Triticum spelta) adatto per la preparazione del
pane e il Triticum monococcum, (chiamato anche piccolo farro) non indicato per la preparazione del pane. Utilizzare il farro grande.
(utilizzare i menu 15, 16, 30 o 31)
6'B%HOLQGE
IT9
Italiano
Acqua
p
Utilizzare la normale acqua di rubinetto.
p
Utilizzare acqua tiepida con i menu 2, 6, 8, 14 o 24 in un
ambiente freddo.
p
Utilizzare acqua fredda con i menu 8, 9, 13, 15, 16, 24, 25, 29, 30
o 31 in un ambiente caldo.
p
Misurare sempre i liquidi utilizzati mediante il bicchiere dosatore
per lievito naturale fornita in dotazione.
Sale
Arricchisce il gusto e dà maggiore forza all’azione
del glutine contribuendo a far lievitare il pane.
p
Il pane potrebbe risultare di dimensioni minori/perdere
gusto se la misurazione non è precisa.
Grassi
Arricchisce il sapore e la morbidezza del pane.
p
Si consiglia di utilizzare burro (non salato) o magarina.
Zucchero
(zucchero semolato, zucchero di canna,
miele, melassa, ecc.)
Aumenta l’azione lievitante, addolcisce e aggiunge
gusto al pane, cambiandone il colore della crosta.
p
Utilizzare quantità minori di zucchero se si aggiungono
all’impasto uvetta o altri frutti contenti fruttosio.
Lievito in polvere
Fa lievitare il pane.
p
Accertarsi di utilizzare lievito in polvere che non necessiti di prefermentazione (non adoperare lievito fresco o lievito
in polvere che necessita di prefermentazione prima dell’utilizzo)
p
Si consiglia l’utilizzo del lievito con la dicitura ‘lievito istantaneo’ sulla confezione.
p
Quando si adopera il lievito in bustine, richiudere immediatamente la bustina dopo l’utilizzo e conservarla in
frigorifero. (Utilizzare entro la data di scadenza consigliata dal produttore)
Utilizzo di miscele per pane...
w
Miscele per pane contenenti lievito
Porre la miscela nel cestello del pane, quindi
aggiungere acqua. (Seguire le istruzioni riportate sulla
confezione per la quantità di acqua necessaria)
Selezionare il menu 2, scegliere una dimensione in
base al volume della miscela e iniziare la cottura.
•
600 g – XL
•
500 g – L
p
La quantità di lievito contenuta in alcune miscele non è
specificata in maniera esatta; potrebbe pertanto essere
necessario fare alcune prove prima di ottenere i risultati
desiderati.
w
Miscele per pane con sacchetto di lievito separato
Porre per primo il lievito nel cestello del pane, quindi
aggiungere la miscela e l’acqua.
Impostare la macchina in base al tipo di farina
contenuta nella miscela e iniziare la cottura.
•
Farina bianca, farina scura
«
menu 1
•
Farina integrale, farina ai cereali
«
menu 5
•
farina di segale
«
menu 8
w
Cottura di brioche con miscela per brioche
p
Selezionare il menu 13 o 2 dimensione ‘Medium’
(Media) - colore della crosta ‘Light’ (Dorata). (P. IT43)
w
È possibile arricchire il sapore del pane aggiungendo
altri ingredienti:
Uova
Aumentano il valore nutrizionale e
migliorano il colore del pane. (la quantità
di acqua deve essere ridotta in misura
proporzionale) Sbattere le uova prima di
aggiungerle all’impasto.
Crusca
Aumenta il contenuto in fibre del pane.
•
Utilizzare al max. 75 mL (5 cucchiai).
Germe di grano
Dona al pane un sapore simile a quello
della noce.
•
Utilizzare al max. 60 mL (4 cucchiai).
Spezie
Arricchiscono il gusto del pane.
•
Utilizzare solo in piccole quantità
(1–2 cucchiai).
6'B%HOLQGE
SP22
Hacer masa para brioche
1
42, 3
Consulte las
recetas de masa en la
página SP32
Q
Para cancelar/parar
después del inicio
(mantenga pulsado el
botón durante más de
1 segundo)
Preparativos
(página SP12)
Corte la mantequilla para añadir más tarde en cubos de 1–2 cm y manténgala en el frigorífico.
Coloque la pala de amasar dentro del recipiente del pan.
Ponga los ingredientes en el recipiente del pan en el orden que se indica en la receta.
Introduzca el recipiente del pan en la unidad principal y enchufe la máquina a la toma de corriente.
1
Seleccione el menú ‘29’
O
El temporizador no está disponible en los menús
de masa (excepto el menú 28).
[Método simple para hacer masa
de brioches]
Añada la mantequilla junto
con los demás ingredientes al
principio.
p
Corte la mantequilla en cubos de 2 cm e
introdúzcalos en el recipiente del pan al mismo
tiempo que los demás ingredientes.
p
Siga los pasos que se muestran a la izquierda. Sin
embargo, cuando la máquina pite en el paso 3 para
añadir la mantequilla adicional, no haga nada.
p
El tiempo necesario para la elaboración es de
1 hora y 50 minutos.
* Cuando se añade la mantequilla al principio,
el sabor, la textura y la elevación del pan son
algo diferentes a cuando el pan se cuece con la
mantequilla adicional añadida más tarde.
2
Inicie la máquina
Tiempo que falta para anadir la mantequilla o ingredientes
O
Se encenderá la luz de inicio.
3
Añada la mantequilla adicional cuando
se oiga el pitido y pulse otra vez el botón
Iniciar
Termine de poner la mantequilla adicional en cubos mientras ‘’ está
parpadeando.
Después de pulsar
el botón Iniciar
La pantalla indica el tiempo que falta hasta que termine el programa
O
Cuando vaya a añadir ingredientes adicionales
como las pasas, incorpórelas con la mantequilla.
(Utilice como máximo 150 g de ingredientes)
O
Aunque no pulse el botón Iniciar, el amasado
continuará después 5 min. El amasado no
continúa inmediatamente, aunque se pulse el
botón Iniciar después de añadir mantequilla u
otros ingredientes.
O
No añada mantequilla después de que la pantalla
muestre el tiempo restante. (página SP43)
4
Pulse ‘Stop’ (Parar) y extraiga la masa
cuando la máquina emita 8 pitidos y parpadee la barra de ‘End’ (Fin)
O
Se apagará la luz de inicio parpadeante.
O
Dé forma a la masa acabada y deje que suba por
segunda vez según la receta y después cuézalo
en el horno.
6'B%HOLQGE
SP23
Español
Hacer masa de pan aderezado
Consulte las
recetas de masa en la
página SP32
Q
Para cancelar/parar
después del inicio
(mantenga pulsado el
botón durante más de
1 segundo)
1
42, 3
Preparativos
(página SP12)
Coloque la pala de amasar dentro del recipiente del pan.
Ponga los ingredientes en el recipiente del pan en el orden que se indica en la receta.
Introduzca el recipiente del pan en la unidad principal y enchufe la máquina a la toma de corriente.
1
Seleccione el menú ‘21’
O
El temporizador no está disponible en los menús
de masa (excepto el menú 28).
2
Inicie la máquina
Tiempo que debe transcurrir hasta la incorporación de los ingredientes
adicionales
* La imagen de arriba es para el caso de temperatura elevada.
En caso de baja temperatura, se mostrará ‘58’.
O
Se encenderá la luz de inicio.
3
Añada los ingredientes adicionales
cuando se oiga el pitido y pulse otra vez
el botón Iniciar
Termine de añadir los ingredientes adicionales mientras ‘’ esté parpadeando.
Incluso sin añadir ingredientes adicionales ni pulsar el botón Iniciar, ‘Knead’
(Amasar) y ‘Bake’ (Cocer) se iniciarán automáticamente después de 5 min.
Después de pulsar
el botón Iniciar
La pantalla indica el tiempo que falta hasta que termine el programa
* La imagen de arriba es para el caso de temperatura elevada.
El tiempo restante variará en función de la temperatura ambiente.
Baja temperatura: 1:20–1:22
Temperatura elevada: 1:10–1:12
O
Para los ingredientes, utilice un máx. de 100 g en
el tamaño M, 125 g en el tamaño L o 150 g en el
tamaño XL.
O
Aunque no pulse el botón Iniciar, el amasado
continuará después 5 min. En amasado no
continúa inmediatamente, aunque de pulse el
botón Iniciar después de añadir mantequilla u
otros ingredientes.
O
No añada ingredientes una vez que la pantalla
muestre el tiempo restante. (página SP43)
O
Vaya a la página SP17 para ver la lista de
ingredientes que se añaden de forma automática
y manual.
4
Pulse ‘Stop’ (Parar) y extraiga la masa
cuando la máquina emita 8 pitidos y parpadee la barra de ‘End’ (Fin)
O
Se apagará la luz de inicio parpadeante.
p
Dé forma a la masa acabada y deje que suba por
segunda vez según la receta y después cuézalo
en el horno.
6'B%HOLQGE
SP24
Cocer pan de soda
Consulte las
recetas de pan en la
página SP31
Q
Para cancelar/parar
después del inicio
(mantenga pulsado el
botón durante más de
1 segundo)
1
72, 4, 6
Preparativos
(página SP12)
Coloque la pala de amasar dentro del recipiente del pan.
Ponga los ingredientes en el recipiente del pan en el orden siguiente:
Libble takes abuse of its services very seriously. We're committed to dealing with such abuse according to the laws in your country of residence. When you submit a report, we'll investigate it and take the appropriate action. We'll get back to you only if we require additional details or have more information to share.
Product:
Forumrules
To achieve meaningful questions, we apply the following rules:
First, read the manual;
Check if your question has been asked previously;
Try to ask your question as clearly as possible;
Did you already try to solve the problem? Please mention this;
Is your problem solved by a visitor then let him/her know in this forum;
To give a response to a question or answer, do not use this form but click on the button 'reply to this question';
Your question will be posted here and emailed to our subscribers. Therefore, avoid filling in personal details.
Register
Register getting emails for Panasonic SD-2511 at:
new questions and answers
new manuals
You will receive an email to register for one or both of the options.
Get your user manual by e-mail
Enter your email address to receive the manual of Panasonic SD-2511 in the language / languages: English, German, Dutch, French, Italian, Spanish as an attachment in your email.
The manual is 10,64 mb in size.
You will receive the manual in your email within minutes. If you have not received an email, then probably have entered the wrong email address or your mailbox is too full. In addition, it may be that your ISP may have a maximum size for emails to receive.
The manual is sent by email. Check your email
If you have not received an email with the manual within fifteen minutes, it may be that you have a entered a wrong email address or that your ISP has set a maximum size to receive email that is smaller than the size of the manual.
The email address you have provided is not correct.
Please check the email address and correct it.
Your question is posted on this page
Would you like to receive an email when new answers and questions are posted? Please enter your email address.