Your DIGA switches on. Play starts if there is a disc in the tray. If a disc is not in the tray, DIGA
plays the television program last recorded to the hard disk.
Your VIERA switches on and input switches.
This unit switches on, input switches to “DVR”, and multi-channel play starts.
Press [+ VOLUME -] to adjust the volume.
You can also adjust the volume with VIERA’s remote control.
(An indicator appears on the television showing that you are adjusting this unit’s volume.)
If the beginning of the program is cut off, press [u SKIP] to skip back to the beginning.
1.
2.
3.
DVD
(TV/STB)
OPTICAL1
YPBPRYYPBPRPBPR
BI-WIRE
LFHF
DIGITAL IN
(DVD RECORDER)
(BD/DVD PLAYER)
(CD)
OPTICAL2COAXIAL1
COAXIAL2
OUT(DVD RECORDER)IN
SVIDEO
TV MONITOR
DVD PLAYER
DVD RECORDER
TV/STB
VIDEO
TV MONITORDVD PLAYER
IN
DVD RECORDER
IN
VCR
IN
TV/STB
L
R
IN
CD
CENTER
SUBWOOFER
SURROUND
FRONT
DVD/DVD 6CH IN
AUDIO
IN
DVD RECORDER
IN
VCR
IN
TV/STB
OUT
SUBWOOFER
LR
FRONTAFRONTB
LR
CENTERSURROUND
LR
SURROUND BACK
LR
TV MONITOR OUTDVD RECORDER IN
COMPONENTVIDEO
TV / STB IN
LOOPEXTLOOPEXTLOOPEXT
AM ANTFM ANT
LOOP ANT
GND
SPEAKERS
OUT
(BD/DVD PLAYER) IN(DVD RECORDER)IN
OUT
INININ
OUTIN
BD/BD/
Using the VIERA Link “HDAVI Control
TM
”
VIERA Link “HDAVI Control”
This convenient feature links control of your receiver and your other Panasonic home theater equipment. VIERA televisions and
DIGA DVD recorders connected with an HDMI cable can be controlled in this way. For details, refer to the operating instructions of
your other equipment.
VIERA Link “HDAVI Control”, based on the control functions provided by HDMI which is an industry standard known as HDMI
CEC (Consumer Electronics Control), is a unique function that we have developed and added. As such, its operation with other
manufacturers’ equipment that supports HDMI CEC cannot be guaranteed.
•
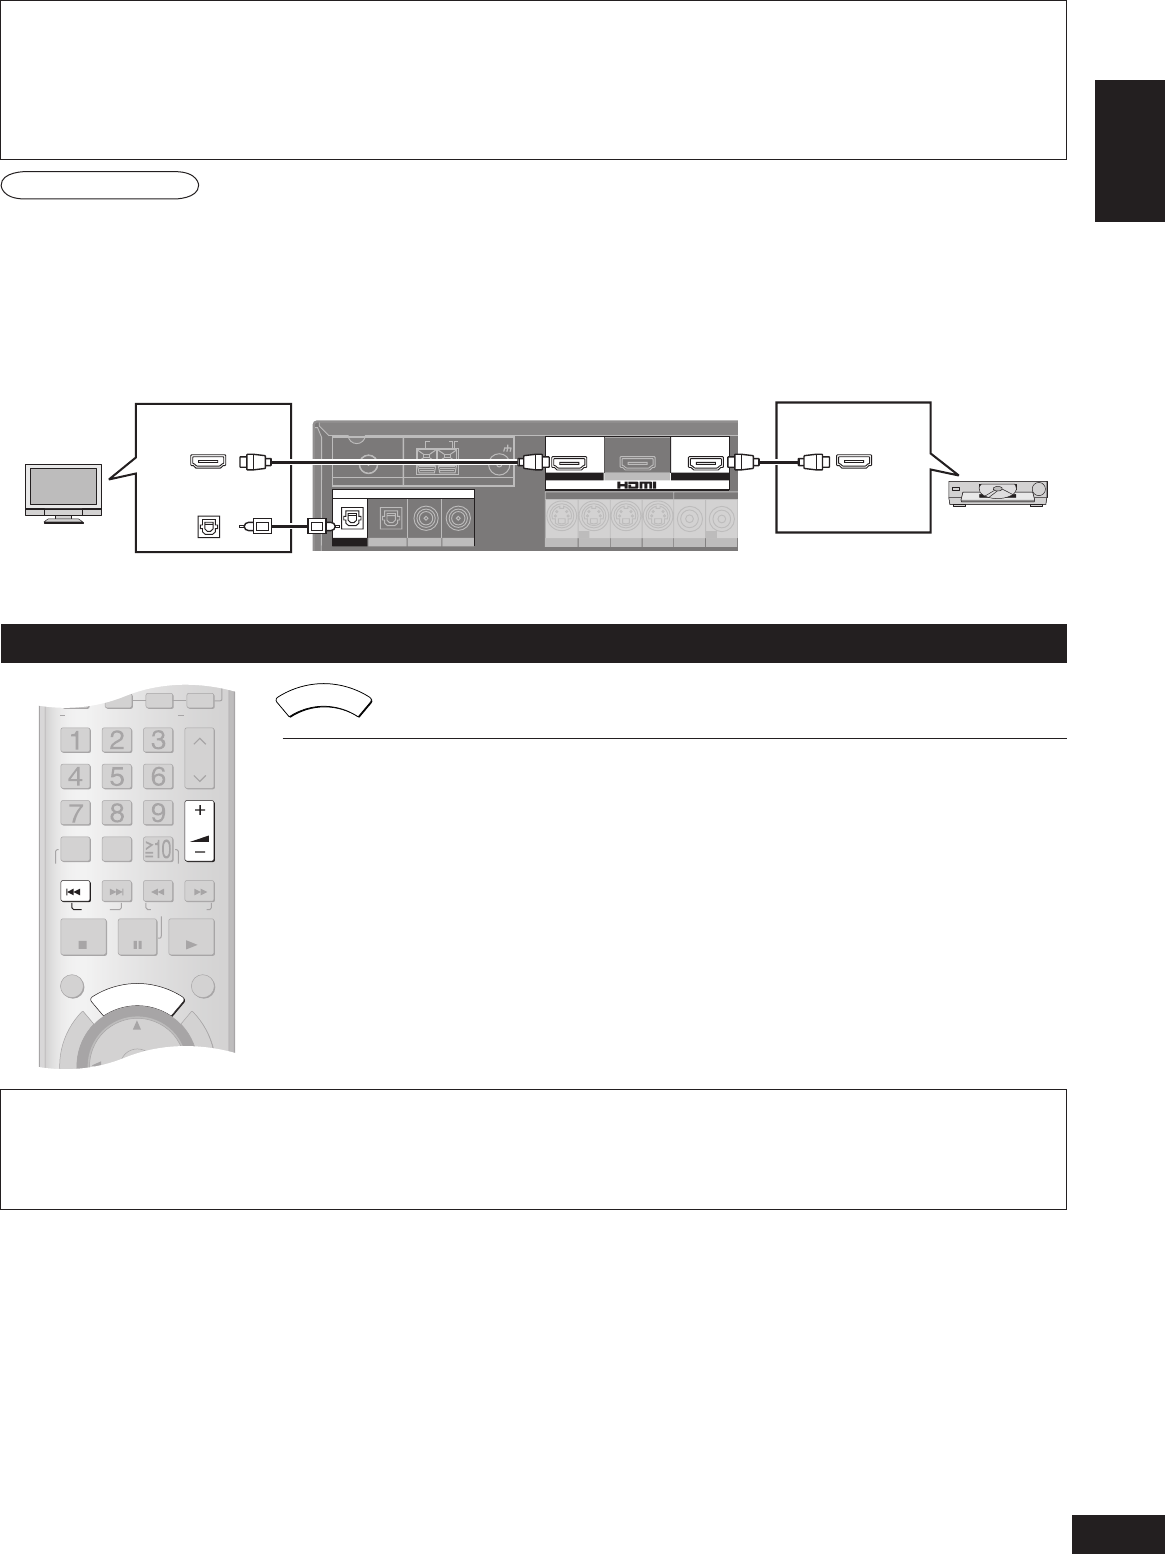
1. Connect your other Panasonic home theater equipment (VIERA Link “HDAVI Control” compatible VIERA television or
DIGA DVD recorder) with an HDMI cable (➡ page 5).
(Cables that do not meet the HDMI specifications are not compatible with this feature. Use a Panasonic HDMI cable for best
results.)
2. Read your television’s operating instructions and make the settings necessary to activate the VIERA Link “HDAVI
Control”.
3. Switch on all your equipment, then switch your television off then on again and check that images from DIGA appear
correctly.
(Do this whenever you change connections or settings.)
TV (VIERA)
Preparation
Rear panel
DVD recorder
(DIGA)
TV HDMI
(AV IN)
DIGITAL AUDIO
OUT (OPTICAL)
DVD HDMI
(AV OUT)
One-touch Home Theater
Point the remote control at your DIGA DVD recorder and press [ONE
TOUCH PLAY].
If you switch your VIERA off, this unit also switches off (unless you have changed the input source to
“TUNER” or “CD”).
VIERA’s speakers start to output the audio instead if you switch this unit off. If you then switch this unit on
again, audio output switches back to this unit.
If this unit is off and you switch the setting on your VIERA so that audio is output from a connected receiver,
this unit switches on and starts to output the audio.
•
•
•
Multi-channel audio for your VIERA
Connect your VIERA’s digital output terminal to the DIGITAL IN OPTICAL 1 terminal on this unit (➡ page 9).
Refer to your VIERA’s operating instructions and make the settings necessary to switch audio output from VIERA’s speakers to
speakers connected to this unit.
The input source on this unit switches to “TV” if you select a channel or otherwise operate the television (➡ page 34).
•
•
•
O
N
E
T
O
U
C
H
P
L
A
Y
D
I
R
E
C
T
N
A
V
I
G
A
T
O
R
T
O
P
M
E
N
U
F
U
N
C
T
I
O
N
S
0
RECEIVER
AV
SYSTEM
TV
RECORDER
DVD
PLAYER
ANALOG 6CH
VCRCD
TUNER
BAND
CH
VOLUME
SKIP
SLOW/SEARCH
STOP
PAUSE
PLAY
DRIVE SELECT
MANUAL SKIP
ENTER
SUB MENURETURN
OFF
SUBWOOFER
TV
LEVEL
EFFECT
VOL
NEO:6
SFC
MUSICMOVIE
MUTING
TV/AV
-
/
--
TEST
DIMMER
AUTO
BD/DVD
DIRECT
TUNING
DISC
O
N
E
T
O
U
C
H
P
L
A
Y
For your reference
To turn off VIERA Link “HDAVI Control”, “HDMI settings”, ➡ page 29.
To take advantage of the multi-channel sounds now available with digital television, use a digital connection if your TV has a digital output terminal.•
Libble takes abuse of its services very seriously. We're committed to dealing with such abuse according to the laws in your country of residence. When you submit a report, we'll investigate it and take the appropriate action. We'll get back to you only if we require additional details or have more information to share.
Product:
Forumrules
To achieve meaningful questions, we apply the following rules:
First, read the manual;
Check if your question has been asked previously;
Try to ask your question as clearly as possible;
Did you already try to solve the problem? Please mention this;
Is your problem solved by a visitor then let him/her know in this forum;
To give a response to a question or answer, do not use this form but click on the button 'reply to this question';
Your question will be posted here and emailed to our subscribers. Therefore, avoid filling in personal details.
Register
Register getting emails for Panasonic SA-XR59 at:
new questions and answers
new manuals
You will receive an email to register for one or both of the options.
Get your user manual by e-mail
Enter your email address to receive the manual of Panasonic SA-XR59 in the language / languages: English as an attachment in your email.
The manual is 7,17 mb in size.
You will receive the manual in your email within minutes. If you have not received an email, then probably have entered the wrong email address or your mailbox is too full. In addition, it may be that your ISP may have a maximum size for emails to receive.
If you have not received an email with the manual within fifteen minutes, it may be that you have a entered a wrong email address or that your ISP has set a maximum size to receive email that is smaller than the size of the manual.
The email address you have provided is not correct.
Please check the email address and correct it.
Your question is posted on this page
Would you like to receive an email when new answers and questions are posted? Please enter your email address.