Następnie wytrzyj pozostałości detergentu szmatką zwilżoną w letniej wodzie.
Kończąc czyszczenie, pamiętaj, żeby koniecznie wytrzeć powierzchnie do sucha zbierając pozostałą wilgoć.
Do czyszczenia nie można używać środków czyszczących (zawierających czynniki ścierne ani chemiczne).
Zabrudzenia z płynów, pożywienia i innych należy z drzwiczek usuwać jak najszybciej.
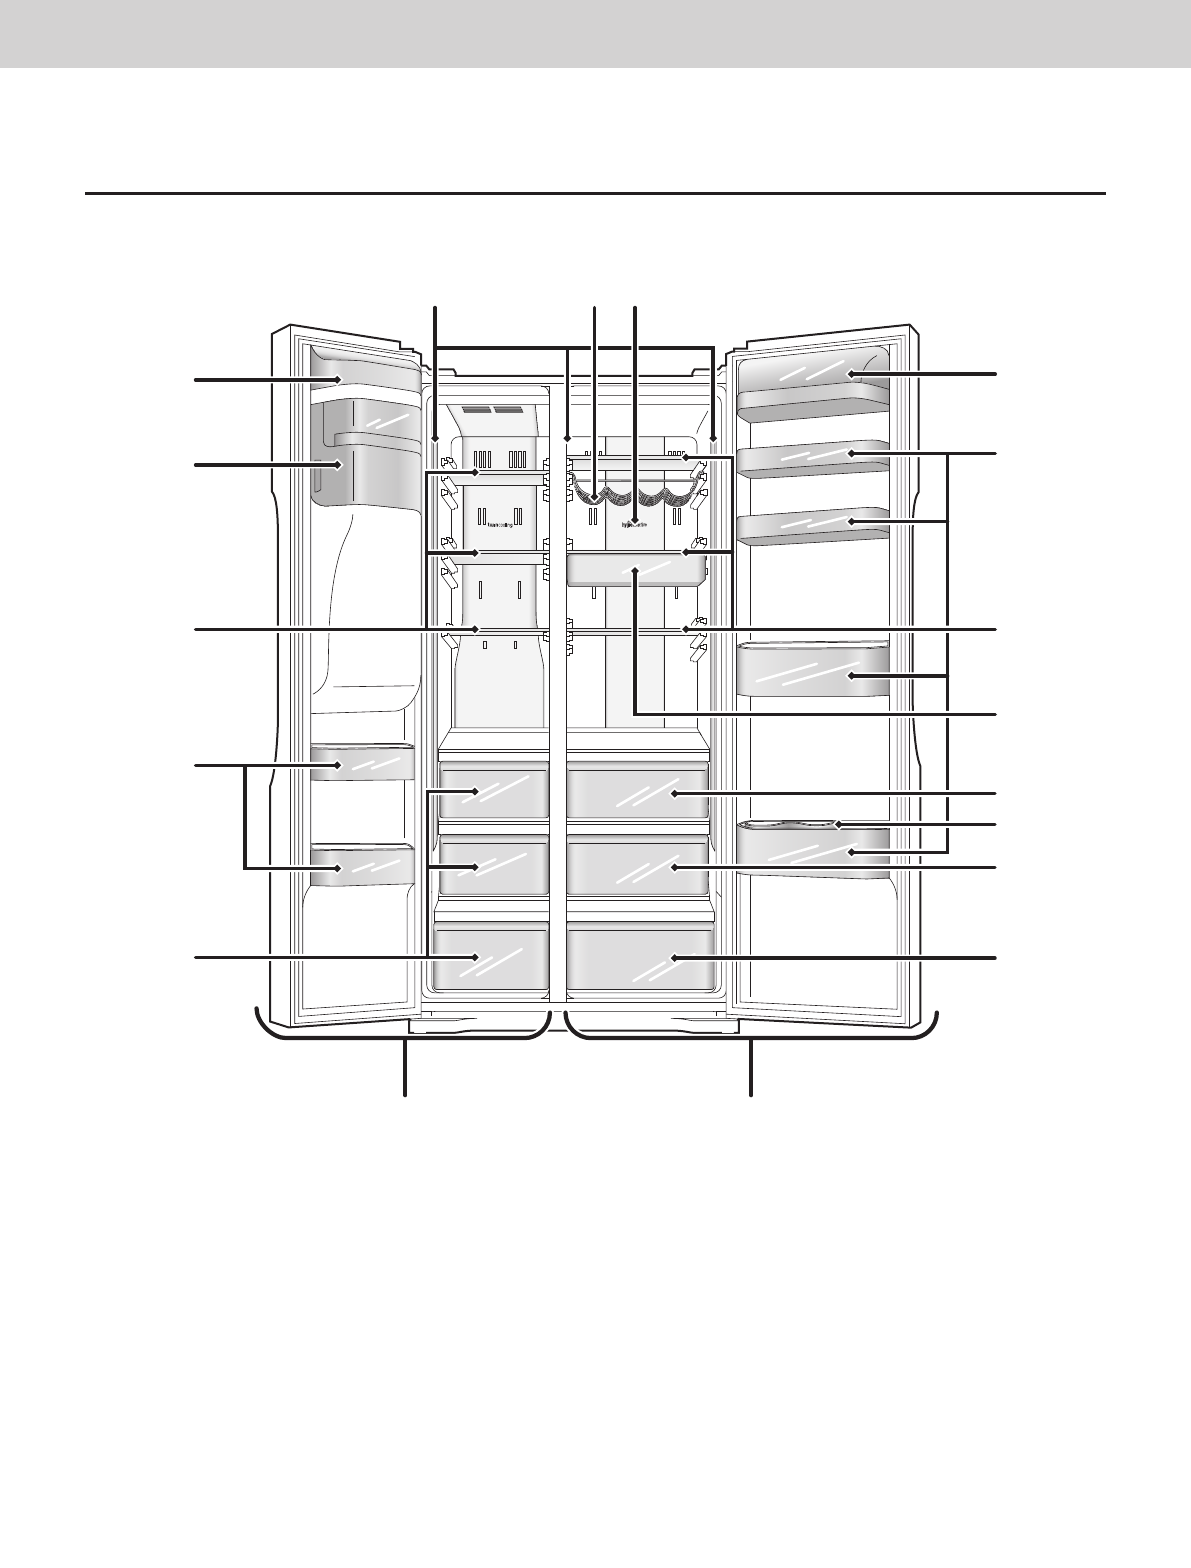
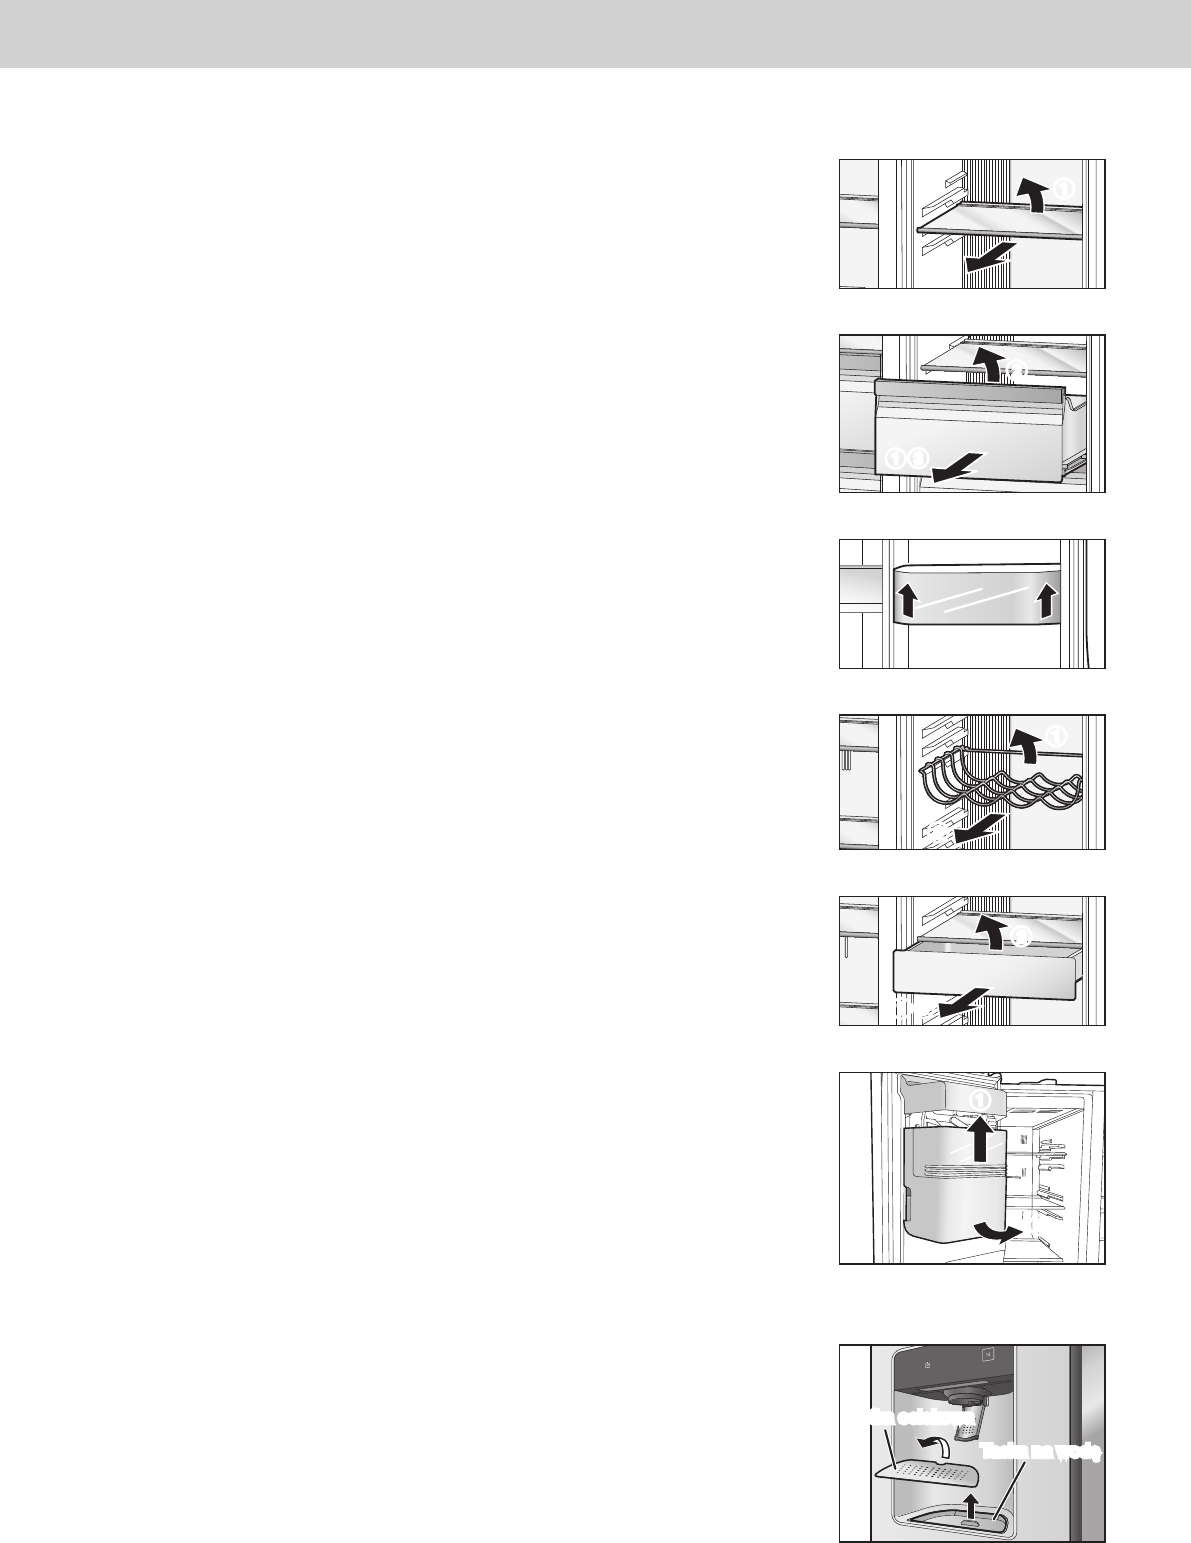
Wnętrze, szuady, półki szklane i półki na drzwiach
Pamiętaj, aby koniecznie wytrzeć oleje jadalne, masło oraz inne rodzaje tłuszczów z elementów z tworzywa.
W innym przypadku, elementy z tworzywa mogą ulec uszkodzeniu. Szuady, półki szklane i półki na
drzwiach można wyjmować.
Jeżeli są bardzo zabrudzone lub mają nieprzyjemny zapach, wyjmij je i umyj.
Uszczelka drzwi
Zabrudzona lub uszkodzona uszczelka spowoduje wydostawanie się
zimnego powietrza na zewnątrz.
Po zabrudzeniu uszczelki, natychmiast ją umyj.
Pojemnik na lód
Jeżeli pojemnik na lód zawiera stary lód lub zbite kostki lodu, usuń je i wyrzuć lód.
Dozownik lodu/wody
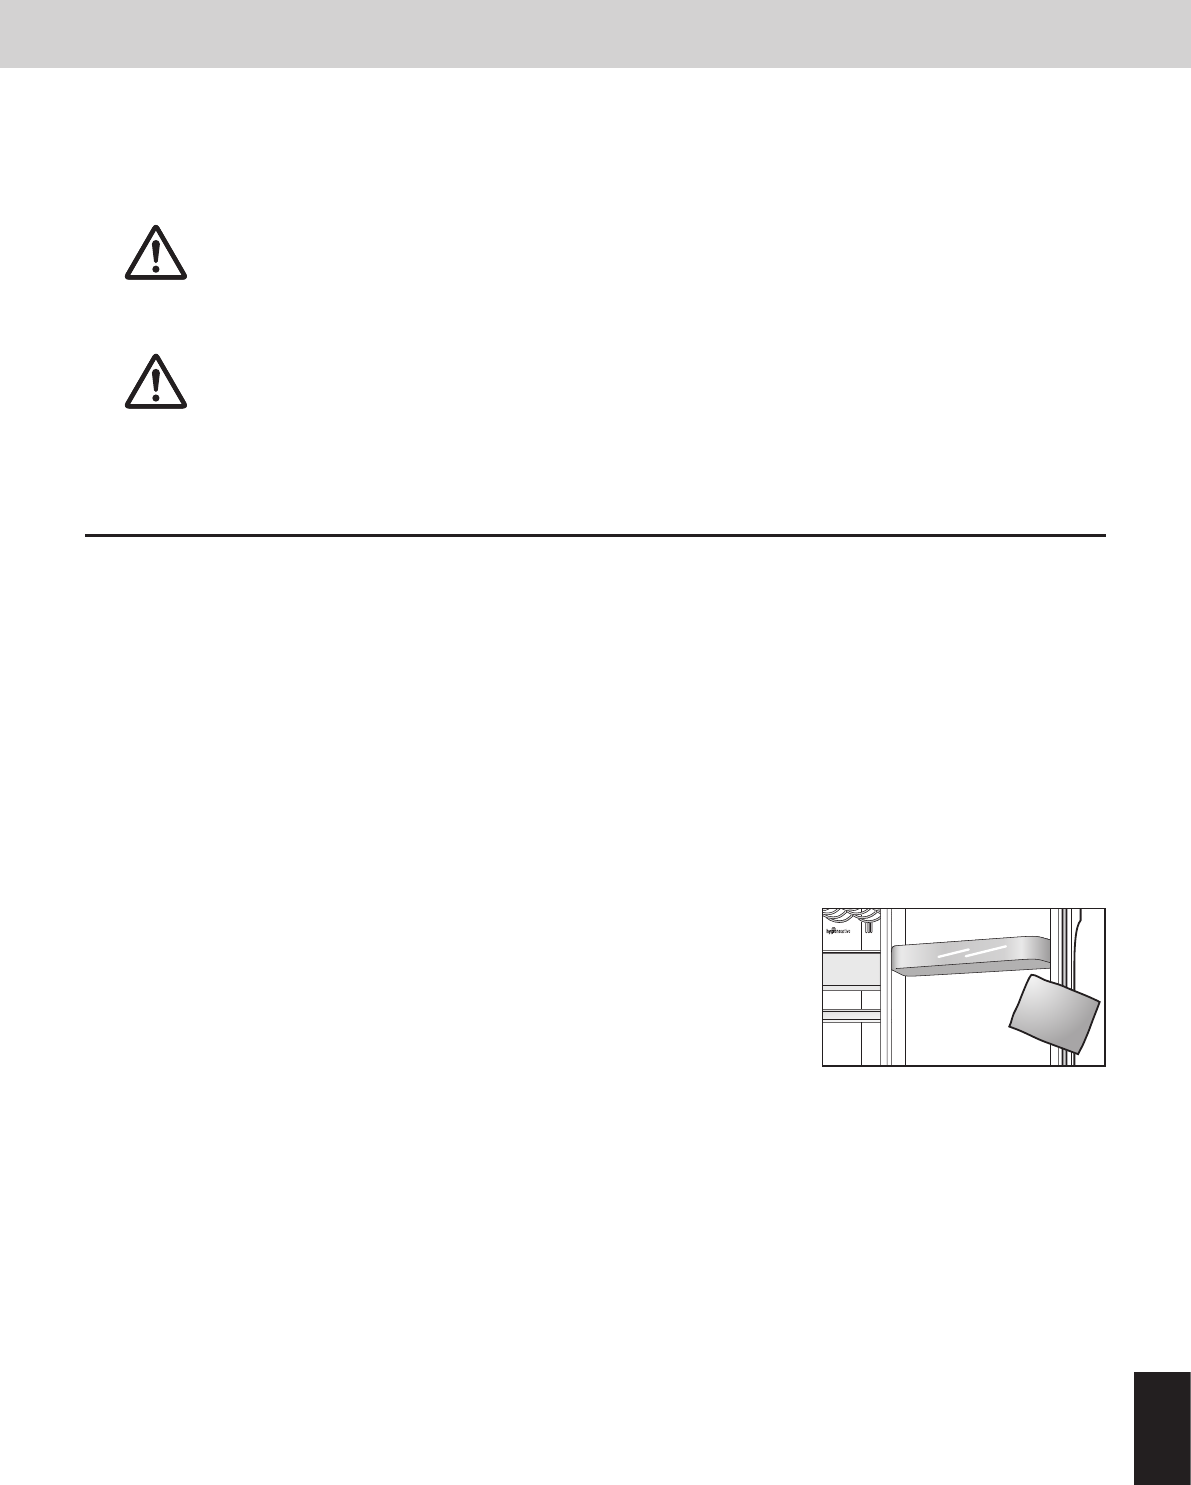
Płytkę ociekową i tackę na wodę można wyjmować. Okresowo, wylewaj wodę zebraną na tacce na wodę.
Ściany zewnętrzne lodówki
Jeżeli ściany zewnętrzne ulegną zabrudzeniu, wytrzyj zabrudzenia. Także, pozostawienie zebranego kurzu
na wtyczce kabla może spowodować pożar. Okresowo, usuwaj kurz suchą szmatką, itp.
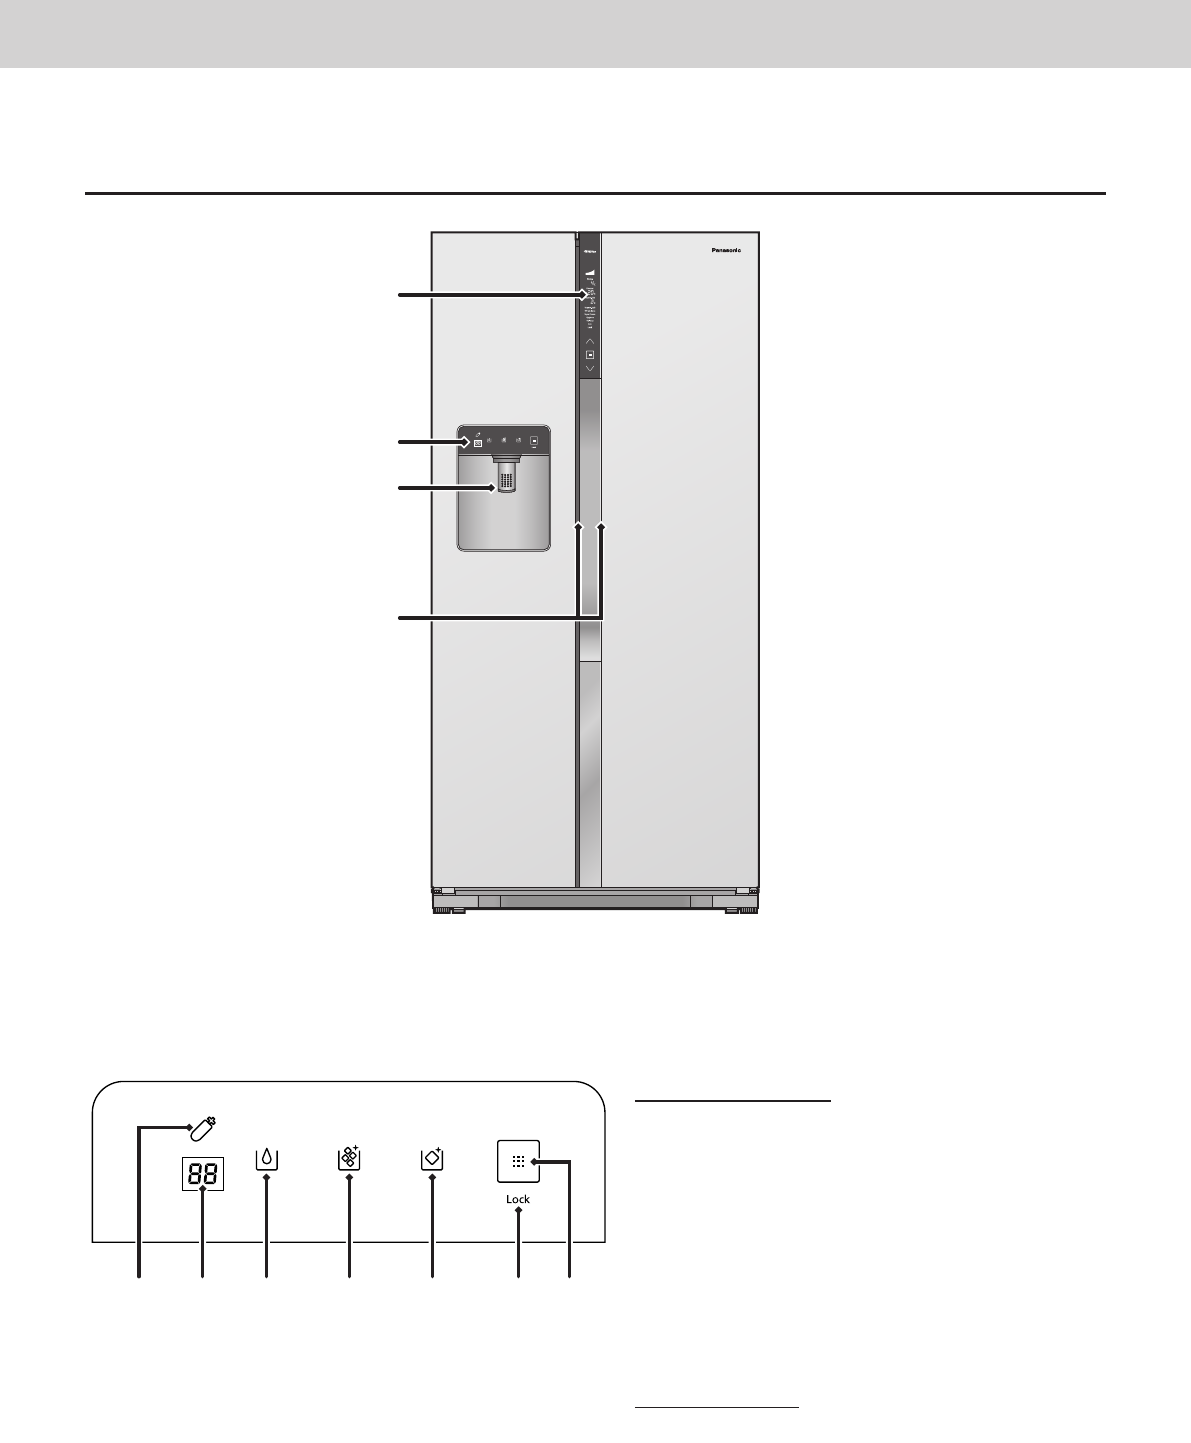
Panel sterowania oraz panel Dozownika lodu/wody
Przetrzyj te panele miękką szmatką zamoczoną w letniej wodzie, a następnie wyciśniętą.
Panel sterowania oraz panel Dozownika lodu/wody wykonane są z delikatnych materiałów.
W związku z tym, należy uważać, aby nie uszkodzić ich powierzchni.
Uwaga:
●Nie należy myć szuad, półek szklanych, półek na drzwiach czy innych części w zmywarce do naczyń. Takie
działanie spowoduje odklejanie się części pozłacanych na ich powłoce lub uszkodzenie części.
Czyszczenie i konserwacja
286
Dodatek
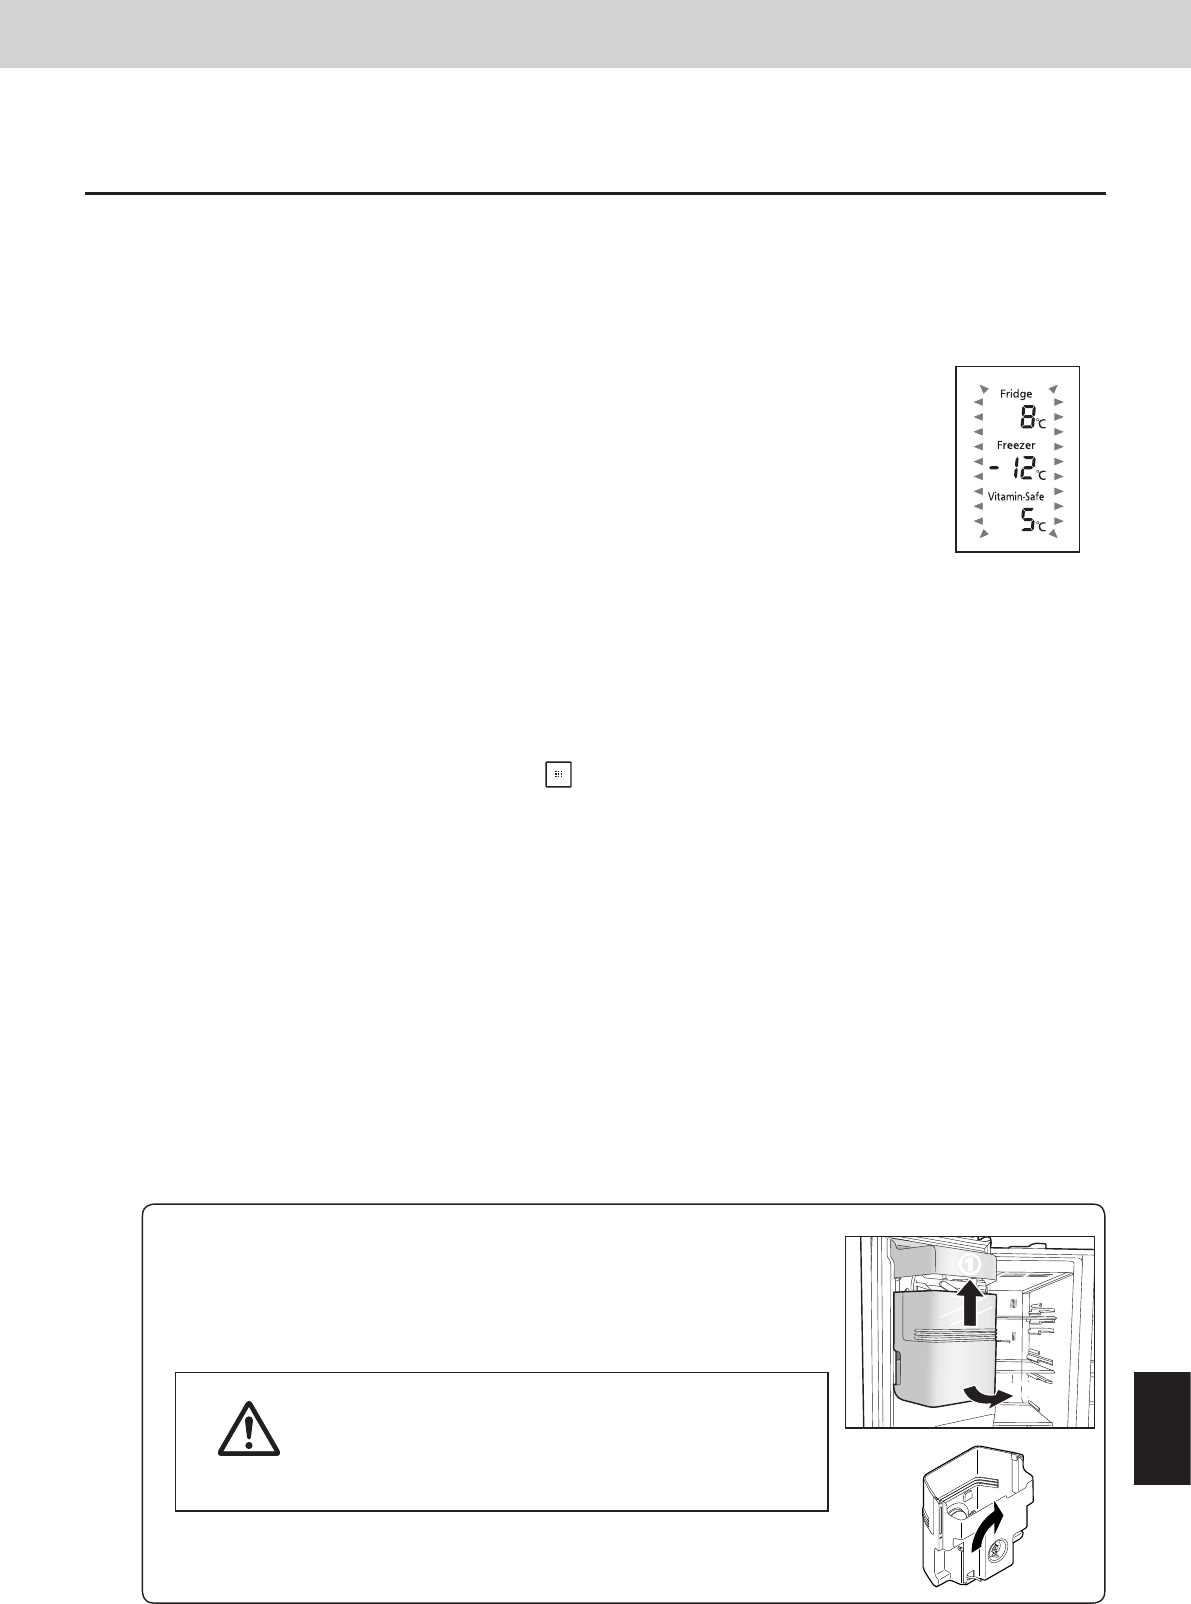
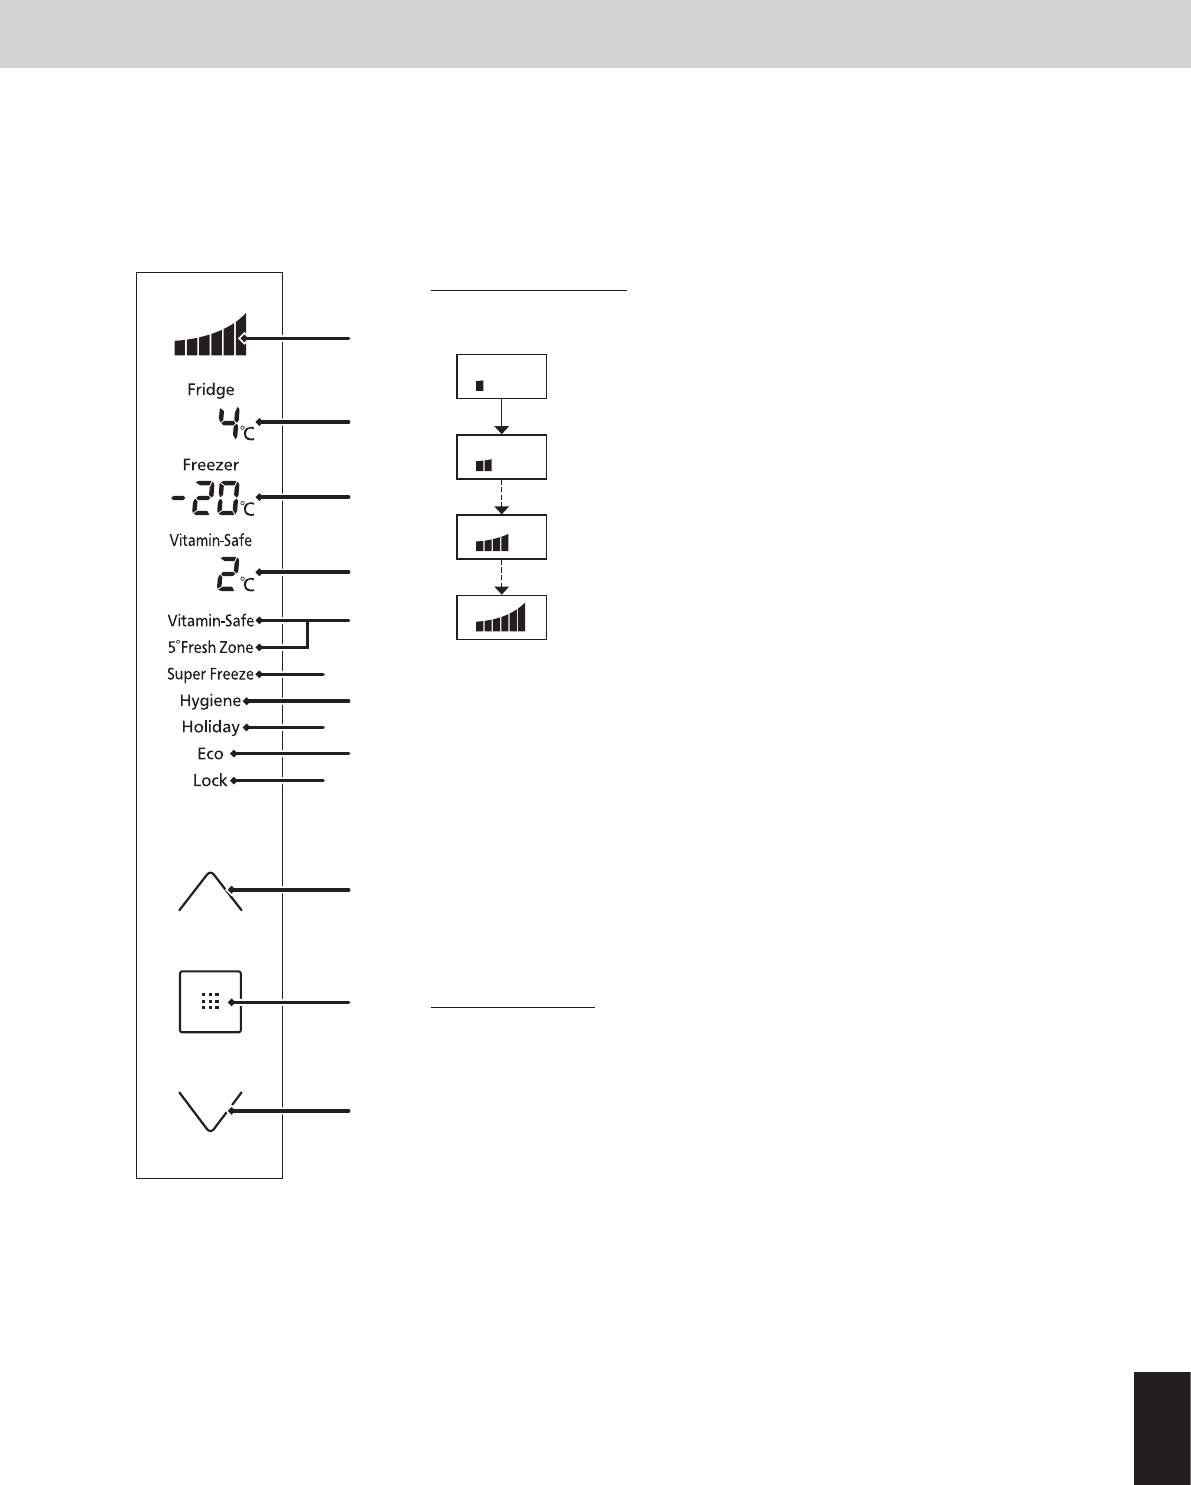
Wymiana ltra wody
Okresowo, należy wymieniać ltr wody. Z reguły, ltr powinien być wymieniany co sześć miesięcy.
Gdy nadejdzie termin wymiany ltra, ikona “” pojawi się na panelu Dozownika lodu/wody.
Termin ten jest różny w zależności od ilości zużywanej wody jak również jakości ciśnienia wody i może się okazać
o wiele krótszy niż sześć miesięcy.
Również, należy wymieniać ltr wody w poniższych okolicznościach:
●Gdy lód lub woda ma nieprzyjemny zapach lub smak (oznacza to, że wydajność ltra jest ograniczona)
●Gdy ilość wody wprowadzanej do lodówki zmniejszyła się (oznacza to, że ltr jest niedrożny)
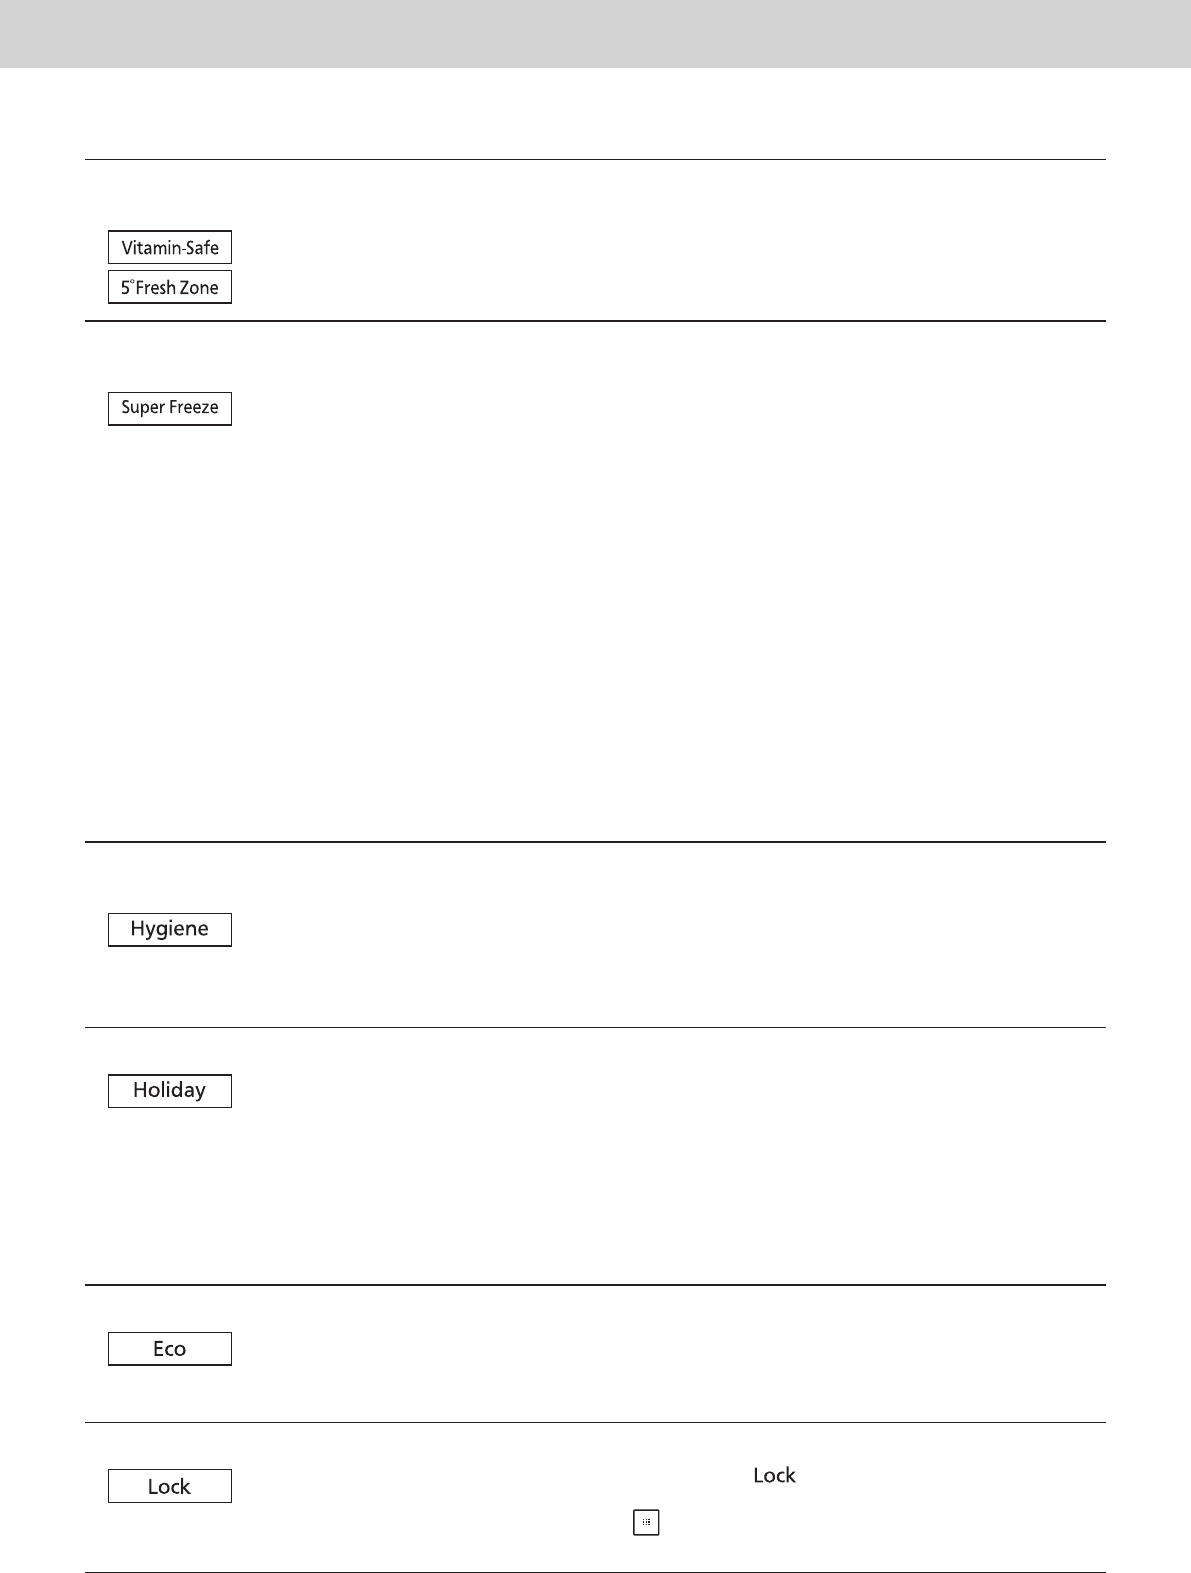
Jak zmieniać ltr
1
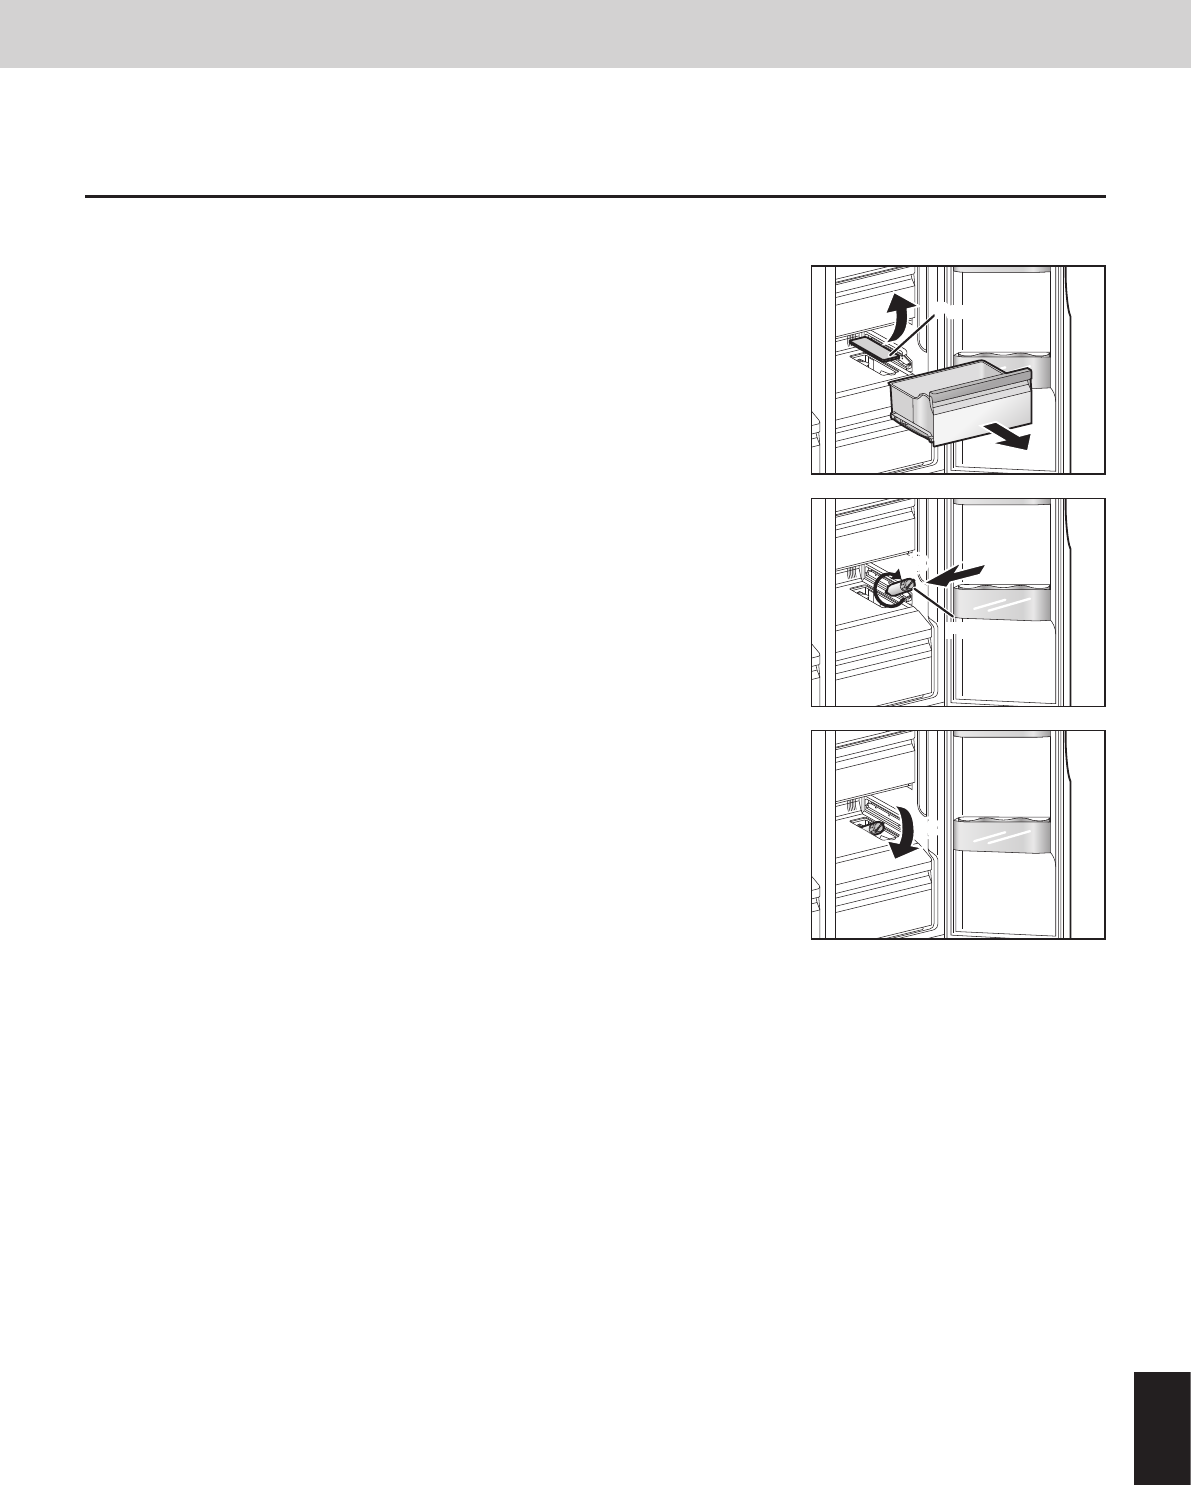
Wyjmij szuada Strefy Vitamin-Safe.
2
Zdejmij panel ltra.
Włóż palce w wycięcie z przodu panela ltra i zdejmij panel ltra.
Panel ltra
1
2
3
Przechyl ltr wody lekko do góry.
3
Filtr wody
4
Obróć ltr wody o 90 stopni w kierunku odwrotnym do kierunku
wskazówek zegara i pociągnij do siebie.
5
Załóż nowy ltr wody.
Postępuj zgodnie z krokami instrukcji wyjmowania ltra w odwrotnej
kolejności.
6
Przy “” wyświetlonym na panelu Dozownika lodu/wody,
przytrzymaj na Dozowniku lodu/wody przez co najmniej 3
sekundy.
Ikona “” na panelu Dozownika lodu/wody wyłącza się.
4
Uwagi:
●Po wyjęciu ltra wody, woda wewnątrz niego może się wylać.
W przypadku wylania się wody, wyjmij szuadę Strefy 5° Fresh i wytrzyj wodę na dnie lodówki.
●Przy zamiarze zakupu nowego ltra wody, zwróć się do dealera lub autoryzowanego przedstawiciela
handlowego o dostarczenie nowego.
Typ ltra wody : CNRAH-257760
287
Dodatek
Polski
Przerwanie automatycznego wytwarzania lodu
Funkcję automatycznego wytwarzania lodu można wyłączyć, gdy, przykładowo,
nie będzie używana do dozowania lodu przez dłuższy okres.
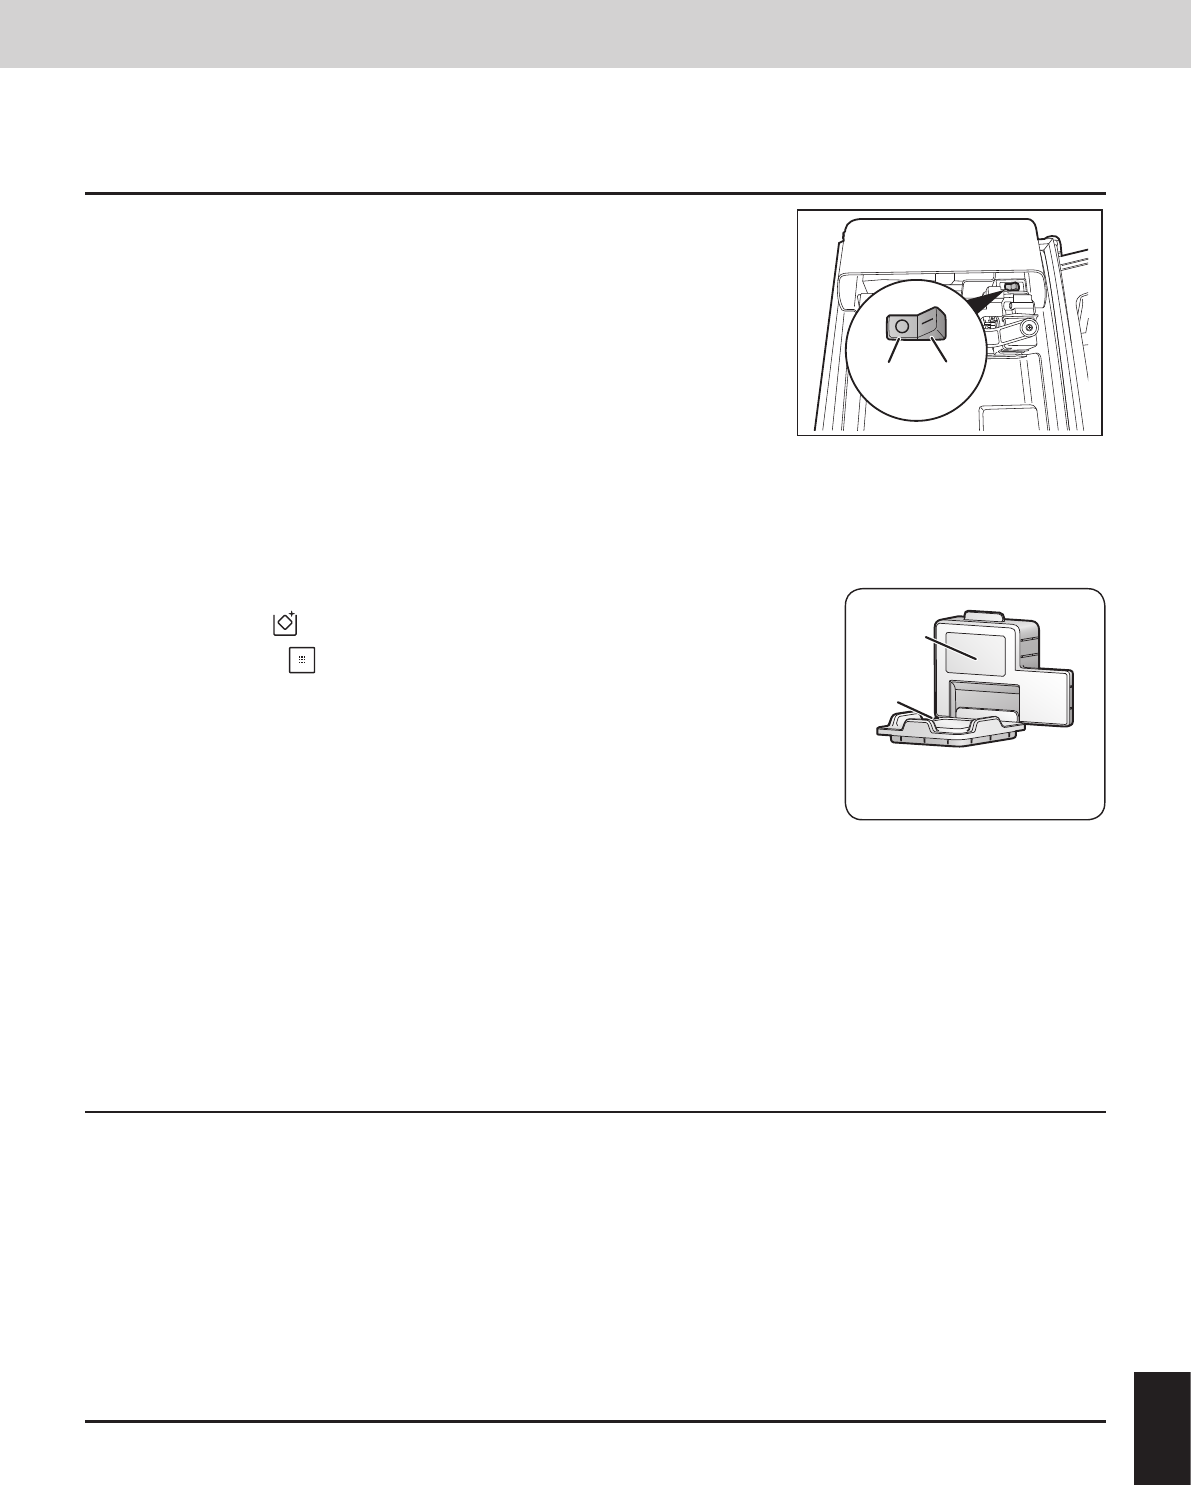
Wyjmij pojemnik na lód oraz ustaw przełącznik wewnątrz automatycznej
kostkarki do lodu na pozycję WYŁ.
Uwaga:
●Po ustawieniu przełącznika na pozycję WYŁ., ponownie włóż pojemnik na lód
na swoje miejsce. Nawet po ustawieniu przełącznika na WYŁ., lód pozostały
na tacy do kostek lodu będzie przechowywany w pojemniku na lód.
WYŁ.WŁ.
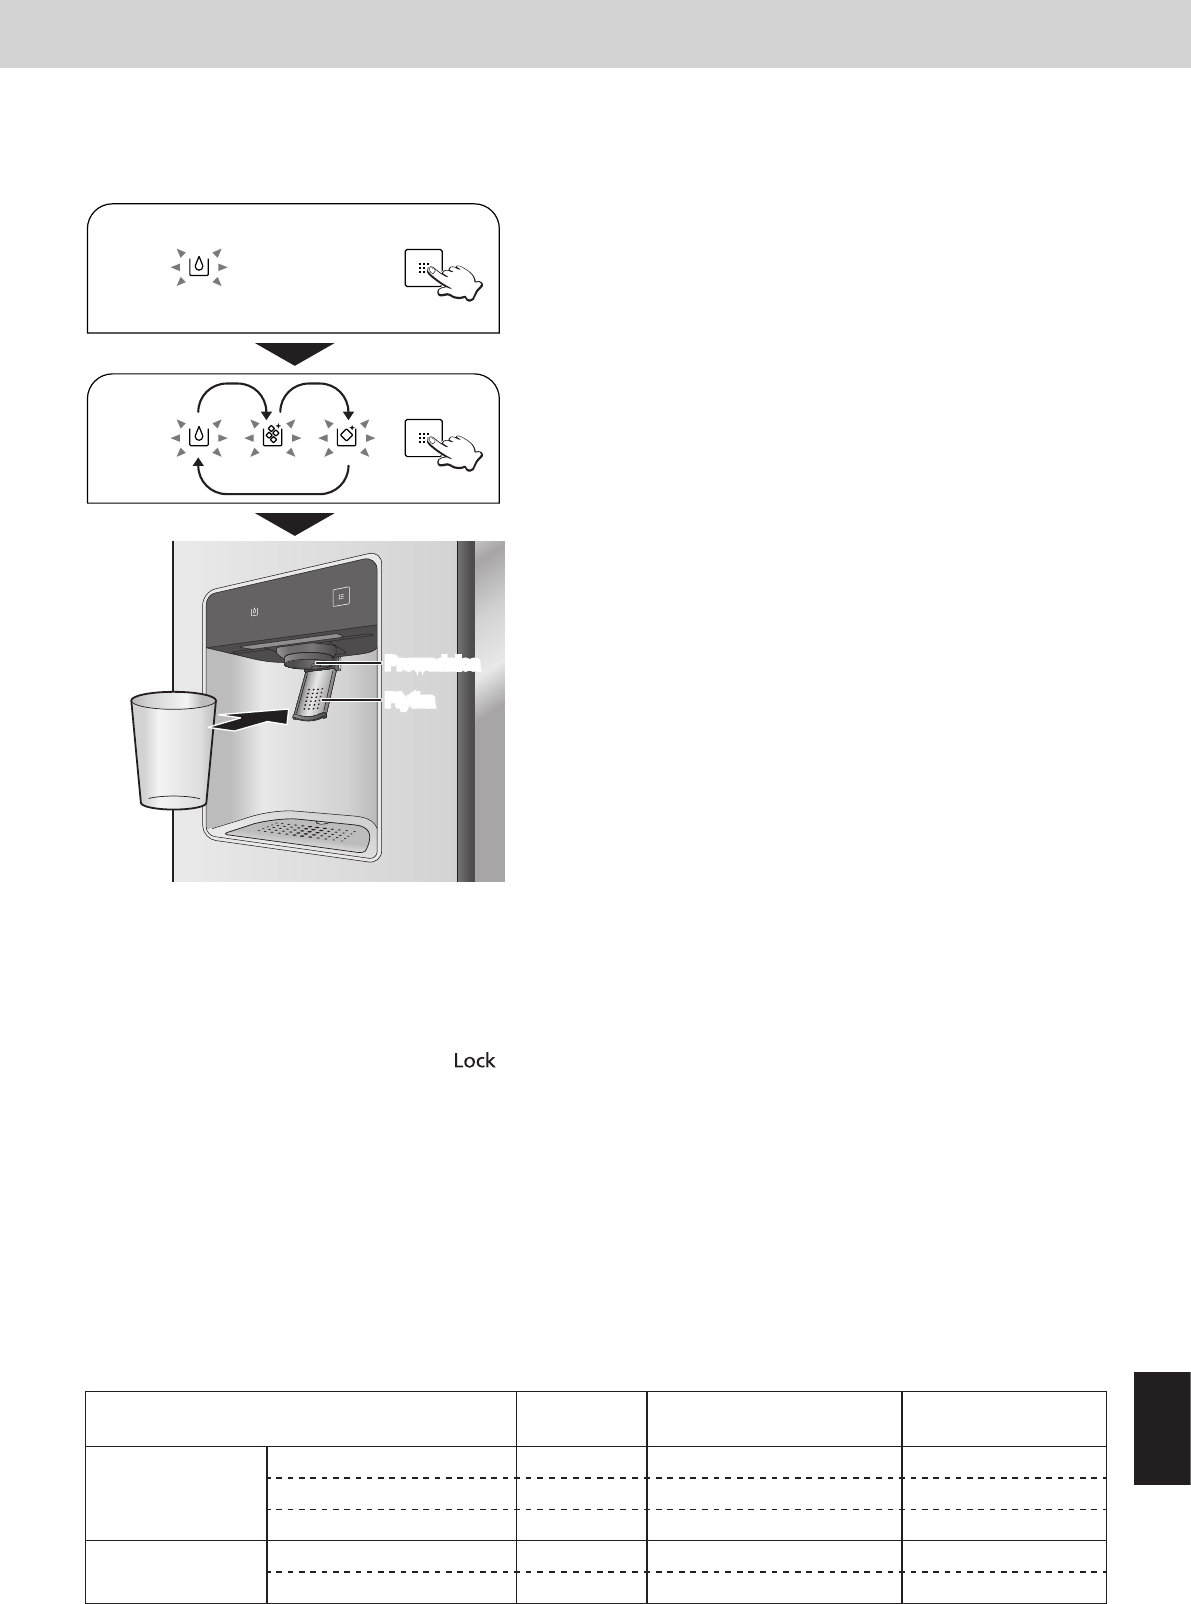
Korzystanie z zamrażarki przy wyjętym pojemniku na lód
Po wyjęciu pojemnika, duże produkty żywnościowe można układać na szklanych półkach zamrażarki.
Aby korzystać z zamrażarki z wyjętym pojemnikiem na lód, należy postępować zgodnie z poniższymi krokami
i zamknąć Dozownik lodu.
1
Wyłącz funkcję automatycznego wytwarzania lodu.
2
Wyświetl “
” na panelu Dozownika lodu/wody.
3
Przytrzymaj
przez co najmniej 3 sekundy.
4
Załóż osłonę dozownika lodu.
Ze zwzględu na bezpieczeństwo i oszczędność energii prosimy założyć
na obszar dozowania lodu osłonę wyrzutnika lodu dostarczoną wraz z
lodówką.
Osłona wyrzutnika lodu składa się z 2 części. Należy założyć najpierw
część
1
, a następnie część
2
.
Uwagi:
●Dozownik wody może być nadal eksploatowany nawet po wyłączeniu
Dozownika lodu przez wykonanie kroków opisanych powyżej.
●Aby ponownie zainstalować pojemnik na lód i znowu z niego korzystać,
należy wykonać poniższe kroki.
1. Zdejmij osłonę dozownika lodu.
2. Ustaw przełącznik automatycznego wytwarzania lodu na pozycję WŁ.
3. Załóż pojemnik na lód.
Przegląd konserwacyjny
Czy kabel elektryczny nie jest uszkodzony?
Czy wtyczka kabla się nagrzewa?
Czy wtyczka kabla jest całkowicie wsunięta do gniazda elektrycznego?
Jeśli kabel elektryczny jest uszkodzony, należy wyjąć wtyczkę z gniazdka i skontaktować się z dealerem
lub autoryzowanym centrum obsługi.
Jeśli lampa LED lub osłona lampy LED jest uszkodzona bądź jeśli cokolwiek wygląda nieprawidłowo, należy
skontaktować się z dealerem lub autoryzowanym centrum obsługi. Nie wolno własnoręcznie naprawiać, wymieniać
lub rozmontowywać itp. jakichkolwiek uszkodzonych części.
Gdy lodówka nie będzie eksploatowana przez dłuższy okres
W takim przypadku, należy odłączyć wtyczkę kabla. Drzwi lodówki należy pozostawić otwarte przez dwa lub trzy
dni, w celu osuszenia wnętrza i uniknięcia powstania nieprzyjemnego zapachu i pleśni.
Przy ponownej eksploatacji, należy dostarczyć wodę (15 szklanek (ok. 3 litry)) i wyjmij lód (około 40 kostek) z
Dozownika lodu/wody aż woda i lód będą przezroczyste.
Osłona dozownika lodu
(akcesoria)
1
2
288
Dodatek
Przenoszenie lub przetransportowanie urządzenia
Przed przeniesieniem lub przetransportowaniem urządzenia
Najpierw, upewnij się, że główna linia dopływu wody jest zamknięta.
Usuń całą żywność i lód z wnętrza lodówki i wyjmij wtyczkę kabla elektrycznego z gniazda.
1
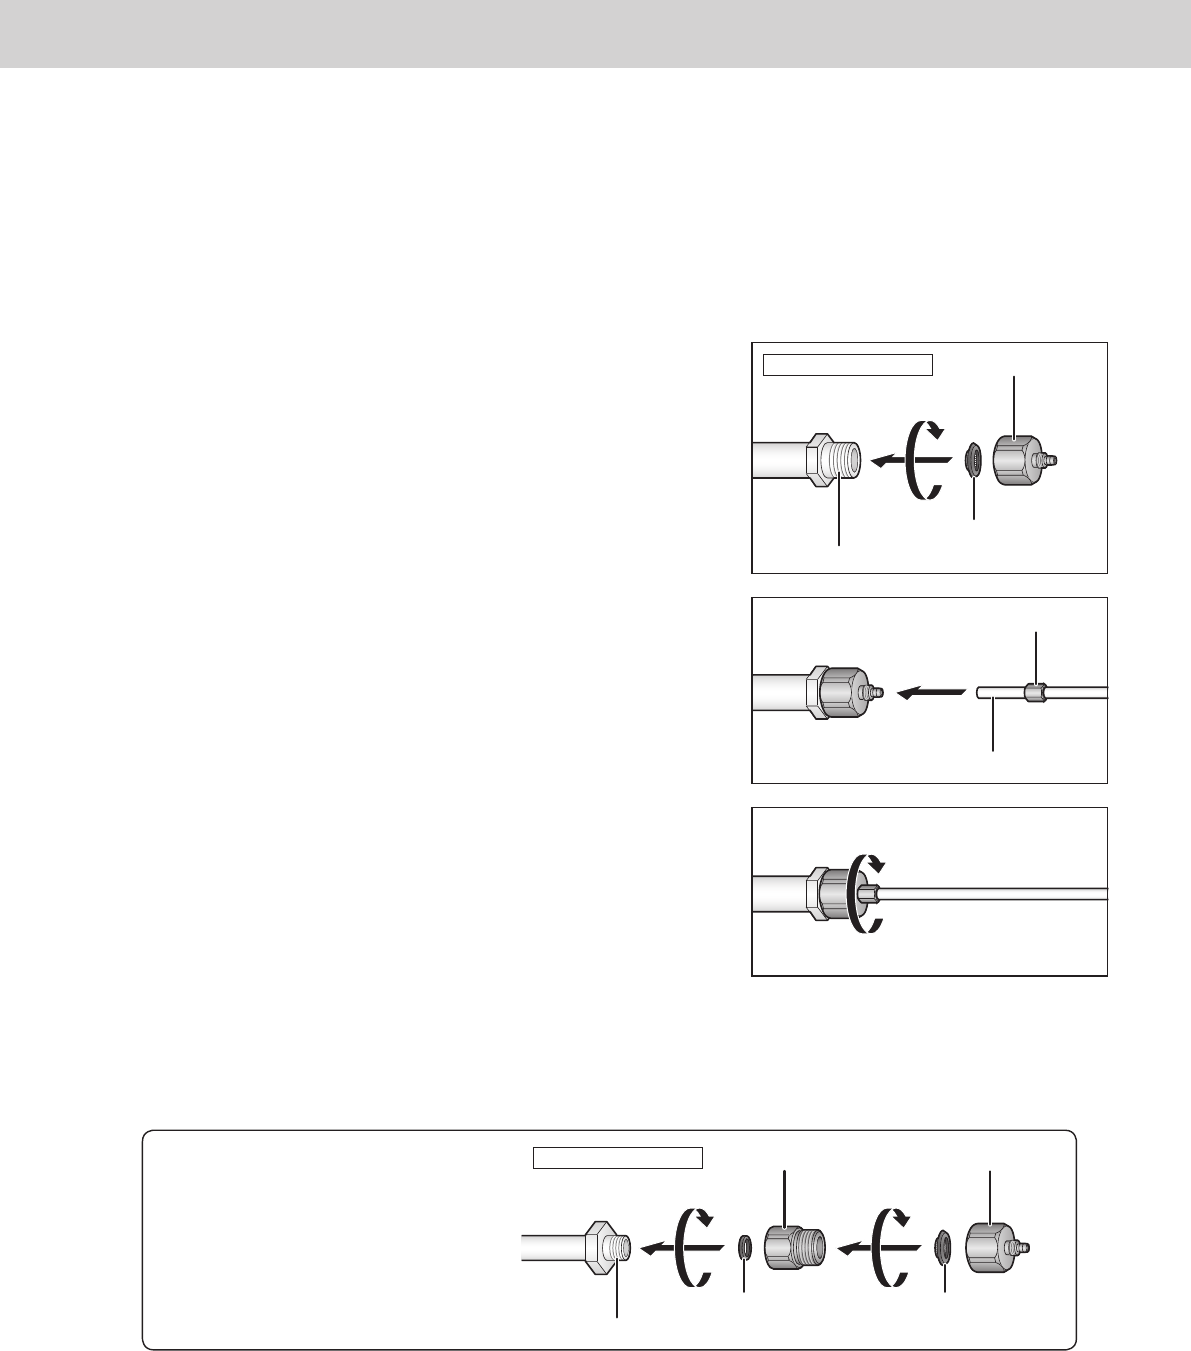
Odłącz wąż doprowadzający wodę od przyłącza węża.
Przygotuj pojemnik do złapania wody, która wyleje się z węża doprowadzającego wodę.
●Również zdejmij przyłącze węża przymocowane do wejścia rury doprowadzającej wodę i przechowuj
je w bezpiecznym miejscu.
2
Zdejmij kratkę przednią.
3
Odłącz oba przewody doprowadzające wodę, które wystają spod drzwi zamrażarki od złącz
doprowadzenia wody.
Zdejmij pierścienie łączące (czarne), a następnie wyciągnij przewody doprowadzające wodę.
Przygotuj pojemnik do złapania wody, która wyleje się z przewodów doprowadzających wodę.
4
Lekko unieś regulowane nóżki i pociągnij lodówkę do przodu.
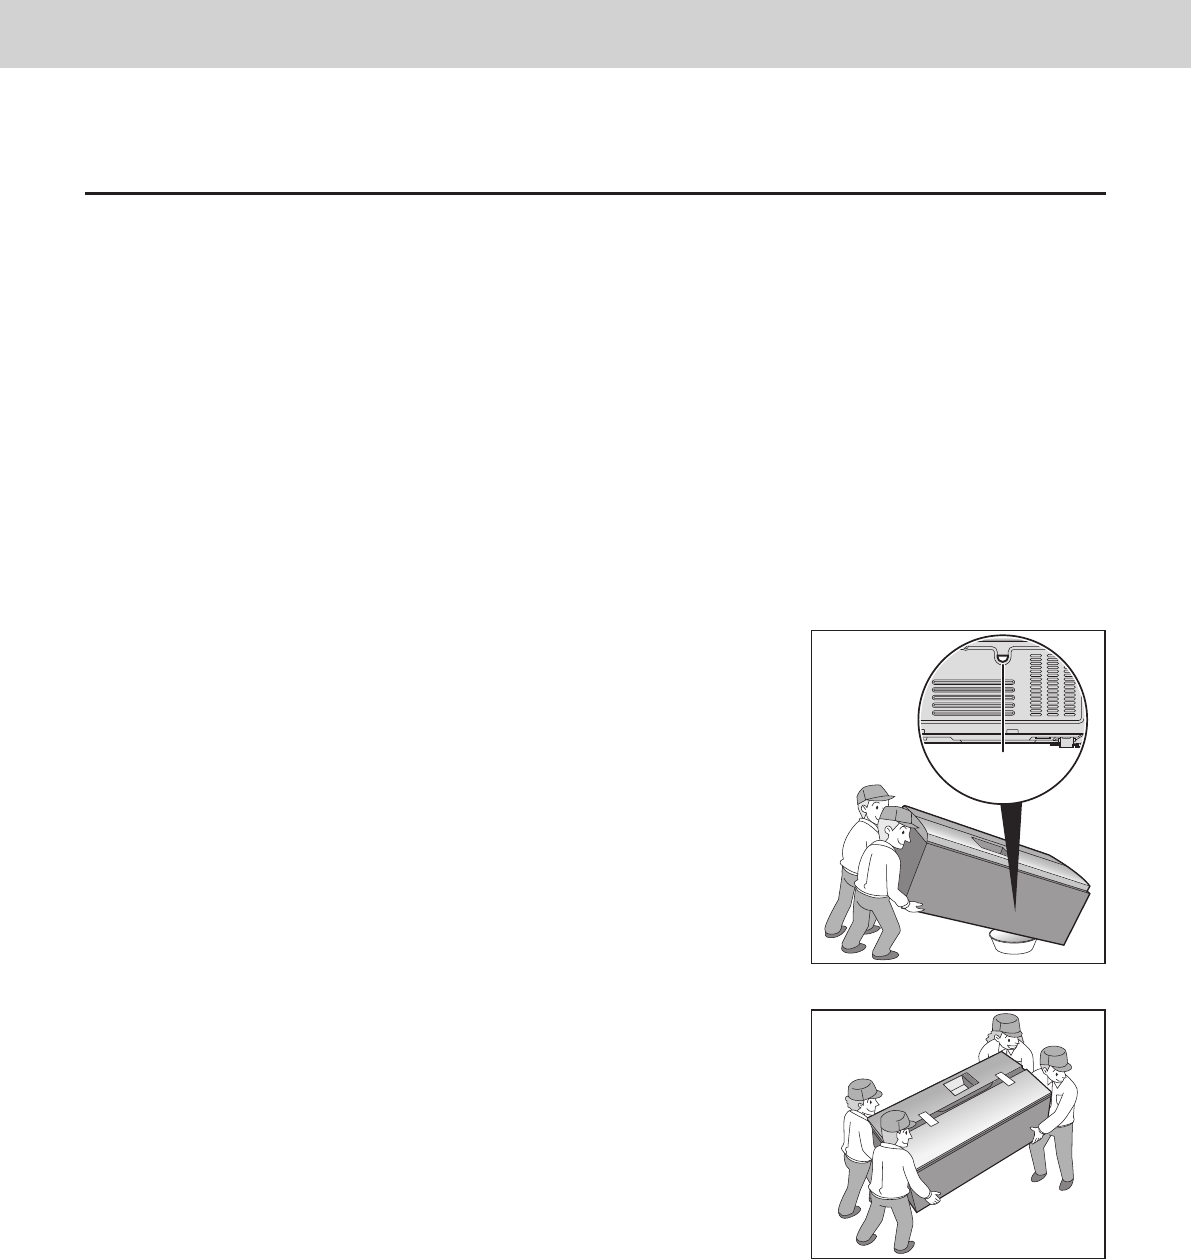
5
Usuń wodę z odpływu u dołu panela tylnego.
Umieść pojemnik pod odpływem, odchyl lodówkę do tyłu i wylej wodę z
odpływu.
6
Ponownie załóż kratkę przednią.
Postępuj zgodnie z krokami instrukcji wyjmowania kratki przedniej w
odwrotnej kolejności.
Odpływ
Przeniesienie lub przetransportowanie urządzenia
Lodówka musi być przenoszona przez co najmniej cztery osoby.
●Każda osoba powinna trzymać lodówkę za jeden z czterech rogów.
●Nie należy trzymać za drzwi.
●Zabezpiecz drzwi taśmą samoprzylepną, aby nie otworzyły się.
Uwaga:
●Należy pamiętać, że woda pozostała wewnątrz lodówki może się wylać.
289
Dodatek
Polski
Rozwiązywanie problemów
Jeżeli uważasz, że lodówka nie funkcjonuje poprawnie, najpierw sprawdź poniższe punkty.
Jeżeli problem utrzymuje się, odłącz wtyczkę kabla i skontaktuj się z dealerem lub autoryzowanym centrum obsługi.
Ogólne
Lodówka wydaje dziwne odgłosy. ●Czy lodówka jest zainstalowana na równej i stabilnej podłodze?
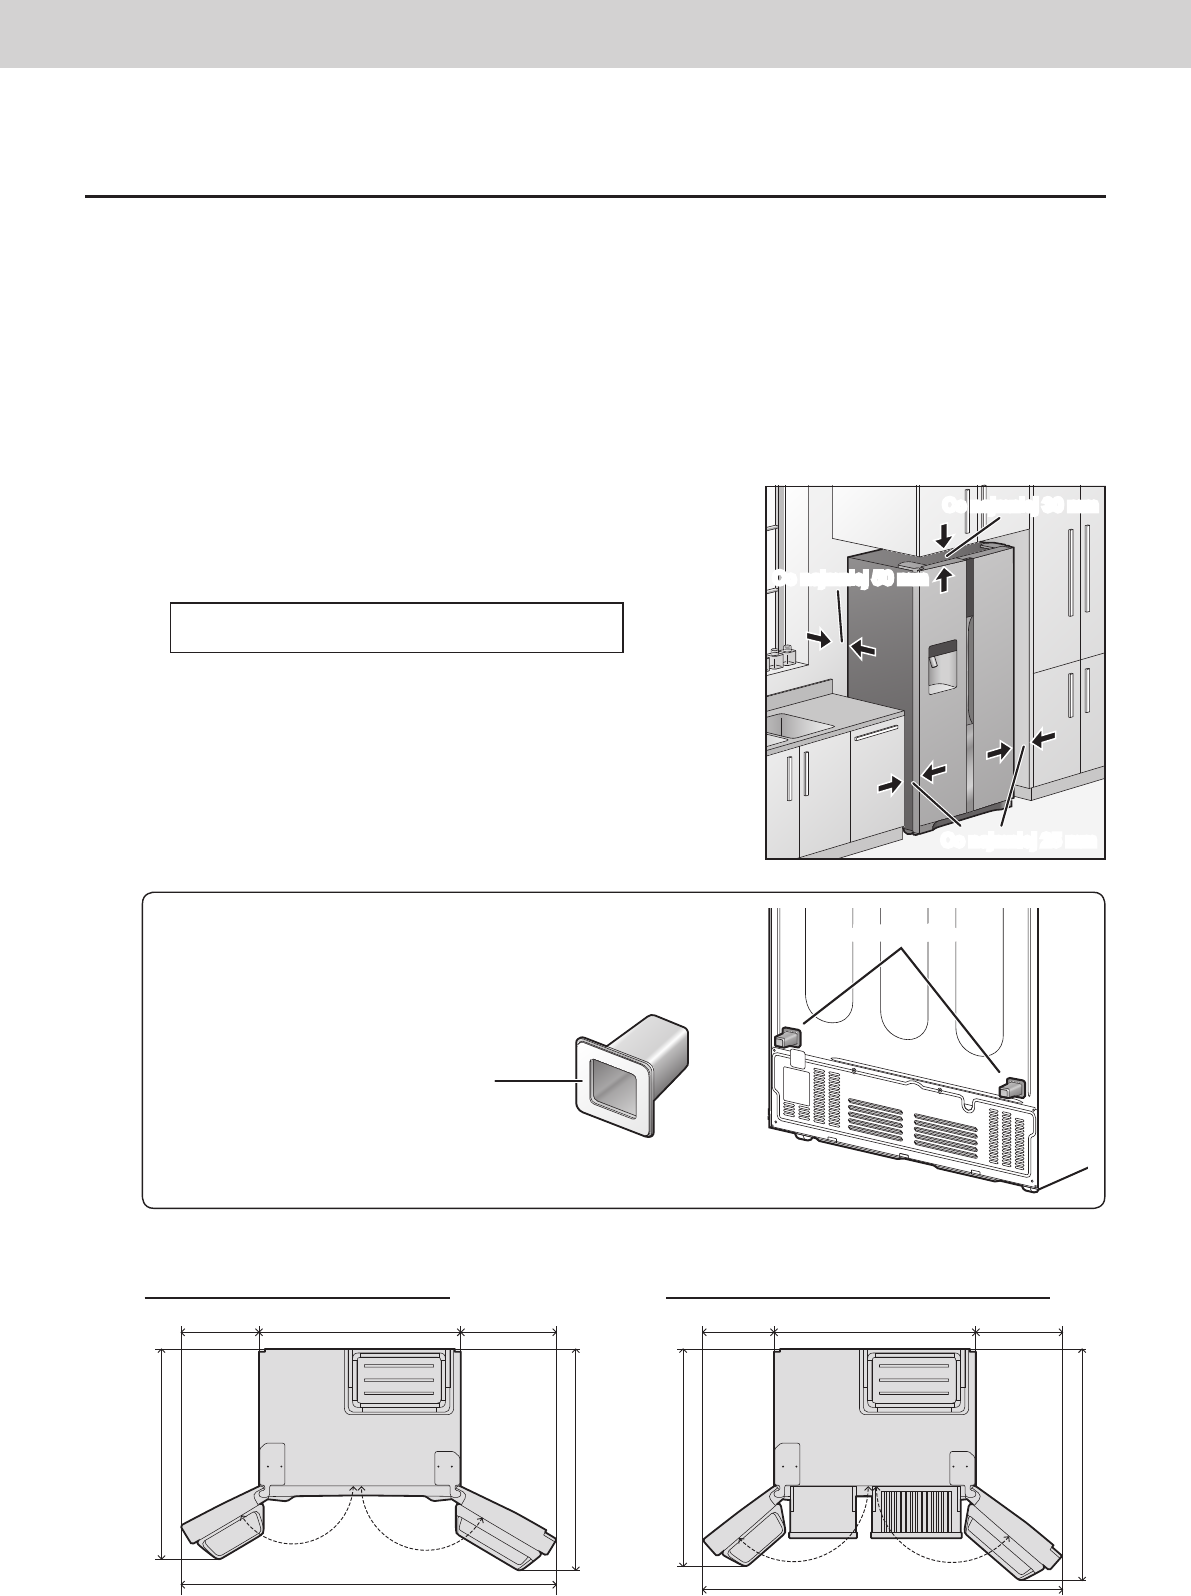
●Czy został zachowany odpowiedni odstęp wokół urządzenia?
●Czy żadne przedmioty nie drżą na górze urządzenia?
●Hałasy są zjawiskiem normalnym, gdy lodówka rozpoczyna lub kończy
pracę.
Słychać odgłos po wyłączeniu
sprężarki.
●Jest to normalne i często powodowane przez czynnik chłodniczy płynący
z powrotem do sprężarki.
Słychać odgłos po otwarciu lub
zamknięciu drzwi.
●Jest to normalne, powodowane przez różnicę w ciśnieniu powietrza
między wnętrzem, a na zewnątrz lodówki.
Słychać odgłos przepływającego
powietrza lub wody po otwarciu
drzwi.
●Jest to powodowane przez czynnik chłodniczy płynący przez wewnętrzny
system rur.
Za każdym razem gdy włączane
jest zasilanie lodówki słychać
kliknięcie.
●Jest to odgłos powodowany aktywacją zaworu trójdrożnego i jest dość
normalny.
Słychać ciągły dźwięk buczenia. ●Ten dźwięk związany jest z pracą wentylatora powodującego krążenie
zimnego powietrza.
●Czy lodówka została ustawiona na Tryb Super Freeze?
W Trybie Super Freeze, wentylator powodujący krążenie zimnego
powietrza pracuje z bardzo dużą prędkością i wydaje głośny dźwięk.
●Czy żywność została zapakowana zbyt ciasno lub czy temperatura
otoczenia jest za wysoka?
W takich przypadkach, wentylator powodujący krążenie zimnego
powietrza pracuje z bardzo dużą prędkością i wydaje głośny dźwięk.
Słychać odgłosy z automatycznej
kostkarki do lodu.
●Są to odgłosy lodu spadającego do pojemnika na lód.
Jest to normalny dźwięk.
Sprężarka pracuje bardzo głośno. ●Czy lodówka została ustawiona na Tryb Super Freeze?
W Trybie Super Freeze, sprężarka pracuje z bardzo dużą prędkością i
wydaje głośny dźwięk.
●Czy żywność została zapakowana zbyt ciasno lub czy temperatura
otoczenia jest za wysoka?
W takich przypadkach, sprężarka pracuje z wysoką prędkością więc
wydawanie głośniejszego dźwięku jest normalne.
Sprężarka pracuje przez długi
czas.
●Jeśli wtyczka kabla została podłączona po raz pierwszy, sprężarka
pracuje dłużej niż zwykle, aby schłodzić wnętrze lodówki do uzyskania
ustawionych temperatur.
●Czy lodówka została ustawiona na Tryb Super Freeze?
●Czy drzwi są często otwierane i zamykane? Czy drzwi są dokładnie
zamknięte?
●Czy żywność została zapakowana zbyt ciasno lub czy temperatura
otoczenia jest za wysoka?
●Gdy jednorazowo jest włożonych wiele produktów, sprężarka musi
pracować przez dłuższy czas.
Na zewnątrz lodówki gromadzi się
wilgoć.
●Skraplanie może występować, gdy wilgotność otoczenia jest wysoka i jest
to zjawisko normalne. Wytrzyj krople suchą szmatką.
Powierzchnia lodówki jest gorąca. ●Pewna ilość ciepła jest zjawiskiem normalnym, ponieważ w lodówce
zainstalowana jest rurka odprowadzająca ciepło, która zapobiega
skraplaniu się wilgoci.
290
Dodatek
Kontrolki na panelu sterowania
nie działają.
●Czy lodówka jest podłączona do zasilania?
●Czy lodówka została ustawiona na blokadę Child Lock?
Lampa LED nie zaświeca się. ●Czy lodówka została ustawiona na Tryb Holiday?
W Trybie Holiday, przednia lampa LED lodówki nie zaświeca się.
●Czy lodówka jest podłączona do zasilania?
Słychać odgłos alarmu i
wyświetlacz temperatury na
panelu sterowania oraz przednia
lampa LED miga.
●Jedne lub oboje drzwi lodówki zostały pozostawione otwarte. Zamknij
drzwi.
Lodówka i zamrażarka
Lodówka nie chłodzi (a
zamrażalnik nie zamraża).
●Czy lodówka jest podłączona do zasilania?
Lodówka nie chłodzi (a zamrażarka
nie zamraża) w zadowalający
sposób.
●Czy ustawiona temperatura jest za wysoka?
●Czy lodówka jest narażona na bezpośrednie promienie słoneczne lub w
pobliżu grzejnika?
●Czy został zachowany odpowiedni odstęp wokół urządzenia?
●Czy żywność została zapakowana zbyt ciasno lub czy temperatura
otoczenia jest za wysoka?
●Czy drzwi są często otwierane i zamykane?
Czy drzwi są dokładnie zamknięte?
●Czy lodówka została ustawiona na Tryb Holiday?
●Gdy do lodówki wkładana jest ciepła żywność, temperatura tymczasowo
wzrośnie.
●W sezonie zimowym lub gdy temperatura otoczenia jest niska, może
wydawać się, że lodówka nie chłodzi.
Temperatura ustawiona różni się
od rzeczywistej.
●Czy lodówka została ustawiona na Tryb Super Freeze?
●Gdy do lodówki wkładana jest ciepła żywność, temperatura tymczasowo
wzrośnie.
Lód nie jest produkowany. ●Czy główna linia dopływu wody została odkręcona?
Czy wąż doprowadzający wodę został podłączony prawidłowo?
●Czy lodówka jest podłączona do zasilania?
●Czy przełącznik automatycznego wytwarzania lodu znajduje się w pozycji
WŁ.?
Żywność w lodówce jest
zamrożona.
●Czy ustawiona temperatura jest za niska?
●Czy umieszczono żywność z tyłu lodówki?
Obszar w pobliżu tylnej ściany to miejsce najniższej temperatury, należy
więc unikać umieszczania tam produktów, które mogą łatwo zamarzać.
Wilgoć gromadzi się w lodówce i
szuadach.
●Lodówka utrzymuje wysoki poziom wilgoci, w celu utrzymania świeżości
warzyw i innych produktów żywnościowych.
Skraplanie może wystąpić, gdy drzwi są często otwierane i zamykane lub
jeśli nie zostały całkowicie zamknięte. Wytrzyj krople suchą szmatką.
Drzwi zamrażarki ciężko się
otwierają.
●Różnica ciśnień między wnętrzem, a na zewnątrz zamrażarki może
czasami utrudniać otwieranie drzwi. Należy poczekać chwilę i ponownie
otworzyć drzwi.
291
Dodatek
Polski
Wewnątrz lodówki utrzymuje się
nieprzyjemny zapach.
●Czy produkty żywnościowe o silnych zapachach zostały zamknięte w
szczelnym opakowaniu przed umieszczeniem w lodówce?
Umieść produkty w szczelnym pojemniku lub przechowuj je w szczelnym
pojemniku na drzwiach.
●Zapachy mogą pozostawać na powierzchniach lodówki. Przetrzyj te
powierzchnie miękką szmatką zamoczoną w letniej wodzie.
Dozownik lodu/wody
Woda i lód mają nieprzyjemny
zapach.
●Czy ltr wody jest zużyty lub stary?
Woda nie wydobywa się. ●Czy główna linia dopływu wody została odkręcona?
Czy wąż doprowadzający wodę został podłączony prawidłowo?
●Czy lodówka jest podłączona do zasilania?
●Czy ikona “
” jest wyświetlona na panelu Dozownika lodu/wody?
Lód nie wydobywa się. ●Czy lodówka jest podłączona do zasilania?
●Czy ikona “
” lub “” jest wyświetlona na panelu Dozownika lodu/
wody?
●Czy jest jakikolwiek lód w pojemniku na lód?
●Czy lód w pojemniku na lód jest zbity?
Lód może ulec zamrożeniu w pojemniku na lód, jeśli nie był wyjmowany
przez długi czas.
Lodu nie można być podawany w przypadku zamrożenia lub zbrylenia w
pojemników na lód.
Wyjmij zbrylony lód z pojemnika na lód i wyrzutnika lodu.
●Ponieważ nie jest możliwe podawanie lodu, kilka kostek może pozostać
w pojemniku na lód. Jest to normalne.
Kontrolki na panelu Dozownika
lodu/wody nie działają.
●Czy lodówka jest podłączona do zasilania?
●Czy lodówka została ustawiona na blokadę Child Lock?
326
Dansk
Oplysninger til brugerne om afhændelse af elektriske apparater og elektronisk udstyr (private husholdninger)
Når produkter og/eller medfølgende dokumenter indeholder dette symbol, betyder det, at elektriske apparater og elektronisk
udstyr ikke må smides ud sammen med det almindelige husholdningsaffald.
For at sikre en korrekt behandling, indsamling og genbrug, skal du aevere disse produkter på dertil indrettede
indsamlingssteder, hvor de vil blive modtaget uden ekstra omkostninger. I nogle lande er der også mulighed for, at du kan
indlevere dine produkter hos den lokale forhandler, hvis du køber et nyt og tilsvarende produkt.
Hvis du afhænder dette produkt på korrekt vis, vil det være med at spare på de værdifulde naturlige råstoffer og forhindre
eventuelle negative påvirkninger på folkesundheden og miljøet, hvilket ellers kunne blive følgerne af en forkert håndtering af
affaldet. Kontakt de lokale myndigheder for at få yderligere oplysninger om, hvor du kan nde det nærmeste indsamlingssted.
I visse lande vil en forkert afhændelse af affaldet medføre en bødestraf i henhold til de gældende bestemmelser på området.
Professionelle brugere i EU
Hvis du ønsker at smide elektriske apparater eller elektronisk udstyr ud, skal du kontakte din forhandler eller leverandør for at få yderligere oplysninger.
Oplysninger om afhændelse i lande uden for EU
Dette symbol er kun gyldigt i EU.
Hvis du ønsker at afhænde dette produkt, skal du rette henvendelse til de lokale myndigheder eller din forhandler. Her kan du få oplysninger
om, hvordan du bedst kommer af med produktet.
SPECIFIKATIONER
Oplysningsskema (EU Regulation 1060/2010)
LEVERANDØRENS NAVNPanasonic
MODELIDENTIFIKATION
NR-B53V2-XE
NR-B53V2-XF
NR-BG53V2-X
NR-B53VW2-WE
NR-B53VW2-WF
NR-BG53VW2-W
KATEGORI7 (Køleskabe med frostboks)
ENERGIEFFEKTIVITETSKLASSEA++
ÅRLIGT ELFORBRUG346 kWh/år
*1
NETTORUMFANG KØL324 L
NETTORUMFANG FRYSER206 L
STJERNE KLASSIFICERING AF FRYSERFire Stjerner
»NO FROST« FOR DE RELEVANTE RUMKøl: No Frost / Fryser: No Frost
TEMPERATURSTIGNINGSTID16 timer
INDFRYSNINGSKAPACITET15 kg/24 timer
KLIMAKLASSESN-T
*2
EMISSION AF LUFTBÅREN STØJ 38 dB
Andre oplysninger
TOTAL BRUTTOVOLUM615 L
TOTAL NETTOVOLUM530 L
UTVENDIG STØRRELSE
BREDDE x DYBDE x HØYDE
915 mm x 710 mm x 1860 mm
NETTOVEKT137 kg
MERKESPENNING220 V - 230 V
MERKEFREKVENS50 Hz
KJØLEVÆSKE/LADINGR600a/70 g
ESEMIDDESyklopentan
Bemærk:
*
1
Energiforbruget per år er baseret på resultaterne af en standardtest over 24 timer i overensstemmelse med EN153.
Det egentlige energiforbrug kan variere afhængig af, hvordan apparatet bruges og placeres.
Energiforbruget under anvendelsen kan variere afhængigt af, hvor enheden er installeret, temperaturindstillingen for hvert af rummene, den omgivende temperatur og
luftfugtighed, hvor ofte dørene åbnes/lukkes, temperaturen og mængden af fødevarer, samt hvordan køleskabet anvendes.
*
2
Tilladt omgivelsestemperatur: 10 °C til 43 °C
Polski
Informacja dla użytkowników o pozbywaniu się urządzeń elektrycznych i elektronicznych (dotyczy gospodarstw domowych)
Przedstawiony symbol umieszczony na produktach lub dołączonej do nich dokumentacji informuje, że niesprawnych urządzeń
elektrycznych lub elektronicznych nie można wyrzucać razem z odpadami gospodarczymi.
Prawidłowe postępowanie w razie konieczności pozbycia się urządzeń elektrycznych lub elektronicznych, utylizacji, powtórnego
użycia lub odzysku podzespołów polega na przekazaniu urządzenia do wyspecjalizowanego punktu zbiórki, gdzie będzie
przyjęte bezpłatnie. W niektórych krajach produkt można oddać lokalnemu dystrybutorowi podczas zakupu innego urządzenia.
Prawidłowa utylizacja urządzenia umożliwia zachowanie cennych zasobów i uniknięcie negatywnego wpływu na zdrowie i
środowisko, które może być zagrożone przez nieodpowiednie postępowanie z odpadami.Szczegółowe informacje o najbliższym
punkcie zbiórki można uzyskać u władz lokalnych.
Nieprawidłowa utylizacja odpadów zagrożona jest karami przewidzianymi w odpowiednich przepisach lokalnych.
Użytkownicy biznesowi w krajach Unii Europejskiej
W razie konieczności pozbycia się urządzeń elektrycznych lub elektronicznych, prosimy skontaktować się z najbliższym punktem sprzedaży lub
z dostawcą, którzy udzielą dodatkowych informacji.
Pozbywanie się odpadów w krajach poza Unią Europejską
Taki symbol jest ważny tylko w Unii Europejskej.
W razie potrzeby pozbycia się niniejszego produktu prosimy skontaktować się z lokalnymi władzami lub ze sprzedawcą celem uzyskania
informacji o prawidłowym sposobie postępowania.
DANE TECHNICZNE
Karta produktu (UE regulacja 1060/2010)
NAZWA DOSTAWCYPanasonic
IDENTYFIKATOR MODELU
NR-B53V2-XE
NR-B53V2-XF
NR-BG53V2-X
NR-B53VW2-WE
NR-B53VW2-WF
NR-BG53VW2-W
KATEGORIA URZĄDZENIA CHŁODNICZEGO
7 (Chłodziarko-zamrażarka)
KLASA EFEKTYWNOŚCI ENERGETYCZNEJ
A+ +
ROCZNE ZUŻYCIE ENERGII346 kWh/rocznie
*1
POJEMNOŚĆ UŻYTKOWA CHŁODZIARKI324 L
POJEMNOŚĆ UŻYTKOWA ZAMRAŻARKI206 L
OZNACZENIE GWIAZDKOWE KOMORY
ZAMRAŻANIA
Cztery gwazdki
Panasonic Corporation
Website : http://panasonic.net/
Pursuant to the directive 2004/108/EC, article 9(2)
Libble takes abuse of its services very seriously. We're committed to dealing with such abuse according to the laws in your country of residence. When you submit a report, we'll investigate it and take the appropriate action. We'll get back to you only if we require additional details or have more information to share.
Product:
Forumrules
To achieve meaningful questions, we apply the following rules:
First, read the manual;
Check if your question has been asked previously;
Try to ask your question as clearly as possible;
Did you already try to solve the problem? Please mention this;
Is your problem solved by a visitor then let him/her know in this forum;
To give a response to a question or answer, do not use this form but click on the button 'reply to this question';
Your question will be posted here and emailed to our subscribers. Therefore, avoid filling in personal details.
Register
Register getting emails for Panasonic NR-B53V2 at:
new questions and answers
new manuals
You will receive an email to register for one or both of the options.
Get your user manual by e-mail
Enter your email address to receive the manual of Panasonic NR-B53V2 in the language / languages: Polish as an attachment in your email.
The manual is 14,68 mb in size.
You will receive the manual in your email within minutes. If you have not received an email, then probably have entered the wrong email address or your mailbox is too full. In addition, it may be that your ISP may have a maximum size for emails to receive.
If you have not received an email with the manual within fifteen minutes, it may be that you have a entered a wrong email address or that your ISP has set a maximum size to receive email that is smaller than the size of the manual.
The email address you have provided is not correct.
Please check the email address and correct it.
Your question is posted on this page
Would you like to receive an email when new answers and questions are posted? Please enter your email address.