734684
7
Zoom out
Zoom in
Previous page
1/45
Next page
Model No:
NN-K189M
NN-K179W
NN-K109W
Operating Instructions and Cookery Book
Microwave & Grill Oven
Important safety instructions
Please read carefully and keep for future reference
For domestic use only
When using recipes in this book always follow metric or imperial measurements. Do not
combine the two. In some recipes the conversions are not a direct equivalent due to recipe
result.
Important Notice
Your oven is rated 700 Watts (IEC). When using other cookbooks remember to adjust
cooking times accordingly. The symbol above, which is displayed on your oven door,
indicates the heating category for your oven when cooking or reheating convenience foods.
Your oven is rated ʻCʼ, which is very efficient. It is therefore very important that you refer
carefully to the packet instructions on convenience foods.
Some packet instructions only display information for B or D rated ovens. We therefore
provide additional guidelines for reheating on pages 27-33 of this book.
ALWAYS check the progress of the food as it cooks or reheats by simply opening the door.
After checking the progress of the foods for model NN-K109M, cooking will restart when the
oven door is closed. For NN-K189M / NN-K179W, after closing oven door press start.
Failure to follow the instructions given in this Cookbook and Operating Instructions,
may affect the recipe result and in some instances may be dangerous.
Customer Care Centre 0844 8443868
Selected Spares and Accessories:
Order direct on line at www.panasonic.co.uk or by telephoning the
Customer Care Centre number above.
For Cookery Advice call: 01344 862108
Alternatively visit our web site at www.cooking-corner.co.uk
C
700W
The IEC (60705) power
output (watts)
The heating category for
small packs of food
Microwave symbol
1
Contents
Safety Information 2
Unpacking your oven 3
Before using your oven 4
Care & cleaning 5
Maintenance of your oven 6
Parts of your oven 7
Important Information 8-9
Microwaving Principles 10
Control Panels 11
General Guidelines 12-13
Containers to use 14-15
Microwave Cooking and Defrosting -
NN-K109W 16
Setting the Clock/Timer/Child Safety Lock
NN-K189M/NN-K179W 17
Microwave Cooking and Defrosting -
NN-K189M/NN-K179W 18
Grilling 19
Combination Cooking 20
Auto Weight Defrosting -
NN-K189M/NN-K179W 21
Defrosting Guidelines 22
Defrosting Charts 23
Auto Weight Cooking-
NN-K189M/NN-K179W 24-26
Cooking/Reheating Guidelines 27
Reheating/Cooking Charts 28-33
Recipes 34-41
Technical Specifications 42
2
This appliance is supplied with a moulded
three pin mains plug for your safety and
convenience. A 13 amp fuse is fitted in this
plug.
Should the fuse need to be replaced, please
ensure that the replacement fuse has the
correct rating for the type of mains plug fitted
and that it is approved by ASTA or BSI to
BSI362.
Check for the ASTA mark or the BSI
mark on the body of the fuse.
IF THE FITTED MOULDED PLUG IS
UNSUITABLE FOR THE SOCKET OUTLET IN
YOUR HOME THEN THE FUSE SHOULD BE
REMOVED AND THE PLUG CUT OFF AND
DISPOSED OF SAFELY AND AN
APPROPRIATE ONE FITTED. THERE IS A
DANGER OF SEVERE ELECTRICAL SHOCK
IF THE CUT OFF PLUG IS INSERTED INTO
ANY 13 AMP SOCKET.
If a new plug is to be fitted, please observe the
wiring code as shown opposite. If in any doubt,
please consult a qualified electrician (For U.K.
Models only).
WARNING: THIS APPLIANCE MUST BE
EARTHED.
IMPORTANT: The wires in this mains lead are
coloured in accordance with the following
code: Green-and-yellow: Earth. Blue: Neutral.
Brown: Live.
As the colours of the wire in the mains lead of
this appliance may not correspond with the
coloured markings identifying the terminals in
your plug, proceed as follows:
The wire which is coloured GREEN-AND-
YELLOW must be connected to the terminal in
the plug which is marked with the letter E or by
the Earth symbol or coloured GREEN or
GREEN-AND-YELLOW.
The wire which is coloured BLUE must be
connected to the terminal in the plug which is
marked with the letter N or coloured BLUE.
The wire which is coloured BROWN must be
connected to the terminal in the plug which is
marked with the letter L or coloured BROWN.
When this oven is installed it should be easy to
isolate the appliance from the electricity supply
by pulling out the plug or operating a circuit
breaker.
Do not immerse cord, plug or oven in water.
Keep cord away from heated surfaces. Do not
let cord hang over the edge of table or work
top. Do not plug your oven in via an extension
cable as this can be dangerous. It is important
to plug the oven directly into a wall socket.
The back of the appliance heats up during use.
Do not allow the cord to be in contact with the
back of the appliance or cabinet surface.
Important safety instructions
Please read carefully and keep for future
reference
If the fuse cover is detachable, never use
the plug with the cover omitted. If a
replacement fuse cover is required, ensure
it is the same colour as that visible on the
pin face of the plug. A replacement fuse
cover can be purchased from your local
Panasonic Dealer.
HOW TO REPLACE THE FUSE
Open the fuse
compartment with a
screwdriver and
replace the fuse.
Voltage & Power
The voltage used must be the same as
specified on this microwave oven. Using a
higher voltage than that which is specified
is dangerous and may result in a fire or
other type of accident causing damage.
3
1. Examine Your Oven
Unpack oven, remove all packing material, and examine the oven for any damage such as
dents, broken door latches or cracks in the door. Notify the dealer immediately if unit is
damaged. Do NOT install if unit is damaged.
2. Guarantee
Your receipt is your guarantee, please keep safe.
3. Cord
If the supply cord of this appliance is damaged, it must be replaced by the manufacturer or itʼs
service agent or a similarly qualified person in order to avoid a hazard.
Note: The appliance should be inspected for damage to the door seals and door seal areas. If
these areas are damaged the appliance should not be operated until it has been repaired by a
service technician trained by the manufacturer.
Unpacking your oven
This oven is intended for household countertop use only. It is not
intended for built-in use or for use inside a cupboard.
1. Oven must be placed on a flat, stable surface 850mm above floor
level. For proper operation, the oven must have sufficient air flow,
i.e. 5cm at one side, the other being open; 15cm clear over the top;
10cm at the rear.
2. Do not place the microwave oven on a shelf directly above a gas or
electric hob. This may be a safety hazard and the oven may be damaged.
3. Do not block air vents on the rear and bottom or top of the cabinet. Do not place any articles
on the top of the oven over the vents. If air vents are blocked during operation, the oven may
overheat. If the oven overheats, a thermal safety device will turn the oven off. The oven will
remain inoperable with blank display until it has cooled.
4. Do not use outdoors.
5. This appliance is not intended to be operated by means of an
external timer or separate remote control system.
Placement of your oven
5cm
open
15cm
10cm
4
1. Exterior oven surfaces, including air vents on the cabinet and the oven door will get hot during
COMBINATION and GRILLING, take care when opening or closing the door and when
inserting or removing food and accessories.
2. The oven has a heater situated in the top of the oven. After using either the GRILL or
COMBINATION functions, the inside surfaces of the oven will be very hot. Care should be
taken to avoid touching any of the inside surfaces near the heating element inside the oven.
N.B. After cooking by these modes, the oven accessories will be very hot.
3. In the case of electronic failure, the oven can only be turned off at wall socket.
4. Only allow children to use the oven without supervision when adequate instructions have
been given so that the child is able to use the oven in a safe way and understands the
hazards of improper use. Ensure that children do not touch the hot outer casing after
operation of the oven.
5. Storage of Accessories
Do not store any objects other than oven accessories inside the oven in case it is accidentally
turned on.
6. Before Use
Before using COMBINATION or GRILL function for the first time operate the oven without food
and accessories (including glass turntable and roller ring) on GRILL 1 for 5 mins. This will
allow the oil that is used for rust protection to be burned off. This is the only time that the oven
is operated empty.
7. This appliance is not intended for use by persons (including children) with reduced physical,
sensory or mental capabilities, or lack of experience and knowledge unless they have been
given supervision or instruction concerning the use of the appliance by a person responsible
for their safety. Children should be supervised to ensure that they do not play with the
appliance.
Before using your oven
1. Hot Surfaces
Exterior oven surfaces, including air vents
on the cabinet and the oven door, will get
hot during COMBINATION and GRILLING.
Use care when opening or closing the door
and when inserting or removing food and
accessories. The oven has a heater
situated in the top of the oven. After using
the COMBINATION and GRILL functions
the roof and walls will be very hot.
2. Children should be kept away from the
oven at all times and should only be
allowed to operate the oven under
supervision. Ensure that children do not
touch the hot outer casing after operation
of the oven.
3. When the appliance is operated in Grill or
Combination mode, children
should only use the oven
under adult supervision due
to the temperatures
generated.
Caution: Hot surfaces
CAUTION: All inside surfaces of the oven will be hot.
DO NOT OPERATE THE OVEN EMPTY.
(Apart from in point 6 above).
The appliance must not be operated by MICROWAVE or
COMBINATION WITHOUT FOOD IN THE OVEN.
Operation when empty will damage the appliance.
5
1. Switch the oven off before cleaning and unplug at socket if possible.
2. Keep the inside of the oven, door seals and door seal areas clean. When food splatters
or spilled liquids adhere to oven walls, door seals and door seal areas wipe off with a damp
cloth. Mild detergent may be used if they get very dirty. The use of harsh detergent or
abrasives is not recommended. Take care when cleaning around the microwave feed guide.
3. Your oven cavity is constructed of zinc coated steel, painted with an extremely durable
coating. After use, the oven interior should be wiped out to remove any remaining water in
order to reduce the risk of corrosion to the cavity and door.
The cavity and door can be damaged by abrasive cleaners and sharp objects so care must
be taken to avoid damage caused in this way. If the cavity or door become damaged the
lining may begin to corrode. Providing the above precautions are taken regarding the
cleaning and care of your oven the life of the cavity and door may be extended.
4. The outside oven surface should be cleaned with a damp cloth. To prevent damage to the
operating parts inside the oven, water should not be allowed to seep into the ventilation
openings.
5. If the control panel becomes dirty, clean with a soft, dry cloth. Do not use harsh detergents
or abrasives on the control panel. When cleaning the control panel, leave the oven door
open to prevent the oven from accidentally turning on. After cleaning touch STOP/CANCEL
Pad to clear display window.
6. Keep air vents clear at all times. Check that no dust or other material is blocking any of the
air vents on the top, bottom or rear of the oven. If air vents become blocked this could
cause overheating which would affect the operation of the oven and possibly result in a
hazardous situation.
7. If steam accumulates inside or around the outside of the oven door, wipe with a soft cloth.
This may occur when the microwave oven is operated under high humidity conditions and
in no way indicates a malfunction of the unit or microwave leakage.
8. It is occasionally necessary to remove the glass turntable for cleaning. Wash the turntable
in warm soapy water. Do not place in the dishwasher.
9. The roller ring and oven cavity floor should be cleaned regularly to avoid excessive
noise. Simply wipe the bottom surface of the oven, particularly the turntable spindle and the
area surrounding this, with mild detergent and hot water then dry with a clean cloth. The
roller ring may be washed in mild soapy water. After removing the roller ring from cavity
floor for cleaning, be sure to replace it in the proper position.
10. When GRILLING or cooking by COMBINATION, some foods may splatter grease onto
the oven walls. If the oven is not cleaned to eliminate this grease, it can accumulate and
cause the oven to ʻSMOKEʼ during use. These marks will be more difficult to clean later.
11. A steam cleaner is not to be used for cleaning.
12. Do not use harsh abrasive cleaners or sharp metal scrapers to clean the oven door glass
since they can scratch the surface, which may result in shattering of the glass.
Care & Cleaning of your Microwave Oven
IMPORTANT - It is essential for the safe operation of the oven that it is kept
clean, and wiped out after each use. Failure to maintain the oven in a clean
condition could lead to deterioration of a surface that could adversely affect
the life of the appliance and possibly result in a hazardous situation.
6
1. Service
WHEN YOUR OVEN REQUIRES A SERVICE call your local Panasonic engineer (Customer
Care Centre on 0844 8443868 can recommend an engineer). It is hazardous for anyone other
than a competent person to carry out any service or repair operation which involves the
removal of a cover which gives protection against exposure to microwave energy.
2. Door Seals
Do not attempt to tamper with or make any adjustments or repairs to door, control panel
housing, safety interlock switches or any other part of the oven. Do not remove outer panel
from oven.
The door seals and door seal areas should always be kept clean – use a damp cloth.
N.B. The appliance should be inspected for damage to the door seals and door seal areas. If
these areas are damaged the appliance should not be operated until it has been repaired by a
service technician trained by the manufacturer.
3. Oven Light
The oven lamp must be replaced by a service technician trained by the manufacturer. DO
NOT attempt to remove the outer casing from the oven.
4. Selected Spares and Accessories
These may be ordered direct; on line at www.panasonic.co.uk or by telephoning the Customer
Care Centre 0844 8443868. Most major credit and debit cards accepted. Ensure you quote
the correct model number.
Maintenance of your oven
7
1. Do not operate the oven without the Roller
Ring and Glass Turntable in place.
2. Only use the Glass Turntable specifically
designed for this oven. Do not substitute
with any other Glass Turntable.
3. If Glass Turntable is hot, allow to cool
before cleaning or placing in water.
4. Do not cook directly on Glass Turntable.
Always place food in a microwave safe
dish. The only exception to this is when
cooking Jacket Potatoes or Auto Program
Jacket Potatoes.
5. If food or utensils on the glass turntable
touch the oven walls, this will cause the
turntable to stop moving, it will then
automatically rotate in the opposite
direction. This is normal. Open oven door,
reposition the food and restart.
6. The Glass Turntable can rotate in either
direction. The maximum weight that can
be placed on the turntable is 3 Kg (6 lb 10
oz) (this includes total weight of food and
dish).
7. While cooking by MICROWAVE or
COMBINATION the turntable may vibrate.
This will not affect cooking performance.
8. The metal Grill Rack must ONLY be used
as directed for GRILLING and
COMBINATION cooking. Never use this
on MICROWAVE only. Do not use if
operating the oven with less than 200g
(7oz) of food on a manual Combination
program. FAILURE TO USE
ACCESSORIES CORRECTLY COULD
DAMAGE YOUR OVEN.
9. Arcing may occur if the incorrect weight of
food is used, a metal container has been
used accidentally, or the grill rack has
been damaged. If this occurs, stop the
machine immediately. You can continue to
cook by GRILL ONLY.
10. Always refer to instructions for correct
accessories to use on all programs. The
glass turntable and Roller Ring are the
only accessories used for MICROWAVE
cooking.
Parts of Your Oven
Glass Turntable
The glass turntable and roller ring are the only
accessories used for Microwave Cooking.
Door Safety
Lock System
Control Panel
Roller Ring
1. The Roller Ring and oven
floor should be cleaned
frequently to prevent
excessive noise.
2. The Roller Ring must always
be used together with the
Glass Turntable for cooking.
Door Safety
Lock System
Microwave
Feed Guide
(Do not remove)
Grill Element
See-through
Oven Window
External Air Vents
Grill Rack
Door Release Pad
Push to open the door.
Opening the door during cooking will stop the
cooking process without cancelling the
program. Cooking resumes as soon as the
door is closed and start is pressed.
Display Window
Identification Plate
Power Supply Cord
8
Safety
If smoke or a fire occurs in the oven, press
Stop/Cancel button or turn TIMER/WEIGHT
SELECT dial back to zero position and leave the
door closed in order to stifle any flames.
Disconnect the power cord, or shut off the power
at the fuse or the circuit breaker panel.
Short Cooking Times
As microwave cooking times are much shorter
than other cooking methods it is essential that
recommended cooking times are not exceeded
without first checking the food.
Cooking times given in the cookbook are
approximate. Factors that may affect cooking
times are: preferred degree of cooking, starting
temperature, altitude, volume, size and shape of
foods and utensils used. As you become familiar
with the oven, you will be able to adjust these
factors.
It is better to undercook rather than overcook
foods. If food is undercooked, it can always be
returned to the oven for further cooking. If food is
overcooked, nothing can be done. Always start
with minimum cooking times.
Important.
If the recommended cooking times are exceeded
the food will be spoiled and in extreme
circumstances could catch fire and possibly
damage the interior of the oven.
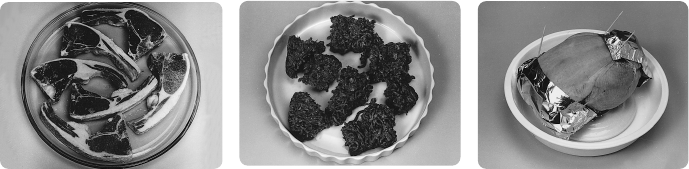
1. Small quantities of food.
Take care when heating small quantities of
food as these can easily burn, dry out or
catch fire if cooked too long. Always set
short cooking times and check the food
frequently.
NEVER OPERATE THE OVEN WITHOUT
FOOD INSIDE ON MICROWAVE OR
COMBINATION.
2. Foods low in moisture.
Take care when heating foods low in
moisture, eg. Bread items, chocolate,
popcorn, biscuits and pastries. These can
easily burn, dry out or catch on fire if
cooked too long. We do not recommend
heating foods low in moisture such as
popcorn or poppadoms. This oven has
been developed for food use. We do not
recommend that it is used for heating non
food items such as wheat bags or hot
water bottles
3. Christmas Pudding.
Christmas puddings and other foods high
in fats or sugar, eg. jam, mince pies, must
not be over heated. These foods must
never be left unattended as with over
cooking these foods can ignite. See pages
28-29.
4. Boiled Eggs.
Eggs in their shell and whole hard-boiled
eggs should not be heated in microwave
ovens since they may explode even after
microwave heating has ended.
5. Foods with Skins.
Potatoes, apples, egg yolk, whole
vegetables and sausages are examples of
food with non porous skins. These must be
pierced using a fork before cooking to
prevent bursting.
6. Liquids.
Liquids and other foods must not be
heated in sealed containers since they are
liable to explode. When heating liquids, eg.
Soup, sauces and beverages in your
microwave oven, overheating the liquid
beyond boiling point can occur without
evidence of bubbling. This could result in a
sudden boil over of the hot liquid. To
prevent this possibility the following steps
should be taken:
a) Avoid using straight-sided containers
with narrow necks.
b) Do not overheat.
c) Stir the liquid before placing the
container in the oven and again
halfway through the heating time.
d) After heating, allow to stand in the
oven for a short time, stirring again
before carefully removing the
container.
e) Microwave heating of beverages
can result in delayed eruptive
boiling, therefore care should be
taken when handling the container.
7. Lids.
Always remove the lids of jars and
containers and takeaway food containers
before you microwave them. If you donʼt
then steam and pressure might build up
inside and cause an explosion even after
the microwave cooking has stopped.
Important Information – Read Carefully
9
8. Deep Fat Frying.
Do not attempt to deep fat fry in your oven.
9. Meat Thermometer.
Use a meat thermometer to check the
degree of cooking of joints and poultry,
only when meat has been removed from
the microwave. If undercooked, return to
the oven and cook for a few more minutes
at the recommended power level. Do not
leave a conventional meat thermometer in
the oven when microwaving.
10. Paper, Plastic.
When heating food in plastic or paper
containers keep an eye on the oven due
to the possibility of ignition. Do not use
wire twist-ties with roasting bags as arcing
will occur.
Do not use recycled paper products, eg
Kitchen roll unless they say they are
specifically designed for use in a
microwave oven. These products contain
impurities which may cause sparks and/or
fires when used.
11. Reheating.
It is essential that reheated food is served
“piping hot”.
Remove the food from the oven and check
that it is “piping hot”, ie. Steam is being
emitted from all parts and any sauce is
bubbling. (If you wish you may choose to
check the food has reached 72˚C with a
food thermometer – but remember do not
use this thermometer inside the
microwave.
For foods that cannot be stirred, eg
Lasagne, shepherds pie, the centre should
be cut with a knife to test it is well heated
through. Even if a manufacturerʼs packet
instructions have been followed always
check the food is piping hot before serving
and if in doubt return your food to the oven
for further heating.
12. Standing Time.
Standing time refers to the period at the
end of cooking or reheating when food is
left before being eaten, ie. it is a rest time
which allows the heat in the food to
continue to conduct to the centre, thus
eliminating cold spots. See page 21.
13. Keeping Your Oven Clean.
It is essential for the safe operation of the
oven that it is wiped out regularly. Use
warm soapy water, squeeze the cloth out
well and use to remove any grease or food
from the interior. Pay particular attention to
the door seal area and also the areas
around the microwave feed guide situated
on the right hand side of the cavity wall.
The oven should be unplugged when
cleaning.
14. Grilling
The oven will only operate on the GRILL
function with the door closed.
15. Utensils.
Before use check that utensils/containers
are suitable for use in microwave ovens.
See pages 14-15.
16. Babies Bottles and Food Jars.
When reheating babies bottles always
remove top and teat. Liquid at the top of
the bottle will be much hotter than that at
the bottom and must be shaken thoroughly
before checking the temperature. The lid
must also be removed from babies food
jars, the contents must also be stirred or
shaken before the temperature is checked.
This should be carried out before
consumption to avoid burns. See page 27.
17. Arcing.
Arcing may occur if a metal container has
been used accidentally or if the incorrect
weight of food is used or the grill rack has
been damaged. Arcing is when blue
flashes of light are seen in the microwave
oven. If this occurs, stop the machine
immediately. If the oven is left unattended
and this continues it can damage the
machine. Continue to cook by GRILL only.
18. Maximum weight on Turntable.
The maximum weight that can be placed
on the turntable is 3 Kg (6 lb 10 oz) (this
includes total weight of food and dish).
Important Information – Read Carefully
10
Microwave energy has been used in this country to cook and
reheat food since early experiments with radar in World War II.
Microwaves are present in the atmosphere all the time, both
naturally and from manmade sources.
Manmade sources include radar, radio, television,
telecommunication links and car phones.
Microwaving Principles
The microwaves cause the water molecules to
vibrate which causes FRICTION, ie. HEAT.
This heat then cooks the food. Microwaves are
also attracted to fat and sugar particles, and
foods high in these will cook more quickly.
Microwaves can only penetrate to a depth of
1
1
2-2 inches (4-5 cm) and as heat spreads
through the food by conduction, just as in a
traditional oven, the food cooks from the
outside inwards.
In a microwave oven,
electricity is converted
into microwaves by the
MAGNETRON.
REFLECTION
The microwaves bounce
off the metal walls
and the metal door screen.
TRANSMISSION
Then they pass through
the cooking containers to
be absorbed by the water
molecules in the food, all
foods contain water to a
greater or lesser extent.
How Microwaves cook food
The dish used to cook or
reheat the food will get
warm during cooking, as the
heat conducts from the
food. Even when micro -
waving, oven gloves are
required!
MICROWAVES CANNOT
PASS THROUGH METAL
AND THERE FORE METAL
COOKING UTEN SILS CAN
NEVER BE USED IN A
MICROWAVE, FOR
COOKING ON
MICROWAVE ONLY
Foods Not Suitable for
Cooking by Microwave
Only
Yorkshire Puddings,
Souffles, Double Crust
Pastry Pies.
This is because these foods
rely on dry external heat to
cook correctly, do not
attempt to cook by micro -
wave.
Foods that require deep fat
frying cannot be cooked
either.
STANDING TIME
When a microwave oven is
switched off, the food will
continue to cook by
conduction – NOT BY
MICROWAVE ENERGY.
Hence STANDING TIME is
very important in
microwaving, particularly for
dense foods i.e. meat,
cakes and reheated meals
(Refer to page 12).
Boiled Eggs
Do not boil eggs in your
microwave. Raw eggs
boiled in their shells can
explode and cause serious
injury
Important Notes
13 Amp fused socket
Magnetron
Wave Guide
Turntable
Oven cavity
11
Control Panels
NN-K189M / NN-K179W*
(1) Display Window
(2) Microwave Power Levels
(3) Grill Pad
(4) Combination Pad
(5) Time Pads
(6) Auto Weight Microwave Programs
(7) Auto Weight Combination Programs
(8) Auto Weight Defrost Pad
(9) Timer /Clock Pad
(10) Weight Selection Pads
(11) Stop /Cancel Pad:
Before Cooking:
one press clears your instructions.
During Cooking:
one press temporarily stops the cooking
program. Another press cancels all your
instructions and the time of day will
appear in the display.
(12) Start Pad
(1)
(10)
(2)
Beep Sound (NN-K189M/NN-K179W only):
When a pad is touched correctly a beep will be
heard. If a pad is touched and no beep is
heard, the unit has not or cannot accept the
instruction. At the end of any complete
program, the oven will beep 5 times, and ʻEndʼ
appears in the display.
(7)
(6)
(3)
(11)
(12)
(8)
*The design of your control panel may vary
from the panel displayed (depending on colour),
but the words on the pads will be the same.
(5)
(4)
(9)
(1) Timer
(2) Cooking Mode Selection Dial
(3) Microwave Power
(4) Defrost Power
(5) Combination Setting
(6) Grill Setting
NN-K109W
(1)
(2)
(6)
(5)
(3)
(4)
12
General Guidelines
STANDING TIME
Dense foods e.g. meat, jacket potatoes and
cakes, require standing time (inside or outside
of the oven) after cook ing, to allow heat to
finish con ducting to the centre of the food to
cook through completely. Wrap meat joints
and jacket potatoes in aluminium foil while
standing. Meat joints need approx. 10-15
minutes, jacket potatoes 5 minutes. Other
foods such as plated meals, vegetables, fish
etc require 2-5 minutes standing. If food is not
cooked after standing time, return to the oven
and cook for additional time. After defrosting
food, standing time should also be allowed.
See pages 20-22.
The skin or membrane on some foods will
cause steam to build up during cooking.
These foods must be pierced or a strip of skin
should be peeled off before cooking to allow
the steam to es cape. Eggs, potatoes, apples,
sausages etc, will all need to be pierced
before cooking. DO NOT ATTEMPT TO BOIL
EGGS IN THEIR SHELLS.
PIERCING
COVERING
QUANTITY
SPACING
Small quantities cook faster than large
quantities, also small meals will reheat more
quickly than large portions.
MOISTURE CONTENT
Many fresh foods e.g. veget ables and fruit,
vary in their moisture content throughout the
season, particularly jacket potatoes. For this
reason cooking times may have to be
adjusted. Dry ingredients e.g. rice, pasta, can
dry out during storage so cooking times may
differ.
Cover foods with microwave cling film or a lid.
Cover fish, vegetables, cas seroles, soups. Do
not cover cakes, sauces, jacket potatoes or
pastry items.
Foods cook more quickly and evenly if spaced
apart. NEVER pile foods on top of each other.
DENSITY
Porous airy foods heat more quickly than
dense heavy foods.
CLING FILM
Cling film helps keep the food moist and the
trapped steam assists in speeding up cooking
times. Pierce before cooking to allow excess
steam to escape. Always take care when
removing cling film from a dish as the build-up
of steam will be very hot.
13
General Guidelines
SHAPE
Even shapes cook evenly. Food cooks better
by microwave when in a round container
rather than square.
STARTING TEMPERATURE
The colder the food, the longer it takes to heat
up. Food from a fridge takes longer to reheat
than food at room temperature. Food
temperature should be between 5 and 8°C
before cooking.
LIQUIDS
All liquids must be stirred before, during and
after heating. Water espe cially must be stirred
before and during heating, to avoid eruption.
Do not heat liquids that have previously been
boiled. DO NOT OVERHEAT.
TURNING AND STIRRING
Some foods require stirring during cooking.
Meat and poultry should be turned after half
the cooking time.
ARRANGING
Individual foods e.g. chicken portions or chops,
should be placed on a dish so that the thicker
parts are towards the outside.
CHECKING FOOD
It is essential that food is checked during and
after a recommended cooking time, even if an
AUTO PROGRAM has been used (just as you
would check food cooked in a conven tional
oven). Return the food to the oven for further
cooking if necessary.
DISH SIZE
Follow the dish sizes given in the recipes, as
these affect the cook ing and reheating times.
A quan tity of food spread in a bigger dish
cooks and reheats more quickly.
CLEANING
As microwaves work on food particles, keep
your oven clean at all times. Stubborn spots of
food can be removed by using a branded
microwave spray cleaner, sprayed onto a soft
cloth. Always wipe the oven dry after cleaning.
14
When unsure that a cooking
con tainer is suitable for use
in your microwave, check by
the follow ing test:
1. Fill a microwave safe
measur ing jug with 300ml
(
1
2
pt) cold water.
2. Place it on the turntable
along side the dish to be
tested. If the dish you are
testing is a large dish, then
stand the measur ing jug on
top of the empty dish.
3. Heat on HIGH power for
1 minute.
Result
If the dish is suitable for
micro waving, it will remain
cool, whilst the water in the
jug will begin to feel warm. If
the testing dish feels warm,
do not use as it is obvious ly
absorbing microwave energy.
N.B. This test does not apply
to plastic or metal based
con tainers e.g. Le Creuset
®
style dishes, which should not
be used as they are cast iron
covered with enamel.
Containers to use
OVEN GLASS
Glass that is heat
resistant e.g. Pyrex
®
,
is ideal. DO NOT
USE FOR GRILLING.
Do not use delicate
glass which may
crack due to the heat
from the food. Do not
use lead crystal
which may crack or
arc.
CHINA AND CERAMIC
Glazed china plates,
saucers, bowls,
mugs and cups can
be used if they are
heat resis tant.
Porcelain and
ceramic are also
ideal. Fine bone
china should only be
used for reheating
for short periods, otherwise the change in
tempera ture may crack the dish or craze the
finish. Do not use dishes with a metal rim or
pattern. Do not use jugs or mugs with glued
handles, since the glue can melt in a
microwave.
POTTERY, EARTHENWARE,
STONEWARE
Only use if completely
glazed. Do not use if
partially glazed or
unglazed, as they are
able to absorb water
which will absorb
microwave energy,
making the container
very hot and slowing
down the cooking of
food.
FOIL/METAL CONTAINERS
NEVER ATTEMPT TO
COOK IN FOIL OR
METAL con tai ners –
the microwaves
cannot pass through
and the food will not
heat evenly – this
may also damage
your oven. Use
wooden kebab sticks
instead of metal skewers.
Quick Check Guide to Cooking Utensils
Choosing the correct container is a very important factor in deciding the success or failure of
your cooking.
Testing Dishes for Suitability
15
PLASTIC
Many plastic containers are designed for
microwave use. Only use Tupperware
®
containers if they are designed for microwave
use. Do not use Melamine as it will scorch. Do
not use plastic for cooking foods high in sugar
or fat or foods that require long cooking times
e.g. brown rice. Never cook in margarine
containers or yogurt pots, as these will melt with
the heat from the food.
DO NOT USE UNDER THE GRILL.
PAPER
Plain white kitchen paper (kitchen towel) can be used for
covering blind pastry cases and for cover ing bacon to
prevent splattering ONLY USE FOR SHORT COOKING
TIMES. NEVER RE-USE A PIECE OF KITCHEN TOWEL.
Avoid kitchen paper containing manmade fibres.
Check that branded re-cycled kitchen towel is
recommended for microwave use. Do not use waxed or
plastic coated cups as the finish may melt in the oven.
Greaseproof paper can be used to line the base of dishes
and to cover fatty foods. White paper plates can be used
for SHORT RE HEATING TIMES, ON MICROWAVE
ONLY.
WICKER, WOOD, STRAW BASKETS
Do not use these items in your microwave. With
continued use and with prolonged exposure they will
crack and could ignite. DO NOT USE ON ANY COOKING
MODE.
CLING FILM
Use microwave cling film to cover food that is to be
reheated, or cooked, ON MICROWAVE ONLY taking care
to avoid the film being in direct contact with the food. DO
NOT USE ON GRILL OR COMBINATION.
ALUMINIUM FOIL
Small amounts of smooth aluminium foil can be used to
SHIELD joints of meat during defrosting and cooking. As
the microwaves cannot pass through the foil this prevents
the shielded parts from overcooking or overdefrosting.
The foil must not touch the sides or roof of the oven, as
this may cause arching and damage your oven.
ROASTING BAGS
These are useful when slit up one side to tent a joint of
meat when roasting by power and time. DO NOT USE
THE METAL TWISTS SUPPLIED.
Containers to use
16
Microwave Cooking and Defrosting
for NN-K109W
700 Watts
600 Watts
360 Watts
270 Watts
200 Watts
Wattage
Turn dial to select
power level.
Set cooking time by turning
dial. If the door is already
closed cooking time will
begin immediately. For short
cooking times always turn
the dial to 2 mins and then
adjust to time required.
Note:
1. If you wish to check the food during cooking simply open the door. The oven will automatically
stop cooking. To continue cooking, close the door.
2. To stop cooking, turn timer dial to zero the “OFF” position. Cooking time can be reset at any
time during the cooking cycle by turning the timer dial.
3. When food is removed from the oven after cooking is complete, check the timer is in the zero
position.
High
Medium
Low
Defrost
Warm
The glass turntable must always be in position when using the oven.
17
Setting the Clock
for NN-K189M and NN-K179W
Press twice
(to set 10 mins.)
Press eleven times
(to set hours)
Press five times
(to set 1 mins.)
Press Timer / Clock
Pad twice
A dot starts to blink.
Press Timer / Clock Pad
The colon stops blinking.
Time of day is now locked
into the display.
Press Time Pads
Enter time of day by pressing
appropriate Time pads.
Note:
1. To reset time of day, repeat step 1 through to step 3, as above.
2. The clock will keep the time of day as long as the oven is plugged in and electricity is
supplied.
3. This is a 12 hour clock, ie 2pm = 2:00 not 14:00. The oven will not function if a 24 hour clock
is set.
When the oven is first plugged in “88:88” appears in display window.
eg. 11.25pm
Timer
for NN-K189M and NN-K179W
This feature operates as a minute timer. During operation there is no microwave energy.
Press the Timer / Clock
Pad once. Display is blank.
Set desired time. Maximum
time is 90 minutes.
Press Start. The time in
the display will count down.
Using this system will make the oven controls inoperable; however, the door can be opened.
Child Lock can be set when the display shows a colon or the time.
To Set:
Press Start Pad three times (within 10
seconds).
The time of day will disappear. Actual time
will not be lost. ʻLʼ is indicated in the display.
Press Stop/Cancel Pad three times
(within 10 seconds). The time of day will
reappear in the display.
Child safety lock
for NN-K189M and NN-K179W
To Cancel:
18
Press the microwave
power pad. Select desired
power level. The microwave
indicator lights and the
wattage appears in the
display.
Select cooking time by pressing
appropriate pads. Your oven can
be programmed for up to 90
minutes in Medium, Low, Simmer
and Defrost power. High power
can be programmed for 30
minutes.
Press Start.
The cooking
program will
start and the
time in the
display will
count down.
Microwave Cooking and Defrosting
for NN-K189M and NN-K179W
The glass turntable must always be in position when using the oven.
700 Watts
270 Watts
600 Watts
440 Watts
200 Watts
Wattage
High
Defrost
Medium
Low
Warm
1 Press
2 Presses
3 Presses
4 Presses
5 Presses
Multi-Stage Cooking
The oven has 2 stage cooking, so you can program up to 2 different instructions and the oven will
switch automatically from power to power (Repeat steps 1 and 2 above but only press Start after
both stages have been entered).
Note:
1. Timer Pad can not be programmed in multi-stage cooking.
2. Auto Weight / Defrost can not be programmed in multi stage cooking.
19
Note:
1. Place food on grill rack on turntable. Place a heatproof plate (Pyrex
®
) underneath to catch
fat and drips.
2. Never cover foods when grilling.
3. DO NOT attempt to preheat the grill.
4. The grill will only operate with the oven door closed. It is not possible to use the grill
function with the door open.
5. There is no microwave power on the GRILL only program.
6. Most foods require turning halfway during cooking. When turning food, open oven door
and CAREFULLY remove grill rack using oven gloves.
7. After turning, return food to the oven and close door. For NN-K109W grill mode will restart
when the oven door is closed. For NN-K189M/NN-K179W after closing oven door, press
START. The oven display will continue to count down the remaining grilling time. It is quite
safe to open the oven door at any time to check the progress of the food as it is grilling.
8. The grill will glow on and off during cooking - this is normal. Always clean the oven after
using the Grill and before using the microwave or combination.
9. NN-K109W only: After grill use the thermostat may switch off to prevent overheating. If
using continuously, allow oven to cool between cooking.
Press Grill Pad to select
level.
1 press grill 1 (high)
2 presses grill 2 (medium)
3 Presses grill 3 (low)
The grill indicator light appears
in the display.
Grilling
Press Start.
Select Cooking time. Time
can be set up to 90 minutes.
CAUTION: The GRILL rack must always be used with the glass turntable in position.
Remove grill rack from oven by holding the rack and heatproof dish firmly. Use oven
gloves when removing accessories. Never touch the outside window or inside metal
parts of the door or oven when taking food in or out due to the high temperatures
involved.
Set Cooking Mode selection
dial to Grill position .
Set grilling time by turning Timer dial. If
the door is already closed cooking time
will begin immediately.
NN-K109W only
NN-K189M/NN-K179W only
20
1 press combi 1 325W 540W
2 presses combi 2 400W 430W
3 presses combi 3 500W 290W
Combination Cooking
Press combination pad to select
level. The combination indicator
lights and combination level (1, 2
or 3) appears in the display.
Select cooking time. Time
can be set up to 90 minutes.
Press Start.
When cooking by combination, the microwave power cooks food quickly whilst the grill gives
traditional browning and crisping.
Note:
1. The grill rack is designed to be used for Combination and Grilling. Never attempt to use
any other metal accessory except the one provided with the oven. Place a heatproof dish
underneath to catch any fat or drips.
2. Use the grill rack only as described. DO NOT use if operating the oven with less than 200g
(7oz) of food on a manual program. For small quantities do not cook by combination,
cook by GRILL ONLY for best results.
3. Never cover foods when cooking on combination.
4. DO NOT preheat the grill on combination.
5. Arcing may occur if the incorrect weight of food is used, the GRILL rack has been
damaged, or a metal container has been used accidentally. Arcing is flashes of blue light
seen in the microwave. If this occurs, stop the oven immediately.
6. Some foods should be cooked on combination without using the grill rack i.e. Roasts,
gratins, pies and puddings. The food should be placed in a heatproof non-metallic dish and
placed directly onto the turntable.
7. DO NOT use plastic MICROWAVE containers on combination programs (unless suitable
for combination cooking.) Dishes must be able to withstand the heat of the top grill -
heatproof glass e.g. Pyrex
®
or ceramic are ideal. But do not put dishes on grill rack directly
under grill.
8. DO NOT use your own metal dishes or tins, as the microwaves will not penetrate the food
evenly.
9. NN-K109W only: After grill use the thermostat may switch off to prevent overheating. If
using continuously, allow oven to cool between cooking.
CAUTION: The GRILL rack must always be used with the glass turntable in position.
Remove grill rack from oven by holding the rack and heatproof dish firmly. Use oven
gloves when removing accessories. Never touch the outside window or inside metal
parts of the door or oven when taking food in or out due to the high temperatures
involved.
Press Level MW Grill
Set cooking mode selection dial to
combination position .
Set cooking time by turning timer dial. If
door is already closed cooking time will
begin immediately.
NN-K109W only
+
NN-K189M/NN-K179W only
21
Program Weight Range Suitable Foods
1 Bread 100 - 600g Bread and rolls. Turn at beep.
2 Meat Items 200 - 1000g
Small pieces of meat, minced meat, chicken
portions, steaks, chops. Turn at beeps and
shield.
3 Meat Joints 600 - 1600g
Whole chicken, meat joints. Turn at beeps
and shield.
Select desired program.
Press the pad once to
select bread, twice to select
meat items and three times
to select meat joints. Auto
program number appears in
the display. The auto and
defrost indicators light.
Press Start.
Remember to stir or
turn the food during
defrosting.
Set Weight using the Up and
Down pads. If the up / down pad is
pressed and held, the weight will
increase / decrease rapidly.
This feature allows you to defrost bread, meat items and joints of meat automatically once you
have entered in the weight of the food.
Auto Weight Defrost
NN-K189M/NN-K179W
1. Bread
This program is suitable for small items which are required for immediate use, they may feel
warm straight after defrosting. Loaves can also be defrosted on this program but these will
require standing time to allow the centre to thaw out. Standing time can be shortened if slices
are separated and buns and loaves cut in half. Items should be turned halfway during
defrosting. THIS PROGRAM IS NOT SUITABLE FOR CREAM CAKES OR DESSERTS e.g.
cheesecake. See defrosting charts on page 23 for standing times.
2. Meat Items (mince/chops/chicken portions)
NOT SUITABLE FOR SAUSAGES, these can be defrosted manually using Defrost power and
time. Chops and chicken portions should be arranged in a single layer and turned frequently
during defrosting. It is necessary for mince to be broken up frequently during defrosting and
this is best carried out in a large shallow dish. See defrosting charts on page 23 for standing
times.
3. Meat Joints / Whole Chickens
Whole chickens and meat joints will require shielding during defrosting especially if it is a
particularly fatty piece. This is to prevent food starting to cook on the outside edges. Protect
wings, breast and fat with smooth pieces of aluminium foil secured with cocktail sticks. DO
NOT ALLOW THE FOIL TO TOUCH THE WALLS OF THE OVEN. Standing time of at least 1
hour should be allowed for joints after defrosting.
22
Defrosting Guidelines
Arrange food in a single layer.
Shield chickens and joints of
meat .
Turn or break up food as soon
as possible.
For Best Results:
1. Place foods in a suitable container. Meat joints and chickens should be placed on an upturned
saucer or on a plastic rack if you have one.
2. Check food during defrosting, as foods vary in their defrosting speed.
3. It is not necessary to cover the food.
4. Always turn or stir the food especially when the oven “beepsʼʼ. Shield if necessary (see point 6).
5. Minced meat, chops and other small items should be broken up or separated as soon as
possible and placed in a single layer.
6. Shielding prevents food cooking. It is essential when defrosting chickens and joints of meat.
The outside thaws out first, so protect wings/breast and fat with smooth pieces of aluminium
foil secured with cocktail sticks.
7. Allow standing time so that the centre of the food thaws out. (Minimum of 1 hour for joints of
meat and whole chickens).
23
Defrosting Foods Using Defrost Power & Time
The times given below are a guideline only. Always check the progress of the food by opening the
oven door and then re-starting. For larger quantities adjust times accordingly. Food should not be
covered during defrosting.
Meat
Defrosting Time per
450g (1lb)
Method
Standing
Time
NN-K179W/
NN-K189M
NN-K109W
Beef/Lamb/Pork
Joint 450g (1lb)
10-12 mins. 7-9 mins.
Place in a suitable dish or on an
upturned saucer or use a rack. Turn
3-4 times. Shield.
60 mins.
Minced Beef
450g (1lb)
9-10 mins. 7-8 mins.
Place in a suitable dish. Break up
and turn 3-4 times.
15 mins.
Chops 450g (1lb) 8 mins. 7 mins.
Place in a suitable dish in a single
layer. Turn twice. Shield if necessary.
15 mins.
Sausages 450g
(1lb)
5-6 mins. 4-5 mins.
Place in a suitable dish in a single
layer. Turn twice. Shield if necessary.
15 mins.
Bacon Rashers
450g (1lb)
7-8 mins. 6-7 mins.
Place in a suitable dish. Turn and
separate twice. Shield if necessary
15 mins.
Stewing Steak
450g (1lb)
9 mins. 8 mins.
Place in a suitable dish. Break up
frequently.
30 mins.
Whole Chicken
450g (1lb)
9-10 mins. 7-8 mins.
Place in a suitable dish on an
upturned saucer or use a rack. Turn
3-4 times. Shield.
60 mins.
Chicken Portions
450g (1lb)
6-8 mins. 6-8 mins.
Place in a suitable dish in a single
layer. Turn twice. Shield if necessary.
30-45
mins.
Fish
Whole 450g (1lb) 7-8 mins. 7-8 mins.
Place in a suitable dish. Turn twice.
Shield.
15 mins.
Fillets/Steak
450g (1lb)
6-7 mins. 7-8 mins.
Place in a suitable dish. Turn twice,
separate if necessary.
15 mins.
Prawns 450g
(1lb)
6-7 mins. 6-7 mins.
Place in a suitable dish. Stir twice
during defrosting.
10 mins.
General
Bread Sliced
400g (14oz)
2 mins. 2-3 mins.
Place on the turntable. Separate and
rearrange during defrosting.
15 mins.
Slice of bread
30g (1oz)
20-30 sec. 20 sec.
Place on the turntable on a piece of
kitchen paper.
1-2 mins.
Pastry 450g (1lb) 4-5 mins. 4-5 mins. Place on a plate. Turn over half way.
10-15
mins.
Soft Fruit 450g
(1lb)
6-7 mins. 6-7 mins.
Place in a suitable dish. Stir twice
during defrosting.
10 mins.
24
Auto Weight Cook Programs
for NN-K189M/NN-K179W
This feature allows you to cook or reheat foods by setting the weight only. The oven determines
the microwave power level and / or combination level then the cooking time automatically. Select
the category of food and then just enter the weight. The weight is entered in grams.
The Auto Weight Programs are designed to take the guesswork out of cooking or reheating your
food. They must ONLY be used for the foods described.
The three foods cooked by selecting the micro cook pad, use microwave power only.
The three foods, cooked by selecting the Combi Cook pad, use the microwave and grill together.
1. Only cook foods within the weight ranges described.
2. Only use the accessories as indicated
3. Do NOT cover food when using the Combi Cook programs as it will prevent the food browning
and the heat of the grill will melt any plastic covering.
4. Most foods benefit from a STANDING time, after cooking on an Auto Program, to allow heat to
continue conducting to the centre.
5. To allow for some variations that occur in food, check that food is thoroughly cooked and piping
hot before serving.
Select desired program by
pressing the pad. The auto
indicator light and the
program number appears in
the display.
Press Start.
Set Weight using the Up and
Down pads. If the up / down pad is
pressed and held, the weight will
increase / decrease rapidly.
eg.
Guidelines for Use
25
1. Chilled meal 200g - 800g
To reheat a chilled convenience meal that can be stirred.
Foods must be in a suitable shallow microwaveable container
and have the film pierced. Select program (1 press of micro cook
pad), enter weight and press start. Stir halfway. After cooking
allow to stand for 1 minute. Ensure that the food is piping hot.
Stir before serving.
2. Frozen meal 300g - 600g
To reheat a frozen convenience meal that can be stirred.
Foods must be in a suitable shallow microwaveable container
and have the film pierced. Select program (2 presses of micro
cook pad), enter weight and press start. Stir halfway. After
cooking allow to stand for 1 minute. Ensure that the food is
piping hot. Stir before serving.
3. Fresh Vegetables 100g - 800g
To cook fresh vegetables eg. carrots, cauliflower, not suitable for
potatoes. Place prepared vegetables into a shallow container on
turntable. Add 15ml (1 tbsp) of water per 100g of vegetables.
Cover with pierced cling film or lid. Select program (3 presses of
micro cook pad), enter weight, press start.
26
For reheating, crisping and browning the top of purchased pre-
cooked pastry items. Remove all packaging and place on Wire
Rack on turntable. Select program (3 presses of combi cook
pad). Enter weight. Press start. DO NOT COVER.
To cook jacket potatoes with a crispier, drier skin. Choose
medium sized potatoes 200-250g (7-9oz) for best results. Wash
and dry potatoes and prick with a fork several times. Place
directly on Wire Rack on turntable. Select program (1 press of
combi cook pad). Enter weight. Press start. DO NOT COVER.
3. Reheat Pastry 100g - 400g
1. Jacket Potatoes 200g - 1000g
2. Chilled crispy top 300g - 600g
For reheating and browning chilled purchased savoury dishes
eg. Lasagne or Shepherds Pie. Remove any lid or covering. If in
a foil container transfer to a similar sized heatproof dish and
place on turntable. If using heatproof plastic based dish that food
is purchased in, take care and support underneath when
removing. Select program (2 presses of combi cook pad). Enter
weight. Press start. DO NOT COVER. Stand for 1 minute before
serving. Ensure the food is piping hot.
27
Cooking and Reheating Guidelines
Most foods reheat very quickly in your oven by HIGH power.
Meals can be brought back to serving temperature in just
minutes and will taste freshly cooked and NOT leftover.
Always check food is piping hot and return to oven if
necessary.
As a general rule, always cover wet foods, e.g. soups,
casseroles and plated meals.
Do not cover dry foods e.g. bread rolls, mince pies,
sausage rolls etc.
The charts on pages 28-33 show you the best way to cook
or reheat your favourite foods. The best method depends on
the type of food.
Remember when cooking or reheating any food that it
should be stirred or turned wherever possible. This ensures
even cooking or reheating on the outside and in the centre.
When is food reheated?
Food that has been reheated or cooked should be served
“piping hot” i.e. steam should be visibly emitted from all
parts. As long as good hygiene practices have been
followed during the prepa ra tion and storage of the food,
then cooking or reheating presents no safety risks.
Foods that cannot be stirred should be cut with a knife to
test that they are adequately heated throughout. Even if a
manufac tur erʼs instructions or the times in the cookbook
have been followed, it is still important to check the food is
heated thoroughly. If in doubt, always return to the oven for
further reheating.
If you cannot find the equivalent food in the chart then
choose a similar type and size listed and adjust the cooking
time if necessary.
PLATED MEALS
Everyoneʼs appetite varies
and reheat times depend
on meal contents. Dense
items e.g. mashed potato,
should be spread out well.
If a lot of gravy is added,
extra time may be required.
Place denser items to the
outside of the plate.
Between 4-7 mins. on
HIGH power will reheat an
average portion. Do not
stack meals.
CANNED FOODS
Remove foods from can
and place in a suitable dish
before heating.
SOUPS
Use a bowl and stir before
heating and at least once
through reheat time and
again at the end.
CASSEROLES
Stir halfway through and
again at the end of heating.
MINCE PIES - CAUTION
CHRISTMAS PUDDINGS
AND LIQUIDS - CAUTION
REMEMBER even if the pastry is
cold to the touch, the filling will be
piping hot and will warm the
pastry through. Take care not to
overheat otherwise burning can
occur due to the high fat and
sugar content of the filling. Check
the temperature of the filling
before consuming to avoid
burning your mouth.
BABIES BOTTLES -
CAUTION
Milk or formula MUST be shaken
thoroughly before heating and
again at the end and tested
carefully before feeding a baby.
For 7-8 fl.oz. of milk from fridge
temperature, remove top and teat.
Heat on HIGH power for 25-30
secs.
CHECK CAREFULLY.
For 3 fl.oz. of milk from fridge
temperature, remove top and teat.
Heat on HIGH power for 10-15
secs.
CHECK CAREFULLY.
N.B. Liquid at top of bottle will be
much hotter than at bottom. The
bottle must be shaken
thouroughly and tested before
use.
WE DO NOT RECOMMEND
THAT YOU USE YOUR
MICROWAVE TO STERILISE
BABIESʼ BOTTLES. If you have a
special microwave steriliser we
urge extreme caution, due to the
low quantity of water involved. It is
vital to follow the manufacturers
instructions implicitly.
Take great care when reheating
these items.
Do not leave unattended.
Do not add extra alcohol.
28
The times given in the charts below are a guideline only, and will vary depending on
STARTING temperature, dish size etc.
HEATING CATEGORY
Your oven is Heating Category C and this is
displayed on the front of your control panel.
The information on this label will assist you
in using new instructions on food packs to
enable you to program the best heating time
in your oven.
C
700W
The IEC (60705)
power output (watts)
The heating
category for small
packs of food
Reheating Charts
Microwave symbol
POINTS FOR CHECKING Always check that food is piping hot after reheating in the microwave. If unsure
return to oven. Foods will still require a STAND TIME, especially if they cannot be stirred. The denser the food
the longer the stand time.
Food
Weight/
Quantity
Power
Level
Time to
Select (approx)
Instructions/Guidelines
BREAD – Precooked – Fresh – N.B. Breads reheated by Microwave will have a soft base.
Croissants
2
HIGH 30-40 secs.
Place on microwave safe plate on
turntable.
Do not cover. If using grill mode, use
heatproof plate.
For NN-K189M/NN-K179W use grill
level 1 (High Grill).
or Grill 3-4 mins.
4
HIGH 40-60 secs.
or Grill 5 mins.
Rolls
1
HIGH 15 secs.
Grill K189 2-2
1
2 mins.
Grill K109 1-2 mins.
4
HIGH 30-40 secs.
Grill K189 3-4 mins.
Grill K109 2-3 mins.
CANNED BEANS, PASTA
Baked Beans, Ravioli in sauce
200 g HIGH 2
1
2 - 3 mins.
Place in a microwave safe bowl.
Cover and place on turntable.
400 g HIGH 5 mins.
Spaghetti in Tomato Sauce 300 g HIGH 2 mins.
CANNED SOUPS
Cream of Tomato 400 g HIGH 3 - 3
1
2 mins.
Place in a microwave safe bowl.
Cover and place on turntable.
Minestrone 400 g HIGH 3 - 3
1
2 mins.
CANNED PUDDINGS
Creamed Rice
425 g HIGH 3 mins.
Place in a microwave safe bowl.
Cover and place on turntable.
624g HIGH 5 mins.
Sponge Pudding 300 g HIGH 2 mins. 30 secs.
CHRISTMAS PUDDINGS - Overheating may cause pudding to ignite
Slice 150 g HIGH 30 secs.
Place in a microwave safe dish.
Cover and place on turntable.
Small 450 g HIGH 2 mins.
Medium 900 g HIGH 3 mins.
DRINKS – COFFEE
1 mug 235 ml HIGH 2 mins.
Place in a microwave safe mug on
turntable. Stir, before, during and
after reheating.
2 mugs 470 ml HIGH 3 mins. 10 secs.
DRINKS – MILK
1 mug 235 ml HIGH 1-1 min. 30 secs.
Place in a microwave safe mug on
turntable. Stir, before, during and
after reheating.
1 jug 600 ml
HIGH
4- 5 mins.
29
Reheating Charts
POINTS FOR CHECKING Always check that food is piping hot after reheating in the microwave. If
unsure return to oven. Foods will still require a STAND TIME, especially if they cannot be stirred.
The denser the food the longer the stand time.
Food
Weight/
Quantity
Power
Level
Time to
Select (approx)
Instructions/Guidelines
PASTRY PRODUCTS - PRECOOKED - N.B. Pastries reheated by microwave will have a soft base.
Cornish Pasty 255 g (1)
HIGH 2-2
1
2 mins.
Place on microwave safe plate on
turntable. Do not cover. If using Combi
mode, use heatproof plate.
Combi* K189 4-5 mins.
Combi* K109 7-8 mins.
Steak & Kidney Pie 250 g (1)
HIGH 2-2
1
2 mins.
or Combi* 6-7 mins.
Sausage Rolls 260 g (4)
HIGH 2-2
1
2 mins.
or Combi* 5-6 mins.
Quiche 400 g (1)
HIGH 3-4 mins.
Place on microwave safe plate on
turntable. Do not cover. If using Combi
mode place on grill rack on turntable.
Combi* K189 10 mins.
Combi* K109 13-14 mins.
Samosas / Spring Rolls 200 g (4)
HIGH 3-3
1
2 mins.
Place on microwave safe plate on
turntable. Do not cover. If using Combi
mode place on grill rack on turntable.
Combi* K189 5
1
2-6 mins.
Combi* K109 7-8 mins. Do not place on grill rack.
Mince Pies 90 g (2) HIGH 10-20 secs.
Place on a microwave safe plate.
Cover and place on turntable.
PLATED MEALS - HOMEMADE - CHILLED
Child Size 1 HIGH 3 mins.
Place on a microwave safe plate.
Cover and place on turntable.
Adult Size 1 HIGH 6-7 mins.
PUDDINGS & DESSERTS N.B. Transfer food from foil containers to a similar sized microwave safe dish
Bread & Butter Pudding 340 g HIGH 3
1
2-4 mins.
Place in a microwave safe dish on
turntable. Do not cover. If using Combi
mode, use heatproof dish.
Fruit Crumble 600 g
HIGH 4-5 mins.
Combi* K189 10-11 mins.
Combi* K109 13-14 mins.
Fruit Pie, individual
1
HIGH 10-15 secs.
Combi* K189 40-50 secs.
Combi* K109 20-30 secs.
4
HIGH 1-1
1
2 mins.
or Combi* 3-3
1
2 mins.
Milk Pudding for 1 HIGH
1 min. 30-40 secs.
PURCHASED CONVENIENCE FOODS - CHILLED N.B. Transfer food from foil container to a similar sized
microwave safe dish. Plastic dishes designed for microwave and conventional ovens may be
used with care.
Cottage Pie 500 g
HIGH 7-8 mins.
Place in microwave safe dish on
turntable. Do not cover. If using Combi
mode, use heatproof dish.
Combi* K189 14-15 mins.
Combi* K109 19-20 mins.
Lasagne 400 g
HIGH 7-8 mins.
Combi* 10-12 mins.
Vegetable Bake 400 g
HIGH 9-10 mins.
Combi* K189 8-10 mins.
Combi* K109 20-21 mins.
*For NN-K189M / NN-K179W use combi level 2.
30
Cooking Charts
Reheating Charts
POINTS FOR CHECKING Always check that food is piping hot after reheating in the microwave. If
unsure return to oven. Foods will still require a STAND TIME, especially if they cannot be stirred. The
denser the food the longer the stand time.
Food
Weight/
Quantity
Power
Level
Time to
Select (approx)
Instructions/Guidelines
PURCHASED CONVENIENCE FOODS - FROZEN N.B. Transfer food from foil container to a similar
sized microwave safe dish. Plastic dishes designed for microwave and conventional ovens may be
used with care.
Lasagne 400 g
HIGH 6 mins. + rest for 1 min.
Place in a microwave safe dish on
turntable. Do not cover. If using combi
mode use heat proof dish.
+ HIGH 5-6 mins.
or HIGH 3 mins.
+ Combi* 23-24 mins.
Salmon Crumble 400 g
HIGH 4 mins. + rest for 1 min.
+ HIGH 4-5 mins.
or HIGH K189 2-3 mins.
HIGH K109 3-4 mins.
+ Combi* 18-20 mins.
Shepherdʼs Pie 400 g
HIGH 5-6 mins. + rest for 1 min.
+ HIGH 4-5 mins.
or High 4-5 mins.
Combi* K189 20-23 mins.
Combi* K109 23-25 mins.
Food
Weight/
Quantity
Power
Level
Time to
Select (approx)
Instructions/Guidelines
BACON – from raw
Rashers 130 g (4) HIGH
3-3
1
2 mins. or 50-
60 secs per rasher.
Place on microwave safe rack or plate
on turntable.
BEANS & PULSES – should be pre-soaked (except lentils)
Chick Peas 225 g
HIGH 10 mins.
Use 600 ml (1 pt) boiling water in a
large bowl. Cover and place on
turntable.
+ LOW 35-40 mins.
Lentils 225 g
LOW
12-15 mins.
Red Kidney Beans 225 g
HIGH 15 mins.
Use 600 ml (1 pt) boiling water in a
large bowl. Cover. Must boil for at
least 12 minutes to destroy toxic
enzymes.
+ LOW 40-42 mins.
BEEF – Joints from raw – Caution: Hot fat! Remove dish with care.
Medium Rare MEDIUM
11-14 mins. per
450 g (1 lb)
Place on upturned saucer in microwave
safe dish or rack. Cover, place on
turntable and turn halfway. Drain off fat
during cooking.
CHICKEN from raw – Caution: Hot fat! Remove dish with care.
Breasts, boneless 450 g (2)
LOW 11-13 mins.
Place on microwave safe rack or plate.
Cover and place on turntable.
Combi* K189 18-20 mins.
Place on grill rack with heatproof plate
underneath. Turn halfway.
Combi* K109 19-20 mins.
Drumsticks 400 g (4)
LOW 12-14 mins.
Place on microwave safe rack or plate.
Cover and place on turntable.
Combi* K189 18-20 mins.
Place on grill rack with heatproof plate
underneath. Turn halfway.
Combi* K109 19-20 mins.
*For NN-K189M / NN-K179W use combi level 2.
31
POINTS FOR CHECKING Always check that food is piping hot after reheating in the microwave. If
unsure return to oven. Foods will still require a STAND TIME, especially if they cannot be stirred. The
denser the food the longer the stand time.
Cooking Charts
Food
Weight/
Quantity
Power
Level
Time to
Select (approx)
Instructions/Guidelines
CHICKEN from raw – Caution: Hot fat! Remove dish with care.
Quarters 552 g (2)
LOW 18-20 mins.
Place on microwave safe rack or plate.
Cover and place on turntable.
Combi* K189 16-20 mins.
Place on grill rack with heatproof plate
underneath. Turn halfway.
Combi* K109 22-23 mins.
Whole HIGH
10-12 mins. per
450 g (1 lb)
Place on upturned saucer breast side
down in microwave safe dish. Place on
turntable, cover, turn over halfway.
EGGS – Poached.
Water 45 ml HIGH 50 secs.
Place in a small bowl and heat for 1st
cooking time.
Add egg (medium sized).
Pierce yolk and white.
Cover.
Cook for 2nd cooking time.
Then leave to stand for 1 min.
Egg 1 HIGH 50 secs.
Water 90 ml HIGH 1 min. 30 secs.
Eggs 2 HIGH 1 min. 10 secs.
EGGS – Scrambled.
1 Egg
HIGH 30 secs.
Add 1 tbsp of milk for each egg used.
Beat eggs, milk and knob of butter
together.
Cook for 1st cooking time then stir.
Cook for 2nd cooking time then stand
for 1 min.
HIGH 20 secs.
2 Eggs
HIGH 1 min.
HIGH 1 min.
FISH – FRESH from raw
Fillets, Steak, Whole 450 g HIGH 5-7 mins.
Place in microwave safe dish. Add 30
ml of liquid. Cover. Place on turntable.
FISH – FRESH from raw
Haddock Fillets 380 g (4) HIGH 5-6 mins.
Place in microwave safe dish. Add 30
ml of liquid. Cover. Place on turntable.
Whole 450 g (2) HIGH 8-10 mins.
Boil in the Bag 170 g (1)
DEFROST
4 mins.
Place bag sauce side down on a
microwave safe plate. Slash top of bag
with a knife.
+ rest 2 mins.
+ LOW 6 mins.
FRUIT – Peel, slice, chop into even sized pieces. Place in shallow microwave safe dish.
Apples, Rhubarb, stewed 450 g HIGH 5-7 mins.
Only half fill dish. Cover. Place on
turntable.
Plums – stewed 450 g HIGH 8-10 mins.
Add 30 ml (2 tbsp) of water. Only half
fill dish. Cover. Place on turntable.
LAMB – from raw – CAUTION: Hot Fat! Remove dish with care.
Chops, loin 400 g (4)
HIGH
2-3m per 450g (1lb)
Place on microwaveable safe dish or
rack. Cover. Place on turntable.
+ LOW
3-4m per 450g (1lb)
Joints
HIGH
4-5m per 450g (1lb)
Place on upturned saucer in microwave
safe dish or rack. Cover.
Place on
turntable and turn joint over halfway.
Drain off fat during cooking.
+ LOW
8-9m per 450g (1lb)
PASTA – Place in a large 3 litre (6 pint) microwave safe bowl.
Macaroni 225 g HIGH 12-13 mins.
Use 600 ml (1 pint) of boiling water in
a 1 litre (2 pints) bowl. Cover. Place on
turntable.
Spaghetti, Tagliatelli 225 g HIGH 11-12 mins.
*For NN-K189M / NN-K179W use combi level 2.
32
Cooking Charts
POINTS FOR CHECKING Always check that food is piping hot after reheating in the microwave. If
unsure return to oven. Foods will still require a STAND TIME, especially if they cannot be stirred. The
denser the food the longer the stand time.
Food
Weight/
Quantity
Power
Level
Time to
Select (approx)
Instructions/Guidelines
PIZZA – FRESH CHILLED – N.B. Remove all packaging. Pizzas will have a soft base.
Thin & Crispy 370 g
HIGH 4-5 mins.
Place on heatproof plate on turntable.
Do not cover.
Combi* K189 10-12 mins.
Combi* K109 8-9 mins.
Deep Pan 460 g
HIGH 5-8 mins.
Place on heatproof plate on turntable.
Do not cover. Not suitable for model
NN-K109W.
Combi* 10-12 mins.
PORK – from raw – CAUTION: Hot Fat! Remove dish with care
Chops 360 g (2)
HIGH 2-3 mins.
Place in microwave safe dish or rack.
Cover. Place on turntable.
+ LOW 4-5 mins.
or Combi* 17-18 mins.
Place on grill rack with heatproof plate
underneath. Turn halfway.
Joints
HIGH
5-6 mins. per
450 g (1lb)
Place on upturned saucer in microwave
safe dish or rack. Cover and place on
turntable, turn joint over halfway. Drain off
fat during cooking.
+ LOW
8-9 mins. per
450 g (1lb)
PORRIDGE – N.B. Use a large bowl.
1 serving
1
/
2
cup oats
HIGH 2
1
2-3mins. Add 1 cup of water or milk. Stir halfway.
2 servings 1 cup oats HIGH 5-5
1
2 mins. Add 2 cups of water or milk. Stir halfway.
POTATO PRODUCTS Part Cooked - FROZEN.
Croquettes 300 g Combi* 20 mins.
Place on grill rack on turntable. Turn
halfway.
Waffles 120 g (2)
Grill** K189 18-20 mins.
Grill** K109 12-13 mins.
RICE – Place in a large microwave safe bowl. 3 Litre (6 pint)
Basmati 250 g LOW 12-13 mins.
Use 600 ml (1 pt) boiling water in large
bowl. Cover. Place on turntable. Stir
halfway.
Easycook White 250 g HIGH 13-14 mins.
SAUSAGES from raw - CAUTION: HOT FAT! Remove dish with care.
Thick 240 g (4)
HIGH 3-3
1
2 mins.
Place on microwave safe plate or
microwave rack. Cover. Place on
turntable.
Combi* K189 14-15 mins.
Place on grill rack with heatproof plate
underneath. Turn halfway.
Combi* K109 10-12 mins.
Thin 110 g (4)
HIGH
2-2
1
2 mins.
Place on microwave safe plate or
microwave rack. Cover. Place on
turntable.
Grill** K189 15-16 mins.
Place on grill rack with heatproof plate
underneath. Turn Halfway.
Grill** K109 13-14 mins.
*For NN-K189M / NN-K179W use combi level 2.
**For NN-K189M / NN-K178W use grill level 1. (High Grill).
33
Cooking Charts
Food
Weight/
Quantity
Power
Level
Time to
Select (approx)
Instructions/Guidelines
FRESH VEGETABLES – Place in shallow microwave safe dish.
Green Beans 450 g HIGH 7-8 mins.
Add 90 ml (6 tbsp) water. Cover. Place
on turntable.
Beetroot 250 g HIGH 10-12 mins.
Broccoli + Cauliflower - florets 450 g HIGH 8 mins.
Brussel Sprouts 300 g HIGH 8-9 mins.
Cabbage – sliced 450 g HIGH 7-9 mins.
Carrots, Leeks 450 g HIGH 7-9 mins.
Corn on the Cob 450 g HIGH 6-7 mins.
Courgettes, Mange Tout 450 g HIGH 4-5 mins.
Peas 450 g HIGH 6-7 mins.
Potatoes – boiled 450 g HIGH 8-9 mins.
Potatoes – jacket
(250 g / 9 oz each)
1 HIGH 6 mins.
Wash and prick skins. Place directly on
turntable. After cooking stand for 5 mins
wrapped in foil.
2 HIGH 9 mins.
FROZEN VEGETABLES – Place in shallow microwave safe dish.
Beans – green, Carrots 450 g HIGH 10-11 mins.
Add 30 ml (2 tbsp) water. Cover. Place
on turntable.
Cauliflower 450 g HIGH 11-12 mins.
Peas 450 g HIGH 8-9 mins.
POINTS FOR CHECKING Always check that food is piping hot after reheating in the microwave. If
unsure return to oven. Foods will still require a STAND TIME, especially if they cannot be stirred. The
denser the food the longer the stand time.
34
Soup and Snacks
I
ngredients
100 g (4oz) quick cook macaroni
225 g (8oz) courgettes, sliced
100 g (4oz) bacon, chopped
50 g (2oz) butter
50 g (2oz) plain flour
600 ml (1pt) milk
100 g (4oz) cheese, grated
5 ml (1tsp) mustard
salt and pepper
Topping
30 ml (2tbsp) Parmesan cheese
30 ml (2tbsp) wholemeal breadcrumbs
Macaroni Cheese with Courgettes and Bacon
Serves 2
I
ngredients
50 g (2oz) green lentils
10 ml (2tsp) oil, 1 small onion, sliced
3 ml (
1
/
2
tsp) grated root ginger
1 garlic clove, crushed
3 ml (
1
/
2
tsp) turmeric
3 ml (
1
/
2
tsp) chilli powder
5 ml (1tsp) curry powder
150 ml (
1
/
4
pt) natural yoghurt
50 g (2oz) mushrooms, sliced
2 tomatoes, peeled and chopped
150 ml (
1
/
4
pt) hot water
25 g (1oz) cashew nuts
225 g (8oz) cooked basmati rice
Garnish
hard boiled egg slices and
coriander leaves
I
ngredients
25 g (1oz) butter
1 small onion, chopped
600 ml (1pt) hot chicken stock
225 g (8oz) button mushrooms, sliced
bouquet garni
15 ml (1tbsp) cornflour
300 ml (
1
/
2
pt) milk
salt and pepper
60 ml (4tbsp) single cream
Cream of Mushroom Soup Serves 4
Dish: large bowl
1. Place the butter and chopped onion in a large bowl.
Cover and cook on HIGH power for 3 mins or until
soft.
2. Add the stock, mushrooms and bouquet garni. Cover
and cook on HIGH power for 12-14 mins, or until
mushrooms are soft.
3. Remove the bouquet garni and blend until smooth.
Mix the cornflour with a little of the milk, then stir in
remaining milk. Add to the mushroom mixture.
4. Cover and cook on HIGH power for 5 mins, or until
thickened. Season and serve with cream swirled on
top.
Dish: 20 cm (8”) casserole
1. Cover and cook macaroni in 450 ml (
3
/
4
pt) boiling
water on HIGH power for 6-8 mins, or until soft. Drain.
2. Place courgettes and bacon in a bowl. Cover and
cook on HIGH power for 3-4 mins, or until soft. Drain.
3. Place the butter in a large jug. Cook on HIGH power
for 30-40 secs. Stir in the flour and cook for 30 secs,
on HIGH power. Gradually add milk, stir well and cook
on HIGH power for approx. 7 mins. or until the sauce
is thick and bubbling. Stir frequently.
4. Add mustard and cheese. Mix in the macaroni,
courgettes and bacon. Season and pour into a
casserole dish, sprinkle over the topping and cook on
combination. For NN-K109W, 17-18 mins. For NN-
K189M / NN-K179W Use combination level 2 for 12-
15 mins. or until the cheese has melted.
Lentil Biryani Serves 2
Dish: large casserole
1. Soak the lentils in cold water for 1 hour then drain.
2. Place the oil and onion in a large bowl. Cover and
cook on HIGH power for 3 mins. or until softened.
3. Add the ginger, garlic, turmeric, chilli and curry
powder. Cover and cook on HIGH power for 2 mins.
4. Add the yoghurt, mushrooms, tomatoes, water and
lentils. Cover and cook on HIGH power for 15-20
mins. or until the lentils are tender and the liquid has
evaporated.
5. Add the lentil mixture and cashew nuts to the cooked
rice and mix thoroughly. Reheat on HIGH power if
necessary to ensure food is piping hot. Garnish and
serve.
35
Meat and Poultry
I
ngredients
25 g (1 oz) butter
2 medium onions, sliced
2 sticks celery, trimmed and chopped
100 g (4 oz) mushrooms, sliced
4 chicken quarters, skinned
300 ml (
1
/
2
pt) hot chicken stock
300 g (11 oz) can tomatoes
salt and pepper
30 ml (2 tbsp) cornflour
Chicken Casserole Serves 4
Dish: 3 litre (6 pt) casserole
1. Place vegetables and butter in dish. Cover and
cook on HIGH power for 2-4 mins. or until soft.
2. Place chicken on top of vegetables, cover with
stock and tomatoes and add salt and pepper to
taste.
3. Cover and cook on HIGH power for 5 mins. then
LOW power for 30-35 mins. or until well cooked
through.
4. Mix cornflour with a little water. Remove chicken
from casserole, skim off excess fat and stir in
cornflour paste. Cook on HIGH power for 2 mins.
Serve chicken with sauce poured over.
N.B. If diced boneless breast is used in place of the
quarters, reduce 2nd cooking time to 12-14
mins. on LOW power or until well cooked
through. Stir halfway.
I
ngredients
3-4 cloves garlic, crushed
1 cm (
1
/
4
”) piece fresh ginger, grated
50 g (2 oz) ground almonds
45 ml (3 tbsp) water
3 whole cardamom pods
2 cloves
2.5 cm (1”) stick of cinnamon
1 onion chopped
30 ml (2 tbsp) oil
450 g (1 lb) boned lamb, trimmed and cut
into cubes
5 ml (1 tsp) ground coriander
5 ml (1 tsp) ground cumin
1.5 ml (
1
/
4
tsp) garam masala
1.5 ml (
1
/
4
tsp) cayenne pepper
150 ml (
1
/
4
pt) single cream
salt and pepper
Lamb in a Spicy Cream and Almond Sauce
Serves 4
Dish: Large casserole dish
1. Mix together the garlic, ginger, almonds and water
to make a thick paste.
2. Place the cardamom pods, cloves, cinnamon,
onion and oil in the casserole dish cook on HIGH
power for 2 mins.
3. Add the lamb and cook for 5 mins. on HIGH
power or until light brown in colour. Stir halfway.
4. Stir in the rest of the spices, the almond mixture,
cream, salt and pepper. Cover and cook on LOW
power for about 40 mins. or until the meat is
tender. Stir the casserole 2-3 times during the
cooking time.
5. Remove the whole cardamom pods, cloves and
cinnamon before serving with rice or other
vegetables.
36
I
ngredients
225 g (8oz) pork fillet, diced
Sweet & Sour Sauce:
15 ml (1tbsp) oil
1 small carrot cut into matchsticks
1 spring onion, thinly sliced
small green pepper, cut into strips
225 g (8oz) can pineapple chunks,
drained (reserve juice)
10 ml (2tsp) soft brown sugar
5 ml (1tsp) cornflour
pinch garlic salt
5 ml (1tsp) cider vinegar
10 ml (2tsp) soy sauce
5 ml (1tsp) tomato ketchup
Pork with Sweet & Sour Sauce Serves 2
Dish: small casserole
1. Place pork in dish, cover and cook on LOW power
for 7-9 mins. or until juices run clear.
2. Place oil, carrot, onion and green pepper in a
bowl. Cover and cook on HIGH power for 2 mins.
or until vegetables are tender.
3. Mix half the reserved juice with the remaining
ingredients except pineapple. Cover and cook on
HIGH power for 1-2 mins. or until clear and
thickened. Stir halfway.
4. Add the sauce to the vegetables. Stir in the
pineapple. Mix well.
5. Cook on HIGH power for 1 min. or until heated
through. Spoon over cooked pork. Reheat for
1-2 mins. on HIGH power or until piping hot.
I
ngredients
50 g (2oz) creamed coconut
45 ml (3tbsp) crunchy peanut butter
45 ml (3tbsp) lemon juice
30 ml (2tbsp) soy sauce
large pinch of chilli powder
2 chicken breast fillets, skinned
15 ml (1tbsp) vegetable oil
1 garlic clove, crushed
3 ml (
1
/
2
tsp) ground turmeric
3 ml (
1
/
2
tsp) five-spice powder
3 ml (
1
/
2
tsp) coriander seeds
3 ml (
1
/
2
tsp) cumin seeds
Chicken Satay Serves 2
Dish: 4 wooden skewers + shallow dish
1. For the serving sauce: Crumble 25 g (1oz) of
creamed coconut into a large jug. Add the peanut
butter, 15 ml (1tbsp) of the lemon juice, 15 ml
(1tbsp) of the soy sauce, the chilli powder and
150 ml (
1
/
4
pt) water. Cook on HIGH power for
4-5 mins. or until the sauce boils and thickens,
stirring frequently. Turn into a serving bowl.
2. Cut the chicken into small chunks and place in a
bowl. Put the remaining creamed coconut, lemon
juice and soy sauce into a food processor. Add
the remaining ingredients and blend until smooth.
3. Pour over the chicken. Cover and marinate in the
fridge for 2-3 hours or overnight.
4. Thread the chicken onto wooden skewers. Place
in a shallow dish, cover with any remaining
marinade and place on grill rack. For NN-K109W
cook on MEDIUM for 3 mins then Combination for
18 mins. For NN-K189M and NN-K179W cook on
Combination level 2 for 18-20 mins. Turn halfway.
Serve hot with the sauce for dipping.
I
ngredients
1 small onion, diced
1 clove garlic, crushed
5 ml (1tsp) oil
200 g (7oz) can chopped tomatoes
15 ml (1tbsp) tomato puree
5 ml (1tsp) mixed herbs
225 g (8oz) minced beef
salt and pepper
Savoury Mince Serves 2
Dish: 1.5 litre (3pt) casserole dish
1. Place onion, garlic and oil in casserole, cover and
cook on HIGH power for 2 mins. or until soft.
2. Place all other ingredients in casserole. Stir well.
3. Cover and cook on HIGH power for 5 mins. then
LOW power for 10-15 mins. or until the meat is
cooked.
37
Fish
Arranging
Thin fillets of fish i.e. plaice,
should be rolled up prior to
cooking to avoid overcooking
on the thinner outside edge
and tail.
Fish steaks should be
arranged in a circle, thicker
part to the outside. Cover with
cling film or lid.
Liquid
Fresh fish should always be
sprinkled with 30ml (2tbsp) of
water, lemon juice or white
wine.
When cooking Frozen fish,
add liquid as above for even
cooking.
Do not sprinkle salt onto fish
before cooking as this may
make the fish dry.
Noise
During cooking, popping
sounds may be heard. This is
due to moisture trapped
between the flesh, particularly
with oily fish such as salmon
and mackerel. This can be
minimised when cooking the
fish if the skin and flesh is
pierced several times with a
cocktail stick.
I
ngredients
25 g (1 oz) butter
1 clove garlic, crushed
1 small onion, finely chopped
15 ml (1tbsp) plain flour
15 ml (1tbsp) curry powder
grated rind and juice of
1
/
2
lemon
300 ml (
1
/
2
pt) hot fish stock
25 g (1oz) sultanas
10 ml (2tsp) tomato puree
30 ml (2tbsp) sweet chutney
450 g (1lb) haddock, skinned and
chopped
salt and pepper
75 g (3oz) creamed coconut
Fish Curry Serves 2
Dish: casserole dish (1.5 litre (3pt))
1. Melt the butter in the casserole dish on HIGH
power for 30 secs. or until melted.
2. Stir in the garlic and onion and cook covered on
HIGH power for 3 mins.
3. Stir in the flour, curry powder, lemon rind and juice
and fish stock. Cover and cook on HIGH power for
3 mins. stirring halfway through the cooking time.
4. Stir in the remaining ingredients except the
coconut, cover and cook on HIGH power for 4-5
mins. or until fish flakes, stirring occasionally.
5. Break up the coconut with a fork, then stir into the
curry.
I
ngredients
450 g (1 lb) smoked haddock
30 ml (2tbsp) lemon juice
15 ml (1tbsp) oil
1 large onion, sliced
600 g (1lb 5oz) cooked jacket potatoes,
sliced
40 g (1
1
/
2
oz) butter
40 g (1
1
/
2
oz) flour
3 ml (
1
/
2
tsp) mustard
600 ml (1pt) milk
salt and pepper
100 g (4oz) Red Leicester cheese
75 g (3oz) wholemeal breadcrumbs
Family Fish Pie Serves 4
Dish: large casserole
1. Arrange fish in a shallow dish. Add lemon juice,
cover and cook on HIGH power for 3 mins. or until
it flakes easily.
2. Place onion and oil in a bowl. Cover and cook on
HIGH power for 3 mins. or until the onion is soft.
3. Melt the butter on HIGH power for 30 secs. Stir in
the flour and mustard and cook for a further 20
secs. Add milk and seasoning, gradually stirring to
a smooth paste. Cook on HIGH power for 5-6
mins. or until the sauce is thick and bubbling. Stir
twice during cooking. Add 75 g (3oz) of grated
cheese to the sauce and stir well.
4. Flake the fish and arrange in the serving dish. Add
onions and place the sliced potatoes on top.
5. Pour over the cheese sauce. Sprinkle with
breadcrumbs and remaining cheese.
6. Cook on LOW power for 8-10 mins. or until the
mixture has been completely reheated.
Use grill and cook for a further 3-4 mins. or until
brown.
38
Vegetables
I
ngredients
40 g (1
1
/
2
oz) dried Cep mushrooms
50 g (2oz) butter
1 clove garlic, finely chopped
1 small onion, finely chopped
freshly ground black pepper
250 g (8oz) Arborio rice
300 ml (
1
/
2
pt) hot vegetable stock
12 basil leaves, torn
Wild Mushroom and Basil Risotto Serves 4
Dish: 3 litre (6pt) casserole dish
1. Soak mushrooms in 300 ml (
1
/
2
pt)
warm water.
2. Place the butter, garlic and onion in a large bowl,
cover with cling film and cook on HIGH power for
3 mins. or until softened. Season with freshly
ground black pepper.
3. Stir the rice into the butter mixture and add the hot
stock and soaking liquid from the mushrooms.
Cover and cook for a further 5 mins on HIGH power.
4. Stir the mushrooms into the rice mixture. Cover and
cook for a further 5 mins. on HIGH power.
5. Stir and add the basil. Continue to cook for the final
5 mins. on HIGH power. Leave to stand for approx.
10 mins. and then stir with a fork.
I
ngredients
1 cauliflower, trimmed and cut into florets
90 ml (6tbsp) water
25 g (1oz) butter
25 g (1oz) flour
3 ml (
1
/
2
tsp) French mustard
300 ml (
1
/
2
pt) milk
seasoning to taste
Topping:
75 g (3oz) grated red cheese
15 ml (1tbsp) brown breadcrumbs
Cauliflower Cheese Serves 2
Dish: large bowl + shallow casserole
1. Place cauliflower upside down in a bowl. Add water.
Cover and cook on HIGH power for 8 mins. or until
tender. Drain.
2. Melt butter on HIGH power for 20-30 secs. Stir in
flour and mustard. Cook for a further 20 secs. Add
milk gradually. Stir well and season. Cook on HIGH
power for approx. 4 mins. or until sauce is thick and
bubbling. Stir once halfway during cooking.
3. Stir in 50 g (2oz) grated cheese. Pour the sauce
over the cauliflower. Top with remaining cheese and
breadcrumbs.
4. Place casserole on glass turntable and cook on
Combination power. For NN-K109W, 6-8 mins. For
NN-K189M / NN-K179W use Combination level 2
for 7-8 mins or until golden brown.
I
ngredients
1 medium aubergine, diced
salt, 15 ml (1tbsp) oil
1 clove of garlic, chopped
pinch cayenne pepper
5 ml (1tsp) ground coriander
3 ml (
1
/
2
tsp) ground cumin
3 ml (
1
/
2
tsp) turmeric
2.5 cm (1”) root ginger, peeled & sliced
1
/
2
small cauliflower, divided into florets
1 medium potato, diced
50 g (2oz) green beans, sliced
1
/
2
fresh chilli, deseeded and sliced
150 ml (
1
/
4
pt) vegetable stock
200 g (7oz) can chopped tomatoes
50 g (2oz) cashew nuts
Vegetable Curry Serves 2
Dish: 3 litre (6pt) casserole
1. Sprinkle the aubergine liberally with salt in a
colander. Stand for 30 mins. to remove bitter juices.
Rinse well under cold water and drain.
2. Combine oil, garlic and spices in the casserole,
cover and cook on HIGH power for 2 mins.
3. Add all other ingredients to casserole, except
cashews. Cover and cook on HIGH power for 5
mins. then LOW power for 25-35 mins. or until
vegetables are soft. Stir occasionally.
4. Sprinkle with cashews and serve with boiled rice.
N.B. This recipe is best cooked in advance, chilled and
then reheated to allow the flavours to develop.
39
Desserts / Cakes
Ingredients
150 g (5oz) self-raising flour
pinch of salt
50 g (2oz) caster sugar
50 g (2oz) suet
1 egg
150 ml (
1
/
4
pt) milk
30 ml (2 tbsp) jam or golden syrup
Optional:
add 1 tbsp of sultanas to dry ingredients
Steamed Suet Sponge Pudding Serves 4
Dish: 1 litre (2 pt) pudding basin
1. In a mixing bowl, sift together the flour and salt.
Stir in the sugar and suet.
2. Make a well in the centre and add beaten egg and
milk. Mix to a soft dropping consistency.
3. Put the jam in the base of the greased pudding
basin and pour pudding mixture over. Cook on
HIGH power for 5-6 mins. until firm.
Ingredients
75g (3 oz) self-raising flour
3 ml (
1
/
2
tsp) baking powder
3 ml (
1
/
2
tsp) mixed spice
25 g (1oz) butter
1 egg
30 ml (2tbsp) treacle
60 ml (4tbsp) stout
15 ml (1tbsp) rum or brandy
200 g (7oz) mincemeat
25 g (1oz) apple, grated
75 g (3oz) currants
25 g (1oz) chopped nuts
Christmas Puddings Serves 4
Dish: 4 ramekins, base lined
1. Place all ingredients into a large mixing bowl and
stir until throroughly mixed.
2. Divide mixture equally between the ramekins.
3. Place towards outer edge of the turntable and
cook on HIGH power for 10-12 mins. or until
cooked.
I
ngredients
15 ml (1tbsp) golden syrup
2 pineapple slices, drained
2 glacé cherries
50 g (2oz) margarine
50 g (2oz) caster sugar
1 egg
50 g (2oz) self raising flour
15 ml (1tbsp) milk
Individual Pineapple
Upside Down Pudding Serves 2
Dish: 2 ramekin dishes, base lined
1. Put
1
/
2
tbsp golden syrup in the base of each
ramekin; arrange pineapple slice and cherry on
top of the syrup in the base.
2. Cream together the margarine and sugar until light
and fluffy. Beat in the egg gradually. Fold in the
flour and mix to a soft consistency with the milk.
3. Spoon the mixture over the pineapple and cook
on HIGH power for 3-4 mins. or until cooked.
Leave to cool slightly before turning upside down
onto a serving plate.
40
Ingredients
100 g (4oz) plain chocolate
100 g (4oz) butter
100 g (4oz) soft dark brown sugar
100 g (4oz) self-raising flour
10 ml (2tsp) cocoa powder
pinch salt
2 eggs, beaten
3 ml (
1
/
2
tsp) vanilla essence
100 g (4oz) walnuts, chopped
Boston Brownies
Dish: 20 cm (8”) square dish lined with
greaseproof
1. Place chocolate and butter in a bowl and cook on
HIGH power for 1 min. or until chocolate has melted.
2. Stir in all other ingredients and beat well.
3. Pour into dish and cook on LOW power for 12-13
mins. or until just slightly sticky. Allow to cool and then
cut into squares.
Ingredients
75 g (3oz) butter or margarine
30 ml (2tbsp) golden syrup
75 g (3oz) light brown sugar
150 g (5oz) porridge oats
50 g (2oz) raisins
Chewy Flapjacks
Dish: 20 cm (8”) round dish
1. Place butter, syrup and sugar in a bowl and cook on
HIGH power for 1-2 mins. or until melted. Stir halfway.
2. Stir in the oats and raisins. Press into dish. Place dish
on glass turntable and cook on Combination power.
For NN-K109W, 4-5 mins. For NN-K189M / NN-
K179W use Combination level 2 for 5-7 mins. or until
firm. Allow to cool slightly then cut into 8 pieces.
I
ngredients
200 g (7 oz) fresh dates, stoned and
finely chopped
175 g (6 oz) self-raising flour
5 ml (1 tsp) baking powder
5 ml (1 tsp) vanilla essence
15 ml (1 tbsp) Camp coffee essence
100 ml (3
1
/
2
fl. oz) milk
75 g (3 oz) butter
150 g (5 oz) caster sugar
2 eggs lightly beaten
Butterscotch sauce
45 g (1
3
/
4
oz) butter
120 ml (8 tbsp) soft brown sugar
200 ml (7 fl. oz) whipping cream
15 ml (1 tbsp) vanilla essence
Date Puddings and Butterscotch Sauce
Serves 6
Dish: Large microwave pudding bowl
1. Pour 175 ml (6 fl. oz) boiling water over the chopped
dates and set aside to cool.
2. Sift together flour and baking powder. Add vanilla and
coffee essence to the milk.
3. Cream the butter and sugar until light and fluffy. Add
eggs a little at a time.
4. Fold in the flour and flavoured milk, then pour in the
date mixture.
5. Place in pudding mould. Cook on HIGH power for 18
mins. and leave to stand for 10 mins.
Sauce
1. Place butter in a large jug and cook on HIGH power
for 50 sec. to 1 minute, or until bubbling.
2. Add sugar and stir until it has dissolved, cooking for 1
minute at a time on HIGH power. Continue to cook
until liquid is foaming and bubbling 30 sec. at a time
on HIGH power.
3. Slowly pour in the cream and bring to the boil on
HIGH power for 2-3 mins. Add essence. Stir, continue
to boil on HIGH power 30 sec. at a time until it starts
to thicken.
41
I
ngredients
450 g (1 lb) soft fruit, washed
450 g (1 lb) caster sugar
30 ml (2 tbsp) lemon juice
5 ml (1 tsp) butter
Soft Fruit Jam Makes approx. 1
1
/
2
lbs jam
Dish: large bowl
1. Place all ingredients in a large bowl and stir. Cook
on HIGH power for 5 mins. (10-15 mins. if using
frozen fruit), stirring frequently. Continue to cook
in one minute intervals until sugar has dissolved.
2. Wash down any sugar crystals from around the
bowl.
3. Bring mixture to the boil and continue to cook until
setting point is reached – approx. 15-25 mins.
Test regularly for setting point.
N.B. Do not double this mixture as it will boil over.
Sauces
Jam
Custard
Dish: 1 litre (2pt) jug
1. Mix together the custard powder, sugar and a little
milk to form a smooth paste.
2. Blend in the remaining milk, whisking well.
3. Cook on HIGH power for 4-6 mins. Whisk well
halfway through cooking time and again at the
end.
I
ngredients
30 ml (2tbsp) custard power
15 ml (1tbsp) sugar
600 ml (1pt) cold milk
White Pouring Sauce
Dish: 1 litre (2pt) jug
1. Melt butter in jug on HIGH power for 20-40 secs.
2. Stir in the flour to make a roux.
3. Add the milk gradually stirring continuously until
well combined.
4. Cook for 2 mins. on HIGH power. Stir and cook
for a further 4-5 mins. Sauce should be smooth
and glossy and coat the back of a spoon.
I
ngredients
30 g (1oz) butter
30 g (1oz) flour
600 ml (1pt) milk
Technical Specifications
Rated Voltage: 230-240 V
Operating Frequency: 50 Hz
Input Power: Max 1100 W
Microwave 1100W
Grill 1000 W
Output Power: Microwave 700 W (IEC-60705)
Outer Dimensions: 433 mm (W) x 327 mm (D) x 258 mm (H)
Oven Cavity Dimensions: 292 mm (W) x 297 mm (D) x 185 mm (H)
Noise Level: 46 dB
Weight: 11.5 kg
Weight and Dimensions shown are approximate.
This product is an equipment that fulfills the European standard for EMC disturbances (EMC =
Electromagnetic Compatibility) EN 55011. According to this standard this product is an
equipment of group 2, class B and is within required limits. Group 2 means that radio-frequency
energy is intentionally generated in the form of electromagnetic radiation for purpose of warming
or cooking food. Class B means that this product may be used in normal household areas.
Information on Disposal for Users of Waste Electrical & Electronic Equipment
(private households)
This symbol on the products and/or accompanying documents means that used
electrical and electronic products should not be mixed with general household waste.
For proper treatment, recovery and recycling, please take these products to
designated collection points, where they will be accepted on a free of charge basis.
Alternatively, in some countries you may be able to return your products to your local
retailer upon the purchase of an equivalent new product.
Disposing of this product correctly will help to save valuable resources and prevent
any potential negative effects on human health and the environment which could
otherwise arise from inappropriate waste handling. Please contact your local authority for further
details of your nearest designated collection point.
Penalties may be applicable for incorrect disposal of this waste, in accordance with national
legislation.
For business users in the European Union
If you wish to discard electrical and electronic equipment, please contact your dealer or supplier
for further information.
Information on Disposal in other Countries outside the European Union
This symbol is only valid in the European Union.
If you wish to discard this product, please contact your local authorities or dealer and ask for the
correct method of disposal.
Pursuant to the directive 2004/108/EC, article 9(2)
Panasonic Testing Centre
Panasonic Service Europe, a division of Panasonic Marketing Europe GmbH
Winsbergring 15,22525 Hamburg, F.R.Germany
Manufactured for Panasonic Corporation by MMEAM
No. 18 Huan Zhen West Road. BeiJiao, ShunDe, FoShan, GuangDong,
Peoples Republic of China
42
Panasonic Corporation
Web Site:http://panasonic.com.net
© Panasonic Corporation 2009
123456
Printed in China
7


Need help? Post your question in this forum.

Forumrules


Report abuse

Libble takes abuse of its services very seriously. We're committed to dealing with such abuse according to the laws in your country of residence. When you submit a report, we'll investigate it and take the appropriate action. We'll get back to you only if we require additional details or have more information to share.

Product:

For example, Anti-Semitic content, racist content, or material that could result in a violent physical act.

For example, a credit card number, a personal identification number, or an unlisted home address. Note that email addresses and full names are not considered private information.

Forumrules

To achieve meaningful questions, we apply the following rules:

Register

Register getting emails for Panasonic NN-K189M at:


You will receive an email to register for one or both of the options.


Get your user manual by e-mail

Enter your email address to receive the manual of Panasonic NN-K189M in the language / languages: English as an attachment in your email.

The manual is 3,21 mb in size.


You will receive the manual in your email within minutes. If you have not received an email, then probably have entered the wrong email address or your mailbox is too full. In addition, it may be that your ISP may have a maximum size for emails to receive.

Others manual(s) of Panasonic NN-K189M

Panasonic NN-K189M User Manual - German - 19 pages


The manual is sent by email. Check your email

If you have not received an email with the manual within fifteen minutes, it may be that you have a entered a wrong email address or that your ISP has set a maximum size to receive email that is smaller than the size of the manual.

The email address you have provided is not correct.

Please check the email address and correct it.

Your question is posted on this page

Would you like to receive an email when new answers and questions are posted? Please enter your email address.


Info