502432
54
Zoom out
Zoom in
Previous page
1/148
Next page
-
54
-
. MONTAGGIO
PRECAUZIONE:
L’uso di una punta per perforazione
di cemento più grande di quella
consigliata potrebbe danneggiare
l'utensile.
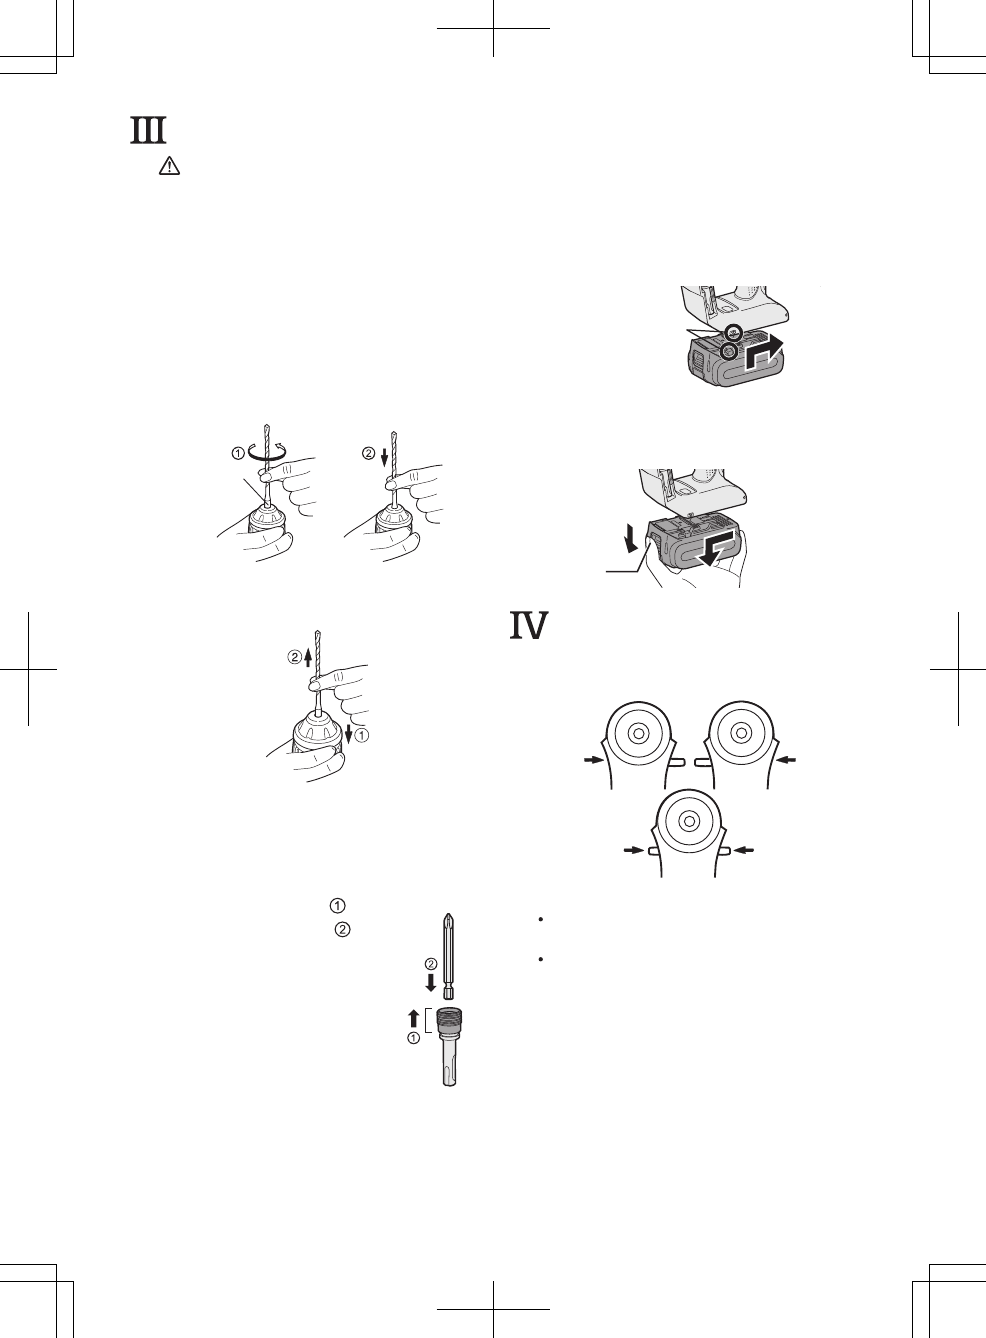
1. Inserire la punta
1-1. Inserire una punta nel foro di mon-
taggio e girarla leggermente per
trovare una posizione di ingaggio.
1-2. Alla posizione di ingaggio, sping-
ere in dentro la punta il più pos-
sibile. Assicurarsi che la punta sia
fissata provando a tirarla.
Punta di tipo
SDS PLUS
2. Rimuovere la punta
2-1. Abbassare il mandrino e tirare la
punta.
Portabit
Usare l’adattatore (O) e la punta.
1. Rimuovere la punta dall’alloggia-
mento dell’adattatore portabit sull’
unità principale.
2. Tirare il portabit. (
)
3. Inserire la punta. (
)
4. Assicurarsi che la
punta sia inserita
saldamente tirandola
leggermente.
5.
Inserire l’adattatore
della punta nel foro di
montaggio e girare per
trovare una posizione di
ingaggio.
6. Alla posizione di ingaggio,
spingere in dentro la punta quanto
è più possibile.
Assicurarsi che la punta sia fissata
provando a tirarla leggermente.
Applicazione o rimozione del
pacco batteria
1. Per collegare il pacco batteria:
Installare il pacco batteria, allineandosi
con le marcature.
Far scorrere il pacco batteria finché
non si blocca in posizione.
Marcature
allineamento
2. Per rimuovere il pacco batteria:
Tirare il pulsante dalla parte frontale
per rilasciare il pacco batterie.
Tasto
.
FUNZIONAMENTO
Leva di avanzamento/inversione
IndietroAvanti
Bloccato
Accertarsi di regolare la leva al cen-
tro per bloccarla dopo l'uso.
Usare la leva di avanti/indietro dopo
che il motore si è fermato completa-
mente.
Leva di commutazione martella -
tura/perforazione
NOTA: Eseguire il cambiamento di
modo dopo che il motore si è
fermato completamente.
Porta-
bit
54


Need help? Post your question in this forum.

Forumrules


Report abuse

Libble takes abuse of its services very seriously. We're committed to dealing with such abuse according to the laws in your country of residence. When you submit a report, we'll investigate it and take the appropriate action. We'll get back to you only if we require additional details or have more information to share.

Product:

For example, Anti-Semitic content, racist content, or material that could result in a violent physical act.

For example, a credit card number, a personal identification number, or an unlisted home address. Note that email addresses and full names are not considered private information.

Forumrules

To achieve meaningful questions, we apply the following rules:

Register

Register getting emails for Panasonic EY78A1 at:


You will receive an email to register for one or both of the options.


Get your user manual by e-mail

Enter your email address to receive the manual of Panasonic EY78A1 in the language / languages: English, German, Dutch, Danish, French, Italian, Swedish, Spanish, Norwegian, Finnish as an attachment in your email.

The manual is 12,25 mb in size.


You will receive the manual in your email within minutes. If you have not received an email, then probably have entered the wrong email address or your mailbox is too full. In addition, it may be that your ISP may have a maximum size for emails to receive.

The manual is sent by email. Check your email

If you have not received an email with the manual within fifteen minutes, it may be that you have a entered a wrong email address or that your ISP has set a maximum size to receive email that is smaller than the size of the manual.

The email address you have provided is not correct.

Please check the email address and correct it.

Your question is posted on this page

Would you like to receive an email when new answers and questions are posted? Please enter your email address.


Info