502432
40
Zoom out
Zoom in
Previous page
1/148
Next page
-
40
-
. MONTAGE
MISE EN GARDE:
Utiliser une mèche à béton plus
large que la taille recommandée
peut endommager l’outil.
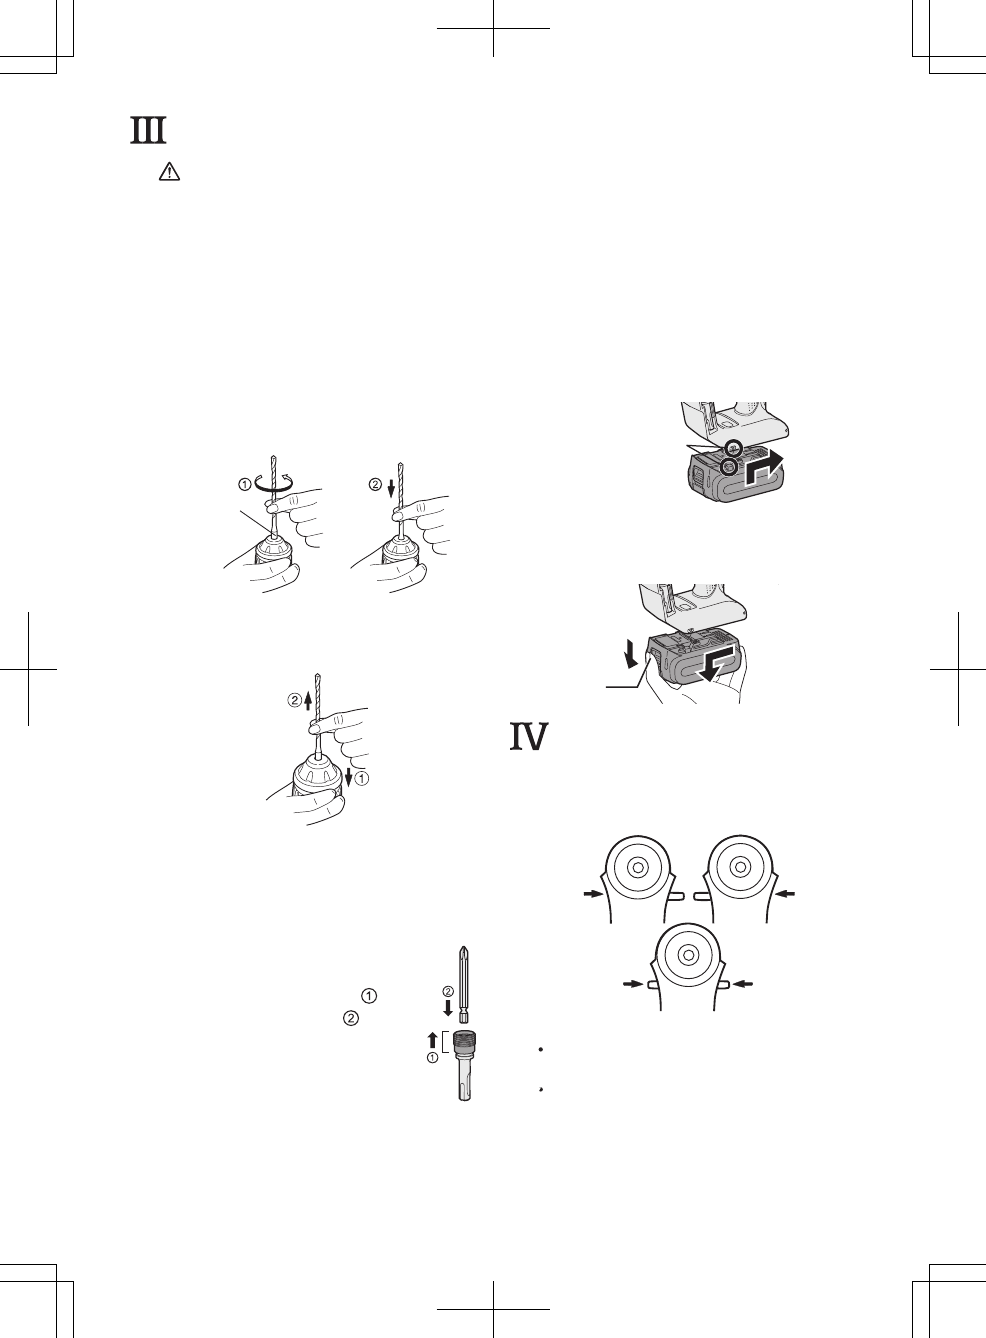
1. Pour insérer la mèche
1-1. Introduisez la mèche dans le trou
de montage, puis tournez-la lé-
gèrement de manière à localiser
une position engagée.
1-2. À la position engagée, repoussez
la mèche le plus loin possible. As-
surez-vous que la mèche est bien
en place en tirant dessus.
Tige de type
SDS PLUS
2. Pour retirer la mèche
2-1. Pressez le porte-mèche et déga-
gez la mèche.
Adaptateur de mèche
Utilisez un adaptateur de mèche (O)
et une mèche.
1.
Retirez l’adaptateur de mèche
du porte-adaptateur
de mèche sur l’unité
principale.
2.
Tirez le porte-mèche.
( )
3. Insérez la mèche. (
)
4. Assurez-vous que la
mèche est bien insérée
en tirant légèrement
dessus.
5. Insérez l’adaptateur de
mèche dans le trou de montage
puis tournez-là de manière à
localiser une position engagée.
6. À la position engagée, repoussez
la mèche le plus loin possible.
Assurez-vous que la mèche ne
bouge pas en tirant légèrement
dessus.
Fixation ou retrait de la bat-
terie autonome
1. Pour raccorder la batterie autonome:
Alignez les marques d’alignement et
fixez la batterie autonome.
Faites glisser la batterie autonome
jusqu’à ce qu’elle se verrouille en
position.
Marques
d’alignement
2. Pour retirer la batterie autonome:
Tirez sur le bouton de l'avant pour
libérerla batterie autonome.
Bouton
.
FONCTIONNEMENT
Levier d’inversion marche
avant-marche arrière
En arrièreEn avant
Verrouillé
Réglez bien le levier au centre pour
le bloquer après le travail.
Actionnez le levier d'inversion
marche avant marche arrière
après que la rotation du moteur se
soit complètement arrêtée.
Porte-
mèche
40


Need help? Post your question in this forum.

Forumrules


Report abuse

Libble takes abuse of its services very seriously. We're committed to dealing with such abuse according to the laws in your country of residence. When you submit a report, we'll investigate it and take the appropriate action. We'll get back to you only if we require additional details or have more information to share.

Product:

For example, Anti-Semitic content, racist content, or material that could result in a violent physical act.

For example, a credit card number, a personal identification number, or an unlisted home address. Note that email addresses and full names are not considered private information.

Forumrules

To achieve meaningful questions, we apply the following rules:

Register

Register getting emails for Panasonic EY78A1 at:


You will receive an email to register for one or both of the options.


Get your user manual by e-mail

Enter your email address to receive the manual of Panasonic EY78A1 in the language / languages: English, German, Dutch, Danish, French, Italian, Swedish, Spanish, Norwegian, Finnish as an attachment in your email.

The manual is 12,25 mb in size.


You will receive the manual in your email within minutes. If you have not received an email, then probably have entered the wrong email address or your mailbox is too full. In addition, it may be that your ISP may have a maximum size for emails to receive.

The manual is sent by email. Check your email

If you have not received an email with the manual within fifteen minutes, it may be that you have a entered a wrong email address or that your ISP has set a maximum size to receive email that is smaller than the size of the manual.

The email address you have provided is not correct.

Please check the email address and correct it.

Your question is posted on this page

Would you like to receive an email when new answers and questions are posted? Please enter your email address.


Info