WARNING: No sources of ignition are permitted to be in the vicinity during the leak test. This also includes smoking. Never check for leaks with a burning
match or a naked flame, and always do this task outdoors.
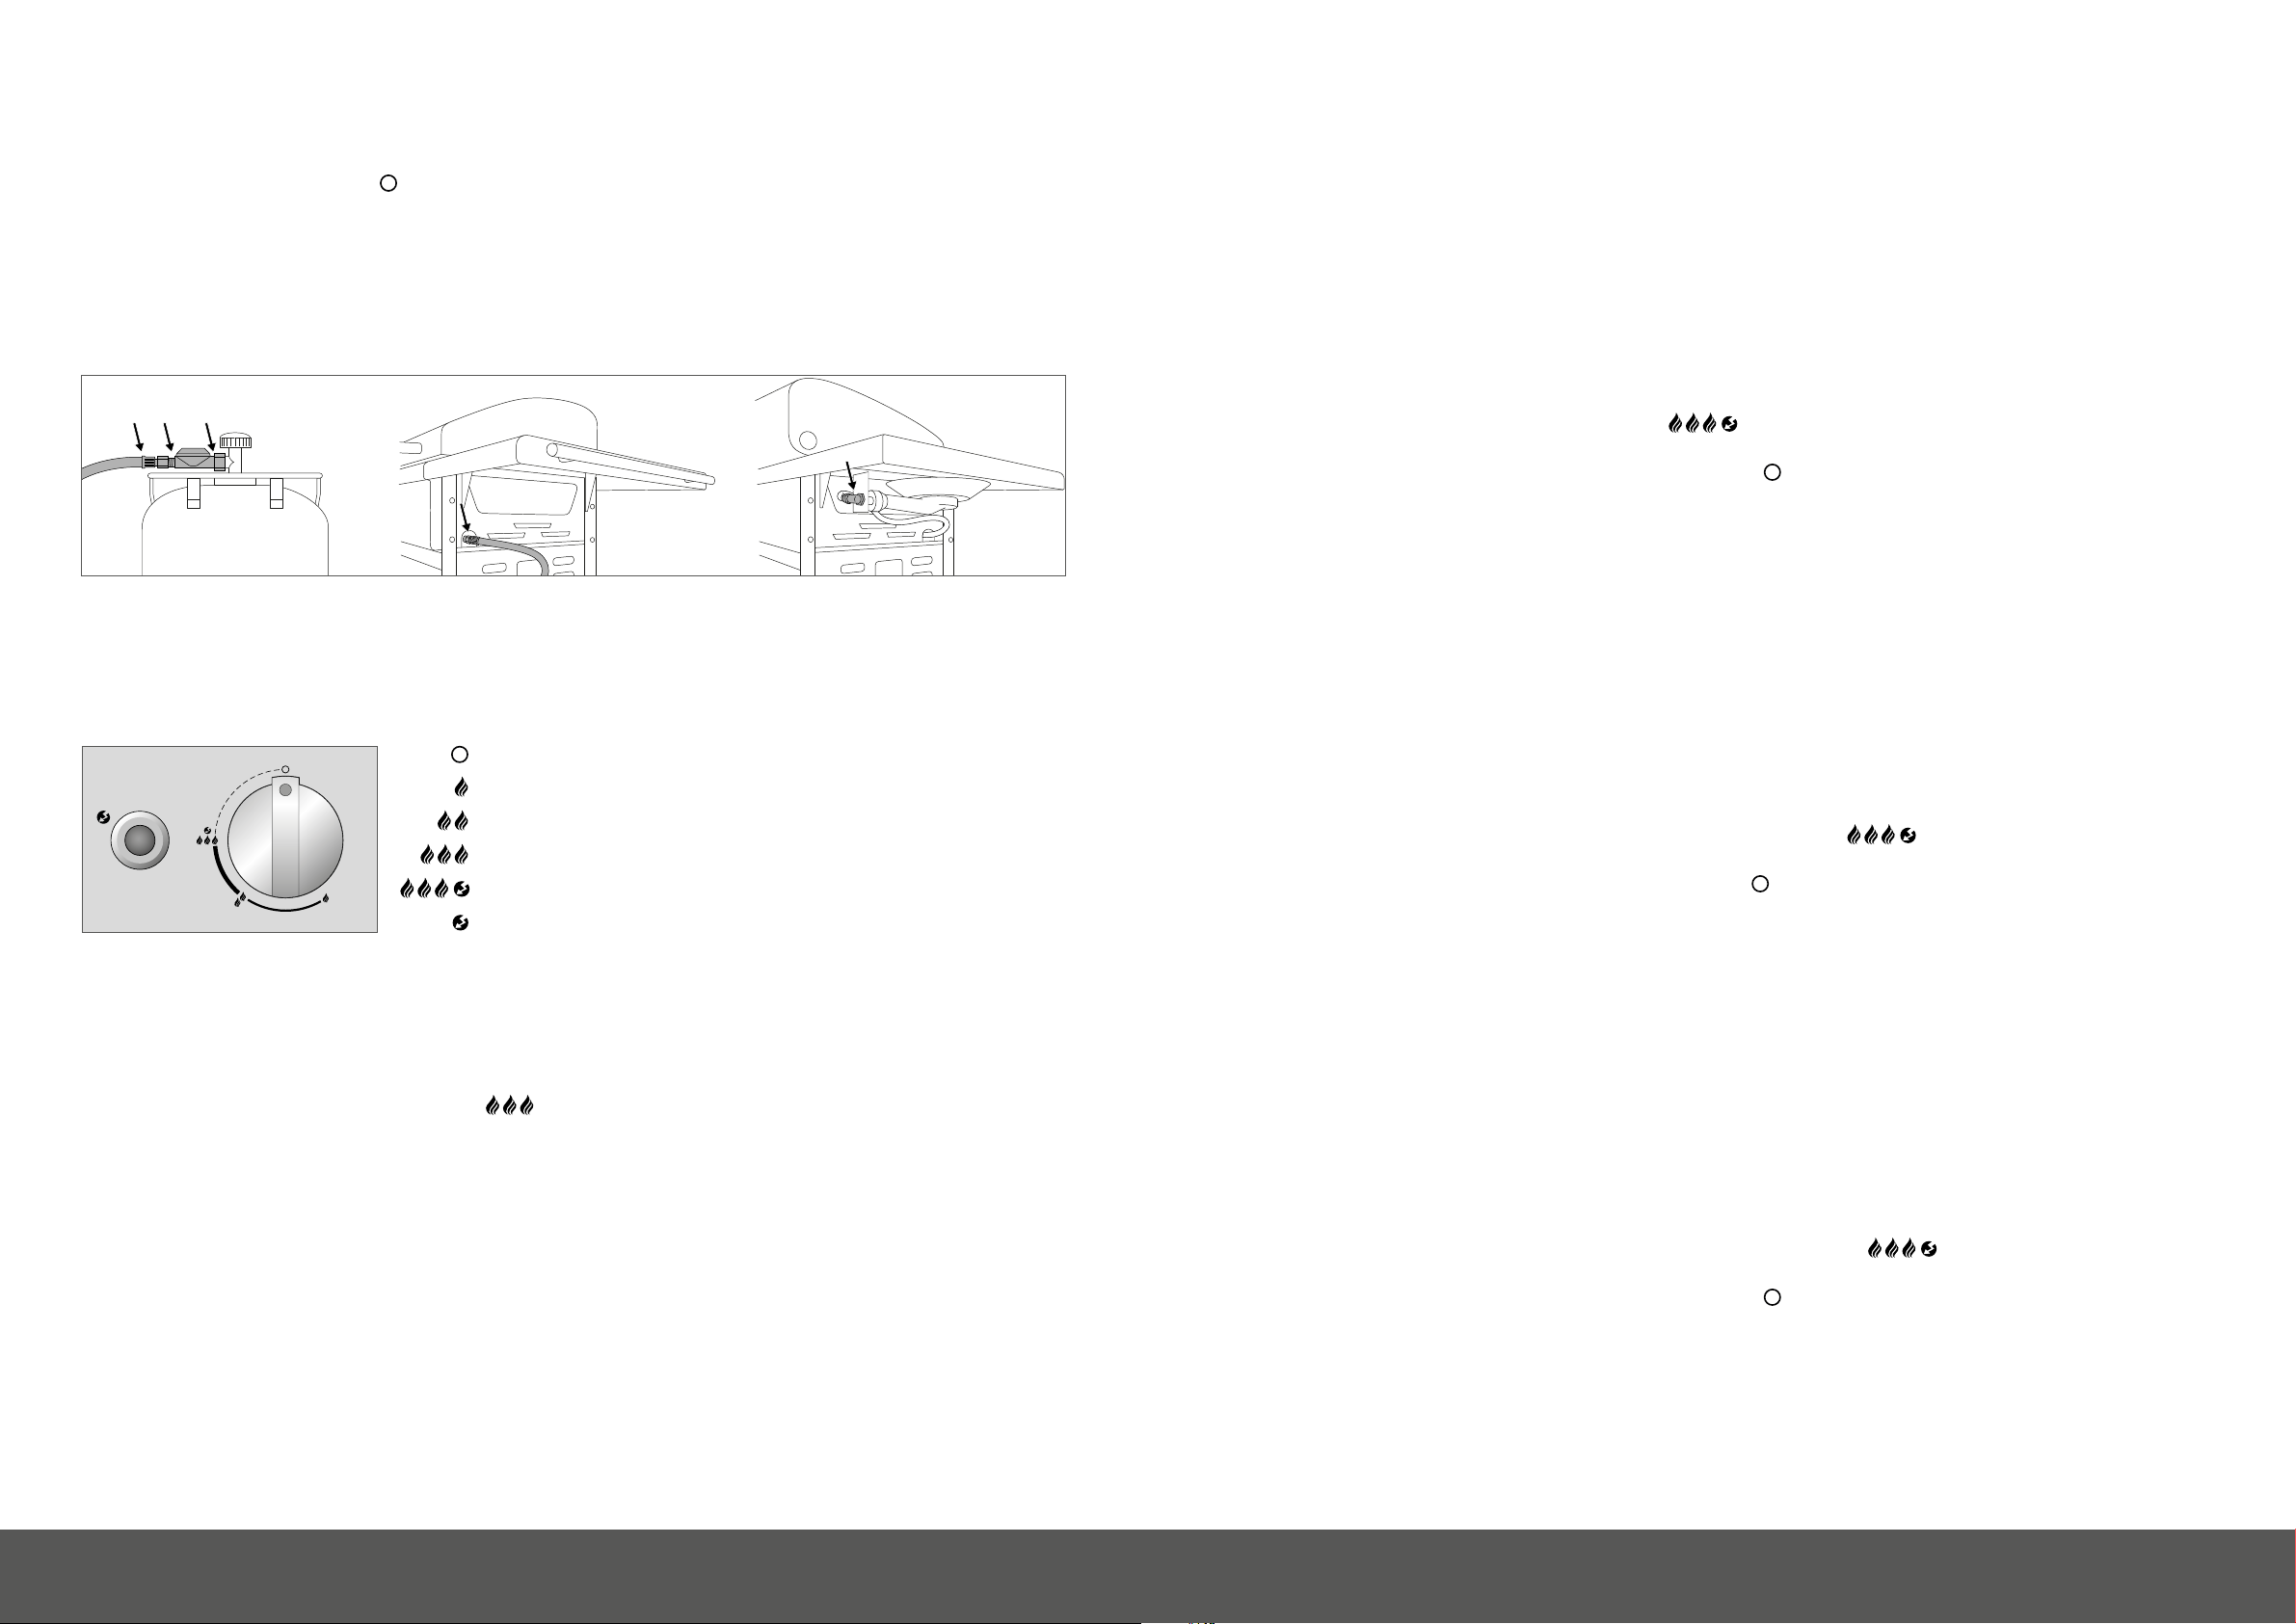
1. The gas regulating knob must be in the position.
2. Open the gas supply at the bottle and brush a soap solution comprising 50 % liquid soap and 50 % water onto all parts that carry gas
(connection at the gas bottle / gas pressure regulator / gas hose / gas inlet / connection on the valve). You can also use a leak spray.
3. Bubbles forming in the soap solution indicate there are leaks. IMPORTANT: Do not use the barbecue before all leaks have been eliminated.
Close the gas supply at the gas bottle.
4. Eliminate the leaks by retightening the connections if possible, or else renew the defective parts.
5. Repeat steps 1 and 2.
6. Contact your specialist gas equipment retailer if the leaks cannot be eliminated.
NOTE: Carry out the CHECK FOR LEAKS each time after the gas bottle is connected or changed, and also at the start of the barbecue season.
EXPLANATION OF THE SYMBOLS ON THE OPERATING CONSOLE
BEFORE FIRST USE
1. Clean all parts that come into contact with foodstuffs.
2. Check all parts that carry gas, as described in the CHECKING FOR LEAKS chapter. Also do this if your gas barbecue was delivered already
assembled by the retailer.
3. Let the barbecue burn for about 20–25 minutes at the setting.
4. Make sure that the drip collector tray has been pushed in fully. This also applies to normal use of the barbecue.
Heat settings and lighting
: Off position
: Low power
: Medium power
: Full power
: Ignition
: Igniter
INSTRUCTIONS FOR LIGHTING
NOTE: It is not always necessary to use all burners. This depends on the type of cooking and the amount of food.
IGNITING THE MAIN BURNERS
AUSTRALIA 315 G / AUSTRALIA 325 G / AUSTRALIA 415 G / AUSTRALIA 425 G /
AUSTRALIA 455 G
1. Make sure that all connections between the gas hose, the gas pressure regulator and the gas bottle are firmly tightened. (Follow the instruction
in the CHECKING FOR LEAKS chapter.)
2. Open the barbecue lid. CAUTION: Never light the barbecue when the lid is closed.
3. Open the gas supply at the gas bottle.
4. Press the gas regulating knob and turn it anticlockwise to the
setting. Press the black ignition button and hold it until the spark cat-
ches and the gas is burning.
5. If the gas does not light within 3 seconds, set the gas regulating knob to . Wait 2 minutes to allow the uncombusted gas to dissipate.
Then repeat points 2 to 4.
6. If it is not possible to light the barbecue after 3 attempts, check the causes (as described in the TROUBLESHOOTING section).
7. The burners must be taken into operation from left to right
LIGHTING THE SIDE BURNER
AUSTRALIA 325 G / AUSTRALIA 425 G / AUSTRALIA 455 G
1. Make sure that all connections between the gas hose, the gas pressure regulator and the gas bottle are firmly tightened. (Follow the instruction
in the CHECKING FOR LEAKS chapter.)
2. Remove the granite cover from the side burner in the AUSTRALIA 455 G and place it in the holder provided under the right-hand side shelf,
or open the cover plate at the side burner in the AUSTRALIA 325 G or AUSTRALIA 425 G.
3. CAUTION: Never light the barbecue when the granite cover or the cover plate is closed.
4. Open the gas supply at the gas bottle.
5. Press the gas regulating knob marked SIDE BURNER and turn it anticlockwise to the
setting. Press the ignition button and hold
it until the spark catches and the gas is burning.
6. If the gas does not light within 3 seconds, set the gas regulating knob to . Wait 2 minutes to allow the uncombusted gas to dissipate. Then
repeat points 2 to 4.
7. If it is not possible to light the side burner after 3 attempts, search for the causes (as described in the TROUBLESHOOTING section).
8. Do not cover the side burner with the granite cover until it has completely cooled down (only AUSTRALIA 455 G model), and do not close
the cover plate until it has completely cooled down (only AUSTRALIA 325 G or AUSTRALIA 425 G models).
9. Do not use cooking vessels of <160 mm and >270 mm on the side cooking area.
IGNITING THE INFRARED BURNER POWER BURNER OF THE AUSTRALIA 455 G
CAUTION: Do not use the infrared burner when the lid is closed.
1. Make sure that all connections between the gas hose, the gas pressure regulator and the gas bottle are firmly tightened. (Follow the instruction
in the CHECKING FOR LEAKS chapter.)
2. Open the barbecue lid. CAUTION: Never ignite the barbecue with the lid closed, and never place the griddle over the infrared burner.
The results could be discolouration of the lid and deformation of the griddle.
3. Open the gas supply at the gas bottle.
4. Press the gas regulating knob marked POWER BURNER and turn it anticlockwise to the
setting. Press the ignition button and
hold it until the spark catches and the gas is burning.
5. If the gas does not light within 3 seconds, set the gas regulating knob to . Wait 2 minutes to allow the uncombusted gas to dissipate.
Then repeat points 2 to 4.
6. If it is not possible to light the infrared burner after 3 attempts, search for the causes (as described in the TROUBLESHOOTING section).
Libble takes abuse of its services very seriously. We're committed to dealing with such abuse according to the laws in your country of residence. When you submit a report, we'll investigate it and take the appropriate action. We'll get back to you only if we require additional details or have more information to share.
Product:
Forumrules
To achieve meaningful questions, we apply the following rules:
First, read the manual;
Check if your question has been asked previously;
Try to ask your question as clearly as possible;
Did you already try to solve the problem? Please mention this;
Is your problem solved by a visitor then let him/her know in this forum;
To give a response to a question or answer, do not use this form but click on the button 'reply to this question';
Your question will be posted here and emailed to our subscribers. Therefore, avoid filling in personal details.
Register
Register getting emails for Outdoorchef Australia 455 G at:
new questions and answers
new manuals
You will receive an email to register for one or both of the options.
Get your user manual by e-mail
Enter your email address to receive the manual of Outdoorchef Australia 455 G in the language / languages: English, German, Dutch, Danish, French, Italian, Swedish, Norwegian, Finnish as an attachment in your email.
The manual is 7.99 mb in size.
You will receive the manual in your email within minutes. If you have not received an email, then probably have entered the wrong email address or your mailbox is too full. In addition, it may be that your ISP may have a maximum size for emails to receive.
If you have not received an email with the manual within fifteen minutes, it may be that you have a entered a wrong email address or that your ISP has set a maximum size to receive email that is smaller than the size of the manual.
The email address you have provided is not correct.
Please check the email address and correct it.
Your question is posted on this page
Would you like to receive an email when new answers and questions are posted? Please enter your email address.