492486
7
Zoom out
Zoom in
Previous page
1/18
Next page
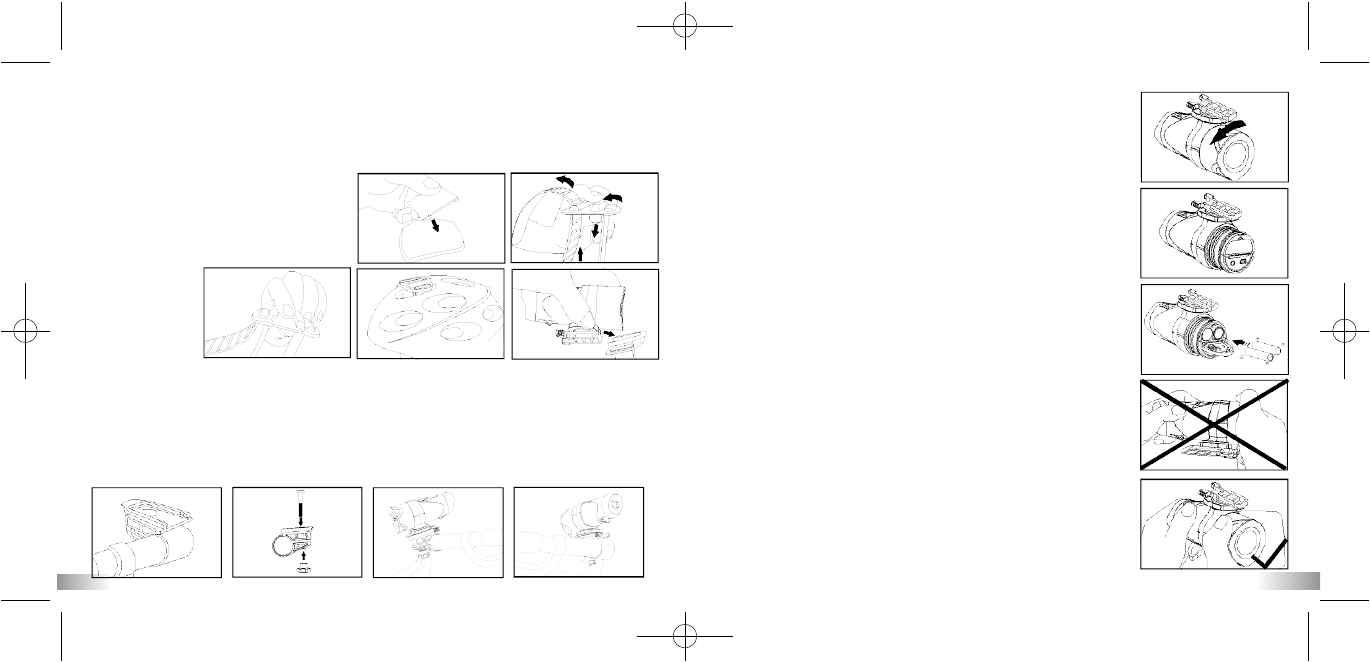
Mounting the camera using the velcro strap:
1. Attach the rubberized patch to the bottom of the helmet grip.
2+3. Place the helmet grip on the helmet, and thread the velcro strap
through the helmet grip.
4. Secure the velcro strap by fastening
it through the helmet vents.
5. Slide the camera into the helmet grip,
and adjust the angle of the camera
making sure it's tight.
Mounting the camera using the handlebar grip:
1. Place the handlebar grip on the handlebar.
2. Add the screw and nut to hold the handlebar grip securely.
3. Slide the camera into the handlebar grip and make sure the handlebar grip is locked
with the camera.
4. Adjust the angle of the camera.
9
10
#1 #2
#3 #4
#5
#1 #2
#3
#4
VI) Quick Start
Battery Installation
1. Unscrew the cover at the end of the unit.
2. Place your finger on the 'lip', which is on the bottom
half of the rear of the unit, and pull in a downward
motion to open the battery slot cover.
3. Insert 2 x AA alkaline batteries into the battery slot
with the polarity in the direction as shown.
4. Replace the battery cover and screw on the end of
unit cover.
Important: When the camera is low in battery, the low
battery icon will appear on the LCD display.
Always download video footage to your PC prior to
replacing batteries to avoid memory loss.
Note:
a) Battery installation should be done under adult supervision.
b) Do not mix old and new batteries together. Replace
all the batteries at the same time.
c) Remove the batteries if the camera is not going to be
used for long periods of time. This will save battery
life.
AT18_manual_UK_31Jan2007 2/2/07 6:14 PM Page 6
7


Need help? Post your question in this forum.

Forumrules


Report abuse

Libble takes abuse of its services very seriously. We're committed to dealing with such abuse according to the laws in your country of residence. When you submit a report, we'll investigate it and take the appropriate action. We'll get back to you only if we require additional details or have more information to share.

Product:

For example, Anti-Semitic content, racist content, or material that could result in a violent physical act.

For example, a credit card number, a personal identification number, or an unlisted home address. Note that email addresses and full names are not considered private information.

Forumrules

To achieve meaningful questions, we apply the following rules:

Register

Register getting emails for Oregon Scientific ATC2000 - ATC2K at:


You will receive an email to register for one or both of the options.


Get your user manual by e-mail

Enter your email address to receive the manual of Oregon Scientific ATC2000 - ATC2K in the language / languages: English as an attachment in your email.

The manual is 1,94 mb in size.


You will receive the manual in your email within minutes. If you have not received an email, then probably have entered the wrong email address or your mailbox is too full. In addition, it may be that your ISP may have a maximum size for emails to receive.

Others manual(s) of Oregon Scientific ATC2000 - ATC2K

Oregon Scientific ATC2000 - ATC2K User Manual - German - 17 pages

Oregon Scientific ATC2000 - ATC2K User Manual - Dutch - 15 pages


The manual is sent by email. Check your email

If you have not received an email with the manual within fifteen minutes, it may be that you have a entered a wrong email address or that your ISP has set a maximum size to receive email that is smaller than the size of the manual.

The email address you have provided is not correct.

Please check the email address and correct it.

Your question is posted on this page

Would you like to receive an email when new answers and questions are posted? Please enter your email address.


Info