492973
10
Zoom out
Zoom in
Previous page
1/133
Next page
MC352/MC362/MC562/ES3452 MFP/ES5462 MFP
Configuration Guide
Preface > 2
P
REFACE
Every effort has been made to ensure that the information in this document is complete,
accurate, and up-to-date. The manufacturer assumes no responsibility for the results of
errors beyond its control. The manufacturer also cannot guarantee that changes in software
and equipment made by other manufacturers and referred to in this guide will not affect
the applicability of the information in it. Mention of software products manufactured by
other companies does not necessarily constitute endorsement by the manufacturer.
While all reasonable efforts have been made to make this document as accurate and helpful
as possible, we make no warranty of any kind, expressed or implied, as to the accuracy or
completeness of the information contained herein.
The most up-to-date drivers and manuals are available from:
http://www.okiprintingsolutions.com
45002202EE; Copyright © 2012 Oki Europe Ltd. All rights reserved.
Oki is a registered trademark of Oki Electric Industry Company, Ltd.
Energy Star is a trademark of the United States Environmental Protection Agency.
Microsoft, MS-DOS and Windows are registered trademarks of Microsoft Corporation.
Apple, Macintosh, Mac and Mac OS are registered trademarks of Apple Computer.
Other product names and brand names are registered trademarks or trademarks of their
proprietors.
Contents > 3
C
ONTENTS
Preface . . . . . . . . . . . . . . . . . . . . . . . . . . . . . . . . . . . . . . . . . . . . . . . . . . .2
Contents . . . . . . . . . . . . . . . . . . . . . . . . . . . . . . . . . . . . . . . . . . . . . . . . . .3
Notes, cautions and warnings . . . . . . . . . . . . . . . . . . . . . . . . . . . . . . . . . .6
About this guide . . . . . . . . . . . . . . . . . . . . . . . . . . . . . . . . . . . . . . . . . . . .7
Documentation suite . . . . . . . . . . . . . . . . . . . . . . . . . . . . . . . . . . . . . . . 7
Purpose of this guide . . . . . . . . . . . . . . . . . . . . . . . . . . . . . . . . . . . . . . . 7
On-line usage . . . . . . . . . . . . . . . . . . . . . . . . . . . . . . . . . . . . . . . . . . . . 8
Printing pages. . . . . . . . . . . . . . . . . . . . . . . . . . . . . . . . . . . . . . . . . . . . 8
Configuring the network settings . . . . . . . . . . . . . . . . . . . . . . . . . . . . . . .9
Checking the common setup information . . . . . . . . . . . . . . . . . . . . . . . . .10
Setting up scan to e-mail and internet fax . . . . . . . . . . . . . . . . . . . . . . . .10
Checking the e-mail settings of the computer . . . . . . . . . . . . . . . . . . . .10
Setting the e-mail address for your machine. . . . . . . . . . . . . . . . . . . . .12
Configuring your machine for scan to e-mail and internet fax . . . . . . . . .13
Setting up scan to network PC . . . . . . . . . . . . . . . . . . . . . . . . . . . . . . . .14
Checking the name of the computer . . . . . . . . . . . . . . . . . . . . . . . . . .14
Determining the names of the items required for scan to network PC . . .16
Configuring the computer for scan to network PC . . . . . . . . . . . . . . . . .16
Managing profiles . . . . . . . . . . . . . . . . . . . . . . . . . . . . . . . . . . . . . . . . .21
Creating a profile for scan to network PC . . . . . . . . . . . . . . . . . . . . . . .21
Deleting a network profile . . . . . . . . . . . . . . . . . . . . . . . . . . . . . . . . .22
Managing the address book . . . . . . . . . . . . . . . . . . . . . . . . . . . . . . . . . .23
Setting sender and reply to e-mail addresses (from/reply to) . . . . . . . . .23
Creating e-mail templates . . . . . . . . . . . . . . . . . . . . . . . . . . . . . . . . .24
Adding an e-mail address entry to the address book . . . . . . . . . . . . . . .25
Deleting an e-mail address entry from the address book . . . . . . . . . . . .25
Modifying an e-mail address entry from the address book . . . . . . . . . . .26
Sorting e-mail addresses in the address book . . . . . . . . . . . . . . . . . . . .26
Searching an e-mail address entry in the address book . . . . . . . . . . . . .26
Adding a group entry to the address book . . . . . . . . . . . . . . . . . . . . . .27
Deleting a group address entry from the address book . . . . . . . . . . . . .27
Modifying a group address entry from the address book. . . . . . . . . . . . .28
Sorting group address entries in the address book . . . . . . . . . . . . . . . .28
Searching a group address entry in the address book . . . . . . . . . . . . . .28
Configuring the scanning to Local and Remote PCs . . . . . . . . . . . . . . . .29
Using Drivers and Software . . . . . . . . . . . . . . . . . . . . . . . . . . . . . . . . . .29
Using TWAIN Driver. . . . . . . . . . . . . . . . . . . . . . . . . . . . . . . . . . . . . .29
Using WIA Driver. . . . . . . . . . . . . . . . . . . . . . . . . . . . . . . . . . . . . . . .32
Using ICA Driver . . . . . . . . . . . . . . . . . . . . . . . . . . . . . . . . . . . . . . . .33
Using ActKey Software. . . . . . . . . . . . . . . . . . . . . . . . . . . . . . . . . . . .34
Useful Functions for Scanning to Local and Remote PCs . . . . . . . . . . . . . . .38
Setting PC Scan Mode . . . . . . . . . . . . . . . . . . . . . . . . . . . . . . . . . . . .38
Enabling the Network TWAIN Settings . . . . . . . . . . . . . . . . . . . . . . . . .38
Enabling the WSD Scan . . . . . . . . . . . . . . . . . . . . . . . . . . . . . . . . . . .38
Selecting the Dual-Side Scan of WSD Scan function . . . . . . . . . . . . . . .39
Deleting a Scanner Driver . . . . . . . . . . . . . . . . . . . . . . . . . . . . . . . . .39
Updating a Scanner Driver . . . . . . . . . . . . . . . . . . . . . . . . . . . . . . . . .40
Contents > 4
Configuring the fax settings (MC362 and MC562 and ES5462 MFP). . . .41
Basic setup. . . . . . . . . . . . . . . . . . . . . . . . . . . . . . . . . . . . . . . . . . . . . .41
Advanced set up . . . . . . . . . . . . . . . . . . . . . . . . . . . . . . . . . . . . . . . . . .42
Connecting to a PBX . . . . . . . . . . . . . . . . . . . . . . . . . . . . . . . . . . . . .42
Automatic redial . . . . . . . . . . . . . . . . . . . . . . . . . . . . . . . . . . . . . . . .43
Reception mode . . . . . . . . . . . . . . . . . . . . . . . . . . . . . . . . . . . . . . . .43
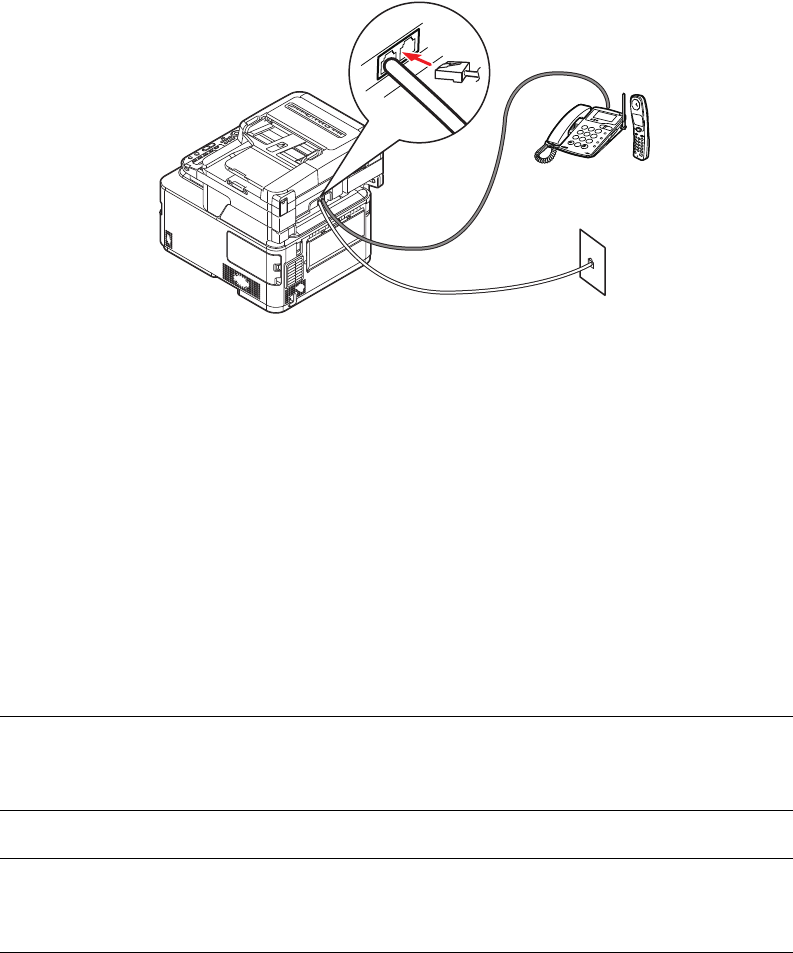
Adding a telephone handset . . . . . . . . . . . . . . . . . . . . . . . . . . . . . . . .44
Managing the phone book . . . . . . . . . . . . . . . . . . . . . . . . . . . . . . . . . . .45
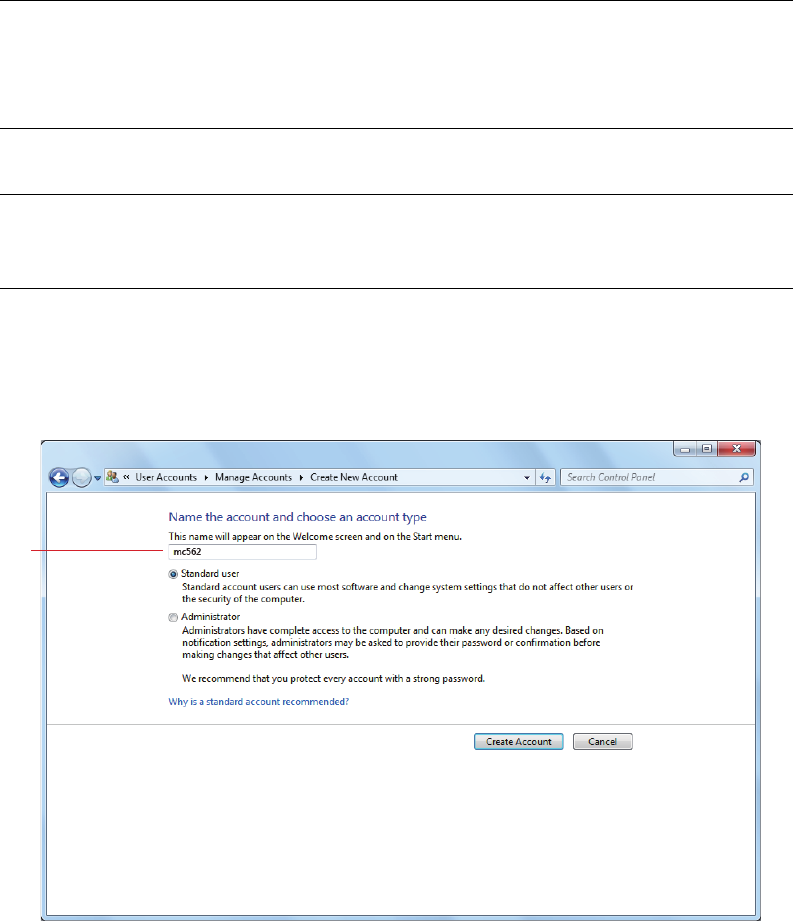
Adding a speed dial entry to the phone book . . . . . . . . . . . . . . . . . . . .45
Adding a group entry to the phone book . . . . . . . . . . . . . . . . . . . . . . .46
Deleting a speed dial entry from the phone book. . . . . . . . . . . . . . . . . .46
Deleting a group dial entry from the phone book. . . . . . . . . . . . . . . . . .46
Modifying a speed dial entry . . . . . . . . . . . . . . . . . . . . . . . . . . . . . . . .47
Modifying a group dial entry . . . . . . . . . . . . . . . . . . . . . . . . . . . . . . . .47
Sorting speed dial entries . . . . . . . . . . . . . . . . . . . . . . . . . . . . . . . . . .47
Sorting group dial entries . . . . . . . . . . . . . . . . . . . . . . . . . . . . . . . . . .47
Searching a speed dial entry. . . . . . . . . . . . . . . . . . . . . . . . . . . . . . . .48
Searching a group dial entry. . . . . . . . . . . . . . . . . . . . . . . . . . . . . . . .48
Registering an entry from reception or transmission history . . . . . . . . . .48
User authentication and access control . . . . . . . . . . . . . . . . . . . . . . . . .49
PIN authentication. . . . . . . . . . . . . . . . . . . . . . . . . . . . . . . . . . . . . . . . .50
Registering a PIN . . . . . . . . . . . . . . . . . . . . . . . . . . . . . . . . . . . . . . .50
Enabling PIN authentication . . . . . . . . . . . . . . . . . . . . . . . . . . . . . . . .50
Operation when PIN authentication is enabled . . . . . . . . . . . . . . . . . . .51
User name and password authentication . . . . . . . . . . . . . . . . . . . . . . . . .52
Registering a user name and password . . . . . . . . . . . . . . . . . . . . . . . .52
Enabling user name and password authentication . . . . . . . . . . . . . . . . .52
Operation when user name and password authentication is enabled . . . .52
Operation from the computer . . . . . . . . . . . . . . . . . . . . . . . . . . . . . . .53
Advanced network settings. . . . . . . . . . . . . . . . . . . . . . . . . . . . . . . . . . .55
Network setting items . . . . . . . . . . . . . . . . . . . . . . . . . . . . . . . . . . . . . .55
TCP/IP . . . . . . . . . . . . . . . . . . . . . . . . . . . . . . . . . . . . . . . . . . . . . . .55
NetWare. . . . . . . . . . . . . . . . . . . . . . . . . . . . . . . . . . . . . . . . . . . . . .57
EtherTalk . . . . . . . . . . . . . . . . . . . . . . . . . . . . . . . . . . . . . . . . . . . . .58
NBT/NetBEUI . . . . . . . . . . . . . . . . . . . . . . . . . . . . . . . . . . . . . . . . . .59
E-mail send . . . . . . . . . . . . . . . . . . . . . . . . . . . . . . . . . . . . . . . . . . .59
E-mail receive. . . . . . . . . . . . . . . . . . . . . . . . . . . . . . . . . . . . . . . . . .61
E-mail alert . . . . . . . . . . . . . . . . . . . . . . . . . . . . . . . . . . . . . . . . . . .62
SNMP. . . . . . . . . . . . . . . . . . . . . . . . . . . . . . . . . . . . . . . . . . . . . . . .66
Printer trap. . . . . . . . . . . . . . . . . . . . . . . . . . . . . . . . . . . . . . . . . . . .67
IPP . . . . . . . . . . . . . . . . . . . . . . . . . . . . . . . . . . . . . . . . . . . . . . . . .69
Windows rally . . . . . . . . . . . . . . . . . . . . . . . . . . . . . . . . . . . . . . . . . .70
IEEE802.1X . . . . . . . . . . . . . . . . . . . . . . . . . . . . . . . . . . . . . . . . . . .70
Secure protocol server (Kerberos) . . . . . . . . . . . . . . . . . . . . . . . . . . . .71
LDAP . . . . . . . . . . . . . . . . . . . . . . . . . . . . . . . . . . . . . . . . . . . . . . . .71
Mail server . . . . . . . . . . . . . . . . . . . . . . . . . . . . . . . . . . . . . . . . . . . .72
Security . . . . . . . . . . . . . . . . . . . . . . . . . . . . . . . . . . . . . . . . . . . . . .73
IP filtering . . . . . . . . . . . . . . . . . . . . . . . . . . . . . . . . . . . . . . . . . . . .74
MAC address filtering . . . . . . . . . . . . . . . . . . . . . . . . . . . . . . . . . . . . .75
SSL/TLS . . . . . . . . . . . . . . . . . . . . . . . . . . . . . . . . . . . . . . . . . . . . . .75
IPSec . . . . . . . . . . . . . . . . . . . . . . . . . . . . . . . . . . . . . . . . . . . . . . . .77
Maintenance . . . . . . . . . . . . . . . . . . . . . . . . . . . . . . . . . . . . . . . . . . .78
Time setup (SNTP settings) . . . . . . . . . . . . . . . . . . . . . . . . . . . . . . . .78
Web printing. . . . . . . . . . . . . . . . . . . . . . . . . . . . . . . . . . . . . . . . . . .79
Contents > 5
Changing network settings from the web page . . . . . . . . . . . . . . . . . . . . .80
Encrypting Communication by SSL/TLS . . . . . . . . . . . . . . . . . . . . . . . .80
IPP printing (Windows only) . . . . . . . . . . . . . . . . . . . . . . . . . . . . . . . .82
Encrypting communication by IPSec . . . . . . . . . . . . . . . . . . . . . . . . . .84
Controlling access using IP address (IP filtering) . . . . . . . . . . . . . . . . . .87
Controlling access using MAC address (MAC address filtering) . . . . . . . .87
Error notification by e-mail (e-mail alert) . . . . . . . . . . . . . . . . . . . . . . .88
Using SNMPv3. . . . . . . . . . . . . . . . . . . . . . . . . . . . . . . . . . . . . . . . . . . .89
Using IPv6 . . . . . . . . . . . . . . . . . . . . . . . . . . . . . . . . . . . . . . . . . . . . . .90
Enabling IPv6 . . . . . . . . . . . . . . . . . . . . . . . . . . . . . . . . . . . . . . . . . .91
Checking IPv6 address. . . . . . . . . . . . . . . . . . . . . . . . . . . . . . . . . . . .91
Using IEEE802.1X . . . . . . . . . . . . . . . . . . . . . . . . . . . . . . . . . . . . . . . . .91
Configuring your machine for IEEE802.1X . . . . . . . . . . . . . . . . . . . . . .91
Connecting your machine to authentication switch . . . . . . . . . . . . . . . .92
Configuring LDAP server. . . . . . . . . . . . . . . . . . . . . . . . . . . . . . . . . . . . .93
Configuring secure protocols. . . . . . . . . . . . . . . . . . . . . . . . . . . . . . . . . .93
Printing without printer driver (direct printing) . . . . . . . . . . . . . . . . . . . . .94
Printing PDFs . . . . . . . . . . . . . . . . . . . . . . . . . . . . . . . . . . . . . . . . . .94
Configuring server to print files attached to e-mails. . . . . . . . . . . . . . . .94
Changing settings on EtherTalk (Mac only) . . . . . . . . . . . . . . . . . . . . . . . .95
Changing EtherTalk machine name . . . . . . . . . . . . . . . . . . . . . . . . . . .95
Changing EtherTalk zone . . . . . . . . . . . . . . . . . . . . . . . . . . . . . . . . . .95
Other operations . . . . . . . . . . . . . . . . . . . . . . . . . . . . . . . . . . . . . . . . . . .96
Initializing network settings . . . . . . . . . . . . . . . . . . . . . . . . . . . . . . . . . .96
Using DHCP . . . . . . . . . . . . . . . . . . . . . . . . . . . . . . . . . . . . . . . . . . . . .96
Configuring DHCP server . . . . . . . . . . . . . . . . . . . . . . . . . . . . . . . . . .96
Configuring your machine. . . . . . . . . . . . . . . . . . . . . . . . . . . . . . . . . .97
Appendix A - menu system . . . . . . . . . . . . . . . . . . . . . . . . . . . . . . . . . . .99
Reports . . . . . . . . . . . . . . . . . . . . . . . . . . . . . . . . . . . . . . . . . . . . . . .100
Paper setup . . . . . . . . . . . . . . . . . . . . . . . . . . . . . . . . . . . . . . . . . . . .101
Address book . . . . . . . . . . . . . . . . . . . . . . . . . . . . . . . . . . . . . . . . . . .103
Phone book . . . . . . . . . . . . . . . . . . . . . . . . . . . . . . . . . . . . . . . . . . . .104
Profile . . . . . . . . . . . . . . . . . . . . . . . . . . . . . . . . . . . . . . . . . . . . . . . .105
Network scan destination . . . . . . . . . . . . . . . . . . . . . . . . . . . . . . . . . . .107
Store document settings . . . . . . . . . . . . . . . . . . . . . . . . . . . . . . . . . . .107
View information . . . . . . . . . . . . . . . . . . . . . . . . . . . . . . . . . . . . . . . . .108
Easy setup . . . . . . . . . . . . . . . . . . . . . . . . . . . . . . . . . . . . . . . . . . . . .108
Admin setup . . . . . . . . . . . . . . . . . . . . . . . . . . . . . . . . . . . . . . . . . . . .110
Index . . . . . . . . . . . . . . . . . . . . . . . . . . . . . . . . . . . . . . . . . . . . . . . . . . .132
Notes, cautions and warnings > 6
N
OTES
,
CAUTIONS
AND
WARNINGS
NOTE
A note provides additional information to supplement the main text.
CAUTION!
A caution provides additional information which, if ignored, may
result in equipment malfunction or damage.
WARNING!
A warning provides additional information which, if ignored, may
result in a risk of personal injury.
About this guide > 7
A
BOUT
THIS
GUIDE
D
OCUMENTATION
SUITE
This guide is part of a suite of online and printed documentation provided to help you
become familiar with your product and to make the best use of its many powerful features.
The documentation is summarised below for reference and is found on the manuals DVD
unless indicated otherwise:
> Installation Safety booklet: provides information for safe use of your product.
This is a paper document that is packaged with the product and should be read before
setting up your machine.
> Set-up guide: describes how to unpack, connect and turn on your product.
This is a paper document that is packaged with the product.
> User’s Guide: helps you become familiar with your product and make the best use
of its many features. Also included are guidelines for troubleshooting and
maintenance to ensure that it performs at its best. Additionally, information is
provided for adding optional accessories as your printing needs evolve.
> Configuration Guide: provides machine, fax and network configuration
information.
> Printing Guide: helps you become familiar with the many features of the driver
software supplied with your product.
> Barcode Printing Guide: helps you become familiar with your product’s built in
barcode printing feature.
> Security Guide: helps you become familiar with your products security features.
> Installation Guides: accompany consumable items and optional accessories to
describe how to install them.
These are paper documents that are packaged with the consumables and optional
accessories.
> On-line Help: on-line information accessible from the printer driver and utility
software.
P
URPOSE
OF
THIS
GUIDE
The purpose of this guide is to provide you with in-depth information on how configure the
network, scan and fax for your machine.
NOTE
Images used in this manual may include optional features that your product
does not have installed.
About this guide > 8
O
N
-
LINE
USAGE
This guide is intended to be read on screen using Adobe Reader. Use the navigation and
viewing tools provided in Adobe Reader.
There are many cross-references within this book, each highlighted as blue text. When you
click on a cross-reference the display will instantly jump to the part of the manual
containing the referenced material.
By using the button in Adobe Reader, you can navigate directly back to where you were
before.
You can access specific information in two ways:
> In the list of bookmarks down the left hand side of your screen, click on the topic of
interest to jump to the required topic. (If the bookmarks are not available, use the
“Contents” on page 3.)
> In the list of bookmarks, click on Index to jump to the Index. (If the bookmarks are
not available, use the “Contents” on page 3.) Find the term of interest in the
alphabetically arranged index and click on the associated page number to jump to
the page containing the term.
P
RINTING
PAGES
The whole manual, individual pages, or sections may be printed. The procedure is:
1. From the toolbar, select File > Print (or press the Ctrl + P keys).
2. Choose which pages you wish to print:
(a) All pages, (1), for the entire manual.
(b) Current page, (2), for the page at which you are looking.
(c) Pages from and to, (3), for the range of pages you specify by entering their
page numbers.
(d) Click OK.
1
2
3
Configuring the network settings > 9
C
ONFIGURING
THE
NETWORK
SETTINGS
Functions such as Scan To E-mail, Scan To Network PC and Internet Fax enable you to send
scanned data to a computer via the network connection. To use them, you need to set up
your machine and the computer to which you want to send scanned data.
First check your computer settings and fill in the information in the Your Value column of
the “Setup Information Form,” on page 9. Then, configure your machine and the computer
using the information in Your Value.
Table 1: Setup Information Form
NOTE
Be sure to set up the network connection before continuing. Refer to the Setup
Guide supplied with the machine.
NO. ITEM EXAMPLE YOUR VALUE
Common Setup Information
A-1 Administrator password for your machine aaaaaa
A-2 IP address of your machine 192.168.0.2
Setup Information Required for Scan To Email and Internet Fax
B-1 Email address for your machine mc562@test.com
(Up to 80 characters)
B-2 SMTP server address smtp.test.com
B-3 POP3 server address pop3.test.com
B-4 Receive Settings
B-5 Authentication method SMTP
B-6 SMTP user ID OKIMC562
B-7 SMTP password okimc562
B-8 POP user ID user
B-9 POP password okimc562
B-10 Name of the email destination User
B-11 Email address of the email destination user@test.com
Setup Information Required for Scan To Network PC
C-1 Name of the destination computer PC1
C-2 User name to log into the destination
computer
mc562
(Up to 32 characters)
C-3 Password to log into the destination
computer
mc562
(Up to 32 characters)
C-4 Profile name to register the settings Sales
(Up to 16 characters)
C-5 Shared folder name on the destination
computer
SalesDev
(Up to 64 characters)
C-6 File name of the scanned data ScanData
(Up to 64 characters)
Configuring the network settings > 10
C
HECKING
THE
COMMON
SETUP
INFORMATION
Check the common setup information for Scan To E-mail, Scan To Network PC and Internet
Fax, and fill in the corresponding column in the “Setup Information Form,” on page 9.
Administrator password
Enter the administrator password of your machine in the “Setup Information Form,” on
page 9.
IP address of your machine
1. Press the SETTING key on the control panel.
2. Using the Down arrow key, scroll to View Information and press OK.
3. Using the Down arrow key, scroll to Network and press OK.
4. Note the IPv4 address in the “Setup Information Form,” on page 9.
S
ETTING
UP
SCAN
TO
E
-
MAIL
AND
INTERNET
FAX
The Scan To E-mail and Internet Fax functions enable you to send scanned images as a file
attachment in an e-mail to the specified e-mail address on the network. To use these
functions, set up the e-mail setting for your machine.
C
HECKING
THE
E
-
MAIL
SETTINGS
OF
THE
COMPUTER
If a network administrator specifies the values such as a mail server account, password and
email address for your machine, note them in the “Setup Information Form,” on page 9,
otherwise follow the procedure below.
1. Click Start > Windows Live Mail.
2. From the drop-down menu, select Tools > Accounts.
If the menu bar is not displayed, click the Menus icon and then select Show menu
bar.
3. Select the default mail account and then click Properties.
NOTE
The default administrator password is “aaaaaa”.
Passwords are case sensitive.
NOTE
The procedure below uses Windows Live Mail on Windows 7. If you are using
different email software, refer to the manual for the email software.
Configuring the network settings > 11
4. On the General tab, note the Name and E-mail address in the “Setup Information
Form,” on page 9.
5. Click the Server tab, and then note each of the settings as shown:
If My server requires authentication is selected, enter SMTP”.
If it is not selected, enter “POP”.
6. Select My server requires authentication and then click Settings.
7. Refer to the Outgoing Mail Server dialog box, and note the settings in the “Setup
Information Form,” on page 9.
If Use the same settings as my incoming mail server is selected, enter the same
values as above.
If Log on using is selected, note the Account name and Password.
B-9
B-10
B-3
B-2
B-7
B-8
B-5
B-6
Configuring the network settings > 12
S
ETTING
THE
E
-
MAIL
ADDRESS
FOR
YOUR
MACHINE
Enter an e-mail address to be used by your machine in the “Setup Information Form,” on
page 9.
> If the e-mail address for your machine is specified by the network administrator,
enter the email address in B-1.
> If you are using an Internet Service Provider, obtain an e-mail address for your
machine from the provider and then enter the e-mail address in B-1.
> If the e-mail address for your machine is neither specified nor obtained, determine
the e-mail address according to the value you entered in authentication method:
> If authentication method is “SMTP”, determine an e-mail address and enter it
in B-1.
> If authentication method is “POP”, enter the same e-mail address as B-12 in
B-1.
NOTE
If you want your machine to receive e-mail, you must obtain an e-mail
address for your machine from a network administrator or your Internet
Service Provider.
Configuring the network settings > 13
C
ONFIGURING
YOUR
MACHINE
FOR
SCAN
TO
E
-
MAIL
AND
INTERNET
FAX
Set up your machine for Scan To E-mail and Internet Fax using the information in the
“Setup Information Form,” on page 9.
1. Press the SETTING button on the control panel.
2. Using the Down arrow key, scroll to Easy Setup and press OK.
3. Using the arrow keys and on-screen keypad, enter the Administrator password.
Highlight Enter and press OK.
4. Using the Down arrow key, scroll to E-mail Setting and then press the Right
arrow key.
5. Press the Right arrow key, then enter the SMTP server address (B-2) using the
arrow keys and on-screen keypad.
6. Highlight Enter and then press OK.
7. Press the Right arrow key, then enter the e-mail address for your machine (B-
1) using the arrow keys and on-screen keypad.
8. Highlight Enter and then press OK.
9. Select a protocol for the Receive Settings (B-4) by using the Up or Down arrow
keys and then press OK.
10. Select an authentication method (B-5) by using the Up or Down arrow keys and
then press OK.
11. Press the Right arrow key, then enter the SMTP user ID (B-6) using the arrow
keys and on-screen keypad.
12. Highlight Enter and then press OK.
13. Press the Right arrow key, then enter the SMTP password (B-7) using the arrow
keys and on-screen keypad.
14. Highlight
Enter and then press OK.
15. Press the Right arrow key, then enter the POP-3 server address (B-3) using the
arrow keys and on-screen keypad.
16. Highlight Enter and then press OK.
17. Press the Right arrow key, then enter the POP-3 user ID (B-8) using the arrow
keys and on-screen keypad.
18. Highlight Enter and then press OK.
19. Press the Right arrow key, then enter the POP password (B-9) using the arrow
keys and on-screen keypad.
20. Highlight Enter and then press OK.
21. When the setup menu screen is displayed, press OK.
The setup for Scan To E-mail and Internet Fax is complete.
NOTE
The default password is “aaaaaa”.
Configuring the network settings > 14
S
ETTING
UP
SCAN
TO
NETWORK
PC
The Scan To Network PC function enables you to send and save scanned images to the
“shared folder” of a computer on the network. To use this function, register your machine
on the computer as a user and create a shared folder, and then create a profile on your
machine to register the settings for the computer.
C
HECKING
THE
NAME
OF
THE
COMPUTER
Check the name of the computer following the procedure below, and fill in C-1 of the “Setup
Information Form,” on page 9.
Windows 7, Windows Server 2008 R2, Windows Server 2008 and Vista
1. Click Start > Control Panel.
2. Select System and Security.
For Windows Server 2008 and Windows Vista, select System and Maintenance.
3. Click System > See the name of this computer.
4. Note the Computer name in C-1.
5. Close the window.
NOTE
Before starting the setup, get permission from the network administrator to
create a shared folder on the computer by following the procedure below.
The CIFS protocol is used in this procedure.
NOTE
The procedure below uses Windows 7 as an example. The display may differ
depending on the operating system.
C-1
Configuring the network settings > 15
Windows Server 2003 and Windows XP
1. For Windows Server 2003, click Start > Control Panel > System.
For Windows XP, click Start > Control Panel > Performance and Maintenance >
System.
2. Select the Computer Name tab and then click Change.
3. Note the Computer name in C-1.
4. Click Cancel to close the window.
Configuring the network settings > 16
D
ETERMINING
THE
NAMES
OF
THE
ITEMS
REQUIRED
FOR
SCAN
TO
NETWORK
PC
Determine the names of the following items and fill in C-2 to C-6 on the “Setup Information
Form,” on page 9.
> User name to log into the destination computer (C-2)
> Password to log into the destination computer (C-3)
> Profile name to register the settings on your machine (C-4)
> Shared folder name on the destination computer (C-5)
> File name of the scanned data (C-6)
C
ONFIGURING
THE
COMPUTER
FOR
SCAN
TO
NETWORK
PC
Register your machine on the computer as a user and then set up a shared folder to which
scanned images are sent and saved.
Windows 7, Windows Server 2008 R2, Windows 2008 and Windows Vista
1. Click Start > Control Panel.
2. Select Add or remove user accounts.
3. Select Create a new account.
4. Enter the user name (C-2) in the text box.
5. Ensure that Standard user is selected, and then click Create Account.
6. Click the icon of the user account created in step 5.
NOTE
If the computer is in a domain, the procedure of adding a user account may
be different to the procedure below.
Refer to Windows help.
NOTE
The procedure below uses Windows 7 as an example. The display may differ
depending on the operating system.
C-2
Configuring the network settings > 17
7. Select Create a password.
8. Enter the password (C-3) in New password and Confirm for new password,
and then click Create password.
9. Close the control panel.
10. Create a new folder on the computer with the shared folder name entered in C-5.
11. Right-click the folder created in step 10 and select Properties.
12. Select the Sharing tab and then click Share.
NOTE
It is recommended that you create a folder in the local drive, not on the
desktop or “My Documents”.
Configuring the network settings > 18
13. Select the user account created in step 5 from the drop down box, then click Add.
14. Select the user added in step 13 and select the permission level, then click Share.
15. Click Done.
16. Click Advanced Sharing on the Sharing tab.
17. Click Permissions.
Configuring the network settings > 19
18. Select the user added in step 13 and select the Allow check box for Full Control,
then click OK.
19. Close the folder’s property dialog box.
Windows Server 2003
1. Click Start > Administrative Tools > Server Management.
2. Click Users.
3. Select Add a user.
4. Enter the user name (C-2) in the First name text box and then click Next.
5. Enter the password (C-3) in Password and Confirm password.
6. Select the Cannot change password and then click Next.
7. Click Finish.
8. Click Close.
9. Create a new folder on the computer with the shared folder name entered in C-5.
10. Right-click the folder created in step 9, and then select Sharing and Security.
11. On the Sharing tab, select Share this folder and then click Permissions.
12. Click Add.
13. Enter the user name (C-2) and then click Check Names.
14. Check that the user name (C-2) is displayed, and then click OK.
15. Select the Allow check box for Full Control, and then click OK.
NOTE
Create a profile to complete the setup for Scan To Network PC. Refer to
“Creating a profile for scan to network PC” on page 21.
NOTE
It is recommended that you create a folder in the local drive, not on the
desktop or “My Documents”.
Configuring the network settings > 20
16. Close the folder’s property dialog box.
Windows XP
1. Click Start > Control Panel.
2. Double-click User Accounts.
3. Select Create a new account.
4. Enter the user name (C-2) in the text box and click Next.
5. Select Limited and click Create Account.
6. Click the icon of the user account created in step 5.
7. Select Create a password.
8. Enter the password (C-3) in Type a new password and Type the new
password again to confirm, and then click Create Password.
9. Close the control panel.
10. Create a new folder on the computer with the shared folder name entered in C-5.
11. Right-click the folder created in step 10, and then select Sharing and Security.
12. Click If you understand the security risks but want to share files without
running the wizard, click here..
13. Select Share this folder in Windows Firewall, and then click OK.
14. Select the Share this folder on the network and Allow network users to
change my files check box, and then click OK.
15. Select the Allow check box for Full Control, and then click OK.
NOTE
Create a profile to complete the setup for Scan To Network PC. Refer to
“Creating a profile for scan to network PC” on page 21.
NOTE
It is recommended that you create a folder in the local drive, not on the
desktop or “My Documents”.
NOTE
If a pop-up screen displays, select Share this folder and click Permissions.
Proceed to step 15.
NOTE
Create a profile to complete the setup for Scan To Network PC. Refer to
“Creating a profile for scan to network PC” on page 21.
Configuring the network settings > 21
M
ANAGING
PROFILES
C
REATING
A
PROFILE
FOR
SCAN
TO
NETWORK
PC
Register the information you configured on the computer as a profile. It is necessary when
you perform Scan To Network PC with the computer.
1. Press the SETTING button on the control panel to prompt the Setting screen.
2. Using the Down arrow key, scroll to Profile and press OK.
3. Select the desired profile number.
4. Press the Right arrow key to prompt the Operation Menu screen.
From here you can register or sort profiles.
5. When registering a new profile, press the Right arrow key to prompt the Profile
screen.
6. Ensure Profile Name: is highlighted then press the Right arrow key.
7. Using the arrow keys and on-screen keypad, enter the information in C-4.
8. Using the arrow keys, highlight Enter and press OK.
9. Using the Down arrow key, scroll to Target URL then press the Right arrow key.
10. Using the arrow keys and on-screen keypad, enter the name of the destination
computer (C-1) and the shared folder name (C-5) as “\\name of the
destination computer\shared folder name”.
11. Using the arrow keys, highlight Enter and press OK.
12. Using the Down arrow key, scroll to User Name then press the Right arrow key.
13. Using the arrow keys and on-screen keypad, enter a suitable user name (C-2).
14. Using the arrow keys, highlight Enter and press OK.
15. Using the Down arrow key, scroll to Password then press the Right arrow key.
16.
Using the arrow keys and on-screen keypad, enter a suitable password (C-3).
17. Using the arrow keys, highlight Enter and press OK.
18. Using the Down arrow key, scroll to File Name then press the Right arrow key.
19. Using the arrow keys and on-screen keypad, enter a suitable file name (C-6).
20. Using the arrow keys, highlight Enter and press OK.
21. Configure other items if necessary, for example:
\\PC1\SalesDev
NOTE
MC562/ES5462 MFP only: You can also use the qwerty keyboard to enter details.
NOTE
If domain management is done, enter “
user name@domain name”.
NOTE
You can enter up to 64 characters.
By adding “#n” to the end of the file name, a serial number is automatically
assigned to the end of the name of sent files.
By adding “#d” to the end of the file name, a date is automatically assigned
to the end of the name of sent files.
Configuring the network settings > 22
22. Press OK to register the settings and save the profile entry.
The setup for Scan To Network PC is complete.
D
ELETING
A
NETWORK
PROFILE
To delete a network profile:
1. Press the SETTING button on the control panel to prompt the Setting screen.
2. Using the Down arrow key, scroll to Profile List and press OK.
3. Select the desired profile number.
4. Ensure Delete is highlighted then press the Right arrow key.
5. At the prompt:
> press OK to continue deleting the profile entry,
or...
> use the Right arrow key to highlight No, then press OK to cancel.
Configuring the network settings > 23
M
ANAGING
THE
ADDRESS
BOOK
S
ETTING
SENDER
AND
REPLY
TO
E
-
MAIL
ADDRESSES
(
FROM
/
REPLY
TO
)
You can set the e-mail address from which e-mails are sent and the address to which
responses are sent.
1. Press the SETTING button.
2. Using the Down arrow key, scroll to Admin Setup and then press OK.
3. Using the arrow keys and on-screen keyboard, enter the administrator password.
4. Select Enter and then press OK.
5. Using the Down arrow key, scroll to Scanner Setup and then press OK.
6. Using the Down arrow key, scroll to E-mail Setup and then press OK.
7. Using the Down arrow key, scroll to From/Reply to and then press OK.
8. Using the Down arrow key, scroll to E-mail Sender ID and then press OK.
9. Using the on-screen keyboard, enter the e-mail address up to 80 characters.
10. Select Enter and then press OK.
11. Using the Down arrow key, scroll to Close and then press OK.
12. Press the RESET/LOGOUT button.
NOTE
The default password is “aaaaaa”.
MC562/ES5462 MFP only: You can also use the qwerty keyboard to enter details.
NOTE
MC562/ES5462 MFP only: You can also use the qwerty keyboard to enter details.
NOTE
You can select e-mail addresses from the address book.
Configuring the network settings > 24
C
REATING
E
-
MAIL
TEMPLATES
You can create up to five e-mail templates with various subject lines and body text.
Registering a subject
1. Press the SETTING button.
2. Using the Down arrow key, scroll to Admin Setup and then press OK.
3. Using the arrow keys and on-screen keyboard, enter the administrator password.
4. Select Enter and then press OK.
5. Using the Down arrow key, scroll to Scanner Setup and then press OK.
6. Using the Down arrow key, scroll to E-mail Setup and then press OK.
7. Using the Down arrow key, scroll to Template and then press OK.
8. Make sure that Edit Subject is selected and then press OK.
9. Using the Down arrow key, select a template entry number and then press OK.
10. Using the on-screen keyboard, enter the subject up to 80 characters.
11. Select Enter and then press OK.
Registering body text
1. Follow steps 1 to 7 in “Registering a subject” on page 24.
2. Using the Down arrow key, scroll to Edit Body and then press OK.
3. Using the on-screen keyboard, enter the body text up to 256 characters.
4. Select Enter and then press OK.
NOTE
The default password is “aaaaaa”.
MC562/ES5462 MFP only: You can also use the qwerty keyboard to enter details.
NOTE
MC562/ES5462 MFP only: You can also use the qwerty keyboard to enter details.
NOTE
MC562/ES5462 MFP only: You can also use the qwerty keyboard to enter details.
Configuring the network settings > 25
A
DDING
AN
E
-
MAIL
ADDRESS
ENTRY
TO
THE
ADDRESS
BOOK
The machine can hold up to 100 e-mail addresses in the address book. To assign a new
e-mail address to the address book:
1. Press the SETTING button on the control panel.
2. Using the Down arrow key, scroll to Address Book and press OK.
3. Press OK to select E-mail Address.
4. Using the arrow keys, scroll to the required entry position and press OK.
5. Press OK to select Register.
6. Press the Right arrow key to select Name.
7. Using the keypad or arrows keys and the on-screen keypad, type in the name.
8. Highlight Enter and press OK.
9. Using the Down arrow key, scroll to E-mail Address and press the Right arrow
key.
10.
Using the keypad or arrows keys and the on-screen keypad, type in the new e-mail address.
11. Highlight Enter and press OK.
12. If required, use the arrow keys and scroll to Group No. then press the Right arrow
key.
13. Using the arrow keys, select the group number to assign the e-mail address to and
press OK.
The check box is selected. You can select multiple entries.
14. Press the Right arrow key to complete.
15. Press OK to confirm.
16. Press OK once more to add your entry to the address book.
17. Press the Left arrow key to exit the menu.
D
ELETING
AN
E
-
MAIL
ADDRESS
ENTRY
FROM
THE
ADDRESS
BOOK
To delete an e-mail address entry from the address book:
1. Press the SETTING button on the control panel.
2. Using the Down arrow key, scroll to Address Book and press OK.
3. Press OK to select E-mail Address.
4. Using the arrow keys, scroll to the required entry position and press OK.
5. Using the arrow keys, scroll to Delete and press OK.
6. At the prompt select Yes to continue or select No to cancel the operation.
7. Press OK.
8. Press the Left arrow key to exit the menu.
NOTE
The maximum length of name is 16 characters.
If you do not enter a name, this column remains blank.
NOTE
The maximum length of address is 80 characters.
Configuring the network settings > 26
M
ODIFYING
AN
E
-
MAIL
ADDRESS
ENTRY
FROM
THE
ADDRESS
BOOK
To edit an e-mail address entry from the address book:
1. Press the SETTING button on the control panel.
2. Using the Down arrow key, scroll to Address Book and press OK.
3. Press OK to select E-mail Address.
4. Using the arrow keys, scroll to the required entry position and press OK.
5. Press OK to select Edit.
6. Modify the Name, E-mail Address and/or Group No. details as required then press
OK.
7. Press the Left arrow key to exit the menu.
S
ORTING
E
-
MAIL
ADDRESSES
IN
THE
ADDRESS
BOOK
To sort e-mail addresses in the address book:
1. Press the SETTING button on the control panel.
2. Using the Down arrow key, scroll to Address Book and press OK to enter the
address book.
3. Select E-mail Address and press OK to enter e-mail adress list.
4. Press OK to show the operation menu.
5. Using the arrow keys, scroll to Sort By Name or Sort By Number, and press OK.
Then the addresses will be sorted depending on the selection.
S
EARCHING
AN
E
-
MAIL
ADDRESS
ENTRY
IN
THE
ADDRESS
BOOK
To search an e-mail address entry in the address book:
1. Press the SETTING button on the control panel.
2. Using the Down arrow key, scroll to Address Book and press OK to enter the
address book.
3. Select E-mail Address and press OK to enter e-mail adress list.
4. Press OK to show the operation menu.
5. Using the arrow keys, scroll to Search, and press OK to enter the input window.
6. Using the on-screen keyboard to enter the key word for searching.
7. After key word inputing, select Enter and press OK.
The entries will be sort by name, and the matched entry will have focus.
NOTE
MC562/ES5462 MFP only: You can also use the qwerty keyboard to enter details.
Configuring the network settings > 27
A
DDING
A
GROUP
ENTRY
TO
THE
ADDRESS
BOOK
The machine can hold up to 20 group addresses. To add a new group address to the address
book:
1. Press the SETTING button on the control panel.
2. Using the Down arrow key, scroll to Address Book and press OK.
3. Using the Down arrow key, scroll to E-mail Group and press OK.
4. Using the arrow keys, scroll to the required entry position and press OK.
5. Press OK to select Register.
6. Press the Right arrow key to select Name.
7. Using the keypad or arrows keys and the on-screen keypad, type in the name.
8. Highlight Enter and press OK.
9. Using the Down arrow key, scroll to Address No. and press the Right arrow key.
10. Using the arrow keys, select the destination to assign the e-mail group to and press
OK.
The check box is selected. You can select multiple entries.
11. Press the Right arrow key to complete.
12. Press OK to confirm.
13. Press OK once more to add your entry to the address book.
14. Press the Left arrow key to exit the menu.
D
ELETING
A
GROUP
ADDRESS
ENTRY
FROM
THE
ADDRESS
BOOK
To delete a group address entry from the address book:
1. Press the SETTING button on the control panel.
2. Using the Down arrow key, scroll to Address Book and press OK.
3. Using the Down arrow key, scroll to E-mail Group and press OK.
4. Using the arrow keys, scroll to the required entry position and press OK.
5. Using the arrow keys, scroll to Delete and press OK.
6. At the prompt select Yes to continue or select No to cancel the operation.
7. Press OK.
8. Press the Left arrow key to exit the menu.
NOTE
The maximum length of name is 16 characters.
Configuring the network settings > 28
M
ODIFYING
A
GROUP
ADDRESS
ENTRY
FROM
THE
ADDRESS
BOOK
To edit a group address entry from the address book:
1. Press the SETTING button on the control panel.
2. Using the Down arrow key, scroll to Address Book and press OK.
3. Using the Down arrow key, scroll to E-mail Group and press OK.
4. Using the arrow keys, scroll to the required entry position and press OK.
5. Press OK to select Edit.
6. Modify the Name and/or Address No. details as required then press OK.
7. Press the Left arrow key to exit the menu.
S
ORTING
GROUP
ADDRESS
ENTRIES
IN
THE
ADDRESS
BOOK
To sort group address entries in the address book:
1. Press the SETTING button on the control panel.
2. Using the Down arrow key, scroll to Address Book and press OK to enter the
address book.
3. Select E-mail Group and press OK to enter e-mail group list.
4. Press OK to show the operation menu.
5. Using the arrow keys, scroll to Sort By Name or Sort By Number, and press OK.
Then the groups will be sorted depending on the selection.
S
EARCHING
A
GROUP
ADDRESS
ENTRY
IN
THE
ADDRESS
BOOK
To search a group address entry in the address book:
1. Press the SETTING button on the control panel.
2. Using the Down arrow key, scroll to Address Book and press OK to enter the
address book.
3. Select E-mail Group and press OK to enter e-mail group list.
4. Press OK to show the operation menu.
5. Using the arrow keys, scroll to Search, and press OK to enter the input window.
6. Using the on-screen keyboard to enter the key word for searching.
7. After key word inputing, select Enter and press OK.
The groups will be sort by name, and the matched entry will have focus.
NOTE
MC562/ES5462 MFP only: You can also use the qwerty keyboard to enter details.
Configuring the scanning to Local and Remote PCs > 29
C
ONFIGURING
THE
SCANNING
TO
L
OCAL
AND
R
EMOTE
PC
S
U
SING
D
RIVERS
AND
S
OFTWARE
This section explains how to use the scanner driver and utilities. They allow you to scan
documents and change settings easily on your computer.
U
SING
TWAIN D
RIVER
Starting a Scan Job (for Windows)
1. Place your document with text face up in the ADF or face down on the document
glass.
2. Press the SCAN key.
3. Press the to select Remote PC and then press OK.
4. Start PaperPort on your computer.
5. Click Select and then select the scanner driver of the machine.
A window appears.
6. Click the Scan.
7. Click the scan buttons.
The scan job starts.
8. Click Quit.
MEMO
The explanations in this section use PaperPort in Windows and Adobe
Photoshop CS3 in Mac OS X as an example.
In this section, procedures using Scan To Remote PC with USB connection
are described. For how to connect to the network and start to scan by Scan
To Local PC, refer to the User's Guide.
NOTE
To use this function, applications supporting TWAIN (PaperPort or Adobe
Photoshop CS3, etc.) should be installed in your computer.
REFERENCE
For details on how to start a scan job, refer to the User's Guide.
Configuring the scanning to Local and Remote PCs > 30
9. When there is no continued page or the back side is not scanned, click Quit.
Changing Settings
You can adjust how the document is scanned by changing the driver setting.
The following explains the setting items.
Simple Mode
You can change the settings of five registered buttons.
1. Follow the procedure for “Starting a Scan Job (for Windows)” on page 29 through
step 6.
2. Select Simple from Mode.
3. Click Settings.
A window appears.
4. Click the scan button to change the settings.
5. Click OK.
6. If you start a scan job, click the scan button.
If you want to finish the setting, click Quit.
Advanced Mode
You can adjust in detail how a document is scanned.
1. Follow the procedure for “Starting a Scan Job (for Windows)” on page 29 through
step 6.
2. Select Advanced from Mode.
3. Change the settings if necessary.
MEMO
The following five buttons are registered as default settings.
Scan Photograph
Scan Magazine
Scan for OCR
Scan for Internet
Customize
Configuring the scanning to Local and Remote PCs > 31
4. Click Scan to start scanning.
If you want to finish the setting, click Quit.
Starting a Scan Job (for Mac OS X)
1. Press the SCAN key on the operator panel.
2. Place your document with text face up in the ADF or face down on the document
glass.
3. Press the to select Remote PC and then press OK.
4. Start Adobe Photoshop CS3 on your computer.
5. Select Import from File and then select OKI MC5(3)x2_ES5(3)4x2 USB or OKI
MC5(3)x2_ES5(3)4x2 Network.
> When OKI MC5(3)x2_ES5(3)4x2 USB is selected, proceed to the step 9.
> When OKI MC5(3)x2_ES5(3)4x2 Network is selected, the network scan is the second
or later time, proceed to the step 9.
6. For the first network scan, the dialog box indicating that the tool for selecting a
connection destination is started is displayed. Then, click OK.
7. On the dialog box of Scan Settings, select a connection destination to register host
information if necessary, and then click OK.
8.
Select
Import
from
File
of Adobe Photoshop CS3 and select
OKI MC5(3)x2_ES5(3)4x2
Network
.
The windows appears.
9. Click the scan button.
Scanning starts.
10. Select Quit Photoshop from Photoshop.
Changing Settings (for Macintosh)
You can adjust how the document is scanned by changing the driver setting.
The following explains the setting items.
Simple Mode
You can change the settings of five registered buttons.
1. Follow the procedure for “Starting a Scan Job (for Mac OS X)” on page 31 through
step 8.
2. Select Simple from Mode.
3. Click Settings.
A window appears.
4. Click the scan button to change the settings.
5. Click OK.
6. If you start a scan job, click the scan button.
If you want to finish the setting, click Quit.
REFERENCE
For details on how to change each setting, refer to the online help.
Configuring the scanning to Local and Remote PCs > 32
Advanced Mode
You can adjust in detail how a document is scanned.
1. Follow the procedure for “Starting a Scan Job (for Mac OS X)” on page 31 through
step 8.
2. Select Advanced from Mode.
3. Change the settings if necessary.
4. Click Scan to start scanning.
If you want to finish the setting, click Quit.
U
SING
WIA D
RIVER
The WIA driver does not support the network scan function. Connect the machine with the
computer via USB or WSD Scan.
The WIA driver does not support Mac OS X.
The WIA 2.0 driver supports Windows 7/ Windows Server 2008 R2.
The WIA 1.0 driver supports Windows Vista/ Windows Server 2008/ Windows XP/ Windows
Server 2003.
Starting a Scan Job
1. Place your document with text face up in the ADF or face down on the document
glass.
2. Press the SCAN key.
3. Press the to select Remote PC and then press OK.
4. Start PaperPort on your computer.
5. Click Select and then click WIA: MC5(3)x2/ES5(3)4x2.
6. Click Scan.
7. Select a paper feeding method.
8. Select a document type.
9. Specify the area to be scanned.
10. Click Scan.
11. Click Cancel when scanning is finished.
12. When there is no continued page or the back side is not scanned, click Finish.
The scanned image is displayed in PaperPort.
Using Windows FAX and Scan
“Windows FAX and Scan” is a function used in Windows Vista/ 7.
1. Place your document with text face up in the ADF or face down on the document
glass.
2. Press the SCAN key.
3. Press the to select Remote PC and then press OK.
MEMO
The explanations in this section use PaperPort as an example, and may differ
from the description depending on your application.
Configuring the scanning to Local and Remote PCs > 33
4. Click Start on your computer, and select All Programs > Windows FAX and Scan.
5. Click New Scan.
6. Select MC5(3)x2/ES5(3)4x2 and click OK.
7. Make additional setting if necessary.
8. Click Scan.
9. Exit Windows FAX and Scan.
U
SING
ICA D
RIVER
The ICA driver is not compatible with the Windows OS.
The ICA driver supports the Mac OS X 10.6/10.7.
Start to read
1. Press the Scan key on the control panel.
2. Place your document with text face up inthe ADF or face down on the document
glass.
3. Press the to select Remote PC and then press OK.
4. Start image capture on your computer.
5. Select the machine from the list at the left to the image capture screen.
6. Click the Scan.
Scanning will start.
7. From the Image Capture, select Close Image Capture.
Change settings
You can adjust the document scan by changing the current driver settings.
The following explains each item to set.
Display the detailed information
You can adjust the document scanning in details.
1. Follow steps 1 to 5 of “Start to read” section.
NOTE
Some examples of image capture are used in the following procedure. The
steps and menus may differ depending on the application you use.
Configuring the scanning to Local and Remote PCs > 34
2. Click on Display the detailed information.
3. Change the settings as required.
4. Click Scan to scan the document.
U
SING
A
CT
K
EY
S
OFTWARE
Using the ActKey, you can start a scan job in specified settings with a click a button.
Installing the Software
1. Insert the “Software DVD-ROM” into your computer.
A window opens.
2. Select ActKey from Software.
3. Install the software as instructed.
4. Click Finish.
Starting the Software
1. Click Start to select All Programs > Okidata > ActKey > ActKey.
Starting ActKey when Scanning to a Local PC
You can set ActKey to start when you select Local PC on the machine.
1. Click Start to select Control Panel.
2. Enter View scanners and cameras in Search Control Panel.
3. Click the View scanners and cameras under Devices and Printers.
4. Select MC5(3)x2/ES5(3)4x2 and click Properties.
If the User Account Control dialog box appears, click Yes.
5. Click the Events tab.
6. Select an event for Select an event.
7. Select the Start this program check box and then select ActKey.
8. Repeat steps 6 and 7 so that ActKey is set to all events.
9. Click OK.
MEMO
ActKey does not support Mac OS X.
When ActKey is installed, Network Configuration is also installed
simultaneously. For Network Configuration, refer to “Using Network
Configuration” on page 35.
REFERENCE
For details on how to start a scan job, refer to the User's Guide.
Configuring the scanning to Local and Remote PCs > 35
Fax Transmission of Scanned Documents
Using the fax service of the Windows component, you can send a scanned document.
1. Start ActKey on your computer.
2. Press the SCAN key on the operator panel of the machine.
3. Press the to select Remote PC and then press OK.
4. Place your document with text face up in the ADF or face down on the document
glass.
5. Click PC-Fax scan button of ActKey on your computer.
The Fax Setup starts.
6. Follow the on-screen instructions to send a fax.
Setting the Scan Button
You can change the settings of four scan buttons.
1. Start ActKey.
2. Select Button settings from Options menu.
3. Click a button you want to set.
4. Change the settings if necessary.
5. Click OK.
Using Network Configuration
Network Configuration is a tool to set in advance when executing Scan To Local PC. In
addition, if the information including the device and IP address of the computer, etc. is
changed when performing network scan, the setting value can be changed by this tool.
When installing ActKey, Network Configuration is also installed simultaneously.
Network Configuration will be automatically run when you log on windows if you select it in
task tray menu.
When starting Network Configuration, the scanner driver installed in the computer is
displayed.
NOTE
The direction to load the paper can not be changed after scanning the
documents.
This function uses the fax service of the Windows component.
MEMO
For PC-FAX function, the resolution is fixed to 200dpi and the color mode is
fixed to black and white.
Configuring the scanning to Local and Remote PCs > 36
> Method to add a new network scanner
To add a new network scanner, select Add Scanner from the Scanner menu, and
select scanner driver name of the added scanner.
> Method to change a scanner driver name
When a scanner driver name has been changed, select Edit Driver Name from
the Scanner menu and then change the scanner driver name.
> Method to change the setting information of the machine
When the IP address of the machine and port number of the machine have been
changed, start Network Configuration and then select Edit Scanner from the
Scanner menu.
The setting value set in the current computer is displayed, and then change the IP
address and port number of the machine.
> Method to set Scan To Local PC
To execute Scan To Local PC, you need to register the computer name, IP address
and port number in the machine.
After installing the scanner driver, start Network Configuration and select the
driver to be used. Then, select Properties from the Scanner menu and select the
Register tab. As the computer information, the computer name, IP address and
port number are displayed. The computer name does not have to be set since the
computer's host name is automatically acquired.
Although the setting value of the computer is automatically displayed for the IP
address, if multiple network cards are installed in the computer, multiple IP
addresses are displayed. Select the IP address of the network card currently used.
Further more, for the port number, the current setting is displayed. If you need to
change, change the setting.
After all settings are complete. Click Register button to register the setting in the
machine.
Configuring the scanning to Local and Remote PCs > 37
If the machine is tuned off and cannot be connected, an error occurs when
registering. After registering, if the computer's name, IP address or port number
is changed, you need to register again with the above procedure.
> Method to delete network-connected PCs of the machine
If you registered several network-connected PCs in the machine, you can delete
them.
Select Properties from the Scanner menu and select Unregister tab. The
registered information is displayed. Select the registered information to be deleted
from the machine, and click Unregister button.
Configuring the scanning to Local and Remote PCs > 38
U
SEFUL
F
UNCTIONS
FOR
S
CANNING
TO
L
OCAL
AND
R
EMOTE
PC
S
This section explains useful functions for scanning to local and remote PCs.
S
ETTING
PC S
CAN
M
ODE
You can select either simple scan mode or secure scan mode for scanning to local PC
function.
1. Press the SETTING key.
2. Press the to select Admin Setup and then press OK.
3. Enter the administrator password.
4. Select Enter and then press OK.
5. Press the to select Scanner Setup and then press OK.
6. Press the to select TWAIN Setup and then press OK.
7. Press the to select PC Scan Mode and then press OK.
8. Press the to select a mode and then press OK.
9. Press the until the top screen appears.
E
NABLING
THE
N
ETWORK
TWAIN S
ETTINGS
Do the following procedure to use scan to the local PC and scan to remote PC functions
connecting to network.
1. Press the SETTING key.
2. Press the to select Admin Setup and then press OK.
3. Enter the administrator password.
4. Select Enter and then press OK.
5. Press the to select Scanner Setup and then press OK.
6. Press the to select TWAIN Setup and then press OK.
7. Check that Network TWAIN is selected and then press OK.
8. Press the to select ON and then press OK.
9. Press the until the top screen appears.
E
NABLING
THE
WSD S
CAN
To use both the Scan To Local PC (WSD Scan) function and the Scan To Remote (WSD
Scan) function via the WSD Scan connection, follow the steps below.
1. Press the SETTING key.
MEMO
To enter the Admin Setup menu, a password is necessary. The default
password is aaaaaa".
NOTE
If you select Disable on this function, you cannot use scan to local PC and
scan to remote PC via network.
Configuring the scanning to Local and Remote PCs > 39
2. Press the to select Admin Setup and then press OK.
3. Enter the administrator password.
4. Select Enter and press OK.
5. Press the to select Scanner Setup and then press OK.
6. Press the to select WSD Scan Setup and then press OK.
7. Check that WSD Scan is selected, and then press OK.
8. Press the to select ON and then press OK.
9. Press the until the top screen appears.
S
ELECTING
THE
D
UAL
-S
IDE
S
CAN
OF
WSD S
CAN
FUNCTION
To enable the Dual-Side Scan of the Scan To Local PC (WSD Scan) function and Scan To
Remote (WSD Scan) function, follow the steps below.
1. Press the SETTING key.
2. Press the to select Admin Setup and then press OK.
3. Enter the administrator password.
4. Select Enter and press OK.
5. Press the to select Scanner Setup and then press OK.
6. Press the to select WSD Scan Setup and then press OK.
7. Press the to select Binding and then press OK.
8. Select Long Edge Bind or Short Edge Bind according to the scan document, and
press OK.
9. Press the until the top screen appears.
D
ELETING
A
S
CANNER
D
RIVER
You can delete scanner drivers.
For Windows
1. Click on Start, and then select Control Panel > Uninstall a program.
2. Select OKI MC5(3)x2/ES5(3)4x2 Scanner and click on Uninstall.
If the User Account Control dialog box appears, click Yes.
3. If a confirmation message appears, click Yes.
4. Click Finish on the Uninstallation Complete screen.
For Mac OS X
1. From the hard disk, select Library > Image Capture > TWAIN Data Sources.
2. Depending on the method of connection of the machine, the following files will be
deleted.
NOTE
You must be logged on as an administrator to complete this procedure.
Configuring the scanning to Local and Remote PCs > 40
> Network connection:
OKI MC5(3)x2_ES5(3)4x2 Network Driver.ds
> USB connection:
OKI MC5(3)x2_ES5(3)4x2 USB Driver.ds
3. Close the TWAIN Data Sources dialog box.
4. From the hard disk, select Library > Image Capture > Devices.
5. Delete the OKI Scanner.
6. Close the Devices dialog box.
7. From the hard disk, select Applications > Okidata > Scanner.
8. Delete network scanner setup tool.
9. Restart the computer.
U
PDATING
A
S
CANNER
D
RIVER
You can update scanner drivers.
For Windows
1. Click on Start, right click Computer Select Properties.
2. Click Device Manager.
If the User Account Control dialog box appears, click Yes.
3. Right click the MC5(3)x2/ES5(3)4x2 icon on Imaging Device and click on
Properties.
4. Check the version of the scanner driver on the Drivers.
5. Delete the scanner driver.
6. Install a new scanner driver.
For Mac OS X
1. Delete the scanner driver.
2. Install a new scanner driver.
NOTE
You must be logged on as an administrator to complete this procedure.
REFERENCE
“Deleting a Scanner Driver” on page 39.
REFERENCE
For details on how to install a driver, refer to the User's Guide.
REFERENCE
“Deleting a Scanner Driver” on page 39.
REFERENCE
For details on how to install a driver, refer to the User's Guide.
Configuring the fax settings (MC362 and MC562 and ES5462 MFP) > 41
C
ONFIGURING
THE
FAX
SETTINGS
(MC362
AND
MC562
AND
ES5462 MFP)
B
ASIC
SETUP
Minimum configuration requirements; a PSTN telephone line connection.
If you wish to connect an external telephone or answering machine, refer to “Adding a
telephone handset” on page 44.
Your MFP has to be set up properly to allow faxing from the machine. The following
parameters must be set before using the fax function:
> Date and time
> Local fax number
> Sender ID
There are other parameters that can be adjusted to suit your personal preferences later if
required, refer to fax set up table for details (See “Advanced set up” on page 42).
To set fax parameters:
1. Press the SETTING button on the control panel.
2. Using the Down arrow key, scroll to Easy Setup and press OK.
3. Using the arrow keys and on-screen keypad, enter the Administrator password.
Highlight Enter and press OK.
4. Press the Right arrow key to select Date/Time Setting.
5. Using the arrow keys, select the correct time zone and press OK.
6. Using the arrow keys, select the correct daylight saving option and press OK.
7. Press OK to select Manual.
8. Using the arrow keys, enter today’s date.
9. Press OK.
10. Using the arrow keys, enter the correct time.
11. Press OK.
12. Using the Down arrow key and scroll to Fax Setting then press Right arrow key.
13. Press the Right arrow key to select Fax Number.
14. Using the keypad and on screen options enter the fax number for this MFP.
15. Highlight Enter and press OK.
NOTE
If you ran the Oki driver installer program from the DVD-ROM you may have
already set the time zone, date and time via the Panel Language Setup utility.
NOTE
The default password is “aaaaaa”.
NOTE
Use the Right and Left arrow keys to move between digits.
NOTE
Use the Right and Left arrow keys to move between digits.
Configuring the fax settings (MC362 and MC562 and ES5462 MFP) > 42
16. Press the Right arrow key to select Sender ID.
17. Using the keypad or arrow keys and on screen keyboard, enter the sender ID.
18. Highlight Enter and press OK.
19. Press OK to complete.
20. Press the Left arrow key to exit the menu.
A
DVANCED
SET
UP
Your machine offers a multitude of features which reduce the time required for manual
operation and make fax communications more efficient.
C
ONNECTING
TO
A
PBX
Private branch exchanges (PBXs) are private telephone systems used to route calls
internally, for example, in a company. When dialling a telephone number, if a prefix is
required to open an outside line, the line is connected to a PBX. If this MFP is going to be
connected to a PBX, please make the following changes to enable it to recognise the prefix
digits in the telephone numbers used to obtain access to the outside line. After dialling the
prefix digits, the MFP will wait until the outside line is available (secondary dial tone
detected) before dialling the rest of the number.
1. Press the SETTING button on the control panel.
2. Using the Down arrow key, scroll to Admin Setup and press OK.
3. Using the arrow keys and on-screen keypad, enter the Administrator password.
Highlight Enter and press OK.
4. Using the Down arrow key, scroll to Fax Setup and press OK.
5. Using the Down arrow key, scroll to Other Settings and press OK.
6. Using the Down arrow key, scroll to Prefix and press OK.
7. Using the keypad, arrow keys and on screen options, enter the required prefix and
press OK.
8. Press the Left arrow key to exit the menu.
NOTE
Maximum 22 characters.
NOTE
By default the country code is set to International. If you need to change this,
refer to “Country Code” on page 114.
If required, set the dialling method for your region (Pulse or Tone). Refer to
“MF(Tone)/DP(Pulse)” on page 130.
If connecting the machine through a private branch exchange (PBX) line, you
must also specify a dial prefix to allow the machine to obtain an external line
before dialling. Refer to “Connecting to a PBX” on page 42.
Configuring the fax settings (MC362 and MC562 and ES5462 MFP) > 43
A
UTOMATIC
REDIAL
You can set the fax to automatically redial if the initial fax transmission fails. The machine
will redial on:
> Line busy
> No answer
> Communication error
To set auto-redial:
1. Press the SETTING button on the control panel.
2. Using the Down arrow key, scroll to Admin Setup and press OK.
3. Using the arrow keys and on-screen keypad, enter the Administrator password.
Highlight Enter and press OK.
4. Using the Down arrow key, scroll to Fax Setup and press OK.
5. Using the Down arrow key, scroll to Other Settings and press OK.
6. Press OK to select the Redial Tries.
7. Using the keypad, enter the required number of redial attempts (between 0 and 9),
then press OK to confirm.
8. Using the Down arrow key, scroll to Redial Interval and press OK.
9. Using the keypad, enter the required redial interval (between 1 and 5 minutes), then
press OK to confirm.
10. Press the Left arrow key to exit the menu.
R
ECEPTION
MODE
You can change the way your MFP handles incoming fax transmissions and telephone calls
(if you have a telephone handset connected) depending on your office requirements.
Choose from:
> Fax Ready Mode
> Tel/ Fa x Re ady Mo de
> Ans/Fax Ready Mode
> Tel Ready Mode
> DRD
To change the reception mode:
1. Press the SETTING button on the control panel.
2. Using the Down arrow key, scroll to Admin Setup and press OK.
3. Using the arrow keys and on-screen keypad, enter the Administrator password.
Highlight Enter and press OK.
4. Using the Down arrow key, scroll to User Install and press OK.
5. Using the Down arrow key, scroll to Reception Mode and press OK.
6. Using the arrow keys, select the required reception mode and press OK.
7. Press the Left arrow key to exit the menu.
The machine behaviour differs depending on the specified reception mode, refer to the
User’s Guide for details.
Configuring the fax settings (MC362 and MC562 and ES5462 MFP) > 44
A
DDING
A
TELEPHONE
HANDSET
If you want to add a telephone handset to your MFP, connect the line to the Tel socket (in
certain countries it may be necessary to use a telephone plug adaptor).
You will also need to update the telephone settings to set the ring response:
1. Press the SETTING button on the control panel.
2. Using the Down arrow key, scroll to Admin Setup and press OK.
3. Using the arrow keys and on-screen keypad, enter the Administrator password.
Highlight Enter and press OK.
4. Using the Down arrow key, scroll to Fax Setup and press OK.
5. Using the Down arrow key, scroll to Other Settings and press OK.
6. Using the Down arrow key, scroll to Ring Response and press OK.
7. Using the arrow keys, select the required response setting (between 1 ring and 20
seconds) and press OK.
8. Press the Left arrow key to exit the menu.
NOTE
You must also set the reception mode to the appropriate setting. See
“Reception mode” on page 43.
NOTE
Dialling for speech purposes is not available using the MFP keypad or speed
dial keys.
Configuring the fax settings (MC362 and MC562 and ES5462 MFP) > 45
M
ANAGING
THE
PHONE
BOOK
The following section describes how to add/remove/modify speed and group dial entries to/
from the Phone Book.
A
DDING
A
SPEED
DIAL
ENTRY
TO
THE
PHONE
BOOK
The machine can hold up to 100 speed dial numbers in the phone book. To add a new speed
dial number to the phone book:
1. Press the SETTING button on the control panel.
2. Using the Down arrow key, scroll to Phone Book and press OK.
3. Press OK to select Speed Dial List.
4. Using the arrow keys, scroll to the required entry position and press OK.
5. Press OK to select Register.
6. Press the Right arrow key to select Name.
7. Using the keypad or arrows keys and the on-screen keypad, type in the name.
8. Highlight Enter and press OK.
9. Using the Down arrow key, scroll to Fax Number and press the Right arrow key.
10. Using the keypad, type in the destination fax number.
11. Highlight Enter and press OK.
12. If required, use the arrow keys and scroll to Group No. then press the Right arrow
key.
13. Using the arrow keys, select the group number to assign the fax number to and
press OK.
The check box is selected. You can select multiple entries.
14. Press the Right arrow key to complete.
15. Press OK to confirm.
16. Press OK once more to add your entry to the phone book.
NOTE
The maximum length of name is 24 characters.
NOTE
The maximum length of number is 40 digits.
If the destination fax number has an “extension number”, press the Pause
button between numbers. The machine will enter a pause when dialling.
If your MFP is connected to a PBX (private branch exchange), you will need to
add a Prefix in order to access to the outside line. Refer to “Connecting to a
PBX” on page 42.
If you need to change the dialling method for the region, press the
Tone
button to change the call parameters for this particular number.
If you make a mistake while entering the number, press the Clear button to
delete the last digit.
NOTE
Numbers registered to groups from the Speed Dial function are synchronized
with the numbers that are registered to groups using the Group No. function.
Configuring the fax settings (MC362 and MC562 and ES5462 MFP) > 46
17. Press the Left arrow key to exit the menu.
A
DDING
A
GROUP
ENTRY
TO
THE
PHONE
BOOK
The machine can hold up to 20 group dial settings. To add a new group dial number to the
phone book:
1. Press the SETTING button on the control panel.
2. Using the Down arrow key, scroll to Phone Book and press OK.
3. Using the Down arrow key, scroll to Group No. Book and press OK.
4. Using the arrow keys, scroll to the required entry position and press OK.
5. Press OK to select Register.
6. Press the Right arrow key to select Name.
7. Using the keypad or arrows keys and the on-screen keypad, type in the name.
8. Highlight Enter and press OK.
9. Using the Down arrow key, scroll to Speed Dial and press the Right arrow key.
10. Using the arrow keys, select the speed dial number you wish to assign to the group
and press OK.
The check box is selected. You can select multiple entries.
11. Press the Right arrow key to complete.
12. Press OK to confirm.
13. Press OK once more to add your entry to the phone book.
14. Press the Left arrow key to exit the menu.
D
ELETING
A
SPEED
DIAL
ENTRY
FROM
THE
PHONE
BOOK
To delete a speed dial entry from the phone book:
1. Press the SETTING button on the control panel.
2. Using the Down arrow key, scroll to Phone Book and press OK.
3. Press OK to select Speed Dial List.
4. Using the arrow keys, scroll to the required entry position and press OK.
5. Using the arrow keys, scroll to Delete and press OK.
6. At the prompt select Yes to continue or select No to cancel the operation.
7. Press OK.
8. Press the Left arrow key to exit the menu.
D
ELETING
A
GROUP
DIAL
ENTRY
FROM
THE
PHONE
BOOK
To delete a group dial entry from the phone book:
1. Press the SETTING button on the control panel.
2. Using the Down arrow key, scroll to Phone Book and press OK.
3. Using the Down arrow key, scroll to Group No. Book and press OK.
4. Using the arrow keys, scroll to the required entry position and press OK.
NOTE
The maximum length of name is 16 characters.
Configuring the fax settings (MC362 and MC562 and ES5462 MFP) > 47
5. Using the arrow keys, scroll to Delete and press OK.
6. At the prompt select Yes to continue or select No to cancel the operation.
7. Press OK.
8. Press the Left arrow key to exit the menu.
M
ODIFYING
A
SPEED
DIAL
ENTRY
To modify a speed dial entry:
1. Press the SETTING button on the control panel.
2. Using the Down arrow key, scroll to Phone Book and press OK.
3. Press OK to select Speed Dial List.
4. Using the arrow keys, scroll to the required entry position and press OK.
5. Press OK to select Edit.
6. Modify the Name, Fax Number and/or Group No. details as required then press OK.
7. Press the Left arrow key to exit the menu.
M
ODIFYING
A
GROUP
DIAL
ENTRY
To modify a group dial entry:
1. Press the SETTING button on the control panel.
2. Using the Down arrow key, scroll to Phone Book and press OK.
3. Using the Down arrow key, scroll to Group No. Book and press OK.
4. Using the arrow keys, scroll to the required entry position and press OK.
5. Press OK to select Edit.
6. Modify the Name, and/or Speed Dial details as required then press OK.
7. Press the Left arrow key to exit the menu.
S
ORTING
SPEED
DIAL
ENTRIES
To sort speed dial entry:
1. Press the SETTING button on the control panel.
2. Using the Down arrow key, scroll to Phone Book and press OK to enter the phone
book.
3. Select Speed Dial and press OK to enter speed dial list.
4. Press OK to show the operation menu.
5. Using the arrow keys, scroll to Sort By Name or Sort By Number, and press OK.
Then the entries will be sorted depending on the selection.
S
ORTING
GROUP
DIAL
ENTRIES
To sort group dial entries:
1. Press the SETTING button on the control panel.
2. Using the Down arrow key, scroll to Phone Book and press OK to enter the phone
book.
3. Select Group No. and press OK to enter dial group list.
Configuring the fax settings (MC362 and MC562 and ES5462 MFP) > 48
4. Press OK to show the operation menu.
5. Using the arrow keys, scroll to Sort By Name or Sort By Number, and press OK.
Then the groups will be sorted depending on the selection.
S
EARCHING
A
SPEED
DIAL
ENTRY
To search a speed dial entry:
1. Press the SETTING button on the control panel.
2. Using the Down arrow key, scroll to Phone Book and press OK to enter the phone
book.
3. Select Speed Dial and press OK to enter speed dial list.
4. Press OK to show the operation menu.
5. Using the arrow keys, scroll to Search, and press OK to enter the input window.
6. Using the on-screen keyboard to enter the key word for searching.
7. After key word inputing, select Enter and press OK.
The entries will be sort by name, and the matched entry will have focus.
S
EARCHING
A
GROUP
DIAL
ENTRY
To search a group dial entry:
1. Press the SETTING button on the control panel.
2. Using the Down arrow key, scroll to Phone Book and press OK to enter the phone
book.
3. Select Group No. and press OK to enter dial group list.
4. Press OK to show the operation menu.
5. Using the arrow keys, scroll to Search, and press OK to enter the input window.
6. Using the on-screen keyboard to enter the key word for searching.
7. After key word inputing, select Enter and press OK.
The groups will be sort by name, and the matched entry will have focus.
R
EGISTERING
AN
ENTRY
FROM
RECEPTION
OR
TRANSMISSION
HISTORY
1. Press the Fax button on the control panel to prompt the Fax Mode screen.
2. Ensure Fax is highlighted, then press OK.
3. Using the Down arrow key, scroll to Fax History and press OK.
4. Using the arrow keys, highlight Tx History or Rx History as appropriate and press
OK.
5. Using the arrow keys, scroll to the required entry and press OK.
6. Check the entry contents and then press the Right arrow key.
7. Press OK to select Register To Speed Dial.
8. Using the arrow keys, scroll to the required entry position and press OK.
9. Continue the registration process as described in Adding a speed dial entry to the
phone book” on page 45.
The fax number is automatically entered. You do not have to enter it manually.
User authentication and access control > 49
U
SER
AUTHENTICATION
AND
ACCESS
CONTROL
The user authentication and access control functions allow you to limit the functions
available to each user. These functions can help you save toner and paper.
Your machine has the following two methods of user authentication:
> PIN (personal identification number)
> User name and password
To control access to the machine, register a PIN or a user name and password for each user
in advance. The user must enter the PIN (or the user name and password) to log into the
machine or to print from a computer.
Access control can be applied to the following functions:
> Copying (Color/Mono)
> Printing (Color/Mono)
> Printing from USB Memory
> Scanning to e-mail
> Scanning to network PC
> Scanning to USB memory
> Faxing (MC362 and MC562 and ES5462 MFP only)
> Faxing via PC (MC362 and MC562 and ES5462 MFP only)
> Internet Faxing (MC362 and MC562 and ES5462 MFP only)
The following conditions are required to enable the user authentication and access control
functions:
> Your machine is connected to a network
> A computer on which Configuration Tool is installed is on the network
NOTE
You can register up to 100 PINs and 100 user name and password sets.
User authentication and access control > 50
PIN
AUTHENTICATION
R
EGISTERING
A
PIN
Before enabling user authentication and access control, be sure to register a PIN for each
user. You must be the administrator to register PINs.
To register a PIN, launch PIN Manager from Configuration Tool.
E
NABLING
PIN
AUTHENTICATION
You must be the logged on as the administrator to control access to the machine.
1. Press the SETTING button on the control panel.
2. Using the Down arrow key, scroll to Admin Setup and then press OK.
3. Using the arrow keys and on-screen keypad, enter the Administrator password.
Highlight Enter and press OK.
4. Using the Down arrow key, scroll to Management and press OK.
5. Using the Down arrow key, scroll to System Setup and press OK.
6. Make sure that Access Control is selected and press OK.
7. Using the arrow keys, scroll to PIN and press OK.
8. Press the BACK button to exit the menu.
NOTE
You can also register a PIN from the MFP web page.
User authentication and access control > 51
O
PERATION
WHEN
PIN
AUTHENTICATION
IS
ENABLED
Logging into the machine
For general users
1. Enter your PIN using the keypad on the control panel.
2. Press OK.
If authentication succeeds, the top screen displays.
For the Administrator
1. Enter “000000” using the keypad on the control panel.
2. Press OK.
3. When the password entry screen displays, enter the administrator password.
4. Using the arrow keys, highlight Enter and then press OK.
If authentication succeeds, the top screen displays.
Logging out of the machine
When you have finished operations, be sure to log out of the machine.
1. Press the BACK button or Left arrow key until the top screen displays.
2. Press the RESET/LOGOUT button on the control panel.
NOTE
The Administrator PIN is “000000”. You cannot change this value.
NOTE
After a certain period of time, the machine automatically logs out users.
User authentication and access control > 52
U
SER
NAME
AND
PASSWORD
AUTHENTICATION
R
EGISTERING
A
USER
NAME
AND
PASSWORD
Before enabling user authentication and access control, be sure to register a user name and
a password for each user. You must be the administrator to register user names and
passwords.
To register a user name and password, launch PIN Manager from Configuration Tool.
E
NABLING
USER
NAME
AND
PASSWORD
AUTHENTICATION
You must be the logged on as the administrator to control access to the machine.
1. Press the SETTING button on the control panel.
2. Using the Down arrow key, scroll to Admin Setup and then press OK.
3. Using the arrow keys and on-screen keypad, enter the Administrator password.
Highlight Enter and press OK.
4. Using the Down arrow key, scroll to Management and press OK.
5. Using the Down arrow key, scroll to System Setup and press OK.
6. Make sure that Access Control is selected and press OK.
7. Using the arrow keys, scroll to User/Password and press OK.
8. Using the Down arrow key, scroll to User Authentication Method and press OK.
9. Make sure that Local is selected and press OK.
10. Press the BACK button to exit the menu.
O
PERATION
WHEN
USER
NAME
AND
PASSWORD
AUTHENTICATION
IS
ENABLED
Logging into the machine
1. Make sure that User Name is selected and then press the Right arrow key.
2. Enter your name.
3. Using the arrow keys, highlight Enter and then press OK.
4. Make sure that Password is selected and then press Right.
5. Enter your password.
6. Using the arrow keys, highlight Enter and then press OK.
7. At the Login screen, press OK.
If authentication succeeds, the top screen displays.
NOTE
You can also register a user name and password from the MFP web page.
NOTE
The default password is “aaaaaa”.
NOTE
When you select
LDAP or Secure Protocol, the server settings are
necessary. For details, refer to “Network Menu” on page 124.
User authentication and access control > 53
Logging out of the machine
When you have finished operations, be sure to log out of the machine.
1. Press the BACK button or Left arrow key until the top screen displays.
2. Press the RESET/LOGOUT button on the control panel.
O
PERATION
FROM
THE
COMPUTER
Printing from Windows
1. Open the file you want to print.
2. From the File menu, select Print.
3. Choose the printer driver you want in Select Printer and click Preferences.
4. Select the Job Options tab.
5. Click User Auth.
6. Select Use User Authentication.
7. Enter the user name in Username and the password in Password.
Clicking Use Windows Login automatically enters your login name on Windows.
8. Click OK.
9. Click OK and then click Print.
Printing from Mac
1. Open the file you want to print.
2. From the File menu, select Print.
3. Select your machine’s printer driver.
4. Select User Authentication from the panel menu under the Printer and Presets
menus.
5. Select Enable User Authentication.
6. Enter the user name in User Name and the password in Password.
7. Click Print.
NOTE
After a certain period of time, the machine automatically logs out users.
NOTE
The authentication type specified on the computer overrides the one specified
on the machine.
NOTE
You cannot use the PCL XPS printer driver for this function.
This procedure uses Windows 7 and NotePad as an example. The procedures
and menus may differ depending on the OS you use.
NOTE
This procedure uses Mac OS X 10.6 as an example. The procedures and menus
may differ depending on the OS you use.
User authentication and access control > 54
Faxing (Windows only)
1. Open the file you want to fax.
2. From the File menu, select Print.
3. Select your machine (fax driver) in Select Printer and click Preferences.
4. On the Setup tab, click User Auth.
5. Select Use User Authentication.
6. Enter the user name in Username and the password in Password.
Clicking Use Windows Login automatically enters your login name on Windows.
7. Click OK.
8. Click OK and then click Print.
NOTE
This procedure uses Windows 7 and NotePad as an example. The procedures
and menus may differ depending on the OS you use.
Advanced network settings > 55
A
DVANCED
NETWORK
SETTINGS
This chapter explains advanced network settings for your machine.
N
ETWORK
SETTING
ITEMS
This section explains the menus available for network settings.
You can check the current network settings by pressing the SETTING key and selecting
View Information then Network on the machine control panel. You can also print the
setting list.
You can change the network settings from the machine’s web page, Configuration Tool,
TELNET, and Network Card Setup. For available menus on each utility, refer to the following
tables.
TCP/IP
NOTE
For details on how to print the network setting list, refer to “Network
Information” on page 100.
ITEM DEFAULT
VALUE
DESCRIPTION
WEB
PAGE
TELNET CONFIG.
TOOL
NETWORK
SETTING
PLUG-IN
NETWORK CARD
SETUP
(WIN.) (MAC)
IP
Address
Set
IP
Address
Set
DHCP/
BOOTP
DHCP/
BOOTP
DHCP/
BOOTP
Manual Specifies whether to
request the DHCP/BOOTP
server to assign an IP
address.
IP
Address
IP
Address
IP Address IP
Address
IP Address xxx.xxx.xxx.x
xx
Sets an IP address.
Subnet
Mask
Subnet
Mask
Subnet Mask Subnet
Mask
Subnet
Mask
xxx.xxx.xxx.x
xx
Sets a subnet mask.
Gateway
Address
Gateway
Address
Default
Gateway
Address
Default
Gateway
Address
Default
Gateway
Address
0.0.0.0 Sets a gateway address.
DNS
Server
(Primary)
DNS
Server
(Pri.)
- - - 0.0.0.0 Specifies the IP address of
the primary DNS server.
Be sure to specify this item
when you use a domain
name to specify the SMTP/
POP/LDAP server.
DNS
Server
(Second-
ary)
DNS
Server
(Sec.)
- - - 0.0.0.0 Specifies the IP address of
the secondary DNS server.
Be sure to specify this item
when you use a domain
name to specify the SMTP/
POP/LDAP server.
Dynamic
DNS
Dynamic
DNS
- - - Disable Specifies whether to
register the information to
the DNS server when a
setting has been changed.
Advanced network settings > 56
Domain
Name
Domain
Name
- - - (NULL) Sets the domain name the
machine belongs to.
WINS
Server
(Primary)
WINS
Server
(Pri.)
- - - 0.0.0.0 Specifies the name or IP
address of the WINS server
(for Windows only).
WINS
Server
(Second-
ary)
WINS
Server
(Sec.)
- - - 0.0.0.0 Specifies the name or IP
address of the WINS server
(for Windows only).
Scope ID Scope ID - - - (NULL) Specifies the Scope ID for
WINS. From 1 to 223
characters can be used.
Windows Windows - - - Disable Specifies whether to use
the auto-discovery function
of Windows.
Macintosh Macintosh - - - Enable Specifies whether to use
the auto-discovery function
of Macintosh.
Device
Name
Printer
Name
---OKI-(machine
name)-(last 6
digits of MAC
address)
Specifies the rule of
displaying the machine
name when the auto-detect
function is enabled.
IPv6 IP Version - - - Disable Specifies whether to use
IPv6.
ITEM DEFAULT
VALUE
DESCRIPTION
WEB
PAGE
TELNET CONFIG.
TOOL
NETWORK
SETTING
PLUG-IN
NETWORK CARD
SETUP
(WIN.) (MAC)
Advanced network settings > 57
N
ET
W
ARE
ITEM DEFAULT
VALUE
DESCRIPTION
WEB
PAGE
TELNET CONFIG.
TOOL
NETWORK
SETTING
PLUG-IN
NETWORK CARD
SETUP
(WIN.) (MAC)
Print mode - - - - Print Server Specifies how to use the
machine, as a print
server, or as a remote
printer.
Connection
method
NetWare
Mode
- --NDS+
Bindery
Specifies the NetWare
priority mode.
Communi-
cation
protocol
TCP or IPX - - - IPX Select IPX or TCP/IP to be
used on NetWare.
Print
Server
Name
Print Server
Name
- --OKI-
(machine
name)-(last
6 digits of
Ethernet
address)-PS
Specifies the print server
name up to 31
characters. This value
must be identical to the
one specified in the file
server.
Printer
Name
PrinterName- --OKI-
(machine
name)-(last
6 digits of
Ethernet
address)-PR
Specifies the machine
name when you use a
remote printer. This value
must be identical to the
one specified in the file
server.
Frame
Type
Frame Type - - - Auto Specifies the frame type
the machine uses on
Netware.
Bindery
Mode
- - - - Enable Specifies whether to use
the bindery mode.
When you access Netware
3.12 or the bindery
network of NetWare 6.0,
5.0, or 4.1, enable the
bindery mode.
When you access NDS of
NetWare 6.0, 5.0, or 4.1,
disable the bindery mode.
File Server
Names
File Server
Name
#1-8
- - - (NULL) Specifies the name of the
file server up to 47
characters. You can
specify up to 8 servers.
Password
for File
Servers
Password - - - (NULL) Sets a password to log in
to the file server up to 31
characters.
You must specify this
item when you set a
password on the file
server for the machine.
Job Polling
Rate
JobPolling
Time (Sec.)
- - - 4 (seconds) Sets the interval to
access the queue for a
print job.
Advanced network settings > 58
E
THER
T
ALK
Tree NDS Tree - - - (NULL) Specifies the NDS tree
name up to 31
characters. Specify the
tree name to which the
file server belongs.
Context NDS Context - - - (NULL) Specifies the NDS context
name up to 77
characters. Specify the
context name to which
the print server belongs.
Job
Timeout
Job Timeout
(Sec.)
- - - 10
(seconds)
Specifies when to free a
port after the last print
job has been accepted.
Print
Server
Names
Print Sever
Name
#1-8
- - - (NULL) Specifies the name of the
print server to access up
to 47 characters. You can
specify up to 8 servers.
ITEM DEFAULT
VALUE
DESCRIPTION
WEB
PAGE
TELNET CONFIG.
TOOL
NETWORK
SETTING
PLUG-IN
NETWORK CARD
SETUP
(WIN.) (MAC)
EtherTalk
Zone
Name
Zone
Name
- - - * Specifies the EtherTalk zone
name up to 32 characters.
EtherTalk
Printer
Name
Printer
Name
- --(machine
name)
Specifies the Ethertalk printer
name up to 31 characters.
ITEM DEFAULT
VALUE
DESCRIPTION
WEB
PAGE
TELNET CONFIG.
TOOL
NETWORK
SETTING
PLUG-IN
NETWORK CARD
SETUP
(WIN.) (MAC)
Advanced network settings > 59
NBT/N
ET
BEUI
E-
MAIL
SEND
ITEM DEFAULT
VALUE
DESCRIPTION
WEB
PAGE
TELNET CONFIG.
TOOL
NETWORK
SETTING
PLUG-IN
NETWORK CARD
SETUP
(WIN.) (MAC)
Short
Device
Name
Short
Device
Name
- --(machine
name)-
(last 6
digits of
Ethernet
address)
Sets the rule of specifying
the name to be identified on
NetBIOS over TCP/NetBEUI
up to 15 characters.
It is displayed on the
PrintServer group in
Network Computer on
Windows.
Workgroup
Name
Work
group
Name
- - - PrintServer Specifies the work group
name to be displayed on
Windows network
computers up to 15
characters.
Master
Browser
Setting
Master
Browser
Setting
- - - Enable Specifies whether to use
master browser.
Comment Comment - - - Ethernet-
Board
OkiLAN
8500e
Sets a comment up to 48
characters.
It is displayed when
Windows Explorer is in the
detailed view.
ITEM DEFAUL
T VALUE
DESCRIPTION
WEB
PAGE
TELNET CONFIG.
TOOL
NETWORK
SETTING
PLUG-IN
NETWORK CARD
SETUP
(WIN.) (MAC)
SMTP Send SMTP
Send
- - - Enable Specifies whether to use SMTP
(E-mail).
SMTP
Server
SMTP
Server
Name
- - - (NULL) Specifies the SMTP server
name. Specify the domain
name or IP address.
Be sure to configure DNS
settings when you enter a
domain name.
Device
E-mail
Address
Device
Email
Address
- - - (NULL) Specifies the e-mail address of
the machine.
Authenticat
ion Method
SMTP
Auth-
Method
- - - None Specifies whether to perform
SMTP authentication.
Advanced network settings > 60
SMTP Port
Number
SMTP Port
Number
- - - 25 Specifies the SMTP port
number.
SMTP
UserID
SMTP
Server
User ID
- - - (NULL) Sets a user ID for SMTP
authentication method.
SMTP
Password
SMTP
Server
Password
- - - (NULL) Sets a password for SMTP
authentication.
SMTP
Encryption
SMTP
Encryption
Algorithm
- - - None Specifies the method for
encrypting the SMTP (E-mail)
send protocol.
POP UserID POP3
Server
UserID
- - - (NULL) Sets a user ID to access the
POP server.
POP
Password
POP3
Server
Password
- - - (NULL) Sets a password to access the
POP server.
POP
Encryption
Algorithm
POP
Encryption
Algorithm
- - - None Specifies the method to
encrypt POP communication.
Attached
Information
Device
Model
Attached
Info
Device
Model
- - - Enable Specifies whether to list the
machine model name on an
alert e-mail.
Attached
Information
Network
Interface
Attached
Info
Network
Interface
- - - Enable Specifies whether to list the
network interface name on an
alert e-mail.
Attached
Information
Serial
Number
Attached
Info Serial
Number
- - - Enable Specifies whether to list the
machine serial number on an
alert e-mail.
Attached
Information
Asset
Number
Attached
Info Asset
Number
- - - Disable Specifies whether to list the
machine asset number on an
alert e-mail.
Attached
Information
Device
Name
Attached
Info
Device
Name
- - - Disable Specifies whether to list the
machine SystemName on an
alert e-mail.
Attached
Information
Location
Attached
Info
Location
- - - Disable Specifies whether to list the
machine SystemLocation on an
alert e-mail.
Attached
Information
IP Address
Attached
Info IP
Address
- - - Enable Specifies whether to list the
machine IP address on an alert
e-mail.
ITEM DEFAUL
T VALUE
DESCRIPTION
WEB
PAGE
TELNET CONFIG.
TOOL
NETWORK
SETTING
PLUG-IN
NETWORK CARD
SETUP
(WIN.) (MAC)
Advanced network settings > 61
E-
MAIL
RECEIVE
Attached
Information
MAC
Address
Attached
Info MAC
Address
- - - Disable Specifies whether to list the
machine MAC address on an
alert e-mail.
Attached
Information
Short
Device
Name
Attached
Info Short
Device
Name
- - - Disable Specifies whether to list the
short product name of the
machine on an alert e-mail.
Attached
Information
Device URL
Attached
Info
Device
URL
- - - Disable Specifies whether to list the
machine URL on an alert e-
mail.
Comment Comment
Line 1-4
- - - (NULL) Sets a comment to add to an
alert e-mail. You can enter a
maximum of 63 characters in a
line. Up to 4 lines can be
specified.
Reply-To-
Address
Reply-To
Address
- --(NULL)Specifies the e-mail address
used to reply to e-mails.
Specify the e-mail address of
the network administrator.
ITEM DEFAUL
T VALUE
DESCRIPTION
WEB
PAGE
TELNET CONFIG.
TOOL
NETWORK
SETTING
PLUG-IN
NETWORK CARD
SETUP
(WIN.) (MAC)
Use
Protocol
POP or
SMTP
- - - Disable Specifies whether to use e-mail
reception function. Select the
protocol to use.
POP
Server
Name
POP3
Server
- - - 0.0.0.0 Specifies the POP server name.
Enter the domain name or IP
address.
POP User
ID
POP3
Server
UserID
- - - (NULL) Sets a user ID to access the
POP server.
POP
Password
POP3
Server
Password
- - - (NULL) Sets a password to access the
POP server.
APOP
Support
Use APOP - - - Disable Specifies whether to use APOP.
POP Port
Number
POP port
number
- - - 110 Specifies the port number to
access the POP server.
ITEM DEFAUL
T VALUE
DESCRIPTION
WEB
PAGE
TELNET CONFIG.
TOOL
NETWORK
SETTING
PLUG-IN
NETWORK CARD
SETUP
(WIN.) (MAC)
Advanced network settings > 62
E-
MAIL
ALERT
POP
Encryption
POP
Encryption
Algorithm
- - - None Specifies the method to encrypt
POP communication.
POP
Receive
Interval
MailPolling
Time (min)
- - - 5 (mins) Specifies the interval to access
the POP server to receive e-
mails.
Domain
Filter
Domain
filter
- - - Disable Specifies whether to use
domain filtering.
Email from
the
following
listed
domains
Filter
Policy
- - - Accept Specifies whether to accept or
block e-mails from the specified
domain.
Domain
1-5
Domain
1-5
- - - (NULL) Specifies a domain to apply
domain filtering.
SMTP
Receive
Port
Number
Port
Number
- - - 25 Specifies the port number to
access the machine via SMTP.
ITEM DEFAULT
VALUE
DESCRIPTION
WEB
PAGE
TELNET CONFIG.
TOOL
NETWORK
SETTING
PLUG-IN
NETWORK CARD
SETUP
(WIN.) (MAC)
Address 1-5 Email
Address 1-5
- --(NULL)Specifies the destination e-
mail addresses. You can
specify up to 5 destinations.
Way of E-
mail
Alerting
Notify Mode
1-5
- --Upon
occurrence
of an event
Specifies when to notify you
of an error.
E-mail Alert
Interval
Email Alert
Interval
(Hours) 1-5
- - - 24 (Hours) Specifies the interval of the e-
mail alert. Valid only when the
periodical alert is specified.
Consumable
Warning
Consumable
Warning
Event 1-5
- - - Immediate Specifies whether to notify
you of a warning on
consumables. Valid only when
the alert in the event of an
error is selected.
Consumable
Warning
Consumable
Warning
Period 1-5
- - - Enable Specifies whether to notify
you of a warning on
consumables. Valid only when
the periodical alert is
selected.
ITEM DEFAUL
T VALUE
DESCRIPTION
WEB
PAGE
TELNET CONFIG.
TOOL
NETWORK
SETTING
PLUG-IN
NETWORK CARD
SETUP
(WIN.) (MAC)
Advanced network settings > 63
Consumable
Error
Consumable
Error Event
1-5
- - - Immediate Specifies whether to notify
you of an error on
consumables. Valid only when
the alert in the event of an
error is selected.
Consumable
Error
Consumable
Error Period
1-5
- - - Enable Specifies whether to notify
you of an error on
consumables. Valid only when
the periodical alert is
selected.
Mainten-
ance Unit
Warning
Mainten-
ance Unit
Warning
Event 1-5
- - - 2H0M Specifies whether to notify
you of a warning on the
maintenance unit. Valid only
when the alert in the event of
an error is selected.
Mainten-
ance Unit
Warning
Mainten-
ance Unit
Warning
Period 1-5
- - - Enable Specifies whether to notify
you of a warning on the
maintenance unit. Valid only
when the periodical alert is
selected.
Mainten-
ance Unit
Error
Mainten-
ance Unit
Error Event
1-5
- - - Immediate Specifies whether to notify
you of an error on the
maintenance unit. Valid only
when the alert in the event of
an error is selected.
Mainten-
ance Unit
Error
Maintenance
Unit Error
Period 1-5
- - - Enable Specifies whether to notify
you of an error on the
maintenance unit. Valid only
when the periodical alert is
selected.
Paper
Supply
Warning
Paper
Supply
Warning
Event 1-5
- - - 0H15M Specifies whether to notify
you of a warning on paper.
Valid only when the alert in
the event of an error is
selected.
Paper
Supply
Warning
Paper
Supply
Warning
Period 1-5
- - - Enable Specifies whether to notify
you of a warning on paper.
Valid only when the periodical
alert is selected.
Paper
Supply
Error
Paper
Supply
Error Event
1-5
- - - Immediate Specifies whether to notify
you of an error on paper. Valid
only when the alert in the
event of an error is selected.
Paper
Supply
Error
Paper
Supply
Error Period
1-5
- - - Enable Specifies whether to notify
you of an error on paper. Valid
only when the periodical alert
is selected.
Printing
Paper
Warning
Printing
Paper
Warning
Event 1-5
- - - Disable Specifies whether to notify
you of a warning on paper
feed. Valid only when the alert
in the event of an error is
selected.
ITEM DEFAULT
VALUE
DESCRIPTION
WEB
PAGE
TELNET CONFIG.
TOOL
NETWORK
SETTING
PLUG-IN
NETWORK CARD
SETUP
(WIN.) (MAC)
Advanced network settings > 64
Printing
Paper
Warning
Printing
Paper
Warning
Period 1-5
- - - Disable Specifies whether to notify
you of a warning on paper
feed. Valid only when the
periodical alert is selected.
Printing
Paper Error
Printing
Paper Error
Event 1-5
- - - 2H0M Specifies whether to notify
you of an error on paper feed.
Valid only when the alert in
the event of an error is
selected.
Printing
Paper Error
Printing
Paper Error
Period 1-5
- - - Enable Specifies whether to notify
you of an error on paper feed.
Valid only when the periodical
alert is selected.
Storage
Device
Warning
Storage
Device
Event 1-5
- - - Disable Specifies whether to notify
you of an error on the storage
device. Valid only when the
alert in the event of an error
is selected.
Storage
Device
Warning
Storage
Device
Period 1-5
- - - Enable Specifies whether to notify
you of an error on the storage
device. Valid only when the
periodical alert is selected.
Print Result
Warning
Print Result
Warning
Event 1-5
- - - Disable Specifies whether to notify
you of a warning on an error
affecting print results. Valid
only when the alert in the
event of an error is selected.
Print Result
Warning
Print Result
Warning
Period 1-5
- - - Enable Specifies whether to notify
you of a warning on an error
affecting print results. Valid
only when the periodical alert
is selected.
Print Result
Error
Print Result
Error Event
1-5
- - - 2H0M Specifies whether to notify
you of an error affecting print
results. Valid only when the
alert in the event of an error
is selected.
Print Result
Error
Print Result
Error Period
1-5
- - - Enable Specifies whether to notify
you of an error affecting print
results. Valid only when the
periodical alert is selected.
Interface
Warning
Interface
Warning
Event 1-5
- - - Disable Specifies whether to notify
you of a warning on the
interface. Valid only when the
alert in the event of an error
is selected.
Interface
Warning
Interface
Warning
Period 1-5
- - - Disable Specifies whether to notify
you of a warning on the
interface. Valid only when the
periodical alert is selected.
ITEM DEFAULT
VALUE
DESCRIPTION
WEB
PAGE
TELNET CONFIG.
TOOL
NETWORK
SETTING
PLUG-IN
NETWORK CARD
SETUP
(WIN.) (MAC)
Advanced network settings > 65
Interface
Error
Interface
Error Event
1-5
- - - 2H0M Specifies whether to notify
you of an error on the
interface. Valid only when the
alert in the event of an error
is selected.
Interface
Error
Interface
Error Period
1-5
- - - Enable Specifies whether to notify
you of an error on the
interface. Valid only when the
periodical alert is selected.
Security
Warning
Security
Warning
Event 1-5
- - - Disable Specifies whether to notify
you of a warning on the
security function. Valid only
when the alert in the event of
an error is selected.
Security
Warning
Security
Warning
Period 1-5
- - - Disable Specifies whether to notify
you of a warning on the
security function. Valid only
when the periodical alert is
selected.
Scanner
Warning
Scanner
Warning
Event 1-5
- - - Disable Specifies whether to notify
you of a warning on the
scanner. Valid only when the
alert in the event of an error
is selected.
Scanner
Warning
Scanner
Warning
Period 1-5
- - - Disable Specifies whether to notify
you of a warning on the
scanner. Valid only when the
periodical alert is selected.
Scanner
Error
Scanner
Error Event
1-5
- - - Disable Specifies whether to notify
you of an error on the
scanner. Valid only when the
alert in the event of an error
is selected.
Scanner
Error
Scanner
Error Period
1-5
- - - Disable Specifies whether to notify
you of an error on the
scanner. Valid only when the
periodical alert is selected.
Fax
Warning
a
FAX
Warning
Event 1-5
- - - Disable Specifies whether to notify
you of a warning on the fax
function. Valid only when the
alert in the event of an error
is selected.
Fax
Warning
a
FAX
Warning
Period 1-5
- - - Disable Specifies whether to notify
you of a warning on the fax
function. Valid only when the
periodical alert is selected.
Fax Error
a
FAX Error
Event 1-5
- - - Disable Specifies whether to notify
you of an error on the fax
function. Valid only when the
alert in the event of an error
is selected.
ITEM DEFAULT
VALUE
DESCRIPTION
WEB
PAGE
TELNET CONFIG.
TOOL
NETWORK
SETTING
PLUG-IN
NETWORK CARD
SETUP
(WIN.) (MAC)
Advanced network settings > 66
SNMP
Fax Error
a
FAX Error
Period 1-5
- - - Disable Specifies whether to notify
you of an error on the fax
function. Valid only when the
periodical alert is selected.
Other Error Other Error
Event 1-5
- - - 2H0M Specifies whether to notify
you of other errors. Valid only
when the alert in the event of
an error is selected.
Other Error Other Error
Period 1-5
- - - Enable Specifies whether to notify
you of other errors. Valid only
when the periodical alert is
selected.
a. MC362 and MC562 and ES5462 MFP only.
ITEM DEFAULT
VALUE
DESCRIPTION
WEB
PAGE
TELNET CONFIG.
NETWORK
SETTING
PLUG-IN
NETWORK CARD
SETUP
(WIN.) (MAC)
Contact to
Administra
tor
Contact to
Admin
- - - (NULL) Specifies the contact
information of the system
administrator up to 225
characters.
Printer
Name
Printer
Name
- --OKI-
(machine
name)-(last
6 digits of
MAC
address)
Sets the machine name up to
31 characters.
Printer
Location
Printer
Location
- - - (NULL) Sets the machine location up
to 255 characters.
Printer
Number
Printer
Asset
Number
- - - (NULL) Sets the arbitrary number to
manage your machine up to 8
characters.
SNMP
Mode
SNMP
Version
- - - SNMPv3+v1 Specifies the SNMP version.
User Name User Name - - - root Sets the user name in SNMPv3
up to 32 characters.
Authentica
tion
Settings
Pass-
phrase
Auth Pass-
phrase
- - - (NULL) Sets the password to create an
authentication key for SNMPv3
Packet Authentication. From 8
to 32 characters can be used.
ITEM DEFAULT
VALUE
DESCRIPTION
WEB
PAGE
TELNET CONFIG.
TOOL
NETWORK
SETTING
PLUG-IN
NETWORK CARD
SETUP
(WIN.) (MAC)
Advanced network settings > 67
P
RINTER
TRAP
- Auth Key - - - (NULL) Sets the authentication key for
SNMPv3 packet authentication
in HEX code. Maximum
number of characters differs
depending on the algorithm
you select.
Authentica
tion
Settings
Algorithm
Auth
Algorithm
- - - MD5 Specifies the algorithm for
SNMPv3 packet
authentication.
Privacy
Settings
Pass-
phrase
Privacy
Pass-
phrase
- - - (NULL) Sets the password to create a
privacy key for SNMPv3 packet
encryption. From 8 to 32
characters can be used.
- Privacy Key - - - (NULL) Sets the authentication key for
SNMPv3 packet encryption in
HEX code. 16 octets (HEX code
32 characters) can be used.
Privacy
Settings
Algorithm
Privacy
Algorithm
- - - DES Specifies the algorithm for
SNMPv3 packet encryption.
You cannot change the value.
New SNMP
Read
Commun-
ity
Read
Community
- - - public Sets the read community for
SNMPv1 up to 15 characters.
New SNMP
Write
Commun-
ity
Write
Community
- - - public Sets the write community for
SNMPv1 up to 15 characters.
ITEM DEFAULT
VALUE
DESCRIPTION
WEB
PAGE
TELNET CONFIG.
TOOL
NETWORK
SETTING
PLUG-IN
NETWORK CARD
SETUP
(WIN.) (MAC)
Printer
Trap
Commun-
ity Name
Prn-Trap
Commun-
ity
- - - public Sets a community name for a
printer trap up to 31 characters.
Address
1-5
TCP #1-5
Trap
Address
- - - 0.0.0.0 Specifies a trap destination in
TCP/IP. You can specify up to 5
destinations.
Trap
Enable 1-5
TCP #1-5
Trap
Enable
- - - Disable Specifies whether to use a
printer trap in TCP #1-5.
ITEM DEFAULT
VALUE
DESCRIPTION
WEB
PAGE
TELNET CONFIG.
NETWORK
SETTING
PLUG-IN
NETWORK CARD
SETUP
(WIN.) (MAC)
Advanced network settings > 68
Printer
Reboot 1-5
TCP #1-5
Printer
Reboot
Trap
- - - Disable Specifies whether to send an
SNMP message when the
machine has rebooted.
Receive
Illegal
Packet 1-5
TCP #1-5
Receive
Illegal Trap
- - - Disable Specifies whether to use a trap
when a community name other
than the one set in Printer Trap
Community Name is used to
access the machine.
Online 1-5 TCP #1-5
Online
Trap
- - - Disable Specifies whether to send an
SNMP message every time the
machine comes online.
Offline 1-5 TCP #1-5
Offline
Trap
- - - Disable Specifies whether to send an
SNMP message every time the
machine goes offline.
Paper Out
1-5
TCP #1-5
Paper Out
Trap
- - - Disable Specifies whether to send an
SNMP message when the
machine runs out of paper.
Paper Jam
1-5
TCP #1-5
Paper Jam
Trap
- - - Disable Specifies whether to send an
SNMP message when the paper
jams.
Cover
Open 1-5
TCP #1-5
Cover
Open Trap
- - - Disable Specifies whether to send an
SNMP message every time the
machine’s cover opens.
Printer
Error 1-5
TCP #1-5
Printer
Error Trap
- - - Disable Specifies whether to send an
SNMP message when an error
occurs.
IPX IPX Trap
Address/
Net
- - - 00000000:
000000000
000
Specifies a trap destination in
IPX. Specify the value as
“(network address):(node
address)”. You can specify only
one address.
IPX Trap
Enable
IPX Trap
Enable
- - - Disable Specifies whether to use a
printer trap in IPX.
IPX Printer
Reboot
- - - - Disable Specifies whether to send an
SNMP message when the
machine has rebooted.
IPX
Receive
Illegal
Packet
- - - - Disable Specifies whether to use a trap
when a community name other
than the one set in Printer Trap
Community Name is used to
access the machine.
IPX Online IPX Online
Trap
- - - Disable Specifies whether to send an
SNMP message every time the
machine comes online.
IPX Offline IPX Offline
Trap
- - - Disable Specifies whether to send an
SNMP message every time the
machine goes offline.
ITEM DEFAULT
VALUE
DESCRIPTION
WEB
PAGE
TELNET CONFIG.
TOOL
NETWORK
SETTING
PLUG-IN
NETWORK CARD
SETUP
(WIN.) (MAC)
Advanced network settings > 69
IPP
IPX Paper
Out
IPX Paper
Out Trap
- - - Disable Specifies whether to send an
SNMP message when the
machine runs out of paper.
IPX Paper
Jam
IPX Paper
Jam Trap
- - - Disable Specifies whether to send an
SNMP message when the paper
jams.
IPX Cover
Open
IPX Cover
Open Trap
- - - Disable Specifies whether to send an
SNMP message every time the
machine’s cover opens.
IPX Printer
Error
IPX Printer
Error Trap
- - - Disable Specifies whether to send an
SNMP message when an error
occurs.
ITEM DEFAULT
VALUE
DESCRIPTION
WEB
PAGE
TELNET CONFIG.
TOOL
NETWORK
SETTING
PLUG-IN
NETWORK CARD
SETUP
(WIN.) (MAC)
IPP - - - - Disable Specifies whether to use IPP.
Message
from
admin-
istrator
- - --(NULL)Enter a message according to
the language selected in
Charset and Language.
Charset - - - - UTF-8 Specifies a character set to use
when submitting settings to the
machine.
Language - - - - EN-US Specifies the language used in
the settings containing text
strings.
Authentic
ation
- - - - NONE Specifies whether to use
authentication when performing
IPP printing.
User
Name
1-50
- - - - (NULL) If you select BASIC in
Authentication, specify a user
name up to 63 characters.
Password
1-50
- - - - (NULL) If you select BASIC in
Authentication, specify a
password up to 16 characters.
ITEM DEFAULT
VALUE
DESCRIPTION
WEB
PAGE
TELNET CONFIG.
TOOL
NETWORK
SETTING
PLUG-IN
NETWORK CARD
SETUP
(WIN.) (MAC)
Advanced network settings > 70
W
INDOWS
RALLY
IEEE802.1X
ITEM DEFAULT
VALUE
DESCRIPTION
WEB
PAGE
TELNET CONFIG.T
OOL
NETWORK
SETTING
PLUG-IN
NETWORK CARD
SETUP
(WIN.) (MAC)
WSD Print WSD Print - - - Enable Specifies whether to use WSD
Print.
WSD Scan WSD Scan - - - Enable Specifies whether to use WSD
Scan.
LLTD LLTD - - - Enable Specifies whether to use LLTD.
ITEM DEFAULT
VALUE
DESCRIPTION
WEB
PAGE
TELNET CONFIG.
TOOL
NETWORK
SETTING
PLUG-IN
NETWORK CARD
SETUP
(WIN.) (MAC)
IEEE802.1X 802.1X - - - Disable Specifies whether to use
IEEE802.1X.
EA P Type EAP Type - - - EAP -TLS Specifies the EAP me th od .
EAP User EAP User - - - eapuser Specifies the user name to be
used for EAP up to 64
characters.
EAP
Password
EAP
Password
---(NULL)Specifies the password to be
used for an EAP user up to 64
characters. Valid only when
PEAP is selected in EAP
Type.
Client
Certificate
Setting
Use SSL.
Certificate
---(NULL)Specifies whether to use an
SSL/TLS certificate to
IEEE802.1X authentication.
It is unavailable when no
SSL/TLS certificate is
installed. Valid only when
EAP-TLS is selected.
CA
Certification
Setting
Authentica
te Server
- - - Authenticate
Server
Specifies whether to
authenticate a certificate
from the RADIUS server by a
CA certificate.
- EAP retry - - - 3 Specifies the number of
retries of IEEE802.1X
authentication.
-EAP
timeout
- - - 40 Specifies the timeout value
to wait for the server
response during IEEE802.1X
authentication.
Advanced network settings > 71
S
ECURE
PROTOCOL
SERVER
(K
ERBEROS
)
LDAP
ITEM DEFAULT
VALUE
DESCRIPTION
WEB
PAGE
TELNET CONFIG.
TOOL
NETWORK
SETTING
PLUG-IN
NETWORK CARD
SETUP
(WIN.) (MAC)
Domain Realm
Name
- - - (NULL) Specifies the realm name for
Kerberos authentication.
ITEM DEFAULT
VALUE
DESCRIPTION
WEB
PAGE
TELNET CONFIG.
TOOL
NETWORK
SETTING
PLUG-IN
NETWORK CARD
SETUP
(WIN.) (MAC)
LDAP
Server
LDAP
Server
- - - (NULL) Specifies the LDAP server
name. Enter the domain name
or IP address.
Port
Number
LDAP Port
Number
- - - 389 Specifies the port number of
the LDAP server.
Timeout LDAP
Timeout
- - - 30 Specifies the timeout value to
wait for the LDAP server
response.
Max.
Entries
Max Entry - - - 100 Specifies the maximum search
results.
Search
Root
Search
Root
- - - (NULL) Specifies where to search
(BaseDN) in LDAP search.
User Name
1
User Name
1
- - - cn Specifies the attribute name
searched for as the user name.
User Name
2
User Name
2
- --sn
User Name
3
User Name
3
- - - givenName
Mail
Address
Mail
Address
- - - mail Specifies the attribute name
searched for as the e-mail
address.
Additional
Filter
Additional
Filter
- - - (NULL) Specifies additional filters for
LDAP search.
Method Authentica
tion
Method
- - - Anonymous Specifies the authentication
method for LDAP server.
User ID Authentica
tion User
ID
- - - (NULL) Sets a user ID to access the
LDAP server.
Advanced network settings > 72
M
AIL
SERVER
Password Authentica
tion User
Password
- - - (NULL) Sets a password to access the
LDAP server.
Encryption Encryption
Algorithm
- - - None Specifies the method to encrypt
LDAP communication.
ITEM DEFAULT
VALUE
DESCRIPTION
WEB
PAGE
TELNET CONFIG.
TOOL
NETWORK
SETTING
PLUG-IN
NETWORK CARD
SETUP
(WIN.) (MAC)
SMTP
Server
SMTP
Server
Name
- - - (NULL) Specifies the SMTP server name.
Specify the domain name or IP
address.
Be sure to configure DNS settings
when you enter a domain name.
SMTP Port SMTP Port
Number
- - - 25 Specifies the SMTP port number.
SMTP
Encryption
SMTP
Encryption
Algorithm
- - - None Specifies the method for
encrypting the SMTP (E-mail)
send protocol.
POP3
Server
POP3
Server
- - - (NULL) Specifies the POP server name.
Enter the domain name or IP
address.
POP3 Port POP port
number
- - - 110 Specifies the port number to
access the POP server.
POP
Encryption
POP
Encryption
Algorithm
- - - None Specifies the method to encrypt
POP communication.
Authentica
tion
method
SMTP Auth - - - None Specifies whether to perform
SMTP authentication.
SMTP
UserID
User ID - - - (NULL) Sets a user ID for SMTP
authentication method.
SMTP
Password
User
Password
- - - (NULL) Sets a password for SMTP
authentication.
POP
UserID
POP3
Server
UserID
- - - (NULL) Sets a user ID to access the POP
server.
POP
Password
POP3
Server
Password
- - - (NULL) Sets a password to access the
POP server.
ITEM DEFAULT
VALUE
DESCRIPTION
WEB
PAGE
TELNET CONFIG.
TOOL
NETWORK
SETTING
PLUG-IN
NETWORK CARD
SETUP
(WIN.) (MAC)
Advanced network settings > 73
S
ECURITY
ITEM DEFAUL
T VALUE
DESCRIPTION
WEB
PAGE
TELNET CONFIG.
TOOL
NETWORK
SETTING
PLUG-IN
NETWORK CARD
SETUP
(WIN.) (MAC)
- TCP/IP - - - Enable Specifies whether to use TCP/IP.
NetBEUI NetBEUI - - - Disable Specifies whether to use
NetBEUI.
NetBIOS
over TCP
NetBIOS
over TCP
- - - Enable Specifies whether to use
NetBIOS over TCP.
NetWare NetWare - - - Disable Specifies whether to use
NetWare.
EtherTalk EtherTalk - - - Disable Specifies whether to use
EtherTalk.
Web (Port
No.: 80)
Web
(Default
Port 80)
Device
Settings
(Web)-
Enable
Printer
Web Page
-Enable
Web Page
Settings
Enable Specifies whether to use the web
page to access the machine.
Web Web (IPP) - - - 80 Specifies the port number to
access the web page of the
machine.
IPP (Port
No.: 631)
IPP
(Default
Port 631)
- - - Disable Specifies whether to use IPP.
Telnet Telnet - - - Disable Specifies whether to use TELNET
to access the machine.
FTP FTP - - - Disable Specifies whether to use FTP to
access the machine.
SNMP SNMP - - - Enable Specifies whether to use SNMP
to access the machine.
POP POP (E-
Mail)
- - - Disable Specifies whether to use POP3.
POP POP - - - 110 Specifies the port number for
POP3.
SNTP SNTP - - - Disable Specifies whether to use SNTP.
Local Ports Local Ports - - - Enable Specifies whether to use a
unique protocol.
-SMTP
(E-Mail)
- - - Enable Specifies whether to use SMTP
send.
SMTP
Send Port
Number
SMTP
Send
- - - 25 Specifies the port number for
SMTP send.
SMTP
Receive
Port
Number
SMTP
Receive
- - - 25 Specifies the port number for
SMTP receive.
Advanced network settings > 74
IP
FILTERING
Network
Password
Configur-
ation
Password Change
Password
Change
Password
Change
Password
Last 6
digits of
MAC
address
Sets a new administrator
password up to 15 characters.
The password is case-sensitive.
This password is used only when
you change settings from the
utilities. The administrator
password set in the machine
cannot be changed from this
item.
ITEM DEFAULT
VALUE
DESCRIPTION
WEB
PAGE
TELNET CONFIG.
TOOL
NETWORK
SETTING
PLUG-IN
NETWORK CARD
SETUP
(WIN.) (MAC)
IP Filtering IP Filtering - - - Disable Specifies whether to use IP filtering.
Be sure to configure the following
settings of this category when you
enable IP filtering.
If you do not, you cannot access the
machine via TCP/IP at all.
Start
Address
1-10
Start
Address
#1-10
- - - 0.0.0.0 Specifies IP addresses which are
allowed to access the machine. You
can specify an individual address or
an address range.
End
Address
1-10
End
Address
#1-10
- - - 0.0.0.0
Printing
1-10
IP Address
Range #1-
10 Printing
- - - Disable Specifies whether to allow print jobs
from specified IP addresses.
Config
1-10
IP Address
Range #1-
10
Configur-
ation
- - - Disable Specifies whether to allow the
configuration from specified IP
addresses.
Administra
tor’s IP
Address
setting
Admin IP
Address
- - - 0.0.0.0 Specifies the administrator IP
address automatically. Only this
address can always access the
machine.
When the administrator accesses
the machine via a proxy server, all
access via the proxy server is
allowed.
ITEM DEFAUL
T VALUE
DESCRIPTION
WEB
PAGE
TELNET CONFIG.
TOOL
NETWORK
SETTING
PLUG-IN
NETWORK CARD
SETUP
(WIN.) (MAC)
Advanced network settings > 75
MAC
ADDRESS
FILTERING
SSL/TLS
ITEM DEFAULT
VALUE
DESCRIPTION
WEB
PAGE
TELNET CONFIG.
TOOL
NETWORK
SETTING
PLUG-IN
NETWORK CARD
SETUP
(WIN.) (MAC)
MAC
Address
Filtering
MAC
Address
Filtering
- - - Disable Specifies whether to use MAC
address filtering. This function uses
Ethernet addresses for filtering. Be
sure to configure the following
settings of this category when you
enable MAC address filtering.
If not, you cannot access the
machine via a network at all.
Communic
ation from
the
following
MAC
Addresses
MAC
Address
Access
- - - Accept Specifies whether to accept or
block the access from specified
MAC addresses.
MAC
Address
1-50
MAC
Address
#1-50
- - - 00:00:00:0
0:00:00
Specifies MAC addresses to which
the filtering is applied.
Administra
tor’s MAC
Address
setting
Admin
MAC
Address
- - - 00:00:00:0
0:00:00
Specifies the administrator MAC
address automatically. Only this
address can always access the
machine.
When the administrator accesses
the machine via a proxy server, all
access via the proxy server is
allowed.
ITEM DEFAULT
VALUE
DESCRIPTION
WEB
PAGE
TELNET CONFIG.
TOOL
NETWORK
SETTING
PLUG-IN
NETWORK CARD
SETUP
(WIN.) (MAC)
SSL/TLS Cipher
(SSL/TLS)
- - - OFF Specifies whether to encrypt
SSL/TLS communication.
Cipher
Strength
Cipher
Strength
- - - Standard Specifies the strength of the
encryption.
HTTP/IPP
Receive
HTTP/IPP - - - OFF Specifies whether to encrypt
reception via HTTP/IPP.
HTTP/IPP
Receive
Cipher
Strength
HTTP/IPP
Cipher
Strength
- - - Standard Specifies the strength of the
encryption of reception via
HTTP/IPP.
FTP
Receive
FTP
Receive
- - - OFF Specifies whether to encrypt
reception via FTP.
Advanced network settings > 76
FTP
Receive
Cipher
Strength
FTP
Receive
Cipher
Strength
- - - Standard Specifies the strength of the
encryption of reception via
FTP.
SMTP
Receive
SMTP
Receive
- - - OFF Specifies whether to encrypt
reception via SMTP.
SMTP
Receive
Cipher
Strength
SMTP
Receive
Cipher
Strength
- - - Standard Specifies the strength of the
encryption of reception via
SMTP.
Select
Certificate
type
- - - - Using self-
signed
Certificate
Creates a self-signed
certificate. And also creates a
CSR to send to a certificate
authority and installs a
certificate issued by it.
Common
Name
- - - - (Machine’s
IP Address)
The machine’s IP address is
specified when you create a
self-signed certificate.
Organizati
on
- - - - (NULL) Specifies the official
organization name you belong
to up to 64 characters.
Organizati
onal Unit
- - - - (NULL) Specifies the sub-group name
such as a branch you belong
to up to 64 characters.
Locality - - - - (NULL) Specifies the country or
region name you are in up to
128 characters.
State/
Province
- - - - (NULL) Specifies the state or province
name you are in up to 128
characters.
Country/
Region
- - - - (NULL) Specifies the country or
region code in 2 characters.
Key
Exchange
method
- - - - RSA Specifies the key method for
encrypted communication.
Key size - - - - 1024bit Specifies the key size for
encrypted communication.
ITEM DEFAULT
VALUE
DESCRIPTION
WEB
PAGE
TELNET CONFIG.
TOOL
NETWORK
SETTING
PLUG-IN
NETWORK CARD
SETUP
(WIN.) (MAC)
Advanced network settings > 77
IPS
EC
ITEM DEFAULT
VALUE
DESCRIPTION
WEB
PAGE
TELNET CONFIG.
TOOL
NETWORK
SETTING
PLUG-IN
NETWORK CARD
SETUP
(WIN.) (MAC)
IPSec IPSec - - - Disable Specifies whether to use IPSec.
IP Address
1-50
- - - - 0.0.0.0 Specifies the host allowed to
communicate in IPSec.
IKE
Encryption
Algorithm
- - - - 3DES-CBC Specifies the IKE encryption
method.
IKE Hash
Algorithm
- - - - SHA-1 Specifies the IKE Hash method.
Diffie-
Hellman
Group
- - - - Group2 Specifies the Diffie-Hellman
group for “Phrase 1 Proposal”.
LifeTime - - - - 28800
(seconds)
Specifies the life time for
“ISAKMP SA.
Pre-
Shared
Key
- - - - (NULL) Specifies the pre-shared key.
Key PFS - - - - NOPFS Specifies whether to use Key
PFS (Perfect Forward Secrecy).
Key PFS
Diffie-
Hellman
Group
- - - - None Specifies the Diffie-Hellman
group for Key PFS.
ESP - - - - Enable Specifies whether to use ESP
(Encapsulating Security
Payload).
ESP
Encryption
Algorithm
- - - - 3DES-CBC Specifies the encryption
algorithm for ESP.
ESP
Authentica
tion
Algorithm
- - - - SHA-1 Specifies the authentication
algorithm for ESP.
AH - - - - Enable Specifies whether to use AH
(Authentication Header).
AH
Authentica
tion
Algorithm
- - - - SHA-1 Specifies the authentication
algorithm for AH.
LifeTime- - --3600
(seconds)
Specifies the life time for
“IPSec SA.
Advanced network settings > 78
M
AINTENANCE
T
IME
SETUP
(SNTP
SETTINGS
)
ITEM DEFAULT
VALUE
DESCRIPTION
WEB
PAGE
TELNET CONFIG.
TOOL
NETWORK
SETTING
PLUG-IN
NETWORK CARD
SETUP
(WIN.) (MAC)
Reset
Network
Card
Reset
Network
Card
- - - Disable Select to reset Network Card.
Reset
Network
Card to
Factory
Defaults
Reset
Network
Card to
Factory
Defaults
- - - Disable Select to restore the factory
default settings.
LAN Scale
Setting
LAN Scale
Setting
- - - Normal Use the default value. SMALL
is recommended only when
you use a small LAN to which a
few computers are connected.
Network
PS-
Protocol
- - - - RAW Specifies the format of
PostScript data for the
network port.
HEX Dump HEX Dump
Mode
- - - NO Specifies whether to show the
received print data in
hexadecimal number.
Restarting the machine
disables this mode.
HUB Link
Setting
HUB Link
Setting
---AUTO
NEGOTIAT-
ION
Specifies the speed and
method of communication
between the hub and the
machine.
TCP ACK - - - - Type1 Normally do not change the
settings.
ITEM DEFAULT
VALUE
DESCRIPTION
WEB
PAGE
TELNET CONFIG.
TOOL
NETWORK
SETTING
PLUG-IN
NETWORK CARD
SETUP
(WIN.) (MAC)
Time
Setup
- - - - Manual Specifies how to set date and
time, manually or
automatically.
SNTP
Server
(Primary)
NTP
Server
(Pri.)
- - - (NULL) Specifies the IP address of the
primary NTP server to get the
current time.
SNTP
Server
(Second-
ary)
NTP
Server
(Sec.)
- - - (NULL) Specifies the IP address of the
secondary NTP server to get
the current time.
Advanced network settings > 79
W
EB
PRINTING
Adjust
Interval
Adjust
Interval
- - - 1 (hour) Specifies how often the
machine should adjust the
time.
Time Zone Local Time
Zone
- - - 00:00 Sets the time lag between GMT
and your local time.
Set
Daylight
Saving
Daylight
Saving
- - - OFF Sets daylight saving time.
ITEM DEFAULT
VALUE
DESCRIPTION
WEB
PAGE
TELNET CONFIG.
TOOL
NETWORK
SETTING
PLUG-IN
NETWORK CARD
SETUP
(WIN.) (MAC)
Paper tray - - - - Tray 1 Specifies the tray to be used for
print jobs.
Copies - - - - 1 Specifies the number of copies.
Collate - - - - Enable Specifies whether to collate the
output.
Fit to page - - - - Enable Specifies whether to fit the
document size to the paper size.
Duplex
printing
- - - - None Specifies whether to and how to
bind a duplex job.
Page
Select
- - - - Disable Specifies the pages to be
printed.
PDF
Password
- - - - Disable Select this item and enter the
password necessary when you
print an encrypted PDF file.
ITEM DEFAULT
VALUE
DESCRIPTION
WEB
PAGE
TELNET CONFIG.
TOOL
NETWORK
SETTING
PLUG-IN
NETWORK CARD
SETUP
(WIN.) (MAC)
Advanced network settings > 80
C
HANGING
NETWORK
SETTINGS
FROM
THE
WEB
PAGE
This section explains how to change the network settings from the machine’s web page.
This function is available on Windows and Mac.
To access the machine’s web page, your computer must meet the following conditions:
> TCP/IP is enabled
> Microsoft Internet Explorer 6 or later, Safari 3.0 or later, or Firefox 3.0 or later is
installed
> Be sure that the security setting for a web browser is set to the middle level or
cookies are allowed.
> To en ter the Admin Setup menu, the administrator password is necessary. The
default password isaaaaaa”.
E
NCRYPTING
C
OMMUNICATION
BY
SSL/TLS
You can encrypt the communication between your computer and the machine.
The communication is encrypted by SSL/TLS when you change the machine settings from
the web page, perform the IPP printing, direct print, or LDAP search, and print data
received via SMTP or FTP.
Creating a certificate
You can create a certificate on the web page. The following two certificates are available:
> A self-signed certificate
> A certificate created by a certificate authority
1. Access the machine’s web page and log in as the administrator.
2. Select Admin Setup.
3. Select Network > Security > SSL/TLS.
4. Follow the on-screen instructions to specify the detailed settings.
5. Click OK.
6. Check the settings and click OK.
7. If you are creating a self-signed certificate, go to “Enabling encryption” on page 81
to enable encryption.
If you are getting a certificate created by a certificate authority, go to step 8.
8. Follow the on-screen instructions to send a CSR to a certificate authority.
NOTE
Some of the following settings can be performed on other utilities. For details,
“Network setting items” on page 55.
NOTE
If you change the machine IP address after you create a certificate, the
certificate becomes invalid. Be sure not to change the machine’s IP address
after creating a certificate.
NOTE
The machine’s IP address is set to Common Name.
Advanced network settings > 81
9. Click Export Certificate.
10. Perform steps 1 to 3 in “Creating a certificate” on page 80 to enter the encryption
screen.
11. Follow the on-screen instructions to install a certificate from the certificate authority.
12. Click Submit.
13. Go to “Enabling encryption” on page 81 to enable encryption.
Enabling encryption
After you creating a certificate, perform the following procedure to enable encryption.
When you enable encryption, the communication is encrypted the next time you change
the settings from the web page.
1. Access the machine’s web page and log in as the administrator.
2. Select Admin Setup.
3. Select Network > Security > Protocol ON/OFF.
4. Select Enable for the desired protocol.
5. Click Submit.
Launching the web page
1. Launch a web browser.
2. Type the IP address of the MFP in the URL field of your browser and then press
Enter. For example http://10.18.207.102
Advanced network settings > 82
IPP
PRINTING
(W
INDOWS
ONLY
)
IPP printing allows you to transmit your print job data from your computer to the machine
via the Internet.
Enabling IPP Printing
IPP printing is disabled by factory default. To perform IPP printing, enable IPP first.
1. Access the machine’s web page and log in as the administrator.
2. Select Admin Setup.
3. Select Network > IPP.
4. Select Enable.
5. Click Submit.
Setting up your machine as an IPP printer
Add your machine as an IPP printer to your computer.
1. Click Start and select Devices and Printers > Add a printer.
2. Select Add a network, wireless or Bluetooth printer on the Add Printer wizard.
3. In the list of available printers, select The printer that I want isn't listed.
4. Choose Select a shared printer by name.
5. Enter “https://your machine IP address/ipp” or “https://your machine IP
address/ipp/lp” and then click Next.
6. Click Have Disk.
7. Insert the DVD that was supplied with your machine into the DVD-ROM drive.
8. Enter the following value in Copy from:
> For PCL driver,D:\Drivers\_PCL”.
> For PS driver,D:\Drivers\PS”.
> For PCL XPS driver,D:\Drivers\XPS”.
9. Click OK.
10. Select the desired printer and click OK.
11. Select Yes in Use this printer as default and click Next.
12. If the Share this printer wizard appears, select Do not share and then click Next.
13. Select No in Print test page? and click Next.
14. Click Finish.
NOTE
The following OSs are supported; Windows 7, Windows Server 2008 R2,
Windows Server 2008, Windows Vista, Windows Server 2003, and Windows
XP.
This procedure uses Windows 7 as an example. The procedures and menus
may differ depending on the OS you use.
NOTE
The values above are the example of when the DVD-ROM drive is set to the
D drive.
Advanced network settings > 83
15. On the Hardware Install screen, click Continue.
16. When the installation finishes, print a test page.
Performing IPP printing
1. Open an application file.
2. From the File menu, select Print.
3. From Select Printer, select the created IPP printer and then click Print.
NOTE
The following procedure is explained using NotePad as an example. The
procedures and menus may differ depending on the application you use.
Advanced network settings > 84
E
NCRYPTING
COMMUNICATION
BY
IPS
EC
You can encrypt the communication between your computer and the machine.
The communication is encrypted by IPSec. When IPSec is enabled, encryption is applied to
all the applications using the IP protocols.
You can specify up to 50 hosts by their IP addresses. When a host that is not registered
tries to access the machine, it is rejected. When you try to access a host that is not
registered, it is invalid.
You must have a pre-shared key in advance.
Configuring your machine
Be sure to configure your machine first from the web page to enable IPSec.
1. Access the machine’s web page and log in as the administrator.
2. Select Admin Setup.
3. Select Network > Security > IPSec.
4. Follow the on-screen instructions to specify the detailed settings.
5. Click Submit.
The network system reboots to enable the new settings.
Configuring your computer
Be sure to configure your machine in advance before configuring your computer.
1. Click Start and select Control Panel > Administrative Tools.
2. Double-click Local Security Policy.
3. On the Local Security Policy window, click IP Security Policies on Local
Computer.
4. From the Action menu, select Create IP Security Policy.
5. On the IP Security Policy Wizard, click Next.
NOTE
> When you enable IPSec, the communication to and from a host that is not
specified in this procedure is rejected.
> Be sure to memorize the values specified in this procedure. They are
necessary when you configure the IPSec setting on your computer.
NOTE
Either ESP or AH must be enabled in the configuration for “Phase2 Proposal”.
NOTE
If you fail to set up IPSec due to the mismatch of the specified parameter, you
cannot access the web page. In this case, disable IPSec from the control panel
of the machine or initialize the network settings.
NOTE
This procedure uses Windows 7 as an example. The procedures and menus
may differ depending on the OS you use.
Advanced network settings > 85
6. Enter a Name and a Description and then click Next.
7. Clear the Activate the default response rule (earlier versions of Windows
only). check box and then click Next.
8. Select Edit properties and then click Finish.
9. On the IP security policy properties window, select the General tab.
10. Click Settings.
11. On the Key Exchange Settings window, enter the value (minutes) in
Authenticate and generate a new key after every.
12. Click Methods.
13. On the Key Exchange Security Methods window, click Add.
14. Specify Integrity algorithm, Encryption algorithm, and Diffie-Hellman group.
15. Click OK.
16. On the Key Exchange Security Methods window, click OK.
17. On the Key Exchange Settings window, click OK.
18. On the IP security policy properties window, select the Rules tab.
19. Click Add.
20. On the Security Rule Wizard, click Next.
21. On the Tunnel Endpoint screen, make sure that This rule does not specify a
tunnel is selected and then click Next.
22. On the Network Type screen, make sure that All network connections is
selected and then click Next.
23. On the IP Filter List screen, click Add.
24. On the IP Filter List window, click Add.
25. On the IP Filter Wizard, click Next.
26. On the IP Filter Description and Mirrored Property screen, click Next.
27. On the IP Traffic Source screen, click Next.
28. On the IP Traffic Destination screen, click Next.
29. On the IP Protocol Type screen, click Next.
30. Click Finish.
31. On the IP Filter List wizard, click OK.
32. On the Security Rule Wizard, select the new IP filter from the list and then click
Next.
33. On the Filter Action screen, click Add.
NOTE
Specify the same value as Life time specified in the configuration for “Phase1
Proposal” in “Configuring your machine” on page 84. Although Life time is
specified by seconds, enter a value by minutes in this step.
NOTE
Select the same value specified in IKE Encryption Algorithm, IKE Hash
Algorithm, and Diffie-Hellman group in the configuration for “Phase1
Proposal” in “Configuring your machine” on page 84.
Advanced network settings > 86
34. On the Filter Action Wizard, click Next.
35. On the Filter Action Name screen, enter a Name and a Description and then click
Next.
36. On the Filter Action General Options screen, make sure that Negotiate security
is selected and then click Next.
37. On the Communicating with computers that do not support IPsec screen,
make sure that Do not allow unsecured communication. is selected and then
click Next.
38. On the IP Traffic Security screen, select Custom and then click Settings.
39. On the Custom Security Method Settings window, configure the settings and
then click OK.
40. On the IP Traffic Security screen, click Next.
41. Select Edit properties and then click Finish.
42. On the filter action properties window, select Use session key perfect forward
secrecy (PFS) if you want to enable Key PFS.
43. Select Accept unsecured communication, but always respond using IPsec if
you perform IPSec communication by the IPv6 global address.
44. Click OK.
45. Select the new filter action and then click Next.
46. On the Authentication Method screen, select the value you want and then click
Next.
47. Click Finish.
48. On the IP security policy properties window, click OK.
49. On the Local Security Policy window, select the new IP security policy.
50. From the Action menu, select Assign.
51. Make sure that Policy Assigned for the new IP security policy is displayed as Yes.
52. Click X on the Local Security Policy screen.
NOTE
Select the same values specified in the configuration for “Phase2 Proposal” in
“Configuring your machine” on page 84.
Advanced network settings > 87
C
ONTROLLING
ACCESS
USING
IP
ADDRESS
(IP
FILTERING
)
You can control access to the machine using the IP address. You can set whether to allow
configuration or printing from the specified IP addresses. By factory default, IP filtering is
disabled.
1. Access the machine’s web page and log in as the administrator.
2. Select Admin Setup.
3. Select Network > Security > IP Filtering.
4. Follow the on-screen instructions to specify the detailed settings.
5. Click Submit.
The network system reboots to enable the new settings.
C
ONTROLLING
ACCESS
USING
MAC
ADDRESS
(MAC
ADDRESS
FILTERING
)
You can control access to the machine using the MAC address. You can allow or reject the
access from the specified MAC addresses.
1. Access the machine’s web page and log in as the administrator.
2. Select Admin Setup.
3. Select Network > Security > MAC Address Filtering.
4. Follow the on-screen instructions to specify the detailed settings.
5. Click Submit.
The network system reboots to enable the new settings.
NOTE
Be sure to specify the correct IP address. If you specify a wrong IP address,
you cannot access the machine using the IP protocol.
When you enable IP filtering, the access to and from a host that is not specified
in this procedure is rejected.
You can use only IPv4 for IP filtering.
NOTE
If nothing is registered in Administrator’s IP Address setting, you may not
be able to access the machine depending on the specified IP address range.
Your Current Local Host/Proxy IP Address and the IP address of your
host may not match if you use a proxy server.
NOTE
Be sure to specify the correct MAC address. If you specify the wrong MAC
address, you cannot access the machine via a network.
You cannot individually specify acceptance or rejection for each address.
NOTE
If nothing is registered in Administrator’s MAC Address setting, you may
not be able to access the machine depending on the specified MAC address.
Your Current Local Host/Proxy MAC Address and the MAC address of
your host may not match if you use a proxy server.
Advanced network settings > 88
E
RROR
NOTIFICATION
BY
E
-
MAIL
(
E
-
MAIL
ALERT
)
You can set the machine to send an error notification e-mail when an error happens. You
can set when to be notified:
> On a regular basis
> Only when an error occurs
Configuring your machine
You can configure the settings for e-mail alert using the web page.
1. Access the machine’s web page and log in as the administrator.
2. Select Admin Setup.
3. Select Network > E-mail > Send Settings.
4. Follow the on-screen instructions to specify the detailed settings.
5. Select Set detail of the SMTP Protocol..
6. If necessary, you can configure Security settings, Configure attached
information, and Others.
7. Click Submit.
The network system reboots to enable the new settings.
Regular alert
1. Access the machine’s web page and log in as the administrator.
2. Select Admin Setup.
3. Select Network > E-mail > Alert Settings.
4. Enter an e-mail address to receive the alerts.
5. Click Setting for the specified address.
Copy is useful when you want to apply the alert conditions to another address.
6. Follow the on-screen instructions to specify the detailed settings.
7. Click OK.
8. Click View a summary of current configuration to check the current settings,
and then click X to close the window.
You can also check the current settings of up to two addresses on the main window.
Select the desired addresses from the list box.
9. Click Submit.
NOTE
When you specify a domain name in SMTP Server, configure the DNS server
in the TCP/IP setting.
You need to set the mail server to allow the machine to send an e-mail. For
details on the mail server setting, refer to your network administrator.
When you use Internet Explorer 7, select Tools > Internet Options, click
Custom level on the Security tab, and then select Enable in Allow
websites to prompt for information using scripted windows to send a
test e-mail.
Advanced network settings > 89
The network system reboots to enable the new settings.
Alert when an error occurs
1. Perform steps 1 to 6 in “Regular alert”.
2. Specify the time lag between when an error occurs and when the alert is sent.
If you specify a longer time, only continuing errors are notified.
3. Click OK.
4. Click View a summary of current configuration to check the current settings,
and then click X to close the window.
You can also check the current settings of up to two addresses on the main window.
Select the desired addresses from the list box.
5. Click Submit.
The network system reboots to enable the new settings.
U
SING
SNMP
V
3
The SNMPv3 manager supporting SNMPv3 encrypts the management of the machine by
SNMP.
1. Access the machine’s web page and log in as the administrator.
2. Select Admin Setup.
3. Select Network > SNMP > Setting.
4. Follow the on-screen instructions to specify the detailed settings.
5. Click Submit.
The network system reboots to enable the new settings.
NOTE
If there is no error specified, the alert e-mail in not sent.
NOTE
Your machine has an SNMP agent. You can check and change the machine
settings by a commercially available SNMP agent. For the MIB of the machine,
refer to the DVD supplied with your machine and check “Readme.text” in the
MISC > Mib folder.
Advanced network settings > 90
U
SING
IP
V
6
Your machine supports IPv6. The machine gets an IPv6 address automatically. You cannot
set the IPv6 address manually.
The machine supports the following protocols:
> For Printing:
> LPR
> IPP
> RAW (Port9100)
> FTP
> For Configuration:
> HTTP
> SNMPv1/v3
> Telnet
The table below shows the protocols that are supported:
*1) To specify a host name, edit the hosts file or access via the DNS server.
*2) You cannot specify a host name by the DNS server when you enable only IPv6 on Telnet.
*3) You cannot specify a host name when you use a link local address to access.
*4) Enter an IPv6 address enclosed with brackets.
NOTE
To enter the Admin Setup menu, the administrator password is necessary.
The default password is “aaaaaa”.
PROTOCOL OS APPLICATION LIMITATIONS
LPD Windows 7
•Windows Vista
•Windows XP
LPR (Command Prompt) *1, 2, 3
FTP Windows 7
•Windows Vista
•Windows XP
FTP (Command Prompt) *1, 2, 3
Mac OS X FTP (Terminal) *1, 2, 3
HTTP Windows 7
•Windows Vista
•Windows XP
Internet Explorer 6.0/7.0 *1, 2, 3
Mac OS X Safari (2.0-v412.2) *1, 2, 3, 4
Tel net Wi ndo ws 7
•Windows Vista
•Windows XP
Telnet (Command Prompt) *1, 2, 3
Mac OS X FTP (Terminal) *1, 2, 3
NOTE
To use IPv6 on Windows XP, install IPv6.
Advanced network settings > 91
E
NABLING
IP
V
6
1. Access the machine’s web page and log in as the administrator.
2. Select Admin Setup.
3. Select Network > TCP/IP.
4. Select Enable for IPv6.
5. Click Submit.
The network system reboots to enable the new settings.
C
HECKING
IP
V
6
ADDRESS
The IPv6 address is automatically assigned.
1. Select View Info.
2. Select Network > TCP/IP.
U
SING
IEEE802.1X
Your machine supports the IEEE802.1X authentication.
Be sure to set up your machine and computer in advance before performing the following
procedure.
C
ONFIGURING
YOUR
MACHINE
FOR
IEEE802.1X
Using PEAP
1. Access the machine’s web page and log in as the administrator.
2. Select Admin Setup.
3. Select Network > IEEE802.1X.
4. Select Enable for IEEE802.1X.
5. Select PEAP for EAP Type.
6. Enter a user name in EAP User.
7. Enter a password in EAP Password.
8. Select Authenticate Server and then click Import.
9. Enter the file name of the CA certificate and then click OK.
Specify the certificate issued by the certificate authority from which the RADIUS
server got it. A PEM, DER, and PKCS#7 file can be imported.
NOTE
When the global address is displayed with only0, it may be an error due to
the router you use.
You can also check the IPv6 address in the network report from the machine
by pressing the SETTING key and then selecting Reports > System >
Network Information.
NOTE
For details on the initial setup and the IP address, refer to “Configuring the
network settings” on page 9.
Advanced network settings > 92
10. Click Submit.
The network system reboots to enable the new settings.
11. When the standby screen appears on the machine, turn off the machine.
12. Go to “Connecting your machine to authentication switch” on page 92.
Using EAP-TLS
1. Access the machine’s web page and log in as the administrator.
2. Select Admin Setup.
3. Select Network > IEEE802.1X.
4. Select Enable for IEEE802.1X.
5. Select EAP-TLS for EAP Type.
6. Enter a user name in EAP User.
7. Select Not use SSL/TLS Certificate for EAP authentication and then click
Import.
8. Enter the file name of the certificate.
Only a PKCS#12 file can be imported.
9. Enter the password of the certificate and then click OK.
10. Select Authenticate Server and then click Import.
11. Enter the file name of the CA certificate and then click OK.
Specify the certificate issued by the certificate authority from which the RADIUS
server got it. A PEM, DER, and PKCS#7 file can be imported.
12. Click Submit.
The network system reboots to enable the new settings.
13. When the standby screen appears on the machine, turn off the machine.
14. Go to “Connecting your machine to authentication switch” on page 92.
C
ONNECTING
YOUR
MACHINE
TO
AUTHENTICATION
SWITCH
1. Make sure that the machine is turned off.
2. Connect an Ethernet cable to the network interface port.
3. Connect the Ethernet cable to the authentication port of an authentication switch.
4. Turn on the machine.
5. Set up the machine.
NOTE
For details on the initial setup, refer to “Configuring the network settings” on
page 9.
Advanced network settings > 93
C
ONFIGURING
LDAP
SERVER
1. Access the machine’s web page and log in as the administrator.
2. Select Admin Setup.
3. Select Network > LDAP.
4. Enter the domain name or IP address of the LDAP server in LDAP Server.
5. Enter the port number of the LDAP server in Port Number.
6. Specify a value for time-out to wait for the search results in Timeout.
7. Specify a value for the maximum entry of the search results in Max. Entries.
8. Specify a BaseDN to access the LDAP server in Search Root.
9. Enter attribute names to be searched for as the user name in User Name.
Be sure to specify a value for Name 1.
10. Enter an e-mail address to be searched for in Mail Address.
11. If necessary, specify a search condition in Additional Filter.
12. Select the authentication method you want in Method.
> When you select Anonymous or Simple, user authentication using LDAP fails.
You need to select Digest-MD5 or Secure Protocol if you configure the LDAP
server for user authentication.
> When you select Digest-MD5, you need to configure the DNS server setting.
> When you select Secure Protocol, you need to configure the DNS server and the
secure protocol server settings.
13. If you do not select Anonymous in step 12, specify the user ID and password to log
in to the LDAP server.
14. Select a value in Encryption.
15. Click Submit.
The network system reboots to enable the new settings.
C
ONFIGURING
SECURE
PROTOCOLS
Authentication using the Kerberos server is available when you access the LDAP server. Be
sure to complete the SNTP and DNS server settings to use the secure protocol.
1. Access the machine’s web page and log in as the administrator.
2. Select Admin Setup.
3. Select Network > Secure Protocol Server.
4. Enter a realm name in Domain.
5. Click Submit.
The network system reboots to enable the new settings.
NOTE
For details on the LDAP server and encryption settings to be specified, refer to
your network administrator.
Advanced network settings > 94
P
RINTING
WITHOUT
PRINTER
DRIVER
(
DIRECT
PRINTING
)
P
RINTING
PDF
S
You can print PDFs without a printer driver. Specify the file you want to print on the web
page and submit it to the machine.
1. Access the machine’s web page and log in as the administrator.
2. Select Direct Print.
3. Select Web Printing.
4. Follow the on-screen instructions to specify the detailed settings.
5. Check the settings and then click OK.
6. Click Print.
C
ONFIGURING
SERVER
TO
PRINT
FILES
ATTACHED
TO
E
-
MAILS
You can print attached files when the machine receives an e-mail.
Configuration for POP
1. Access the machine’s web page and log in as the administrator.
2. Select Admin Setup.
3. Select Network > E-mail > Receive Settings.
4. Select POP3 and then click To STEP2.
5. Follow the on-screen instructions to specify the detailed settings.
NOTE
> It may be necessary to install additional RAM in order to print some PDF
files.
> If you have problems printing a PDF file, open the file in Adobe Reader
and print it.
NOTE
> When you have performed the initial setup described in “Configuring the
network settings” on page 9, the server settings are finished.
> Up to 10 files and a maximum of 8 MB for each file can be printed.
> PDF, JPEG, and TIFF files can be printed.
> It may be necessary to install additional RAM in order to print some PDF
files.
> If you have problems printing a PDF file, open the file in Adobe Reader
and print it.
NOTE
Be sure to specify the correct value for your mail server. If you enable APOP
when your mail server does not support the APOP protocol, e-mails may not
be correctly received.
When you specify a domain name for the mail server, configure the DNS
server in the TCP/IP setting.
Advanced network settings > 95
6. Click Submit.
Configuration for SMTP
1. Access the machine’s web page and log in as the administrator.
2. Select Admin Setup.
3. Select Network > E-mail > Receive Settings.
4. Select SMTP and then click To STEP2.
5. Follow the on-screen instructions to specify the detailed settings.
6. Click Submit.
C
HANGING
SETTINGS
ON
E
THER
T
ALK
(M
AC
ONLY
)
C
HANGING
E
THER
T
ALK
MACHINE
NAME
1. Access the machine’s web page and log in as the administrator.
2. Select Admin Setup.
3. Select Network > EtherTalk.
4. Enter a new name in EtherTalk Printer Name.
5. Click Submit.
C
HANGING
E
THER
T
ALK
ZONE
1. Access the machine’s web page and log in as the administrator.
2. Select Admin Setup.
3. Select Network > EtherTalk.
4. Enter a new zone name in EtherTalk Zone Name.
5. Click Submit.
NOTE
When the POP server does not support the SSL encryption, e-mails may not
be correctly received.
NOTE
Be sure to specify a zone in the same segment.
Other operations > 96
O
THER
OPERATIONS
This section explains how to initialize the network settings and how to setup your machine
and computer to use DHCP.
I
NITIALIZING
NETWORK
SETTINGS
1. Press the SETTING key.
2. Using the Down arrow key, scroll to Admin Setup and then press OK.
3. Enter the administrator password.
4. Select Enter and then press OK.
5. Using the arrow keys, scroll to Network Menu and then press OK.
6. Make sure that Network Setup is selected and then press OK.
7. Using the arrow keys, scroll to select Factory Defaults and then press OK.
8. Press OK.
9. Using the arrow keys, highlight Yes to continue or No to exit and then press OK.
The machine restarts to enable the new settings.
U
SING
DHCP
You can get an IP address from the DHCP server.
C
ONFIGURING
DHCP
SERVER
DHCP assigns an IP address to each host on the TCP/IP network.
1. Click Start > Server Manager.
If DHCP Server is already displayed, go to step 8.
2. Select Add Roles on the Roles Summary area.
3. On the Add Roles Wizard, click Next.
4. Select DHCP Server and click Next.
NOTE
This procedure initializes all the network settings.
NOTE
> You must be authorized as the administrator.
> If you enter a wrong IP address, the network system may go down.
> You can also get an IP address from the BOOTP server.
NOTE
The machine must have a static IP address if you want to print via a network.
For details on how to assign a static IP address, refer to the manual of your
DHCP server.
The following OSs are supported; Windows Server 2008 R2, Windows Server
2008, and Windows Server 2003
The following procedure uses Windows Server 2008 as an example. The
procedures and menus may differ depending on the OS you use.
Other operations > 97
5. Follow the on-screen instructions and configure the settings as necessary.
6. On the Confirm Installation Selections screen, check the settings and click
Install.
7. When the installation finishes, click Close.
8. Click Start and select All Programs > Administrative Tools > DHCP to launch
the DHCP wizard.
9. On the DHCP list, select a server to use.
10. From the Action menu, select New Scope.
11. On the New Scope Wizard, follow the on-screen instructions and configure the
settings as necessary.
> Be sure to configure the default gateway settings.
> On the Activate Scope screen, select Yes, I want to activate this scope now.
12. Click Finish.
13. Select the new scope from the DHCP list and then select Reservations.
14. From the Action menu, select New Reservation.
15. Configure the settings.
16. Click Add.
17. Click X to close the DHCP wizard.
C
ONFIGURING
YOUR
MACHINE
The following explains how to configure your machine to use DHCP/BOOTP. By factory
default, the DHCP/BOOTP protocol is enabled, so you do not have to perform this
procedure.
1. Turn on the machine.
2. Turn on your computer.
3. Insert the Software DVD-ROM into the DVD drive.
The Setup Utility starts automatically. if it does not start, double-click setup.exe (in
the root directory) on the DVD-ROM.
4. Choose your language.
5. Select your model and then click Next.
6. Read the license agreement and click I Agree.
7. Select Device Configuration > Network Card Setup.
8. Select your machine from the list.
9. From the Setting menu, select Setting Printer.
10. Enter the IP address and then click OK.
NOTE
The following procedure is explained using Network Card Setup and Windows
7 as an example. The procedures and menus may differ depending on the OS
you use.
Other operations > 98
11. Enter the password for Password and then click OK.
12. Click OK on the confirmation window.
The machine restarts to enable the new settings. During the restart, the machine
status icon changes to red. When the machine has restarted and the new settings
have been enabled, the status icon changes to green.
13. From the File menu, select Exit to close Network Card Setup.
NOTE
The initial password is the last six digits of the Ethernet address.
The password is case-sensitive.
Appendix A - menu system > 99
A
PPENDIX
A -
MENU
SYSTEM
The top-level function menus are:
> Reports
> Paper setup
> Address book
> Phone book
> Profile
> Network scan destination
> Store document settings
> View information
> Easy setup
> Admin setup
The menu trees are given to the lowest menu item level. Typically, this can be a parameter
that can be set by selecting from a range of values provided or a command that can be
executed to display or print a status or setting value.
Appendix A - menu system > 100
R
EPORTS
ITEM OPTION OPTION/DESCRIPTION
Configuration Yes, No Prints out a report of the machine’s
configuration
System File List Yes, No Prints out a file list
Demo Page 01:DEMO1 Yes, No Prints a
Demonstration page
Error Log Yes, No Prints out an error log
MFP Usage Yes, No Prints a full report of the machine usage.
Network
Information
Yes, No Prints out a report of the Network
configuration
Fax
a
a. MC362 and MC562 and ES5462 MFP only.
Speed Dial List Enter the Admin
Password
Yes, No Prints the list of fax
numbers registered
for speed dials.
Group List Enter the Admin
Password
Yes, No Prints the list of fax
numbers registered
under groups.
Fax Tx/Rx Log Enter the Admin
Password
Yes, No Prints the list of the
communication
results for the latest
100 fax jobs
received or sent.
Fcode Box List Yes, No Prints the list of fcode boxes.
E-mail/Internet Fax Journal Report Enter the Admin
Password
Yes, No Prints the results of
the latest 50
Internet Fax jobs.
Address Book Enter the Admin
Password
Yes, No Prints the registered
address list.
Print PCL Font List Yes, No Prints the list of PCL font samples.
PSE Font List Yes, No Prints the list of PostScript font samples.
PPR Font List Yes, No Prints the list of IBM PPR font samples.
FX Font List Yes, No Prints the list of EPSON FX font samples.
Color Tuning
Pattern
Yes, No Prints a color tuning pattern for adjusting
gradation characteristics.
Color Profile List Yes, No Prints the list of colour profiles.
Appendix A - menu system > 101
P
APER
SETUP
ITEM OPTION OPTION/DESCRIPTION
Tray 1 Paper Size A4/A5/A6/B5/
Letter/Legal13/
Legal13.5/Legal14/
Executive/
16K(184x260mm)/
16K(195x270mm)/
16K(197x273mm)/
Postcard/Custom
Sets paper in Tray 1.
Custom Width:
100~210~216mm
Length:
148~297~356mm
Enter paper width and length.
Media Type Plain/Letter Head/
Bond/Recycled/
Card Stock/Rough/
Glossy/User Type1/
User Type2/User
Type3/User Type4 /
User Type5
Select the type of media loaded in this tray.
This will help the MFP to adjust its internal
operating parameters, such as engine
speed and fusing temperature, to better
accommodate the media to be fed. For
example, letterhead may benefit from a
slightly lower fusing temperature to ensure
that its ink does not offset.
Media Weight Light/Medium Light/
Medium/Heavy/
Ultra Heavy1
Adjusts the MFP for the weight of paper
stock loaded in this tray.
Tray 2 Paper Size A4/A5/B5/Letter/
Legal13/Legal13.5/
Legal14/Executive/
16K(184x260mm)/
16K(195x270mm)/
16K(197x273mm)/
Custom
Sets paper in Tray 2.
Custom Width:
148~210~216mm
Length:
210~297~356mm
Enter paper width and length.
Media Type Plain/Letter Head/
Bond/Recycled/
Card Stock/Rough/
Glossy/User Type1/
User Type2/User
Type3/User Type4 /
User Type5
Select the type of media loaded in this tray.
This will help the MFP to adjust its internal
operating parameters, such as engine
speed and fusing temperature, to better
accommodate the media to be fed. For
example, letterhead may benefit from a
slightly lower fusing temperature to ensure
that its ink does not offset.
Media Weight Light/Medium Light/
Medium/Heavy/
Ultra Heavy1
Adjusts the MFP for the weight of paper
stock loaded in this tray.
Appendix A - menu system > 102
MP Tray Paper Size A4/A5/A6/B5/
Letter/Legal13/
Legal13.5/Legal14/
Executive/
16K(184x260mm)/
16K(195x270mm)/
16K(197x273mm)/
Custom/COM-9
Envelope/COM-10
Envelope/Monarch
Envelope/DL
Envelope/C5
Envelope/Postcard/
Return Postcard/
Envelope1/
Envelope2/
Envelope3/
Envelope4/Index
Card
Select the size of paper to be fed from the
multi purpose tray.
Custom Width:
64~210~216mm
Length:
127~297~1321mm
Enter paper width and length.
Media Type Plain/Letter Head/
Labels/Bond/
Recycled/Card
Stock/Rough/
Glossy/User Type1/
User Type2/User
Type3/User Type4 /
User Type5
Select the type of media to be fed from the
multi purpose tray so that the MFP can
adjust its internal parameters to better
accommodate the selected type of media.
Media Weight Light/Medium Light/
Medium/Heavy/
Ultra Heavy1/Ultra
Heavy2
Select the media weight to be fed from the
multi purpose tray.
Select Tray
Fax
a
Tray 1: ON/OFF/ON(Prior) Fax: Set tray for
received Fax.
Tray usage, priority
given to trays set to
ON(Prior), then ON.
If tray is set to OFF,
it will not be used.
Tray 2: ON/OFF/ON(Prior)
MP Tray: ON/OFF/ON(Prior)
Copy Tray 1: ON/OFF/ON(Prior) Copy: Set tray for
copy jobs.
If Tray Selection is
set to “Auto”: Tray
usage, priority
given to trays set to
ON, then ON(Prior).
If tray is set to OFF,
it will not be used.
Tray 2: ON/OFF/ON(Prior)
MP Tray: ON/OFF/ON(Prior)
Duplex Last Page Always Print/Skip Blank Page
a. MC362 and MC562 and ES5462 MFP only.
ITEM OPTION OPTION/DESCRIPTION
Appendix A - menu system > 103
A
DDRESS
BOOK
ITEM OPTION OPTION/DESCRIPTION
E-mail Address Select an address number.
Max. 100 entries.
Register Name user defined Enter a name for the e-mail address entry.
Max. 16 characters.
E-mail
Address
user defined Enter the e-mail address.
Max. 80 digits.
Group No. Add to a registered group.
Edit Edit settings. Refer to options above for
details.
Delete Yes, No Delete entry.
Sort By Name Sort list of entries by name.
Sort By Number Sort list of entries by number.
Search
E-mail Group Select a group number.
Max. 20 group entries.
Register Name user defined Enter a name for the e-mail group entry.
Max. 16 characters.
Address No. Select and assign addresses from resultant
list.
Max. 100 entries can be register to a
group.
Edit Edit settings. Refer to options above for
details.
Delete Yes, No Delete entry.
Sort By Name Sort list of entries by name.
Sort By Number Sort list of entries by number.
Search
Appendix A - menu system > 104
P
HONE
BOOK
NOTE
MC362 and MC562 and ES5462 MFP only.
ITEM OPTION OPTION/DESCRIPTION
Speed Dial Select a speed dial number.
Max. 100 speed dial entries.
Register Name user defined Enter a name for the speed dial entry.
Max. 24 characters.
Fax
Number
user defined Enter the fax number for the speed dial
entry.
Max. 40 digits.
Group No. Add to a registered group.
Edit Edit settings. Refer to options above for
details.
Delete Yes, No Delete entry.
Sort By Name Sort list of entries by name.
Sort By Number Sort list of entries by number.
Search
Group No. Select a group number.
Max. 20 group entries.
Register Name user defined Enter a name for the group dial entry.
Max. 16 characters.
Speed Dial Select and assign speed dial entries from
resultant list.
Max. 100 entries can be register to a
group.
Edit Edit settings. Refer to options above for
details.
Delete Yes, No Delete entry.
Sort By Name Sort list of entries by name.
Sort By Number Sort list of entries by number.
Search
Appendix A - menu system > 105
P
ROFILE
ITEM OPTION VALUE/DESCRIPTION
No. Select a profile number.
Register Profile Name user defined Sets a profile name.
Max. 16 characters.
Protocol CIFS, FTP, HTTP Selects a protocol to use for storing files.
Target URL user defined Sets a server address and a directory to store the
scanned data.
Max. 144 characters.
Port No. 1 ~ 445 ~65535 Sets a port number.
PASV Mode ON, OFF Sets whether to use the FTP Passive mode.
Display condition: Protocol set to FTP.
User Name user defined Sets a user name to use for logging onto the
server.
Max. 32 characters.
Password user defined Sets a password to use when logging onto the
server.
Max. 32 characters.
CIFS Character
Set
UTF-16, Shift-JIS Sets a character set to use in CIFS.
Display condition: CIFS is set as a protocol.
Encode
Communication
None Selects an encryption method for communication.
Not available when using CIFS protocol. Choices
vary depending on the protocol selected.
Scan Size A4, A5, A6, B5,
Letter, Legal 13,
Legal 13.5, Legal 14,
Executive
Selects a scan size.
Note: A6 duplex scan is not supported.
Image Settings Density -3 ~ 0 ~ +3 Sets the density of
images.
Document Type Text, Text&Photo,
Photo, Photo
(Glossy)
Sets the image quality.
Background Removal OFF, 1, 2, 3, 4, 5, 6 Sets the default setup of
the background removal.
Resolution 75dpi, 100dpi,
150dpi, 200dpi,
300dpi, 400dpi,
600dpi
Selects a resolution.
Contrast -3 ~ 0 ~ +3 Sets the contrast.
Hue -3 ~ 0 ~ +3 Sets the red-green colour
balance.
Saturation -3 ~ 0 ~ +3 Sets the colour saturation.
RGB R:-3 ~ 0 ~ +3
G:-3 ~ 0 ~ +3
B:-3 ~ 0 ~ +3
R:[0], G:[0], B:[0]
Sets the RGB contrast.
Appendix A - menu system > 106
Register
(cont.)
File Name user defined Sets a file name. Max. 64 characters.
The following options can be set as the default file
name:
#n: adding a serial number from 00000 to 99999
#d: adding the date of a file creation
(yymmddhhmmss)
Greyscale OFF, ON Select ON to print in grayscale.
File Format Color PDF, TIFF, JPEG, XPS Sets a file format for
scanning.
Mono (Greyscale) PDF, TIFF, JPEG, XPS
Mono (Binary) PDF, TIFF, XPS
Encrypted PDF Not Encrypt Encryption disabled.
Encrypt Low, Medium, High Set encryption level.
Also enable/disable
document open and
permissions passwords.
Compression Rate Color High, Medium, Low Sets a compression rate
for scanning.
Mono (Greyscale) High, Medium, Low
Mono (Binary) High, Medium, Raw
Edge Erase OFF Sets whether to erase the
edge shadow created in
the surrounding of 2-page
spread documents.
ON Width:
5 mm
Sets an erasing width.
Range: 5 to 50 mm.
Edit Edit profile settings. Refer to options above for
details.
Delete Yes, No Delete profile.
Sort By
Name
Sort list of entries by name.
Sort By
Number
Sort list of entries by number.
Search
ITEM OPTION VALUE/DESCRIPTION
Appendix A - menu system > 107
N
ETWORK
SCAN
DESTINATION
S
TORE
DOCUMENT
SETTINGS
ITEM OPTION OPTION/DESCRIPTION
No. Select a destination number.
Register Destination user defined Sets a destination name.
Max. 16 characters.
Destination
Address
user defined Sets a destination address.
Max. 16 characters.
Port No. 9968 Sets a port number.
Available range: 1 to 65535.
Edit Destination Edit destination name.
Destination Address Edit destination address.
Port No. Edit port no.
Delete Yes, No Deletes destination.
Sort By Name Sort list of entries by name.
Sort By Number Sort list of entries by number.
Search
ITEM OPTION OPTION/DESCRIPTION
Store Fcode Bulletin
Board
Over Write Stores documents in a bulletin box.
Delete Fcode Bulletin Board Deletes accumulated documents.
Print Fcode Box Prints accumulated documents.
Appendix A - menu system > 108
V
IEW
INFORMATION
E
ASY
SETUP
ITEM OPTION OPTION/DESCRIPTION
System
Information
Serial No.
Asset No.
Lot No.
CU Version
PU Version
Scanner Version
Panel Version
Tot al Memory
Flash Memory
SD Memory Card
a
a. MC562 and ES5462 MFP only.
Displays system information
Network
IPv4 Address
b
Subnet Mask
b
Gateway Address
b
MAC Address
NIC Program Version
IPv6 Address (Local)
c
IPv6 Address (Global)
c
b. Appears only when the “TCP/IP” setting is “Enable” and the “IP Version” setting is “IPv4”.
c. Appears only when the “TCP/IP” setting is “Enable” and the “IP Version” setting is “IPv6”.
Displays network information
NOTE
The Easy Setup menu is blocked by the Admin password.
ITEM OPTION OPTION/DESCRIPTION
Date/Time Setting user defined Using the arrow keys, select your time zone,
in relation to GMT, from the list. Press OK to
continue.
Not Summer
Time
Now Summer
Time
Manual Day
Month
Year
Using the keypad
and arrow keys,
enter the correct
date and time.
Hour
Minute
Second
Server Set Address of SNTP
Server (Primary)
user defined
Set SNTP Server
(Secondary)
Fax Setting
a
Fax Number user defined Using the keypad and on screen options,
enter the fax number of this machine.
Sender ID user defined Using the arrow keys and on screen
keyboard, enter the sender ID.
Appendix A - menu system > 109
Network Setting Manual
Auto
IP Address Specifies whether IP address allocation is
automatic (DHCP) or manually assigned.
Display condition: TCP/IP protocol must be
enabled.
Subnet Mask Current assigned subnet mask.
To change, enter the address using the
keypad. Press OK to register new address.
Display condition: TCP/IP protocol must be
enabled.
Default Gateway Current assigned gateway address.
To change, proceed as above.
Display condition: TCP/IP protocol must be
enabled.
DNS Server
(Primary)
Current assigned DNS server (primary).
DNS Server
(Secondary)
Current assigned DNS server (secondary).
WINS Server
(Primary)
Current assigned WINS server (primary).
WINS Server
(Secondary)
Current assigned WINS server (secondary).
E-mail Setting Set IP Address of
Mail Server
user defined Enter the IP address of the mail server.
Receive Settings POP3/SMTP/
Disable
From user defined Enter the sender’s address
No Authentication Set the
authentication
method.
SMTP Auth User Name
Password
POP Before SMTP Set Address of
POP3 Server
User Name
Password
a. MC362 and MC562 and ES5462 MFP only.
ITEM OPTION OPTION/DESCRIPTION
Appendix A - menu system > 110
A
DMIN
SETUP
NOTE
The Admin Setup option is blocked by a password.
ITEM OPTION VALUE/DESCRIPTION
Copy Setup Default
Settings
Scan size A4, A5, A6, B5,
Letter, Legal 13,
Legal 13.5, Legal 14,
Executive
Allows you to select
the document size.
Duplex Copy
OFF(Simplex)
,
Simplex -> Duplex LE,
Simplex -> Duplex SE,
Duplex -> Duplex,
Duplex LE -> Simplex,
Duplex SE -> Simplex
Turns the duplex (2-
sided) function off or
on.
Note: A6 duplex copy
is not supported.
Zoom Auto, 100%,
Zoom (25-400%),
A4->A5(70%),
Leg14->Let(78%),
Leg13.5->Let(81%),
Leg13->Let(84%),
A4->B5(86%),
A4->Let(94%),
Let->A4(97%),
Fit to page(98%),
B5->A4(115%),
A5->A4(141%)
Allows you to scale the
copy using the presets
values or by scaling in
1% increments up to
400% and down to 0
by entering the value
using the keypad.
Sort ON, OFF ON prints 1 entire
copy/set of the
multiple copy
document at a time
(e.g. pages
1,2,3,1,2,3,1,2,3,…)
OFF batch prints the
multiple copy
document page by
page (e.g. pages
1,1,1,2,2,2,3,3,3,…)
Image
Settings
Density -3 ~ 0 ~ +3 Allows you to edit the
image settings.
Document
Type
Text, Text&Photo,
Photo, Photo
(Glossy)
Scan
Resolution
Normal, Extra Fine
Background
Removal
OFF, 1, 2, 3, 4, 5, 6
Contrast -3 ~ 0 ~ +3
Hue -3 ~ 0 ~ +3
Saturation -3 ~ 0 ~ +3
RGB -3 ~ 0 ~ +3
R:0/G:0/B:0
Direction Portrait, Landscape Selects the default
page orientation.
Appendix A - menu system > 111
Copy Setup
(cont.)
Default
Settings
(cont.)
ID Card Copy ON, OFF Allows you to set ID
card copying as the
default copy mode.
Note: place the ID
card 5mm from the
edge of the scanner
flatbed.
Continue Scan ON, OFF Allows you to continue
scanning more
documents. Allows you
to construct a single
scan job from multiple
individual sheets or
originals.
Mixed Size ON, OFF Allows you to load
originals of same
width but different
length in the ADF.
The following
document sizes can be
set concurrently; A3
and A4 LEF, B4 and B5
LEF, A4SEF and A5
LEF.
When enabled, the
tray setting is
automatic, you cannot
specify a tray
manually.
Margin ON, OFF Allows you to change
the document top and
left margin areas.
Input range: -25 to
+25mm.
Edge Erase ON, OFF Allows you to block out
the peripheral areas of
the document where
spurious shadows and
borders may arise
when copying with the
document cover open
(such as with books
and magazines) or for
other purposes.
Input range: 5 to
50mm.
ITEM OPTION VALUE/DESCRIPTION
Appendix A - menu system > 112
Fax Setup
a
Default
Settings
Resolution Normal, Fine,
Extra-Fine, Photo
Allows you to specify
the type of images on
the document.
Density -3 ~ 0 ~ +3 Adjust density
Darker: Keep colour
intensity and darker
image.
Lighter: Reduce colour
intensity and gives
lighter image.
Scan Size A4, Letter, Legal 13,
Legal 13.5, Legal 14
Allows you to select
the paper size to
match the document
size.
Continue Scan ON, OFF Allows you to continue
scanning more
documents. Allows you
to construct a single
fax job from multiple
individual sheets or
originals.
TTI ON, OFF Prints the sender
name on the header of
the transmitted fax.
By default, the name
you specified in
Sender ID is printed.
Transmit Confirmation Report ON, OFF Select ON to print a
fax confirmation after
transmission.
Memory Tx ON, OFF Select OFF to enable
real time transmission,
i.e. fax transmission
synchronisation with
scanning.
Fcode Box Register
Confidential Box
Box Name
Sub-Address
Hold Time
I.D.Code
user defined
user defined
00 ~ 0 ~ 31
user defined
Confidential Box:
received data cannot
be printed without
entering ID code (for
secret documents).
You can also enter a
Box Name, Password
and specify the hold
time for your secure
box.
Range: 00 - 31
Bulletin Box
Box Name
Sub-Address
user defined
user defined
Bulletin Box: Enable to
transmit/receive
documents to/from
Bulletin.
Edit Edit settings. Refer to options above for details.
Delete Yes, No Delete entry.
ITEM OPTION VALUE/DESCRIPTION
Appendix A - menu system > 113
Fax Setup
a
(cont.)
Security
Function
ID Check Tx ON, OFF Check and match the
last four digits of the
destination fax
numbers with those
registered in the
target. If ON, the MFP
will send only when
they match.
Broadcast Destination ON, OFF Fax number
confirmation screen
displays before
sending the fax.
Confirm Dial ON, OFF
When ON, you will be
asked to re-enter the
destination fax number.
The fax will only be
sent when the two
numbers match.
Other
Settings
Redial Tries 0 ~ 2 ~ 9 time(s) Set the number of
redial attempts.
Range: 0 - 9 time(s)
Redial Interval 1 ~ 5 minute(s) Set the time between
redial attempts.
Range: 1 - 5 minute(s)
Ring Response 1 Ring, 5 seconds,
10 seconds,
15 seconds,
20 seconds
Enter the number of
rings required before
receiving an incoming
fax.
Dialling Pause Duration 0 ~ 2 ~ 10
second(s)
Enter the pause
duration required.
Range: 0 - 10 second(s)
Rx Reduc. Rate Auto, 100% Select the Rx
reduction rate.
Reduc. Margin 0 ~ 24 ~ 100 mm Select the reduction
margin.
Range: 0 - 100 mm
ECM Mode ON, OFF
Error correction mode
(ECM) automatically
detects and corrects
errors in the fax
transmission process that
are sometimes caused by
telephone line noise.
Prefix user defined
Enter the require
dialling prefix (if you are
connected via a PBX
then you need to enter
a prefix to obtain an
outside line connection).
Received Time Stamp ON, OFF Set to ON if you want
the time stamp printed
on incoming faxes.
Print Check Message ON, OFF If enabled, when a
transmission error
occurs the error
content is reported.
ITEM OPTION VALUE/DESCRIPTION
Appendix A - menu system > 114
Fax Setup
a
(cont.)
Fax Setting Service Bit ON, OFF
Country Code International Select the country in
which the MFP is
situated.
A/R Full Print ON
H/Modem Rate (For Tx)
33.6 Kbps
,
28.8 Kbps, 14.4 Kbps,
9.6 Kbps, 48. Kbps
Specify modem rate.
Note: If you are using
an IP phone line and
fax Tx/Rx fails, change
the modem rate to
14.4kbps or less.
H/Modem Rate (For Rx)
33.6 Kbps
,
28.8 Kbps, 14.4 Kbps,
9.6 Kbps, 48. Kbps
PBX Line ON, OFF
Forwarding Setting ON, OFF
TAD Mode
Type 1, Type 2,
Type 3
Specify TAD mode type.
Tel Priority Mode ON, OFF
CNG Detection ON, OFF
T/F Timer Programming 20 seconds,
35 seconds
Soft Ringer Volume OFF, Low, Middle,
High
Select volume level.
Remote Receive Number OFF, 000, 111, 222,
333, 444, 555, 666,
777, 888, 999
The left digits can be
set.
Internet
Fax Setup
Default
Settings
Scan Size A4, Letter, Legal 13,
Legal 13.5, Legal 14
Allows you to select the
paper size to match the
document size.
Density -3 ~ 0 ~ +3 Adjust density
Darker: Keep colour
intensity and darker
image.
Lighter: Reduce colour
intensity and gives
lighter image.
Resolution Normal, Fine,
Extra-Fine, Photo
Allows you to specify
the type of images on
the document.
Background Removal OFF, 1, 2, 3, 4, 5, 6
Allows you to block out
the colour background
of the image (assuming
document has a colour
background) - such
that the background
colour is not printed.
Continue Scan ON, OFF
Allows you to continue
scanning more
documents. Allows you to
construct a single fax job
from multiple individual
sheets or originals.
Compression Rate High, Medium, Low Select the appropriate
compression level.
ITEM OPTION VALUE/DESCRIPTION
Appendix A - menu system > 115
Scanner
Setup
Default
Settings
Scan Size A4, A5, A6, B5,
Letter, Legal 13,
Legal 13.5, Legal 14,
Executive
Allows you to select
the scan size.
Note: A6 is only
simplex scanning.
Image Settings
Density : -3 ~ 0 ~ +3
Allows you to adjust
image settings.
Document Type : Text, Text&Photo,
Photo, Photo
(Glossy)
Background Removal : OFF, 1, 2, 3, 4, 5, 6
Resolution : 75dpi, 100dpi,
150dpi, 200dpi,
300dpi, 400dpi,
600dpi
Contrast : -3 ~ 0 ~ +3
Hue : -3 ~ 0 ~ +3
Saturation : -3 ~ 0 ~ +3
RGB : -3 ~ 0 ~ +3
R:0/G:0/B:0
Continue Scan ON, OFF Allows you to continue
scanning more
documents. Allows you
to construct a single
scan job from multiple
individual sheets or
originals.
Greyscale ON, OFF Select ON to print in
grayscale.
File Format
Color:
Greyscale:
Mono:
PDF, TIFF, JPEG, XPS
PDF, TIFF, XPS
Select the appropriate
file format.
Encrypted PDF Setting
Document Open Password:
Permissions Password:
Display Default Password:
user defined
user defined
Disable, Enable
Set the encryption
passwords and display
option.
Compression Rate
Color:
Greyscale:
Mono:
High, Medium, Low
High, Medium, Low
High, Medium, Raw
Select the appropriate
compression level.
Edge Erase ON, OFF Input range: 5 to
50mm.
ITEM OPTION VALUE/DESCRIPTION
Appendix A - menu system > 116
Scanner
Setup
(cont.)
E-mail Setup
File Name user defined
Template Edit Subject
Edit Body
Select template from list
From /
Reply To
From:
Address Book
Select e-mail address
from the address book.
Direct Input
Enter e-mail address using
the on-screen keyboard.
LDAP Simple Search Use the on-screen
keyboard to enter a
search value.
Advanced Search
Search Method
User Name
E-mail Address
Use Advanced Search
to search the LDAP
address book by user
name and/or e-mail
address.
E-mail Sender ID: user defined Used as the name of
E-mail sender.
Reply To: user defined
Broadcast
Destination
ON, OFF
MDN
Response
ON, OFF
A/R Full
Print
ON, OFF
MCF Report ON, OFF Select ON to print a
fax confirmation after
transmission.
Timeout of
MCF Report
OFF, 5 minutes,
15 minutes,
30 minutes,
90 minutes,
150 minutes
Print Check
Message
ON, OFF If enabled, when a
transmission error
occurs the error
content is reported.
USB
Memory
Setup
File Name user defined Max. 64 characters.
#n:Assigns a
consecutive number as
the file name.
#d:Assigns a created
date and time
(YYMMDDHHMMSS
format) as the file name.
TWAIN Setup
Network TWAIN ON, OFF
Port No. 1 ~ 9967 ~ 65535 Range: 1 - 65535
PC Scan Mode Simple Scan Mode,
Secure Scan Mode
WSD Scan
Setup
WSD Scan Enable/Disable
Binding Long Edge Bind,
Short Edge Bind
Scanner
Calibration
Execute Yes, No
ITEM OPTION VALUE/DESCRIPTION
Appendix A - menu system > 117
Print From
USB Memory
Setup
Default
Settings
Paper Feed Tray 1(A4),
Tray 2 (A 4) ,
MP Tray(A4)
Selects the default
tray for paper feed,
Tray 1 (u pp er ), Tray 2
(lower, if installed) or
MP Tray (multi purpose
tray).
Copies 1 - 999 Enter the number of
copies of a document
to be printed.
Duplex ON, OFF Switches the Duplex
(2 sided) function ON/
OFF.
Binding Long Edge Bind,
Short Edge Bind
Display condition:
duplex setting is
enabled.
Fit ON, OFF Sets the printing mode
that can fit print data
in the printable area.
Print Setup Print Menu Tray Configuration
Paper Feed: Tray 1, Tray 2,
MP Tray
Adjust tray
configuration settings.
Auto Tray Switch: ON, OFF
Tray Sequence: Down, Up, Paper
Feed Tray
MP Tray Usage: When Mismatching,
Do Not Use
Media Check: Enable, Disable
Print Setup
Copies: 1 - 999
Adjust print setup.
Duplex: ON, OFF
Binding: Long Edge Bind,
Short Edge Bind
Resolution: 600dpi,
600x1200dpi,
600dpi M-LEVEL
Toner Save Mode: OFF, Low, Middle,
High
Mono-Print Speed: Auto, Color Print
Speed, Normal print
Speed
Orientation: Portrait, Landscape
Lines Per Page: 5 ~ 64 ~ 128 Line(s)
ITEM OPTION VALUE/DESCRIPTION
Appendix A - menu system > 118
Print Setup
(cont.)
Print Menu
(cont.)
Edit Size: Cassette Size, A4,
A5, A6, B5, Letter,
Legal 13, Legal 13.5,
Legal 14, Executive,
16K(184x260mm),
16K(195x270mm),
16K(197x273mm),
Custom,
COM-9 Envelope,
COM-10 Envelope,
Monarch Envelope,
DL Envelope,
C5 Envelope, Postcard,
Return Postcard,
Envelope1,
Envelope2,
Envelope3,
Envelope4,
Index Card
Width: 64 ~ 210 ~ 216 mm
Length:
127 ~
297
~ 1321 mm
Printer Adjust
Manual Timout: Disable, 30 seconds,
60 seconds
Adjust general printer
settings.
Wait Timeout: Disable, 5 seconds,
10 seconds,
20 seconds,
30 seconds,
40 seconds,
50 seconds,
60 seconds,
90 seconds,
120 seconds,
150 seconds,
180 seconds,
210 seconds,
240 seconds,
270 seconds,
300 seconds
Print Mode Without Color
Toner : Alarm, Cancel
Jam Recovery: Enable, Disable
Paper Black Setting: -2 ~ 0 ~ +2
Paper Color Setting: -2 ~ 0 ~ +2
SMR Setting: -3 ~ 0 ~ +3
BG Setting: -3 ~ 0 ~ +3
Print Position Adjust
Front X Adjust:
Front Y Adjust:
Back X Adjust:
Back Y Adjust:
0.00 mm
0.00 mm
0.00 mm
0.00 mm
Range: -2.00 to
+2.00 mm
Drum Cleaning ON, OFF
Set to produce idling of
a drum before printing
in order to reduce
horizontal white lines.
This shortens image
drum life.
Hex Dump ON, OFF
Prints out the data
received from the host
PC in hexidecimal code.
ITEM OPTION VALUE/DESCRIPTION
Appendix A - menu system > 119
Print Setup
(cont.)
Color Menu Density Control Auto, Manual If set to Auto, image
density will be
automatically adjusted
at power on, when a
new image drum or
toner cartridge is
installed, and at
intervals of 100, 300
and 500 drum counts.
If a 500 drum count
interval occurs during
a print job it will occur
at the end of that job,
and will take up to 55
seconds. If set to
manual, this
adjustment will only
be performed when
initiated by the next
menu item.
Adjust Density Execute Selecting this will
perform the auto
density set up
immediately.
Color Tuning/Print Pattern Execute Selecting this item
prints the colour
tuning pattern to help
you adjust the colour
balance.
Cyan Highlight -3 ~ 0 ~ +3 Adjusts image density
for each colour
component (cyan,
magenta, yellow and
black). Normal setting
is 0.
Cyan Mid-Tone -3 ~ 0 ~ +3
Cyan Dark -3 ~ 0 ~ +3
Magenta Highlight -3 ~ 0 ~ +3
Magenta Mid-Tone -3 ~ 0 ~ +3
Magenta Dark -3 ~ 0 ~ +3
Yellow Highlight -3 ~ 0 ~ +3
Yellow Mid-Tone -3 ~ 0 ~ +3
Yellow Dark -3 ~ 0 ~ +3
Black Highlight -3 ~ 0 ~ +3
Black Mid-Tone -3 ~ 0 ~ +3
Black Dark -3 ~ 0 ~ +3
Cyan Darkness -3 ~ 0 ~ +3 Adjusts darkness of
each colour (cyan,
magenta, yellow and
black). Normal setting
is 0.
Magenta Darkness -3 ~ 0 ~ +3
Yellow Darkness -3 ~ 0 ~ +3
Black Darkness -3 ~ 0 ~ +3
ITEM OPTION VALUE/DESCRIPTION
Appendix A - menu system > 120
Print Setup
(cont.)
Color Menu
(cont.)
Adjust Registration Execute Performs automatic
colour registration
adjustment. Normally
this is done on power
on and when the top
cover is opened and
then closed. This
process accurately
aligns the cyan,
magenta and yellow
images to the black
image.
Cyan Reg Fine Adj -3 ~ 0 ~ +3 Performs fine
adjustment of image
timing in relation to
the black image
component.
Magenta Reg Fine Adj -3 ~ 0 ~ +3
Yellow Reg Fine Adj -3 ~ 0 ~ +3
Ink Simulation OFF, SWOP,
EUROSCALE, JAPAN
Selects from a range
of industry standard
colour swatches.
UCR Low, Medium, High Selects the limitation
of the toner layer
thickness.
If paper curl occurs in
dark printing, selecting
Medium or Low
sometimes helps
reduce curl.
CMY100% Density Enable, Disable When enabled, black
areas are produced
using 100% C, M, and
Y instead of black. This
results in a glossier
finish.
CMYK Conversion ON, OFF Setting to OFF will
simplify the conversion
process of CMYK data,
which will reduce
process time.
This setting is ignored
when Ink Simulation
function is used.
System
Configuration
Menu
Personality Auto Emulation,
PCL, IBM PPR,
EPSON FX,
PS3 Emulation
This item selects which
industry standard
emulation your MFP
should use. When set
to Auto, incoming data
is examined and the
correct emulation is
automatically selected
each time a print job is
received.
Alarm Release Manual, Auto
When Manual, non-
critical warnings, such
as requests for a
different paper size, can
be cleared by pressing
the RESET button.
When set to Auto, they
are cleared when the
print job resumes.
ITEM OPTION VALUE/DESCRIPTION
Appendix A - menu system > 121
Print Setup
(cont.)
System
Configuration
Menu
(cont.)
Auto Continue ON, OFF Determines whether or
not the MFP will
automatically recover
from a memory
overflow condition.
Error Report ON, OFF If ON, the MFP will
print error details
when a PostScript
emulation error
occurs.
PCL Setup Font Source Resident Specifies the location
of the PCL default font.
Font No. I0 ~ I90 Sets the PCL font
number.
Font Pitch 0.44~10.00~
99.99 CPI
Sets the width of the
PCL default font.
Font Height 4.00~12.00~
999.75 point(s)
Sets the height of the
PCL default font.
Symbol Set PC-8 PCL symbol set. If the
font source and
number are changed
to one which does not
support the selected
symbol set, this must
be changed to an
available symbol set
for that font.
A4 Print Width 78 Column,
80 Column
Sets the number of
columns subject to
Auto LF with A4 paper
in PCL. This is the
value when Auto CR/
LF Mode is set to OFF
with the 10CPI
character.
White Page Skip ON, OFF Selects whether blank
pages are printed or
not.
CR Function CR, CR+LF Selects whether a
received carriage
return character (0Dh)
also causes a line
feed.
LF Function LF, CR+LF Selects whether a
received line feed
character (0Ah) also
causes a carriage
return.
Print Margin Normal,
1/5 inch, 1/6 inch
Sets the non-printable
page area. Normal is
PCL compatible.
True B lack ON, OFF Selects whether black
image data is printed
using black toner (True
Black ON) or 100%
CMY. (Valid in PCL
emulation mode only.)
ITEM OPTION VALUE/DESCRIPTION
Appendix A - menu system > 122
Print Setup
(cont.)
PCL Setup
(cont.)
Pen Width Adjust ON, OFF The thinnest line width
in PCL, a 1-dot line,
may look broken.
ON: when the thinnest
line width is specified,
line width is
emphasized to look
wider.
OFF: the line appears
as specified.
Tray I D#
Tray 2 :
MP Tray :
1 ~ 5 ~ 59
1 ~ 4 ~ 59
Sets the number to
specify Tray 2 and MP
Tray for the paper feed
destination command
in PCL5e emulation.
PS Setup L1 Tray Type 1, Type 2 Switches between
Postscript types.
SIDM Setup SIDM Manual ID# 0 ~ 2 ~ 9 Set up Pn specified in
MANUAL by MANUAL-1
ID No.FX/PPR Emu in
CSF control command
(ESC EM Pn).
SIDM Manual2 ID# 0 ~ 3 ~ 9 Set up Pn specified
MANUAL by MANUAL-2
ID No.FX/PPR Emu in
CSF control
command(ESC EM Pn).
SIDM MP Tray ID# 0 ~ 4 ~ 9 Set up Pn specified
TRAYO(MP Tray) by MP
Tray I D N o.FX/PP R
Emu in CSF control
command(ESC EM Pn).
SIDM Tray1 ID# 0 ~ 1 ~ 9 Set up Pn specified
TRAY 1by Tray 1 ID
No.FX/PPR Emu in CSF
control command(ESC
EM Pn).
SIDM Tray2 ID# 0 ~ 5 ~ 9
Set up Pn specified TRAY
2 by Tray 2 ID No.FX/
PPR Emu in CSF control
command (ESC EM Pn).
IBM PPR
Setup
Character Pitch 10 CPI, 12 CPI,
17 CPI, 20 CPI,
Proportional
Specifies character
pitch in IBM PPR
emulation.
Font Condense 12CPI to 20CPI,
12CPI to 12CPI
Specifies 12CPI pitch
for Condense Mode.
Character Set SET-1, SET-2
Specifies a character set.
Symbol Set IBM-437 Specifies a symbol set.
Letter O Style Enable, Disable
Specifies the style that
replaces 9BH with letter
o and 9DH with a zero
Zero Character Normal, Slashed Sets the zero to be
slashed or unslashed.
Line Pitch 6 LPI, 8 LPI Specifies the line
spacing.
ITEM OPTION VALUE/DESCRIPTION
Appendix A - menu system > 123
Print Setup
(cont.)
IBM PPR
Setup
(cont.)
White Page Skip ON, OFF Selects whether blank
pages are printed or
not.
CR Function CR, CR+LF Selects whether a
received carriage
return character (0Dh)
also causes a line
feed.
LF Function LF, LF+CR Selects whether a
received line feed
character (0Ah) also
causes a carriage
return.
Line Length 80 Column,
136 Column
Specifies the number
of characters per line.
Form Length 11 inch, 11.7 inch,
12 inch
Specifies the length of
paper.
TOF Position 0.0 ~ 1.0 inch Specifies the distance
of print from the top
edge of the paper.
Left Margin 0.0 ~ 1.0 inch Specifies the distance
of print from the left
hand edge of the
paper.
Fit To Letter Enable, Disable
Sets the printing mode
that can fit print data,
equivalent to 11 inches
(66 lines), in the LETTER-
size printable area.
Tex t Heig ht Same, Diff Sets the height of a
character.
SAME: Regardless of
CPI, same height
DIFF: As CPI,
character heights vary.
EPSON FX
Setup
Character Pitch 10 CPI, 12 CPI,
17 CPI, 20 CPI,
Proportional
Specifies character
pitch in this emulation.
Character Set SET-1, SET-2
Specifies a character set.
Symbol Set IBM-437 Specifies a symbol set.
Letter O Style Enable, Disable
Specifies the style that
replaces 9BH with letter
o and 9DH with a zero
Zero Character Normal, Slashed Sets the zero to be
slashed or unslashed.
Line Pitch 6 LPI, 8 LPI Specifies the line
spacing.
White Page Skip ON, OFF
Selects whether blank
pages are printed or not.
CR Function CR, CR+LF
Selects whether a
received carriage
return character (0Dh)
also causes a line feed.
ITEM OPTION VALUE/DESCRIPTION
Appendix A - menu system > 124
Print Setup
(cont.)
EPSON FX
Setup
(cont.)
Line Length 80 Column,
136 Column
Specifies the number
of characters per line.
Form Length 11 inch, 11.7 inch,
12 inch
Specifies the length of
paper.
TOF Position 0.0 ~ 1.0 inch Specifies the distance
of print from the top
edge of the paper.
Left Margin 0.0 ~ 1.0 inch Specifies the distance
of print from the left
hand edge of the
paper.
Fit To Letter Enable, Disable Sets the printing mode
that can fit print data,
equivalent to 11
inches (66 lines), in
the LETTER-size
printable area.
Tex t Heig ht Same, Diff Sets the height of a
character.
SAME: Regardless of
CPI, same height
DIFF: As CPI,
character heights vary.
Network
Menu
Network
Setup
TCP/IP Enable, Disable Enables or disables
this network protocol.
IP Version IPv4, IPv4+IPv6 Set up the IP version.
Display condition:
TCP/IP protocol must
be enabled.
NetBEUI Enable, Disable Enables or disables
this network protocol.
NetBIOS Over TCP Enable, Disable Enables or disables
this network protocol.
Display condition:
TCP/IP protocol must
be enabled.
NetWare Enable, Disable Enables or disables
this network protocol.
EtherTalk Enable, Disable Enables or disables
this network protocol.
Frame Type Auto, 802.2, 802.3,
ETHERNET II, SNAP
Selects the Ethernet
MAC layer frame type.
Display condition:
Netware must be
enabled.
IP Address Set Auto, Manual Specifies whether IP
address allocation is
automatic (DHCP) or
manually assigned.
Display condition:
TCP/IP protocol must
be enabled.
ITEM OPTION VALUE/DESCRIPTION
Appendix A - menu system > 125
Network
Menu
(cont.)
Network
Setup
(cont.)
IPv4 Address xxx.xxx.xxx.xxx Current assigned IP
address.
To change, enter the
address using the
numerical keypad.
Press Enter to register
new address.
Display condition:
TCP/IP protocol must
be enabled.
Subnet Mask xxx.xxx.xxx.xxx Current assigned
subnet mask. To
change, proceed as
above.
Display condition:
TCP/IP protocol must
be enabled.
Gateway Address xxx.xxx.xxx.xxx Current assigned
gateway address. To
change, proceed as
above.
Display condition:
TCP/IP protocol must
be enabled.
DNS Server (Primary) 0.0.0.0 The IP address of your
DNS server (primary).
DNS Server (Secondary) 0.0.0.0
The IP address of your
DNS server (secondary).
WINS Server (Primary) 0.0.0.0
The IP address of your
WINS server (primary).
WINS Server (Secondary) 0.0.0.0 The IP address of your
WINS server
(secondary).
Web Enable, Disable Enables or disables
web config. facility.
Display condition:
TCP/IP protocol must
be enabled.
Telnet Enable, Disable Enables or disables
Telnet config. facility.
Display condition:
TCP/IP protocol must
be enabled.
FTP Enable, Disable
Enables or disables
communication via FTP.
Display condition:
TCP/IP protocol must
be enabled.
IPSec Enable, Disable
Enable via the web page
or Configuration Tool.
SNMP Enable, Disable Enables or disables
SNMP of FTP (TCP/IP
or NetWare).
Display condition:
TCP/IP protocol must
be enabled.
ITEM OPTION VALUE/DESCRIPTION
Appendix A - menu system > 126
Network
Menu
(cont.)
Network
Setup
(cont.)
Network Scale Normal, Small Normal: Can work
effectively even when
connected to a HUB
that has a spanning
tree feature. However,
printer start up time
gets longer when
computers are
connected to two or
three small LANs.
Small: Computers can
cover from two or
three small LANs to a
large LAN, but it may
not work effectively
when it is connected to
a HUB with a spanning
tree feature.
HUB Link Setting Auto Negotiate,
100BASE-TX FULL,
100BASE-TX HALF,
10BASE-T FULL,
10BASE-T HALF
Sets the hub linking
method.
TCP ACK Type1, Type2
Network PS-Protocol ASCII, RAW Select PostScript data
format for the network
port.
Factory Defaults Execute Select Yes to reload
the settings present
when the unit was
setup by the
manufacturer.
Mail Server
Setup
SMTP Server user defined Set the host name for
the SMTP server.
SMTP Port 1 ~ 25 ~ 65535 Set the port number.
SMTP Encryption None, SMTPS,
STARTTLS
Select encryption
method.
Receive Setting POP3, SMTP, Disable
POP3 Server user defined Set the IP address or
host name for the
POP3 server.
POP3 Port 1 ~ 110 ~ 65535 Set the port number.
POP Encryption None, POP3S,
STARTTLS
Select encryption
method.
Authentication Method None, SMTP, POP Set the authentication
method.
SMTP User ID user defined Set a user ID for the
SMTP server.
SMTP Password user defined Set a password for the
SMTP server.
POP User ID user defined Set a user ID for the
POP3 server.
POP Password user defined Set a password for the
POP3 server.
ITEM OPTION VALUE/DESCRIPTION
Appendix A - menu system > 127
Network
Menu
(cont.)
LDAP
Server
Setting
Server Setting
LDAP Server:
Port No.:
Timeout:
Max. Entries:
Search Root:
user defined
1 ~ 389 ~ 65535
10 ~
30
~ 120second(s)
5 - 100 Entries
user defined
Edit the LDAP server
settings.
Attribute
Name1:
Name2:
Name3:
E-mail Address:
Additional Filter:
cn
sn
givenName
mail
user defined
Edit the LDAP search
attribute if required.
Authentication
Method: Anonymous,
Simple, Digest-MD5,
Secure Protocol
Set the authentication
method for LDAP.
User ID: user defined Set a user ID and
password for the LDAP
server.
Displays when
authentication method
is set.
Password: user defined
Encryption None, LDAPS,
STARTTLS
Set the encryption
method.
Secure
Protocol
Server
Setting
Domain user defined Domain must be
registered in the DNS
server.
Management
Default Mode
Copy
, Scan, Print, Fax*
* MC362 & MC562 &
ES5462 MFP only.
Operation
Clear
Operation Timeout
After 1 ~
3
~ 10 minutes
Clear After Job ON, OFF
Sound
Control
Key Touch Tone Volume
OFF, Low,
Middle
, High
Select key touch
volume level.
Fax Buzzer Volume
OFF, Low,
Middle
, High
Select volume level.
Local
Interface
USB Menu
Soft Reset:
Speed:
USB PS_Protocol:
Offline Receive:
Serial Number:
Enable, Disable
480Mbps, 12 Mbps
ASCII, RAW
Enable, Disable
Enable, Disable
Default settings listed,
these can be changed
if required.
System
Setup
Access Control PIN, User/Password,
Disable
Enable access control
to restrict usage to
authorised user only.
User Authentication Method Local, LDAP,
Secure Protocol
Unit Of Measure Inch, Millimeter
Select unit of measure.
Date Format mm/dd/yyyy,
dd/mm/yyyy,
yyyy/mm/dd
Select desired date
format.
ITEM OPTION VALUE/DESCRIPTION
Appendix A - menu system > 128
Management
(cont.)
System
Setup
(cont.)
Allow All Reports To Print Enable, Disable Enable/disable report
printing.
Near Life LED Enable, Disable Enable/disable near
life LED.
Status In Near Life Enable, Disable Enable: Display a
near-life warning.
Disable: Do not
display a near-life
warning.
Address Information Lock
Time Out
1 ~
3
~ 10 minute(s)
Enter time-out
duration.
USB Memory Interface Enable, Disable Select disable to turn
off scan to USB
function.
Panel Contrast -10 ~ 0 ~ +10 Adjust the LCD panel
contrast.
Power Save Power Save Time
1 minute
, 2 minutes,
3 minutes,
4 minutes,
5 minutes,
10 minutes,
15 minutes,
30 minutes,
60 minutes,
120 minutes
Select desired time
interval before
machine enters power
save mode.
Sleep Time 1 minute, 2 minutes,
3 minutes,
4 minutes,
5 minutes,
10 minutes,
15 minutes,
30 minutes,
60 minutes,
120 minutes
Select desired time
interval before
machine enters sleep
mode.
Auto Power Off Time 1 hour, 2 hours,
3 hours, 4 hours,
8 hours, 12 hours,
18 hours, 24 hours
Select desired time
interval to turn off the
machine's power
automatically.
Silent Mode ON, OFF Enable/disable silent
mode.
ECO Mode ON, OFF When ON, if the
machine is in power
save mode and you
send a small print job
(1 or 2 pages), the
machine will print the
job without warming
the fuser to the
“normal” operating
temperature
beforehand.
ITEM OPTION VALUE/DESCRIPTION
Appendix A - menu system > 129
Management
(cont.)
Memory
Setup
Receive Buffer Size Auto, 0.5 MB, 1 MB,
2 MB, 4 MB, 8 MB
Specify the size of the
buffer you want to use
to receive data.
Resource Save Auto, OFF, 0.5 MB,
1 MB, 2 MB, 4 MB,
8 MB
Specify the size of the
buffer you want to use
for resource saving.
Flash
Memory
Setup
Initialize Execute
SD Memory
Card Setup
Initialize Execute
Format Partition PCL
Common
PS
Storage
Maintenance
Setup
Check File System Execute Making changes will
automatically restart
the system.
Erase SD Memory Card Execute Deletion of all data
stored in the SD Card.
Data cannot be
recovered.
Initial Lock Enable, Disable Enable/disable initial
lock.
Encryption
Setup
Job Limitation Disable,
Encrypted Job Only
Enable/disable
limitation setting.
Language
Maint Setup
Initialize Execute Making changes will
automatically restart
the system.
Admin
Password
New Password user defined Enter new password.
Retype your password
when prompted to
verify.
Note: password must
be six characters or
more.
Enter Password (Verify) user defined
Reset Settings Execute Continuing will
automatically restart
the system.
Job Log
Setup
Save Job Log Enable, Disable
Clear Job Log
Print
Statistics
Supplies Report Enable, Disable
Indication of frequency
of consumable
exchange/non
indication is set.
Reset Main Counter Execute Zeros the counter.
Reset Supplies Counter
ITEM OPTION VALUE/DESCRIPTION
Appendix A - menu system > 130
User Install Time Zone 00:00 Range: -12:00 to
+12:00 minutes in 15
minute increments.
Set Daylight Saving ON, OFF
Enable/disable daylight
saving setting.
Time Setup Auto Setup
SNTP Server (Primary):
SNTP Server (Secondary):
user defined
user defined
Set todays date and
time automatically.
Manual Setup
Date:
Time:
user defined
user defined
Enter todays date and
time using the keypad.
Use the arrow keys to
move between digits.
Power Save Power Save Enable ON, OFF Enable/disable power
save mode.
Sleep ON, OFF Enable/disable sleep
mode.
Auto Power Off Enable, Auto
Config, Disable
Sets the behavior of
automatic power off.
High Humid Mode ON, OFF If moistened paper is
curled significantly
after printing, change
the setting to ON.
Note: Moistened paper
means paper that has
been left in a high-
humidity environment.
MF(Tone)/DP(Pulse) Tone, Pulse Select the appropriate
dialling method for the
region you are in.
Reception Mode Fax Ready Mode,
Tel/Fax Ready Mode,
Ans/Fax Ready Mode,
Tel R ead y Mod e, DRD
Specify the reception
mode.
DRD Type Type 1, Type 2,
Type 3, Type 4
Allows the machine to
detect a distinctive
ring if it has been
enabled on the phone
line.
Dial Tone Detection ON, OFF Enable/disable dial
tone detection.
Busy Tone Detection ON, OFF Enable/disable busy
tone detection.
Monitor Control OFF OFF=Not to monitor.
Type1=Monitor up to
DIS. Type2=Execute
monitoring during
communication.
Monitor Volume Middle Select Volume OFF,
Low, Middle, High.
TTI
Register/
Edit
TTI 1:
TTI 2:
TTI 3:
user defined Register/Edit transmit
terminal identification
(TTI) settings.
ITEM OPTION VALUE/DESCRIPTION
Appendix A - menu system > 131
User Install
(cont.)
Standard TTI TTI 1, TTI 2, TTI 3 Select default TTI from
the registered list.
TTI Number user defined Enter your fax number.
TTI Calendar Type yyyy/mm/dd,
mm/dd/yyyy,
dd/mm/yyyy
Specify the TTI
calendar date format.
Super G3 ON, OFF OFF=G3,
ON=SuperG3
Erase Privacy Data Execute Continuing will delete
all settings and
registered data.
a. MC362 and MC562 and ES5462 MFP only.
ITEM OPTION VALUE/DESCRIPTION
Index > 132
I
NDEX
A
Adding a telephone
handset
............................... 44
Address book
adding a group entry
........ 27
adding an email entry....... 25
deleting a group entry ...... 27
deleting an email entry..... 25
editing a group entry........ 28
editing an email entry ...... 26
Advanced Mode..................... 30
C
Configuring the scanning to
Local and Remote PCs
........ 29
D
Deleting Scanner Drivers ...... 39
Direct Print............................ 93
E
Email Reception .................... 61
Encryption
IPSec
................................ 84
SSL/TLS ............................ 80
error notification ................... 88
EtherTalk............................... 58
F
Fax
automatic redial
................ 43
initial setup....................... 41
reception mode................. 43
I
IEEE802.1X ........................... 70
Initializing network ............... 96
IP Filtering........................74, 87
IPP Printing ........................... 82
IPP printing ........................... 82
IPSec................................77, 84
L
LDAP ..................................... 71
M
MAC Address Filtering ......75, 87
Maintenance.......................... 78
N
NBT/NetBEUI ........................ 59
NetWare................................ 57
Network Configuration .......... 35
P
Phone book
adding a group
dial entry
........................ 46
adding a speed
dial entry
........................ 45
deleting a group
dial entry
........................ 46
deleting a speed
dial entry
........................ 46
Printer Trap........................... 67
S
Scan To Local PC................... 36
Scanner Driver Name............ 36
Security................................. 73
SMTP (Email Send) ..........59, 62
SNMP .................................... 66
SNTP ..................................... 78
SSL/TLS ...........................75, 80
T
TCP/IP................................... 55
U
Updating a Scanner Driver.... 40
Using Drivers and
Software
............................. 29
Using TWAIN Driver .............. 29
W
Web Browser......................... 80
Web Printing ......................... 79
Windows Rally.......69, 70, 71, 72
Oki Europe Limited
Blays House
Wick Road
Egham
Surrey, TW20 0HJ
United Kingdom
Tel: +44 (0) 208 219 2190
Fax: +44 (0) 208 219 2199
www.okiprintingsolutions.com
45002202EE Rev1
10


Need help? Post your question in this forum.

Forumrules


Report abuse

Libble takes abuse of its services very seriously. We're committed to dealing with such abuse according to the laws in your country of residence. When you submit a report, we'll investigate it and take the appropriate action. We'll get back to you only if we require additional details or have more information to share.

Product:

For example, Anti-Semitic content, racist content, or material that could result in a violent physical act.

For example, a credit card number, a personal identification number, or an unlisted home address. Note that email addresses and full names are not considered private information.

Forumrules

To achieve meaningful questions, we apply the following rules:

Register

Register getting emails for Oki MC352 at:


You will receive an email to register for one or both of the options.


Get your user manual by e-mail

Enter your email address to receive the manual of Oki MC352 in the language / languages: English as an attachment in your email.

The manual is 2,79 mb in size.


You will receive the manual in your email within minutes. If you have not received an email, then probably have entered the wrong email address or your mailbox is too full. In addition, it may be that your ISP may have a maximum size for emails to receive.

Others manual(s) of Oki MC352

Oki MC352 User Manual - English - 196 pages

Oki MC352 User Manual - German - 218 pages


The manual is sent by email. Check your email

If you have not received an email with the manual within fifteen minutes, it may be that you have a entered a wrong email address or that your ISP has set a maximum size to receive email that is smaller than the size of the manual.

The email address you have provided is not correct.

Please check the email address and correct it.

Your question is posted on this page

Would you like to receive an email when new answers and questions are posted? Please enter your email address.


Info