z (reset) button..............................................................3816Reset switch...................................................................108
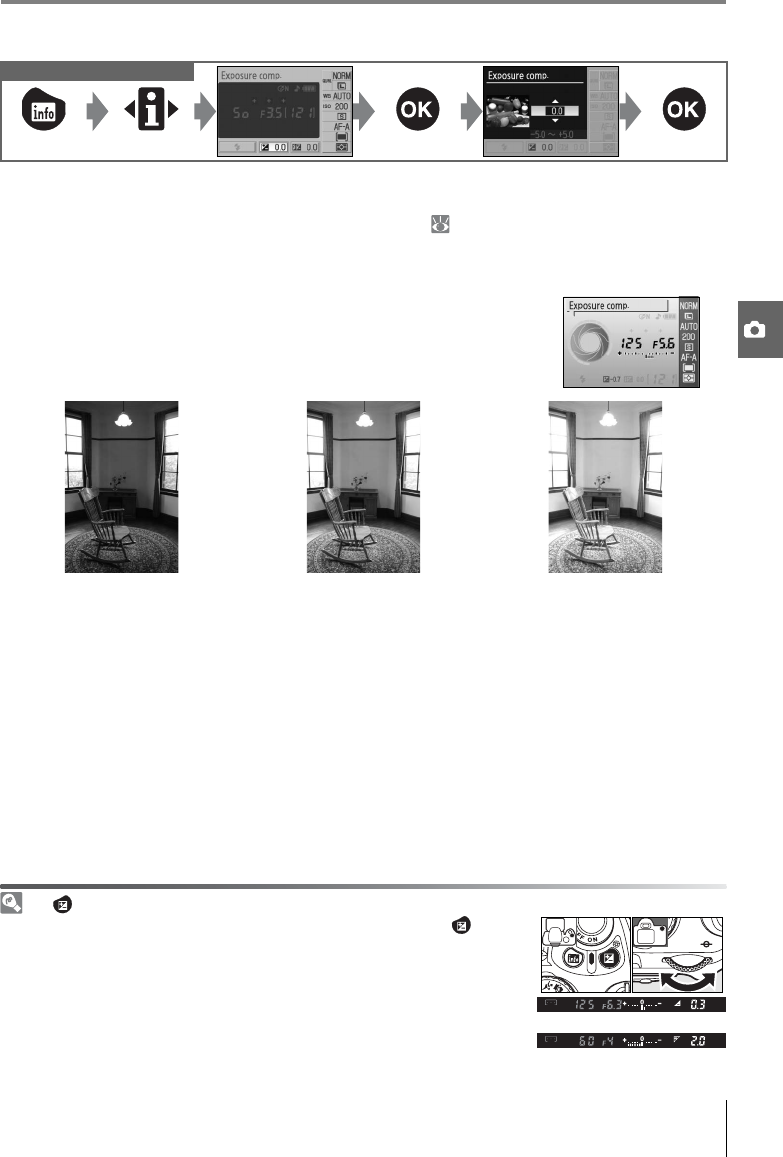
Use a type G or D lens for best results. Results are optimized for current shooting conditions and vary
with exposure and the position of the subject in the frame. For consistent results over a series of pho-
tographs, select Custom and choose a setting other than Auto for image sharpening, tone compen-
sation, and saturation.
Settings other than Custom use the sRGB color space.
Color Space
The color space determines the gamut of colors available for color reproduction. sRGB is for general
use, while Adobe RGB is used in publishing and commercial printing.
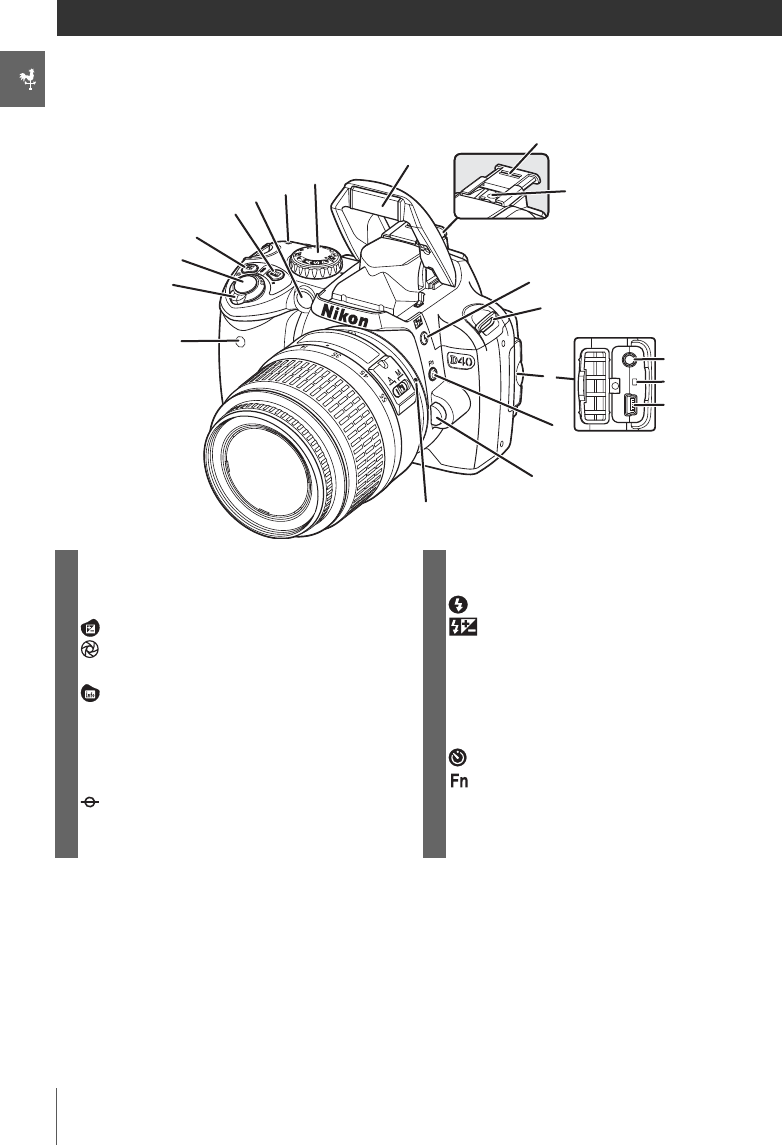
N
S
O
VI
VI
PO
B
W
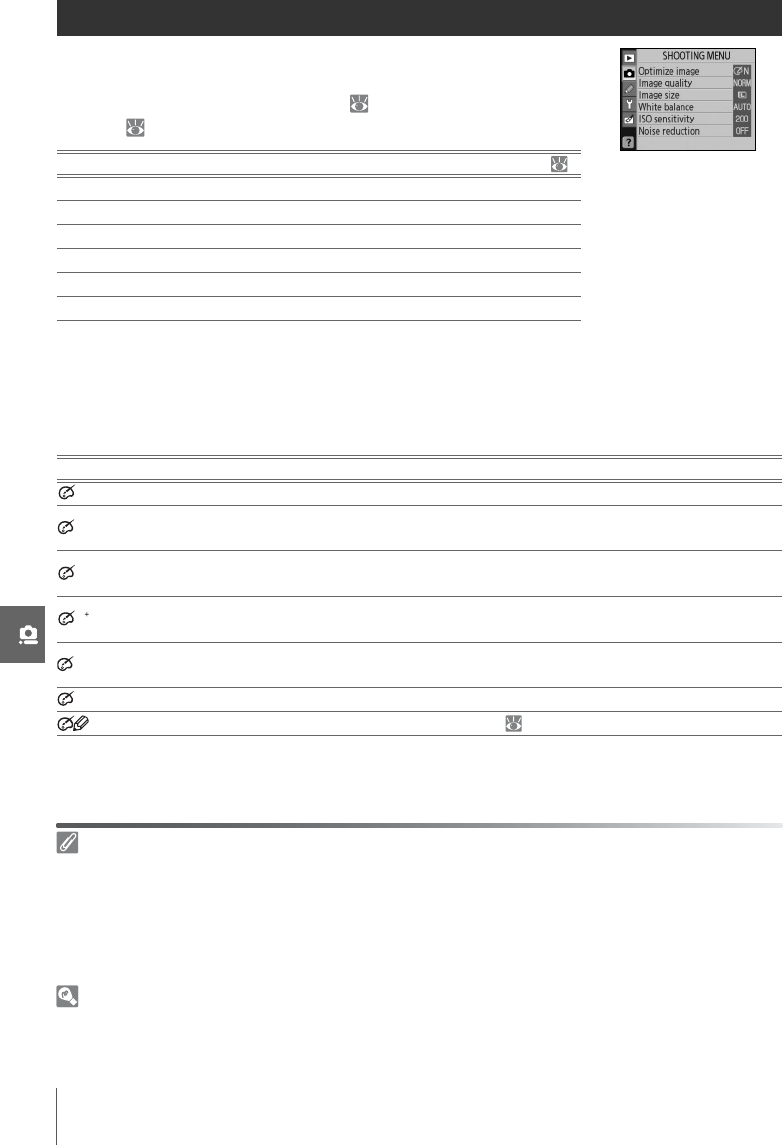
Menu Guide/Shooting Options: The Shooting Menu69
Customizing Image Enhancement Options: Custom
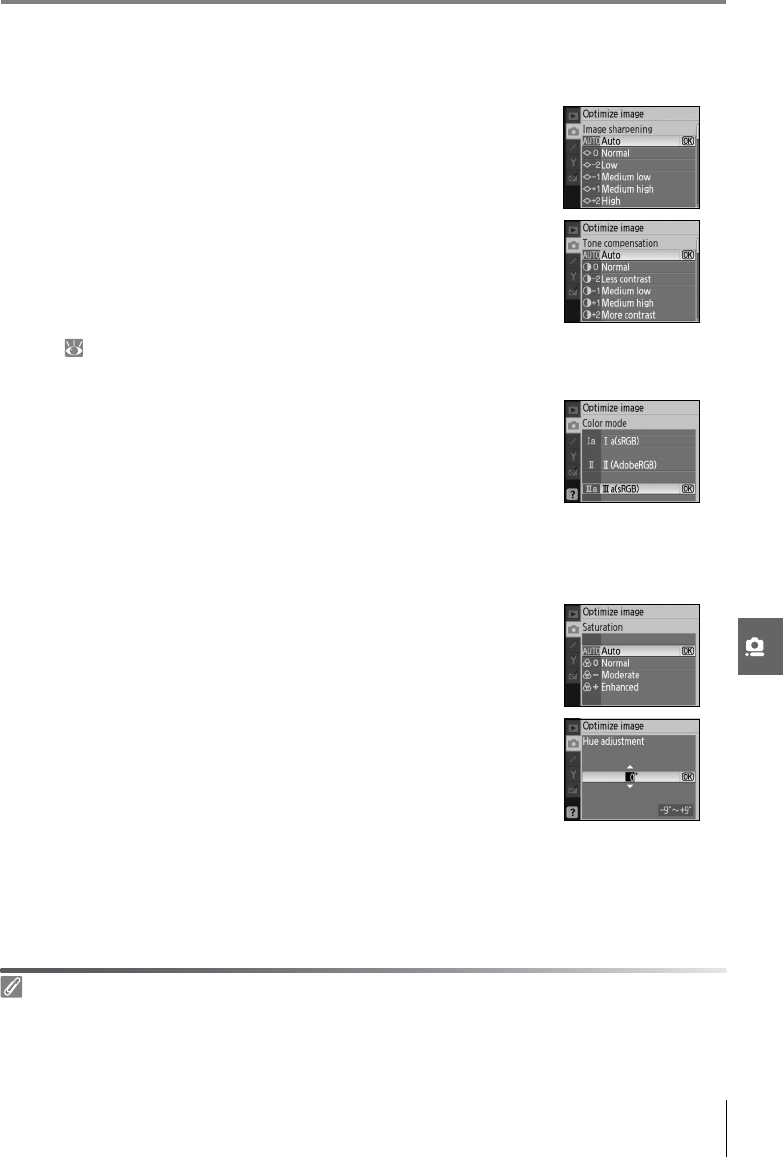
Select Custom to make separate adjustments to the following options. After adjusting set-
tings, highlight Done and press OK.
•Image sharpening: Choose how much outlines are sharpened dur-
ing shooting. Choose high settings for sharp outlines, low set-
tings for softer outlines.
Default setting: Auto.
•Tone compensation: Control contrast. Lower settings prevent loss
of detail in highlights under harsh lighting or in direct sunlight.
Higher settings preserve detail in misty landscapes and other
low-contrast subjects. Choose Custom to select a user-defined
tone curve created using Camera Control Pro (available sepa-
rately; 103). See the Camera Control Pro manual for details.
Default setting: Auto.
•Color mode: Control color reproduction. Photos taken in modes Ia
and IIIa are adapted to the sRGB color space and are suited for
printing or use “as is,” with no further modification. Choose Ia for
portrait shots and IIIa for nature or landscape shots. Mode II is
adapted to the Adobe RGB color space, which supports a wider
gamut of colors than sRGB. Mode II is the preferred choice for
photos that will be extensively processed or retouched.
Default setting: IIIa (sRBG).
•Saturation: Control the vividness of colors. Choose Moderate for
less saturated colors, Enhanced for more vivid colors.
Default setting: Auto.
•Hue adjustment: Hue can be adjusted between –9° to +9° in incre-
ments of 3° (the degrees refer to the “color wheel” often used to
express hue). Positive values make reds more orange, greens
more blue, and blues more purple. Negative values make reds
more purple, blues more green, and greens more yellow.
Default setting: ±0.
Color Mode
Modes Ia and IIIa are recommended for photos that will be printed without modification or viewed in
applications that do not support color management. If the application supports color management,
choose the Adobe RGB color space when opening photos taken in mode II.
70Menu Guide/Shooting Options: The Shooting Menu
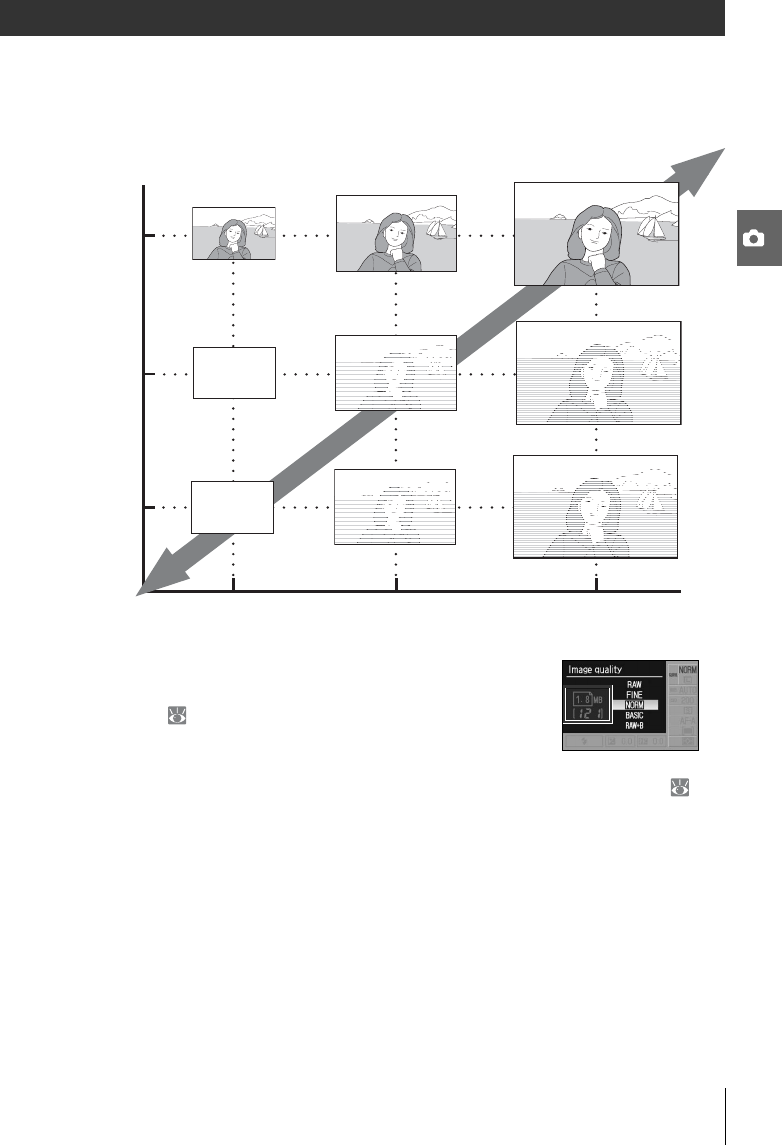
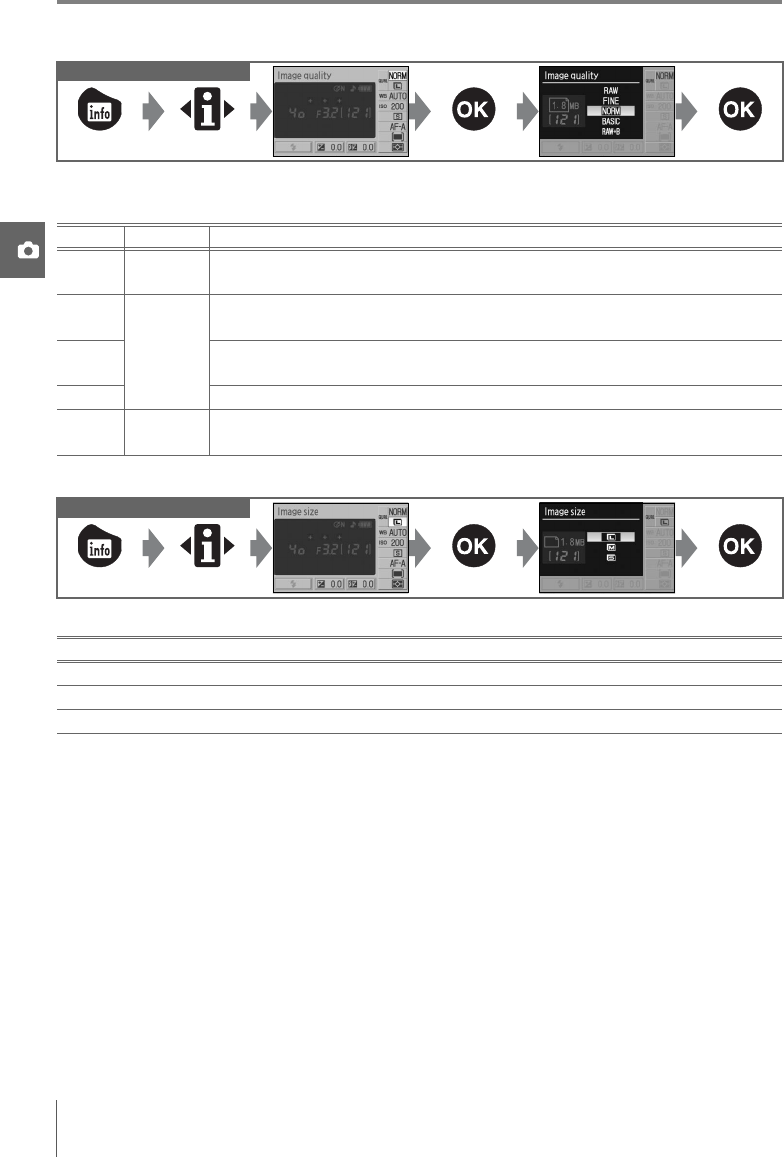
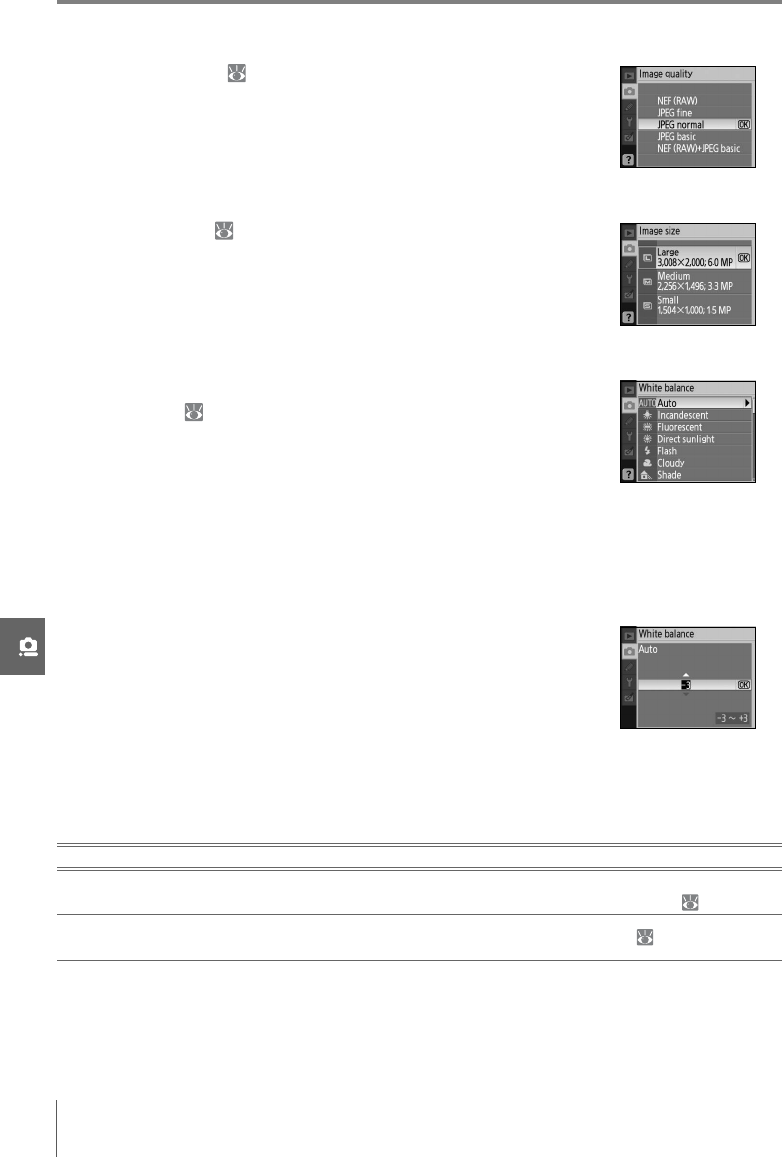
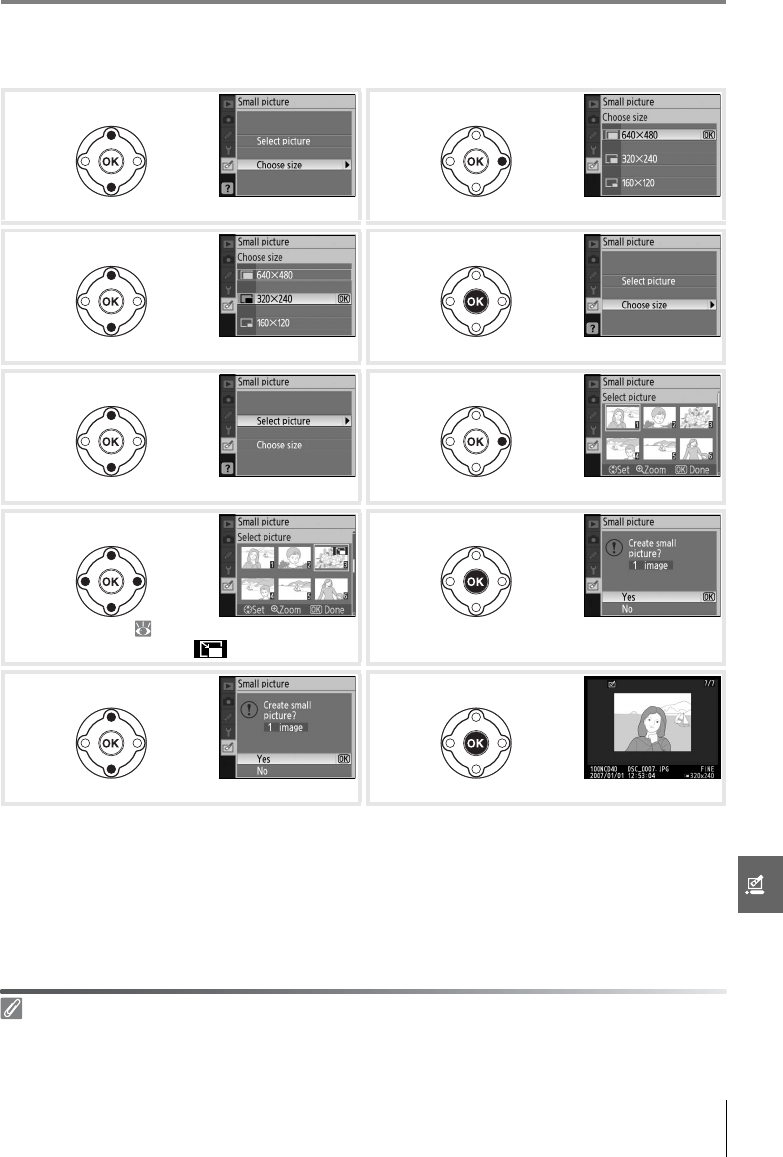
Image Quality
Select image quality ( 30).
Image Size
Choose image size ( 30).
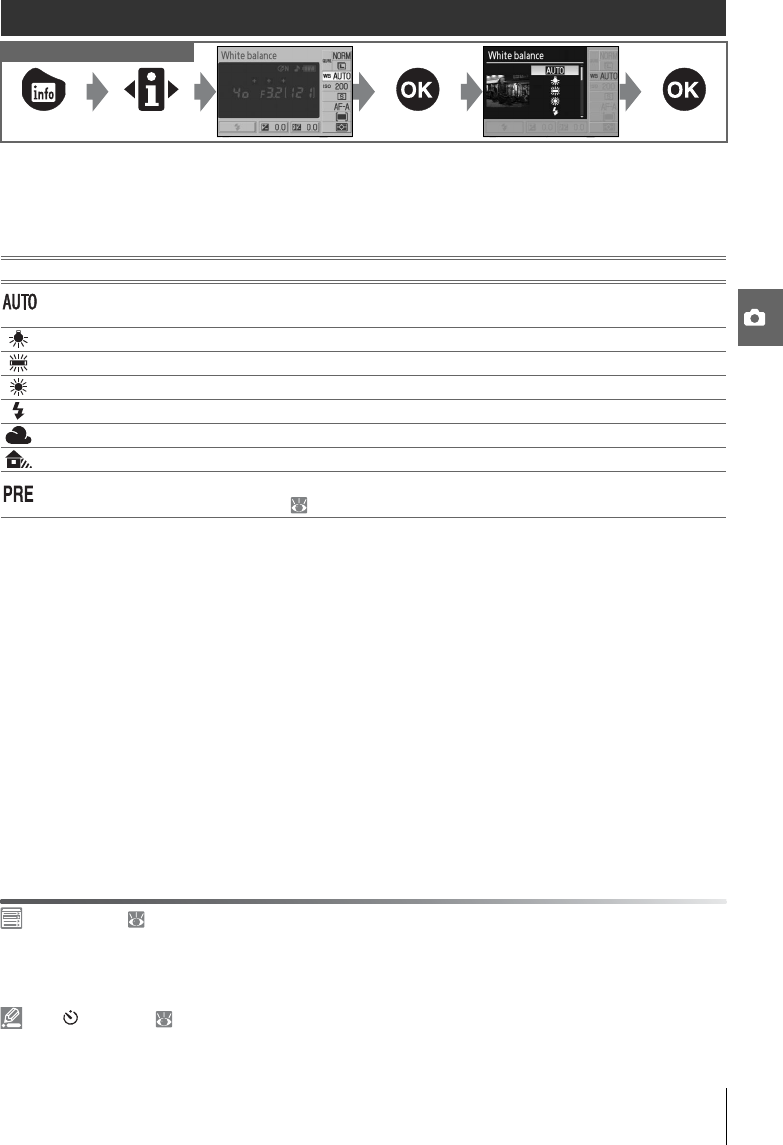
White Balance (P, S, A, and M Modes)
Nine options are available for white balance. See “Reference:
White Balance” ( 49).
Fine-Tuning White Balance
At settings other than White balance preset, white balance can be “fine tuned” by ±3 in
increments of one (see page 118 of the Appendix for color temperature equivalents).
Choose lower values to make photographs appear slightly more yellow or red, higher val-
ues to lend images a bluish tinge.
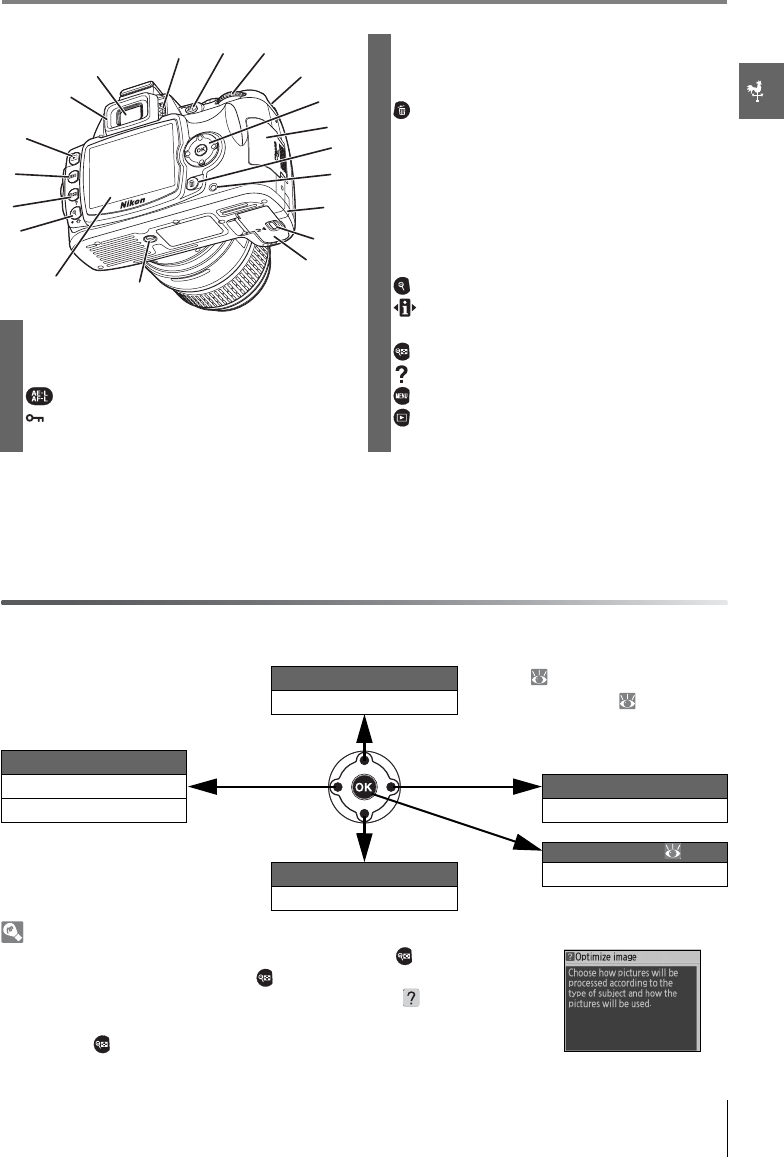
Selecting an option other than preset in the white balance menu
displays the menu shown at right. Press the multi selector up or
down to select a value for fine tuning; press OK to select and return
to the shooting menu.
Preset White Balance
Preset white balance can be used when the desired results can not be achieved at other
settings or to match white balance to the value used in an existing photograph. Two meth-
ods are available for setting preset white balance:
MethodDescription
Direct measurement
Neutral gray or white object is placed under lighting that will be used in
final photograph and white balance is measured by camera ( 71).
Copy from existing
photograph
White balance is copied from photo on memory card ( 72).
Menu Guide/Shooting Options: The Shooting Menu71
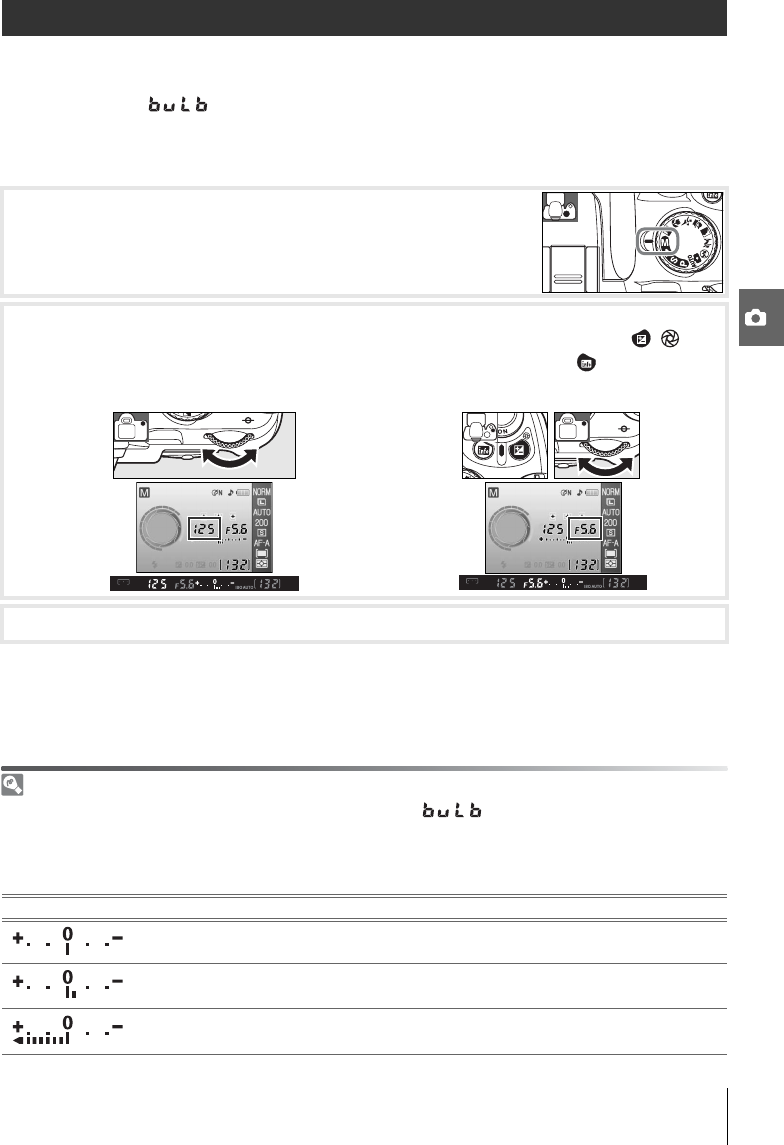
Measuring a Value for Preset White Balance
1
Place a neutral gray or white object under the lighting that will be used in the final
photograph. A standard gray card can be used as a reference in studio settings. Do
alter exposure from the value selected by the camera; when shooting in mode M, use
the electronic analog exposure display to select optimum exposure.
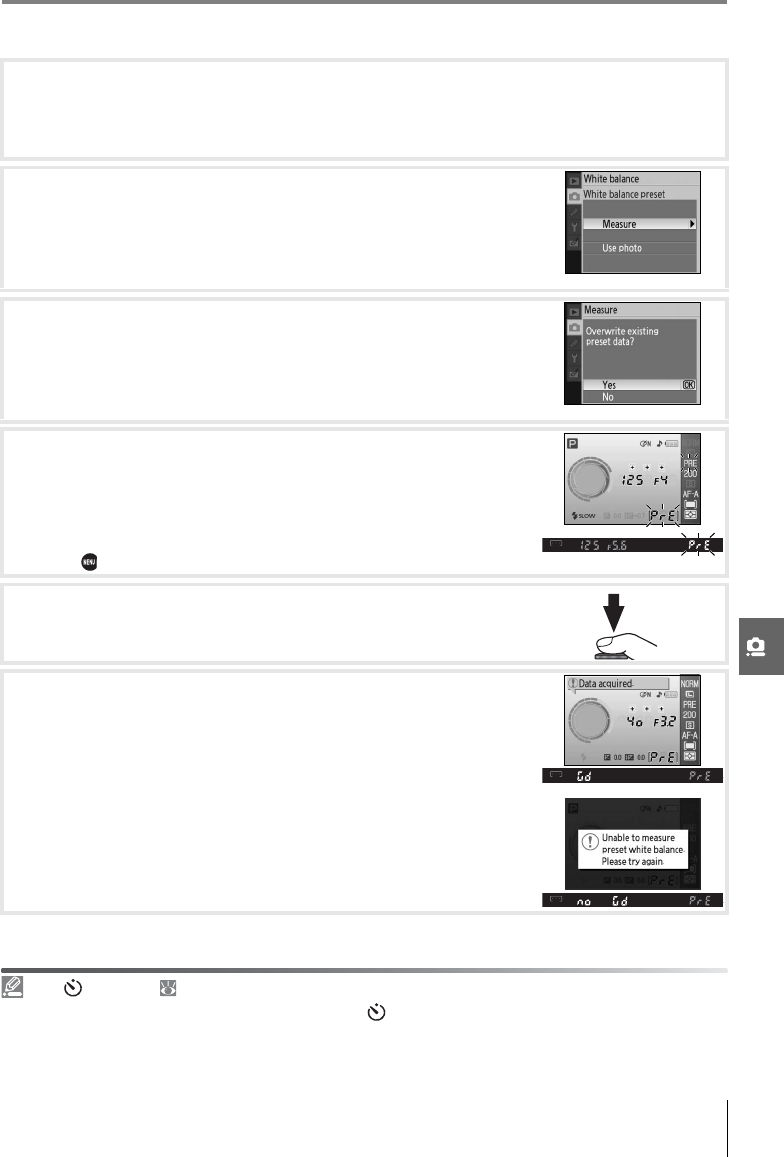
2
Display the shooting menu and select White balance>
White balance preset (to proceed directly to Step 4 without
displaying the shooting menu, select White balance preset
for white balance in the shooting information display as
described on page 49 and press OK).
3
Highlight Measure and press the multi selector right. The
menu shown at right will be displayed; highlight Ye s and
press the multi selector right (to set white balance to the last
measured value and exit to shooting mode, highlight No and
press OK).
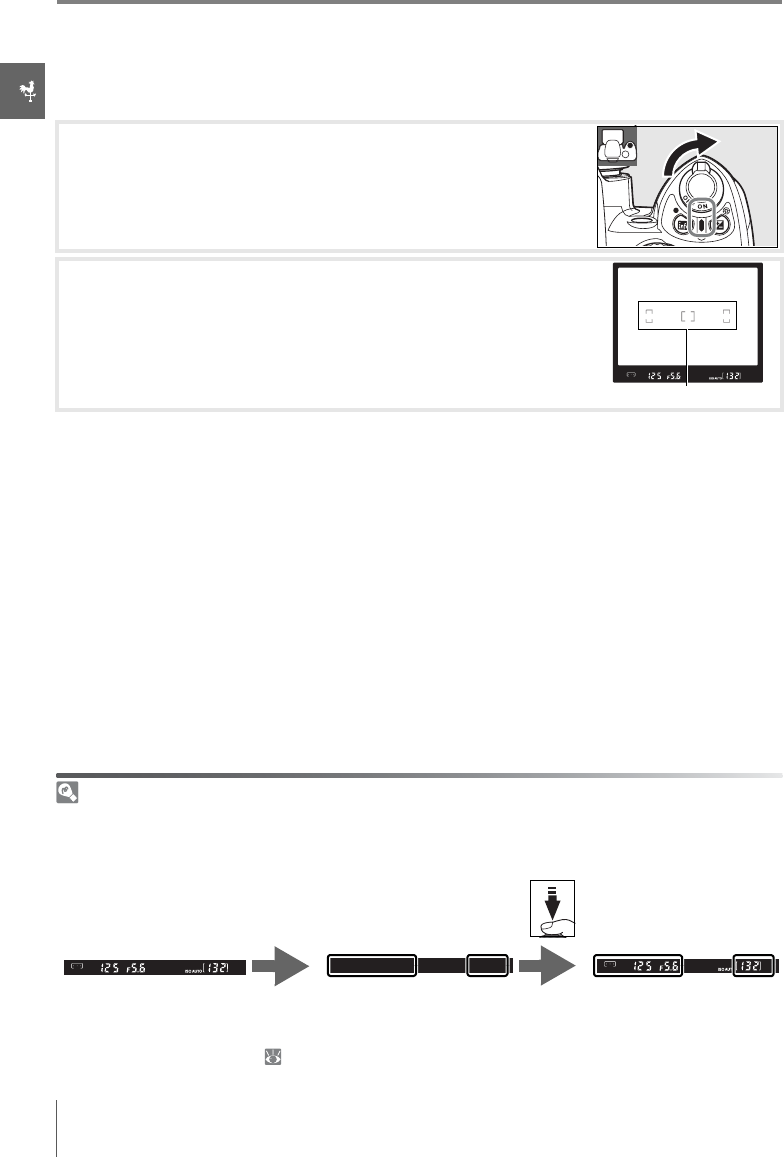
4
The message, “Take photo of white or gray object filling view-
finder under lighting for shooting” will be displayed. When
the message clears from the display, the viewfinder and
shooting information white balance displays will flash as
shown at right. To exit without measuring a preset value,
press and select another option for white balance.
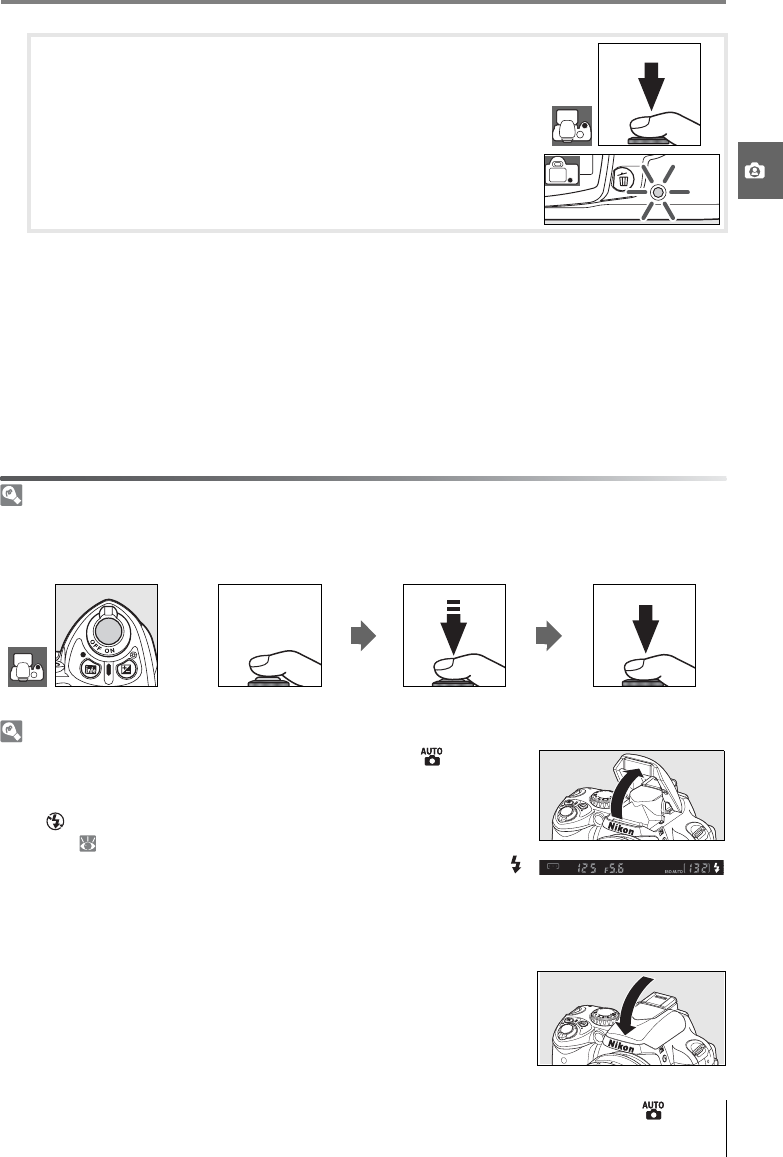
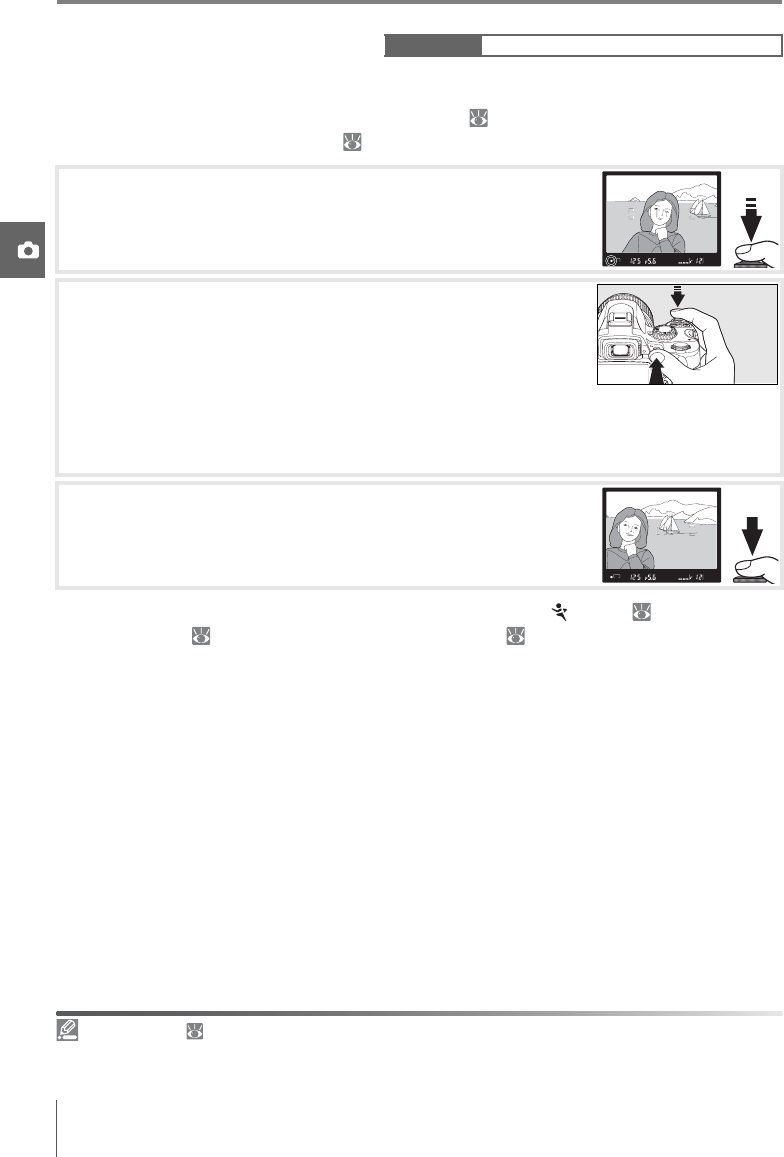
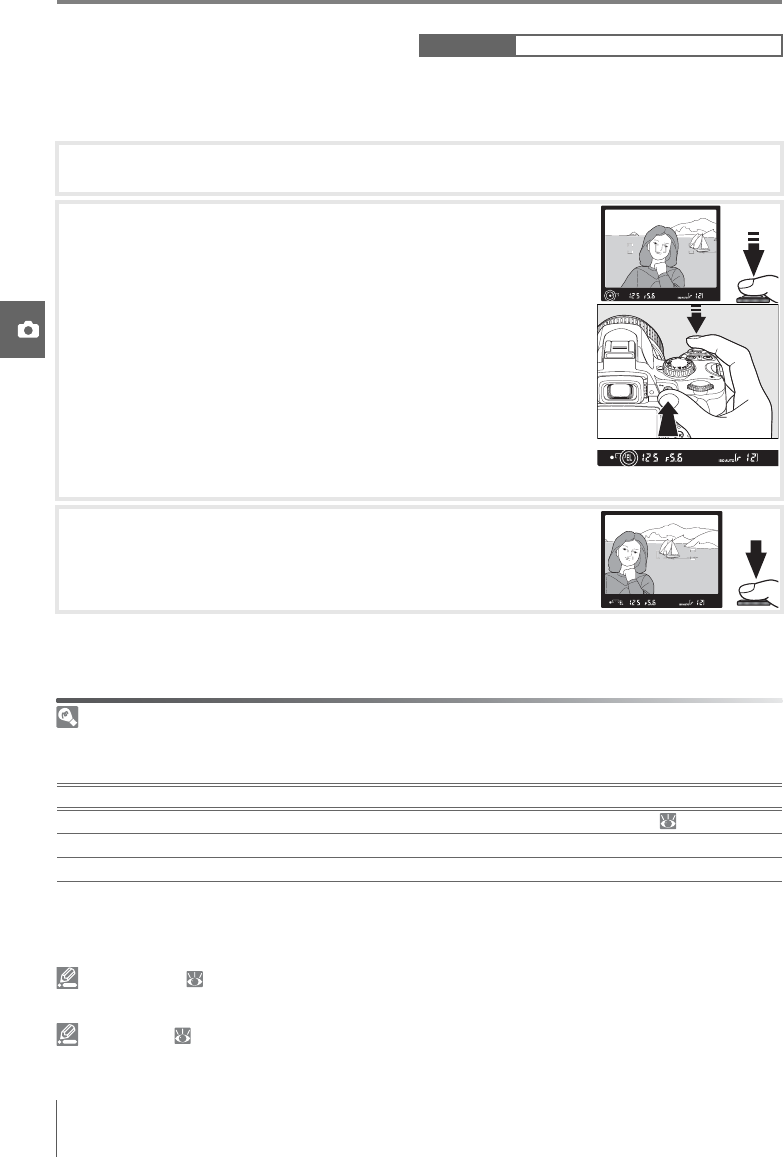
5
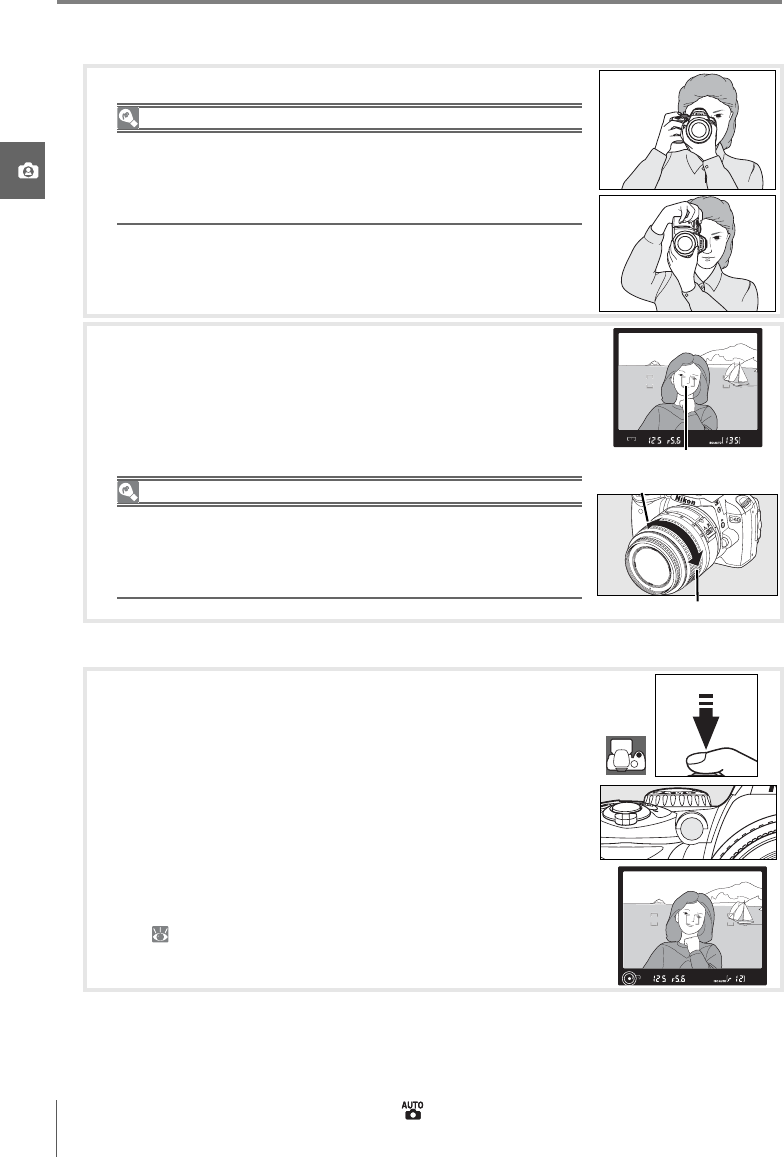
Frame the reference object so that it fills the viewfinder and
press the shutter-release button all the way down.
6
If the camera was able to measure a value for white balance,
the message “Data acquired” will be displayed. White balance
will automatically be set to the measured value; no photo-
graph will be recorded.
If the warning shown at right is displayed, the camera was
unable to measure white balance. Return to Step 2 and mea-
sure white balance again.
11—/Fn Button ( 77)
If White balance is chosen for Custom Setting 11 (/Fn button), pressing the Fn button for about 2s
when preset white balance is selected will display the indicators shown in Step 4. Measure a value for
preset white balance as described in Steps 5–6.
72Menu Guide/Shooting Options: The Shooting Menu
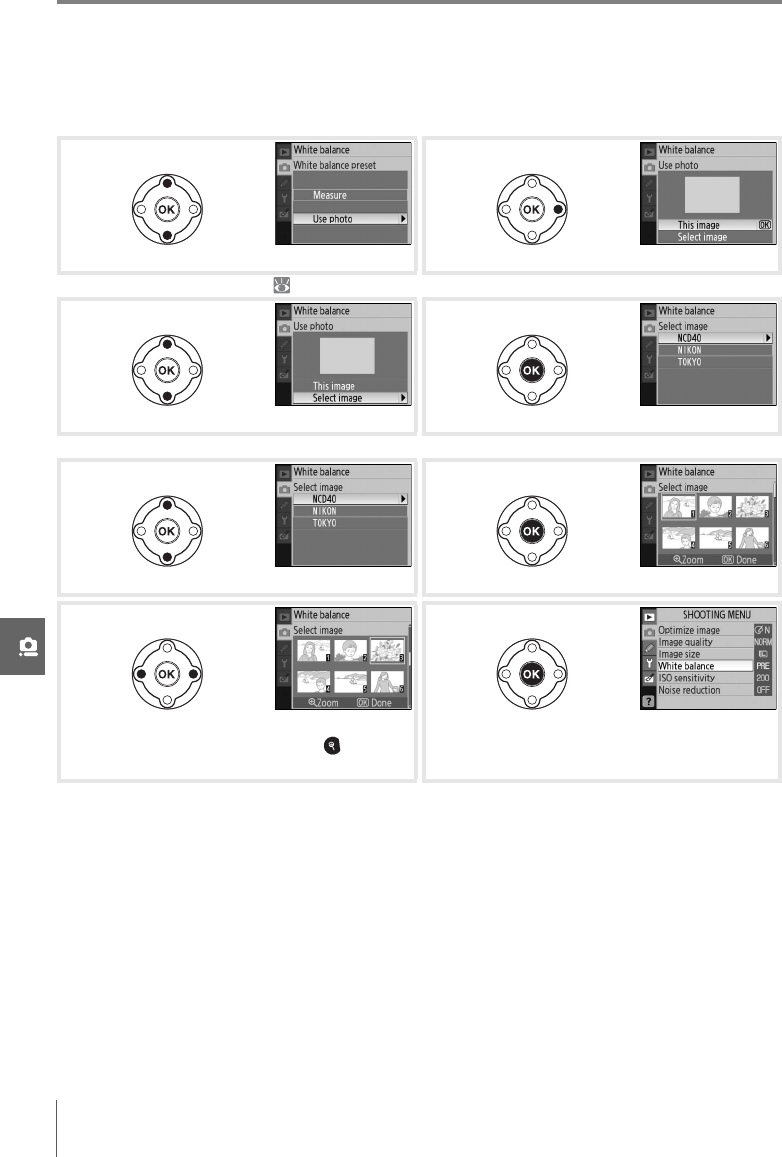
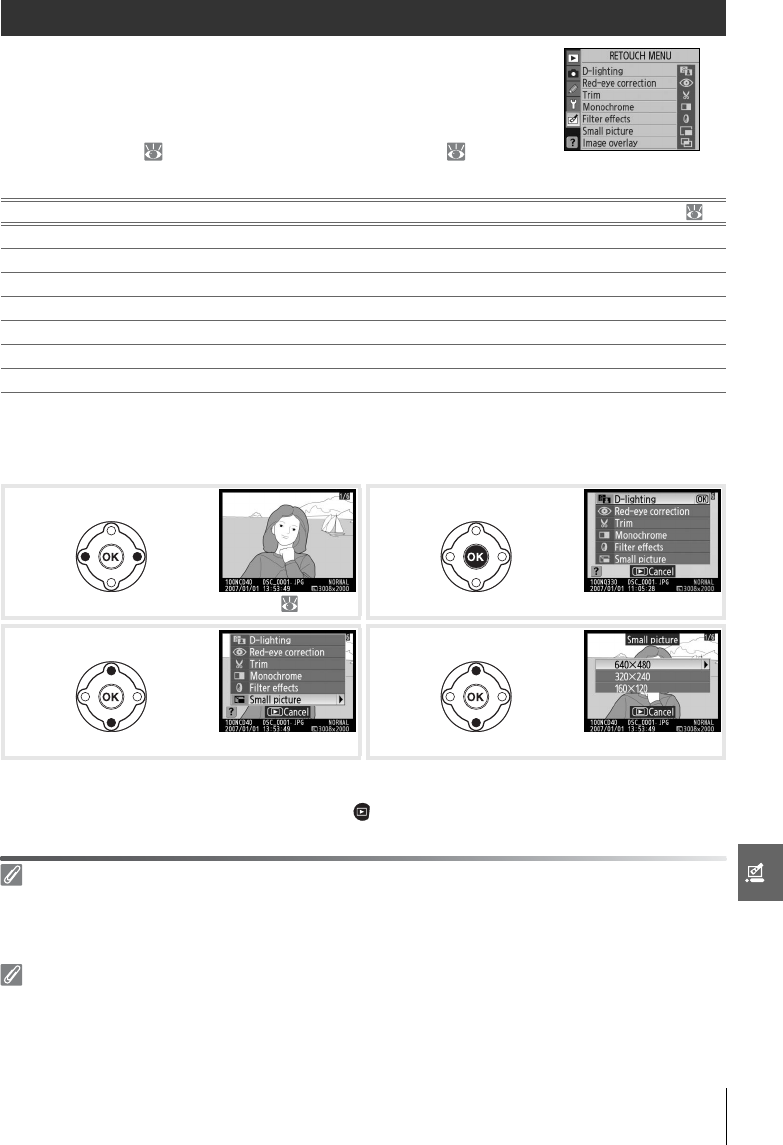
Copying White Balance from a Photograph
A white balance value copied from an existing photograph can be used for preset white
balance. Select White balance>White balance preset in the shooting menu. The menu
shown in Step 1 will be displayed.
Note that if a new value is measured for white balance, white balance will be set to the mea-
sured value even if Use photo is currently selected in the preset white balance menu.
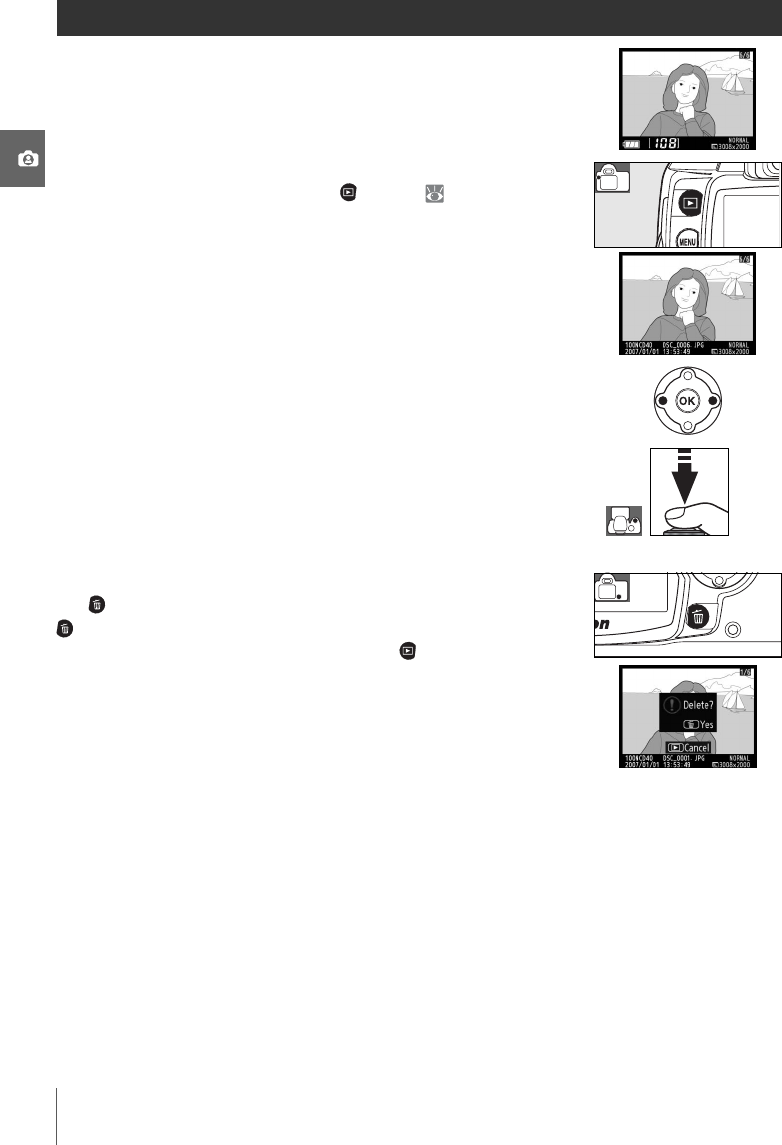
Highlight Use photo.
*
Display current source photo.
* To use last measured value ( 71), highlight Measure and press multi selector right.
Highlight Select image.
†
Display folder list.
†To use current source photo, highlight This image and press OK.
Highlight folder.Display images in selected folder.
•
Highlight photograph.
‡
To view highlighted
picture full frame, press and hold button.
Set preset white balance to value for high-
lighted photograph and return to shooting
menu.
‡Images displayed may include those created with other cameras, but only photographs created
with D40 can be used as source for preset white balance.
1
2
3
4
5
6
7
8
Menu Guide/Shooting Options: The Shooting Menu73
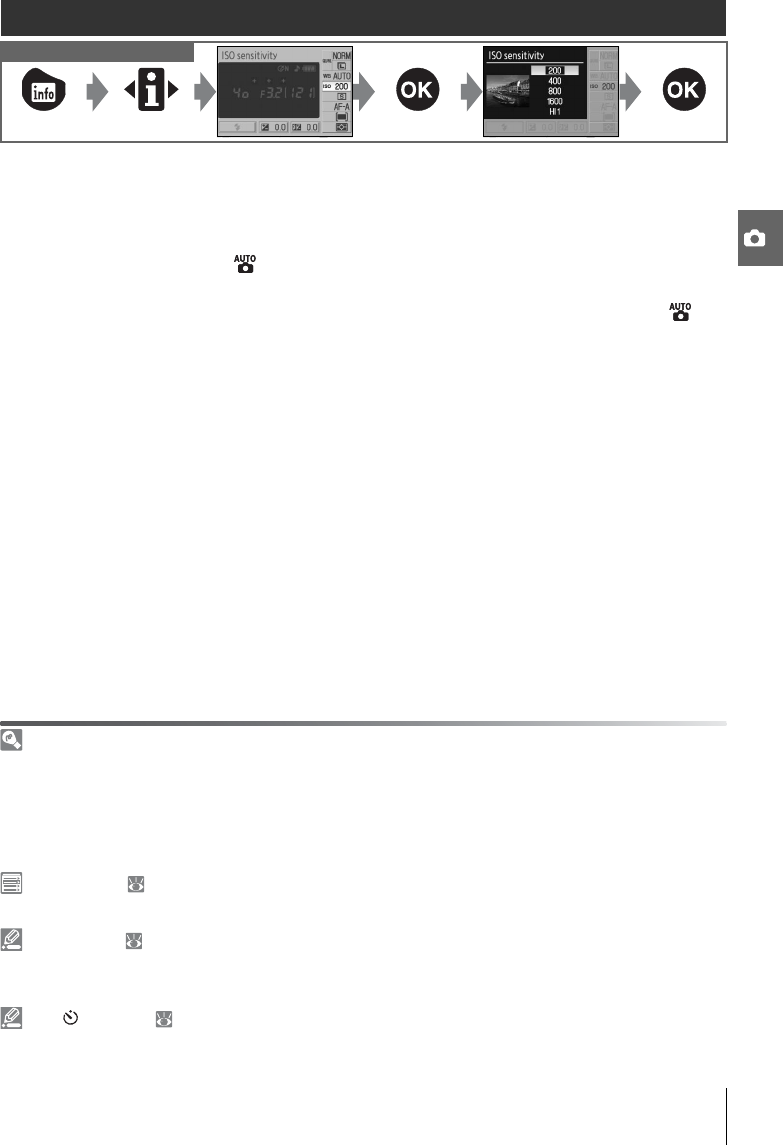
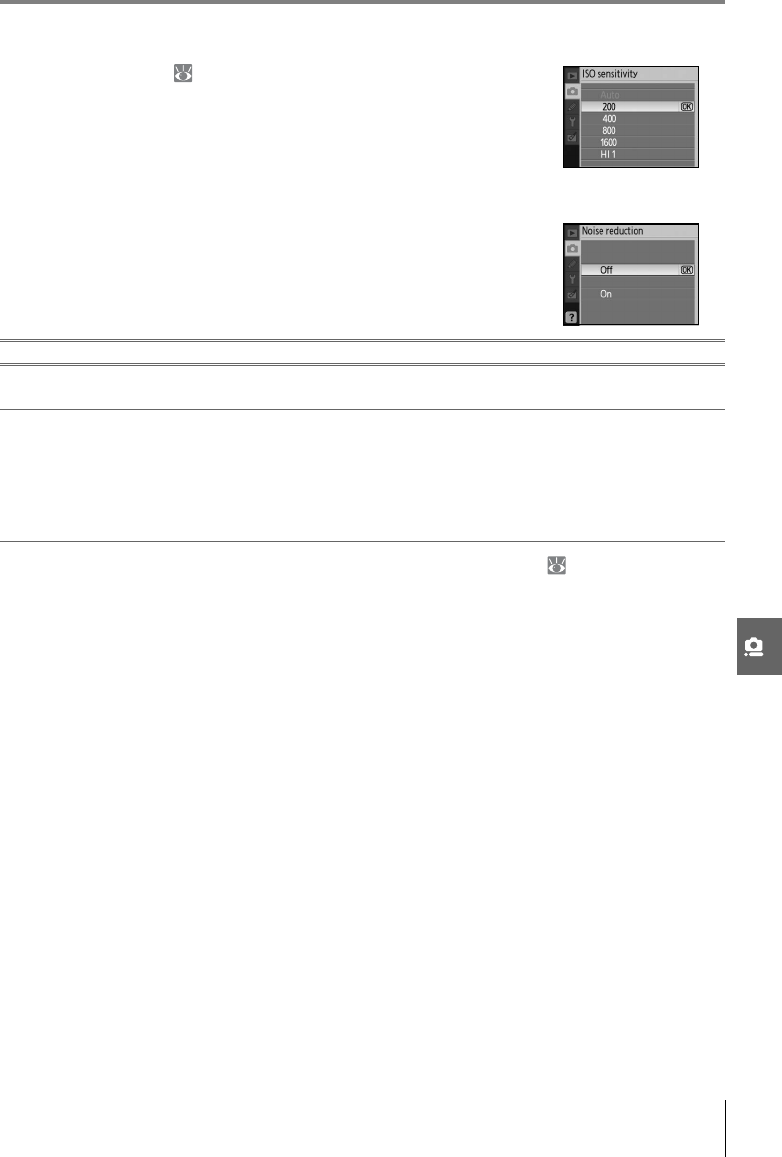
ISO Sensitivity
Adjust ISO sensitivity ( 37).
Noise Reduction
Photographs taken at high sensitivities or at shutter speeds of 1s
or slower can be processed to reduce “noise” in the form of mot-
tling or randomly-spaced, brightly-colored pixels. Choose from
the following options:
Frame rates will slow if On is selected in continuous shooting mode ( 32).
OptionDescription
Off
(default)
Noise turns off reduction at ISO sensitivities of 1600 or less. Minimal noise reduction is still
performed when ISO sensitivity is set to HI 1.
On
Photographs taken at ISO sensitivities over ISO 800 or at shutter speeds of about 1s or
slower are processed to reduce noise (if shutter speed is 1s or slower, time need to process
photographs before they are recorded approximately doubles and capacity of memory
buffer may drop). “Job nr” is displayed at the bottom of the viewfinder during processing.
Noise reduction will not be performed if the camera is turned off before processing is com-
plete.
74Menu Guide/Custom Settings
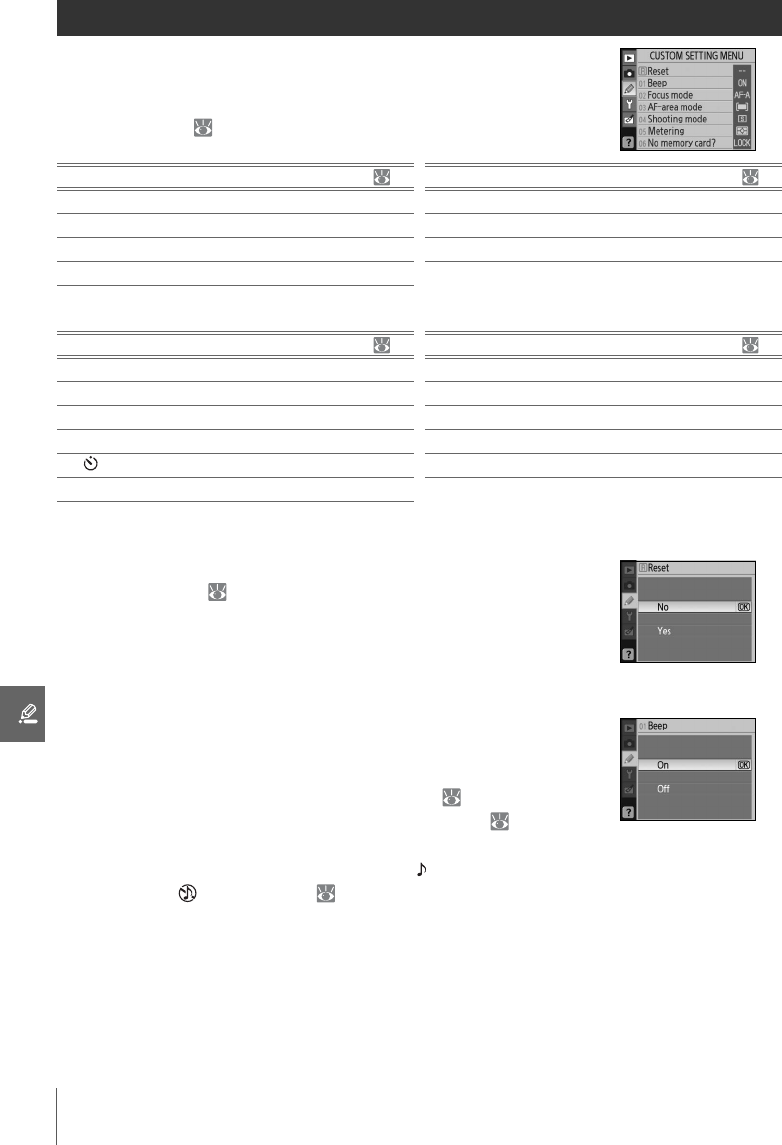
Custom Settings
Custom Settings are used to customize camera settings to suit
individual preferences. The following options are available when
Simple (the default option) is selected for CSM/Setup menu in
the setup menu ( 80):
To display the following options, select Full for CSM/Setup menu:
R: Reset
Select Yes to restore all Custom Settings to their default values.
See the Appendix ( 113) for a complete list of default settings.
1: Beep
At the default setting of On, a beep will sound when the camera
focuses in single-servo AF (AF-S or when shooting stationary sub-
jects in AF-A autofocus mode), while the release timer is counting
down in self-timer and delayed remote modes ( 33), or when a
photograph is taken in quick-response remote mode ( 33). The
beep will not sound when Off is selected. The current setting is
shown in the shooting information display: is displayed when
the beep is on, when it is off ( 6).
OptionOption
RReset744Shooting mode75
1Beep745Metering75
2Focus mode756No memory card?75
3AF-area mode75
OptionOption
7Image review7513AE lock77
8Flash level7614Built-in flash78
9AF-assist 7615Auto off timers78
10ISO auto7616Self-timer79
11/Fn button7717Remote on duration79
12AE-L/AF-L77
Menu Guide/Custom Settings75
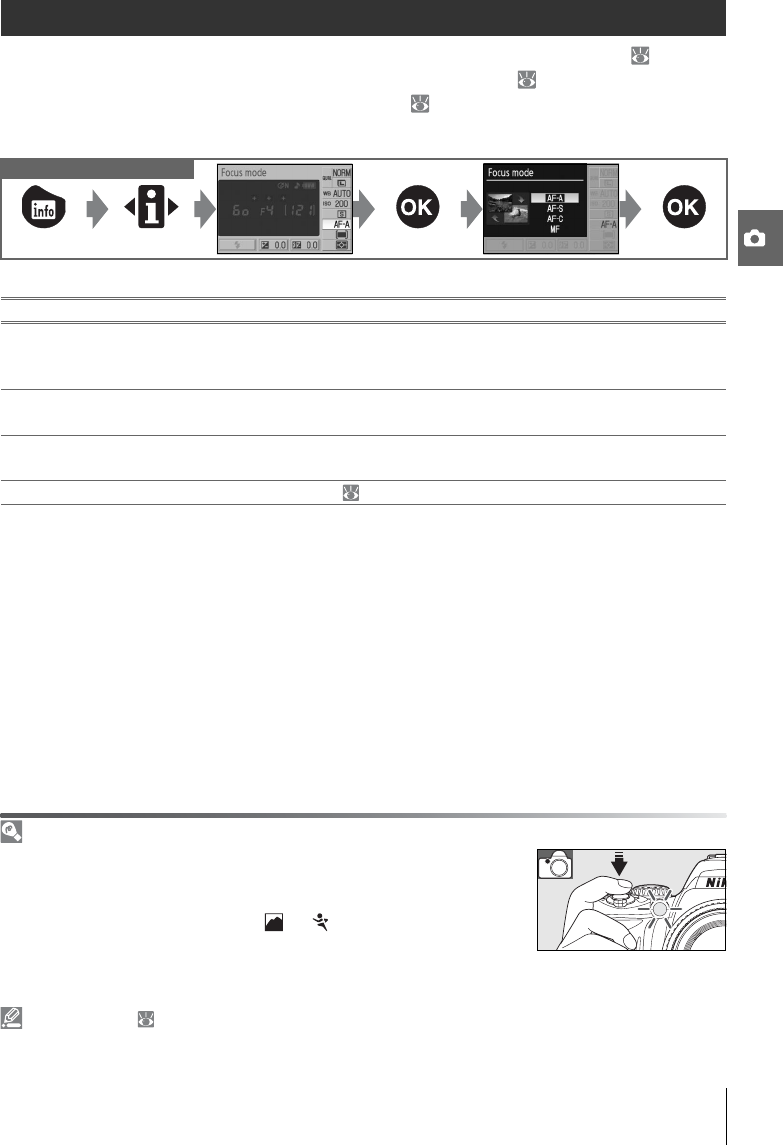
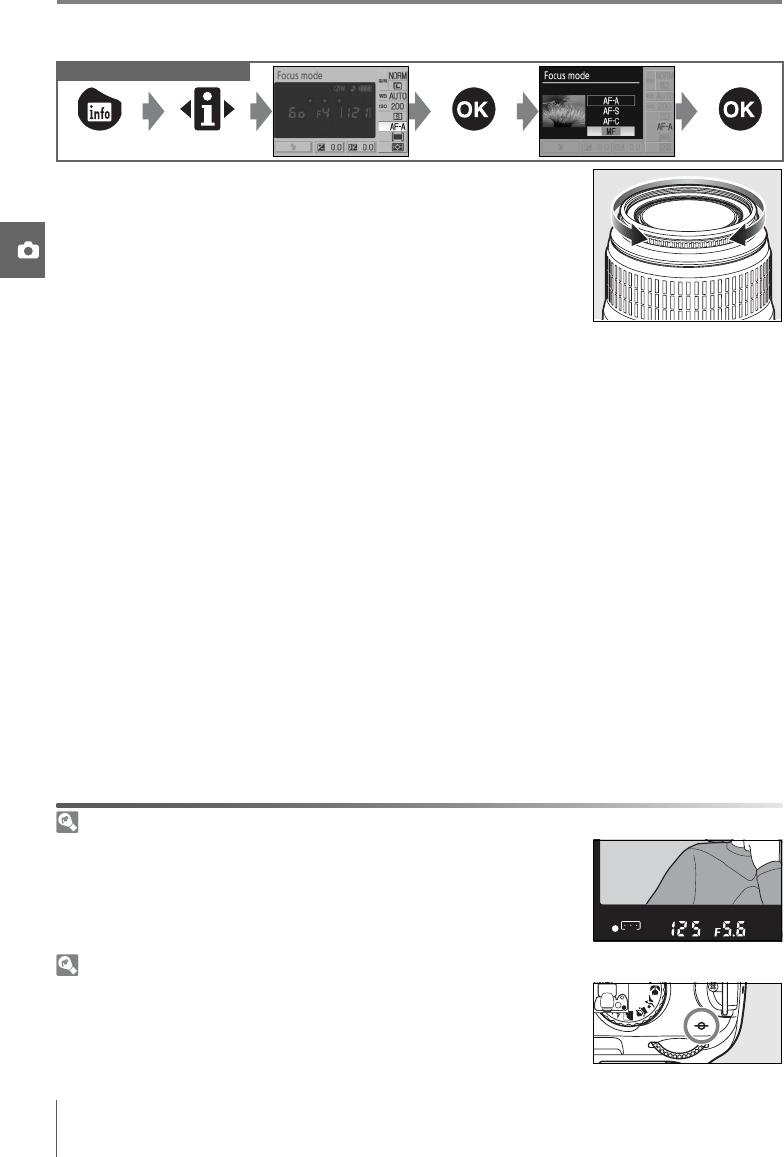
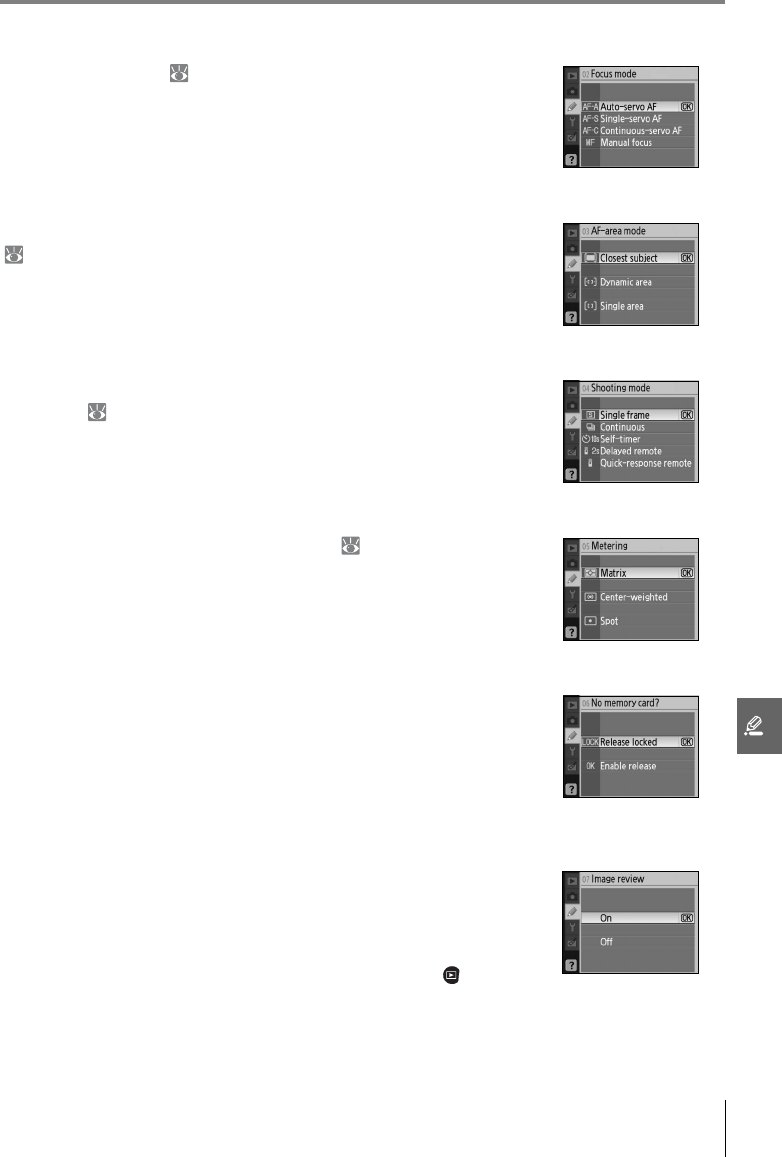
2: Focus Mode
Select a focus mode ( 23).
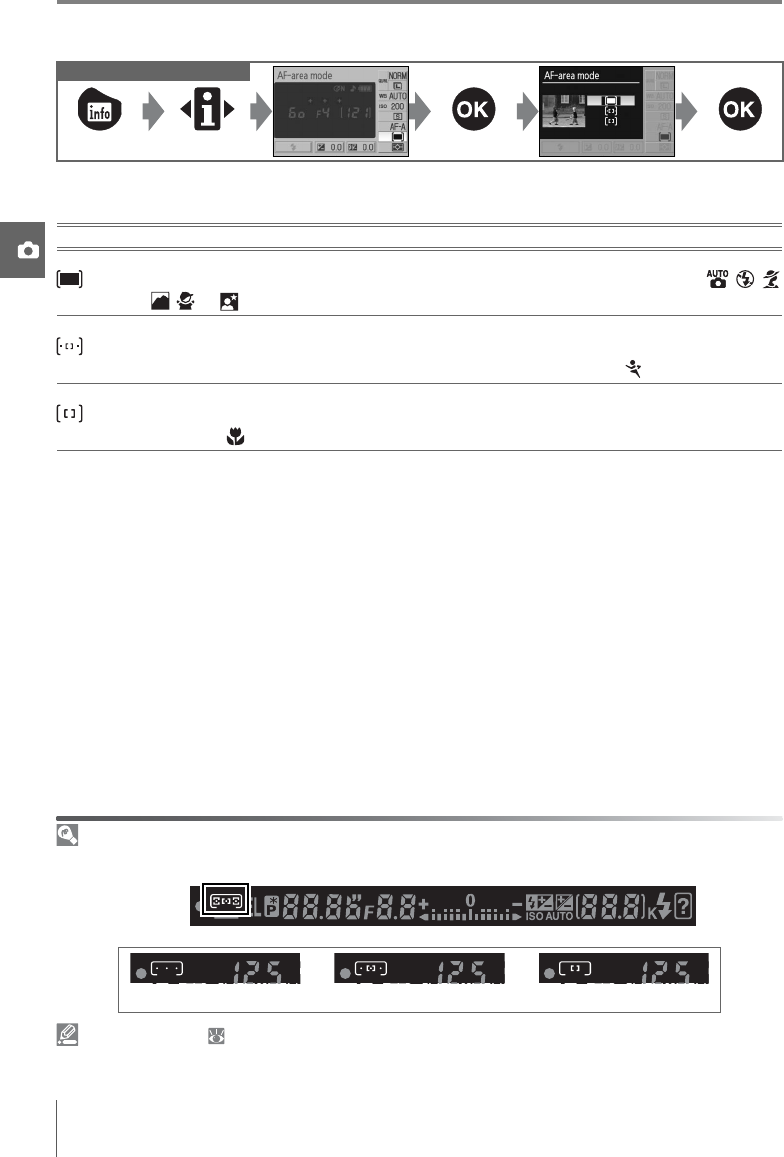
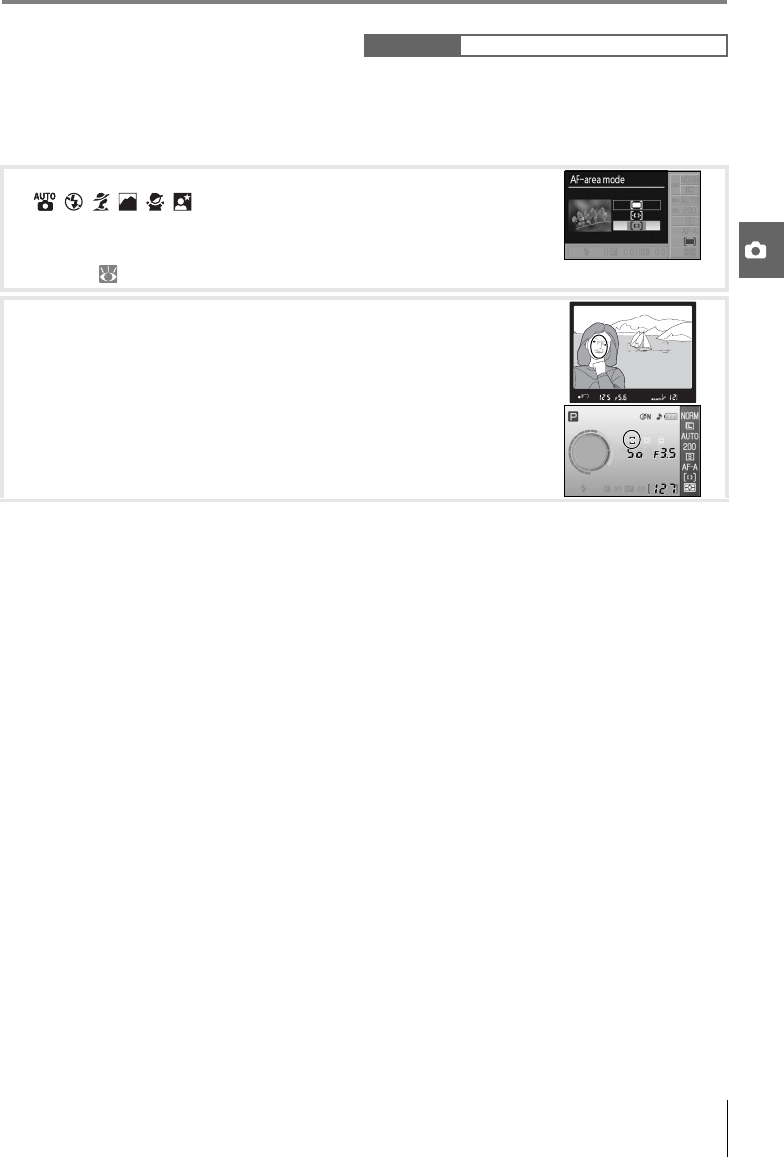
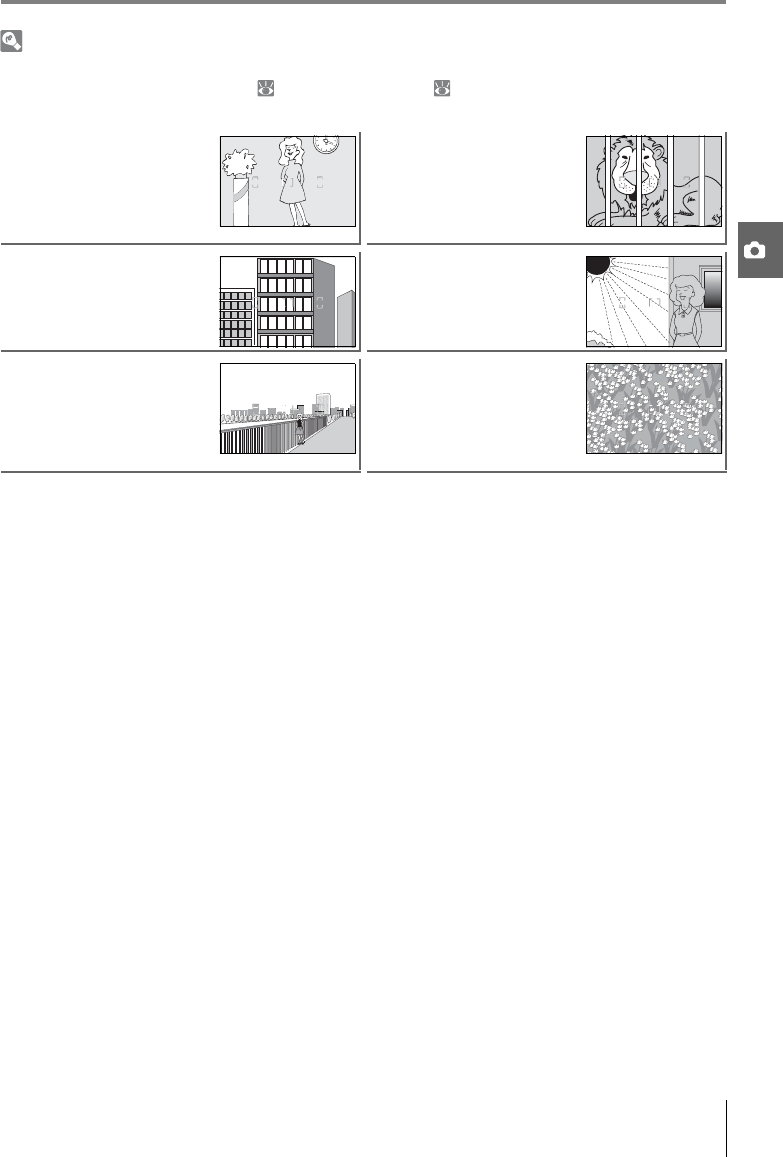
3: AF-Area Mode
Choose how the camera selects the focus area in autofocus mode
( 24).
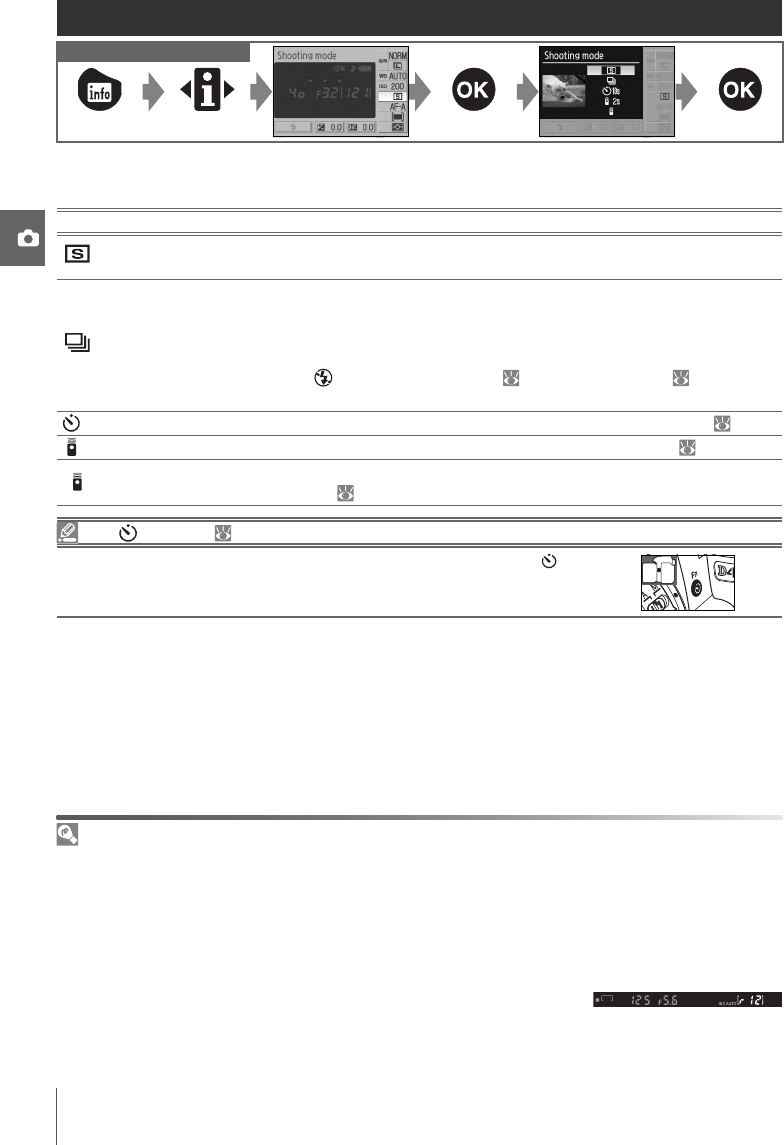
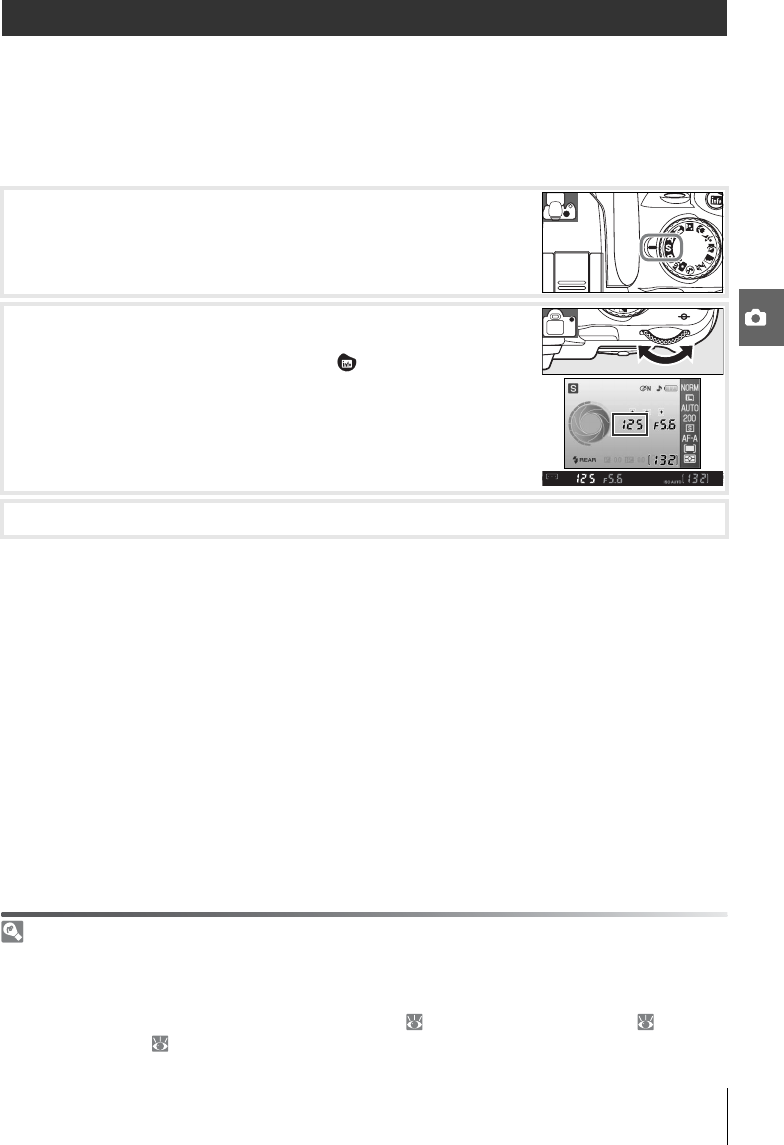
4: Shooting Mode
Select from single-frame, continuous, self-timer, and remote con-
trol mode ( 32).
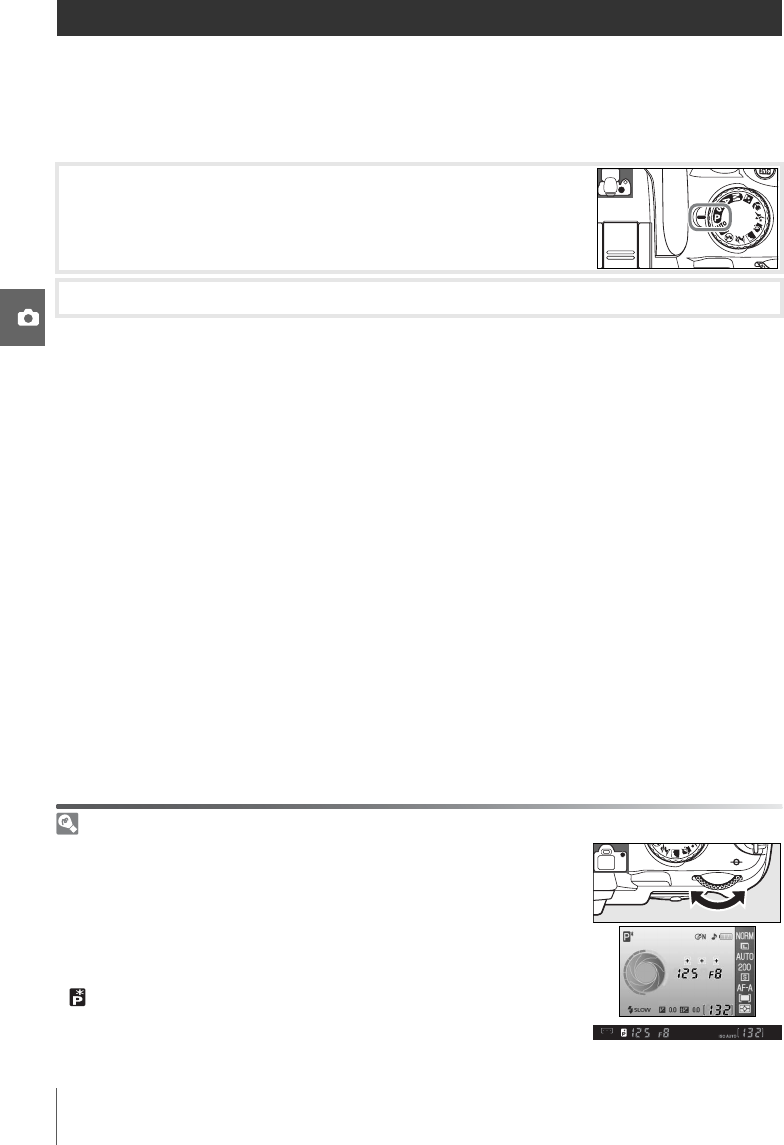
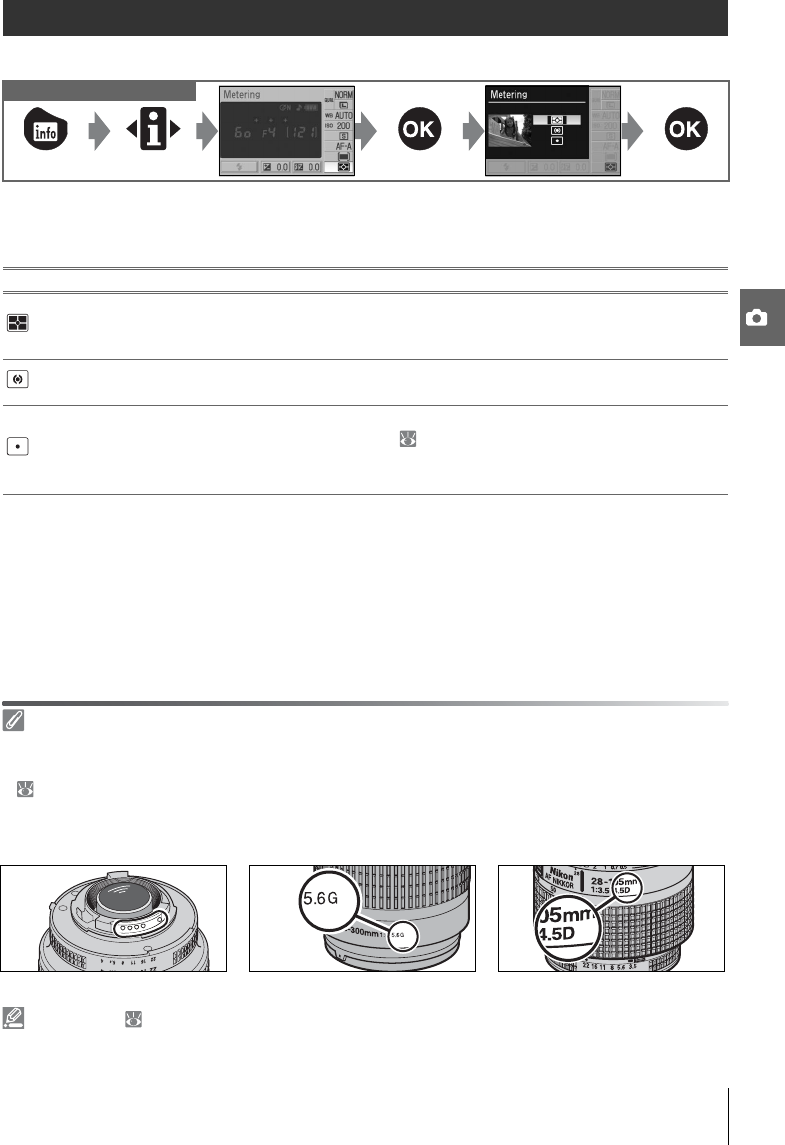
5: Metering (P, S, A, and M Modes Only)
Choose how the camera meters exposure ( 45).
6: No Memory Card?
If Release locked (the default setting) is selected, the shutter-
release is disabled when no memory card is inserted. Choose
Enable release to enable the shutter-release button when no
memory card is inserted. Photographs will be displayed in the
monitor but will not be saved.
7: Image Review
If On (the default setting) is selected, photographs will automati-
cally be displayed in the monitor after shooting (the length of
time photographs are displayed depends on the option selected
for Custom Setting 15: Auto off timers). If Off is selected, photo-
graphs can be displayed in the monitor by pressing the button.
76Menu Guide/Custom Settings
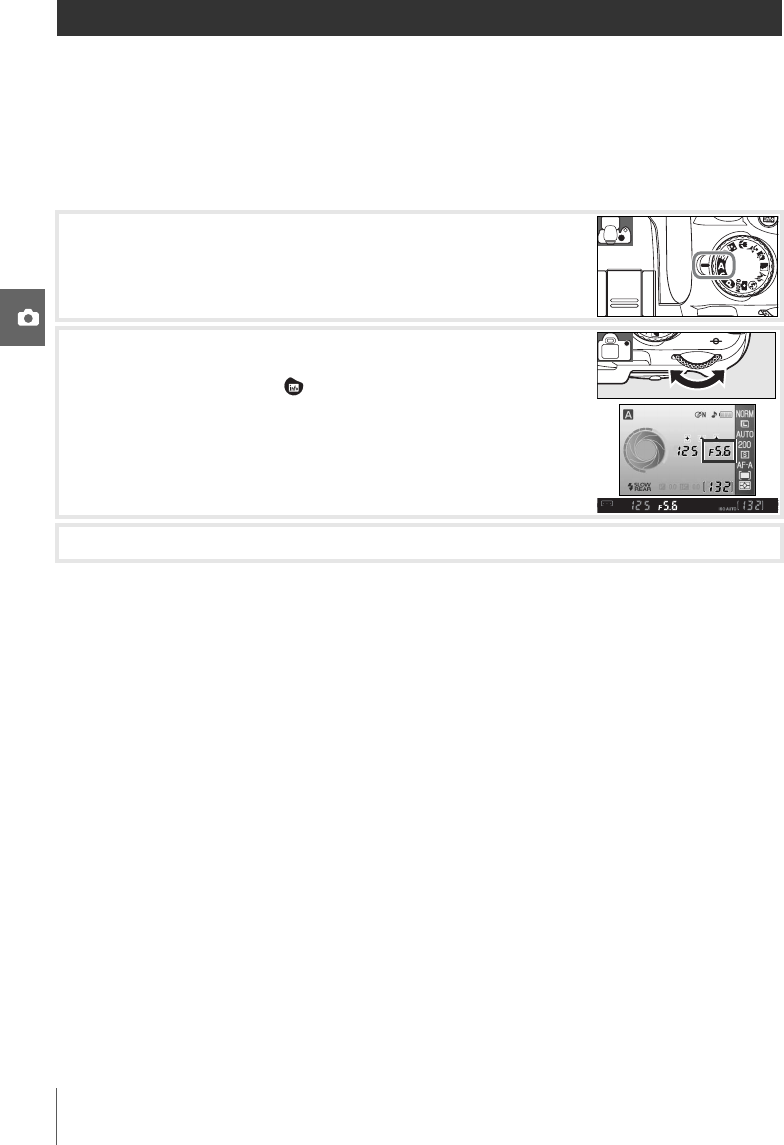
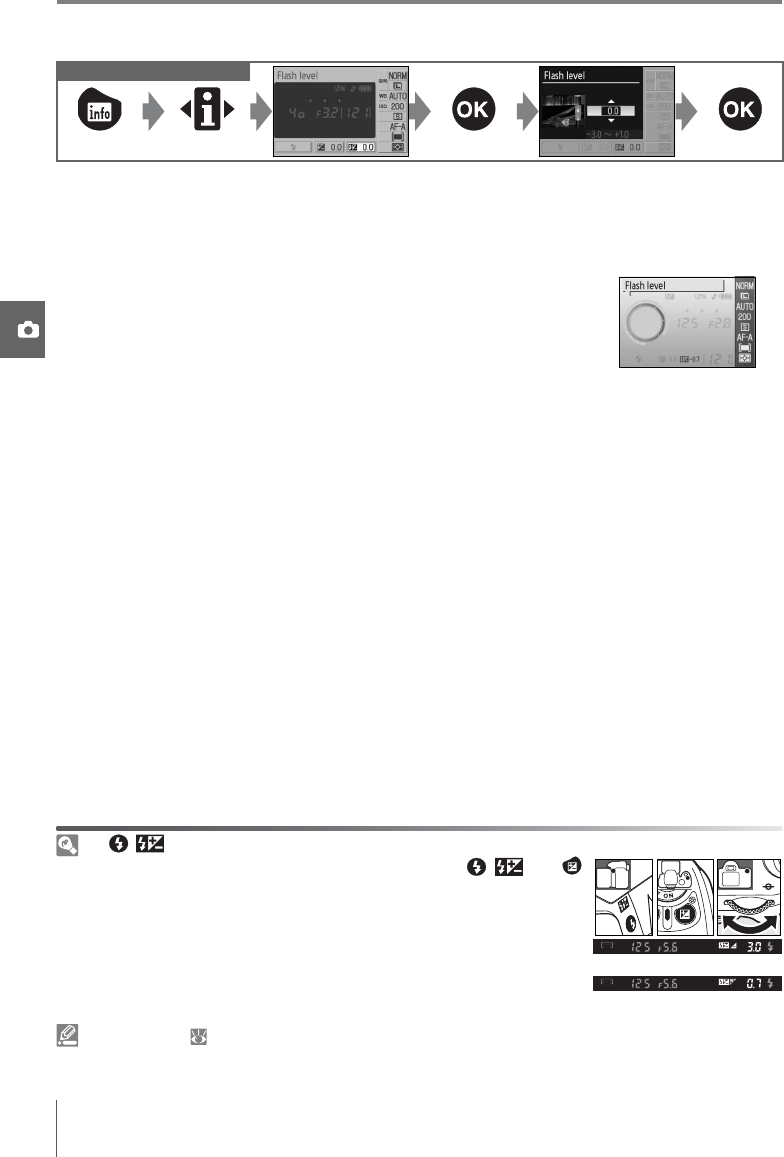
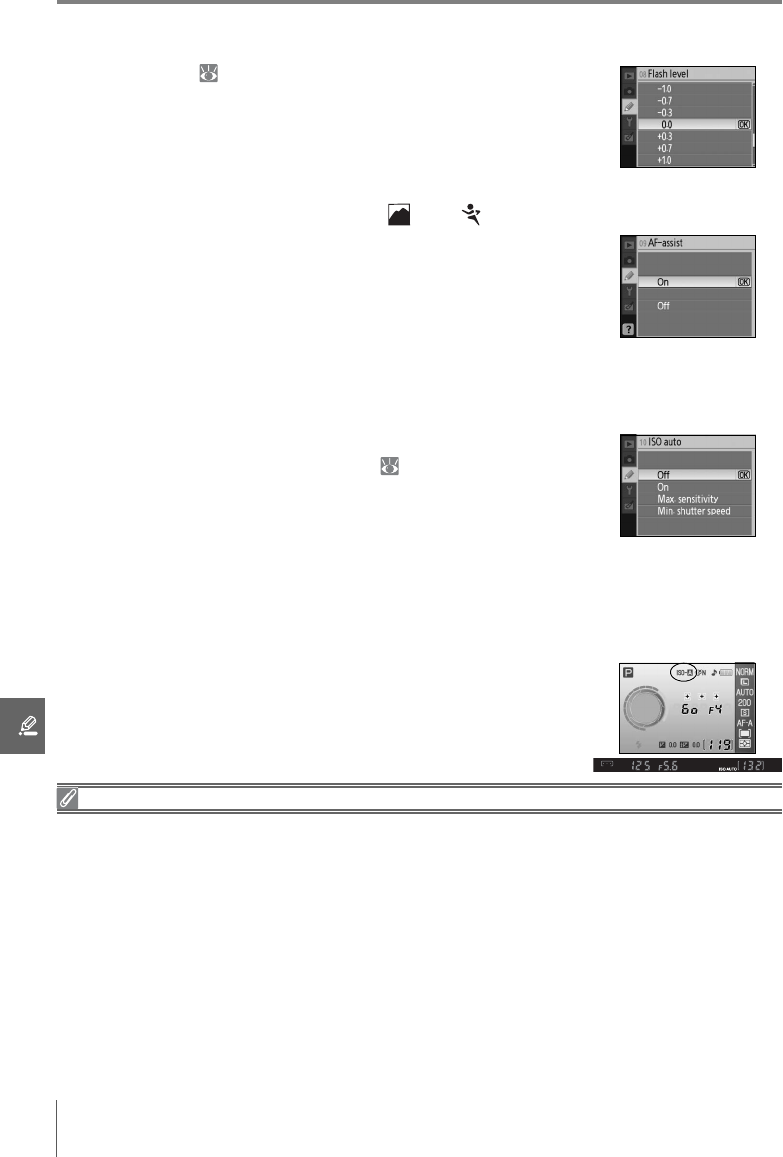
8: Flash Level (P, S, A, and M Modes Only)
Adjust flash level ( 48).
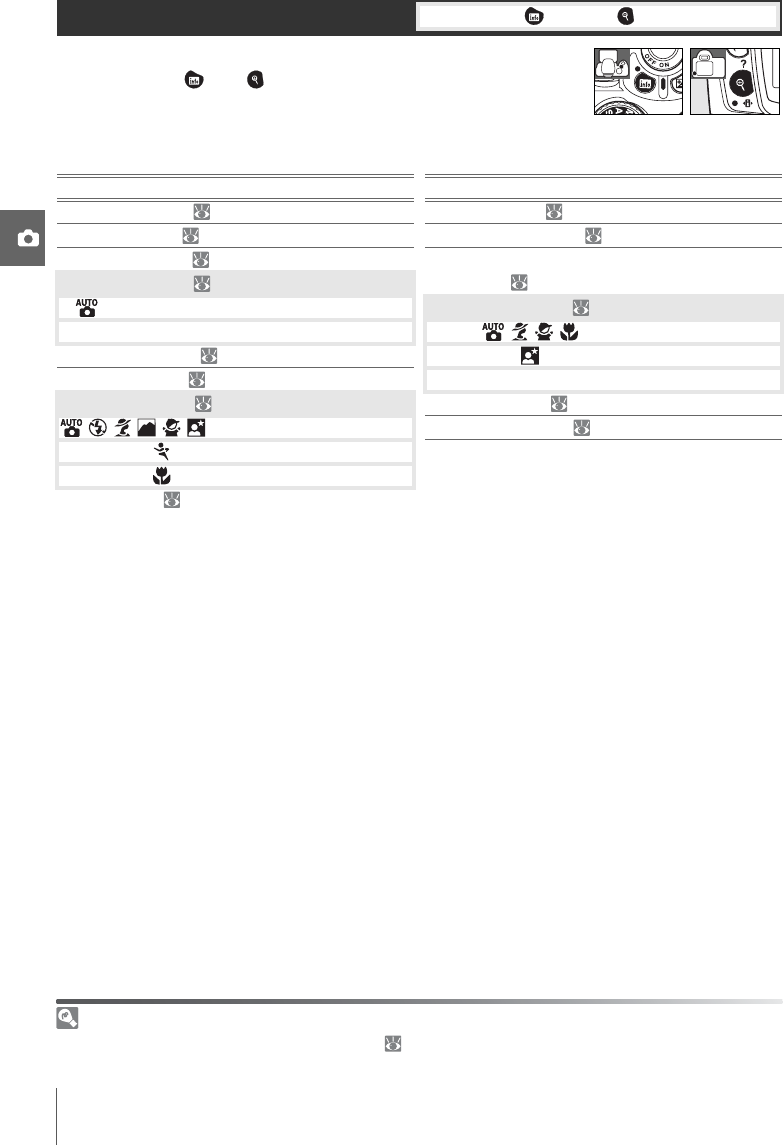
9: AF-assist (All Modes Except and )
If On (the default setting) is selected and the subject is poorly lit,
the AF-assist illuminator will light to assist the focus operation in
single-servo AF (AF-S or single-servo AF selected in AF-A autofocus
mode). Choose Off to disable the AF-assist illuminator. Note that
when the illuminator is off, the camera may not be able to focus
on poorly-lit subjects using autofocus.
10: ISO Auto (P, S, A, and M Modes Only)
If Off (the default setting) is selected, ISO sensitivity will remain
fixed at the value selected by the user ( 37). If On is selected,
ISO sensitivity will automatically be adjusted if optimal exposure
can not be achieved at the selected value (flash level is adjusted
appropriately). The maximum value for auto ISO sensitivity can be
selected using the Max. sensitivity option. In modes P and A,
sensitivity will only be adjusted if underexposure would result at the shutter speed selected
for Min. shutter speed (slower shutter speeds may be used if optimal exposure can not be
achieved at the value selected for maximum sensitivity).
When On is selected, the viewfinder and shooting information
display show ISO-AUTO. Unless a flash is used, these indicators blink
when sensitivity is altered from the value selected by the user.
Note that noise is more likely at higher sensitivities.
ISO Auto
Auto ISO control is not available at an ISO sensitivity of HI 1. Foreground subjects may be
underexposed in photos taken with the flash at slow shutter speeds, in daylight, or against a bright
background. Choose a flash mode other than slow sync or select mode A or M and choose a larger
aperture.
Menu Guide/Custom Settings77
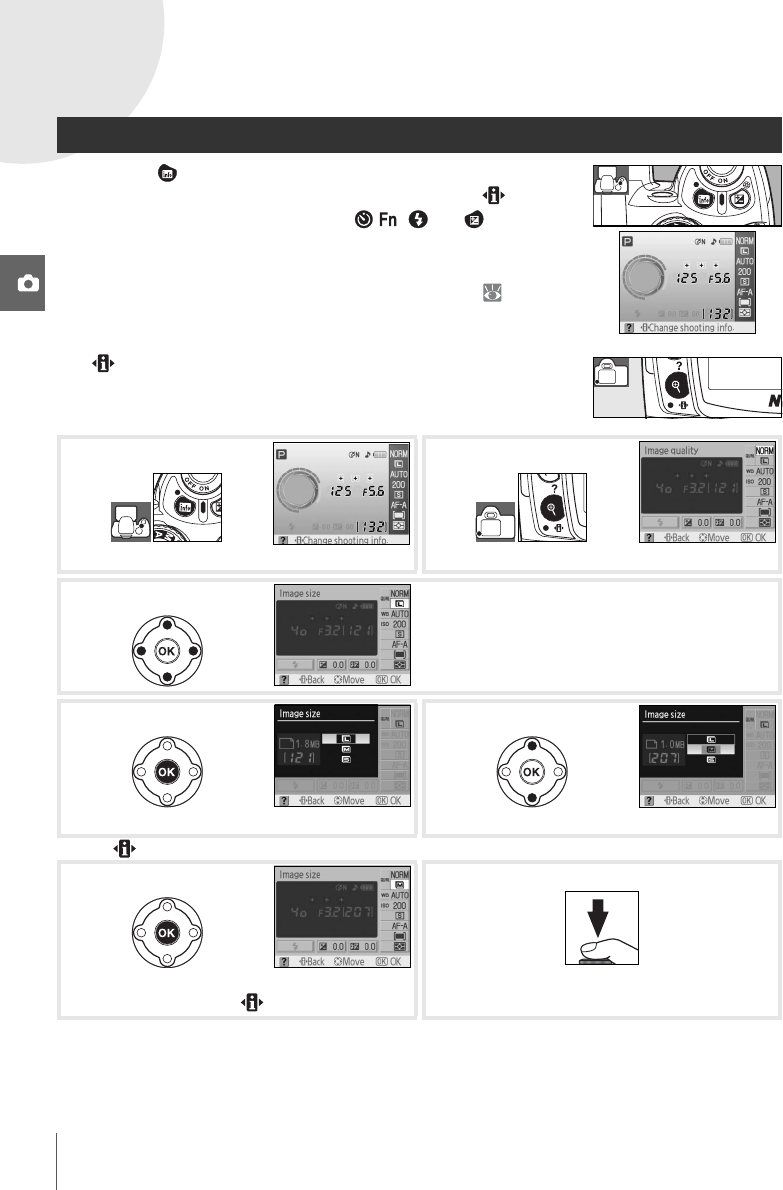
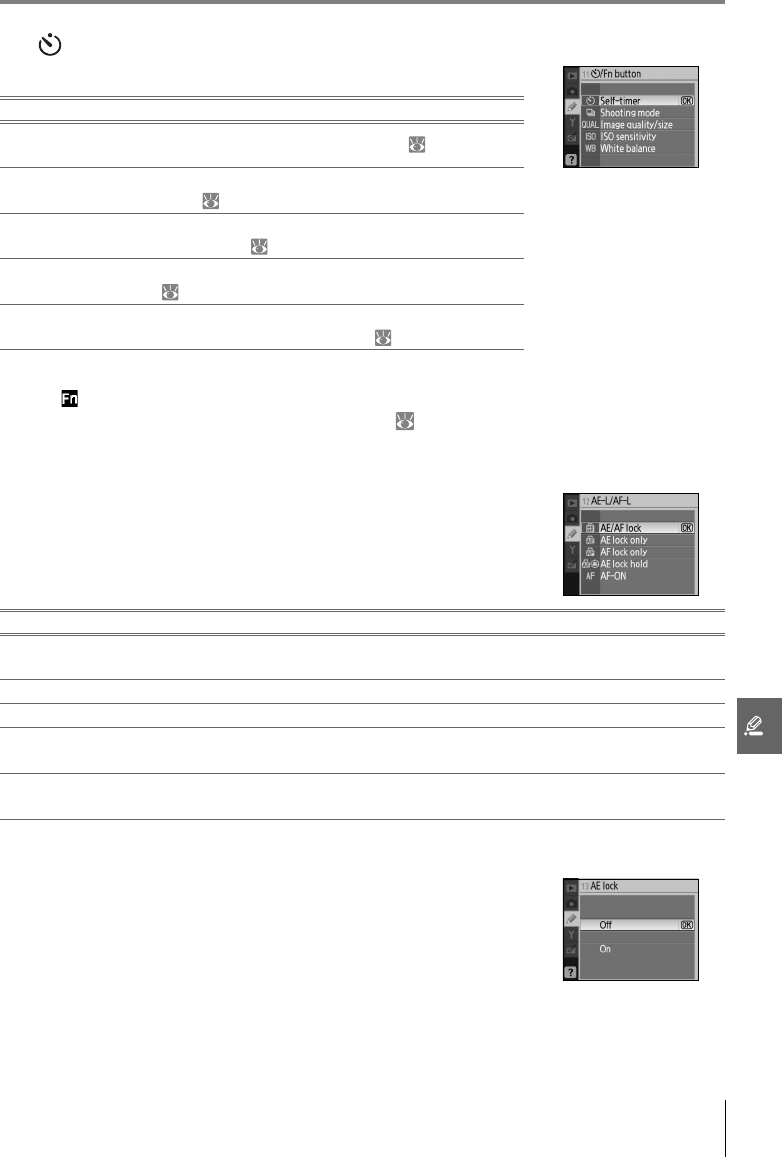
11: /Fn Button
Choose the function performed by the Fn button.
At settings other than Self-timer (the default option), the shooting information display will
show a icon to the left of the setting that can be adjusted by pressing the Fn button and
rotating the command dial (“Classic” display only; 81).
12: AE-L/AF-L
Choose the function performed by the AE-L/AF-L button.
13: AE Lock
If Off (the default option) is selected, pressing the shutter-release
button halfway does not lock exposure. If On is selected, expo-
sure will lock when the shutter-release button is pressed halfway.
OptionDescription
Self-timer
(default)
Press the Fn button to select self-timer mode ( 33).
Shooting
mode
Press the Fn button and rotate the command dial to select
shooting mode ( 32).
Image
quality/size
Press the Fn button and rotate the command dial to select
image quality and size ( 29).
ISO
sensitivity
Press the Fn button and rotate the command dial to select ISO
sensitivity ( 37).
White
balance
Press the Fn button and rotate the command dial to select
white balance (P, S, A, and M modes only; 49).
OptionDescription
AE/AF lock
(default)
Both focus and exposure lock while the AE-L/AF-L button is pressed.
AE lock onlyExposure locks while the AE-L/AF-L button is pressed. Focus is unaffected.
AF lock onlyFocus locks while the AE-L/AF-L button is pressed. Exposure is unaffected.
AE lock hold
Exposure locks when the AE-L/AF-L button is pressed and remains locked until the button is
pressed again or the exposure meters turn off.
AF-ON
The AE-L/AF-L button initiates autofocus. The shutter-release button can not be used to
focus.
78Menu Guide/Custom Settings
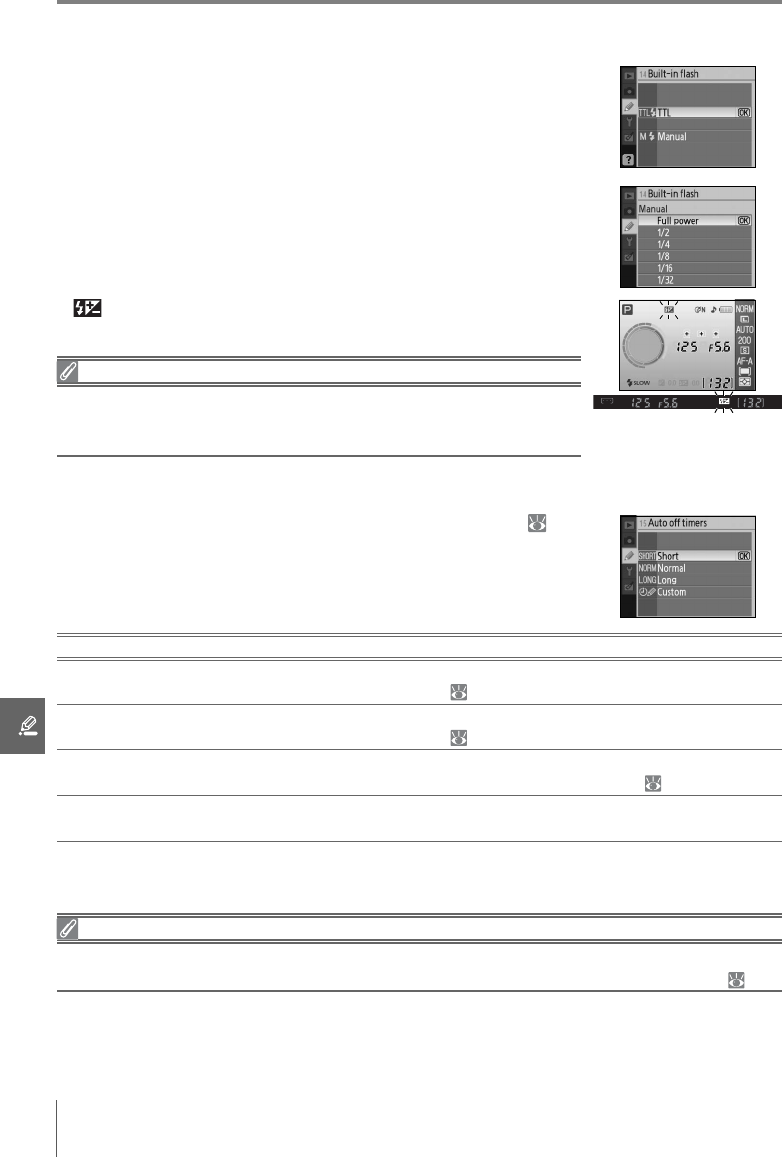
14: Built-in Flash (P, S, A, and M Modes Only)
Choose a flash control mode for the built-in flash or the optional
SB-400 Speedlight.
TTL (default): Flash output is adjusted automatically in response to
shooting conditions.
Manual: The flash fires at the level selected in the menu shown at
right. At full power, the built-in flash has a Guide Number of 18/59
(ISO 200, m/ft., 20°C
/68°F).
A icon flashes in the viewfinder and shooting information dis-
play when Manual is selected.
The Optional SB-400 Speedlight
When an optional SB-400 Speedlight is attached, Custom Setting 14 is
used to choose the flash control mode for the SB-400 and the name
changes to Optional Speedlight.
15: Auto off Timers
Choose how long the monitor and exposure meters ( 14)
remain on when no operations are performed. Choose a shorter
auto off delay for longer battery life.
Note that the shooting information display turns off automatically when the exposure
meters turn off.
Using an AC Adapter
Regardless of the setting chosen, the monitor and exposure meters do not turn off automatically
when the camera is powered by an optional EH-5 AC adapter and EP-5 AC adapter connector ( 103).
OptionDescription
Short
Monitor and exposure meters remain on for 4s. When Image review is on, pictures are
displayed in monitor for 4s after shooting ( 75).
Normal
(default)
Monitor and exposure meters remain on for 8s. When Image review is on, pictures are
displayed in monitor for 4s after shooting ( 75).
Long
Monitor remains on for 20s; exposure meters remain on for 1minute. When Image
review is on, pictures are displayed in monitor for 20s after shooting ( 75).
Custom
Choose monitor off delay and image review time from 4s, 8s, 20s, 1minute, and
10minutes. Choose auto meter-off delay from 4s, 8s, 20s, 1minute, or 30minutes.
Menu Guide/Custom Settings79
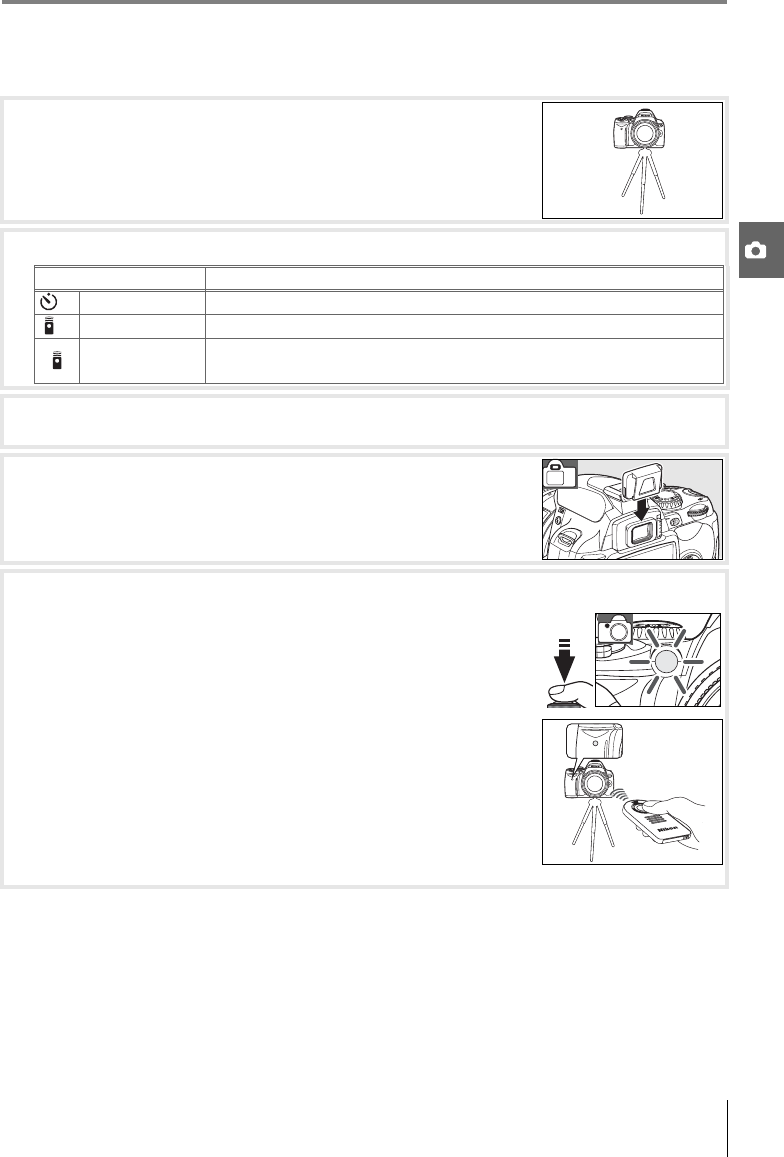
16: Self-Timer
Choose the length of the shutter-release delay in self-timer mode
( 33). The default setting is 10s.
17: Remote on Duration
Choose how long the camera will wait for a signal from the
remote before cancelling delayed or quick-response remote
modes ( 33). Choose shorter times for longer battery life. The
default setting is one minute.
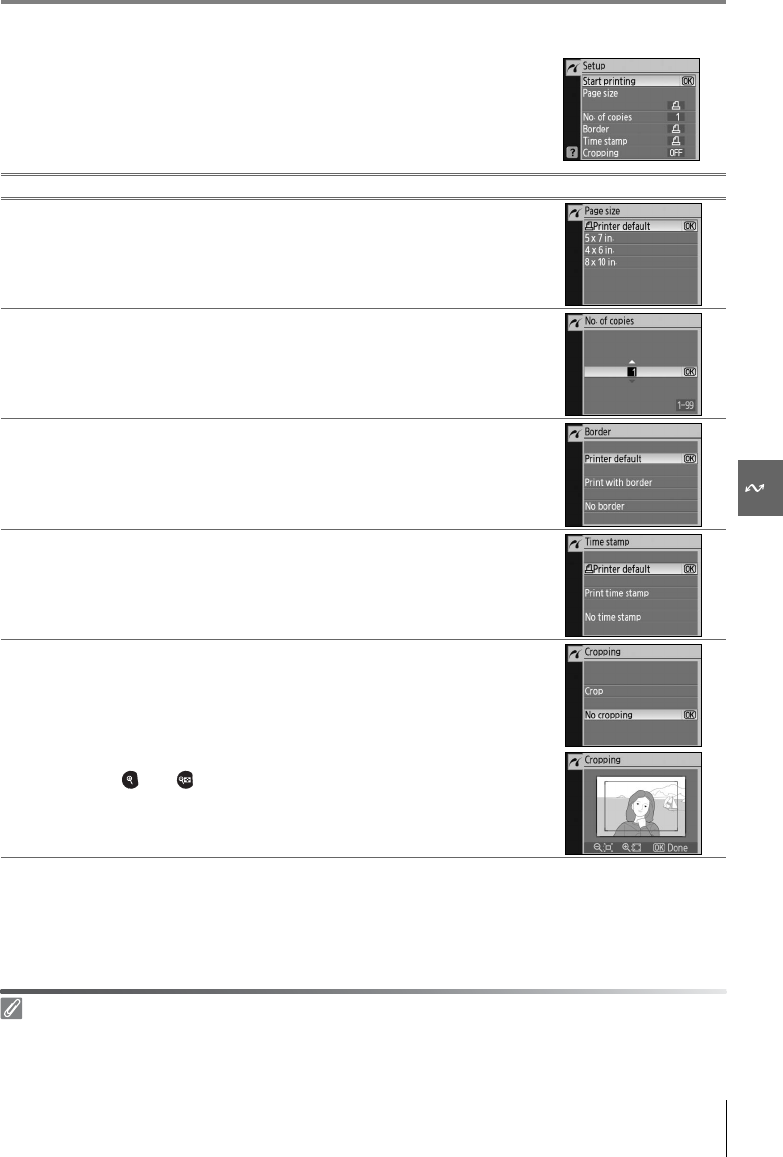
80Menu Guide/Basic Camera Settings: The Setup Menu
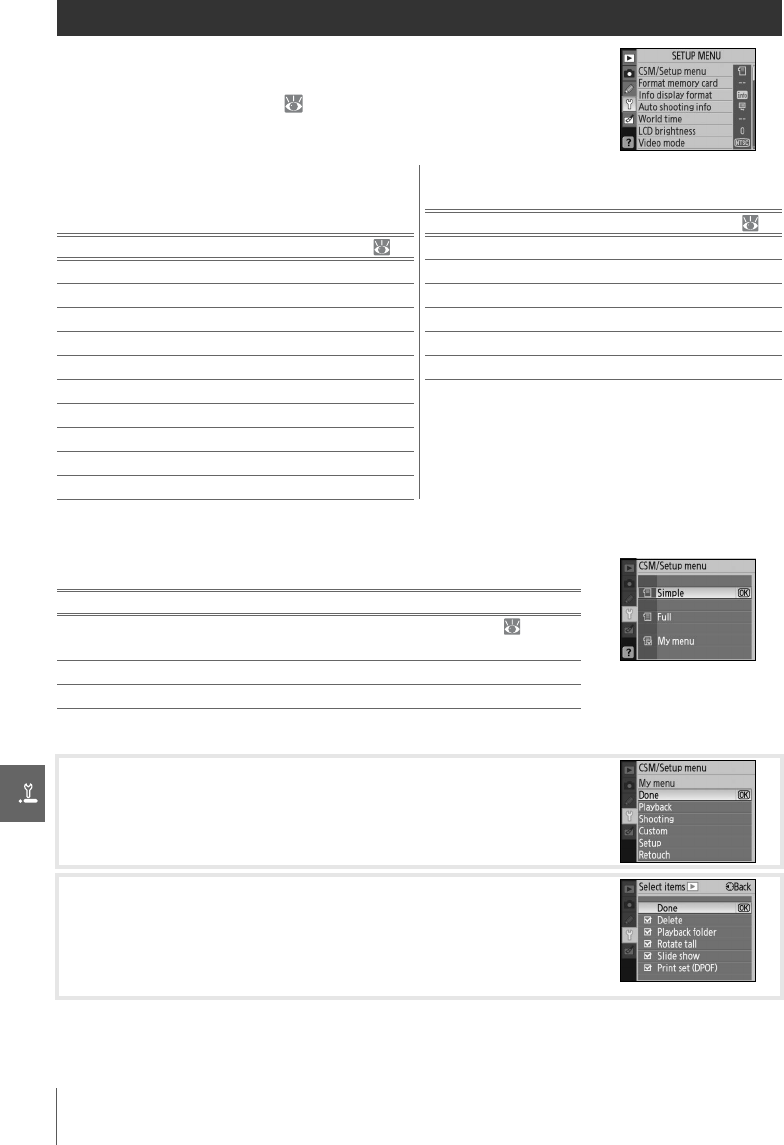
Basic Camera Settings: The Setup Menu
The setup menu contains the options listed below (options dis-
played may differ if My menu is selected for CSM/Setup menu.
See “Using Camera Menus” ( 63) for more information on using
the menus.
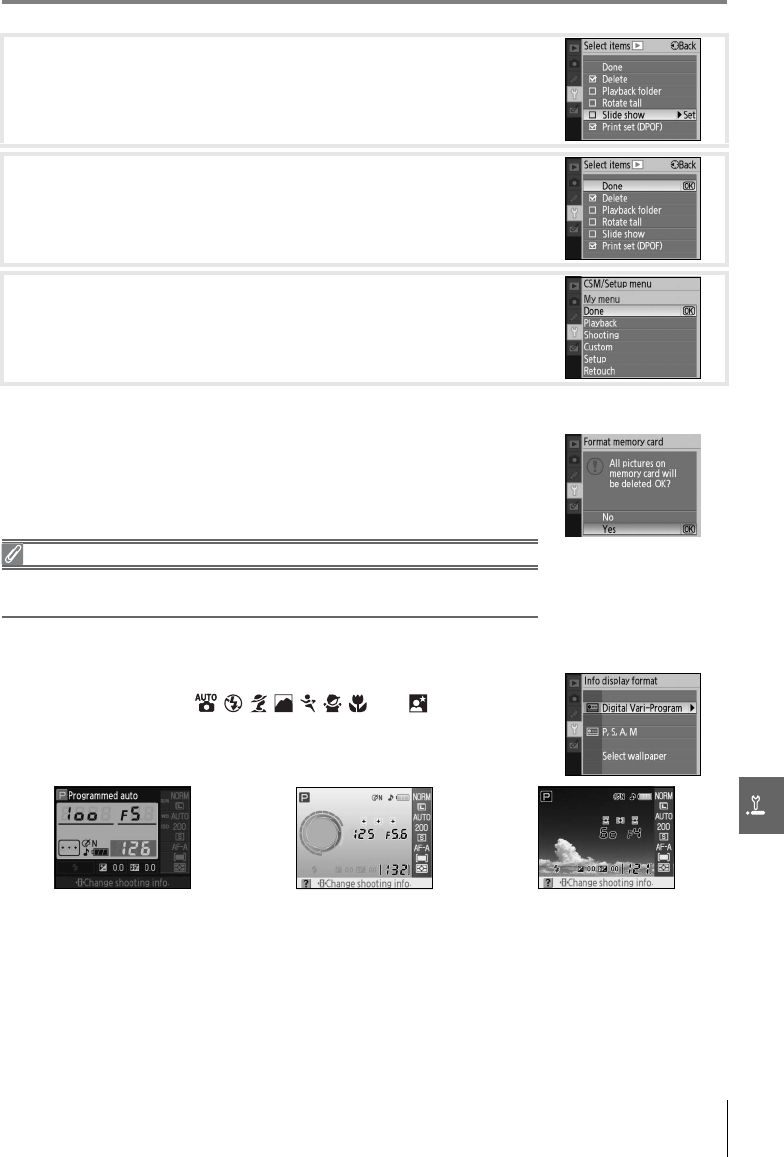
CSM/Setup menu
Choose the options displayed in the menus.
To choose menu items for display with My menu:
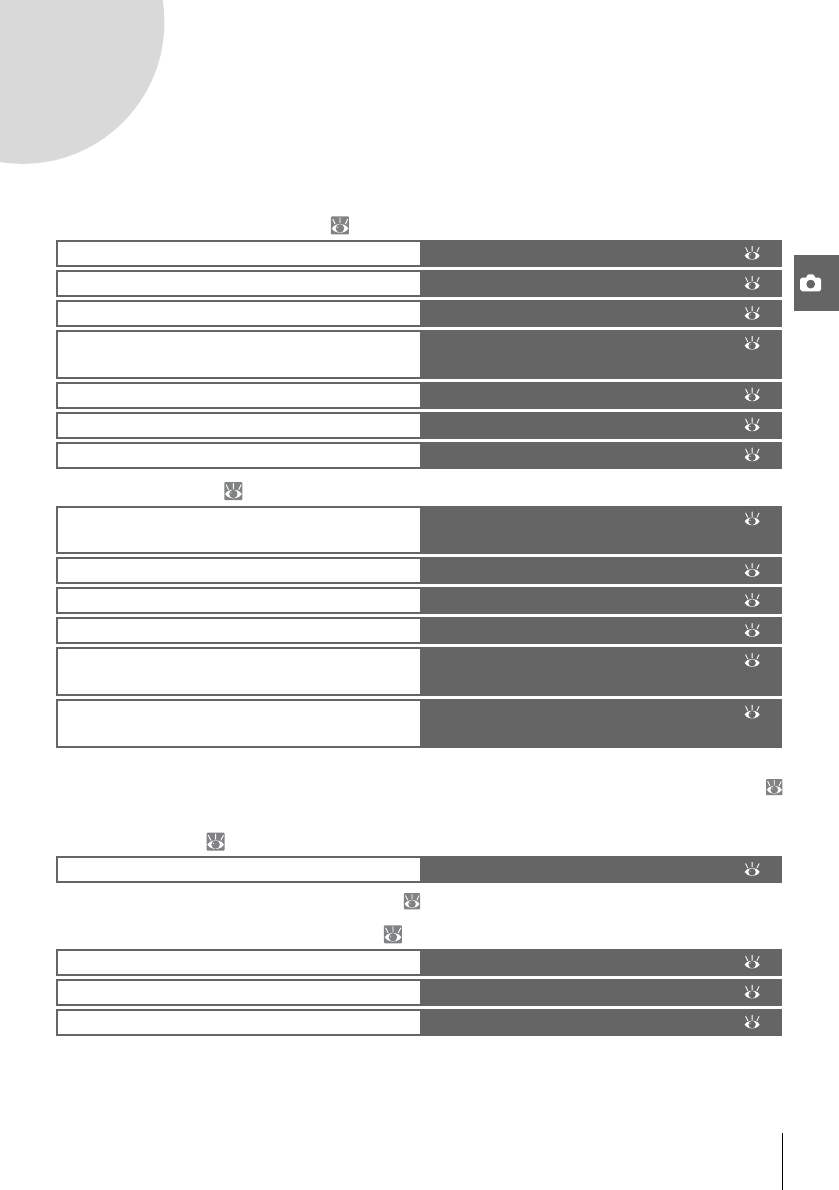
The following options are available when
Simple (the default option) is selected for
CSM/Setup menu:
To display the following additional options,
select Full for CSM/Setup menu:
Option
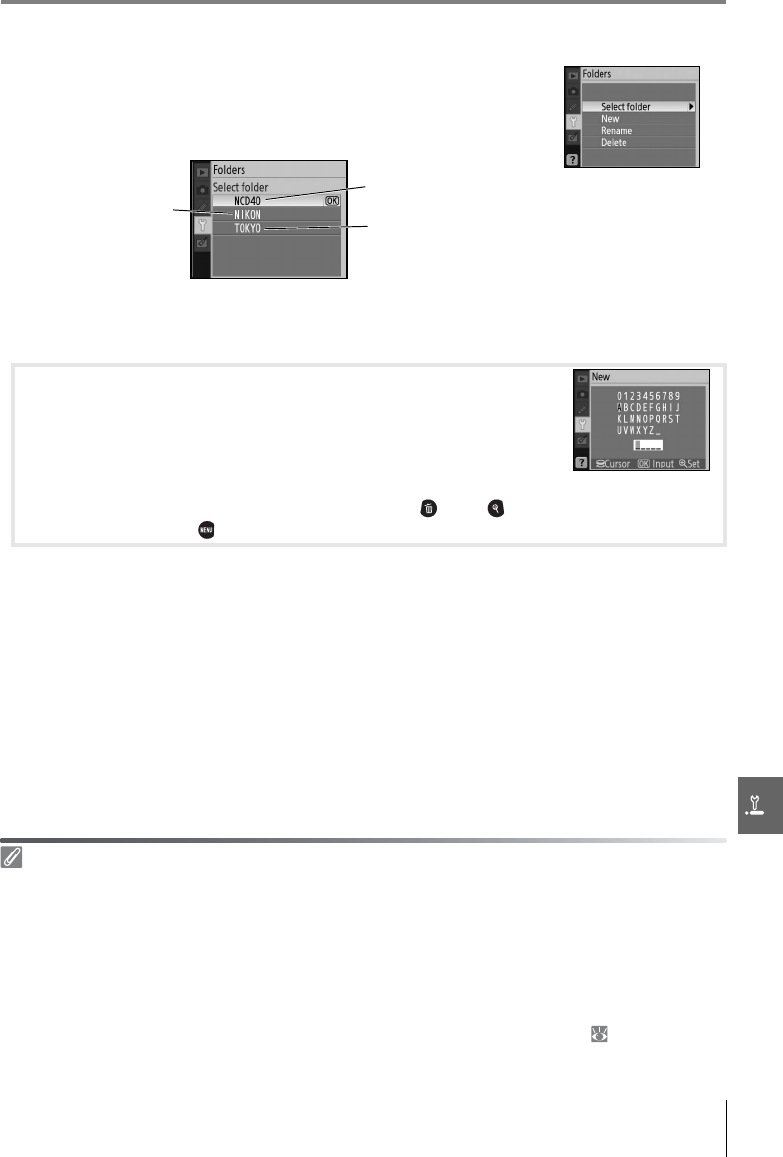
OptionFolders85
CSM/Setup menu80–81File no. sequence86
Format memory card81Mirror lock-up86
Info display format81–82Firmware version86
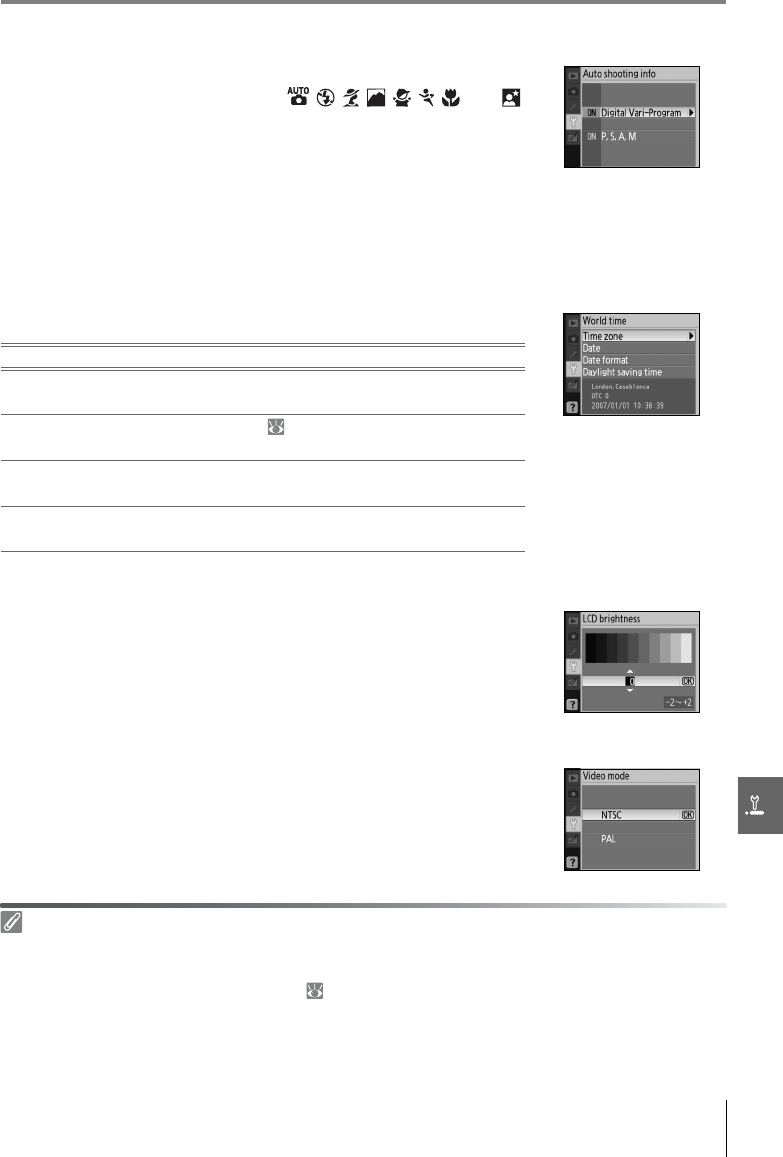
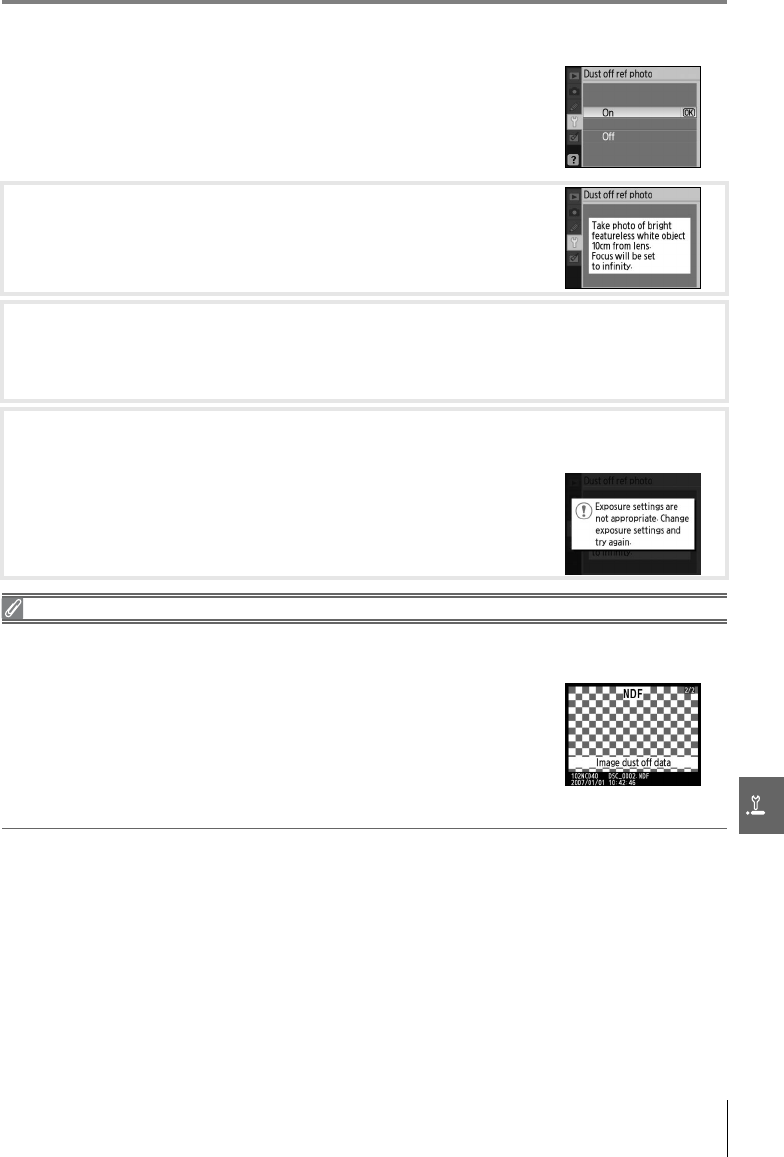
Auto shooting info83Dust off ref photo87
World time83Auto image rotation88
LCD brightness83
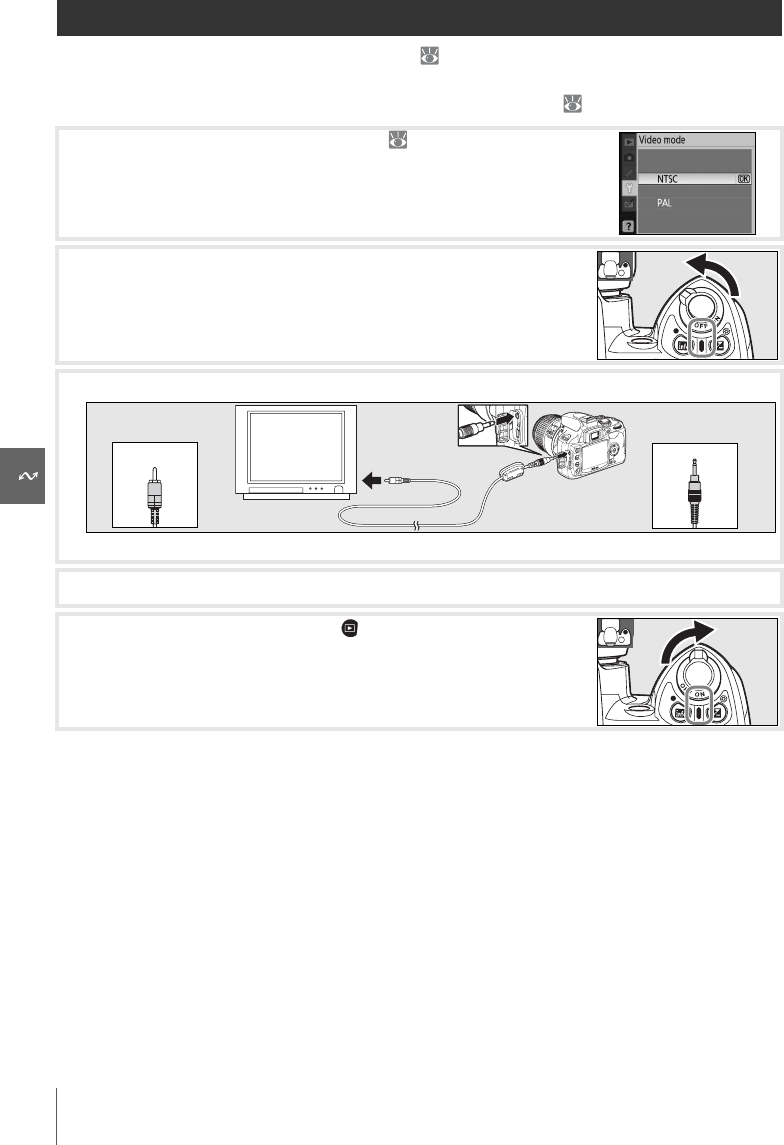
Video mode83
Language84
Image comment84
USB84
OptionDescription
Simple
(default)
Display only basic options in the Custom Settings ( 74) and
setup menus (see above). Other menus list all options.
FullDisplay all options.
My menuDisplay only selected options.
1
Highlight My menu and press the multi selector right. A list
of menu names will be displayed.
2
Highlight a menu name and press the multi selector right.
The items in the selected menu will be listed as shown at right
(the illustration shows the items listed when the playback
menu is selected). The CSM/Setup menu item in the setup
menu can not be selected.
Menu Guide/Basic Camera Settings: The Setup Menu81
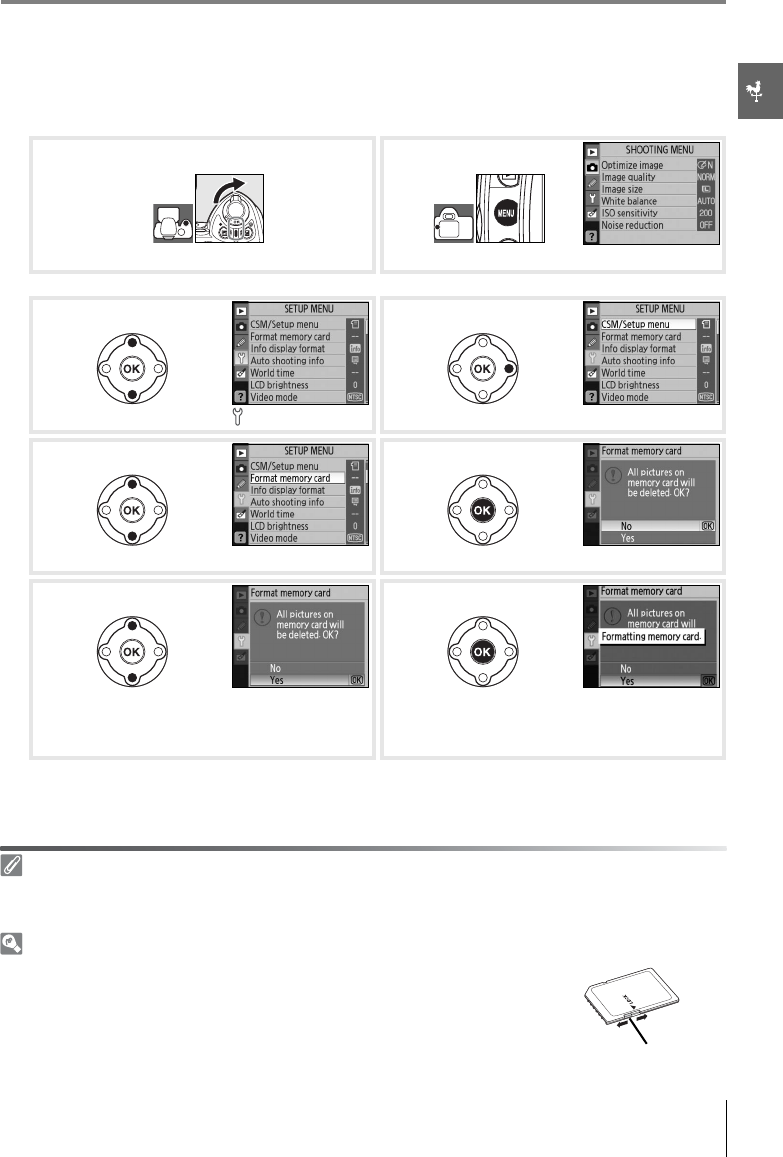
Format Memory Card
Info Display Format
3
Press the multi selector up or down to highlight items and
then press to the right to select or deselect. Selected items
are indicated by a check mark.
4
Highlight Done and press OK to return to the list of menu
names shown in Step 1. Repeat steps 2–3 to edit additional
menus.
5
Highlight Done in the list of menu names and press OK to
return setup menu.
Select Yes to format the memory card. Note that this permanently
deletes all photographs and any other data the card may contain.
Be sure that any valued files have been copied to a computer
before formatting.
Formatting Memory Cards
Do not turn the camera off or remove the memory card while formatting is
in progress.
Choose one of the following shooting information display formats
for Digital Vari-Program (, , , , , , , and ) modes and
P, S, A, and M modes.
ClassicGraphicWallpaper
82Menu Guide/Basic Camera Settings: The Setup Menu
Classic format is shown below.
The design of the Wallpaper format is the same as the Graphic
display except that a user-selected photograph is displayed in the
background, the background color for the menus differs, and the
shutter speed and aperture displays are not displayed ( 6). To
choose a photograph for the Wallpaper format:
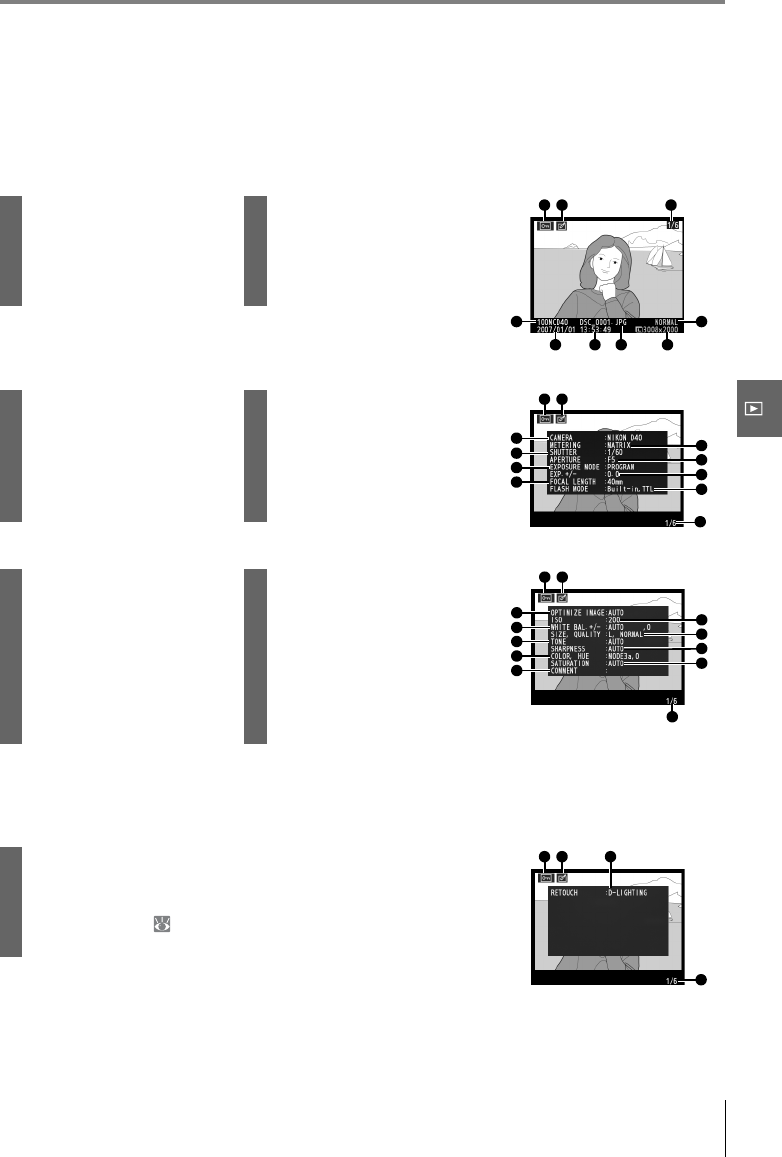
1Mode........................................................................................410Electronic analog exposure display................... 43
8Number of exposures remaining..............15, 11617AF-area mode.................................................................. 24
Preset white balance recording indicator......7118Focus mode......................................................................23
PC mode indicator........................................................5619Shooting mode.............................................................. 32
9Manual flash control indicator...............................7820ISO sensitivity...................................................................37
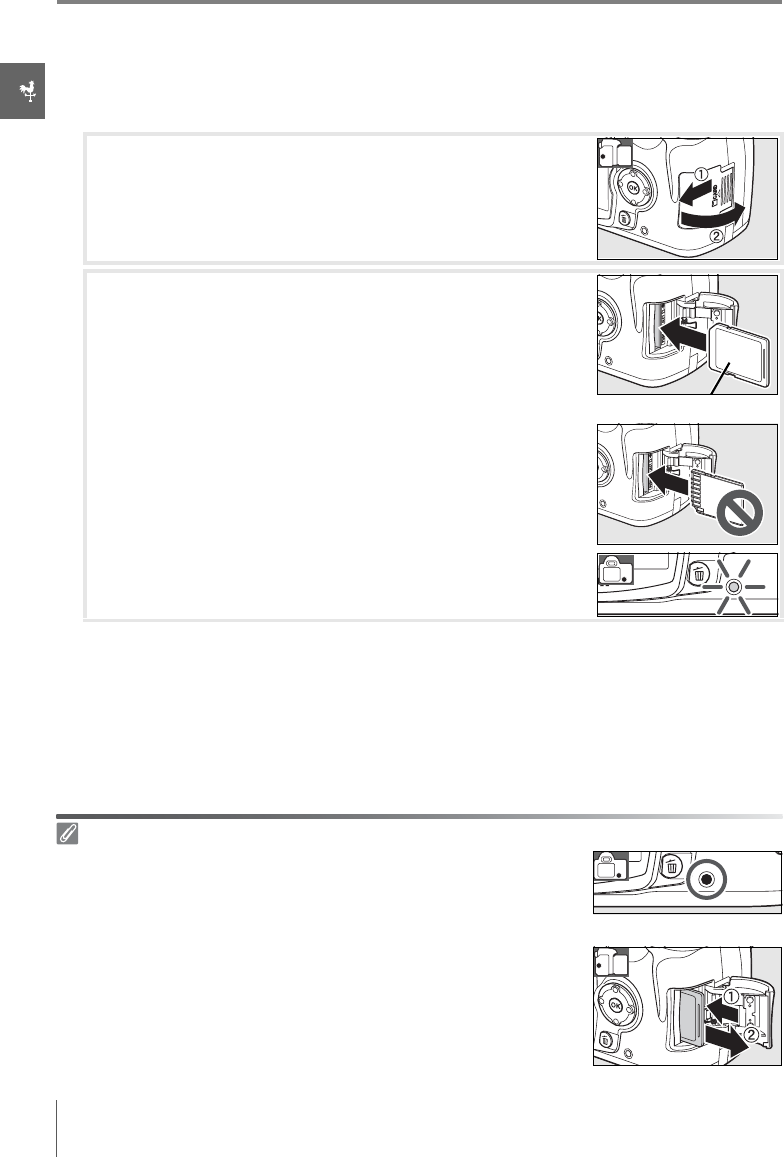
•Format memory cards in the camera before first use.
•Turn the power off before inserting or removing memory cards. Do not remove memory cards from
the camera, turn the camera off, or remove or disconnect the power source during formatting or
while data are being recorded, deleted, or copied to a computer. Failure to observe these precau-
tions could result in loss of data or in damage to the camera or card.
•Do not touch the card terminals with your fingers or metal objects.
•Do not apply force to the card casing. Failure to observe this precaution could damage the card.
•Do not bend, drop, or subject to strong physical shocks.
•Do not expose to heat, water, high levels of humidity, or direct sunlight.
SanDisk64MB, 128MB, 256MB, 512MB, 1GB, 2GB
*
, 4GB
*†
Toshiba64MB, 128MB, 256MB, 512MB, 1GB, 2GB
*
Panasonic64MB, 128MB, 256MB, 512MB, 1GB, 2GB
*
, 4GB
*†
Lexar128MB, 256MB, 512MB, 1GB, 2GB
*
*If card will be used with card reader or other device, check that device
supports 2GB and 4GB cards.
†SDHC compliant. If card will be used with card reader or
other device, check that device supports SDHC.
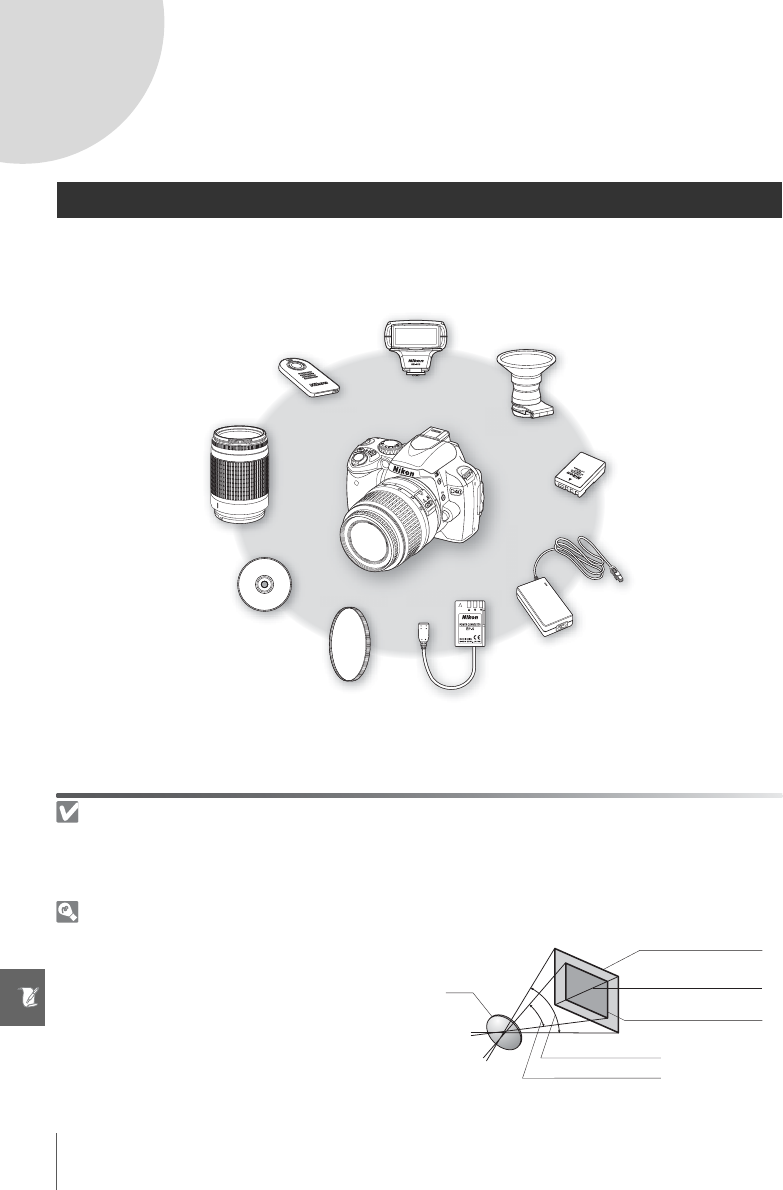
Technical Notes/Optional Accessories103
Accessories for the D40
At the time of writing, the following accessories were available for the D40. Up to date infor-
mation is available at Nikon websites or from our latest product catalogs.
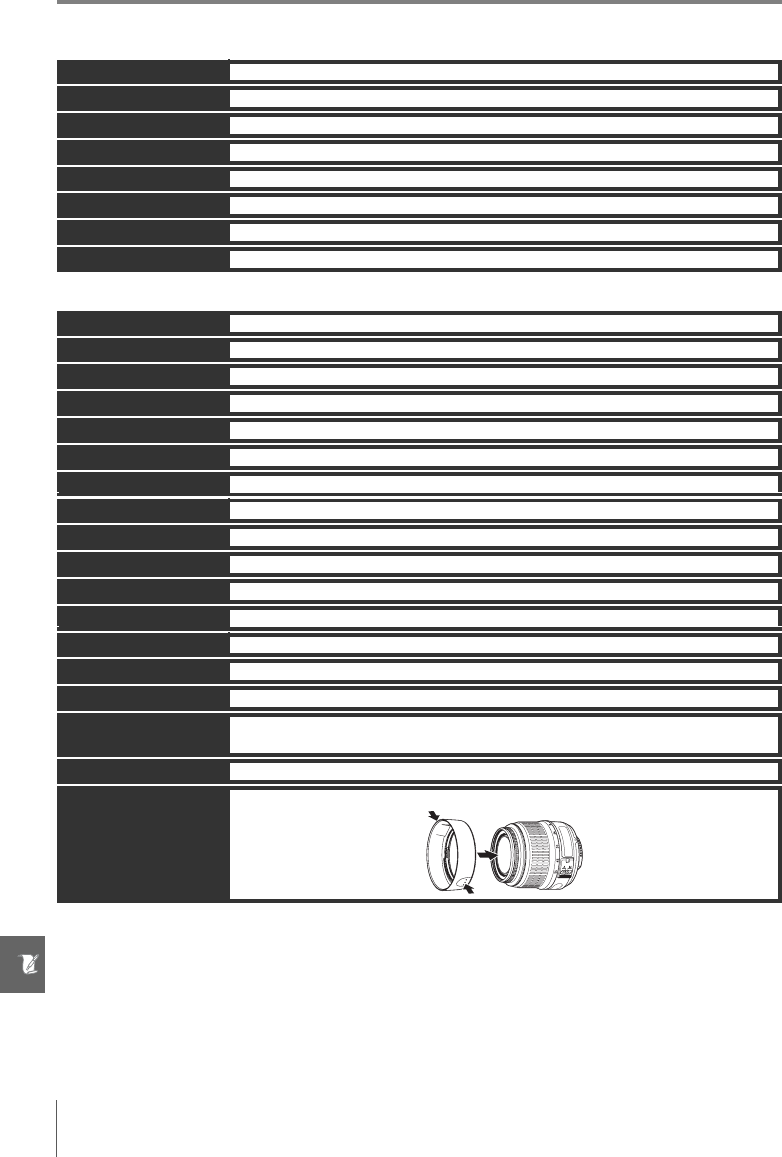
Connecting the Optional EP-5 AC Adapter Connector and EH-5 AC Adapter
See the EP-5 and EH-5 instruction manuals for more information on using an AC adapter.
Power
sources
•EN-EL9 rechargeable Li-ion battery: Additional EN-EL9 batteries are available from local
retailers and Nikon service representatives.
•EH-5 AC adapter: Use to power the camera for extended periods. EP-5 AC adapter connec-
tor required (available separately).
•EP-5 AC adapter connector: Connect the EH-5 to the D40.
Body caps
•BF-1A body cap: The BF-1A keeps the mirror, viewfinder screen, and low-pass filter free of
dust when a lens is not in place.
Video cablesEG-D100 video cable: View photos on TV or record them to video tape ( 62).
Remote
controls
•ML-L3 wireless remote control: Use as a remote shutter release for self-portraits or to prevent
blur caused by camera shake. The ML-L3 uses a 3V CR2505 battery.
Software
•Capture NX: A complete photo editing package with support for RAW images. Update to
the most recent version.
•Camera Control Pro: Control the camera remotely from a computer and save photographs
directly to the computer. Update to the most recent version.
1
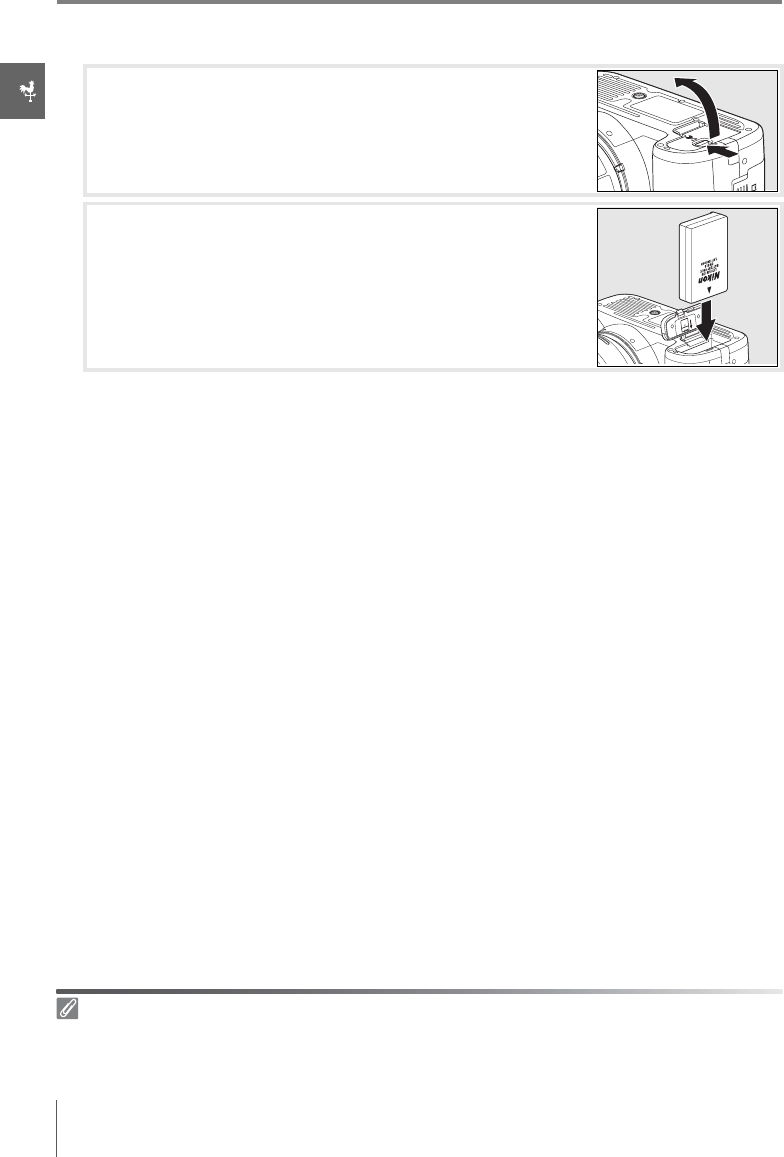
Open the battery-chamber (c) and power-connector (d)
covers.
2
Insert the EP-5 into the battery chamber as shown at right,
making sure the “+” and “–” terminals are in the correct orien-
tation.
3
Guide the power cord into the opening left by the power con-
nector cover and close the battery-chamber cover.
4
Insert the EH-5 AC adapter plug into the EH-5 AC inlet (e) and connect the EH-5 DC
plug to the EP-5 DC in connector (f). When the camera is powered by the AC
adapter, the battery-level indicator in the monitor will show .
12345
ᕡᕡᕡ
ᕢᕢᕢ
ᕣᕣᕣ
ᕤᕤᕤ
104Technical Notes/Caring for the Camera
Caring for the Camera
Storage
When the camera will not be used for an extended period, turn the camera off, remove the
battery, and store the battery in a cool, dry area with the terminal cover in place. To prevent
mold or mildew, store the camera in a dry, well-ventilated area. Do not store the camera
with naphtha or camphor moth balls or in locations that:
•are poorly ventilated or subject to humidities of over 60%
•are next to equipment that produces strong electromagnetic fields, such as televisions or
radios
•are exposed to temperatures above 50°C
/122°F (for example, near a space heater or in a
closed vehicle in a hot day) or below –10°C
(14°F)
Cleaning
Camera
body
Use a blower to remove dust and lint, then wipe gently with a soft, dry cloth. After using
the camera at the beach or seaside, wipe off sand or salt with a cloth lightly dampened in
distilled water and dry thoroughly. Important: Dust or other foreign matter inside the camera
may cause damage not covered under warranty.
Lens,
mirror, and
viewfinder
These elements are made of glass and are easily damaged. Remove dust and lint with a
blower. If using an aerosol blower, keep the can vertical to prevent the discharge of liquid.
To remove fingerprints and other stains, apply a small amount of lens cleaner to a soft
cloth and clean with care.
Monitor
Remove dust and lint with a blower. When removing fingerprints and other stains, wipe
the surface lightly with a soft cloth or chamois leather. Do not apply pressure, as this could
result in damage or malfunction.
The Monitor
Should the monitor break, care should be taken to avoid injury caused by broken glass and to prevent
liquid crystal from the monitor from entering your eyes or mouth.
Servicing the Camera and Accessories
The D40 is a precision device and requires regular servicing. Nikon recommends that the camera be
inspected by the original retailer or Nikon service representative once every one to two years, and that
it be serviced once every three to five years (note that fees apply to these services). Frequent inspec-
tion and servicing are particularly recommended if the camera is used professionally. Any accessories
regularly used with the camera, such as lenses or optional Speedlights, should be included when the
camera is inspected or serviced.
Technical Notes/Caring for the Camera105
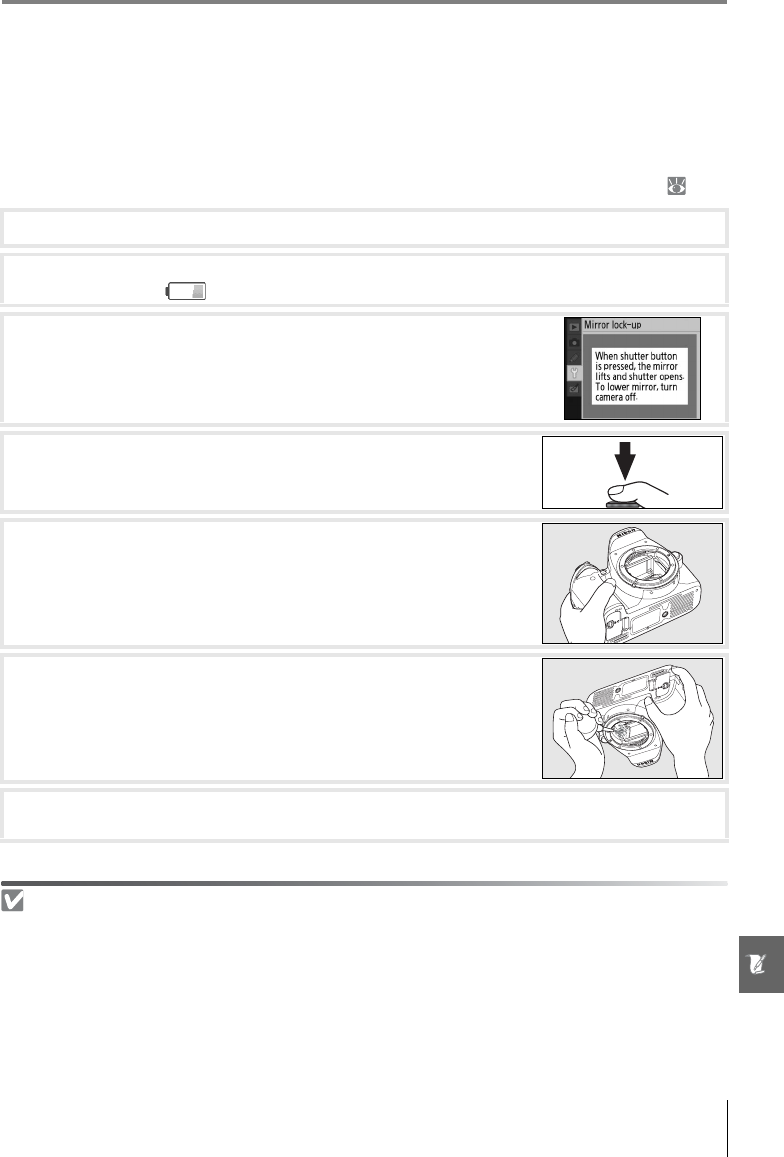
The Low-Pass Filter
The image sensor that acts as the camera’s picture element is fitted with a low-pass filter to
prevent moiré. If you suspect that dirt or dust on the filter is appearing in photographs, you
can clean the filter as described below. Note, however, that the filter is extremely delicate
and easily damaged. Nikon recommends that the filter be cleaned only by Nikon-authorized
service personnel. To prevent the camera from powering off while the mirror is raised, use a
full-charged battery or an optional EH-5 AC adapter and EP-5 AC adapter connector ( 103).
Use a Reliable Power Source
The shutter curtain is delicate and easily damaged. If the camera turns off with the mirror raised, the
curtain will close automatically. To prevent damage to the curtain, observe the following precautions:
•Do not turn the camera off until cleaning or inspection is complete. Do not remove or disconnect
the power source while the mirror is raised.
•If the battery runs low while the mirror is raised, a beep will sound and the AF-assist illuminator will
blink to warn that the shutter curtain will close and the mirror will be lowered after about two min-
utes. End cleaning or inspection immediately.
1
Remove the lens and turn the camera on.
2
Select Mirror lock-up from the setup menu (note that this option is not available at
battery levels of or below).
3
Highlight On and press OK. The message shown at right will
be displayed. To restore normal operation without inspecting
the low-pass filter, turn the camera off.
4
Press the shutter-release button all the way down. The mirror
will be raised and the shutter curtain will open, revealing the
low-pass filter.
5
Holding the camera so that light falls on the low-pass filter,
examine the filter for dust or lint. If no foreign objects are
present, proceed to Step 7.
6
Remove any dust and lint from the filter with a blower. Do not
use a blower-brush, as the bristles could damage the filter.
Dirt that can not be removed with a blower can only be
removed by Nikon-authorized service personnel. Under no
circumstances should you touch or wipe the filter.
7
Turn the camera off. The mirror will be lowered and the shutter curtain will close.
Replace the lens or body cap.
106Technical Notes/Caring for the Camera
Caring for the Camera and Battery: Cautions
Do not drop: The product may malfunction if subjected to
strong shocks or vibration.
Keep dry: This product is not waterproof, and may malfunc-
tion if immersed in water or exposed to high levels of
humidity. Rusting of the internal mechanism can cause
irreparable damage.
Avoid sudden changes in temperature: Sudden changes in tem-
perature, such as occur when entering or leaving a heated
building on a cold day, can cause condensation inside the
device. To prevent condensation, place the device in a car-
rying case or plastic bag before exposing it to sudden
changes in temperature.
Keep away from strong magnetic fields: Do not use or store this
device in the vicinity of equipment that generates strong
electromagnetic radiation or magnetic fields. Strong static
charges or the magnetic fields produced by equipment
such as radio transmitters could interfere with the monitor,
damage data stored on the memory card, or affect the
product’s internal circuitry.
Do not leave the lens pointed at the sun: Do not leave the lens
pointed at the sun or other strong light source for an
extended period. Intense light may cause the image sensor
to deteriorate or produce a white blur effect in photo-
graphs.
Blooming: Vertical white streaks may appear in photographs
of the sun or other strong light sources. This phenomenon,
known as “blooming,” can be prevented by reducing the
amount of light that falls on the image sensor, either by
choosing a slow shutter speed and small aperture or by
using an ND filter.
Do not touch the shutter curtain: The shutter curtain is
extremely thin and easily damaged. Under no circum-
stances should you exert pressure on the curtain, poke it
with cleaning tools, or subject it to powerful air currents
from a blower. These actions could scratch, deform, or tear
the curtain.
Handle all moving parts with care: Do not apply force to the bat-
tery-chamber, card-slot, or connector covers. These parts
are especially susceptible to damage.
Lens contacts: Keep the lens contacts clean.
Turn the product off before removing or disconnecting the power
source: Do not unplug the product or remove the battery
while the product is on or while images are being recorded
or deleted. Forcibly cutting power in these circumstances
could result in loss of data or in damage to product memory
or internal circuitry. To prevent an accidental interruption of
power, avoid carrying the product from one location to
another while the AC adapter is connected.
Cleaning: When cleaning the camera body, use a blower to
gently remove dust and lint, then wipe gently with a soft,
dry cloth. After using the camera at the beach or seaside,
wipe off any sand or salt using a cloth lightly dampened in
pure water and then dry the camera thoroughly.
The lens and mirror are easily damaged. Dust and lint
should be gently removed with a blower. When using an
aerosol blower, keep the can vertical to prevent discharge of
liquid. To remove fingerprints and other stains from the
lens, apply a small amount of lens cleaner to a soft cloth and
wipe the lens carefully.
See “The Low-Pass Filter” ( 105) for information on clean-
ing the low-pass filter.
Storage: To prevent mold or mildew, store the camera in a
dry, well-ventilated area. If the product will not be used for
an extended period, remove the battery to prevent leakage
and store the camera in a plastic bag containing a desiccant.
Do not, however, store the camera case in a plastic bag, as
this may cause the material to deteriorate. Note that desic-
cant gradually loses its capacity to absorb moisture and
should be replaced at regular intervals.
To prevent mold or mildew, take the camera out of storage
at least once a month. Turn the camera on and release the
shutter a few times before putting it away.
Store the battery in a cool, dry place. Replace the terminal
cover before putting the battery away.
Notes on the monitor: The monitor may contain a few pixels
that are always lit or that do not light. This is common to all
TFT LCD monitors and does not indicate a malfunction.
Images recorded with the product are unaffected.
Images in the monitor may be difficult to see in a bright
light.
Do not apply pressure to the monitor, as this could cause
damage or malfunction. Dust or lint on the monitor can be
removed with a blower. Stains can be removed by wiping
lightly with a soft cloth or chamois leather. Should the mon-
itor break, care should be taken to avoid injury from broken
glass and to prevent liquid crystal from the monitor touch-
ing the skin or entering the eyes and mouth.
Batteries: Dirt on the battery terminals can prevent the cam-
era from functioning and should be removed with a soft,
dry cloth before use. After removing the battery from the
camera, be sure to replace the terminal cover.
Charge the battery before use. When taking photographs
on important occasions, ready a spare EN-EL9 battery and
keep it fully charged. Depending on your location, it may be
difficult to purchase replacement batteries on short notice.
Technical Notes/Caring for the Camera107
On cold days, the capacity of batteries tends to decrease. Be sure the battery is fully charged before taking photographs
outside in cold weather. Keep a spare battery in a warm place and exchange the two as necessary. Once warmed, a cold
battery may recover some of its charge.
Continuing to charge the battery after it is fully charged can impair battery performance.
Batteries may leak or explode if improperly handled. Observe the following precautions when handling batteries:
•Turn the product off before replacing the battery.
•The battery may become hot when used for extended periods. Observe due caution when handling the battery.
•Use only batteries approved for use in this equipment.
•Do not expose the battery to flame or excessive heat.
Used batteries are a valuable resource. Please recycle used batteries in accord with local regulations.
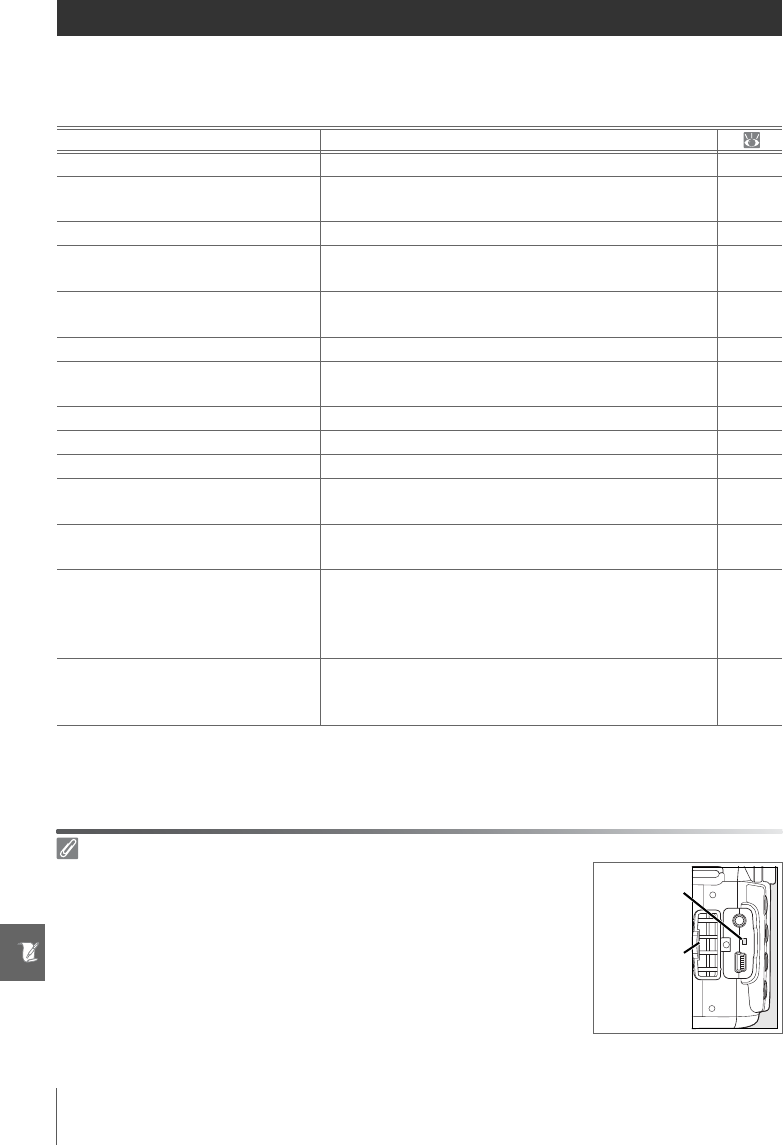
Foreign Matter on the Low-Pass Filter
Nikon takes every possible precaution to prevent foreign matter from coming into contact with the
low-pass filter during production and shipping. The D40, however, is designed to be used with inter-
changeable lenses, and foreign matter may enter the camera when lenses are removed or exchanged.
Once inside the camera, this foreign matter may adhere to the low-pass filter, where it may appear in
photographs taken under certain conditions. To protect the camera when no lens is in place, be sure
to replace the body cap provided with the camera, being careful to first remove all dust and other for-
eign matter that may be adhering to the body cap.
Should foreign matter find its way onto the low-pass filter, clean the filter or have it cleaned by autho-
rized Nikon service personnel ( x). Photographs affected by the presence of foreign matter on the
filter can be retouched using Capture NX (available separately; 103) or the clean image options
available in some third-party imaging applications.
108Technical Notes/Troubleshooting
Troubleshooting
If the camera fails to function as expected, check the list of common problems below
before consulting your retailer or Nikon representative. Refer to the page numbers in the
right-most column for more information.
A Note on Electronically-Controlled Cameras
ProblemSolution
Camera takes time to turn on.Delete files or folders.20, 65
Viewfinder is out of focus.
Adjust viewfinder focus or use optional diopter adjust-
ment lenses.
14, 102
Displays turn off without warning.Choose a longer auto off delay.78
Camera stops functioning
See “A Note on Electronically-Controlled Cameras,”
below.
—
Display in viewfinder is unrespon-
sive and dim.
The response times and brightness of the viewfinder
display varies with temperature.
—
Menu item is not displayed.Select Full for CSM/Setup menu.80
Menu item can not be selected.
Rotate mode dial to another setting or insert memory
card.
4, 12
Image size can not be changed.Image quality set to RAW or RAW+B.30
Metering can not be changed.Autoexposure lock in effect.46
Can not measure white balance.Subject is too dark or too bright.71
Image can not be selected as source
for preset white balance.
Image was not created with D40.72
Full range of shutter speeds not
available.
Flash in use.117
Can not select focus area.
•Closest subject selected for AF-area mode: choose
another mode.
•Press shutter-release button halfway to activate
exposure meters.
24
14
Focus does not lock when shutter-
release button is pressed halfway.
Use AE-L/AF-L button to lock focus in AF-C autofocus
mode or when photographing moving subjects in
AF-A mode.
23, 26
In extremely rare instances, a strong external static charge may cause the
camera may stop functioning. Turn the camera off, remove and replace
the battery (note that the battery may be hot) or disconnect and recon-
nect the AC adapter, and turn the camera on again. If the problem per-
sists, turn the camera off and press the reset switch (see right; note that
this resets the clock). In the event of continued malfunction, contact your
retailer or a Nikon-authorized service representative.
Reset
switch
Connector
cover
Technical Notes/Troubleshooting109
ProblemSolution
Image in viewfinder is not in focus.
•Manual focus selected: if AF-S or AF-I lens is attached,
choose autofocus mode. Otherwise focus manually.
•Camera unable to focus using autofocus: use manual
focus or focus lock.
•Lens is not AF-S or AF-I: use manual focus.
28, 97
26, 28
28, 97
AF-assist illuminator does not light.
•Mode dial rotated to or : select another mode.
•AF-assist lamp does not light for manual focus or
continuous-servo autofocus. Choose AF-S.
•Choose On for Custom Setting 9 (AF-assist).
•Illuminator has turned off automatically. Illuminator
may become hot with continued use; wait for lamp
to cool down.
4, 18–19
23
76
—
Shutter release is disabled.
•Memory card is full, locked, or not inserted.
•Flash is charging.
•Camera is not in focus.
• CPU lens with aperture ring attached without lock-
ing aperture at highest f/-number.
•Non-CPU lens is attached: rotate camera mode dial
to M.
• Mode dial rotated to S after shutter speed of bulb
selected in mode M: choose new shutter speed.
12, 13,
15
17
23
8, 39
39, 43,
45
41, 43
No photo taken when remote con-
trol shutter-release button is
pressed.
•Replace battery in remote control.
•Choose remote control mode.
•Flash is charging.
•Time selected for Custom Setting 17 (Remote on
duration) has passed: reselect remote control
mode.
•Bright light is interfering with remote.
103
33
17
79
—
Only one shot taken each time shut-
ter-release button is pressed in con-
tinuous shooting mode.
Continuous shooting is not available when flash is
raised.
32, 34,
36
Camera is slow to record photos.Turn noise reduction off.73
Date of recording is not correct.Set camera clock.11
Final photo is larger than area
shown in viewfinder.
Viewfinder horizontal and vertical frame coverage is
approximately 95%.
—
Randomly-spaced bright pixels
(“noise”) appears in photographs.
•Lower ISO sensitivity or use noise reduction.
•Shutter speed is slower than 1s: use noise reduction.
37, 73
73
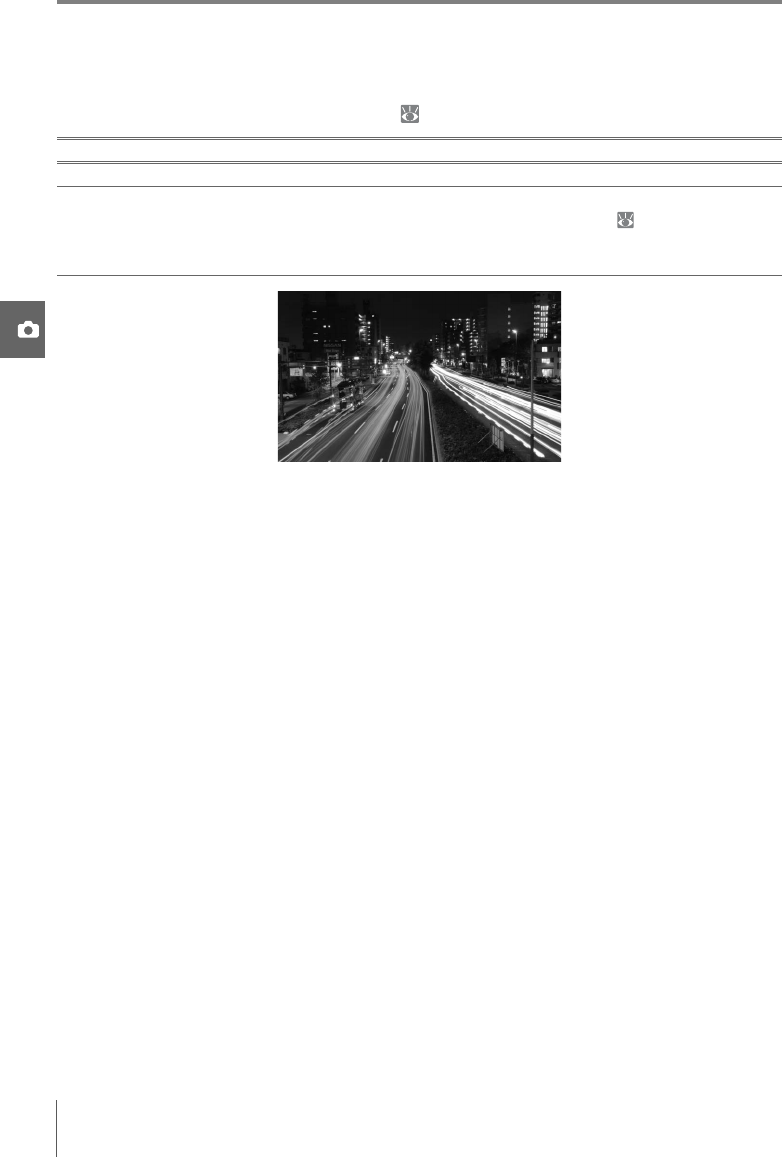
Reddish areas appear in photos.
Reddish areas may appear in long time-exposures.
Turn noise reduction on when shooting at shutter
speeds of “bulb” or “--”.
44, 73
Colors are unnatural
•Select mode P, S, A, or M and adjust white balance to
match light source.
•Select mode P, S, A
, or M and adjust Optimize image
settings.
39, 49
39, 68
110Technical Notes/Troubleshooting
ProblemSolution
Flashing areas appear in images
Press multi selector up or down to choose photo infor-
mation displayed.
51Shooting data appear on images
A graph appears during playback
RAW image is not played back.Photo was taken at image quality of NEF+JPEG.30
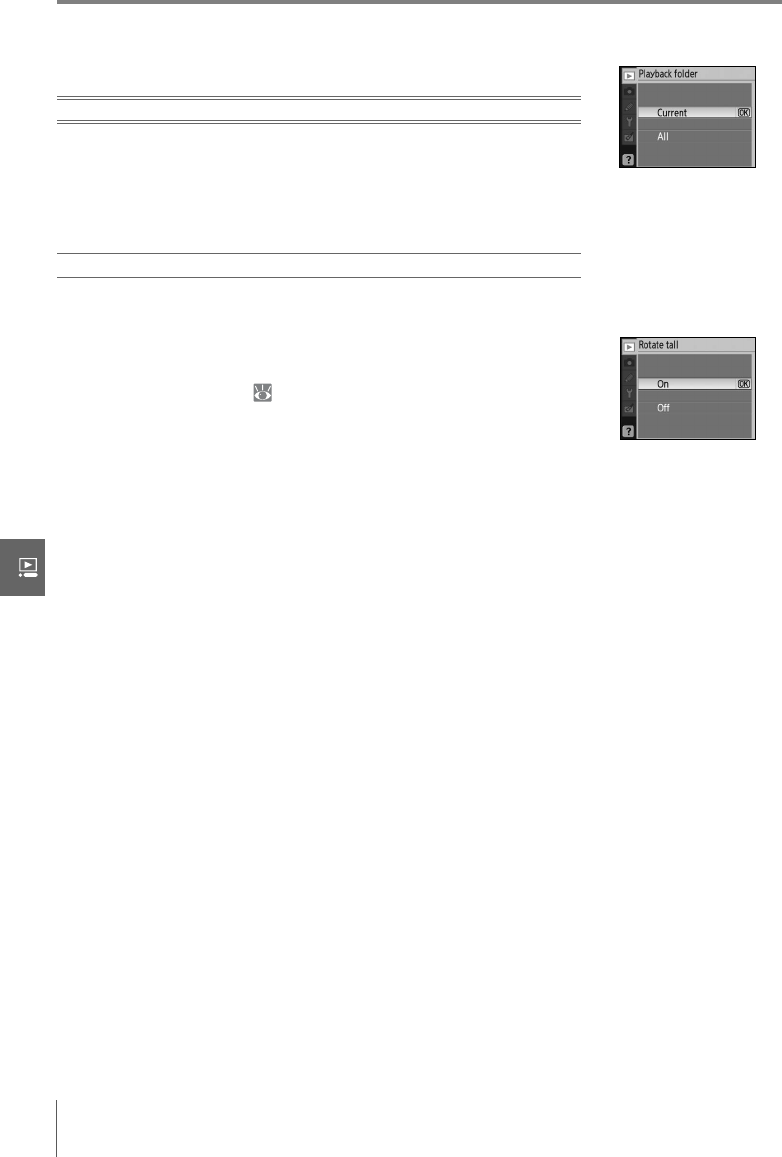
•Some photos are not displayed
during playback
•Message displayed stating that no
images are available for playback.
Select All for Playback folder. Note that Current will
automatically be selected when next photo is taken.
66
“Tall” (portrait) orientation photos
are displayed in “wide” (landscape)
orientation.
•Select On for Rotate tall.
•Photo was taken with Off selected for Auto image
rotation.
•Camera orientation was changed while shutter-
release button was pressed in continuous shooting
mode.
• Camera was pointed up or down when photo was
taken.
66
88
88
88
Can not delete photo.Photo is protected: remove protection.54
Can not change print order.Memory card is full or locked.13, 15
Can not select photo for printing.
Photo is in RAW (NEF) format. Transfer to computer
and print using PictureProject or Capture NX.
55, 57
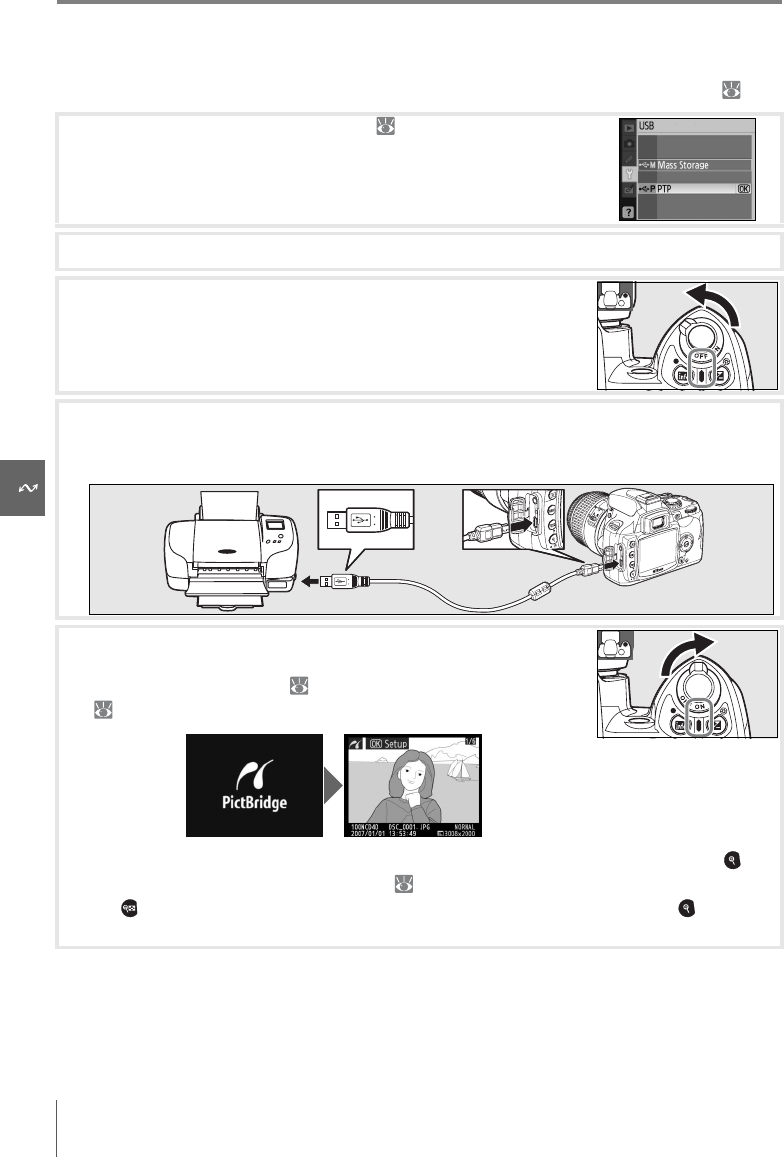
Can not print pictures via direct USB
connection.
Set USB to PTP.58, 84
Photo is not displayed on TV.Choose correct video mode.62, 83
Can not copy photos to computer.Choose correct USB option.55
Can not use Camera Control Pro.Set USB to PTP.55, 56
Technical Notes/Troubleshooting111
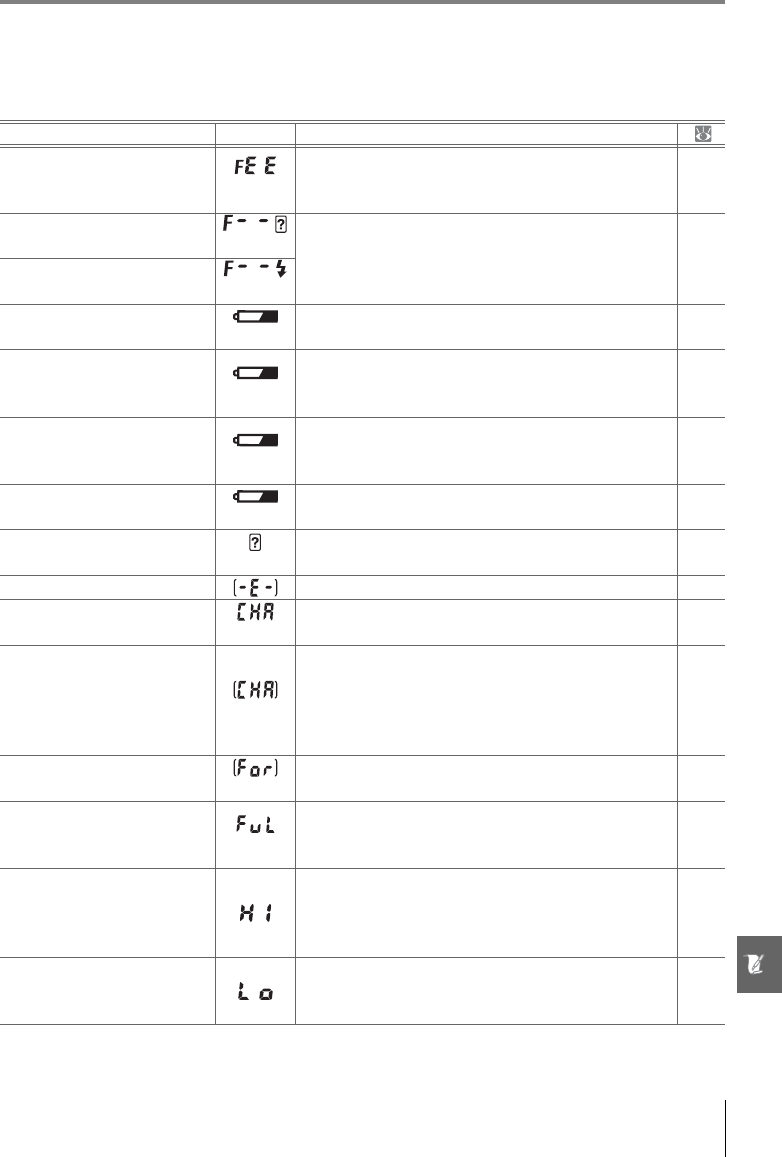
Camera Error Messages and Displays
This section lists common warning indicators and error messages that appear in the view-
finder and monitor.
MessageViewfinderSolution
Lock lens aperture ring at
minimum aperture (largest f/-
number).
(blinks)
Lock ring at minimum aperture (largest f/-number).8, 39
Lens not attached.
/
(blinks)
•No lens attached: attach lens.
•Attached lens is not CPU lens: select mode M.
8
39,
43, 45
Attach a lens.
/
(blinks)
Initialization error. Turn
camera off and then on again.
(blinks)
Turn camera off, remove and reinsert battery, and
then turn camera on again.
—
This battery cannot be used.
Choose battery designated
for use in this camera.
(blinks)
Insert EN-EL9 battery.
7, 9–
10
Battery level is low. Complete
operation and turn camera
off immediately.
(blinks)
End cleaning or inspection of low-pass filter and
turn camera off immediately.
105
Shutter release disabled.
Recharge battery.(blinks)
Turn camera off and recharge battery or replace
with fully-charged spare battery.
9–10,
15
Clock not set.
(blinks)
Set camera clock.11
NO MEMORY CARD.Insert memory card.12–13
Memory card is locked.
Slide lock to “write” position.(blinks)
Slide card write-protect switch to “write” position.13
This card can not be used.
(blinks)
•Use Nikon-approved card.
•Card may be damaged. Contact retailer or Nikon-
authorized service representative.
•Delete unwanted files or insert new memory card.
102
x
12–13,
20, 65
This card is not formatted.
Format the card.(blinks)
Format memory card.13, 81
Card is full.
(blinks)
•Reduce image quality or size.
•Delete photographs.
•Insert new memory card.
29–30
20, 65
12
Subject is too bright.
•Choose lower ISO sensitivity.
•Increase shutter speed.
•Choose smaller aperture (larger f/-number).
•Use optional Neutral Density (ND) filter.
37
39–44
39–44
102
Subject is too dark.
•Choose higher ISO sensitivity.
•Decrease shutter speed.
•Choose larger aperture (smaller f/-number).
37
39–44
39–44
112Technical Notes/Troubleshooting
Help
A blinking is displayed in the monitor or viewfinder indicates that a description of the current prob-
lem can be viewed by pressing the button.
MessageViewfinderSolution
—
(blinks)
Flash has fired at full power. View photo; if underex-
posed, adjust settings and try again.
20, 45,
48, 50,
76, 78
—
/
(blinks)
•Built-in flash is lowered: raise built-in flash.
•Flash head on optional SB-400 Speedlight is in
bounce-flash position.
•SB-400 is unable to fully illuminate subject at cur-
rent lens focal length. Increase distance to subject
(this warning is not displayed with other optional
Speedlights).
34
99
99
Flash is in TTL mode. Choose
another setting or use a CPU
lens.
(blinks)
Change flash control mode for optional Speedlight.100
No Bulb in S mode.
(blinks)
Change shutter speed or select mode M.39–44
(blinks)
Unable to measure white
balance. Please try again.(blinks)
Camera unable to measure preset white balance.
Adjust exposure settings and try again.
47, 70
Folder contains no images.—
•Insert another memory card.
•Set Playback folder to All.
12
66
File does not contain image
data.
—Delete file or reformat memory card.
13,
20, 65
Check printer.—
Insert new ink or toner cartridge in printer. If error
occurs with ink remaining in printer, check printer
status.
60
Error. Press shutter release
button again.(blinks)
Press shutter-release button again. If error persists,
consult with Nikon-authorized service representa-
tive.
x,
16–17
Initialization error. Contact
Nikon-authorized service rep-
resentative.
(blinks)
Contact Nikon-authorized service representative.x
Technical Notes/Appendix113
Appendix
The Appendix covers the following topics:
•Available Settings and Defaults............................................................................................................................... 113
•Memory Card Capacity and Image Quality/Size ................................................................................................. 116
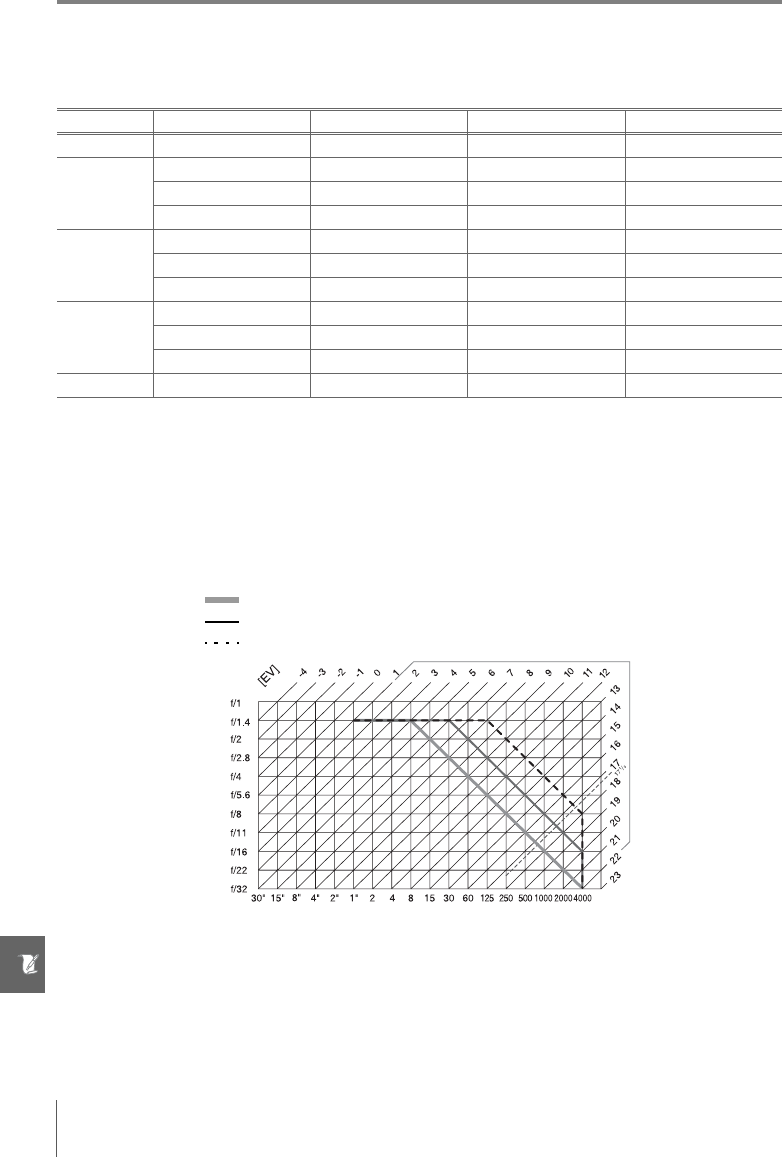
•Exposure Program (Mode P)....................................................................................................................................... 116
•White Balance and Color Temperature................................................................................................................... 118
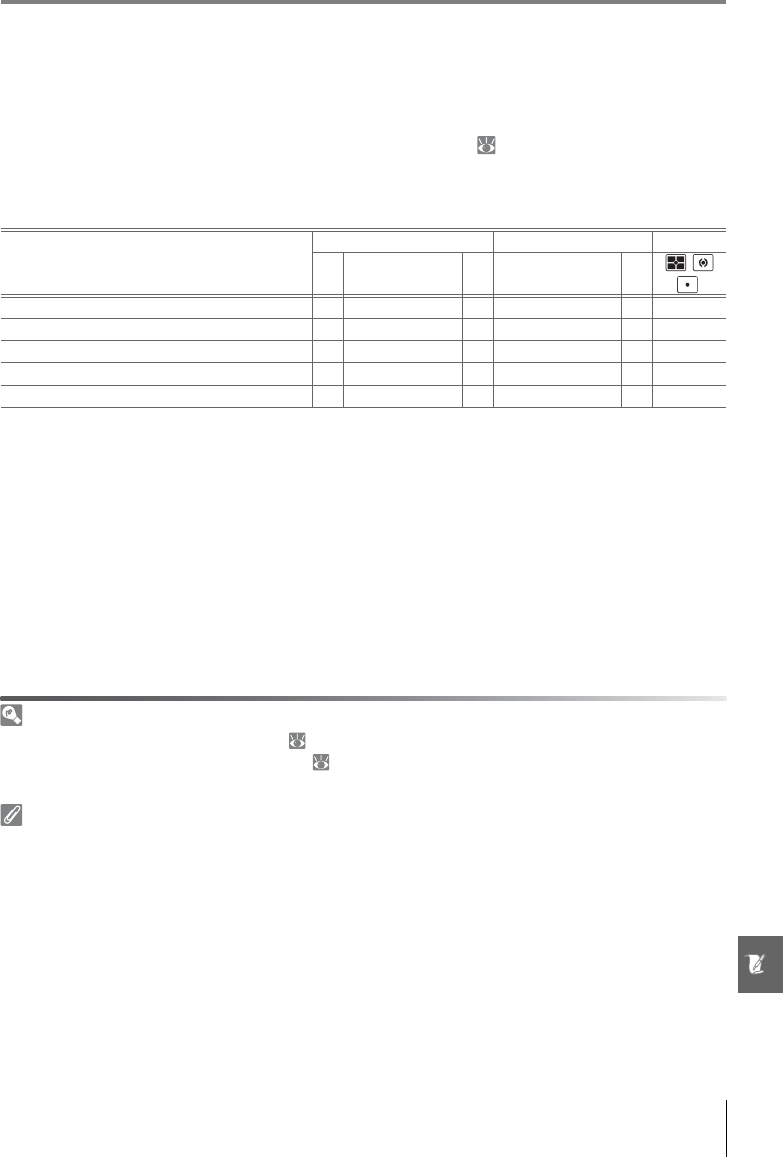
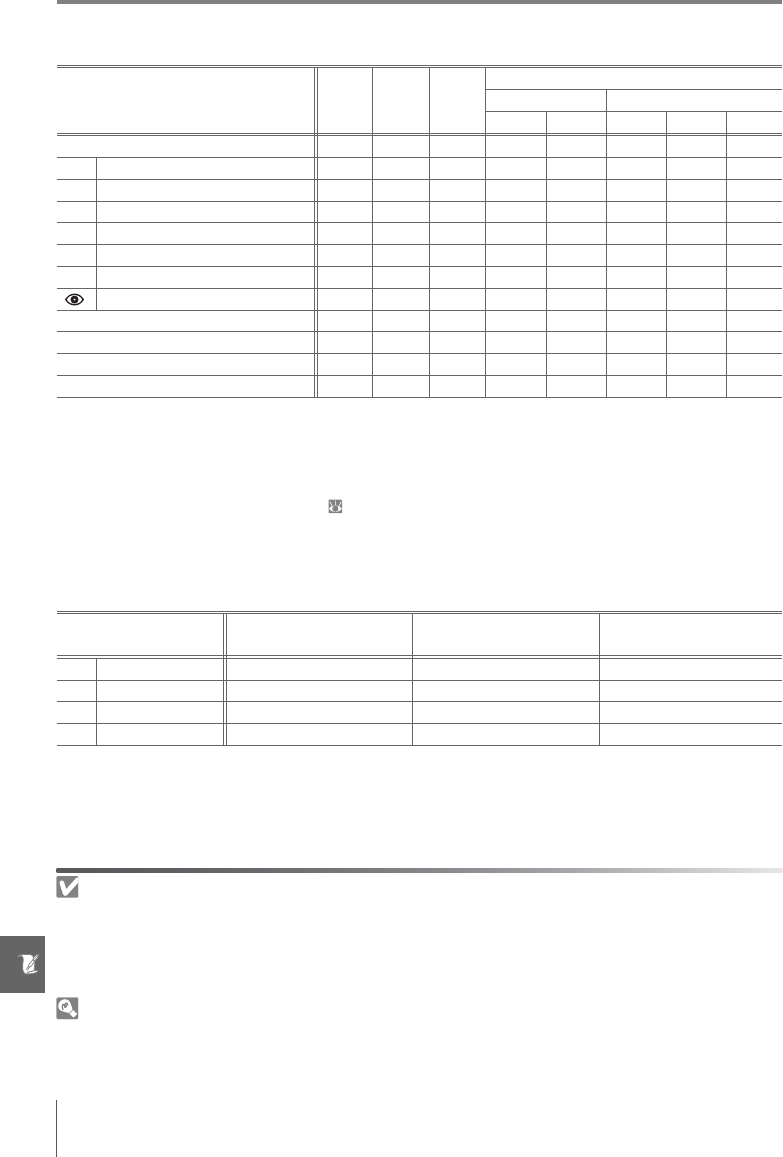
Available Settings and Defaults
The following table lists the settings that can be adjusted in each mode.
PSAM
Shooting menu
Optimize image
9999
Image quality
1
999999999999
Image size
1
999999999999
White balance
1
9999
ISO sensitivity
1
999999999999
Noise reduction999999999999
Custom Settings
2
1: Beep
999999999999
2: Focus mode
1
999999999999
3: AF-area mode
1
9
3
9
3
9
3
9
3
9
3
9
3
9
3
9
3
9999
4: Shooting mode
1
999999999999
5: Metering
1
9999
6: No memory card?999999999999
7: Image review999999999999
8: Flash level9999
9: AF-assist 9999999999
10: ISO auto9999
11:/Fn button999999999999
12: AE-L/AF-L999999999999
13: AE lock999999999999
14: Built-in flash9999
15: Auto off timers999999999999
16: Self-timer999999999999
17: Remote on duration999999999999
Other settings
Flash mode
1
9
3
9
3
9
4
9
3
9
4
9
3
9
3
9999
Autoexposure lock
1
999999999999
Exposure compensation
1
9999
Flexible program
1
9
1. Reset with two-button reset ( 38).
2. Reset with Custom Setting R (Reset).
3. Reset with when mode dial is rotated to new setting.
4. Available with optional Speedlight only.
114Technical Notes/Appendix
The following defaults are restored with Custom Setting R (Reset):
1. Max. sensitivity set to 800, Min. shutter speed set to 1/30.
Libble takes abuse of its services very seriously. We're committed to dealing with such abuse according to the laws in your country of residence. When you submit a report, we'll investigate it and take the appropriate action. We'll get back to you only if we require additional details or have more information to share.
Product:
Forumrules
To achieve meaningful questions, we apply the following rules:
First, read the manual;
Check if your question has been asked previously;
Try to ask your question as clearly as possible;
Did you already try to solve the problem? Please mention this;
Is your problem solved by a visitor then let him/her know in this forum;
To give a response to a question or answer, do not use this form but click on the button 'reply to this question';
Your question will be posted here and emailed to our subscribers. Therefore, avoid filling in personal details.
Register
Register getting emails for Nikon D40 at:
new questions and answers
new manuals
You will receive an email to register for one or both of the options.
Get your user manual by e-mail
Enter your email address to receive the manual of Nikon D40 in the language / languages: English as an attachment in your email.
The manual is 8,77 mb in size.
You will receive the manual in your email within minutes. If you have not received an email, then probably have entered the wrong email address or your mailbox is too full. In addition, it may be that your ISP may have a maximum size for emails to receive.
If you have not received an email with the manual within fifteen minutes, it may be that you have a entered a wrong email address or that your ISP has set a maximum size to receive email that is smaller than the size of the manual.
The email address you have provided is not correct.
Please check the email address and correct it.
Your question is posted on this page
Would you like to receive an email when new answers and questions are posted? Please enter your email address.