62717
19
Zoom out
Zoom in
Previous page
1/476
Next page
DIGITAL CAMERA
En
User's Manual
Where to Find It
Find what youre looking for from:
Digitutor
Digitutor, a series of “watch and learn” manuals in movie form, is available
from the following website:
http://www.nikondigitutor.com/index_eng.html
i
The Q&A Index
pp. iv–ix
Know what you want to do but dont know the function name?
Find it
from the “question and answer” index.
i
The Table of Contents
pp. x–xvii
Find items by function or menu name.
i
The Quick Start Guide
pp. 23–24
A brief guide for those who want to get started taking pictures right away.
i
The Index
pp. 442–448
Search by key word.
i
Error Messages
pp. 414–420
If a warning is displayed in the viewfinder or monitor, find the solution
here.
i
Troubleshooting
pp. 407–413
Camera behaving unexpectedly?
Find the solution here.
A For Your Safety
Before using the camera for the first time, read the safety
instructions in “For Your Safety” (pg. xviii).
i
Package Contents
Be sure all items listed here were included with your camera.
Memory cards are sold separately.
D3X digital camera (pg. 3)
Body cap (pp. 4, 391)
BS-2 accessory shoe cover (pg. 3)
EN-EL4a rechargeable Li-ion battery with terminal cover (pp. 32,
34)
MH-22 quick charger with power cable and two contact
protectors (pp. 32, 437)
UC-E4 USB cable (pp. 256, 264)
USB cable clip (pg. 259)
EG-D2 audio/video cable (pg. 274)
AN-D3X strap (pg. 5)
Warranty
Users Manual (this guide)
Quick Guide
Software Installation Guide
Software Suite CD-ROM
Registration card (U. S. A. only)
ii
Symbols and Conventions
To make it easier to find the information you need, the following
symbols and conventions are used:
Menu items, options, and messages displayed in the camera monitor
are shown in brackets ([ ]).
A Trademark Information
Macintosh, Mac OS, and QuickTime are registered trademarks of Apple
Inc.
Microsoft, Windows and Windows Vista are either registered
trademarks or trademarks of Microsoft Corporation in the United States
and/or other countries.
CompactFlash is a trademark of SanDisk
Corporation.
Microdrive is a trademark of Hitachi Global Storage
Technologies in the United States and other countries.
HDMI, the HDMI
logo, and High-Definition Multimedia Interface are trademarks or
registered trademarks of HDMI Licensing LLC.
PictBridge is a trademark.
All other trade names mentioned in this manual or the other
documentation provided with your Nikon product are trademarks or
registered trademarks of their respective holders.
D
This icon marks cautions; information that should be read before
use to prevent damage to the camera.
A
This icon marks notes; information that should be read before
using the camera.
iii
Introduction
Tutorial
Image Recording Options
Focus
Release Mode
ISO Sensitivity
Exposure
White Balance
Image Enhancement
Flash Photography
Other Shooting Options
More About Playback
Voice Memos
Connections
Menu Guide
Technical Notes
X
k
S
Z
r
J
l
t
I
e
Q
U
s
d
N
n
iv
Q&A Index
Find what you’re looking for using this “question and answer
index.
❚❚ New Features
❚❚ Camera Setup
Question Key phrase See page
How do I take pictures in 35mm format? Image area 60
How do I take high-quality NEF (RAW)
photos?
14-bit NEF (RAW) 69
How do I record photographs using two
memory cards?
Slot 2 72
Can I use the monitor as a viewfinder? Live view 90
Can I control how photos are processed? Picture Controls 162
How do I preserve details in shadows and
highlights?
Active D-Lighting 181
How do I focus on erratically moving
subjects?
3D-tracking 308
Can I adjust focus separately for different
lenses?
AF fine tune 361
Question Key phrase See page
How do I focus the viewfinder? Viewfinder focus 47
How do I keep the monitor from turning
off?
Monitor off delay 319
How do I keep the shutter speed and
aperture displays from turning off?
Auto meter off 50, 318
v
❚❚ Menus and Displays
How do I set the clock?
World time 40, 349
How do I set the clock for daylight
savings time?
How do I change time zones when I
travel?
How do I adjust monitor brightness for
menus or playback?
LCD brightness 347
How do I restore default settings? Two-button reset 204
How do I restore shooting menu
defaults?
Reset shooting menu 293
How do I restore Custom Setting
defaults?
Reset custom settings 304
How do I change the self-timer delay? Self-timer delay 319
Can I reverse the electronic analog
exposure display?
Reverse indicators 345
Can I display the menus in a different
language?
Language 349
Can I save menu settings for use on a
different D3X camera?
Save/load settings 358
Question Key phrase See page
How do I get more information on a
menu?
Help 31
How do I use the menus? Using the menus 26
What do these indicators mean?
Viewfinder, control
panels, shooting
information display
8, 10,
12, 14
What information is in the shooting
information display?
What does this warning mean?
Error messages and
displays
414
How much charge does the battery have
left?
Battery level 48
How do I get more information about the
battery?
Battery info 355
Question Key phrase See page
vi
❚❚ Taking Photographs
How do I keep the file number from
being reset when I insert a new memory
card?
File number sequence 322
How do I reset file numbering to 1?
How do I clean the camera or lens? Cleaning the camera 395
Question Key phrase See page
How many more shots can I take with this
card?
Number of exposures
remaining
49
How do I take bigger photographs?
Image quality and size 66, 70
How can I get more photos on the
memory card?
Can I control how the camera focuses? Autofocus 73
How do I take a lot of photographs
quickly?
Release mode 86
Can I change the frame advance rate? Shooting speed 88, 321
Can I shoot a self-portrait? Self-timer mode 100
Can I take pictures under low light
without the flash?
ISO sensitivity 104
Can the ISO sensitivity I choose be
adjusted to ensure optimal exposure?
ISO sensitivity auto
control
106
How do I freeze or blur moving objects?
Exposure mode f
(shutter-priority auto)
116
How do I blur background details or keep
both foreground and background in
focus?
Exposure mode g
(aperture-priority auto)
118
Question Key phrase See page
vii
❚❚ Viewing Photographs
Can I set both shutter speed and aperture
manually?
Exposure mode h
(manual)
120
Can I make photos brighter or darker? Exposure compensation 128
How do I make a time exposure? Long time-exposures 122
Can I vary exposure or flash level
automatically over a series of photos?
Exposure and flash
bracketing
131, 328
Can I create multiple copies of a photo
using different white balance settings?
White balance
bracketing
135, 328
How do I adjust white balance? White balance 140
How do I change settings for the optional
flash unit?
Flash mode 194
How can I record multiple shots as a
single photograph?
Multiple exposure 206
Can I record voice memo when taking a
photograph?
Voice memo 248
Can I pick the standard exposure level?
Fine tune optimal
exposure
316
How can I reduce blur? Exposure delay mode 325
Question Key phrase See page
Can I view my photographs on the
camera?
Camera playback 226
Can I view more information about
photos?
Photo info 229
Why do parts of my photos blink? Photo info, highlights 231, 282
Question Key phrase See page
viii
❚❚ Retouching Photographs
How do I get rid of an unwanted photo?
Deleting individual
photos
245
Can I delete several photos at once? Delete 281
Can I zoom in on pictures to make sure
they’re in focus?
Playback zoom 243
Can I protect photos from accidental
deletion?
Protect 244
Can I hide selected photos? Hide image 281
How do I tell if parts of my photos may be
overexposed?
Display mode:
highlights
282
How do I tell where the camera focused?
Display mode: focus
point
282
Can I view photos as they are taken? Image review 287
Can I record a voice memo on photos? Voice memo 251
Is there an automatic playback (“slide
show”) option?
Slide show 288
Question Key phrase See page
How do I bring out details in shadows? D-Lighting 366
Can I get rid of red eye? Red-eye correction 367
Can I crop photographs on the camera? Trim 368
Can I create a monochrome copy of a
photograph?
Monochrome 369
Can I create a copy with different colors? Filter effects 370
Can I use camera to create JPEG copies of
NEF (RAW) photographs?
Color balance 370
Can I overlay two photos to make a single
image?
Image overlay 371
Question Key phrase See page
ix
❚❚ Viewing or Printing Photographs on Other Devices
❚❚ Optional Accessories
Question Key phrase See page
Can I view my photos on TV? Television playback 274
Can I view my photos in High Definition? HDMI 276
How do I copy photos to my computer?
Connecting to a
computer
256
How do I print photographs? Printing photographs 262
Can I print photos without a computer? Printing via USB 263
Can I print the date on my photographs? Time stamp 266, 270
How do I order professional prints? Print set (DPOF) 272
Question Key phrase See page
What optional flash units (Speedlights)
can I use?
Optional flash units 187
What lenses can I use? Compatible lenses 382
What AC adapters, remote cords, and
viewfinder accessories are available for
my camera?
Other accessories 387
What memory cards can I use?
Approved memory
cards
394
What software is available for my
camera?
Other accessories 391
x
Q&A Index ................................................................................................iv
For Your Safety .................................................................................. xviii
Notices.....................................................................................................xxi
Introduction 1
Overview....................................................................................................2
Getting to Know the Camera..............................................................3
Camera Body....................................................................................... 3
The Top Control Panel .....................................................................8
The Rear Control Panel..................................................................10
The Viewfinder Display..................................................................12
The Shooting Information Display............................................14
The Command Dials .......................................................................16
Quick Start Guide................................................................................. 23
Tutorial 25
Camera Menus...................................................................................... 26
Using Camera Menus .....................................................................28
Help ......................................................................................................31
First Steps ............................................................................................... 32
Charge the Battery ..........................................................................32
Insert the Battery .............................................................................34
Attach a Lens.....................................................................................37
Basic Setup.........................................................................................39
Insert a Memory Card.....................................................................42
Formatting Memory Cards...........................................................45
Adjust Viewfinder Focus ...............................................................47
Basic Photography and Playback................................................... 48
Turn the Camera On .......................................................................48
Adjust Camera Settings.................................................................51
Ready the Camera ...........................................................................54
Table of Contents
xi
Focus and Shoot.............................................................................. 55
Viewing Photographs.................................................................... 57
Deleting Unwanted Photographs............................................. 58
Image Recording Options 59
Image Area............................................................................................. 60
Image Quality........................................................................................ 66
Image Size .............................................................................................. 70
Slot 2 ........................................................................................................ 72
Focus 73
Focus Mode ........................................................................................... 74
AF-Area Mode....................................................................................... 76
Focus Point Selection......................................................................... 78
Focus Lock.............................................................................................. 80
Manual Focus........................................................................................ 83
Release Mode 85
Choosing a Release Mode ................................................................ 86
Continuous Mode................................................................................ 88
Framing Pictures in the Monitor (Live View) ............................. 90
Self-Timer Mode.................................................................................100
Mirror up Mode ..................................................................................102
ISO Sensitivity 103
Choosing ISO Sensitivity Manually..............................................104
Auto ISO Sensitivity Control ..........................................................106
xii
Exposure 109
Metering ...............................................................................................110
Exposure Mode...................................................................................112
e: Programmed Auto ..................................................................114
f: Shutter-Priority Auto .............................................................. 116
g: Aperture-Priority Auto ...........................................................118
h: Manual......................................................................................... 120
Shutter-Speed and Aperture Lock...............................................123
Autoexposure (AE) Lock..................................................................125
Exposure Compensation.................................................................128
Bracketing ............................................................................................130
White Balance 139
White Balance Options ....................................................................140
Fine-Tuning White Balance............................................................143
Choosing a Color Temperature ....................................................147
Preset Manual .....................................................................................148
Image Enhancement 161
Picture Controls..................................................................................162
Creating Custom Picture Controls.......................................... 170
Active D-Lighting...............................................................................181
Color Space..........................................................................................183
Flash Photography 185
The Nikon Creative Lighting System (CLS)...............................186
Compatible Flash Units ...................................................................187
CLS-Compatible Flash Units ..................................................... 187
Other Flash Units .......................................................................... 191
i-TTL Flash Control.............................................................................193
Flash Modes.........................................................................................194
xiii
FV Lock ..................................................................................................198
Flash Contacts.....................................................................................201
Other Shooting Options 203
Two-Button Reset: Restoring Default Settings .......................204
Multiple Exposure .............................................................................206
Interval Timer Photography ..........................................................211
Non-CPU Lenses.................................................................................218
Using a GPS Unit ................................................................................221
More About Playback 225
Full-Frame Playback .........................................................................226
Photo Information.............................................................................229
Viewing Multiple Images: Thumbnail Playback .....................241
Taking a Closer Look: Playback Zoom........................................243
Protecting Photographs from Deletion.....................................244
Deleting Individual Photographs ................................................245
Voice Memos 247
Recording Voice Memos .................................................................248
Playing Voice Memos.......................................................................253
Connections 255
Connecting to a Computer ............................................................256
Direct USB Connection ...............................................................258
Wireless and Ethernet Networks .............................................261
Printing Photographs.......................................................................262
Direct USB Connection ...............................................................263
Viewing Photographs on TV..........................................................274
Standard Definition Devices .....................................................274
High-Definition Devices .............................................................276
xiv
Menu Guide 277
D The Playback Menu: Managing Images...............................278
Delete........................................................................................... 281
Playback Folder......................................................................... 281
Hide Image .................................................................................281
Display Mode............................................................................. 282
Copy Image(s) ........................................................................... 283
Image Review ............................................................................287
After Delete................................................................................ 287
Rotate Tall................................................................................... 287
Slide Show ..................................................................................288
Print Set (DPOF)........................................................................ 289
C The Shooting Menu: Shooting Options...............................290
Shooting Menu Bank ..............................................................291
Reset Shooting Menu .............................................................293
Active Folder.............................................................................. 293
File Naming ................................................................................296
Slot 2............................................................................................. 296
Image Quality ............................................................................296
Image Size................................................................................... 297
Image Area ................................................................................. 297
JPEG Compression................................................................... 297
NEF (RAW) Recording ............................................................. 297
White Balance............................................................................ 297
Set Picture Control................................................................... 298
Manage Picture Control......................................................... 298
Color Space ................................................................................ 298
Active D-Lighting..................................................................... 298
Vignette Control.......................................................................299
Long Exp. NR (Long Exposure Noise Reduction) ..........300
High ISO NR................................................................................300
ISO Sensitivity Settings .......................................................... 301
Live View ..................................................................................... 301
Multiple Exposure....................................................................301
Interval Timer Shooting......................................................... 301
A Custom Settings: Fine-Tuning Camera Settings ..............302
B: Custom Setting Bank........................................................ 304
xv
A: Reset Custom Settings .....................................................304
a: Autofocus ....................................................................................305
a1: AF-C Priority Selection.....................................................305
a2: AF-S Priority Selection .....................................................306
a3: Dynamic AF Area ...............................................................307
a4: Focus Tracking with Lock-On........................................309
a5: AF Activation.......................................................................309
a6: Focus Point Illumination .................................................310
a7: Focus Point Wrap-Around..............................................311
a8: AF Point Selection .............................................................311
a9: AF-ON Button......................................................................312
a10: Vertical AF-ON Button ...................................................313
b: Metering/Exposure..................................................................314
b1: ISO Sensitivity Step Value ..............................................314
b2: EV Steps for Exposure Cntrl. ..........................................314
b3: EV Steps for Exposure Comp.........................................314
b4: Easy Exposure Compensation ......................................315
b5: Center-Weighted Area ....................................................316
b6: Fine Tune Optimal Exposure.........................................316
c: Timers/AE Lock ..........................................................................318
c1: Shutter-Release Button AE-L .........................................318
c2: Auto Meter-off Delay........................................................318
c3: Self-Timer Delay .................................................................319
c4: Monitor off Delay...............................................................319
d: Shooting/Display......................................................................320
d1: Beep .......................................................................................320
d2: Shooting Speed .................................................................321
d3: Max. Continuous Release ...............................................321
d4: File Number Sequence....................................................322
d5: Control Panel/Viewfinder...............................................323
d6: Shooting Info Display ......................................................324
d7: LCD Illumination................................................................325
d8: Exposure Delay Mode......................................................325
e: Bracketing/Flash .......................................................................326
e1: Flash Sync Speed ...............................................................326
e2: Flash Shutter Speed..........................................................327
e3: Modeling Flash...................................................................327
e4: Auto Bracketing Set..........................................................328
e5: Auto Bracketing (Mode M).............................................329
xvi
e6: Bracketing Order ...............................................................330
f: Controls ........................................................................................ 331
f1: Multi Selector Center Button .........................................331
f2: Multi Selector....................................................................... 332
f3: Photo Info/Playback.......................................................... 332
f4: Assign FUNC. Button......................................................... 333
f5: Assign Preview Button .....................................................339
f6: Assign AE-L/AF-L Button ................................................. 340
f7: Customize Command Dials............................................ 341
f8: Release Button to Use Dial.............................................. 343
f9: No Memory Card? ..............................................................344
f10: Reverse Indicators ...........................................................345
B The Setup Menu: Camera Setup...............................................346
Format Memory Card ............................................................. 347
LCD Brightness.......................................................................... 347
Lock Mirror up for Cleaning .................................................347
Video Mode................................................................................ 348
HDMI............................................................................................. 348
World Time................................................................................. 349
Language ....................................................................................349
Image Comment ...................................................................... 350
Auto Image Rotation .............................................................. 351
Voice Memo ...............................................................................351
Voice Memo Overwrite .......................................................... 352
Voice Memo Button ................................................................ 352
Audio Output ............................................................................352
USB ................................................................................................ 352
Dust off Ref Photo.................................................................... 353
Battery Info................................................................................. 355
Wireless Transmitter ............................................................... 356
Image Authentication ............................................................ 356
Copyright Information ...........................................................357
Save/Load Settings.................................................................. 358
GPS ................................................................................................360
Virtual Horizon ..........................................................................360
Non-CPU Lens Data................................................................. 360
AF Fine Tune .............................................................................. 361
Firmware Version .....................................................................362
xvii
N The Retouch Menu: Creating Retouched Copies .............363
D-Lighting...................................................................................366
Red-Eye Correction..................................................................367
Trim................................................................................................368
Monochrome .............................................................................369
Filter Effects ................................................................................370
Color Balance .............................................................................370
Image Overlay............................................................................371
Side-by-Side Comparison......................................................374
O My Menu: Creating a Custom Menu......................................376
Adding Options to My Menu....................................................376
Deleting Options from My Menu ............................................378
Reordering Options in My Menu .............................................379
Displaying Recent Settings........................................................380
Technical Notes 381
Compatible Lenses ...........................................................................382
Other Accessories..............................................................................387
Caring for the Camera......................................................................395
Storage..............................................................................................395
Cleaning ...........................................................................................395
Replacing the Focusing Screen................................................396
Replacing the Clock Battery ......................................................398
The Low-Pass Filter.......................................................................400
Caring for the Camera and Battery: Cautions..........................403
Troubleshooting ................................................................................407
Error Messages ...................................................................................414
Appendix ..............................................................................................421
Specifications......................................................................................431
Index.......................................................................................................442
xviii
For Your Safety
To prevent damage to your Nikon product or injury to yourself or to
others, read the following safety precautions in their entirety before using
this equipment.
Keep these safety instructions where all those who use
the product will read them.
The consequences that could result from failure to observe the
precautions listed in this section are indicated by the following symbol:
❚❚ WARNINGS
A Keep the sun out of the frame
Keep the sun well out of the
frame when shooting backlit
subjects.
Sunlight focused into
the camera when the sun is in or
close to the frame could cause a
fire.
A Do not look at the sun through the
viewfinder
Viewing the sun or other strong
light source through the
viewfinder could cause
permanent visual impairment.
A Using the viewfinder diopter control
When operating the viewfinder
diopter control with your eye to
the viewfinder, care should be
taken not to put your finger in
your eye accidentally.
A Turn off immediately in the event of
malfunction
Should you notice smoke or an
unusual smell coming from the
equipment or AC adapter
(available separately), unplug
the AC adapter and remove the
battery immediately, taking care
to avoid burns.
Continued
operation could result in injury.
After removing the battery, take
the equipment to a Nikon-
authorized service center for
inspection.
A Do not disassemble
Touching the product’s internal
parts could result in injury.
In
the event of malfunction, the
product should be repaired only
by a qualified technician.
Should
the product break open as the
result of a fall or other accident,
remove the battery and/or AC
adapter and then take the
product to a Nikon-authorized
service center for inspection.
This icon marks warnings.
To prevent possible injury, read all
warnings before using this Nikon product.
A
xix
A Do not use in the presence of
flammable gas
Do not use electronic equipment
in the presence of flammable
gas, as this could result in
explosion or fire.
A Keep out of reach of children
Failure to observe this
precaution could result in injury.
A Do not place the strap around the neck
of an infant or child
Placing the camera strap around
the neck of an infant or child
could result in strangulation.
A Observe proper precautions when
handling batteries
Batteries may leak or explode if
improperly handled.
Observe
the following precautions when
handling batteries for use in this
product:
Use only batteries approved for
use in this equipment.
Use only CR1616 lithium
batteries to replace the clock
battery. Using another type of
battery could cause an
explosion. Dispose of used
batteries as directed.
Do not short or disassemble the
battery.
Be sure the product is off before
replacing the battery.
If you are
using an AC adapter, be sure it is
unplugged.
Do not attempt to insert the
battery upside down or
backwards.
Do not expose the battery to
flame or to excessive heat.
Do not immerse in or expose to
water.
Replace the terminal cover when
transporting the battery.
Do not
transport or store the battery
with metal objects such as
necklaces or hairpins.
Batteries are prone to leakage
when fully discharged.
To avoid
damage to the product, be sure
to remove the battery when no
charge remains.
When the battery is not in use,
attach the terminal cover and
store in a cool, dry place.
The battery may be hot
immediately after use or when
the product has been used on
battery power for an extended
period.
Before removing the
battery turn the camera off and
allow the battery to cool.
Discontinue use immediately
should you notice any changes
in the battery, such as
discoloration or deformation.
xx
A Observe proper precautions when
handling the quick charger
Keep dry.
Failure to observe this
precaution could result in fire or
electric shock.
Dust on or near the metal parts
of the plug should be removed
with a dry cloth.
Continued use
could result in fire.
Do not handle the power cable
or go near the charger during
thunderstorms.
Failure to
observe this precaution could
result in electric shock.
Do not damage, modify, or
forcibly tug or bend the power
cable.
Do not place it under
heavy objects or expose it to
heat or flame.
Should the
insulation be damaged and the
wires become exposed, take the
power cable to a Nikon-
authorized service
representative for inspection.
Failure to observe this
precaution could result in fire or
electric shock.
Do not handle the plug or
charger with wet hands.
Failure
to observe this precaution could
result in electric shock.
Do not use with travel converters
or adapters designed to convert
from one voltage to another or
with DC-to-AC inverters.
Failure
to observe this precaution could
damage the product or cause
overheating or fire.
A Use appropriate cables
When connecting cables to the
input and output jacks, use only
the cables provided or sold by
Nikon for the purpose to
maintain compliance with
product regulations.
A CD-ROMs
CD-ROMs containing software or
manuals should not be played
back on audio CD equipment.
Playing CD-ROMs on an audio
CD player could cause hearing
loss or damage the equipment.
A Observe caution when using a flash
Using optional flash units in
close contact with the skin or
other objects could cause burns.
Using optional flash units close
to the subjects eyes could cause
temporary visual impairment.
Particular care should be
observed when photographing
infants, when the flash should be
no less than one meter (39 in.)
from the subject.
A Avoid contact with liquid crystal
Should the monitor break, care
should be taken to avoid injury
due to broken glass and to
prevent the liquid crystal from
the monitor touching the skin or
entering the eyes or mouth.
xxi
Notices
No part of the manuals included with this
product may be reproduced, transmitted,
transcribed, stored in a retrieval system,
or translated into any language in any
form, by any means, without Nikon’s prior
written permission.
Nikon reserves the right to change the
specifications of the hardware and
software described in these manuals at
any time and without prior notice.
Nikon will not be held liable for any
damages resulting from the use of this
product.
While every effort has been made to
ensure that the information in these
manuals is accurate and complete, we
would appreciate it were you to bring
any errors or omissions to the attention
of the Nikon representative in your area
(address provided separately).
Notices for Customers in Canada
CAUTION
This Class B digital apparatus complies
with Canadian ICES-003.
ATT ENTIO N
Cet appareil numérique de la classe B est
conforme à la norme NMB-003 du Canada.
Notice for Customers in Europe
This symbol indicates that
this product is to be collected
separately.
The following apply only to
users in European countries:
This product is designated for separate
collection at an appropriate collection
point.
Do not dispose of as household
waste.
For more information, contact the
retailer or the local authorities in
charge of waste management.
This symbol on the battery
indicates that the battery is
to be collected separately.
The following apply only to
users in European countries:
All batteries, whether marked with this
symbol or not, are designated for
separate collection at an appropriate
collection point.
Do not dispose of as
household waste.
For more information, contact the
retailer or the local authorities in
charge of waste management.
CAUTION
RISK OF EXPLOSION IF BATTERY IS REPLACED BY AN INCORRECT TYPE. DISPOSE OF
USED BATTERIES ACCORDING TO THE INSTRUCTIONS.
xxii
Notices for Customers in the U.S.A.
Federal Communications Commission (FCC) Radio Frequency Interference Statement
This equipment has been tested and found
to comply with the limits for a Class B digital
device, pursuant to Part 15 of the FCC rules.
These limits are designed to provide
reasonable protection against harmful
interference in a residential installation.
This equipment generates, uses, and can
radiate radio frequency energy and, if not
installed and used in accordance with the
instructions, may cause harmful
interference to radio communications.
However, there is no guarantee that
interference will not occur in a particular
installation.
If this equipment does cause
harmful interference to radio or television
reception, which can be determined by
turning the equipment off and on, the user
is encouraged to try to correct the
interference by one or more of the
following measures:
Reorient or relocate the receiving
antenna.
Increase the separation between the
equipment and receiver.
Connect the equipment into an outlet on
a circuit different from that to which the
receiver is connected.
Consult the dealer or an experienced
radio/television technician for help.
CAUTIONS
Modifications
The FCC requires the user be notified that
any changes or modifications made to this
device that are not expressly approved by
Nikon Corporation may void the user’s
authority to operate the equipment.
Interface Cables
Use the interface cables sold or provided
by Nikon for your equipment.
Using other
interface cables may exceed the limits of
Class B Part 15 of the FCC rules.
Notice for Customers in the State of California
WARNING: Handling the cord on this product
may expose you to lead, a chemical known
to the State of California to cause birth
defects or other reproductive harm.
Wash
hands after handling.
Nikon Inc., 1300 Walt Whitman Road,
Melville, New York 11747-3064, U.S.A.
Tel.: 631-547-4200
The Battery Charger
IMPORTANT SAFETY INSTRUCTIONS—SAVE THESE
INSTRUCTIONS
DANGER—TO REDUCE THE RISK OF FIRE OR ELECTRIC
SHOCK, CAREFULLY FOLLOW THESE INSTRUCTIONS
For connection to a supply not in the U.S.A., use an attachment plug adapter of the
proper configuration for the power outlet if needed. This power unit is intended to be
correctly oriented in a vertical or floor mount position.
D3X
xxiii
Disposing of Data Storage Devices
Please note that deleting images or formatting memory cards or other data storage
devices does not completely erase the original image data.
Deleted files can
sometimes be recovered from discarded storage devices using commercially
available software, potentially resulting in the malicious use of personal image
data.
Ensuring the privacy of such data is the users responsibility.
Before discarding a data storage device or transferring ownership to another
person, erase all data using commercial deletion software, or format the device and
then completely refill it with images containing no private information (for
example, pictures of empty sky).
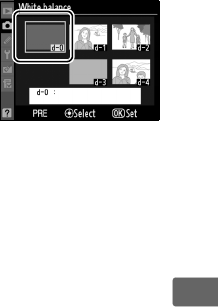
Be sure to also replace any pictures selected for
preset manual.
Care should be taken to avoid injury when physically destroying
data storage devices.
Notice Concerning Prohibition of Copying or Reproduction
Note that simply being in possession of material that has been digitally copied or
reproduced by means of a scanner, digital camera, or other device may be
punishable by law.
Items prohibited by law from being copied or
reproduced
Do not copy or reproduce paper
money, coins, securities, government
bonds, or local government bonds,
even if such copies or reproductions
are stamped “Sample.
The copying or reproduction of paper
money, coins, or securities which are
circulated in a foreign country is
prohibited.
Unless the prior permission of the
government has been obtained, the
copying or reproduction or unused
postage stamps or post cards issued by
the government is prohibited.
The copying or reproduction of stamps
issued by the government and of
certified documents stipulated by law
is prohibited.
Cautions on certain copies and reproductions
The government has issued cautions on
copies or reproductions of securities
issued by private companies (shares, bills,
checks, gift certificates, etc.), commuter
passes, or coupon tickets, except when a
minimum of necessary copies are to be
provided for business use by a company.
Also, do not copy or reproduce passports
issued by the government, licenses
issued by public agencies and private
groups, ID cards, and tickets, such as
passes and meal coupons.
Comply with copyright notices
The copying or reproduction of
copyrighted creative works such as
books, music, paintings, woodcuts,
prints, maps, drawings, movies, and
photographs is governed by national
and international copyright laws.
Do
not use this product for the purpose of
making illegal copies or to infringe
copyright laws.
xxiv
Use Only Nikon Brand Electronic Accessories
Nikon cameras are designed to the highest standards and include complex
electronic circuitry.
Only Nikon brand electronic accessories (including battery
chargers, batteries, AC adapters, and flash accessories) certified by Nikon
specifically for use with this Nikon digital camera are engineered and proven to
operate within the operational and safety requirements of this electronic circuitry.
The use of non-Nikon electronic accessories could damage the
camera and may void your Nikon warranty.
The use of third-party
rechargeable Li-ion batteries not bearing the Nikon holographic seal
shown at right could interfere with normal operation of the camera
or result in the batteries overheating, igniting, rupturing, or leaking.
For more information about Nikon brand accessories, contact a local authorized
Nikon dealer.
A Before Taking Important Pictures
Before taking pictures on important occasions (such as at weddings or
before taking the camera on a trip), take a test shot to ensure that the
camera is functioning normally.
Nikon will not be held liable for damages
or lost profits that may result from product malfunction.
A Life-Long Learning
As part of Nikons “Life-Long Learning” commitment to ongoing product
support and education, continually-updated information is available on-
line at the following sites:
For users in the U.S.A.: http://www.nikonusa.com/
For users in Europe and Africa: http://www.europe-nikon.com/support/
For users in Asia, Oceania, and the Middle East: http://www.nikon-asia.com/
Visit these sites to keep up-to-date with the latest product information,
tips, answers to frequently-asked questions (FAQs), and general advice on
digital imaging and photography.
Additional information may be
available from the Nikon representative in your area.
See the following
URL for contact information: http://imaging.nikon.com/
X
1
X
Introduction
This chapter covers information you will need to know before
using the camera, including the names of camera parts.
Overview.............................................................................. pg. 2
Getting to Know the Camera ........................................... pg. 3
Camera Body ....................................................................................... pg. 3
The Top Control Panel...................................................................... pg. 8
The Rear Control Panel .................................................................. pg. 10
The Viewfinder Display.................................................................. pg. 12
The Shooting Information Display ............................................ pg. 14
The Command Dials ....................................................................... pg. 16
Quick Start Guide ............................................................. pg. 23
2
X
Overview
Thank you for your purchase of a Nikon single-lens reflex (SLR)
digital camera.
Please be sure to read all instructions thoroughly
to get the most from the camera, and keep them where they will
be read by all those who use the product.
D Use Only Nikon Brand Accessories
Only Nikon brand accessories certified by Nikon specifically for use with
your Nikon digital camera are engineered and proven to operate within its
operational and safety requirements.
THE USE OF NON-NIKON ACCESSORIES
COULD DAMAGE YOUR CAMERA AND MAY VOID YOUR NIKON WARRANTY.
D Servicing the Camera and Accessories
The camera is a precision device and requires regular servicing.
Nikon
recommends that the camera be inspected by the original retailer or a
Nikon-authorized service representative once every one to two years, and
that it be serviced once every three to five years (note that fees apply to
these services).
Frequent inspection and servicing are particularly
recommended if the camera is used professionally.
Any accessories
regularly used with the camera, such as lenses or optional flash units,
should be included when the camera is inspected or serviced.
3
X
Getting to Know the Camera
Take a few moments to familiarize yourself with camera controls
and displays.
You may find it helpful to bookmark this section and
refer to it as you read through the rest of the manual.
Camera Body
1 D (bracketing)
button ....................... 131, 135, 328
2 Release mode dial
lock release....................................87
3 Release mode dial.......................87
4 Eyelet for camera strap ............... 5
5 M (flash mode) button ............ 196
6 F (command lock)
button .................................123, 124
7 Focal plane mark (E)................84
8 Metering selector..................... 111
9 Metering selector
lock button................................. 111
10 Power switch.................................48
11 Shutter-release button ...... 55, 56
12 E (exposure compensation)
button...........................................128
13 Eyelet for camera strap................5
14 I (exposure mode)
button...........................................113
Q (format) button.....................45
15 Top control panel ..........................8
16 Diopter adjustment knob........ 47
17 Accessory shoe ..................22, 201
(for optional flash unit)
18 Accessory shoe cover
........................................ 22, 201, 405
4
X
Camera Body (Continued)
1 Mirror............................90, 102, 400
2 Self-timer lamp ......................... 101
3 Flash sync terminal cover...... 201
4 Ten-pin remote terminal
cover....................................221, 392
5 Flash sync terminal.................. 201
6 Ten-pin remote
terminal ..............................221, 392
7 USB connector cover .....258, 264
8 Lens release button....................38
9 Connector cover..............274, 276
10 USB connector................. 258, 264
11 DC-IN connector for
optional AC adapter EH-6......387
12 Audio/video (A/V)
connector ....................................274
13 HDMI connector........................276
14 Focus-mode selector.......... 74, 83
15 Battery-cover latch..................... 34
16 Battery-chamber cover............. 34
17 Meter coupling lever...............433
18 Body cap......................................391
5
X
❚❚ Attaching the Camera Strap
Attach the camera strap securely to the two eyelets on the camera
body as shown below.
1 Depth-of-field preview
button .................................113, 339
2 Sub-command dial.....................16
3 Fn button .....................64, 199, 333
4 Sub-command dial for
vertical shooting .........................16
5 Shutter-release button for
vertical shooting .........................54
6 Vertical shooting shutter-
release button lock .................... 54
7 CPU contacts
8 Mounting index ..........................37
9 Lens mount...................................84
10 Tripod socket
6
X
Camera Body (Continued)
D The Speaker and Microphone
Do not bring magnetic devices, such as microdrive cards, close to the
built-in speaker or microphone.
1 Viewfinder eyepiece...................47
2 Eyepiece shutter lever...............47
3 O (delete) button............... 58, 245
Q (format) button.....................45
4 K (playback) button ....... 57, 226
5 Monitor.......................... 57, 90, 226
6 G (menu) button.......... 26, 277
7 N (thumbnail/playback
zoom) button ...................242, 243
8 L (protect) button ............... 244
? (help) button..............................31
R (info) button............................14
9 J (OK) button..............................28
10 Speaker.........................................254
11 Rear control panel.............10, 323
12 ISO (ISO sensitivity) button.....104
Two-button reset button.......204
13 QUAL (image quality/size)
button...................................... 67, 71
14 WB (white balance)
button........................141, 146, 147
Two-button reset button.......204
15 Microphone................................248
7
X
1 Viewfinder .....................................47
2 A (AE/AF lock) button
.......................................... 80, 81, 340
3 B (AF-ON) button ..........75, 94
4 Main command dial...................16
5 Multi selector................................28
6 Focus selector lock .....................78
7
Memory card access lamp....43, 56
8 Memory card slot cover .....42
, 44
9 Card slot cover release button
(under cover)................................ 42
10 B (AF-ON) button for
vertical shooting.......................313
11 H (microphone) button ..........249
12 AF-area mode selector ............. 76
13 Main command dial for
vertical shooting......................... 16
8
X
The Top Control Panel
1
2
3
4
5
6
7
8
9
10
15
14
13
12
11
1 Shutter speed...................116, 120
Exposure compensation
value ............................................. 128
Number of shots in
exposure and flash bracketing
sequence..................................... 131
Number of shots in
WB bracketing sequence ...... 135
Number of intervals for
interval timer photography
.... 214
Focal length
(non-CPU lenses)...................... 220
ISO sensitivity ............................ 104
2 Shutter-speed lock icon......... 123
3 Flexible program indicator ... 115
4 Exposure mode......................... 112
5 Flash mode .................................194
6 Shooting menu bank.............. 291
7 Custom settings bank............. 304
8 Memory card indicator
(slot 1).......................................42, 45
9 Memory card indicator
(slot 2) ......................................42, 45
10 Number of exposures
remaining...................................... 49
Number of shots remaining
before memory buffer fills ......88
Capture mode indicator.........256
11
Aperture stop indicator
.. 119, 385
12 Aperture (f-number)......118, 120
Aperture (number of
stops)................................... 119, 385
Exposure and flash bracketing
increment....................................132
WB bracketing increment......136
Number of shots per
interval .........................................214
Maximum aperture
(non-CPU lenses) ......................220
PC mode indicator....................259
9
X
SHOOT
CUSTOM
16
17
18
19
20
21
29
27
28
25
26
24
23
22
13 Battery indicator..........................48
14 Frame count..................................49
Preset white balance
recording indicator.................. 151
Manual lens number............... 220
15 “K” (appears when memory
remains for over 1000
exposures) .....................................49
16 FV lock indicator....................... 199
17 Flash sync indicator................. 326
18 Clock battery indicator ... 41, 398
19 GPS connection indicator ..... 223
20 Focus mode indicator................74
21 Interval timer indicator .......... 214
22
Multiple exposure
indicator
....................................... 208
23 Aperture lock icon ................... 124
24 Image comment indicator ....350
25 “Beep” indicator ........................320
26 Exposure compensation
indicator.......................................128
27 Exposure and flash bracketing
indicator.......................................131
28 White-balance bracketing
indicator.......................................135
29 Electronic analog exposure
display ..........................................122
Exposure compensation........128
Exposure and flash bracketing
progress indicator ....................131
WB bracketing progress
indicator.......................................135
PC connection indicator ........259
Tilt indicator................................335
10
X
The Rear Control Panel
A LCD Illuminators
Rotating the power switch toward D
activates the exposure meters and the
control panel backlights (LCD
illuminators), allowing the displays to
be read in the dark.
After the power
switch is released, the illuminators will
remain lit for six seconds (at default
settings) while the exposure meters are
active or until the shutter is released or
the power switch is rotated toward D
again.
3
2
1
4
5
6
7
8
9
10
11
12
Power switch
11
X
1 Image quality (JPEG images) ..67
2 “Remaining” indicator ...............49
3 Image size......................................71
4 ISO sensitivity indicator......... 104
Auto ISO sensitivity
indicator ...................................... 106
5 ISO sensitivity............................ 104
ISO sensitivity (high/low gain)
........................................................ 105
Number of exposures
remaining ......................................49
Length of voice memo........... 251
White balance fine-tuning.... 146
White balance preset
number........................................ 158
Color temperature................... 147
PC mode indicator................... 259
6 “K” (appears when memory
remains for over 1000
exposures)..................................... 49
Color temperature
indicator.......................................147
7 Memory card slot indicators... 72
Image quality ...............................67
8 White-balance bracketing
indicator.......................................135
9 Voice memo recording
indicator (shooting mode) ....249
10 Voice memo status
indicator............................. 251, 252
11 Voice memo recording
mode.............................................249
12 White balance ............................140
White balance fine-tuning
indicator.......................................146
12
X
The Viewfinder Display
312
45678 9 10
12 1511 1413 16
17 18 19
20
21
22
23
1 12-mm reference circle for
center-weighted metering ... 110
2 AF area brackets...................47, 92
3 Focus points........................ 78, 311
Spot metering targets ............110
4 Focus indicator......................55, 84
5 Metering...................................... 110
6 Autoexposure (AE) lock ......... 125
7 Exposure mode .........................112
8 Shutter speed lock icon..........123
9 Shutter-speed.................. 116, 120
10 Aperture lock icon....................124
11 Aperture (f-number)......118, 120
Aperture
(number of stops)........... 119, 385
13
X
* Displayed when an optional flash unit is attached (pg. 187).
The flash-
ready indicator lights when the flash is charged.
D No Battery
When the battery is totally exhausted or no battery is inserted, the display
in the viewfinder will dim.
This is normal and does not indicate a
malfunction.
The viewfinder display will return to normal when a fully-
charged battery is inserted.
D The Control Panel and Viewfinder Displays
The brightness of the control panel and viewfinder displays varies with
temperature, and the response times of the displays may drop at low
temperatures.
This is normal and does not indicate a malfunction.
12 ISO sensitivity indicator .........104
Auto ISO sensitivity
indicator ...................................... 106
13 ISO sensitivity ............................104
14 Frame count..................................49
Number of exposures
remaining ......................................49
Number of shots remaining
before memory buffer fills.......88
Preset white balance
recording indicator.................. 151
Exposure compensation
value ............................................. 128
PC mode indicator................... 259
15 “K” (appears when memory
remains for over 1000
exposures) .....................................49
16 Flash-ready indicator
*
.............199
17 FV lock indicator .......................199
18 Flash sync indicator .................326
19
Aperture stop indicator
.. 119, 385
20 Battery indicator ......................... 48
21 Electronic analog exposure
display ..........................................122
Exposure compensation display
.........................................................128
Tilt indicator................................335
22 Exposure compensation
indicator.......................................128
23 Exposure and flash bracketing
indicator.......................................131
14
X
The Shooting Information Display
Shooting information, including shutter
speed, aperture, the number of exposures
remaining, and AF-area mode is displayed in
the monitor when the R button is pressed.
To clear shooting information from the monitor, press the R
button again or press the shutter-release button halfway.
At
default settings, the monitor will turn off automatically if no
operations are performed for about 20 seconds.
A See Also
For information on choosing how long the monitor stays on, see Custom
Setting c4 ([Monitor off delay], pg. 319). For information on changing the
color of the lettering in the shooting information display, see Custom
Setting d6 ([Shooting info display], pg. 324).
R
button
11
10
9
15
16
14
13
12
1
23
24
25
26
27
29
30
37
36
38
17
35 34 33 32 31
18 19 20 21
23 4 56 7
8
22
28
15
X
1 Exposure mode......................... 112
2 Flexible program indicator ... 115
3 Shutter-speed lock icon......... 123
4 Shutter speed...................116, 120
Exposure compensation
value ............................................. 128
Number of shots in exposure
and flash bracketing sequence
........................................................ 131
Number of shots in WB
bracketing sequence .............. 135
Focal length
(non-CPU lenses)...................... 220
5
Multiple exposure indicator
.... 208
6 Aperture lock icon ................... 124
7 Aperture (f-number) ......118, 120
Aperture
(number of stops) ...........119, 385
Exposure and flash bracketing
increment ................................... 132
WB bracketing increment .....136
Maximum aperture
(non-CPU lenses)...................... 220
8
Aperture stop indicator
...119, 385
9 Number of exposures
remaining ......................................49
10 “K” (appears when memory
remains for over 1000
exposures) .....................................49
11 Frame count..................................49
Manual lens number............... 220
12 Memory card indicator
(slot 2).......................................42, 45
13 Memory card indicator
(slot 1).......................................42, 45
14 Custom settings bank............. 304
15 Shooting menu bank.............. 291
16 Flash sync indicator .................326
17 Flash mode..................................194
18 Clock battery indicator....41, 398
19 FV lock indicator .......................199
20 Interval timer indicator...........214
21 Image comment indicator ....350
22 Copyright information
indicator.......................................357
23 “Beep” indicator ........................320
24 Exposure compensation
indicator.......................................128
25 Battery indicator ......................... 48
26 Exposure and flash bracketing
indicator.......................................131
WB bracketing indicator ........135
27 Focus mode indicator ............... 74
28 Long exposure noise reduction
indicator.......................................300
29 Color space indicator ..............183
30 Picture Control indicator........165
31 Active D-Lighting indicator...181
32 High ISO noise reduction
indicator.......................................300
33 Vignette control ........................299
34 Release mode (single frame/
continuous) indicator................ 86
Continuous shooting speed
....321
35 Auto-area AF indicator .............77
Focus points indicator .............. 78
AF-area mode indicator ...........77
3D-tracking indicator .......77, 308
36 Image area indicator ................. 61
37 GPS connection indicator......223
38 Electronic analog exposure
display ..........................................122
16
X
The Command Dials
The main- and sub-command dials are used alone or in
combination with other controls to adjust a variety of settings.
F button
Sub-command
dial
Main command
dial
M button
I button
E button
WB buttonISO button QUAL button
BKT button
Fn button
17
X
❚❚ Image Quality and Size
Press the Fn or QUAL button and rotate the command dials.
Choose an
image area (pg.
64)
*
* The DX format image area is automatically selected when a DX lens is
attached.
Set image
quality
(pg. 67)
Choose an image
size (pg. 71)
❚❚ ISO Sensitivity
Press the ISO button and rotate the main command dial.
Set ISO
sensitivity (pg.
104)
+
Fn button Main command dial
Shooting information
display
QUAL button Main command dial Rear control panel
+
QUAL button Sub-command dial Rear control panel
+
ISO button Main command dial Rear control panel
+
18
X
❚❚ Exposure
Press the I button and rotate the main command dial to choose
the exposure mode.
Choose the
exposure mode
(pg. 113)
Use the command dials to adjust exposure.
Choose a
combination of
aperture and
shutter speed
(exposure mode
e; pg. 115)
Choose a shutter
speed (exposure
mode f or h; pg.
116, 121)
Choose an
aperture
(exposure
mode g or h;
pg. 118, 121)
I button Main command dial Top control panel
+
SHOOT
CUSTOM
Exposure
mode e
Main
command dial
Top control panel
+
SHOOT
CUSTOM
SHOOT
CUSTOM
+
Exposure
mode f or h
Main
command dial
Top control panel
SHOOT
CUSTOM
SHOOT
CUSTOM
Exposure
mode g or h
Sub-command
dial
Top control panel
+
SHOOT
CUSTOM
19
X
Set exposure
compensation
(pg. 128)
Shutter speed
lock (exposure
mode f or h;
pg. 123)
Aperture lock
(exposure
mode g or h;
pg. 124)
E button Main command dial Top control panel
+
SHOOT
CUSTOM
F button Main command dial Top control panel
+
SHOOT
CUSTOM
F button Sub-command dial Top control panel
+
20
X
Activate or
cancel
bracketing/
select number
of shots in
bracketing
sequence (pp.
131, 134)
Select
bracketing
exposure
increment (pg.
132)
❚❚ White Balance
Press the WB button and rotate the command dials.
Choose a white
balance setting
(pg. 141)
Fine-tune
white balance
(pg. 146), set
color
temperature
(pg. 147), or
choose a white
balance preset
(pg. 158)
D button Main command dial Top control panel
+
D button Sub-command dial Top control panel
++
WB button Main command dial Rear control panel
+
WB button Sub-command dial Rear control panel
+
21
X
❚❚ Flash Settings
Press the M button and rotate the main command dial.
Choose flash
mode (pg. 196)
A The Fn Button
Depending on the option selected for Custom Setting f4 ([Assign FUNC.
button], pg. 333), the Fn button and command dials can be used to select
from FX, DX, and 5 : 4 image areas, toggle between FX and DX image
areas, select shutter speed and aperture in steps of 1 EV, choose pre-
specified lens data for non-CPU lenses, select the focus point, choose a
shooting menu bank, or select the number of focus points for dynamic-
area AF.
A The Depth-of-Field Preview and AE-L/AF-L Buttons
Depending on the options selected for Custom Settings f5 ([Assign
preview button], pg. 339) and f6 ([Assign AE-L/AF-L button], pg. 340), the
depth-of-field preview and AE-L/AF-L buttons can be used with the
command dials to perform the same functions as the Fn button.
M button Main command dial Top control panel
+
22
X
The BS-2 Accessory Shoe Cover
The supplied BS-2 accessory shoe
cover can be used to protect the
accessory shoe or to prevent light
reflected from the metal parts of
the shoe from appearing in
photographs. The BS-2 attaches to
the camera accessory shoe as
shown at right.
To remove the accessory shoe
cover, hold it down with your
thumb and slide it off as shown at
right while keeping a firm grip on
the camera.
23
X
Quick Start Guide
Follow these steps for a quick start with the D3X.
1
Charge the battery (pg. 32).
2
Insert the battery (pg. 34).
3
Attach a lens (pg. 37).
4
Insert a memory card (pg. 42).
5
Turn the camera on (pg. 48).
For information on choosing a language
and setting the time and date, see page 39.
See page 47 for information on adjusting
viewfinder focus.
Mounting
index
Back
24
X
6
Check camera settings (pp. 48, 51).
7
Select single-servo autofocus (pg. 53
,
74).
Rotate the focus-mode selector to S (single-servo autofocus).
8
Focus and shoot (pp. 55, 56).
Press the shutter-release
button halfway to focus, then
press the shutter-release
button the rest of the way
down to take the photograph.
9
View the
photograph (pg. 57).
10
Delete unwanted
photos (pg. 58).
Press O twice to delete
the current
photograph.
SHOOT
CUSTOM
Exposure
mode
Top control panel
Image qualityISO sensitivity
White balance
Rear control panel
Image size
Battery level
Number of exposures
remaining
Frame
count
Focus indicator
K button
O button
s
25
s
Tutorial
This section describes how to use the camera menus, how to ready
the camera for use, and how to take your first pictures and play
them back.
Camera Menus .................................................................. pg. 26
Using Camera Menus ..................................................................... pg. 28
Help ...................................................................................................... pg. 31
First Steps .......................................................................... pg. 32
Charge the Battery .......................................................................... pg. 32
Insert the Battery............................................................................. pg. 34
Attach a Lens..................................................................................... pg. 37
Basic Setup......................................................................................... pg. 39
Insert a Memory Card..................................................................... pg. 42
Formatting Memory Cards........................................................... pg. 45
Adjust Viewfinder Focus................................................................ pg. 47
Basic Photography and Playback...................................pg. 48
Turn the Camera On ....................................................................... pg. 48
Adjust Camera Settings................................................................. pg. 51
Ready the Camera ........................................................................... pg. 54
Focus and Shoot .............................................................................. pg. 55
Viewing Photographs..................................................................... pg. 57
Deleting Unwanted Photographs ............................................. pg. 58
26
s
Camera Menus
Most shooting, playback, and setup options
can be accessed from the camera menus.
To
view the menus, press the G button.
G button
Choose from playback, shooting,
Custom Settings, setup, retouch,
and My menus (see following
page).
Slider shows position in current
menu.
Current settings
are shown by
icons.
If “Q” icon is displayed, help for
current item can be viewed by
pressing L (Q) button (pg. 31).
Options in current menu.
Menu optionsQ
Tabs
27
s
❚❚ Menus
The following menus are available:
Menu Description
D Playback
Adjust playback settings and manage photos (pg.
278).
C Shooting Adjust shooting settings (pg. 290).
A Custom Settings Personalize camera settings (pg. 302).
B Setup
Format memory cards and perform basic camera
setup (pg. 346).
N Retouch
Create retouched copies of existing photographs
(pg. 363).
O My Menu
Create a menu of custom options (pg. 376).
If
desired, a menu of recently-used settings can be
displayed in place of [My Menu] (pg. 380).
28
s
Using Camera Menus
❚❚ Menu Controls
The multi selector and J button are used to navigate the menus.
❚❚ Navigating the Menus
Follow the steps below to navigate the menus.
1 Display the menus.
Press the G button to display the
menus.
2 Highlight the icon for the
current menu.
Press 4 to highlight the icon
for the current menu.
Move cursor
up
Cancel and return
to previous menu
Select
highlighted item
or display sub-
menu
Select
highlighted
item
Select highlighted
item
J button
Move cursor
down
G button
29
s
3 Select a menu.
Press 1 or 3 to select the desired menu.
4 Position the cursor in the
selected menu.
Press 2 to position the cursor
in the selected menu.
5 Highlight a menu item.
Press 1 or 3 to highlight a
menu item.
6 Display options.
Press 2 to display options for
the selected menu item.
7 Highlight an option.
Press 1 or 3 to highlight an
option.
30
s
8 Select the highlighted item.
Press J to select the highlighted item.
To exit without making a selection, press
the G button.
Note the following points:
Menu items that are displayed in gray are not currently available.
While pressing 2 or the center of the multi selector generally has
the same effect as pressing J, there are some cases in which
selection can only be made by pressing J.
To exit the menus and return to shooting mode, press the
shutter-release button halfway (pg. 56).
J button
31
s
Help
If a Q icon is displayed at the bottom left
corner of the monitor, help can be displayed
by pressing the L (Q) button.
A
description of the currently selected option
or menu will be displayed while the button
is pressed.
Press 1 or 3 to scroll through
the display.
L button
32
s
First Steps
Charge the Battery
The D3X is powered by an EN-EL4a rechargeable Li-ion battery
(supplied).
The EN-EL4a is not fully charged at shipment.
To maximize
shooting time, charge the battery in the supplied MH-22 quick
charger before use.
About two hours and twenty-five minutes are
required to fully recharge the battery when no charge remains.
1 Plug the charger in.
Insert the AC adapter plug into the
battery charger and plug the power
cable into an electrical outlet.
All lamps
will remain off.
2 Remove the terminal cover.
Remove the terminal cover from the
battery.
3 Remove the contact protector.
Remove the contact protector of the
quick chargers battery chambers.
33
s
4 Charge the battery.
Insert the battery (terminals first), aligning the end of the
battery with the guide and then sliding the battery in the
direction indicated until it clicks into place.
The chamber lamp
and charge lamps will blink while the battery charges:
Charging is complete when the chamber lamp stops blinking
and the charge lamps turn off.
About two hours and twenty-
five minutes are required to fully charge an exhausted battery.
5 Remove the battery when charging is complete.
Remove the battery and unplug the charger.
A Calibration
See page 437 for more information on calibration.
Charge state
Chamber
lamp
Charge lamps
50% 80% 100%
Less than 50% of maximum capacity H (blinks) H (blinks) I (off) I (off)
50–80% of maximum capacity H (blinks) K (glows) H (blinks) I (off)
More than 80% but less than 100% of
maximum capacity
H (blinks) K (glows) K (glows) H (blinks)
100% of maximum capacity K (glows) I (off) I (off) I (off)
Guide
Chamber
lamps
Charge
lamps
(green)
Contacts
34
s
Insert the Battery
1 Turn the camera off.
Always turn the camera off
before inserting or removing
batteries.
2 Remove the battery-chamber cover.
Lift the battery-chamber cover latch,
turn it to the open (A) position (q) and
remove the BL-4 battery-chamber cover
(w).
3 Attach the cover to the battery.
If the battery release is positioned so that
the arrow (4) is visible, slide the battery
release to cover the arrow.
Insert the two
projections on the battery into the
matching slots in the cover and slide the
battery release to reveal the arrow.
A The BL-4 Battery-Chamber Cover
The battery can be charged with the BL-4
attached.
To prevent dust from accumulating
inside the battery chamber when the battery
is not inserted, slide the battery release in the direction indicated by
the arrow (4), remove the BL-4 from the battery, and replace it on the
camera.
The BL-1 battery-chamber cover for D2-series cameras can not be
used.
Power switch
35
s
4 Insert the battery.
Insert the battery as shown at right.
5 Latch the cover.
To prevent the battery from
becoming dislodged during
operation, rotate the latch to
the closed position and fold it
down as shown at right. Be
sure the cover is securely
latched.
A EN-EL4a Rechargeable Li-ion Batteries
The supplied EN-EL4a shares information with compatible devices,
enabling the camera to show battery charge state in six levels (pg. 48).
The [Battery info] option in the setup menu details battery charge, battery
life, and the number of pictures taken since the battery was last charged
(pg. 355).
The battery can be recalibrated as necessary to ensure that
battery level continues to be reported accurately (pg. 437).
36
s
D The Battery and Charger
Read and follow the warnings and cautions on pages xviii–xx and 403–406 of
this manual.
To prevent short-circuits, replace the terminal cover when
the battery is not in use.
Do not use the battery at ambient temperatures below 0°C (32°F) or
above 40°C (104°F).
Charge indoors at ambient temperatures in the
vicinity of 5–35°C (41–95°F); for best results, charge the battery at
temperatures above 20°C (68°F).
Battery capacity may temporarily drop if
the battery is charged at low temperatures or used at a temperature
below the temperature at which it was charged.
If the battery is charged
at a temperature below 5°C (41°F), the battery life indicator in the [Battery
info] display may show a temporary decrease.
The battery may be hot immediately after use.
Wait for the battery to cool
before recharging.
Use the charger with compatible batteries only.
Unplug when not in use.
A Compatible Batteries
The camera can also be used with EN-EL4 rechargeable Li-ion batteries.
A Removing the Battery
Before removing the battery, turn the camera off
and lift the battery-chamber cover latch, turn it to
the open (A) position.
To prevent short-circuits,
replace the terminal cover when the battery is not
in use.
37
s
Attach a Lens
Care should be taken to prevent dust from entering the camera
when the lens is removed.
1 Remove the rear lens cap and the camera body cap.
After confirming that the camera is off, remove the rear lens
cap from the lens and remove the camera body cap.
2 Attach the lens.
Keeping the mounting mark on the lens aligned with the
mounting mark on the camera body, position the lens in the
cameras bayonet mount.
Being careful not to press the lens-
release button, rotate the lens counter-clockwise until it clicks
into place.
If the lens is equipped with an A-M or
M/A-M switch, select A (autofocus) or M/
A (autofocus with manual priority).
Mounting
index
38
s
❚❚ Detaching the Lens
Be sure the camera is off when removing or
exchanging lenses.
To remove the lens, press
and hold the lens release button while turning
the lens clockwise.
After removing the lens,
replace the lens caps and camera body cap.
D CPU Lenses with Aperture Rings
In the case of CPU lenses equipped with an aperture ring (pg. 384), lock
aperture at the minimum setting (highest f-number).
See the lens manual
for details.
A Lens
An AF Nikkor 85 mm f/1.4D lens is used in this manual for illustrative
purposes.
A Image Area
The DX format image area is automatically
selected when a DX lens is attached.
Focus ring (pg. 83)
CPU contacts (pg. 384)
A-M mode switch (pg. 37)
Lens cap
Mounting index
Aperture ring
Image area
39
s
Basic Setup
The language option in the setup menu is automatically
highlighted the first time menus are displayed. Choose a language
and set the time and date.
1 Turn the camera on.
2 Select [Language].
Press G to display the
camera menus, then select
[Language] in the setup menu.
For information on using
menus, see “Using Camera
Menus” (pg. 28).
3 Select a language.
Press 1 or 3 to highlight the
desired language and press J.
Power switch
G button
40
s
4 Select [World time].
Select [World time] and press
2.
5 Set time zone.
A time-zone selection dialog
will be displayed.
Press 4 or 2
to highlight the local time zone
(the [UTC] field shows the
difference between the
selected time zone and
Coordinated Universal Time, or
UTC, in hours) and press J.
6 Turn daylight saving time
on or off.
Daylight saving time options
will be displayed.
Daylight
saving time is off by default; if
daylight saving time is in effect in the local time zone, press 1
to highlight [On] and press J.
7 Set the date and time.
The dialog shown at right will
be displayed.
Press 4 or 2 to
select an item, 1 or 3 to
change. Press J when the
clock is set to the current date
and time.
41
s
8 Set date format.
Press 1 or 3 to choose the
order in which the year, month,
and day will be displayed and
press J.
9 Exit to shooting mode.
Press the shutter-release button halfway
to exit to shooting mode.
A The B Icon
If a flashing B icon appears in the top control panel the first time the
camera is used, check that clock settings (including time zone and
daylight saving time) are correct.
The icon will stop flashing when the J
button is pressed to exit the menu.
A The Clock Battery
The camera clock is powered by a separate, non-rechargeable CR1616
lithium battery with a life of about four years.
When this battery is
exhausted, a B icon will be displayed in the top control panel while the
exposure meters are on.
For information on replacing the clock battery,
see page 398.
A The Camera Clock
The camera clock is less accurate than most watches and household
clocks.
Check the clock regularly against more accurate time pieces and
reset as necessary.
42
s
Insert a Memory Card
The camera stores photographs on CompactFlash and microdrive
memory cards (available separately; pg. 394).
Up to two memory
cards can be inserted in the camera simultaneously.
The following
section describes how to insert and format a memory card.
1 Turn the camera off.
Always turn the camera off
before inserting or removing
memory cards.
2 Open the card slot cover.
Open the door protecting the card-slot
cover release button (q) and press the
release button (w) to open the card slot
(e).
A Memory Card Slots
Slot 1 is for the main card; the card in slot 2 plays a
backup or secondary role. If the default setting of
[Overflow] is selected for [Slot 2] (pg. 72) when
two memory cards are inserted, the card in slot 2
will only be used when the card in slot 1 is full.
The card currently in use is indicated in the top
control panel.
Power switch
Slot 2
Slot 1
SHOOT
CUSTOM
43
s
3 Insert the memory card.
Insert the first memory card in slot 1.
Slot 2 should be used only if a card is
already inserted in slot 1.
Insert the
memory card with the rear label toward
the monitor (q).
When the memory
card is fully inserted, the eject button will
pop up (w) and the green access lamp
will light briefly.
D Inserting Memory Cards
Insert the memory card terminals first.
Inserting the card upside down or backwards
could damage the camera or the card.
Check
to be sure that the card is in the correct
orientation.
4 Close the card slot cover.
Rear label
Access lamp
Direction of
insertion
Terminals
Rear label
44
s
❚❚ Removing Memory Cards
1 Turn the camera off.
Confirm that the access lamp is off and
turn the camera off.
2 Remove the memory card.
Open the memory card slot cover (q)
and press the eject button (w) to
partially eject the card (e).
The memory
card can then be removed by hand.
Do
not push on the memory card while
pressing the eject button.
Failure to observe this precaution
could damage the camera or memory card.
D Memory Cards
Memory cards may be hot after use.
Observe due caution when
removing memory cards from the camera.
Memory cards that have been formatted in a computer or other device
must be reformatted in the camera before they can be used for
recording or playback.
Turn the power off before inserting or removing memory cards.
Do not
remove memory cards from the camera, turn the camera off, or remove
or disconnect the power source during formatting or while data are
being recorded, deleted, or copied to a computer.
Failure to observe
these precautions could result in loss of data or in damage to the camera
or card.
Do not touch the card terminals with your fingers or metal objects.
Do not bend, drop, or subject to strong physical shocks.
Do not apply force to the card casing.
Failure to observe this precaution
could damage the card.
Do not expose to water, high levels of humidity, or direct sunlight.
Access lamp
45
s
Formatting Memory Cards
Memory cards must be formatted before first use.
Format the card
as described below.
D Formatting Memory Cards
Formatting memory cards permanently deletes any data they may contain.
Be sure to copy any photographs and other data you wish to keep to a
computer before proceeding (pg. 256).
1 Turn the camera on.
2 Press the Q buttons.
Hold the Q (I and O)
buttons down simultaneously
for more than two seconds.
A blinking C will appear in the
shutter-speed displays in the
viewfinder and top control panel.
If
two memory cards are inserted, the
main command dial can be used to
select the card to be formatted;
check that the correct card is
selected in the top control panel
before proceeding.
To exit without formatting the memory
card, press any button other than the Q (I and O) buttons.
Power switch
I button
O button
SHOOT
46
s
3 Press the Q buttons again.
Press the Q (I and O) buttons together a second time to
format the memory card.
Do not remove the memory card or
remove or disconnect the power source during formatting.
When formatting is complete, the top
control panel will show the number of
photographs that can be recorded at
current settings and the frame-count
displays will show B.
A No Memory Card
If no memory card is inserted, the top control
panel and viewfinder will show S. If the
camera is turned off with a charged EN-EL4a
battery and no memory card inserted, S will
be displayed in the top control panel.
A See Also
See page 347 for information on formatting
memory cards using the [Format memory card] option in the setup menu.
SHOOT
CUSTOM
47
s
Adjust Viewfinder Focus
The camera is equipped with diopter adjustment to accommodate
individual differences in vision. Check that the display in the
viewfinder is in focus before shooting.
1 Lift the diopter adjustment knob.
Remove the lens cap, turn the camera
on, and pull the diopter adjustment
knob out (q).
2 Focus the viewfinder.
Rotate the diopter adjustment knob (w)
until the viewfinder display, focus points,
and AF area brackets are in sharp focus.
3 Replace the diopter adjustment
knob.
Push the diopter adjustment knob back
in (e).
A Diopter Adjustment Viewfinder Lenses
Corrective lenses (available separately; pg. 389)
can be used to further adjust viewfinder diopter.
Before attaching a diopter-adjustment viewfinder
lens, remove the DK-17 viewfinder eyepiece by
closing the viewfinder shutter to release the
eyepiece lock (q) and then unscrewing the
eyepiece as shown at right (w).
48
s
Basic Photography and Playback
Turn the Camera On
Before taking photographs, turn the camera on and check the
battery level and number of exposures remaining as described
below.
1 Turn the camera on.
Turn the camera on.
The
control panels will turn on and
the display in the viewfinder
will light.
2 Check the battery level.
Check the battery level in the
viewfinder or top control panel.
Icon
*
DescriptionControl panel Viewfinder
L Battery fully charged.
K
Battery partially discharged.J
I
H d
Low battery.
Prepare to charge battery
or ready spare battery.
H
(blinks)
d
(blinks)
Shutter release disabled.
Charge or
exchange battery.
* No icon displayed when camera is powered by optional AC adapter.
Power switch
SHOOT
CUSTOM
49
s
3 Check the number of exposures
remaining.
The top control panel shows the
number of photographs that can be
taken at current settings.
When this
number reaches zero, the number of
exposures remaining, frame count, and
N icon will flash in the top control
panel and a flashing g icon will
appear in the viewfinder.
No further pictures can be taken
until you delete pictures or insert a new memory card.
You
may be able to take additional pictures at lower image quality
or size settings.
A Large-Capacity Memory Cards
When enough memory remains on the memory
card to record a thousand or more pictures at
current settings, the number of exposures
remaining will be shown in thousands, rounded
down to the nearest hundred (e.g., if there is
room for approximately 1,260 exposures, the
exposure count display will show 1.2 K).
SHOOT
CUSTOM
SHOOT
CUSTOM
SHOOT
CUSTOM
50
s
A The Battery Indicator
If the segments in the top control panel battery icon blink on and off, the
camera is calculating the battery charge. The battery level will be
displayed in about three seconds.
A Auto Meter Off
At default settings, the shutter speed and aperture displays in the top
control panel and viewfinder will turn off if no operations are performed
for about six seconds (auto meter off), reducing the drain on the battery.
Press the shutter-release button halfway to reactivate the display in the
viewfinder (pg. 56).
The length of time before the exposure meters turn off automatically can
be adjusted using Custom Setting c2 ([Auto meter-off delay], pg. 318).
A Camera Off Display
If the camera is turned off with a battery and
memory card inserted, the frame count and
number of exposures remaining will be displayed
(some memory cards may only display this
information when the camera is on).
SHOOT
CUSTOM
SHOOT
CUSTOM
SHOOT
CUSTOM
6 s
Exposure meters on Exposure meters off Exposure meters on
Top control panel
51
s
Adjust Camera Settings
This tutorial describes how to take photos at default settings.
1 Check camera settings.
Default settings are listed below.
Option Default Description Page
Image
quality
NORM
(JPEG
normal)
Record JPEG images at a compression ratio
of roughly 1 : 8
*
. Ideal for snapshots.
* [Size priority] selected for [JPEG compression].
66
Image size
L
(Large)
FX format images are 6,048 × 4,032 pixels
in size.
70
ISO
sensitivity
100
ISO sensitivity (digital equivalent of film
speed) set to ISO 100.
104
White
balance
v
(Auto)
White balance is adjusted automatically for
natural colors under most types of lighting.
140
Exposure
mode
e
(Programmed
auto)
Camera automatically adjusts shutter
speed and aperture for optimal exposure
in most situations.
112
Focus
point
Center focus
point
(single-
point AF)
Viewfinder focus point display is shown
above.
Camera focuses on subject in
center focus point when shutter-release
button is pressed halfway.
78
SHOOT
CUSTOM
Exposure
mode
Top control panel
Image qualityISO sensitivity
White balance
Rear control panel
Image size
Focus point
52
s
2 Choose exposure mode e.
Press the I button and rotate the
main command dial to select exposure
mode e.
The camera will automatically
adjust shutter speed and aperture for
optimal exposure in most situations.
3 Choose single frame
release mode.
Hold the release mode dial lock
release down and turn the
release mode dial to S (single
frame).
At this setting, the
camera will take one
photograph each time the
shutter-release button is
pressed.
4 Choose single-point AF.
Rotate the AF-area mode
selector until it clicks into place
pointing to K (single-point
AF).
At this setting, the user
can choose the focus point.
I button
Main command
dial
Release mode dial
Release mode dial
lock release
AF-area mode
selector
53
s
5 Choose single-servo
autofocus.
Rotate the focus-mode selector
until it clicks into place
pointing to S (single-servo
autofocus).
At this setting, the
camera will automatically focus
on the subject in the selected
focus point when the shutter-release button is pressed
halfway.
Pictures can only be taken when the camera is in
focus.
6 Choose matrix metering.
Press the metering selector
lock button and rotate the
metering selector to Y (matrix
metering).
Matrix metering
uses information from the
1,005-segment RGB sensor to
ensure optimal results for the
entire frame.
Focus-mode
selector
Metering selector
54
s
Ready the Camera
When framing photographs in the
viewfinder, hold the handgrip in your right
hand and cradle the camera body or lens
with your left.
Keep your elbows propped
lightly against your torso for support and
place one foot half a pace ahead of the other
to keep you upper body stable.
When framing photographs in portrait (tall)
orientation, unlock the shutter-release
button for vertical shooting (pg. 5) and hold
the camera as shown at right.
For information on framing photographs in
the monitor, see page 90.
55
s
Focus and Shoot
1 Press the shutter-
release button
halfway to focus (pg.
56).
At default settings, the
camera will focus on the
subject in the center
focus point. Frame a
photo in the viewfinder
with the main subject positioned in the center focus point and
press the shutter-release button halfway.
If the camera is able
to focus, the in-focus indicator (I) will appear in the
viewfinder.
While the shutter-release button is pressed halfway, focus will
lock and the number of exposures that can be stored in the
memory buffer (“t”; pg. 88) will be shown in the viewfinder
display.
For information on what to do if the camera is unable to focus
using autofocus, see “Getting Good Results with Autofocus”
(pg. 82).
Viewfinder display Description
I Subject in focus.
2 Focus point is between camera and subject.
4 Focus point is behind subject.
24
(blinks)
Camera unable to focus on subject in focus
point using autofocus.
Focus
indicator
Buffer
capacity
56
s
2 Press the shutter-release
button the rest of the way
down to shoot.
Smoothly press the shutter-
release-button the rest of the
way down to take the picture.
While the photograph is being
recorded to the memory card, the access lamp next to the card
slot cover will light.
Do not eject the memory card, turn the
camera off, or remove or disconnect the power source until the
lamp has gone out.
A The Shutter-Release Button
The camera has a two-stage shutter-release button.
The camera focuses
when the shutter-release button is pressed halfway.
To take the
photograph, press the shutter-release button the rest of the way down.
Access lamp
Focus Take
photograph
57
s
Viewing Photographs
1 Press the K button.
The most recent photograph will be displayed in the monitor.
2 View additional pictures.
Additional pictures can be
displayed by pressing 4 or 2.
To view additional information
on the current photograph,
press 1 and 3 (pg. 229).
The card containing the
current photograph is indicated by an
icon as shown at right.
To end playback and return to shooting
mode, press the shutter-release button halfway.
A Image Review
When [On] is selected for [Image review] in the playback menu (pg. 287),
photographs are automatically displayed in the monitor for about 20 s
(the default setting) after shooting.
0. 0
AUTO 0, 0
1
/
125
,
F5
.
6
100 85
mm
100
NCD
3
X
D
S
C
_
0001
.
JP
G
15
/
12
/
2008 10
:
15
:
00
N
N
OR
OR
M
AL
AL
6048x4032
N
I
KO
N
D
3
X
1
/
10
58
s
Deleting Unwanted Photographs
To delete the photograph currently displayed in the monitor, press
the O button.
Note that photographs can not be recovered once
deleted.
1 Display the photograph.
Display the photograph you wish to delete as described in
“Viewing Photographs” on the previous page.
The card containing the current
photograph is indicated by an icon as
shown at right.
2 Delete the photograph.
Press the O button.
A confirmation dialog will be displayed.
Press the O button again to delete the image and return to
playback.
To exit without deleting the picture, press K.
A [Delete]
To delete multiple images or to delete images from the second of two
memory cards, use the [Delete] option in the playback menu (pg. 281).
K button
O button
d
59
d
Image Recording
Options
This section describes how to choose image area, quality, and size
and how to choose the role played by memory card slot 2.
Image Area .........................................................................pg. 60
Image Quality.....................................................................pg. 66
Image Size...........................................................................pg. 70
Slot 2 ....................................................................................pg. 72
60
d
Image Area
The cameras FX format (35.9 × 24.0 mm)
image sensor can be used to record pictures
with an image area (picture angle)
equivalent to a 35mm (135) format film
camera.
Image area is selected using the
[Image area] option in the shooting menu.
At the default setting of [Auto DX crop], the camera will
automatically crop pictures to the DX picture angle when a DX
format lens is attached.
The [Choose image area] option can be
used to select a 35mm picture angle or to crop photographs to the
DX format picture angle or to a 5 : 4 aspect ratio.
❚❚ Auto DX Crop
Choose whether to automatically select a DX crop when a DX lens
is attached.
Option Description
On
(default)
Camera automatically selects DX crop when DX lens is
attached.
Off Crop selected for [Choose image area] is used.
61
d
❚❚ Choose Image Area
Choose the image area used when [Off] is selected for [Auto DX
crop] (pg. 63).
Option Description
c
FX format
(36x24)
Images are recorded in FX
format using the full area of the
image sensor (35.9 × 24.0 mm),
producing a picture angle
equivalent to a Nikkor lens on a
35mm format camera.
The
edges of pictures taken with DX
format lenses will be blacked
out.
a
DX format
(24x16)
An area at the center of the
image sensor 23.6 × 15.7 mm is
used to record pictures in DX
format.
To calculate the
approximate focal length of the
lens in 35mm format, multiply
by 1.5.
b
5:4
(30x24)
Pictures are recorded with an
aspect ratio of 5 : 4
(30.0 × 24.0 mm).
The edges of
pictures taken with DX format
lenses will be blacked out.
62
d
A DX Lenses
DX lenses are designed for use with DX format cameras and have a smaller
picture angle than lenses for 35mm format cameras.
If [Auto DX crop] is
off and [FX format (36 × 24)] or [5 :4 (30 × 24)] is selected for [Image area]
when a DX lens is attached, the edges of the image may be eclipsed.
This
may not be apparent in the viewfinder, but when the images are played
back you may notice a drop in resolution or that the edges of the picture
are blacked out.
A The Viewfinder Display
The DX format and 5 :4 crops are shown below.
DX format (24 × 16)
image circle
FX format (36 × 24)
image circle
DX format
5:4
FX format
DX format 5 : 4
63
d
Image area can be set using the [Image area] option in the
shooting menu or (at default settings) by pressing the Fn button
and rotating a command dial.
❚❚ The Image Area Menu
1 Select [Image area].
Highlight [Image area] in the
shooting menu (pg. 290) and
press 2.
2 Choose an option.
Highlight [Auto DX crop] or
[Choose image area] and
press 2.
3 Adjust settings.
Choose an option and press J.
The selected crop is displayed
in the viewfinder (pg. 62).
64
d
❚❚ The Fn Button
The image area can be selected
by pressing the Fn button and
rotating the main or sub-
command dial until the desired
crop is displayed in the viewfinder
(pg. 62).
This operation (the
default option for the Fn button
and command dials; pg. 336) can
not be performed while a
multiple exposure is being
recorded (pg. 209).
The option currently selected for image area
can be viewed by pressing the Fn button to
display the image area in the top control
panel or shooting information display.
FX
format is displayed as “36 × 24”, DX format as
“24 × 16”, and 5 : 4 as “30 × 24”.
A Information Display (pg. 14)
The current image area selection can be viewed
by pressing the R button to display shooting
information in the monitor.
c is displayed when
[FX format (36 × 24)] is selected, a when [DX
format (24 × 16)] is selected, and b when [5 : 4
(30 × 24)] is selected.
Main command
dial
Fn button
65
d
D Auto DX Crop
The Fn button can not be used to select image area when a DX lens is
attached and [Auto DX crop] is on.
A The Fn, Depth-of-Field Preview, and AE-L/AF-L Buttons
Changes to image area settings can be made using the Fn button (the
default setting, see Custom Setting f4, [Assign FUNC. button], pg. 333), the
depth-of-field preview button (Custom setting f5, [Assign preview
button]), pg. 339), or the AE-L/AF-L button (Custom Setting f6, [Assign AE-L/
AF-L button], pg. 340). Note that some “button press” options can not be
combined with options using “+dials.
A Image Size
Image size varies with the option selected for image area.
66
d
Image Quality
The camera supports the following image quality options.
Option File type Description
NEF (RAW) NEF
Raw data from the image sensor are saved
directly to the memory card in Nikon Electronic
Format (NEF).
Use with images that will be
transferred to a computer for printing or
processing.
Note that once transferred to a
computer, NEF (RAW) images can only be
viewed using compatible software such as
ViewNX (supplied) or Capture NX 2 (available
separately; pg. 391).
TIFF (RGB)
TIFF
(RGB)
Record uncompressed TIFF-RGB images at a bit
depth of 8 bits per channel (24-bit color).
TIFF is
supported by a wide variety of imaging
applications.
JPEG fine
JPEG
Record JPEG images at a compression ratio of
roughly 1:4 (fine image quality).
*
JPEG normal
Record JPEG images at a compression ratio of
roughly 1:8 (normal image quality).
*
JPEG basic
Record JPEG images at a compression ratio of
roughly 1:16 (basic image quality).
*
NEF (RAW)+
JPEG fine
NEF/
JPEG
Two images are recorded, one NEF (RAW) image
and one fine-quality JPEG image.
NEF (RAW)+
JPEG normal
Two images are recorded, one NEF (RAW) image
and one normal-quality JPEG image.
NEF (RAW)+
JPEG basic
Two images are recorded, one NEF (RAW) image
and one basic-quality JPEG image.
*[Size priority] selected for [JPEG compression].
67
d
Image quality is set by pressing
the QUAL button and rotating the
main command dial until the
desired setting is displayed in the
rear control panel.
A File Size
See page 427 for information on the number of pictures that can be
recorded at different image quality and size settings.
A NEF (RAW) Recording
The [NEF (RAW) recording] item in the shooting menu controls
compression (pg. 69) and bit depth (pg. 69) for NEF (RAW) images.
A JPEG Compression
JPEG images can be compressed for relatively uniform file size or optimal
image quality.
The [JPEG compression] option in the shooting menu can
be used to choose the type of compression (pg. 68).
A NEF (RAW)+JPEG
If only one memory card is used, only the JPEG image will be displayed
when photographs taken at [NEF (RAW) + JPEG fine], [NEF (RAW) + JPEG
normal], or [NEF (RAW) + JPEG basic] are viewed on the camera.
Deleting
the JPEG image deletes the NEF (RAW) copy.
If two memory cards are
inserted and [RAW Slot 1-JPEG Slot 2] is selected for Slot 2, deleting the
JPEG copy from the memory card in slot 2 has no effect on the NEF (RAW)
copy on the memory card in slot 1 (pg. 72).
A The Image Quality Menu
Image quality can also be adjusted using the [Image quality] option in the
shooting menu (pg. 290).
QUAL button
Main command
dial
Rear control panel
68
d
❚❚ The JPEG Compression Menu
The [JPEG compression] item in the shooting menu offers the
following options for JPEG images:
Option Description
O
Size priority
(default)
Images are compressed to produce relatively
uniform file size.
Quality varies with scene
recorded.
P Optimal quality
Optimal image quality.
File size varies with
scene recorded.
69
d
❚❚ The NEF (RAW) Recording Menu: Type
The [NEF (RAW) recording] > [Type] item in the shooting menu
offers the following compression options for NEF (RAW) images:
❚❚ The NEF (RAW) Recording Menu: NEF (RAW) Bit Depth
The [NEF (RAW) recording] > [NEF (RAW) bit depth] item in the
shooting menu offers the following bit-depth options for NEF
(RAW) images:
Option Description
N
Lossless
compressed
(default)
NEF images are compressed using a reversible
algorithm, reducing file size by about 20–40%
with no effect on image quality.
O Compressed
NEF images are compressed using a non-
reversible algorithm, reducing file size by about
40–55% with almost no effect on image quality.
Uncompressed NEF images are not compressed.
Option Description
q
12-bit
(default)
NEF (RAW) images are recorded at a bit-depth of 12 bits.
r 14-bit
NEF (RAW) images are recorded at a bit-depth of 14 bits,
producing files larger than 12-bit files but increasing the
color data recorded.
70
d
Image Size
Image size is measured in pixels.
Choose from Large (the default
option), Medium, or Small (note that image size varies depending
on the option selected for [Image area], pg. 60):
A NEF (RAW) Images
Note that the option selected for image size does not affect the size of NEF
(RAW) images.
When opened in software such as ViewNX (supplied) or
Capture NX 2 (available separately), NEF (RAW) images have the
dimensions given for large (L-size) images in the table above.
Image area Option Size (pixels) Print size (cm/in.)
*
FX format
(36 × 24)
L 6,048 × 4,032 76.8 × 51.2/30.2 × 20.2
M 4,544 × 3,024 57.7 × 38.4/22.7 × 15.1
S 3,024 × 2,016 38.4 × 25.6/15.1 × 10.1
DX format
(24 × 16)
L 3,968 × 2,640 50.4 × 33.5/19.8 × 13.2
M 2,976 × 1,976 37.8 × 25.1/14.9 × 9.9
S 1,984 × 1,320 25.2 × 16.8/ 9.9 × 6.6
5 : 4 (30 × 24)
L 5,056 × 4,032 64.2 × 51.2/25.3 × 20.2
M 3,792 × 3,024 48.2 × 38.4/19.0 × 15.1
S 2,528 × 2,016 32.1 × 25.6/12.6 × 10.1
* Approximate size when printed at 200 dpi.
Print size in inches equals image
size in pixels divided by printer resolution in dots per inch (dpi;
1 inch = approximately 2.54 cm).
Print size decreases as printer resolution
increases.
71
d
Image size can be set by pressing
the QUAL button and rotating the
sub-command dial until the
desired option is displayed in the
rear control panel.
A The Image Size Menu
Image size can also be adjusted using the [Image size] option in the
shooting menu (pg. 290).
Sub-command
dial
QUAL button
Rear control panel
72
d
Slot 2
Use the [Slot 2] option in the shooting menu (pg. 290) to choose
the role played by the memory card in slot 2.
D Backup/RAW Slot 1-JPEG Slot 2
When the above options are selected, the shutter-release will be disabled
when either of the memory cards is full.
The viewfinder and top control
panel show the number of exposures remaining on the card with the least
amount of available memory.
Voice memos (pg. 250) are appended to the
copy recorded to the memory card in slot 1.
Option Rear control panel Description
X
Overflow
(default)
The memory card in slot 2 is
used to record photographs
when the memory card in slot
1 is full.
Y
Backup
Each photograph is recorded
to both memory cards.
Z
RAW Slot 1-
JPEG Slot 2
At image quality settings of
NEF (RAW)+JPEG, the NEF
(RAW) image is recorded to
the memory card in slot 1, the
JPEG image to the memory
card in slot 2.
At other image
qualities, this option is the
same as [Backup].
N
73
N
Focus
– Controlling How the Camera Focuses
This section describes the options that control how your camera
focuses.
Focus Mode ........................................................................pg. 74
AF-Area Mode ....................................................................pg. 76
Focus Point Selection .......................................................pg. 78
Focus Lock ..........................................................................pg. 80
Manual Focus .....................................................................pg. 83
74
N
Focus Mode
Focus mode is controlled by the
focus-mode selector on the front of
the camera.
There are two
autofocus (AF) modes, in which the
camera focuses automatically
when the shutter-release button is
pressed halfway, and one manual focus mode, in which focus must
be adjusted manually using the focusing ring on the lens:
Choose single-servo AF for landscapes and other stationary sub-
jects. Continuous-servo AF may be a better choice with erratically-
moving subjects. Manual focus is recommended when the camera
is unable to focus using autofocus.
Option Description
S
Single-servo
AF
Camera focuses when shutter-release button is pressed
halfway.
Focus locks when in-focus indicator (I) appears
in viewfinder, and remains locked while shutter-release
button is pressed halfway (focus lock).
At default settings,
shutter can only be released when in-focus indicator is
displayed (focus priority).
C
Continuous-
servo AF
Camera focuses continuously while shutter-release button
is pressed halfway.
If subject moves, camera will engage
predictive focus tracking (pg. 75) to predict final distance to
subject and adjust focus as necessary.
At default settings,
shutter can be released whether or not subject is in focus
(release priority).
M
Manual
(pg. 83)
Camera does not focus automatically; focus must be
adjusted manually using the lens focusing ring.
If
maximum aperture of lens is f/5.6 or faster, viewfinder
focus indicator can be used to confirm focus (electronic
range finding; pg. 84), but photographs can be taken at any
time, whether or not subject is in focus.
Focus-mode selector
75
N
A The B Buttons
For the purpose of focusing the camera,
pressing either of the B buttons has the same
effect as pressing the shutter-release button
halfway.
A Predictive Focus Tracking
In continuous-servo AF, the camera will initiate predictive focus tracking if
the subject moves toward or away from the camera while the shutter-
release button is pressed halfway or either of the B buttons is pressed.
This allows the camera to track focus while attempting to predict where
the subject will be when the shutter is released.
A See Also
For information on using focus priority in continuous-servo AF, see
Custom Setting a1 ([AF-C priority selection], pg. 305).
For information on
using release priority in single-servo AF, see Custom Setting a2 ([AF-S
priority selection], pg. 306).
For information on preventing the camera
from focusing when the shutter-release button is pressed halfway, see
Custom Setting a5 ([AF activation], pg. 309).
B button
B button for
vertical shooting
76
N
AF-Area Mode
AF-area mode determines how the
focus point is selected in autofocus
mode (pg. 74).
To select the AF-
area mode, rotate the AF-area
mode selector.
The following
options are available:
Mode Description
K
Single-point
AF
User selects focus point manually; camera focuses on
subject in selected focus point only.
Use for relatively
static compositions with subjects that will stay in selected
focus point.
I
Dynamic-
area AF
In continuous-servo AF (pg. 74), user selects focus point
manually; if subject briefly leaves selected focus point,
camera will focus based on information from
surrounding points.
Number of focus points used can
be selected from 9, 21, and 51 using Custom Setting a3
([Dynamic AF area], pg. 307).
If [51 points (3D-tracking)]
is selected for Custom Setting a3, focus point will be
selected automatically using 3D-tracking.
In single-servo AF (pg. 74), user selects focus point
manually; camera focuses on subject in selected focus
point only.
H
Auto-area AF
Camera automatically detects
subject and selects focus point.
If
type G or D lens is used, camera
can distinguish human subjects
from background for improved
subject detection.
In single-servo
AF, active focus points are
highlighted for about one second after camera focuses.
Active focus points are not displayed in continuous-servo
AF.
AF-area mode selector
77
N
A AF-Area Mode
AF-area mode is shown in the shooting
information display when the R button is
pressed.
* Only active focus point is displayed in the viewfinder. Remaining focus
points provide information to assist focus operation.
A Manual Focus
Single-point AF is automatically selected when manual focus is used.
A See Also
For information on the settings available in dynamic-area AF, see Custom
Setting a3 ([Dynamic AF area], pg. 307).
For information on adjusting how
long the camera waits before refocusing when an object moves in front of
the camera, see Custom Setting a4 ([Focus tracking with lock-on], pg. 309).
AF-area mode
Information
display
K Single-point AF
I
Dynamic-
area AF
*
Custom Setting a3 ([Dynamic AF area], pg. 307)
9 points
(default)
21 points
51 points
51 points (3D-tracking)
H Auto-area AF
AF-area mode
indicator
78
N
Focus Point Selection
The camera offers a choice of 51
focus points that together cover a
wide area of the frame.
The focus
point can be selected manually,
allowing photographs to be
composed with the main subject
positioned almost anywhere in the frame (single-point and
dynamic-area AF), or automatically (auto-area AF; note that
manual focus point detection is not available when auto-area AF is
selected).
To select the focus point manually:
1 Rotate the focus selector
lock to .
This allows the multi selector to
be used to select the focus
point.
2 Select the focus point.
Use the multi selector to select
the focus point.
At default
settings, the center focus point
can be selected by pressing the
center of the multi selector.
The focus selector lock can be
rotated to the locked (L)
position following selection to
prevent the selected focus
point from changing when the
multi selector is pressed.
AF-area mode selector
Focus selector lock
79
N
A Portrait (Tall-Orientation) Photographs
When framing shots in portrait (“tall”) orientation, use the command dials
to select the focus area.
For more information, see Custom Setting f4
([Assign FUNC. button], pg. 337).
A See Also
For information on choosing when the focus point is illuminated, see
Custom Setting a6 ([Focus point illumination], pg. 310).
For information
on setting focus-point selection to “wrap around,” see Custom Setting a7
([Focus point wrap-around], pg. 311).
For information on choosing the
number of focus points that can be selected using the multi selector, see
Custom Setting a8 ([AF point selection], pg. 311).
For information on
choosing the role of the B button for vertical shooting, see Custom
Setting a10 ([Vertical AF-ON button], pg. 313).
For information on
changing the role of the multi selector center button, see Custom Setting
f1 ([Multi selector center button], pg. 331).
80
N
Focus Lock
Focus lock can be used to change the composition after focusing,
making it possible to focus on a subject that will not be in a focus
point in the final composition.
It can also be used when the
autofocus system is unable to focus (pg. 82).
1 Focus.
Position the subject in the selected focus
point and press the shutter-release
button halfway to initiate focus.
2 Check that the in-focus indicator
(I) appears in the viewfinder.
Single-servo AF
Focus will lock automatically
when the in-focus indicator
appears, and remain locked
until you remove your finger
from the shutter-release
button.
Focus can also be locked by pressing the AE-L/AF-L
button (see following page).
81
N
Continuous-servo AF
Press the AE-L/AF-L button to lock both
focus and exposure (an AE-L icon appears
in the viewfinder, see page 125).
Focus
and exposure will remain locked while
the AE-L/AF-L button is pressed, even if
you later remove your finger from the
shutter-release button.
3 Recompose the
photograph and shoot.
Focus will remain locked
between shots as long as the
shutter-release button is kept
pressed halfway, allowing several photographs in succession
to be taken at the same focus setting.
Focus will also remain
locked between shots while the AE-L/AF-L button is pressed.
Do not change the distance between the camera and the
subject while focus lock is in effect.
If the subject moves, focus
again at the new distance.
A See Also
For information on choosing the role played by the AE-L/AF-L button, see
Custom Setting f6 ([Assign AE-L/AF-L button], pg. 340).
w
q
Shutter-release
button
AE-L/AF-L button
82
N
Getting Good Results with Autofocus
Autofocus does not perform well under the conditions listed
below.
The shutter release may be disabled if the camera is unable
to focus under these conditions, or the in-focus indicator () may
be displayed, allowing the shutter to be released even when the
subject is not in focus.
In these cases, use manual focus (pg. 83) or
use focus lock (pg. 80) to focus on another subject at the same
distance and then recompose the photograph.
There is little or no contrast between the subject
and the background
Example: subject is the same color as the background.
The focus point contains objects at different
distances from the camera
Example: subject is inside a cage.
The subject is dominated by regular geometric
patterns
Example: blinds or a row of windows in a skyscraper.
The focus point contains areas of sharply
contrasting brightness
Example: subject is half in the shade.
Background objects appear larger than the subject
Example: a building is in the frame behind the subject.
The subject contains many fine details
Example: a field of flowers or other subjects that are
small or lack variation in brightness.
83
N
Manual Focus
Manual focus is available for
lenses that do not support
autofocus (non-AF Nikkor lenses)
or when the autofocus does not
produce the desired results
(pg. 82).
To focus manually, set
the focus-mode selector to M and
adjust the lens focusing ring until
the image displayed on the clear
matte field in the viewfinder is in
focus.
Photographs can be taken
at any time, even when the image
is not in focus.
A A-M Selection/Autofocus with Manual Priority
If the lens supports A-M selection, set the lens A-M switch to M (manual).
If the lens supports M/A (autofocus with manual override, MF priority) or
A/M (autofocus with manual override, AF priority), focus can be adjusted
manually, regardless of the mode selected with the lens.
See the
documentation provided with your lens for details.
Focus-mode
selector
84
N
The Electronic Rangefinder
If the lens has a maximum aperture of f/5.6
or faster, the viewfinder focus indicator can
be used to confirm whether the subject in
the selected focus point is in focus (the
focus point can be selected from any of the
51 focus points).
After positioning the
subject in the selected focus point, press
the shutter-release button halfway and
rotate the lens focusing ring until the in-
focus indicator (I) is displayed (pg. 55).
Note that with the subjects listed on page
82, the in-focus indicator may sometimes
be displayed when the subject is not in
focus; confirm focus in the viewfinder
before shooting.
A Focal Plane Position
To determine the distance between your subject
and the camera, measure from the focal plane
mark (E) on the camera body.
The distance
between the lens mounting flange and the focal
plane is 46.5 mm (1.83 in.).
Focal plane mark
k
85
k
Release Mode
Single Frame, Continuous, Live View, Self-Timer, or
Mirror Up
Release mode determines how the camera takes photographs:
one at a time, in a continuous sequence, with the view through the
lens displayed in the monitor, with a timed shutter-release delay,
or with the mirror raised to enhance shutter response and
minimize vibration.
Choosing a Release Mode............................................... pg. 86
Continuous Mode............................................................. pg. 88
Framing Pictures in the Monitor (Live View)............... pg. 90
Self-Timer Mode ............................................................ pg. 100
Mirror up Mode.............................................................. pg. 102
86
k
Choosing a Release Mode
The camera supports the following release modes:
Mode Description
S
Single frame
Camera takes one photograph each time shutter-release
button is pressed.
C
L
Continuous
low speed
While shutter-release button is held down,
1–5 frames per
second
*
.
C
H
Continuous
high speed
While shutter-release button is held down, camera records
up to 5 frames per second
*
(5–7 fps when [
DX format
(24 × 16)
] is selected for [Image area]; see page 60)
.
a
Live view
Frame pictures in monitor (pg.
90
). Recommended at high
or low angles or in other situations in which viewfinder is
hard to use or when enlarged view in monitor can assist in
obtaining very precise focus.
E
Self-timer
Use self-timer for self-portraits or to reduce blurring caused
by camera shake (pg. 100).
MUP
Mirror up
Choose this mode to minimize camera shake in telephoto
or close-up photography or in other situations in which the
slightest camera movement can result in blurred
photographs (pg.
102
).
*Average frame rate with continuous-servo AF, manual or shutter-priority auto
exposure, a shutter speed of
1
/250 s or faster, remaining settings other than
Custom Setting d2 (pg. 321) at default values, and memory remaining in
memory buffer.
87
k
To choose a release mode, press
the release mode dial lock release
and turn the release mode dial to
the desired setting.
Release mode
dial
Release mode dial lock
release
88
k
Continuous Mode
To take pictures in CH (continuous high speed) and CL (continuous
low speed) modes:
1 Select CH or CL mode.
Press the release mode dial
lock release and turn the
release mode dial to C
H or CL.
2 Frame a photograph, focus, and shoot.
While the shutter-release button is pressed all the
way down, pictures will be taken at the frame rate
selected for Custom Setting d2 ([Shooting speed], pg. 321).
A Continuous High Speed
In continuous high speed mode, the maximum frame rate for FX (36 × 24)
format and 5 : 4 (30 × 24) images is 5 fps. The maximum frame rate for DX
(24 × 16) format images can be chosen from 5, 6, and 7 fps using Custom
Setting d2 ([Shooting speed], pg. 321) > [Continuous high-speed].
The maximum frame rate when recording NEF (RAW) images at a bit
depth of 14 bits (pg. 69) is 1.8 fps, or 2.6 fps for DX format.
A Buffer Size
The approximate number of images that can be
stored in the memory buffer at current settings is
shown in the exposure-count displays in the
viewfinder and top control panel while the
shutter-release button is pressed.
The illustration
at right shows the display when space remains in
the buffer for about 38 pictures.
Release mode dial
SHOOT
CUSTOM
89
k
A The Memory Buffer
The camera is equipped with a memory buffer for temporary storage,
allowing shooting to continue while photographs are being saved to the
memory card.
Up to 130 photographs can be taken in succession; note,
however, that frame rate will drop when the buffer is full.
In rare cases,
frame rate may also drop when a microdrive memory card is used.
While photographs are being recorded to the memory card, the access
lamp next to the memory card slot will light. Depending on the number
of the images in the buffer, recording may take from a few seconds to a
few minutes. Do not remove the memory card or remove or disconnect the
power source until the access lamp has gone out.
If the camera is switched
off while data remain in the buffer, the power will not turn off until all
images in the buffer have been recorded.
If the battery is exhausted while
images remain in the buffer, the shutter release will be disabled and the
images transferred to the memory card.
A See Also
For information on choosing the maximum number of photographs that
can be taken in a single burst, see Custom Setting d3 ([Max.
continuous
release], pg. 321). For information on the number of pictures that can be
taken in a single burst, see page 427.
90
k
Framing Pictures in the Monitor
(Live View)
Select live view (a) mode to frame pictures in the monitor.
The
following options are available:
Hand-held (g): Choose when taking hand-held shots of moving
subjects, or when framing photographs at angles that make it
difficult to use the viewfinder (pg. 91).
Camera focuses normally
using phase-detection autofocus.
Tripod (h): Choose when the camera is mounted on a tripod (pg.
94).
You can zoom in on the image displayed in the monitor for
precise focus, making this option suitable for static subjects.
Contrast-detect autofocus can be used to compose photographs
with the subject positioned anywhere in the frame.
A Phase-Detection Versus Contrast-Detect AF
The camera normally uses phase-detection autofocus, in which focus is
adjusted based on data from a special focusing sensor. When [Tripod] is
selected in live view, however, the camera uses contrast-detect autofocus,
in which the camera analyses the data from the image sensor and adjusts
focus to produce the greatest contrast. Contrast-detect autofocus takes
longer than phase-detection autofocus.
91
k
Hand-Held Mode (g)
1 Select live view mode.
Press the release mode dial
lock release and turn the
release mode dial to a.
2 Adjust [Live view] options in the shooting menu.
Select [Live view] in the shooting menu
and choose [Hand-held] for [Live view
mode].
The [Live view] menu also contains a
[Release mode] option, where you can
choose from single-frame and
continuous release modes (pg. 86).
3 Press the shutter-release
button all the way down.
The mirror will be raised and
the view through the lens will
be displayed in the camera
monitor instead of the viewfinder (for improved focus, focus
on your subject by pressing the shutter-release button
halfway, then press it the rest of the way down to start live
view). To exit without taking a picture, rotate the release
mode dial to another setting or press G.
Release mode dial
92
k
4 Frame a picture in the monitor.
To magnify the view in the monitor up to 13 ×, press the N
button while rotating the main command dial.
While the view through the lens is zoomed in, a
navigation window will appear in the bottom right
corner of the display. Use the multi selector to scroll
within the AF area brackets.
5 Focus.
Autofocus (focus mode S or C):
Press the shutter-release
button halfway or press an
B button.
The camera will
focus normally and set
exposure.
Note that the mirror will click back into place while
either button is pressed, temporarily interrupting live view.
Live view is restored when the button is released.
Manual focus (focus mode M; pg. 83): Focus using the lens
focusing ring.
N button Main command
dial
93
k
6 Take the picture.
Press the shutter-release button the rest
of the way down to reset focus and
exposure and take the picture. If continuous high speed or
continuous low speed is selected for [Release mode], the
monitor will turn off while the shutter-release button is
pressed.
D No Picture
After shooting, play the picture back in the monitor to ensure that the
photograph has been recorded. Note that the sound the mirror makes
when the shutter-release button is pressed halfway or an B button is
pressed can be mistaken for the sound of the shutter, and that pressing
the shutter-release button all the way down when the camera is unable to
focus in single-servo AF will end live view without a photograph being
recorded.
94
k
Tripod Mode (h )
1 Ready the camera.
Mount the camera on a tripod or place it on a stable, level
surface.
2 Select live view mode.
Press the release mode dial
lock release and turn the
release mode dial to a.
3 Adjust [Live view] options in the shooting menu.
Select [Live view] in the shooting menu
and choose [Tripod] for [Live view
mode].
[Release mode] options can be
selected as described on page 91.
4 Frame a picture in the
viewfinder.
Frame a picture in the
viewfinder and select a focus
point using the multi selector,
then press an B button.
The camera will focus normally
and set exposure.
Note that the camera can NOT be focused by
pressing the shutter-release button halfway.
Release mode dial
B
button
95
k
5 Press the shutter-release
button all the way down.
The mirror will be raised and
the view through the lens will
be displayed in the camera
monitor. The subject will no
longer be visible in the viewfinder. To exit without taking a
picture, rotate the release mode dial to another setting or
press G.
6 Focus.
Autofocus (focus mode S or C): In
tripod mode, the focus point
for contrast-detect autofocus
can be moved to any point in
the frame using the multi
selector.
To focus using contrast-detect
autofocus, press an B button.
The
focus point will blink green and the
monitor may brighten while the camera
focuses.
If the camera is able to focus
using contrast-detect autofocus, the
focus point will be displayed in green; if the camera is unable
to focus, the focus point will blink red.
D Contrast-Detect Autofocus
The camera will not continue to adjust focus while an B button is
pressed in continuous-servo autofocus mode.
In both single-servo
and continuous-servo autofocus modes, the shutter can be released
even when the camera is not in focus.
Manual focus (focus mode M; pg. 83): Use zoom for precise focus.
Contrast-detect AF point
B button
96
k
To magnify the view in the monitor up to 13 × and check
focus, press the N button while rotating the main command
dial.
While the view through the lens is zoomed in, a
navigation window will appear in the bottom right
corner of the display. Use the multi selector to scroll
to areas of the frame not visible in the monitor.
To preview exposure at current settings,
press J.
In exposure modes other than
h, exposure can be adjusted by pressing
the E button and rotating the main
command dial (note that while exposure
compensation can be adjusted by ±5 EV,
only values between –3 and +3 EV can
be previewed in the monitor).
A Exposure Preview
Matrix metering is used to set exposure.
Exposure can not be
previewed when an optional flash unit is attached, bracketing is in
effect (pg. 130), active D-lighting is on (pg. 181), or shutter speed is
set to A or “p” (flash sync speed).
A Remote Cords
If the shutter-release button on a remote cord (available separately; see
pg. 392) is pressed halfway for over a second in tripod mode, it will
activate contrast-detect autofocus.
If the remote cord shutter-release
button is pressed all the way down without focusing, focus will not be
adjusted before the picture is taken.
N button
Main command dial
97
k
7 Take the picture.
Press the shutter-release
button the rest of the way
down to take the picture. If
continuous high speed or
continuous low speed is
selected for [Release mode], the monitor will turn off while the
shutter-release button is pressed.
D Focusing with Contrast-Detect Autofocus
Contrast-detect autofocus will take longer than normal (phase-detection)
autofocus.
In the following situations, the camera may be unable to focus
using contrast-detect autofocus:
The camera is not mounted on a tripod
The subject contains lines parallel to the long edges of the frame
The subject lacks contrast
The subject in the focus point contains areas of sharply contrasting
brightness, or the subject is lit by spot lighting or by a neon sign or other
light source that changes in brightness
Flicker or banding appears under fluorescent, mercury-vapor, sodium-
vapor, or similar lighting
A cross (star) filter or other special filter is used
The subject appears smaller than the focus point
The subject is dominated by regular geometric patterns
(e.g., blinds or a row of windows in a skyscraper)
The subject is moving
Note that the focus point may sometimes be displayed in green when the
camera is unable to focus.
Use an AF-S lens.
The desired results may not be achieved with other
lenses or teleconverters.
98
k
D Shooting in Live View Mode
Although they will not appear in the final picture, banding or distortion
may be visible in the monitor under fluorescent, mercury vapor, or sodium
lamps or if the camera is panned horizontally or if an object moves at high
speed through the frame.
Bright light sources may leave after-images in
the monitor when the camera is panned.
Bright spots may also appear.
When shooting in live view mode, avoid pointing the camera at the sun or
other strong light sources.
Failure to observe this precaution could result
in damage to the cameras internal circuitry.
Live view shooting ends automatically if the lens is removed.
Live view mode can be used for up to an hour.
Note, however, that when used in live view mode
for extended periods, the camera may become
noticeably warm and the temperature of its
internal circuits may rise, resulting in image noise
and unusual colors. To prevent damage to the
cameras internal circuits, live view shooting will
end automatically before the camera overheats. A count-down display
will appear in the monitor 30 s before shooting ends. At high ambient
temperatures, this display may appear immediately when live view mode
is selected.
In exposure modes other than manual, close the viewfinder eyepiece
shutter after focusing. This prevents light entering via the viewfinder
from interfering with exposure (pg. 100).
Some noise may be audible when zoom lenses are zoomed in or out or
shutter speed is changed in exposure mode e or f.
To reduce blur in tripod mode, choose [On] for Custom Setting d8
([Exposure delay mode], pg. 325).
If a CPU lens with an aperture ring is attached and [Aperture ring] selected
for Custom Setting f7 ([Customize command dials]) > [Aperture setting]
(pp. 341–342), live view will not start and the shutter release will be
disabled.
Select [Sub-command dial] when using a CPU lens equipped
with an aperture ring.
27s
99
k
A The Shooting Information Display
To hide or display indicators in the monitor in live view mode, press the R
button.
1 Only displayed during exposure preview (tripod mode; pg. 96).
2 Not displayed when view through lens is zoomed in.
A Monitor Brightness
Monitor brightness can be adjusted by pressing the K button while the
view through the monitor is displayed.
Press 1 or 3 to adjust brightness
(note that monitor brightness has no effect on pictures taken in live view
mode).
To return to live view, release the K button.
Monitor brightness
can not be adjusted during exposure preview (pg. 96).
A HDMI
When the camera is attached to an
HDMI video device, the camera monitor
will turn off and the video device will
display the view through the lens as
shown at right.
Shooting information
display
Shooting info + histogram
1, 2
Framing guides
2
Shooting information
off
Virtual horizon
2
100
k
Self-Timer Mode
The self-timer can be used to reduce camera shake or for self-
portraits. To use the self-timer, mount the camera on a tripod
(recommended) or place the camera on a stable, level surface and
follow the steps below:
1 Select self-timer mode.
Press the release mode dial
lock release and turn the
release mode dial to
E.
2 Frame the photograph and
focus.
In single-servo autofocus
(pg. 74), photographs can only
be taken if the in-focus (I)
indicator appears in the
viewfinder.
A Close the Viewfinder Eyepiece Shutter
In exposure modes other than manual,
close the viewfinder eyepiece shutter after
focusing.
This prevents light entering via
the viewfinder from interfering with
exposure.
Release mode dial
Focus-mode
selector
101
k
3 Start the timer.
Press the shutter-release
button all the way down to
start the timer.
The self-timer
lamp will start to blink, stopping two seconds before the
photograph is taken.
To turn the self-timer off before a photograph is taken, turn the
release mode dial to another setting.
A A
In self-timer mode, a shutter speed of A is equivalent to
approximately
1
/10 s.
A See Also
For information on changing the timer duration, see Custom Setting c3
([Self-timer delay], pg. 319).
For information on setting a beep to sound
during the timer count-down, see Custom Setting d1 ([Beep], pg. 320).
102
k
Mirror up Mode
Choose this mode to minimize blurring caused by camera
movement when the mirror is raised. Use of a tripod is
recommended.
1 Select mirror up mode.
Press the release mode dial
lock release and turn the
release mode dial to M
UP.
2 Raise the mirror.
Frame the picture, focus, and then press
the shutter-release button the rest of the
way down to raise the mirror.
D Using the Viewfinder
Note that autofocus, metering, and framing can not be confirmed in
the viewfinder while mirror is raised.
3 Take a picture.
Press the shutter-release button all the
way down again to take a picture. To
prevent blurring caused by camera
movement, press the shutter-release button smoothly or use
an optional remote cord (pg. 392). The mirror lowers when
shooting ends.
A Mirror up Mode
A picture will be taken automatically if no operations are performed for
about 30 s after the mirror is raised.
Release mode dial
S
103
S
ISO Sensitivity
Reacting Faster to Light
“ISO sensitivity” is the digital equivalent of film speed. The higher
the ISO sensitivity, the less light needed to make an exposure,
allowing higher shutter speeds or smaller apertures. This chapter
describes how to set ISO sensitivity manually and automatically.
Choosing ISO Sensitivity Manually............................ pg. 104
Auto ISO Sensitivity Control........................................ pg. 106
104
S
Choosing ISO Sensitivity
Manually
ISO sensitivity can be set to values between ISO 100 and ISO 1600
in steps equivalent to
1
/3 EV. Settings of from about 0.3–1 EV
below ISO 100 and 0.3–2 EV above ISO 1600 are also available for
special situations.
ISO sensitivity can be adjusted
by pressing the ISO button and
rotating the main command
dial until the desired setting is
displayed in the control panels
or viewfinder.
A The ISO Sensitivity Menu
ISO sensitivity can also be adjusted using the [ISO sensitivity] option in the
shooting menu (pg. 290).
ISO button
Main command
dial
Top control panel Rear control panel Viewfinder
ISO sensitivity: 1600
105
S
A ISO Sensitivity Settings
The settings available depend on the option selected for Custom Setting
b1 ([ISO sensitivity step value], pg. 314).
A Hi 0.3–Hi 2
The settings [Hi 0.3] through [Hi 2] correspond to ISO sensitivities 0.3–2 EV
over ISO 1600 (ISO 2000–6400 equivalent). Pictures taken at these
settings are more likely to be subject to noise and color distortion.
A Lo 0.3–Lo 1
The settings [Lo 0.3] through [Lo 1] correspond to ISO sensitivities 0.3–
1 EV below ISO 100 (ISO 80–50 equivalent).
Use for larger apertures when
lighting is bright. Contrast is slightly higher than normal; in most cases,
ISO sensitivities of ISO 100 or above are recommended.
A See Also
For information on Custom Setting b1 ([ISO sensitivity step value]), see
page 314. For information using the [High ISO NR] option in the shooting
menu to reduce noise at high ISO sensitivities, see page 300.
Custom Setting b1
(ISO sensitivity step value)
ISO sensitivity settings available
1/3 step
(default)
Lo 1, Lo 0.7, Lo 0.3, 100,125,160, 200, 250,
320, 400, 500, 640, 800, 1000, 1250, 1600,
Hi 0.3, Hi 0.7, Hi 1, Hi 2
1/2 step
Lo 1, Lo 0.5, 100,140, 200, 280, 400, 560, 800,
1100, 1600, Hi 0.5, Hi 1, Hi 2
1 step Lo 1, 100, 200, 400, 800, 1600, Hi 1, Hi 2
* If possible, the current ISO sensitivity setting is maintained when the
step value is changed. If the current ISO sensitivity setting is not
available at the new step value, ISO sensitivity will be rounded up to the
nearest available setting.
106
S
Auto ISO Sensitivity Control
If [Off ] (the default setting) is chosen for the [ISO sensitivity auto
control] option in the shooting menu, ISO sensitivity will remain
fixed at the value selected by the user (see page 104). If [On] is
chosen, ISO sensitivity will automatically be adjusted if optimal
exposure can not be achieved at the value selected by the user
(flash level is adjusted appropriately). The maximum value for
auto ISO sensitivity can be selected using the [Maximum
sensitivity] option in the [ISO sensitivity auto control] menu (the
minimum value for auto ISO sensitivity is automatically set to ISO
100; note that if the value selected for [Maximum sensitivity] is
lower than the value currently selected for [ISO sensitivity], the
value selected for [Maximum sensitivity] will be used). In exposure
modes e and g, sensitivity will only be adjusted if underexposure
would result at the shutter speed selected for [Minimum shutter
speed] (
1
/4000–1 s).
Slower shutter speeds may be used if optimum
exposure can not be achieved at the ISO sensitivity value selected
for [Maximum sensitivity].
When [On] is selected, the viewfinder and
rear control panel show ISO-AUTO. When
sensitivity is altered from the value selected
by the user, these indicators blink and the
altered value is shown in the viewfinder.
107
S
A Auto ISO Sensitivity Control
Noise is more likely at higher sensitivities. Use the [High ISO NR] option in
the shooting menu to reduce noise (see page 300). When a flash is used,
the value selected for [Minimum shutter speed] is ignored in favor of the
option selected for Custom Setting e1 ([Flash sync speed], pg. 326).
Foreground subjects may be underexposed in photos taken with a flash at
slow shutter speeds, in daylight, or against a bright background. Choose a
flash mode other than slow sync or select exposure mode g or h and
choose a larger aperture.
108
S
V
109
Z
Exposure
Controlling How the Camera Sets Exposure
This section describes the options available to control exposure,
including metering, exposure mode, exposure lock, exposure
compensation, and bracketing.
Metering ......................................................................... pg. 110
Exposure Mode.............................................................. pg. 112
e: Programmed Auto................................................................... pg. 114
f: Shutter-Priority Auto .............................................................. pg. 116
g: Aperture-Priority Auto ........................................................... pg. 118
h: Manual......................................................................................... pg. 120
Shutter-Speed and Aperture Lock ............................. pg. 123
Autoexposure (AE) Lock............................................... pg. 125
Exposure Compensation.............................................. pg. 128
Bracketing....................................................................... pg. 130
110
Z
Metering
Metering determines how the camera sets exposure.
The
following options are available:
Method Description
a
3D color
matrix II
Recommended in most situations.
Camera meters a wide
area of the frame and sets exposure according to distribution
of brightness, color, distance, and composition for natural
results.
Z
Center-
weighted
Camera meters entire frame but
assigns greatest weight to area in
center of frame (defaults to 12-mm
circle in center of viewfinder; if CPU
lens is attached, area can be selected
using Custom Setting b5, [Center-
weighted area], pg. 316
1
).
Classic
meter for portraits.
2
b
Spot
Camera meters circle 4 mm (0.16 in.) in
diameter (approximately 1.5% of
frame).
Circle is centered on current
focus point, making it possible to
meter off-center subjects (if non-CPU
lens is used or if auto-area AF is in
effect (pg. 76), camera will meter
center focus point).
Ensures that
subject will be correctly exposed, even
when background is much brighter or darker.
2
1 When non-CPU lens is attached, average for entire frame will be used if
[Average] is selected for Custom Setting b5; otherwise, center-weighted
metering for non-CPU lenses will use 12-mm circle in center of viewfinder,
regardless of setting selected for [Non-CPU lens data].
2 For improved precision with non-CPU lenses, specify lens focal length and
maximum aperture in [Non-CPU lens data] menu (pg. 218).
3 Metered area is not actually displayed in viewfinder.
Center weight area
3
Spot metering area
3
111
Z
To choose a metering method,
press the metering selector lock
button and rotate the metering
selector until the desired mode is
displayed.
A 3D Color Matrix II Metering
In matrix metering, exposure is set using a 1005-segment RGB sensor.
Use
a type G or D lens for results that include range information (3D color
matrix metering II; see page 384 for information on lens types).
With other
CPU lenses, 3D range information is not included (color matrix metering
II).
Color matrix metering is available when focal length and maximum
aperture of non-CPU lens are specified using [Non-CPU lens data] item in
setup menu (see page 218; center-weighted metering is used if focal
length or aperture is not specified).
A See Also
For information on choosing the size of the area assigned the greatest
weight in center-weighted metering, see Custom Setting b5 ([Center-
weighted area], pg. 316).
For information on making separate
adjustments to optimal exposure for each metering method, see Custom
Setting b6 ([Fine tune optimal exposure], pg. 316).
Metering selector
112
Z
Exposure Mode
Exposure mode determines how the camera sets shutter speed
and aperture when adjusting exposure.
Four modes are available:
programmed auto (e), shutter-priority auto (f ), aperture-priority
auto (g), and manual (h).
A Lens Types
When using a CPU lens equipped with an aperture ring, lock the aperture
ring at the minimum aperture (highest f-number).
Type G lenses are not
equipped with an aperture ring.
Non-CPU lenses can only be used in exposure mode g (aperture-priority
auto) and h (manual).
In other modes, exposure mode g is automatically
selected when a non-CPU lens is attached.
The exposure mode indicator
(e or f) in the top control panel will blink and g will be displayed in the
viewfinder.
Mode Description
e
Programmed
auto
(pg. 114)
Camera sets shutter speed and aperture for
optimal exposure.
Recommended for snapshots
and in other situations in which there is little time
to adjust camera settings.
f
Shutter-priority
auto
(pg. 116)
User chooses shutter speed; camera selects
aperture for best results.
Use to freeze or blur
motion.
g
Aperture-
priority auto
(pg. 118)
User chooses aperture; camera selects shutter
speed for best results.
Use to blur background for
portraits or bring both foreground and
background into focus for landscape shots.
h
Manual
(pg. 120)
User controls both shutter speed and aperture.
Set shutter speed to “A” for long time-
exposures.
113
Z
To choose the exposure mode, press the I
button and rotate the main command dial
until the desired mode is displayed in the
viewfinder or top control panel.
A Depth-of-Field Preview
To preview the effects of aperture, press and hold
the depth-of-field preview button.
The lens will
be stopped down to the aperture value selected
by the camera (modes e and f) or the value
chosen by the user (modes g and h), allowing
depth of field to be previewed in the viewfinder.
A Custom Setting e3—Modeling Flash
This setting controls whether the SB-900, SB-800, SB-600, SB-R200, and
other optional flash units that support the Creative Lighting System (CLS;
see page 186) will emit a modeling flash when the depth-of-field preview
button is pressed.
See page 327 for more information.
A See Also
See page 106 for information on auto ISO sensitivity control.
For
information on using the [Long exp. NR] option in the shooting menu for
reducing noise at slow shutter speeds, see page 300.
For information on
choosing the size of the increments available for shutter speed and
aperture, see Custom Setting b2 ([EV steps for exposure cntrl.], pg. 314).
For information on changing the roles of the main and sub-command
dials, see Custom Setting f7 ([Customize command dials] > [Change main/
sub], pg. 341).
I button
Main command
dial
Preview button
114
Z
e: Programmed Auto
In this mode, the camera automatically adjusts shutter speed and
aperture according to a built-in program to ensure optimal
exposure in most situations.
This mode is recommended for
snapshots and other situations in which you want to leave the
camera in charge of shutter speed and aperture.
To take
photographs in programmed auto:
1 Select exposure
mode e.
Press the I button
and rotate the main
command dial until e
is displayed in the
viewfinder and top
control panel.
2 Frame a photograph, focus, and shoot.
I button
Main command dial
Shutter speed:
1
/320 s
Aperture: f/9
115
Z
A Flexible Program
In exposure mode e, different combinations of
shutter speed and aperture can be selected by
rotating the main command dial (“flexible
program”).
Rotate the command dial to the right
for large apertures (small f-numbers) that blur
background details or fast shutter speeds that
“freeze” motion.
Rotate the command dial to the
left for small apertures (large f-numbers) that
increase depth of field or slow shutter speeds
that blur motion.
All combinations produce the
same exposure.
While flexible program is in
effect, an asterisk (“*”) appears in the top control
panel.
To restore default shutter speed and
aperture settings, rotate the command dial until the asterisk is no longer
displayed, choose another mode, or turn the camera off.
A See Also
See page 430 for information on the built-in exposure program.
Main command dial
SHOOT
CUSTOM
Shutter speed:
1
/2,000 s
Aperture: f/3.5
Shutter speed:
1
/50 s
Aperture: f/22
116
Z
f: Shutter-Priority Auto
In shutter-priority auto, you choose the shutter speed while the
camera automatically selects the aperture that will produce the
optimal exposure.
To take photographs in shutter-priority auto:
1 Select exposure
mode f.
Press the I button
and rotate the main
command dial until f
is displayed in the
viewfinder and top
control panel.
2 Choose a shutter speed.
Rotate the main command dial to
choose the desired shutter speed.
Shutter speed can be set to “p” (the
flash sync speed limit) or to values
between 30 s (q) and
1
/8,000 s (o).
Use slow shutter
speeds to suggest motion by blurring moving objects, high
shutter speeds to “freeze” motion.
I button
Main command dial
SHOOT
CUSTOM
117
Z
Shutter speed can be locked at the selected setting (see page
123).
3 Frame a photograph, focus, and shoot.
A See Also
See page 416 for information on what to do if flashing “A” indicator
appears in the shutter-speed displays.
Slow shutter speed (
1
/10 s)Fast shutter speed (
1
/1,000 s)
118
Z
g: Aperture-Priority Auto
In aperture-priority auto, you choose the aperture while the camera
automatically selects the shutter speed that will produce the
optimal exposure.
To take photographs in aperture-priority auto:
1 Select exposure
mode g.
Press the I button
and rotate the main
command dial until g is
displayed in the
viewfinder and top
control panel.
2 Choose an aperture.
Rotate the sub-
command dial to
choose the desired
aperture from values
between the minimum
and maximum for the
lens.
I button
Main command dial
SHOOT
CUSTOM
Sub-command dial
119
Z
Small apertures (high f-numbers) increase depth of field (see
page 113), bringing both foreground and background into
focus.
Large apertures (low f-numbers) soften background
details in portraits or other compositions that emphasize the
main subject.
Aperture can be locked at the selected setting (see page 124).
3 Frame a photograph, focus, and shoot.
A Non-CPU Lenses
If the maximum aperture of the lens has been
specified using the [Non-CPU lens data] item in
setup menu (pg. 218) when a non-CPU lens is
attached, the current f-number will be
displayed in the viewfinder and top control
panel, rounded to the nearest full stop.
Otherwise the aperture displays will show only
the number of stops (F, with maximum
aperture displayed as FA) and the f-number
must be read from the lens aperture ring.
Large aperture (f/2.8)Small aperture (f/36)
SHOOT
CUSTOM
120
Z
h: Manual
In manual exposure mode, you control both shutter speed and
aperture.
To take photographs in manual exposure mode:
1 Select exposure
mode h.
Press the I button
and rotate the main
command dial until h
is displayed in the
viewfinder and top
control panel.
2 Choose aperture and shutter speed.
Rotate the main command dial to choose a shutter speed, and
the sub-command dial to set aperture.
Shutter speed can be
set to “p” (the flash sync speed limit) or to values
between 30 s and
1
/8,000 s, or the shutter can be held open
indefinitely for a long time-exposure (A, pg. 122).
Aperture can be set to values between the minimum and
maximum values for the lens.
Check exposure in the
electronic analog exposure displays (see page 122), and
continue to adjust shutter speed and aperture until the
desired exposure is achieved.
I button
Main command dial
121
Z
Shutter speed and aperture can be locked at the selected
setting (see pages 123, 124).
3 Frame a photograph, focus, and shoot.
A AF Micro Nikkor Lenses
Provided that an external exposure meter is used, the exposure ratio need
only be taken into account when the lens aperture ring is used to set
aperture.
Sub-command
dial
Main command
dial
Setting
aperture
Setting
shutter
speed
SHOOT
CUSTOM
SHOOT
CUSTOM
Shutter speed:
1
/250 s
Aperture: f/8
122
Z
A Electronic Analog Exposure Displays
The electronic analog exposure displays in the viewfinder and top control
panel show whether the photograph would be under- or over-exposed at
current settings.
Depending on the option chosen for Custom Setting b2
([EV steps for exposure cntrl.], pg. 314), the amount of under- or over-
exposure is shown in increments of
1
/3 EV,
1
/2 EV, or 1 EV.
If the limits of
the exposure metering system are exceeded, the displays will flash.
A Long Time-Exposures
At a shutter speed of A, the shutter will
remain open while the shutter-release button
is held down.
Use for long time-exposure
photographs of moving lights, the stars, night
scenery, or fireworks.
Nikon recommends
using a fully-charged EN-EL4a battery or an
optional EH-6 AC adapter to prevent loss of
power while the shutter is open.
Note that
noise and distortion may be present in long
exposures; before shooting, choose [On] for
the [Long exp.
NR] option in the shooting
menu (pg. 300).
A See Also
See Custom Setting f10 ([Reverse indicators], pg. 345) for information on
reversing the electronic analog exposure display.
Custom Setting b2 set to [1/3 step]
Optimal exposure Underexposed by
1
/3 EV Overexposed by over 3 EV
Control panel
Viewfinder
Shutter speed: 35 s
Aperture: f/25
123
Z
Shutter-Speed and Aperture Lock
The F button can be used to lock shutter speed at the value
selected in shutter-priority auto or manual exposure mode, or to
lock aperture at the value selected in aperture-priority auto and
manual exposure modes.
Lock is not available in programmed
auto.
❚❚ Shutter-Speed Lock
To lock shutter speed at the selected value, press the F button and
rotate the main command dial until R icons appear in the
viewfinder and the top control panel.
To unlock shutter speed, press the F button
and rotate the main command dial until the
R icons disappear from the displays.
F button
Main command dial
SHOOT
CUSTOM
124
Z
❚❚ Aperture Lock
To lock aperture at the selected value, press the F button and
rotate the sub-command dial until R icons appear in the
viewfinder and the top control panel.
To unlock aperture, press the F button and
rotate the sub-command dial until the R
icons disappear from the displays.
F button
Sub-command dial
SHOOT
CUSTOM
125
Z
Autoexposure (AE) Lock
Use autoexposure lock to recompose photographs after metering
exposure.
1 Select center-weighted or
spot metering (pg. 110).
Matrix metering will not
produce the desired results
with autoexposure lock.
If
using center-weighted
metering, select the center
focus point with the multi
selector (pg. 78).
2 Lock exposure.
Position the subject in the selected
focus point and press the shutter-
release button halfway.
With the
shutter-release button pressed halfway
and the subject positioned in the focus
point, press the AE-L/AF-L button to lock
exposure (and focus, except in manual
focus mode).
Confirm that the in-focus
indicator (I) appears in the viewfinder.
While exposure lock is in effect, an AE-L
indicator will appear in the viewfinder.
Metering selector
w
q
Shutter-release
button
AE-L/AF-L button
126
Z
3 Recompose the
photograph.
Keeping the AE-L/AF-L button
pressed, recompose the
photograph and shoot.
127
Z
A Metered Area
In spot metering, exposure will be locked at the value metered in a 4-mm
(0.16 in.) circle centered on the selected focus point.
In center-weighted
metering, exposure will be locked at the value metered in the center of
the viewfinder (the default area for center-weighted metering is shown by
the 12-mm circle in the viewfinder).
A Adjusting Shutter Speed and Aperture
While exposure lock is in effect, the following settings can be changed
without altering the metered value for exposure:
The new values can be confirmed in the viewfinder and top control panel.
Note that the metering method can not be changed while exposure lock
is in effect (changes to metering take effect when the lock is released).
A See Also
If [On] is selected for Custom Setting c1 ([Shutter-release button AE-L], pg.
318), exposure will lock when the shutter-release button is pressed
halfway.
For information on changing the role of the AE-L/AF-L button, see
Custom Setting f6 ([Assign AE-L/AF-L button], pg. 340).
Exposure mode Settings
e Shutter speed and aperture (flexible program; pg. 115)
f Shutter speed
g Aperture
128
Z
Exposure Compensation
Exposure compensation is used to alter exposure from the value
suggested by the camera, making pictures brighter or darker.
In exposure mode h, only the exposure information shown in the
electronic analog exposure display is affected; shutter speed and
aperture do not change.
To choose a value for exposure compensation, press the E button
and rotate the main command dial until the desired value is
displayed in the viewfinder or top control panel.
E button
±0 EV
(E button pressed)
–0.3 EV +2.0 EV
Main command dial
129
Z
Exposure compensation can be set to values between –5 EV
(underexposure)
and +5 EV (overexposure) in increments of
1
/3 EV.
In general, choose positive values to make the subject
brighter, negative values to make it darker.
At values other than ±0, the 0 at the center of the electronic
analog exposure displays will flash and a E icon will be displayed
in the viewfinder and top control panel after you release the E
button.
The current value for exposure compensation can be
confirmed in the electronic analog exposure display by pressing
the E button.
Normal exposure can be restored by setting exposure
compensation to ±0.
Exposure compensation is not reset when
the camera is turned off.
A See Also
For information on choosing the size of the increments available for
exposure compensation, see Custom Setting b3 ([EV steps for exposure
comp.], pg. 314).
For information on making adjustments to exposure
compensation without pressing the E button, see Custom Setting b4
([Easy exposure compensation], pg. 315).
–1 EV No exposure
compensation
+1 EV
130
Z
Bracketing
The camera offers three types of bracketing: exposure bracketing,
flash bracketing, and white balance bracketing.
In exposure
bracketing (pg. 131), the camera varies exposure compensation
with each shot, while in the case of flash bracketing (pg. 131), flash
level is varied with each shot (i-TTL and, in the case of the SB-900
and SB-800, auto aperture flash control modes only; see pages 186
and 189).
Only one photograph is produced each time the shutter
is released, meaning that several shots are required to complete
the bracketing sequence.
Exposure and flash bracketing are
recommended in situations in which it is difficult to set exposure
and there is not enough time to check results and adjust settings
with each shot.
In white balance bracketing (pg. 135), the camera creates multiple
images each time the shutter is released, each with a different
white balance adjustment.
Only one shot is required to complete
the bracketing sequence.
White balance bracketing is
recommended when shooting under mixed lighting or
experimenting with different white balance settings.
A See Also
At default settings, the camera varies both exposure and flash level.
Custom Setting e4 ([Auto bracketing set], pg. 328) is used to choose the
type of bracketing performed.
131
Z
❚❚ Exposure and Flash Bracketing
1 Select flash or exposure bracketing.
Choose the type of bracketing to be
performed using Custom Setting e4
([Auto bracketing set], pg. 328).
Choose
[AE & flash] to vary both exposure and
flash level (the default setting), [AE only]
to vary only exposure, or [Flash only] to vary only flash level.
2 Choose the number of shots.
Pressing the BKT button, rotate the main command dial to
choose the number of shots in the bracketing sequence.
The
number of shots is shown in the top control panel.
At settings other than zero, a M icon and exposure and
flash bracketing indicator will be displayed in the
viewfinder and top control panel.
BKT button
Main command
dial
Top control panel
Number of shots
Exposure and flash
bracketing indicator
132
Z
3 Select an exposure increment.
Pressing the BKT button, rotate the sub-command dial to
choose the exposure increment.
At default settings, the size of the increment can be chosen
from
1
/3,
2
/3, and 1 EV.
The bracketing programs with an
increment of
1
/3 EV are listed below.
A See Also
For information on choosing the size of the exposure increment, see
Custom Setting b2 ([EV steps for exposure cntrl.], pg. 314).
For
information on choosing the order in which bracketing is performed, see
Custom Setting e6 ([Bracketing order], pg. 330).
Control panel display No. of shots Bracketing order (EVs)
00
3 +0.3/0/+0.7
3 –0.3/–0.7/0
20/+0.3
20/0.3
3 0/–0.3/+0.3
5 0/–0.7/–0.3/+0.3/+0.7
7
0/–1.0/–0.7/–0.3/+0.3/
+0.7/+1.0
9
0/–1.3/–1.0/–0.7/–0.3/
+0.3/+0.7/+1.0/+1.3
BKT button
Sub-command
dial
Top control panel
E
xposure
i
ncrement
133
Z
4 Frame a photograph, focus, and
shoot.
The camera will vary exposure and/or flash level shot-by-shot
according to the bracketing program selected.
Modifications
to exposure are added to those made with exposure
compensation (see page 128), making it possible to achieve
exposure compensation values of more than 5 EV.
While bracketing is in effect, a bracketing
progress indicator will be displayed in
the top control panel and viewfinder.
A
segment will disappear from the
indicator after each shot.
SHOOT
CUSTOM
SHOOT
CUSTOM
Exposure increment:
0 EV
Exposure increment:
–1 EV
Exposure increment:
+1 EV
134
Z
❚❚ Canceling Bracketing
To cancel bracketing, press the BKT button and rotate the main
command dial until the number of shots in the bracketing
sequence is zero (r) and M is no longer displayed in the control
panel on top of the camera.
The program last in effect will be
restored the next time bracketing is activated.
Bracketing can also
be cancelled by performing a two-button reset (pg. 204), although
in this case the bracketing program will not be restored the next
time bracketing is activated.
A Exposure and Flash Bracketing
In single frame and self-timer modes, one shot will be taken each time the
shutter-release button is pressed.
In continuous low speed and
continuous high speed modes, shooting will pause after the number of
shots specified in the bracketing program have been taken.
Shooting will
resume the next time the shutter-release button is pressed.
If the memory card fills before all shots in the sequence have been taken,
shooting can be resumed from the next shot in the sequence after the
memory card has been replaced or shots have been deleted to make
room on the memory card.
If the camera is turned off before all shots in
the sequence have been taken, bracketing will resume from the next shot
in the sequence when the camera is turned on.
A Exposure Bracketing
The camera modifies exposure by varying shutter speed and aperture
(programmed auto), aperture (shutter-priority auto), or shutter speed
(aperture-priority auto, manual exposure mode).
When [On] is selected
for [ISO sensitivity settings] > [ISO sensitivity auto control] in shooting
menu and no flash is attached, the camera will automatically vary ISO
sensitivity for optimum exposure when the limits of the camera exposure
system are exceeded.
Custom Setting e5 ([Auto bracketing (mode M)], pg. 329) can be used to
change how the camera performs exposure and flash bracketing in
manual exposure mode.
Bracketing can be performed by varying flash
level together with shutter speed and/or aperture, or by varying flash
level alone.
135
Z
❚❚ White Balance Bracketing
1 Select white balance bracketing.
Choose [WB bracketing] for Custom
Setting e4 [Auto bracketing set] (pg.
328).
2 Choose the number of shots.
Pressing the BKT button, rotate the main command dial to
choose the number of shots in the bracketing sequence.
The
number of shots is shown in the top control panel.
At settings other than zero, a WB
bracketing indicator will appear in the
top control panel and a W icon will
be displayed in the top and rear
control panels.
BKT button
Main command
dial
Top control panel
Number of shots
WB bracketing
indicator
136
Z
3 Select a white balance increment.
Pressing the BKT button, rotate the sub-command dial to
choose the white balance adjustment.
Each increment is
roughly equivalent to 5 mired.
Choose from increments of 1 (5 mired), 2 (10 mired), or 3
(15 mired).
Higher B values correspond to increased amounts
of blue, higher A values to increased amounts of amber (pg.
144).
The bracketing programs with an increment of 1 are
listed below.
A See Also
See page 145 for a definition of “mired.
Control panel display
No. of
shots
White balance
increment
Bracketing order (EVs)
01 0
31B 1B/0/2B
31A 1A/2A/0
21B 0/1B
21A 0/1A
3 1A, 1B 0/1A/1B
5 1A, 1B 0/2A/1A/1B/2B
71A, 1B
0/3A/2A/1A/
1B/2B/3B
91A, 1B
0/4A/3A/2A/1A/
1B/2B/3B/4B
BKT button
Sub-command
dial
Top control panel
White balance
increment
137
Z
4 Frame a photograph, focus, and
shoot.
Each shot will be processed to create the number of copies
specified in the bracketing program, and each copy will have a
different white balance.
Modifications to white balance are
added to the white balance adjustment made with white
balance fine-tuning.
If the number of shots in the
bracketing program is greater than
the number of exposures remaining,
frame count, and N icon will flash in
the top control panel, a flashing g
icon will appear in the viewfinder, and
the shutter release will be disabled.
Shooting can begin when
a new memory card is inserted.
SHOOT
CUSTOM
138
Z
❚❚ Canceling Bracketing
To cancel bracketing, press the BKT button and rotate the main
command dial until the number of shots in the bracketing
sequence is zero (r) and W are no longer displayed in the
control panels.
The program last in effect will be restored the next
time bracketing is activated.
Bracketing can also be cancelled by
performing a two-button reset (pg. 204), although in this case the
bracketing program will not be restored the next time bracketing
is activated.
A White Balance Bracketing
White balance bracketing is not available at an image quality of NEF
(RAW).
Selecting [NEF (RAW)], [NEF (RAW)+JPEG fine], [NEF (RAW)+JPEG
normal], or [NEF (RAW)+JPEG basic] cancels white balance bracketing.
White balance bracketing affects only color temperature (the amber-blue
axis in the white balance fine-tuning display, pg. 144).
No adjustments are
made on the green-magenta axis.
In self-timer mode (pg. 100), the number of copies specified in the white-
balance program will be created each time the shutter is released.
If the camera is turned off while the memory card access lamp is lit, the
camera will power off only after all photographs in the sequence have
been recorded.
r
139
r
White Balance
Keeping Colors True
The color of light reflected from an object varies with the color of
the light source.
The human brain is able to adapt to changes in
the color of the light source, with the result that white objects
appear white whether seen in the shade, direct sunlight, or under
incandescent lighting.
Unlike the film used in film cameras, digital
cameras can mimic this adjustment by processing images
according to the color of the light source.
This is known as “white
balance.
This chapter covers white balance settings.
White Balance Options................................................. pg. 140
Fine-Tuning White Balance.......................................... pg. 143
Choosing a Color Temperature................................... pg. 147
Preset Manual ................................................................ pg. 148
140
r
White Balance Options
For natural coloration, choose a white balance setting that
matches the light source before shooting.
The following options
are available:
Option
Color temp.
(K)
Description
v
Auto
(default)
3,500–
8,000
*
White balance is adjusted
automatically using color
temperature measured by image
sensor and 1,005-segment RGB
sensor.
For best results, use type G or
D lens.
If optional flash unit is used,
white balance reflects conditions in
effect when the flash goes off.
J Incandescent 3,000
*
Use under incandescent lighting.
I Fluorescent
Use under following seven light
sources:
Sodium-vapor lamps 2,700
*
Use under sodium-vapor lighting
(found in sports venues).
Warm-white
fluorescent
3,000
*
Use under warm-white fluorescent
lights.
White fluorescent 3,700
*
Use under white fluorescent lights.
Cool-white fluorescent 4,200
*
Use under cool-white fluorescent
lights.
Day white fluorescent 5,000
*
Use under daylight white fluorescent
lights.
Daylight fluorescent 6,500
*
Use under daylight fluorescent lights.
High temp. mercury-
vapor
7,200
*
Use under high color temperature
light sources (e.g. mercury-vapor
lamps).
H Direct sunlight 5,200
*
Use with subjects lit by direct
sunlight.
141
r
Auto white balance is recommended with most light sources.
If
the desired results can not be achieved with auto white balance,
choose an option from the list above or use preset white balance.
White balance can be selected by pressing the WB button and
rotating the main command dial until the desired setting is
displayed in the rear control panel.
A The White Balance Menu
White balance can also be adjusted using the [White balance] option in
the shooting menu (pg. 290).
A I (Fluorescent)
Selecting I (fluorescent) with the WB button and main command dial
selects the type of bulb chosen for the [Fluorescent] option in the white
balance menu (pg. 290).
N Flash 5,400
*
Use with optional flash units.
G Cloudy 6,000
*
Use in daylight under overcast skies.
M Shade 8,000
*
Use in daylight with subjects in the
shade.
K Choose color temp.
2,500–
10,000
Choose color temperature from list of
values (pg. 147).
L Preset manual
Use subject, light source, or existing
photograph as reference for white
balance (pg. 148).
* All values are approximate.
Fine-tuning set to 0.
Option
Color temp.
(K) Description
WB button
Main command
dial
Rear control panel
142
r
A Studio Flash Lighting
Auto white balance may not produce the desired results with large studio
flash units.
Choose a color temperature, use preset white balance, or set
white balance to [Flash] and use fine tuning to adjust white balance.
A Color Temperature
The perceived color of a light source varies with the viewer and other
conditions.
Color temperature is an objective measure of the color of a
light source, defined with reference to the temperature to which an object
would have to be heated to radiate light in the same wavelengths.
While
light sources with a color temperature in the neighborhood of 5,000–
5,500K appear white, light sources with a lower color temperature, such as
incandescent light bulbs, appear slightly yellow or red.
Light sources with
a higher color temperature appear tinged with blue.
A See Also
When [WB bracketing] is selected for Custom Setting e4 ([Auto bracketing
set], pg. 328), the camera will create several images each time the shutter
is released.
White balance will be varied with each image, “bracketing”
the value currently selected for white balance.
See page 130 for more
information.
143
r
Fine-Tuning White Balance
White balance can be “fine tuned” to compensate for variations in
the color of the light source or to introduce a deliberate color cast
into an image.
White balance is fine tuned using the [White
balance] option in the shooting menu or by pressing the WB
button and rotating the sub-command dial.
❚❚ The White Balance Menu
1 Select a white balance
option.
Select [White balance] in the
shooting menu (pg. 290), then
highlight a white balance
option and press 2.
If an option other than [Fluorescent],
[Choose color temp.], or [Preset manual] is selected, proceed
to Step 2.
If [Fluorescent] is selected, highlight a lighting type
and press 2.
If [Choose color temp.] is selected, highlight a
color temperature and press 2.
If [Preset manual] is selected,
choose a preset as described on page 157 before proceeding.
144
r
2 Fine tune white balance.
Use the multi selector to fine-
tune white balance.
White
balance can be fine tuned on
the amber (A)–blue (B) axis and
the green (G)–magenta (M)
axis.
The horizontal (amber-
blue) axis corresponds to color temperature, with each
increment equivalent to about 5 mired.
The vertical (green-
magenta) axis has the similar effects to the corresponding
color compensation (CC) filters.
3 Press J.
Press J to save settings and return to
the shooting menu.
If white balance
has been fine-tuned on the A-B axis, a
E icon will be displayed in the rear
control panel.
Coordinates Adjustment
Increase green
Increase magenta
Increase blue Increase amber
Green (G)
Magenta (M)
Blue (B)
Amber (A)
J button
145
r
A White Balance Fine Tuning
The colors on the fine-tuning axes are relative, not absolute. For example,
moving the cursor to B (blue) when a “warm” setting such as J
(incandescent) is selected for white balance will make photographs
slightly “colder” but will not actually make them blue.
A “Mired”
Any given change in color temperature produces a greater difference in
color at low color temperatures than it would at higher color
temperatures.
For example, a change of 1000 K produces a much greater
change in color at 3000 K than at 6000 K.
Mired, calculated by multiplying
the inverse of the color temperature by 10
6
, is a measure of color
temperature that takes such variation into account, and as such is the unit
used in color-temperature compensation filters.
E.g.:
4000 K–3000 K (a difference of 1000 K)=83 mired
7000 K–6000 K (a difference of 1000 K)=24 mired
146
r
❚❚ The WB Button
At settings other than K ([Choose color temp.]) and L ([Preset
manual]), the WB button can be used to fine-tune white balance on
the amber (A)–blue (B) axis (pg. 144; to fine-tune white balance
when K or L is selected, use the shooting menu as described on
page 143).
Six settings in both directions are available; each
increment is equivalent to about 5 mired (pg. 145).
Press the WB
button and rotate the sub-command dial until the desired value is
displayed in the rear control panel.
Rotating the sub-command
dial to the left increases the amount of amber (A).
Rotating the
sub-command dial to the right increases the amount of blue (B).
At settings other than 0, a E icon appears in the rear control
panel.
WB button
Sub-command dial
Rear control panel
147
r
Choosing a Color Temperature
When K ([Choose color temp.]) is selected for white balance, color
temperature can be selected by pressing the WB button and
rotating the sub-command dial.
The color temperature is
displayed in the rear control panel:
D Choose Color Temperature
Note that the desired results will not be obtained with flash or fluorescent
lighting.
Choose N ([Flash]) or I ([Fluorescent]) for these sources.
With
other light sources, take a test shot to determine if the selected value is
appropriate.
A The White Balance Menu
Color temperature can also be selected in the white balance menu.
Note
that the color temperature with the WB button and the sub-command dial
replaces the value selected in the white balance menu.
Rear control panel
WB button
Sub-command dial
148
r
Preset Manual
Preset manual is used to record and recall custom white balance
settings for shooting under mixed lighting or to compensate for
light sources with a strong color cast.
Two methods are available
for setting preset white balance:
Method Description
Direct
measurement
Neutral gray or white object is placed under
lighting that will be used in final photograph and
white balance is measured by camera (pg. 150).
Copy from existing
photograph
White balance is copied from photo on memory
card (pg. 155).
149
r
The camera can store up to five values for preset white balance in
presets d-0 through d-4.
A descriptive comment can be added to
any white balance preset (pg. 159).
A White Balance Presets
Changes to white balance presets apply to all shooting menu banks (pg.
291).
A confirmation dialog will be displayed if the user attempts to
change a white balance preset created in another shooting menu bank
(no warning is displayed for preset d-0).
d-0
Stores last value measured for white
balance (pg. 150).
This preset is
overwritten when a new value is
measured.
d-1–d-4
Store values copied from d-0 (pg. 154).
Store values copied
from images on
memory card (pg. 155).
150
r
❚❚ Measuring a Value for White Balance
1 Light a reference object.
Place a neutral gray or white object under the lighting that will
be used in the final photograph.
In studio settings, a standard
gray panel can be used as a reference object.
Note that
exposure is automatically increased by 1 EV when measuring
white balance; in exposure mode h, adjust exposure so that
the electronic analog exposure displays shows ±0 (pg. 122).
2 Set white balance to L ([Preset manual]).
Press the WB button and rotate the main command dial until
L is displayed in the rear control panel.
WB button Main command dial Rear control panel
151
r
3 Select direct measurement mode.
Release the WB button briefly and then
press the button until the L icon
starts to flash.
A flashing D will also
appear in the top control panel and
viewfinder.
At default settings, the
displays will flash for about six
seconds.
4 Measure white balance.
Before the indicators stop flashing, frame the
reference object so that it fills the viewfinder and
press the shutter-release button all the way down.
The camera
will measure a value for white balance and store it in preset
d-0.
No photograph will be recorded; white balance can be
measured accurately even when the camera is not in focus.
Rear control panel
Viewfinder
Top control panel
SHOOT
CUSTOM
152
r
5 Check the results.
If the camera was able to measure a
value for white balance, C will
flash in the control panels, while the
viewfinder will show a flashing a.
At
default settings, the displays will flash
for about six seconds.
If lighting is too dark or too bright, the
camera may be unable to measure
white balance.
A flashing ba will
appear in the control panels and
viewfinder (at default settings, the
displays will flash for about six
seconds).
Press the shutter-release
button halfway to return to Step 4 and
measure white balance again.
6 Select preset d-0.
If the new value for preset white balance will be used
immediately, select preset d-0 by pressing the WB button and
rotating the sub-command dial until d-0 is displayed in the
rear control panel.
Top control panel
Rear control panel
Viewfinder
Top control panel
Rear control panel
Viewfinder
153
r
D Direct Measurement Mode
If no operations are performed while the displays are flashing, direct
measurement mode will end in the time selected for Custom Setting c2
([Auto meter-off delay], pg. 318).
The default setting is six seconds.
A Preset d-0
The new value for white balance will be stored in
preset d-0, automatically replacing the previous
value for this preset (no confirmation dialog will
be displayed).
A thumbnail will be displayed in
the preset white balance list.
To use the new value for white balance, select preset d-0 (if no value has
been measured for white balance before d-0 is selected, white balance
will be set to a color temperature of 5,200 K, the same as [Direct sunlight]).
The new white balance value will remain in preset d-0 until white balance
is measured again.
By copying preset d-0 to one of the other presets
before measuring a new value for white balance, up to five white balance
values can be stored (pg. 154).
154
r
❚❚
Copying White Balance from d-0 to Presets d-1–d-4
Follow the steps below to copy a measured value for white
balance from d-0 to any of the other presets (d-1–d-4).
1 Select L ([Preset
manual]).
Highlight [Preset manual] in
the white balance menu (pg.
140) and press 2.
2 Select a destination.
Highlight the destination
preset (d-1 to d-4) and press
the center of the multi
selector.
3 Copy d-0 to the selected
preset.
Highlight [Copy d-0] and
press J.
If comment has
been created for d-0 (pg. 159),
the comment will be copied
to the comment for the selected preset.
155
r
❚❚ Copying White Balance from a Photograph (d-1–d-4 Only)
Follow the steps below to copy a value for white balance from a
photograph on the memory card to a selected preset (d-1–d-4
only).
Existing white balance values can not be copied to preset
d-0.
1 Select L ([Preset
manual]).
Highlight [Preset manual] in
the white balance menu (pg.
140) and press 2.
2 Select a destination.
Highlight the destination
preset (d-1 to d-4) and press
the center of the multi selector.
3 Choose [Select image].
Highlight [Select image] and
press 2.
156
r
4 Highlight a source image.
Highlight the source image.
To
view the highlighted image full
frame, press the N button.
If two memory cards are inserted, the
slot can be selected by holding the N
button and pressing 1.
The menu
shown at right will be displayed
(pg. 228); highlight the desired slot and
press J.
5 Copy white balance.
Press the center of the multi selector to
copy the white balance value for the
highlighted photograph to the selected preset.
If the
highlighted photograph has a comment (pg. 350), the
comment will be copied to the comment for the selected
preset.
A Choosing a White Balance Preset
Press 1 to highlight the current white balance
preset (d-0d-4) and press 2 to select another
preset.
157
r
❚❚ Selecting a White Balance Preset
To set white balance to a preset value:
1 Select L ([Preset
manual]).
Highlight [Preset manual] in
the white balance menu
(pg. 140) and press 2.
2 Select a preset.
Highlight the desired preset
and press the center of the
multi selector.
To select the
highlighted preset and display
fine tuning menu (pg. 143)
without completing the next step, press J instead of pressing
the center of the multi selector.
3 Select [Set].
Highlight [Set] and press 2.
Fine tuning menu for the
selected white balance preset
is displayed (pg. 143).
158
r
A Selecting a White Balance Preset: the WB Button
At a setting of L ([Preset manual]), presets can also be selected by
pressing the WB button and rotating the sub-command dial.
The current
preset is displayed in the rear control panel while the WB button is
pressed.
WB button
Sub-command dial
Rear control panel
159
r
❚❚ Entering a Comment
Follow the steps below to enter a descriptive comment of up to
thirty-six characters for a selected white balance preset.
1 Select L ([Preset
manual]).
Highlight [Preset manual] in
the white balance menu
(pg. 140) and press 2.
2 Select a preset.
Highlight the desired preset
and press the center of the
multi selector.
3 Select [Edit comment].
Highlight [Edit comment] and
press 2.
4 Edit the comment.
Edit the comment as described on page
292.
160
r
J
161
J
Image Enhancement
This chapter describes how to optimize sharpening, contrast,
brightness, saturation and hue using Picture Controls, how to
preserve detail in highlights and shadows using active D-lighting,
and how to choose a color space.
Picture Controls ............................................................. pg. 162
Creating Custom Picture Controls.......................................... pg. 170
Active D-Lighting .......................................................... pg. 181
Color Space..................................................................... pg. 183
162
J
Picture Controls
Nikon’s unique Picture Control system makes it possible to share
image processing settings among compatible devices and
software.
Select from the Picture Controls provided with the
camera to instantly adjust image processing settings, or make
independent adjustments to sharpening, contrast, brightness,
saturation, and hue.
These settings can be saved under new
names as custom Picture Controls to be recalled or edited at will.
Custom Picture Controls can also be saved to the memory card for
use in compatible software, and software-created Picture Controls
can be loaded into the camera.
Any given set of Picture Controls
will produce nearly the same results on all cameras that support
the Nikon Picture Control system.
163
J
❚❚ Using Picture Controls
Picture Controls can be used as described below.
Select Nikon Picture Controls (pg. 164): Select an existing Nikon
Picture Control.
Modify existing Picture Controls (pg. 166): Modify an existing Picture
Control to create a combination of sharpening, contrast,
brightness, saturation, and hue for a particular scene or effect.
Create custom Picture Controls (pg. 170): Store modified Picture
Controls under unique names and recall or edit them as desired.
Share custom Picture Controls (pg. 174): Custom Picture Controls
created with the camera can be saved to the memory card for
use in ViewNX (supplied) and other compatible software, or
software-created custom Picture Controls can be loaded into the
camera.
Manage custom Picture Controls (pg. 177): Rename or delete custom
Picture Controls.
A Nikon Picture Controls Versus Custom Picture Controls
The Picture Controls supplied by Nikon are referred to as Nikon Picture
Controls. In addition to the Nikon Picture Controls supplied with the
camera, optional Picture Controls are available for download from Nikon
websites.
Custom Picture Controls are created through modifications to
existing Nikon Picture Controls.
Both Nikon and custom Picture Controls
can be shared among compatible devices and software.
164
J
Selecting Nikon Picture Controls
The camera offers four preset Nikon Picture Controls.
Choose a
Picture Control according to the subject or type of scene.
❚❚ Choosing a Picture Control
1 Select [Set Picture Control].
In the shooting menu (pg. 290),
highlight [Set Picture Control]
and press 2.
2 Select a Picture Control.
Highlight the desired Picture
Control and press J.
Option Description
Q Standard
Standard processing for balanced results.
Recommended for most situations.
R Neutral
Minimal processing for natural results.
Choose for
photographs that will later be extensively
processed or retouched.
S Vivid
Pictures are enhanced for a vivid, photoprint effect.
Choose for photographs that emphasize primary
colors.
T Monochrome Take monochrome photographs.
165
J
A The Picture Control Grid
Pressing the N button in Step 2 displays a
Picture Control grid showing the contrast and
saturation for the selected Picture Control in
relation to the other Picture Controls (only
contrast is displayed when [Monochrome] is
selected).
To select a different Picture Control,
press 1 or 3, then press 2 to display Picture
Control options and press J.
A The Picture Control Indicator
The current Picture Control is shown in the
shooting information display when the R button
is pressed.
Picture Control
indicator
166
J
Modifying Existing Picture Controls
Existing Nikon or custom Picture Controls
can be modified to suit the scene or the
users creative intent.
Choose a balanced
combination of settings using [Quick adjust],
or make manual adjustments to individual
settings.
1 Select a Picture Control.
Highlight the desired Picture
Control in the [Set Picture
Control] menu (pg. 164) and
press 2.
2 Adjust settings.
Press 1 or 3 to highlight the
desired setting and press 4 or
2 to choose a value (pg. 167).
Repeat this step until all
settings have been adjusted, or
select [Quick adjust] (pg. 167) to choose a preset combination
of settings.
Default settings can be restored by pressing the O
button.
3 Press J.
A Modifications to Original Picture Controls
Picture Controls that have been modified from
default settings are indicated by an asterisk (“U”)
in the [Set Picture Control] menu.
167
J
❚❚ Picture Control Settings
Option Description
Quick adjust
Choose from options between [–2] and [+2] to reduce or
exaggerate the effect of the selected Picture Control
(note that this resets all manual adjustments).
For
example, choosing positive values for [Vivid] makes
pictures more vivid.
Not available with [Neutral],
[Monochrome], or custom Picture Controls.
Manual adjustments
(all Picture Controls)
Sharpening
Control the sharpness of outlines.
Select [A] to adjust
sharpening automatically according to the type of
scene, or choose from values between [0] (no
sharpening) and [9] (the higher the value, the greater
the sharpening).
Contrast
Select [A] to adjust contrast automatically according to
the type of scene, or choose from values between [–3]
and [+3] (choose lower values to prevent highlights in
portrait subjects from being “washed out” in direct
sunlight, higher values to preserve detail in misty
landscapes and other low-contrast subjects).
Brightness
Choose [–1] for reduced brightness, [+1] for enhanced
brightness.
Does not affect exposure.
Manual adjustments
(non-monochrome only)
Saturation
Control the vividness of colors.
Select [A] to adjust
saturation automatically according to the type of scene,
or choose from values between [–3] and [+3] (lower
values reduce saturation and higher values increase it).
Hue
Choose negative values (to a minimum of [–3]) to make
reds more purple, blues more green, and greens more
yellow, positive values (up to [+3]) to make reds more
orange, greens more blue, and blues more purple.
Manual adjustments
(monochrome only)
Filter
effects
Simulate the effect of color filters on monochrome
photographs.
Choose from [Off] (the default setting),
yellow, orange, red, and green (pg. 169).
Toning
Choose the tint used in monochrome photographs from
[B&W] (black-and-white, the default setting), [Sepia],
[Cyanotype] (blue-tinted monochrome), [Red], [Yellow],
[Green], [Blue Green], [Blue], [Purple Blue], and [Red
Purple] (pg. 169).
168
J
D Active D-Lighting
[Contrast] and [Brightness] can not be adjusted when Active D-Lighting
(pg. 181) is on.
Any manual adjustments currently in effect will be lost
when Active D-Lighting is turned on.
D “A” (Auto)
Results for auto contrast and saturation vary with
exposure and the position of the subject in the
frame.
Use a type G or D lens for best results.
The
icons for Picture Controls that use auto contrast
and saturation are displayed in green in the
Picture Control grid, and lines appear parallel to
the axes of the grid.
A The Picture Control Grid
Pressing the N button in Step 2 displays a
Picture Control grid showing the contrast and
saturation for the selected Picture Control in
relation to the other Picture Controls (only
contrast is displayed when [Monochrome] is
selected).
Release the N button to return to the
Picture Control menu.
A Previous Settings
The line under the value display in the Picture
Control setting menu indicates the previous value
for the setting.
Use this as a reference when
adjusting settings.
169
J
A Filter Effects (Monochrome Only)
The options in this menu simulate the effect of color filters on
monochrome photographs.
The following filter effects are available:
Note that the effects achieved with [Filter effects] are more pronounced
than those produced by physical glass filters.
A Toning (Monochrome Only)
Pressing 3 when [Toning] is selected displays
saturation options.
Press 4 or 2 to adjust
saturation.
Saturation control is not available
when [B&W] (black-and-white) is selected.
A Custom Picture Controls
The options available with custom Picture Controls are the same as those
on which the custom Picture Control was based.
Option Description
Y Yellow
Enhances contrast.
Can be used to tone down the brightness
of the sky in landscape photographs.
Orange produces more
contrast than yellow, red more contrast than orange.
O Orange
R Red
G Green Softens skin tones.
Can be used for portraits.
170
J
Creating Custom Picture Controls
The Nikon Picture Controls supplied with the camera can be
modified and saved as custom Picture Controls.
1 Select [Manage Picture
Control].
In the shooting menu (pg. 290),
highlight [Manage Picture
Control] and press 2.
2 Select [Save/edit].
Highlight [Save/edit] and press
2.
171
J
3 Select a Picture Control.
Highlight an existing Picture
Control and press 2, or press J
to proceed to step 5 to save a
copy of the highlighted Picture
Control without further
modification.
4 Edit the selected control.
See page 167 for more
information.
To abandon any
changes and start over from
default settings, press the O
button.
Press J when settings
are complete.
5 Select a destination.
Choose a destination for the
custom Picture Control (C-1
through C-9) and press 2.
172
J
6 Name the Picture
Control.
The text-entry dialog shown
at right will be displayed.
By
default, new Picture
Controls are named by adding a two-digit number (assigned
automatically) to the name of the existing Picture Control.
This name can be edited to create a new name as described
below.
To move the cursor in the name area, press the N
button and press 4 or 2.
To enter a new letter at
the current cursor position, use the multi selector to
highlight the desired character in the keyboard area
and press the center of the multi selector.
To delete the
character at the current cursor position, press the O button.
Custom Picture Control names can be up to 19 characters
long.
Any characters after the 19th will be deleted.
After entering the name, press J. The
new Picture Control will appear in the
Picture Control list.
Custom Picture Controls can be renamed
at any time using the [Rename] option in
the [Manage Picture Control] menu.
Keyboard
area
Name area
173
J
A Custom Picture Controls
Custom Picture Controls are not affected by [Reset shooting menu]
(pg. 293).
Custom Picture Controls do not have a [Quick adjust] option (pg. 167).
Custom Picture Controls based on [Monochrome] have [Filter effects] and
[Toning] options in place of [Saturation] and [Hue] controls.
A The Original Picture Control Icon
The Nikon Picture Control on which the custom
Picture Control is based is indicated by an icon
in the top right corner of the edit display.
Original Picture
Control icon
174
J
Sharing Custom Picture Controls
Custom Picture Controls created using the Picture Control Utility
available with ViewNX or optional software such as Capture NX 2
can be copied to a memory card and loaded into the camera, or
custom Picture Controls created with the camera can be copied to
the memory card to be used in compatible cameras and software.
❚❚ Copying Custom Picture Controls to the Camera
1 Select [Load/save].
In the [Manage Picture Control]
menu, highlight [Load/save]
and press 2.
2 Select [Copy to camera].
Highlight [Copy to camera] and
press 2.
3 Select a Picture Control.
Highlight a custom Picture
Control and either;
press 2 to view current
Picture Control settings, or
press J to proceed to Step 4.
175
J
4 Select a destination.
Choose a destination for the
custom Picture Control (C-1
through C-9) and press 2.
5 Name the Picture Control.
Name the Picture Control as described
on page 172.
The new Picture Control
will appear in the Picture Control list and
can be renamed at any time using the
[Rename] option in the [Manage Picture
Control] menu.
A Use Slot 1
Slot 1 is used when saving custom Picture Controls to a memory card or
copying custom Picture Controls to the camera.
Cards in slot 2 can not be
used.
176
J
❚❚ Saving Custom Picture Controls to the Memory Card
1 Select [Copy to card].
After displaying the [Load/
save] menu as described in
Step 1 on page 174, highlight
[Copy to card] and press 2.
2 Select a Picture Control.
Highlight a custom Picture
Control and press 2.
3 Choose a destination.
Choose a destination from slots
1 through 99 and press J to
save the selected Picture
Control to the memory card.
Any Picture Controls that may
already have been saved to the selected slot will be
overwritten.
A Saving Custom Picture Controls
Up to 99 custom Picture Controls can be stored on the memory card at
any one time.
The memory card can only be used to store user-created
custom Picture Controls.
The Nikon Picture Controls supplied with the
camera can not be copied to the memory card.
177
J
Managing Custom Picture Controls
Follow the steps below to rename or delete custom Picture
Controls.
❚❚ Renaming Custom Picture Controls
1 Select [Rename].
In the [Manage Picture Control]
menu, highlight [Rename] and
press 2.
2 Select a Picture Control.
Highlight a custom Picture
Control (C-1 through C-9) and
press 2.
3 Rename the Picture Control.
Rename the Picture Control as described
on page 172.
178
J
❚❚ Deleting Custom Picture Controls from the Camera
1 Select [Delete].
In the [Manage Picture Control]
menu, highlight [Delete] and
press 2.
2 Select a Picture Control.
Highlight a custom Picture
Control (C-1 through C-9) and
press 2.
3 Select [Yes].
Highlight [Yes] and press J to
delete the selected Picture
Control.
A Nikon Picture Controls
The Nikon Picture Controls supplied with the camera ([Standard],
[Neutral], [Vivid], and [Monochrome]) can not be renamed or deleted.
179
J
❚❚ Deleting Custom Picture Controls from the Memory Card
1 Select [Load/save].
In the [Manage Picture Control]
menu, highlight [Load/save]
and press 2.
2 Select [Delete from card].
Highlight [Delete from card]
and press 2.
180
J
3 Select a Picture Control.
Highlight a custom Picture
Control (slot1 through 99) and
either:
press 2 to view current
Picture Control settings, or
press J to display
confirmation dialog shown at
right.
4 Select [Yes].
Highlight [Yes] and press J to
delete the selected Picture
Control.
181
J
Active D-Lighting
Active D-Lighting preserves details in highlights and shadows,
creating photographs with natural contrast.
Use for high contrast
scenes, for example when photographing brightly lit outdoor
scenery through a door or window or taking pictures of shaded
subjects on a sunny day.
Active D-Lighting off Active D-Lighting:
Auto
Active D-Lighting off Active D-Lighting:
High
182
J
To use Active D-Lighting:
1 Select [Active D-Lighting].
In the shooting menu (pg. 290),
highlight [Active D-Lighting]
and press 2.
2 Choose an option.
Highlight an option and
press
J
. Choose [Auto] to let
the camera automatically select
[High], [Normal], or [Low]
according to shooting
conditions.
D Active D-Lighting
When Active D-Lighting is on, the capacity of the memory buffer drops
and additional time is required to record images (pg. 429).
Matrix
metering is recommended (pg. 110).
Although exposure is in fact reduced
to prevent loss of detail in highlights and shadows, highlights,
underexposed areas, and mid-tones are automatically adjusted to prevent
the resulting photograph from being underexposed.
The [Brightness] and
[Contrast] Picture Control settings (pg. 167) can not be adjusted while
Active D-Lighting is in effect.
Noise, distortion, or banding may be visible
at high ISO sensitivities.
In exposure mode h, an Active D-Lighting setting
of [Auto] is equivalent to [Normal].
D Active D-Lighting” versus “D-Lighting”
The [Active D-Lighting] option in the shooting menu adjusts exposure
before shooting to optimize the dynamic range, while the [D-Lighting]
option in the retouch menu optimizes dynamic range in images after
shooting.
183
J
Color Space
The color space determines the gamut of colors available for color
reproduction.
Choose a color space according to how
photographs will be processed on leaving the camera.
1 Select [Color space].
Highlight [Color space] in the
shooting menu (pg. 290) and
press 2.
2 Select a color space.
Highlight the desired option
and press J.
Option Description
W sRGB (default)
Choose for photographs that will be printed or
used “as is, with no further modification.
X Adobe RGB
This color space is capable of expressing a wider
gamut of colors than sRGB, making it the preferred
choice for images that will be extensively
processed or retouched.
184
J
A Color Space
Color spaces define the correspondence between colors and the numeric
values that represent them in a digital image file.
The sRGB color space is
widely used, while the Adobe RGB color space is typically used in
publishing and commercial printing.
sRGB is recommended when taking
photographs that will be printed without modification or viewed in
applications that do not support color management, or when taking
photographs that will be printed with ExifPrint, the direct printing option
on some household printers, or kiosk printing or other commercial print
services.
Adobe RGB photographs can also be printed using these
options, but colors will not be as vivid.
JPEG photographs taken in the Adobe RGB color space are Exif 2.21 and
DCF 2.0 compliant; applications and printers that support Exif 2.21 and
DCF 2.0 will select the correct color space automatically.
If the application
or device does not support Exif 2.21 and DCF 2.0, select the appropriate
color space manually.
An ICC color profile is embedded in TIFF
photographs taken in the Adobe RGB color space, allowing applications
that support color management to automatically select the correct color
space.
For more information, see the documentation provided with the
application or device.
A Nikon Software
The following Nikon software automatically selects the correct color space
when opening photographs created with the D3X: ViewNX (supplied) and
Capture NX 2 (available separately).
l
185
l
Flash Photography
Using Optional Flash Units
This chapter describes how to use the camera with optional flash
units that support the Nikon Creative Lighting System (CLS).
The Nikon Creative Lighting System (CLS) ............... pg. 186
Compatible Flash Units ................................................ pg. 187
CLS-Compatible Flash Units ..................................................... pg. 187
Other Flash Units .......................................................................... pg. 191
i-TTL Flash Control......................................................... pg. 193
Flash Modes.................................................................... pg. 194
FV Lock ............................................................................ pg. 198
Flash Contacts................................................................ pg. 201
186
l
The Nikon Creative Lighting
System (CLS)
Nikon’s advanced Creative Lighting System (CLS) offers improved
communication between the camera and compatible flash units
for improved flash photography. The Creative Lighting System
supports the following features:
i-TTL flash control: Improved through-the-lens (TTL) flash control
for use with CLS (see page 193). Flash level is set using monitor
pre-flashes to measure the light reflected by the subject,
ensuring that the level is adjusted appropriately for ambient
lighting.
Advanced Wireless Lighting: Allows i-TTL flash control with remote
wireless flash units.
FV lock (pg. 198): Locks flash level at the metered value, allowing a
series of photographs to be taken at the same flash level.
Auto FP High-Speed Sync (pg. 197): Allows the flash to be used at the
highest shutter speed supported by the camera, making it
possible to choose the maximum aperture for reduced depth of
field.
The CLS-compatible D3X can be used for flash photography when
an optional Speedlight is mounted on the cameras accessory
shoe.
A flash can be used not only when natural lighting is
inadequate, but also to fill in shadows, illuminate back-lit subjects,
and even to add a catch light to the eyes of a portrait subject.
See
the Speedlight manual for details.
187
l
Compatible Flash Units
CLS-Compatible Flash Units
The D3X can be used with the following CLS-compatible flash
units: the SB-900, SB-800, SB-600, SB-400, SB-R200, and SU-800.
❚❚ The SB-900, SB-800, SB-600, SB-400, and SB-R200
The principal features of these flash units are listed below.
❚❚ SU-800 Wireless Speedlight Commander
When mounted on a CLS-compatible camera, the SU-800 can be
used as a commander for remote SB-900, SB-800, SB-600, or
SB-R200 flash units.
The SU-800 itself is not equipped with a flash.
Flash unit
SB-900
1
SB-800 SB-600 SB-400 SB-R200
2
Feature
Guide No.
3
34/111 38/125 30/98 21/69 10/33
Auto power zoom
(mm)
17–200 24–105 24–85
4
5
Wide panel (mm) 12, 14, 17 14, 17 14
Head rotation
down,
90 ° up,
180 ° left,
and right
down,
90 ° up,
180 ° left,
90 ° right
90 ° up,
180 ° left,
90 ° right
90 ° up
60 ° down
(toward lens
light axis),
45 ° up
(away from
light axis)
1 If a color filter is attached to the SB-900 when v or N (flash) is selected for
white balance, the camera will automatically detect the filter and adjust
white balance appropriately.
2 Controlled remotely using optional SB-900 or SB-800 flash unit or SU-800
wireless Speedlight commander.
3 ISO 100, m/ft., 20 °C (68 °F), SB-900, SB-800, and SB-600 at 35 mm zoom
head position; SB-900 with standard illumination.
4 27 mm zoom coverage.
5 24 mm zoom coverage.
188
l
A Guide Number
To calculate the range of the flash at full power, divide the Guide Number
by the aperture.
For example, at ISO 100 the SB-800 has a Guide Number
of 38 m or 125 ft.; its range at an aperture of f/5.6 is 38÷5.6 or about 6.8
meters (or in feet, 125÷5.6=23 ft. 7 in.).
For each twofold increase in ISO
sensitivity, multiply the Guide Number by the square root of two
(approximately 1.4).
189
l
The following features are available with the SB-900, SB-800, SB-
600, SB-400, SB-R200, and SU-800:
1 Only available when SU-800 is used to control other flash units.
2 Standard i-TTL flash for digital SLR is used with spot metering or when selected
with flash unit.
3 Standard i-TTL flash for digital SLR is used with spot metering.
4 Selected with flash unit.
Non-TTL auto (A) selected automatically if non-CPU lens
is attached without specifying lens data using [Non-CPU lens data].
5Auto aperture (AA) is used regardless of mode selected with flash unit.
Non-TTL
auto (A) selected automatically if non-CPU lens is attached without specifying
lens data using [Non-CPU lens data].
6 Selected with flash unit.
7 Select [1/250 s (Auto FP)] for Custom Setting e1 ([Flash sync speed], pg. 326).
8CPU lens required.
Flash unit
SB-900
SB-800
SB-600 SB-400
Advanced Wireless Lighting
Commander Remote
Flash mode/feature
SB-900
SB-800
SU-800
1
SB-900
SB-800
SB-600
SB-R200
i-TTL
i-TTL balanced fill-flash
for digital SLR
2
2
3
✔✔✔
AA Auto aperture
4
——
5
5
5
——
A Non-TTL auto
6
——
5
5
——
GN Range-priority manual ——— ———
M Manual ✔✔ ✔✔✔
RPT Repeating flash ——✔✔
Auto FP High-Speed Sync
7
✔✔ ✔✔✔
FV lock ✔✔✔✔ ✔✔✔
AF-assist for multi-area AF
8
✔✔ ✔✔———
Flash Color Information
Communication
✔✔✔✔——
REAR Rear-curtain sync ✔✔✔✔ ✔✔✔
Y Red-eye reduction ✔✔✔✔——
Auto zoom ✔✔ ——
190
l
A The WG-AS1 Water Guard
The optional WG-AS1 is a water guard that covers the base of SB-900 flash
units mounted on the D3X, increasing the SB-900’s splash resistance by
protecting the accessory shoe contacts from rain and spray.
A Modeling Illumination
CLS-compatible Speedlights such as the SB-900, SB-800, and SB-600 emit
a modeling flash when the camera depth-of-field preview button is
pressed.
This feature can be used with Advanced Wireless Lighting to
preview the total lighting effect achieved with multiple flash units.
Modeling illumination can be turned off using Custom Setting e3
[Modeling flash] (pg. 327).
191
l
Other Flash Units
The following flash units can be used in non-TTL auto and manual
modes. If they are set to TTL, the camera shutter-release button
will lock and no photographs can be taken.
D Notes on Optional Speedlights
Refer to the Speedlight manual for detailed instructions. If the Speedlight
supports the Nikon Creative Lighting System, refer to the section on CLS-
compatible digital SLR cameras. The D3X is not included in the “digital
SLR” category in the SB-80DX, SB-28DX, and SB-50DX manuals.
i-TTL flash control can be used at ISO sensitivities between 100 and 1600.
At values over 1600, the desired results may not be achieved at some
ranges or aperture settings. If the flash-ready indicator blinks for about
three seconds after a photograph is taken, the flash has fired at full power
and the photograph may be underexposed.
Speedlight SB-80DX,
SB-28DX,
SB-28, SB-26,
SB-25, SB-24
SB-50DX
SB-30, SB-27
1
,
SB-22s, SB-22,
SB-20,
SB-16B, SB-15
SB-23, SB-29
2
,
SB-21B
2
,
SB-29s
2
Flash mode
A Non-TTL auto
M Manual ✔✔✔✔
G Repeating flash ———
REAR Rear-curtain sync ✔✔✔✔
1 Flash mode is automatically set to TTL and shutter-release is disabled. Set flash
unit to A (non-TTL auto flash).
2 Autofocus is only available with AF-Micro lenses (60 mm, 105 mm, or 200 mm).
192
l
The SB-900, SB-800, SB-600, and SB-400 provide red-eye reduction in red-
eye reduction and slow sync with red-eye reduction modes, while the
SB-900, SB-800, SB-600, and SU-800 provide AF-assist illumination when
the conditions for AF-assist illumination are met.
When used with AF
lenses with focal lengths of 17–135 mm, the SB-900 provides AF-assist
illumination (active AF-assist illumination) for all focus points; note,
however, that autofocus is available only with the following focus points:
When used with AF lenses with focal lengths of 24–105 mm, the SB-800,
SB-600, and SU-800 provide AF-assist illumination to assist autofocus for
the following focus points:
In programmed auto, the maximum aperture (minimum f-number) is
limited according to sensitivity (ISO equivalency), as shown below:
For each one-step increase in sensitivity (e.g., from 200 to 400), aperture is
stopped down by half an f-stop. If the maximum aperture of the lens is
smaller than given above, the maximum value for aperture will be the
maximum aperture of the lens.
When an SC-series 17, 28, or 29 sync cable is used for off-camera flash
photography, correct exposure may not be achieved in i-TTL mode. We
recommend that you choose spot metering to select standard i-TTL flash
control. Take a test shot and view the results in the monitor.
In i-TTL, use the flash panel or bounce adapter provided with the flash
unit. Do not use other panels such as diffusion panels, as this may
produce incorrect exposure.
17–19 mm 20–105 mm 106–135mm
24–34 mm 35–49 mm 50–105mm
Maximum aperture at ISO equivalent of:
100 200 400 800 1600
4 4.8 5.6 6.7 8
193
l
i-TTL Flash Control
When a CLS-compatible flash unit is set to TTL, the camera
automatically selects one of the following types of flash control:
i-TTL balanced fill-flash for digital SLR: Flash unit emits series of nearly invisible
preflashes (monitor preflashes) immediately before main flash.
Preflashes reflected from objects in all areas of frame are picked up by
1,005-segment RGB sensor and are analyzed in combination with range
information from matrix metering system to adjust flash output for
natural balance between main subject and ambient background
lighting.
If type G or D lens is used, distance information is included
when calculating flash output.
Precision of calculation can be increased
for non-CPU lenses by providing lens data (focal length and maximum
aperture; see pg. 218).
Not available when spot metering is used.
Standard i-TTL flash for digital SLR: Flash output adjusted to bring lighting in
frame to standard level; brightness of background is not taken into
account.
Recommended for shots in which main subject is emphasized
at expense of background details, or when exposure compensation is
used.
Standard i-TTL flash for digital SLR is activated automatically when
spot metering is selected.
194
l
Flash Modes
The camera supports the following flash modes:
Flash mode Description
Front-curtain
sync
This mode is recommended for most situations.
In
programmed auto and aperture-priority auto modes,
shutter speed will automatically be set to values
between
1
/250 and
1
/60 s (
1
/8,000 to
1
/60 s with Auto FP
High-Speed Sync).
Slow sync
Flash is combined with shutter speeds as slow as 30 s to
capture both subject and background at night or under
dim light.
This mode is only available in exposure modes
e and g.
Tripod is recommended to prevent blurring
caused by camera shake.
Rear-curtain
sync
In exposure modes f and h, flash fires just before the
shutter closes.
Use to create effect of a stream of light
behind moving objects.
In exposure modes e and g,
slow rear-curtain sync is used to capture both subject
and background.
Tripod is recommended to prevent
blurring caused by camera shake.
Red-eye
reduction
In this mode (available only with SB-900, SB-800, SB-600,
and SB-400), red-eye reduction pre-flash lights for
approximately one second before main flash. Pupils in
subjects eyes to contract, reducing “red-eye” effect
sometimes caused by flash.
Owing to one-second
shutter-release delay, this mode is not recommended
with moving subjects or in other situations in which
quick shutter response is required.
Avoid moving
camera while red-eye reduction pre-flash is lit.
195
l
Red-eye
reduction with
slow sync
Combines red-eye reduction with slow sync.
Use for
portraits taken against a backdrop of night scenery.
Available only with SB-900, SB-800, SB-600, and SB-400
in exposure modes e and g.
Tripod is recommended to
prevent blurring caused by camera shake.
Flash mode Description
196
l
❚❚ Choosing a Flash Mode
To choose the flash mode, press
the M button and rotate the main
command dial until the desired
flash mode is selected in the top
control panel:
1 Available only in exposure modes e and g.
In modes f and h, front-
curtain sync is selected when M button is released.
2 In exposure modes e and g, flash-sync mode will be set to slow
rear-curtain sync when the M button is released.
3 Y icon blinks if flash unit does not support red-eye reduction.
4 Red-eye reduction with slow sync is available only in exposure
modes e and g.
In modes f and h, red-eye reduction is selected when
the M button is released.
M button
Main-command
dial
Front-curtain sync Slow sync
1
Rear-curtain sync
2
Red-eye reduction with
slow sync
3, 4
Red-eye reduction
3
197
l
A Studio Flash Systems
Rear-curtain sync can not be used with studio flash systems, as the correct
synchronization can not be obtained.
A Shutter Speed and Aperture
Shutter speed and aperture can be set as follows when a Speedlight is
used:
A See Also
For information on choosing a flash sync speed, see Custom Setting e1
([Flash sync speed], pg.
326).
For information on choosing the slowest
shutter speed available when using the flash, see Custom Setting e2
([Flash shutter speed], pg.
327).
Mode Shutter speed Aperture See page
e
Set automatically by camera
(
1
/250 s–
1
/60 s)
1, 2
Set automatically
by camera
114
f
Value selected by user
(
1
/250 s–30 s)
2
116
g
Set automatically by camera
(
1
/250 s–
1
/60 s)
1, 2
Value selected
by user
3
118
h
Value selected by user
(
1
/250 s–30 s)
2
120
1 Shutter speed may be set as slow as 30s in slow sync, slow rear-curtain
sync, and slow sync with red-eye reduction flash modes.
2 Speeds as fast as
1
/8,000 s are available with optional SB-900, SB-800, and
SB-600 flash units when [1/250 s (Auto FP)] is selected for Custom Setting
e1 ([Flash sync speed], pg. 326).
3 Flash range varies with aperture and ISO sensitivity.
When setting aperture
in exposure modes g and h, consult the table of flash ranges provided with
optional Speedlight.
198
l
FV Lock
This feature is used to lock flash output, allowing photographs to
be recomposed without changing the flash level and ensuring that
flash output is appropriate to the subject even when the subject is
not positioned in the center of the frame.
Flash output is adjusted
automatically for any changes in ISO sensitivity and aperture. FV
lock is available with CLS compatible flash units only.
To use FV lock:
1 Assign FV lock to the Fn button.
Select [FV lock] for Custom Setting f4
([Assign FUNC. button] > [FUNC.
button
press], pg. 333).
2 Attach a CLS-compatible flash unit.
Mount an SB-900, SB-800, SB-600, SB-400, or SU-800 on the
camera accessory shoe.
3 Set the flash unit to TTL or AA mode.
Turn the flash unit on and set the flash mode to TTL or AA.
See
the Speedlight instruction manual for details.
199
l
4 Focus.
Position the subject in the
center of the frame and press
the shutter-release button
halfway to focus.
5 Lock flash level.
After confirming that the flash ready
indicator (M) is displayed in the
viewfinder, press the Fn button.
The
flash will emit a monitor preflash to
determine the appropriate flash level.
Flash output will be locked at this level
and FV lock icons (P and e) will
appear in the top control panel and
viewfinder.
6 Recompose the photograph.
7 Take the photograph.
Press the shutter-release button the rest of the way down to
shoot.
If desired, additional pictures can be taken without
releasing FV lock.
Fn button
SHOOT
CUSTOM
200
l
8 Release FV lock.
Press the Fn button to release FV lock.
Confirm that the FV lock
icons (P and e) are no longer displayed in the top control
panel and viewfinder.
A Metering
The metering areas for FV lock are as follows:
A See Also
For information on using the depth-of-field preview or AE-L/AF-L button for
FV lock, see Custom Setting f5 ([Assign preview button], pg. 339) or
Custom Setting f6 ([Assign AE-L/AF-L button], pg. 340).
Speedlight Flash mode Metered area
Stand-alone flash unit
i-TTL 5-mm circle in center of frame
AA
Area metered by flash exposure
meter
Used with other flash
units (Advanced
Wireless Lighting)
i-TTL Entire frame
AA
Area metered by flash exposure
meter
A (master
flash)
201
l
Flash Contacts
The camera is equipped with an accessory shoe for attaching
optional flash units directly to the camera and a sync terminal that
allows flash units to be connected via a sync cable.
When an
optional flash unit is attached, the flash will fire whenever the
shutter is released.
❚❚ The Accessory Shoe
Use the accessory shoe to mount optional
flash units directly on the camera without a
sync cable (pg. 187).
The accessory shoe is
equipped with a safety lock for Speedlights
with a locking pin, such as the SB-900, SB-800,
SB-600, and SB-400.
❚❚ The Sync Terminal
A sync cable can be connected to the sync
terminal as required.
Do not connect
another flash unit via a sync cable when
performing rear-curtain sync flash
photography with a flash unit mounted on
the camera accessory shoe.
D Use Only Nikon Flash Accessories
Use only Nikon Speedlights. Negative voltages or voltages over 250 V
applied to the accessory shoe could not only prevent normal operation,
but damage the sync circuitry of the camera or flash. Before using a Nikon
Speedlight not listed in this section, contact a Nikon-authorized service
representative for more information.
202
l
t
203
t
Other Shooting Options
This chapter covers restoring default settings, making multiple
exposures, interval timer photography, and using GPS units and
non-CPU lenses.
Two-Button Reset: Restoring Default Settings........ pg. 204
Multiple Exposure ......................................................... pg. 206
Interval Timer Photography........................................ pg. 211
Non-CPU Lenses ............................................................ pg. 218
Using a GPS Unit............................................................ pg. 221
204
t
Two-Button Reset: Restoring
Default Settings
The camera settings listed below can be
restored to default values by holding the ISO
and WB buttons down together for more
than two seconds (these buttons are
marked by a green dot). The control panels
turn off briefly while settings are reset.
1 Custom Setting f6 ([Assign AE-L/AF-L button], pg. 340) is unaffected.
2 Number of shots is reset to zero.
Bracketing increment is reset to 1EV
(exposure/flash bracketing) or 1 (white balance bracketing).
ISO
button
WB
button
Option Default
Focus point Center
Exposure mode
Programmed
auto
Flexible program
Off
Exposure
compensation
Off
AE hold Off
1
Aperture lock Off
Shutter-speed
lock
Off
Bracketing Off
2
Flash mode
Front-curtain
sync
FV lock Off
Multiple
exposure
Off
Option Default
205
t
The following shooting-menu options will also be reset.
Only
settings in the bank currently selected using the [Shooting menu
bank] option will be reset (pg. 291). Settings in the remaining
banks are unaffected.
If the current Picture Control has been modified, existing settings
for the Picture Control will also be restored.
A See Also
See page 422 for a list of default settings.
Option Default
Image quality JPEG Normal
Image size Large
White balance Auto
*
ISO sensitivity 100
* Fine-tuning off.
Option Default
206
t
Multiple Exposure
Follow the steps below to record a series of two to ten exposures
in a single photograph. Multiple exposures can be recorded at any
image quality setting, and produce results with colors noticeably
better than photographs combined in an imaging application
because they make use of RAW data from the camera image
sensor.
❚❚ Creating a Multiple Exposure
Note that at default settings, shooting will end and a multiple
exposure will be recorded automatically if no operations are
performed for 30 s.
1 Select [Multiple exposure].
Highlight [Multiple exposure]
in the shooting menu (pg. 290)
and press 2.
2 Select [Number of shots].
Highlight [Number of shots]
and press 2.
A Extended Recording Times
For an interval between exposures of more than 30 s, select [On] for the
[Image review] (pg. 287) option in the playback menu and extend the
monitor-off delay using Custom Setting c4 ([Monitor off delay], pg. 319).
The maximum interval between exposures is 30 s longer than the option
selected for Custom Setting c4.
207
t
3 Select the number of shots.
Press 1 or 3 to choose the
number of exposures that will
be combined to form a single
photograph and press J.
4 Select [Auto gain].
Highlight [Auto gain] and press
2.
5 Set gain.
Highlight one of the following
options and press J.
Option Description
On
(default)
Gain adjusted according to number of exposures actually
recorded (gain for each exposure is set to
1
/2 for 2
exposures,
1
/3 for 3 exposures, etc.).
Off
Gain is not adjusted when recording multiple exposure.
Recommended if background is dark.
208
t
6 Select [Done].
Highlight [Done] and press J.
A n icon will be displayed in
the top control panel. To exit
without taking a multiple
exposure, select [Multiple
exposure] > [Reset] in the
shooting menu.
7 Frame a photograph,
focus, and shoot.
In continuous high-speed and continuous low-
speed release modes (pg. 86), the camera will
record all exposures in a single burst. In single-frame release
mode, one photograph will be taken each time the shutter-
release button is pressed; continue shooting until all
exposures have been recorded (for information on
interrupting a multiple exposure before all photographs are
recorded, see page 210).
The n icon will blink until shooting
ends. When shooting ends, multiple
exposure mode will end and the n
icon will no longer be displayed.
Repeat steps 1–7 to take additional
multiple exposures.
SHOOT
CUSTOM
SHOOT
CUSTOM
209
t
D Multiple Exposure
Do not remove or replace the memory card while recording a multiple
exposure.
Live view (pg. 90) can not be used to record multiple exposures.
The information listed in the playback photo information display
(including date of recording and camera orientation) is for the first shot in
the multiple exposure.
If no operations are performed for 30 s after the monitor has turned off
during playback or menu operations, shooting will end and a multiple
exposure will be created from the exposures that have been recorded to
that point.
A Voice Memos
The camera stores only the last voice memo created during a multiple
exposure.
A Interval Timer Photography
If interval timer photography is activated before the first exposure is
taken, the camera will record exposures at the selected interval until the
number of exposures specified in the multiple exposure menu have been
taken (the number of shots listed in the interval timer shooting menu is
ignored). These exposures will then be recorded as a single photograph
and multiple exposure mode and interval timer shooting will end.
Cancelling multiple exposure cancels interval timer shooting.
A Other Settings
While multiple exposure mode is in effect, memory cards can not be
formatted and the following can not be changed: image area, bracketing,
and shooting menu options other than [White balance] and [Interval
timer shooting] (note that [Interval timer shooting] can only be adjusted
before the first exposure is taken). The [Lock mirror up for cleaning] and
[Dust off ref photo] options in the setup menu can not be used.
210
t
❚❚ Interrupting Multiple Exposures
Selecting [Multiple exposure] in the
shooting menu while a multiple exposure is
being recorded displays the options shown
at right. To interrupt a multiple exposure
before the specified number of exposures
have been taken, highlight [Cancel] and
press J. If shooting ends before the
specified number of exposures have been taken, a multiple
exposure will be created from the exposures that have been
recorded to that point. If [Auto gain] is on, gain will be adjusted to
reflect the number of exposures actually recorded. Note that
shooting will end automatically if:
A two-button reset is performed (pg. 204)
The camera is turned off
The battery is exhausted
Pictures are deleted
211
t
Interval Timer Photography
The camera is equipped to take photographs automatically at
preset intervals.
1 Select [Interval timer
shooting].
Highlight [Interval timer
shooting] in the shooting
menu (pg. 290) and press 2.
2 Select a starting trigger.
Highlight one of the
following [Choose start time]
options and press 2.
[Now]: Shooting begins
about 3 s after settings are
completed (proceed to Step 4).
[Start time]: Choose a start time (see Step 3).
D Before Shooting
Choose single-frame (S), continuous low speed (C
L), or continuous high
speed (C
H) release mode when using the interval timer.
Before beginning
interval timer photography, take a test shot at current settings and view
the results in the monitor. Remember that the camera will focus before
each shot—no shots will be taken if the camera is unable to focus in
single-servo AF.
Before choosing a starting time, select [World time] in the setup menu
and make sure that the camera clock is set to the correct time and date
(pg. 40).
Use of a tripod is recommended. Mount the camera on a tripod before
shooting begins.
To ensure that shooting is not interrupted, be sure the battery is fully
charged.
212
t
3 Choose a start time.
Press 4 or 2 to highlight
hours or minutes; press 1 or
3 to change. The starting
time is not displayed if [Now]
is selected for [Choose start
time].
4 Choose an interval.
Press 4 or 2 to highlight
hours, minutes, or seconds;
press 1 or 3 to change.
Note that the camera will not
be able to take photographs
at the specified interval if it is shorter than the shutter speed
or the time required to record images.
5 Choose the number of
intervals and number of
shots per interval.
Press 4 or 2 to highlight
number of intervals or
number of shots; press 1 or
3 to change. The total
number of shots that will be
taken is displayed to the right.
N
umber of
i
ntervals
Number
of shots/
interval
Total
number of
shots
213
t
6 Start shooting.
Highlight [Start] > [On] and
press J (to return to the
shooting menu without
starting the interval timer,
highlight [Start] > [Off] and
press J).
The first series of shots will be taken at the specified
starting time.
Shooting will continue at the selected interval
until all shots have been taken.
A message will be displayed in the monitor one minute before
each series of shots is taken.
If shooting can not proceed at
current settings (for example, if a shutter speed of A is
currently selected in manual exposure mode or the start time
is in less than a minute), a warning will be displayed in the
monitor.
A The Viewfinder Eyepiece
In exposure modes other than manual, close the
viewfinder eyepiece shutter to prevent light
entering via the viewfinder from interfering with
exposure.
214
t
D Out of Memory
If the memory card is full, the interval timer will remain active but no
pictures will be taken. Resume shooting (pg. 215) after deleting some
pictures or turning the camera off and inserting another memory card.
D Bracketing
Adjust bracketing settings before starting interval timer photography. If
exposure and/or flash bracketing is active while interval timer
photography is in effect, the camera will take the number of shots in the
bracketing program at each interval, regardless of the number of shots
specified in the interval timer menu. If white balance bracketing is active
while interval timer photography is in effect, the camera will take one shot
at each interval and process it to create the number of copies specified in
the bracketing program.
A During Shooting
During interval timer photography, the Q
icon in the top control panel will blink.
Immediately before the next shooting interval
begins, the shutter speed display will show the
number of intervals remaining, and the aperture
display will show the number of shots remaining in the current interval.
At other times, the number of intervals remaining and the number of
shots in each interval can be viewed by pressing the shutter-release
button halfway (once the button is released, the shutter speed and
aperture will be displayed until the exposure meters turn off).
To view current interval timer settings, select
[Interval timer shooting] between shots. While
interval timer photography is in progress, the
interval timer menu will show the starting time,
the shooting interval, and the number of
intervals and shots remaining. None of these
items can be changed while interval timer
photography is in progress.
SHOOT
CUSTOM
215
t
❚❚ Pausing Interval Timer Photography
Interval time photography can be paused by:
Pressing the J button between intervals
Highlighting [Start] > [Pause] in the interval timer menu and
pressing J
Turning the camera off and then on again (if desired, the
memory card can be replaced while the camera is off)
Selecting live view (a), self-timer (E), or mirror-up (M
UP) release
modes
To resume shooting:
1 Choose a new starting
trigger.
Choose a new starting trigger
and start time as described
on page 211.
2 Resume shooting.
Highlight [Start] > [Restart]
and press J. Note that if
interval timer photography
was paused during shooting,
any shots remaining in the
current interval will be canceled.
216
t
❚❚ Interrupting Interval Timer Photography
Interval timer shooting will end automatically if the battery is
exhausted. Interval timer photography can also be ended by:
Selecting [Start] > [Off] in the interval timer menu
Performing a two button reset (pg. 204)
Selecting [Reset shooting menu] in the shooting menu (pg. 293)
Changing bracketing settings (pg. 130)
Normal shooting will resume when interval timer photography
ends.
❚❚ No Photograph
Photographs will not be taken if the previous photograph is yet to
be taken, the memory buffer or memory card is full, or the camera
is unable to focus in single-servo AF (note that the camera focuses
again before each shot).
A Release Mode
Regardless of the release mode selected, the camera will take the
specified number of shots at each interval. In C
H (continuous high speed)
mode, photographs will be taken at a rate of five shots per second or, if
[DX format (24 × 16)] is selected for [Image area], at the frame rate
selected for Custom Setting d2 [Shooting speed] (pg. 321) > [Continuous
high-speed]. In S (single frame) and CL (continuous low-speed),
photographs will be taken at the rate chosen for Custom Setting d2
[Shooting speed] (pg. 321) > [Continuous low-speed].
A Using the Monitor
Pictures can be played back and shooting and menu settings can be
adjusted freely while interval timer photography is in progress.
The
monitor will turn off automatically about four seconds before each
interval.
217
t
A Shooting Menu Banks
Changes to interval timer settings apply to all shooting menu banks
(pg. 291). If shooting menu settings are reset using the [Reset shooting
menu] item in the shooting menu (pg. 290), interval timer settings will be
reset as follows:
Choose start time: Now
Interval: 00:01':00"
Number of intervals: 1
Number of shots: 1
Start shooting: Off
218
t
Non-CPU Lenses
By specifying lens data (lens focal length and maximum aperture),
the user can gain access to a variety of CPU lens functions when
using a non-CPU lens. If the focal length of the lens is known:
Automatic power zoom can be used with SB-900, SB-800, and
SB-600 Speedlights (available separately)
Lens focal length is listed (with an asterisk) in the playback photo
info display
When the maximum aperture of the lens is known:
The aperture value is displayed in the top control panel and
viewfinder
Flash level is adjusted for changes in aperture
Aperture is listed (with an asterisk) in the playback photo info
display
Specifying both the focal length and maximum aperture of the
lens:
Enables color matrix metering (note that it may be necessary to
use center-weighted or spot metering to achieve accurate results
with some lenses, including Reflex-Nikkor lenses)
Improves the precision of center-weighted and spot metering
and i-TTL balanced fill-flash for digital SLR
A Focal Length Not Listed
If the correct focal length is not listed, choose the closest value greater
than the actual focal length of the lens.
A Zoom Lenses
Lens data are not adjusted when non-CPU lenses are zoomed in or out.
After changing the zoom position, select new values for lens focal length
and maximum aperture.
219
t
❚❚ The Non-CPU Lens Data Menu
1 Select [Non-CPU lens
data].
Highlight [Non-CPU lens
data] in the setup menu
(pg. 346) and press 2.
2 Select a lens number.
Highlight [Lens number] and
press 4 or 2 to choose a lens
number between 1 and 9.
3 Select a focal length.
Highlight [Focal length (mm)]
and press 4 or 2 to choose a
focal length between 6 and
4,000 mm.
4 Select a maximum
aperture.
Highlight [Maximum aperture]
and press 4 or 2 to choose a
maximum aperture between
f/1.2 and f/22. The maximum aperture for teleconverters is the
combined maximum aperture of the teleconverter and lens.
220
t
5 Select [Done].
Highlight [Done] and press J.
The specified focal length and
aperture will be stored under
the chosen lens number. This
combination of focal length
and aperture can be recalled at any time by selecting the lens
number using camera controls as described below.
❚❚ Choosing a Lens Number Using Camera Controls
1 Assign non-CPU lens number selection to a camera
control.
Select [Choose non-CPU lens number] as the “+command
dials” option for a camera control in the Custom Settings
menu. Non-CPU lens number selection can be assigned to the
Fn button (Custom Setting f4, [Assign FUNC. button], pg. 333),
the depth-of-field preview button (Custom Setting f5, [Assign
preview button], pg. 339), or the AE-L/AF-L button (Custom
Setting f6, [Assign AE-L/AF-L button], pg. 340).
2 Use the selected control to choose a lens number.
Press the selected button and rotate the main command dial
until the desired lens number is displayed in the top control
panel.
Main command dial
Focal length Maximum aperture
Lens number
221
t
Using a GPS Unit
A GPS unit can be connected to the ten-pin remote terminal,
allowing the current latitude, longitude, altitude, Coordinated
Universal Time (UTC), and heading to be recorded with each
photograph taken.
The camera can be used with an optional GP-1
GPS unit (see below; note that the GP-1 does not provide the
compass heading), or with third-party units connected via an
optional MC-35 GPS adapter cord (pg. 222).
❚❚ The GP-1 GPS Unit
The GP-1 is an optional GPS unit designed for use with Nikon
digital cameras.
For information on connecting the unit, see the
manual provided with the GP-1.
222
t
❚❚ Other GPS Units
Optional Garmin GPS units that conform to version 2.01 or 3.01 of
the National Marine Electronics Association NMEA0183 data
format can be connected to the cameras ten-pin remote terminal
using an MC-35 GPS adapter cord (available separately; pg. 393).
Operation has been confirmed with Garmin eTrex and Garmin
geko series devices equipped with a PC interface cable connector.
These devices connect to the MC-35 using a cable with a D-sub 9-
pin connector provided by the manufacturer of the GPS device.
See the MC-35 instruction manual for details. Before turning the
camera on, set the GPS device to NMEA mode (4800 baud).
MC-35
223
t
❚❚ The k Icon
When the camera establishes
communication with a GPS device, a k icon
will be displayed in the top control panel.
Photo information for pictures taken while
the k icon is displayed will include a page
of GPS data (pg. 238), including the current latitude, longitude,
altitude, Coordinated Universal Time (UTC), and heading (if
supported). If no data are received from the GPS unit for two
seconds, the k icon will clear from the display and the camera will
stop recording GPS information.
A GPS Data
GPS data are only recorded when the k icon is
displayed.
Confirm that the k icon is displayed
in the top control panel before shooting.
A
flashing k icon indicates that the GPS device is
searching for a signal; pictures taken while the k
icon is flashing will not include GPS data.
SHOOT
CUSTOM
SHOOT
CUSTOM
224
t
❚❚ Setup Menu Options
The [GPS] item in the setup menu contains the options listed
below.
[Auto meter off]: Choose whether or not the exposure meters will
turn off automatically when a GPS unit is attached.
[Position]: This item is only available if a GPS device is connected,
when it displays the current latitude, longitude, altitude,
Coordinated Universal Time (UTC), and heading (if supported) as
reported by the GPS device.
A Heading
The heading is only recorded if the GPS device is
equipped with a digital compass (note that the
GP-1 is not equipped with a compass).
Keep the
GPS device pointing in the same direction as the
lens and at least 20 cm (8 in.) from the camera.
A Coordinated Universal Time (UTC)
UTC data is provided by the GPS device and is independent of the camera
clock.
Option Description
Enable
(default)
Exposure meters will turn off automatically if no operations
are performed for the period specified in Custom Setting c2
[Auto meter-off delay]. This reduces the drain on the
battery but may prevent GPS data from being recorded if
the shutter-release button is pressed all the way down
without pausing.
Disable
Exposure meters will not turn off while a GPS unit is
connected; GPS data will always be recorded.
I
225
I
More About Playback
Playback Options
This chapter describes how to play back photographs and details
the operations that can be performed during playback.
Full-Frame Playback...................................................... pg. 226
Photo Information ........................................................ pg. 229
Viewing Multiple Images: Thumbnail Playback ...... pg. 241
Taking a Closer Look: Playback Zoom....................... pg. 243
Protecting Photographs from Deletion .................... pg. 244
Deleting Individual Photographs............................... pg. 245
226
I
Full-Frame Playback
To play photographs back, press
the K button. The most recent
photograph will be displayed in
the monitor.
A Rotate Tall
To display “tall” (portrait-orientation)
photographs in tall orientation, select [On] for
the [Rotate tall] option in the playback menu
(pg. 287). Note that because the camera itself is
already in the appropriate orientation during
shooting, images are not rotated automatically
during image review (pg. 228).
K button
N button
L button
J button
Multi selector
O button
Sub-command dial
Main command dial
H button
G button
227
I
To Use Description
View
additional
photographs
Press 2 to view photographs in order
recorded, 4 to view photographs in
reverse order.
View photo
information
Press 1 or 3 to view information
about current photograph (pg. 229).
View
thumbnails
N
+
See page 241 for more information on
the thumbnail display.
Zoom in on
photograph
N
+
See page 243 for more information on
playback zoom.
Delete images
O
Confirmation dialog will be displayed.
Press O again to delete photo
(pg. 245).
Record/play
voice memo
H
If voice memo has not been recorded,
voice memo will be recorded while H
button is pressed. If voice memo has
been recorded, pressing H button will
start playback (pg. 248).
Change
protect
status
L
To protect image, or to remove
protection from protected image, press
L
button (pg.
244
).
View images
on other
memory card
N
+
If two memory cards are inserted,
choose memory card from which
pictures are played back (pg. 228).
Return to
shooting
mode
/
K
Monitor will turn off. Photographs
can be taken immediately.
Display menus
G
See page 277 for more information.
228
I
A Image Review
When [On] is selected for [Image review] in the playback menu (pg. 287),
photographs are automatically displayed in the monitor for about 20 s
(the default setting) after shooting (because the camera is already in the
correct orientation, images are not rotated automatically during image
review). In single-frame, self-timer, and mirror-up release modes,
photographs are displayed one at a time as they are taken. In continuous
release mode, display begins when shooting ends, with the first
photograph in the current series displayed.
A Two Memory Cards
If two memory cards are inserted, holding the N
button and pressing 1 in full-frame or thumbnail
playback will display the menu shown at right.
Highlight the desired slot and press J.
The same
method can be used to choose a slot when
selecting images for operations in the playback
(pg. 278) or retouch menus (pg. 363) or when
choosing an image as the source for preset white balance (pg. 156).
A See Also
For information on choosing how long the monitor will remain on when
no operations are performed, see Custom Setting c4 [Monitor off delay]
(pg. 319).
The roles of the multi selector buttons can be reversed, so that the 1 and
3 buttons display other images and the 4 and 2 buttons control photo
information. See Custom Setting f3 [Photo info/playback] (pg. 332) for
details.
229
I
Photo Information
Photo information is superimposed on images displayed in full-
frame playback.
There are up to 9 pages of information for each
photo.
Press 1 or 3 to cycle through photo information as shown
below.
Note that shooting data, RGB histograms, and highlights
are only displayed if corresponding option is selected for [Display
mode] (pg. 282; shooting data page 4 is only displayed if copyright
information was recorded with the photograph as described on
page 357).
GPS data are only displayed if a GPS device was used
when the photo was taken.
File information
100
NCD
3
X
D
S
C
_
0001
.
JP
G
15
/
12
/
2008 10
:
15
:
00
N
N
OR
OR
M
AL
AL
6048x4032
1
/
10
Highlights
100
-
1
RGB histogram
100
-
1
M
TR
,
SP
D
,
AP
.
E
XP.
M
O
D
E
, I S
O
, EXP. T
U
N
I
N
G
F
OCAL
LE
N
G
T
H
LE
N
S
A
F
/
V
R
FL
A
S
H
M
O
D
E,
:
,
1
/
125
,
F5
.
6
:
,
100
:
0, 0,
:
85
mm
:
85
/
1. 4
:
S
:
N
I
KO
N
D
3
X
100
-
1
Shooting data page 4
ART
IST
C
O
PYRI
GHT
:
NIKON
TARO
:
NIKON
N
I
KO
N
D
3
X
100
-
1
Overview data
0. 0
AUTO 0, 0
1
/
125
,
F5
.
6
100 85
mm
100
NCD
3
X
D
S
C
_
0001
.
JP
G
15
/
12
/
2008 10
:
15
:
00
N
N
OR
OR
M
AL
AL
6048x4032
N
I
KO
N
D
3
X
1
/
10
GPS data
:
:
:
:
:
:
:
:
E
N
L
AT I TUDE
2008
/
12
/
15
01 15 00
::
TI
M
E
(
UTC
)
HEADI NG
35
º
35 971
'
.
105
.
17
º
ALT I TUDE
LONGI TUDE
35
m
9
.
696
'
13
º
43
N
I
KO
N
D
3
X
100
-
1
Shooting data pages 1–3
230
I
❚❚ File Information
1 Displayed only if [Focus point] is selected for [Display mode] (pg. 282).
2 Displayed in yellow if [DX format (24 × 16)] or [5 : 4 (30 × 24)] was selected
for the [Image area] option (pg. 60) in the shooting menu.
100
NCD
3
X
D
S
C
_
0001
.
JP
G
15
/
12
/
2008 10
:
15
:
00
N
N
OR
OR
M
AL
AL
6048x4032
1
/
10
1 2 3 4
6 5
14
13
12
11 10 9
8
15
7
1 Voice memo icon ..................... 248
2 Protect status ............................ 244
3 Retouch indicator .................... 363
4 Focus point
1
.............................. 282
5 AF area brackets...................47, 92
6 Frame number/
total number of frames
7 Image quality ...............................66
8 Image size ..................................... 70
9 Image area
2
................................. 60
10 Image authentication .............356
11 Time of recording....................... 40
12 Date of recording ....................... 40
13 Slot number.................................. 42
14 Folder name ...............................293
15 File name.....................................296
231
I
❚❚ Highlights
1
1 Displayed only if [Highlights] is selected for [Display mode] (pg. 282).
2 Blinking areas indicate highlights (areas that may be
overexposed) for current channel. Press 4 or 2 while
pressing N button to cycle through channels as
follows:
3 Displayed in yellow if [DX format (24 × 16)] (a) or [5 : 4 (30 × 24)] (b) was
selected for the [Image area] option (pg. 60) in the shooting menu.
100
-
1
1 2 3
5
6
7
4
1 Voice memo icon ..................... 248
2 Protect status ............................ 244
3 Retouch indicator .................... 363
4 Highlight display indicator... 282
5 Image highlights
2
...................282
6 Folder number–frame
number
3
......................................293
7 Current channel
2
RGB
(all channels)
R
(red)
G
(green)
B
(blue)
232
I
❚❚ RGB Histogram
1
1 Displayed only if [RGB histogram] is selected for [Display mode] (pg. 282).
2 Blinking areas indicate highlights (areas that may be
overexposed) for current channel. Press 4 or 2 while
pressing N button to cycle through channels as
follows:
3 Displayed in yellow if [DX format (24 × 16)] (a) or [5 : 4 (30 × 24)] (b) was
selected for the [Image area] option (pg. 60) in the shooting menu.
100
-
1
6
4
5
7
8
9
10
1 2 3
1 Voice memo icon ...................... 248
2 Protect status ............................. 244
3 Retouch indicator ..................... 363
4 Image highlights
2
.................. 282
5 Folder number–frame
number
3
...................................... 293
6 Histogram (RGB channel)
4
. In all
histograms, horizontal axis gives
pixel brightness, vertical axis
number of pixels.
7 Current channel
2
8 Histogram (red channel)
4
9 Histogram (green channel)
4
10 Histogram (blue channel)
4
RGB
(all channels)
R
(red)
G
(green)
B
(blue)
Highlight display off
233
I
4 Some sample histograms are shown below:
If the image contains objects with a
wide range of brightnesses, the
distribution of tones will be relatively
even.
If the image is dark, tone distribution
will be shifted to the left.
If the image is bright, tone
distribution will be shifted to the
right.
Increasing exposure compensation shifts the distribution of tones to the right,
while decreasing exposure compensation shifts the distribution to the left.
Histograms can provide a rough idea of overall exposure when bright ambient
lighting makes it difficult to see photographs in the monitor.
A Histograms
Camera histograms are intended as a guide only and may differ from
those displayed in imaging applications.
234
I
❚❚ Shooting Data Page 1
1
1 Displayed only if [Data] is selected for [Display mode] (pg. 282).
2 Displayed in red if photo was taken with ISO sensitivity auto control on.
3 Displayed if Custom Setting b6 ([Fine tune optimal exposure]) has been set
to a value other than zero for any metering method.
4 Displayed only if VR lens is attached.
5 Displayed only if optional flash unit SB-900, SB-800, SB-600, or SB-R200 is
used.
6 Displayed in yellow if [DX format (24 × 16)] or [5 : 4 (30 × 24)] was selected
for the [Image area] option (pg. 60) in the shooting menu.
M
TR
,
SP
D
,
AP
.
E
XP.
M
O
D
E
, I S
O
, EXP. T
U
N
I
N
G
F
OCAL
LE
N
G
T
H
LE
N
S
A
F
/
V
R
FL
A
S
H
M
O
D
E,
:
,
1
/
8000
,
F2
.
8
:
,
Hi
0
.
3
:
+
1
.
3,
+
5
/
6
:
85
mm
:
85
/
1. 4
:
C
:
Optional
,
TTL
,
+
1
.
3
SL
O
W
N
I
KO
N
D
3
X
100
-
1
4
5
6
7
8
9
10
11 1312
1 2
3
1 Voice memo icon ..................... 248
2 Protect status ............................ 244
3 Retouch indicator .................... 363
4 Metering method .................... 110
Shutter speed...................116, 120
Aperture.............................118, 120
5 Exposure mode ........................ 112
ISO sensitivity
2
......................... 104
6 Exposure compensation ....... 128
Optimal exposure tuning
3
... 316
7 Focal length............................... 386
8 Lens data .....................................218
9 Focus mode .................................. 74
Lens VR
(vibration reduction)
4
...........382
10 Flash mode .................................194
Flash compensation
Commander mode
5
11 Camera name
12 Image area
6
................................. 60
13 Folder number–frame
number
6
......................................293
235
I
❚❚ Shooting Data Page 2
1
1 Displayed only if [Data] is selected for [Display mode] (pg. 282).
2 [Standard] and [Vivid] Picture Controls only.
3 [Neutral], [Monochrome], and custom Picture Controls.
4 Not displayed with monochrome Picture Controls.
5 Monochrome Picture Controls only.
6 Displayed in yellow if [DX format (24 × 16)] or [5 : 4 (30 × 24)] was selected
for the [Image area] option (pg. 60) in the shooting menu.
:
:
:
:
:
:
:
:
:
Adobe RGB
STANDARD
A6,,
M
1
W
HITE BALANCE
COLOR SPACE
PICTURE CTRL
QU I CK AD J US T
CONTRAS T
BR IGHTNESS
SATURAT ION
HUE
0
3
0
0
0
0
S ARPENINGH
N
I
KO
N
D
3
X
100
-
1
4
5
6
7
8
9
10
11
12
13 1514
1
2
3
1 Voice memo icon ..................... 248
2 Protect status ............................ 244
3 Retouch indicator .................... 363
4 White balance ........................... 140
Color temperature................... 147
White balance fine-tuning ... 143
Preset manual .......................... 148
5 Color space................................. 183
6 Picture Control.......................... 162
7 Quick adjust
2
............................ 167
Original Picture Control
3
...... 173
8 Sharpening .................................167
9 Contrast .......................................167
10 Brightness ...................................167
11 Saturation
4
.................................167
Filter effects
5
..............................167
12 Hue
4
..............................................167
Toning
5
........................................167
13 Camera name
14 Image area
6
................................. 60
15 Folder number–frame
number
6
......................................293
236
I
❚❚ Shooting Data Page 3
1
1 Displayed only if [Data] is selected for [Display mode] (pg. 282).
2 Displayed in yellow if [DX format (24 × 16)] or [5 : 4 (30 × 24)] was selected
for the [Image area] option (pg. 60) in the shooting menu.
:
:
:
:
:
:
:
:
:
NOR
M
AL
NOR
M
AL
LONG EXP
/
.
HI ISO
N
OISE REDUC
.
CYANOTYPE
TRI
M
RETOUCH
CO
MM
ENT
SP SPRING HAS CO
M
E
.
RING HAS CO
M
E
.
3636
VIGNETT CTRLE
ACT
.
DLI
.
GHT
-
FILTER
W
AR
M
IINGDLGHT
-
N
I
KO
N
D
3
X
100
-
1
4
5
6
7
8
9 1110
1 2 3
1 Voice memo icon ..................... 248
2 Protect status ............................ 244
3 Retouch indicator .................... 363
4 High ISO noise reduction...... 300
Long exposure noise
reduction .................................... 300
5 Active D-Lighting..................... 181
6 Vignette control........................299
7 Retouch history.........................363
8 Image comment .......................350
9 Camera name
10 Image area
2
................................. 60
11 Folder number–frame
number
2
......................................293
237
I
❚❚ Shooting Data Page 4
1
1 Displayed only if [Data] is selected for [Display mode] (pg. 282) and
copyright information was appended to photograph (pg. 357).
2 Displayed in yellow if [DX format (24 × 16)] or [5 : 4 (30 × 24)] was selected
for the [Image area] option (pg. 60) in the shooting menu.
ART
IST
C
O
PYRI
GHT
:
NIKON
TARO
:
NIKON
N
I
KO
N
D
3
X
100
-
1
4
5
6 8 7
1 2 3
1 Voice memo icon ..................... 248
2 Protect status ............................ 244
3 Retouch indicator .................... 363
4 Name of photographer......... 357
5 Copyright holder..................... 357
6 Camera name
7 Image area
2
................................. 60
8 Folder number–frame
number
2
......................................293
238
I
❚❚ GPS Data
1
1 Displayed only if GPS device was used when photo was taken (pg. 221).
2 Displayed only if GPS device is equipped with electronic compass.
3 Displayed in yellow if [DX format (24 × 16)] or [5 : 4 (30 × 24)] was selected
for the [Image area] option (pg. 60) in the shooting menu.
:
:
:
:
:
:
:
:
E
N
L
AT I TUDE
2008
/
12
/
15
01 15 00
::
TI
M
E
(
UTC
)
HEAD ING
35
º
35 971
'
.
105
.
17
º
ALT I TUDE
LONG I TUDE
35
m
9
.
696
'
13
º
43
N
I
KO
N
D
3
X
100
-
1
1
2 3
4
5
6
7
8
11109
1 Voice memo icon ..................... 248
2 Protect status ............................ 244
3 Retouch indicator .................... 363
4 Latitude
5 Longitude
6 Altitude
7 Coordinated Universal Time
(UTC)
8 Heading
2
9 Camera name
10 Image area
3
................................. 60
11 Folder number-frame
number
3
......................................293
239
I
❚❚ Overview Data
1 Displayed in red if photo was taken with ISO sensitivity auto control on.
1
/
8000
,
F2
.
8
H
i 0
.
3 85
mm
1. 3
+
1
.
3 REAR
10000 A6,
M
1
L
100
NCD
3
X
D
S
C
_
0001
.
JP
G
15
/
12
/
2008 10
:
15
:
00
N
N
OR
OR
M
AL
AL
6048x4032
N
I
KO
N
D
3
X
1
/
10
1 2 3 4
7
10
11
6
5
8
9
14
13
15
16
12
17
1 Frame number/
total number of frames
2 Voice memo icon ..................... 248
3 Protect status ............................ 244
4 Camera name
5 Retouch indicator .................... 363
6 Histogram showing the
distribution of tones in the
image (pg. 233). Horizontal axis
corresponds to pixel brightness,
vertical axis shows number of
pixels of each brightness in
image.
7 ISO sensitivity
1
..........................104
8 Focal length................................386
9 GPS data indicator ...................221
10 Image comment indicator ....350
11 Flash mode .................................194
12 Flash compensation
13 Exposure compensation........128
14 Metering method.....................110
15 Exposure mode .........................112
16 Shutter speed .................. 116, 120
17 Aperture ............................ 118, 120
240
I
2 Displayed in yellow if [DX format (24 × 16)] or [5 : 4 (30 × 24)] was selected
for the [Image area] option (pg. 60) in the shooting menu.
1
/
8000
,
F2
.
8
H
i 0
.
3 85
mm
1. 3
+
1
.
3 REAR
10000 A6,
M
1
L
100
NCD
3
X
D
S
C
_
0001
.
JP
G
15
/
12
/
2008 10
:
15
:
00
N
N
OR
OR
M
AL
AL
6048x4032
N
I
KO
N
D
3
X
1
/
10
18
19
20
28
29
30
25 26 2324 22 27 21
18 Picture Control........................... 162
19 Active D-Lighting...................... 181
20 File name ..................................... 296
21 Image quality ................................66
22 Image size.......................................70
23 Image area
2
...................................60
24 Image authentication
indicator....................................... 356
25 Time of recording ........................40
26 Folder name ................................293
27 Date of recording ........................ 40
28 Slot number................................... 42
29 White balance.............................140
Color temperature ....................147
White balance fine-tuning .....143
Preset manual ............................148
30 Color space ..................................183
241
I
Viewing Multiple Images:
Thumbnail Playback
To display images in “contact sheets” of four
or nine images, press the N button and
rotate the main command dial.
Full-frame playback Thumbnail playback
242
I
The following operations can be performed while thumbnails are
displayed:
A See Also
For information on choosing the role played by the center of the multi
selector, see Custom Setting f1 [Multi selector center button] (pg. 331).
To Use Description
Change number of
images displayed
N
+
Press N button and rotate main
command to left to display one,
four, or nine images per page.
Toggle full frame
playback
Press center of multi selector to
switch back and forth between full
frame and thumbnail playback.
Highlight images
Use multi selector to highlight
images for full-frame playback,
playback zoom (pg. 243), or deletion
(pg. 245).
Page through
images
N
+
Press N button and rotate sub-
command dial to scroll through
images a page at a time.
Delete highlighted
photo
O
See page 245 for more information.
Record/play voice
memo
H
See page 248 for more information.
Change protect status
of highlighted photo
L
See page 244 for more information.
View images on
other memory
card
N
+
If two memory cards are inserted,
choose memory card from which
pictures are played back (pg. 228).
Return to shooting
mode
/
K
Monitor will turn off. Photographs
can be taken immediately.
Display menus
G
See page 277 for more information.
243
I
Taking a Closer Look: Playback
Zoom
Press the
N
button and rotate the main command dial right to zoom
in on the image displayed in full-frame playback or on the image
currently highlighted in thumbnail playback.
The following operations can be performed while zoom is in effect:
To Use Description
Zoom in or
out
N
+
Press N button to
display frame
showing area
currently zoomed
in. While N
button is pressed, main command dial
can be used to control size of frame—
rotate dial left to zoom out, right to zoom
36 × 24 (3 : 2) format images in up to 27 ×
(large images), 20 × (medium images) or
13 × (small images). Release N button
to magnify selected area to fill monitor.
View other
areas of image
N
+
Use multi selector to view area not visible
in monitor. Keep multi selector pressed
to scroll rapidly to other areas of frame.
View other
images
Rotate main command dial to view same
location in other images at current zoom
ratio.
Change
protect status
L
See page 244 for more information.
Return to
shooting
mode
/
K
Monitor will turn off. Photographs can be
taken immediately.
Display
menus
G
See page 277 for more information.
244
I
Protecting Photographs from
Deletion
In full-frame, zoom, and thumbnail playback, the L button can
be used to protect photographs from accidental deletion.
Protected files can not be deleted using the O button or the
[Delete] option in the playback menu. Note that protected images
will be deleted when the memory card is formatted (pp. 45, 347).
To protect a photograph:
1 Select an image.
Display the image in full-
frame playback or
playback zoom or
highlight it in the
thumbnail list.
2 Press the L button.
The photograph will be
marked with a a icon. To
remove protection from the
photograph so that it can be
deleted, display the
photograph or highlight it in the thumbnail list and then press
the L button.
A Voice Memos
Changes to the protect status of images also apply to any voice memos
that may have been recorded with the images. Voice memo overwrite
status can not be set separately.
A Removing Protection from All Images
To remove protection from all images in the folder or folders currently
selected in the [Playback folder] menu, press the L and O buttons
together for about two seconds.
245
I
Deleting Individual Photographs
To delete the photograph displayed in full-frame playback or the
photograph highlighted in the thumbnail list, press the O button.
Once deleted, photographs can not be recovered.
1 Select an image.
Display the image or highlight it in the thumbnail list.
2 Press the O button.
A confirmation dialog will be
displayed.
To delete the photograph, press the O
button again.
To exit without deleting
the photograph, press the K button.
Full-frame playback
Thumbnail playback
246
I
A Voice Memos
If a voice memo has been recorded with the
selected image, the confirmation dialog shown
at right will be displayed when the O button is
pressed.
[Image/sound]: Select this option and press the O
button to delete both photo and voice memo.
[Sound only]: Select this option and press the
O button to delete only the voice memo.
To exit without deleting either voice memo or photo, press K.
A See Also
To delete multiple images, use the [Delete] option in the playback menu
(pg. 281). The [After delete] option in the playback menu determines
whether the next image or the previous image is displayed after an image
is deleted (pg. 287).
e
247
e
Voice Memos
Recording and Playback
The camera is equipped with a built-in microphone, allowing voice
memos to be added to photographs.
Voice memos can be played
back over the cameras built-in speaker.
Recording Voice Memos .............................................. pg. 248
Playing Voice Memos.................................................... pg. 253
248
e
Recording Voice Memos
Voice memos up to sixty seconds long can be added to
photographs using the built-in microphone.
Readying the Camera for Recording
Before recording voice memos, choose the desired options for the
[Voice memo] (pg. 248), [Voice memo overwrite] (pg. 249), and
[Voice memo button] (pg. 249) options in the setup menu.
❚❚ Voice Memo
This option controls whether voice memos
are recorded automatically or manually. The
following options are available:
Option Description
Y Off (default) Voice memos can not be recorded in shooting mode.
Z
On
(Auto and
manual)
Selecting this option displays
menu shown at right; select
maximum recording time
from 5 (default), 10, 20, 30, 45,
or 60 s.
Unless [On] is
selected for [Image review] in
playback menu (pg. 287),
recording will begin when shutter-release button is
released after shooting.
Recording ends when H
button is pressed or after specified recording time has
ended.
a
Manual
only
Memo can be recorded for most recent photograph
by pressing and holding H button (pg. 250).
249
e
❚❚ Voice Memo Overwrite
This option controls whether the voice
memo for the most recent photograph can
be overwritten in shooting mode. The
following options are available:
❚❚ Voice Memo Button
This option controls manual recording. The
following options are available:
A Voice Memo
The option selected for [Voice memo] is indicated by an icon in the rear
control panel.
Option Description
Disable
(default)
Voice memo can not be recorded in
shooting mode if one already exists for
most recent image.
Enable
Voice memo can be recorded in
shooting mode even if one already
exists for most recent image (pg. 250).
Existing memo will be deleted and
replaced by new memo.
Option Description
b
Press and
hold
(default)
Voice memo is recorded while H
button is held down.
Recording
will end automatically after 60 s.
c
Press to
start/
stop
Recording begins when H
button is pressed and ends
when H button is pressed again.
Recording will end
automatically after 60 s.
On (auto and manual) Manual only
250
e
Automatic Recording (Shooting Mode)
If [On (Auto and manual)] is selected for [Voice memo] (pg. 248), a
voice memo will be added to the most recent photograph when
shooting ends.
Recording will end when the H button is pressed
or after the specified recording time has ended.
Manual Recording (Shooting Mode)
If [On (Auto and manual)] or [Manual only] is
selected for [Voice memo] (pg. 248), a voice
memo can be recorded for the most recent
photograph by pressing and holding the H
button.
A voice memo will be recorded while
the button is held down (note that no voice
memo will be recorded if the H button is not
held down for at least one second).
D Automatic Recording
Voice memos will not be recorded automatically if [On] is selected for the
[Image review] option (pg. 287) in the playback menu.
A voice memo can
however be added to the photograph displayed during image review
even if [Off] is selected for the [Voice memo] option in the setup menu.
D Slot 2
If two memory cards are inserted and [Backup] or [RAW Slot 1-JPEG Slot 2]
is selected for the [Slot 2] option (pg. 72) in the shooting menu, voice
memos will be associated with the images recorded to the memory card
in slot 1.
H button
251
e
Playback Mode
To add a voice memo to the photograph currently displayed in
full-frame playback or highlighted in the thumbnail list (pg. 226):
1 Choose a photograph.
Display or highlight the photograph.
Only one voice memo can be recorded
per image; additional voice memos can
not be recorded for images already
marked with a h icon.
2 Press and hold the H button.
A voice memo will be recorded while
the H button is held down (note that no
voice memo will be recorded if the H
button is not held down for at least one
second).
A During Recording
During recording, the C icons in the rear
control panel will blink.
A countdown timer in
the rear control panel shows the length of the
voice memo that can be recorded (in
seconds).
In playback mode, a C icon is displayed in the
monitor during recording.
H button
Rear control panel
252
e
A Interrupting Recording
Recording will end automatically if:
The G button is pressed to display the menus
The K button is pressed
The shutter-release button is pressed halfway
The camera is turned off
During interval timer photography, recording will end automatically
about two seconds before the next photograph is taken.
A After Recording
If a voice memo has been recorded for the most
recent photograph, a C icon will be displayed in
the rear control panel.
If a voice memo exists for the photograph
currently selected in playback mode, a h icon
will be displayed in the monitor.
A Voice Memo File Names
Voice memos are stored as WAV files with names of the form
xxxxnnnn.WAV,” where “xxxxnnnn” is a file name copied from the image
with which the voice memo is associated.
For example, the voice memo
for the image “DSC_0002.JPG” would have the file name “DSC_0002.WAV.
Voice memo file names can be viewed on a computer.
Rear control panel
253
e
Playing Voice Memos
Voice memos can be played back over the
cameras built-in speaker when the
associated image is viewed in full-frame
playback or highlighted in the thumbnail list
(pp. 226, 242). The presence of a voice
memo is indicated by an h icon.
A Interrupting Playback
Playback will end automatically if:
The G button is pressed to display the menus
The monitor is turned off by pressing the K button or by pressing the
shutter-release button halfway
The camera is turned off
Another image is selected
To Press Description
Start/end
playback
H
Press H to start playback. Playback will end when H
button is pressed again or entire memo has been
played back.
Delete
voice
memo
O
Confirmation dialog will be
displayed. Press 1 or 3 to
highlight option, press O to
select.
[Image/sound]: Delete both
photo and voice memo.
[Sound only]: Delete voice
memo only.
To exit without deleting image or voice memo, press
the K button.
254
e
Voice Memo Playback Options
The [Audio output] option in the setup menu
controls whether voice memos are played
back over the cameras built-in speaker or by
a device to which the camera is connected
via an HDMI or audio/video cable.
When
sound is played back over the built-in
speaker, the [Audio output] option also
controls playback volume.
Option Description
d
Via speaker
(default)
Voice memos are played
back over built-in speaker.
Selecting this option
displays menu shown at
right.
Press 1 or 3 to
change volume.
Beep will
sound when option is
selected.
Press J to make selection and return to
setup menu.
e
HDMI/audio-
video output
Audio signal output to HDMI or A/V-OUT terminal.
f Off
Voice memos are not played back.
b icon is
displayed when photo for which voice memo exists
is viewed in monitor.
Q
255
Q
Connections
Connecting to External Devices
This chapter describes how to copy photographs to a computer,
how to print pictures, and how to view them on a television set.
Connecting to a Computer........................................... pg. 256
Direct USB Connection ................................................................ pg. 258
Wireless and Ethernet Networks.............................................. pg. 261
Printing Photographs .................................................... pg. 262
Direct USB Connection ................................................................ pg. 263
Viewing Photographs on TV ........................................ pg. 274
Standard Definition Devices...................................................... pg. 274
High-Definition Devices .............................................................. pg. 276
256
Q
Connecting to a Computer
This section describes how to connect the camera to a computer
using the supplied UC-E4 USB cable.
Once the camera is
connected, Nikon Transfer (supplied) or optional Nikon software
such as Camera Control Pro 2 can be used to copy photographs to
the computer or control the camera remotely.
D Connecting Cables
Be sure the camera is off when connecting or disconnecting interface
cables.
Do not use force or attempt to insert the connectors at an angle.
A Camera Control Pro 2
Camera Control Pro 2 (available separately; pg. 391) can be used to control
the camera from a computer.
Before connecting the camera, set the
camera [USB] option (pg. 257) to [MTP/PTP].
When Camera Control Pro 2
is running, “c” will be displayed in the top control panel.
257
Q
❚❚ Before Connecting the Camera
Install the necessary software from the supplied installer CD (see
the Install Guide for more information).
To ensure that data
transfer is not interrupted, be sure the camera battery is fully
charged.
If in doubt, charge the battery before use or use an EH-6
AC adapter (available separately).
Before connecting the camera, select the
[USB] option in the camera setup menu
(pg. 352) and choose a USB option from
[MTP/PTP] (default) and [Mass Storage] as
described below.
Operating system
*
Nikon Transfer Camera Control Pro 2
Windows Vista Service Pack 1 (32-bit
Home Basic/Home Premium/
Business/Enterprise/Ultimate
editions)
Windows XP Service Pack 3
(Home Edition/Professional)
Choose
[MTP/PTP] or
[Mass Storage]
Choose
[MTP/PTP]
Mac OS X
(version 10.3.9, 10.4.11, or 10.5.5)
* See the websites listed on page xxiv for the latest information on supported
operating systems.
258
Q
Direct USB Connection
Connect the camera using the supplied UC-E4 USB cable.
1 Select a USB option.
Before connecting the camera to the computer, make sure the
correct option is selected for the [USB] item in the camera
setup menu (pg. 257).
2 Turn the camera off.
3 Turn the computer on.
Turn the computer on and wait for it to start up.
4 Connect the USB cable.
Connect the USB cable as shown.
Do not use force or attempt
to insert the connectors at an angle.
Power switch
259
Q
D The USB Cable Clip
To prevent cable from being disconnected, fasten the clip as shown.
D USB Hubs
Connect the camera directly to the computer; do not connect the
cable via a USB hub or keyboard.
5 Turn the camera on.
If [Mass Storage] is selected for [USB]
(pg. 257), c will be displayed in the
control panels and viewfinder, and the
PC connection indicator will flash in the
top control panel (camera displays do
not change if [MTP/PTP] is selected).
6 Transfer photographs.
Transfer photographs to the computer as described in the
online help for Nikon Transfer.
To view the online help, start
Nikon Transfer and select [Nikon Transfer help] from the Nikon
Transfer [Help] menu.
D During Transfer
Do not turn the camera off or disconnect the USB cable while transfer is in
progress.
Power switch
260
Q
7 Turn the camera off.
If [MTP/PTP] is selected for [USB], the camera can be turned off
and the USB cable disconnected once transfer is complete.
If
[Mass Storage] is selected, the camera must first be removed
from the system as described below.
Windows Vista
Click the “Safely Remove Hardware” icon
( ) in the taskbar and select [Safely
Remove USB Mass Storage Device] from
the menu that appears.
Windows XP Home Edition / Windows XP Professional
Click the “Safely Remove Hardware” icon
( ) in the taskbar and select [Safely
remove USB Mass Storage Device] from
the menu that appears.
Mac OS X
Drag the camera volume (“NIKON D3X”)
into the Trash.
261
Q
Wireless and Ethernet Networks
If the optional WT-4 wireless transmitter is attached, photographs
can be transferred or printed over wireless or Ethernet networks
and the camera can also be controlled from network computers
running Camera Control Pro 2 (available separately).
The WT-4 can
be used in any of the following modes:
For more information, see the WT-4 users manual.
Be sure to
update to the latest versions of the WT-4 firmware and supplied
software.
D USB
Select [MTP/PTP] for the camera [USB] option (pg. 257) before connecting
a WT-4 wireless transmitter.
D WT-4A/B/C/D/E
The principal difference between the WT-4 and WT-4A/B/C/D/E is in the
number of channels supported; unless otherwise stated, all references to
the WT-4 also apply to the WT-4A/B/C/D/E.
Mode Function
Transfer mode
Upload new or existing photographs to computer or ftp
server.
Thumbnail
select mode
Preview photographs on computer monitor before
upload.
PC mode
Control camera from computer using Camera Control
Pro 2 (available separately).
Print mode
Print JPEG photographs on printer connected to network
computer.
262
Q
Printing Photographs
Photographs can be printed by any of the following methods:
Connect the camera to a printer and print JPEG photographs
directly from the camera (pg. 263).
Insert the camera memory card in a printer equipped with a card
slot (see the printer manual for details).
If the printer supports
DPOF (pg. 440), photographs can be selected for printing using
[Print set (DPOF)] (pg. 272).
Take the camera memory card to a developer or digital printer
center.
If the center supports DPOF (pg. 440), photographs can
be selected for printing using [Print set (DPOF)] (pg. 272).
Print JPEG photographs on a printer connected to a network
computer using the WT-4 wireless transmitter (available
separately; see the WT-4 users manual for details).
Transfer pictures (pg. 256) and print them from a computer using
ViewNX (supplied) or Capture NX 2 (available separately; pg.
391).
Note that this is the only method available for printing
RAW (NEF) pictures.
A TIFF Photographs
TIFF photographs can be printed from a computer.
Some digital print
services may also support TIFF; check with the service before ordering.
263
Q
Direct USB Connection
If the camera is connected to a PictBridge printer via the supplied
USB cable, selected JPEG pictures can be printed directly from the
camera.
D USB Hubs
Connect the camera directly to the computer; do not connect the cable
via a USB hub or keyboard.
A Printing Via Direct USB Connection
Be sure the battery is fully charged or use an optional EH-6 AC adapter.
When taking photographs to be printed via direct USB connection, set
[Color space] to [sRGB] (pg. 183).
Take photographs
Select photographs for printing
using [Print set (DPOF)] (pg. 272)
Select [MTP/PTP] in camera [USB] menu and connect camera to
printer (pg. 264)
Print photographs
one at a time
(pg. 265)
Print multiple
photographs
(pg. 268)
Create index prints
(pg. 271)
Disconnect USB cable
264
Q
❚❚ Connecting the Printer
Connect the camera using the supplied UC-E4 USB cable.
1 Select [MTP/PTP].
If the [USB] option in the camera setup
menu has been changed from the
default setting of [MTP/PTP], display the
[USB] menu and select [MTP/PTP] (pg.
257).
2 Turn the camera off.
3 Connect the USB cable.
Turn the printer on and connect the USB cable as shown.
Do
not use force or attempt to insert the connectors at an angle.
4 Turn the camera on.
A welcome screen will be displayed in the monitor, followed
by a PictBridge playback display.
qw
265
Q
❚❚ Printing Pictures One at a Time
1 Select a picture.
Press 4 or 2 to view additional
pictures, or press the N
button and rotate the main
command dial right to zoom in
on the current frame (pg. 243).
Press K to return to full-frame playback.
To view six pictures
at a time, press the center of the multi selector.
Use the multi
selector to highlight pictures, or press the center of the multi
selector again to display the highlighted picture full frame.
2 Display printing options.
Press J to display PictBridge printing
options.
J button
266
Q
3 Adjust printing options.
Press 1 or 3 to highlight an option and press 2 to select.
Option Description
Page size
Menu shown at right will be
displayed.
Press 1 or 3 to
choose page size (to print at
default page size for current
printer, select [Printer default]),
then press J to select and return
to previous menu.
No.
of
copies
Menu shown at right will be
displayed.
Press 1 or 3 to
choose number of copies
(maximum 99), then press J to
select and return to previous
menu.
Border
Menu shown at right will be
displayed.
Press 1 or 3 to
choose print style from [Printer
default] (default for current
printer), [Print with border] (print
photo with white border), or [No
border], then press J to select
and return to previous menu.
Time
stamp
Menu shown at right will be
displayed.
Press 1 or 3 to
choose [Printer default] (default
for current printer), [Print time
stamp] (print time and date of
recording on photo), or [No time
stamp], then press J to select
and return to previous menu.
267
Q
4 Start printing.
Select [Start printing] and press
J to start printing.
To cancel
before all copies have been
printed, press J.
D Selecting Photographs for Printing
Images created at image quality settings of NEF (RAW) or TIFF (RGB)
(pg. 66) can not be selected for printing.
A See Also
See page 420 for information on what to do if an error occurs during
printing.
Cropping
Menu shown at right will be
displayed.
To exit without
cropping picture, highlight [No
cropping] and press J.
To crop
picture, highlight [Crop] and
press 2.
If [Crop] is selected, dialog
shown at right will be displayed.
Rotate main command dial to
right to increase size of crop, left
to decrease.
Choose position of
crop using multi selector and
press J.
Option Description
268
Q
Printing Multiple Pictures
1 Display the PictBridge menu.
Press the G button in the PictBridge
playback display (see Step 4 on page
264).
2 Choose [Print select] or
[Print (DPOF)].
Highlight one of the following
options and press 2.
[Print select]: Select pictures for
printing.
[Print (DPOF)]: Print an existing print order created with the
[Print set (DPOF)] option in the playback menu (pg. 272).
The current print order will be displayed in Step 3.
To create an index print of all JPEG pictures on the memory
card, select [Index print].
See page 271 for more information.
G button
269
Q
3 Select pictures.
Use the multi selector to scroll
through the pictures on the
memory card.
To display the
current picture full screen,
press N button.
To select the
current picture for printing,
press the L button and press
1.
The picture will be marked
with a Z icon and the number
of prints will be set to 1.
Keeping the L button
pressed, press 1 or 3 to specify the number of prints (up to
99; to deselect the picture, press 3 when the number of prints
is 1).
Continue until all the desired pictures have been
selected.
4 Display printing options.
Press J to display PictBridge printing
options.
L button
J button
270
Q
5 Adjust printing options.
Press 1 or 3 to highlight an
option and press 2 to select.
6 Start printing.
Select [Start printing] and press J to
start printing.
To cancel before all copies
have been printed, press J.
A Page Size, Border, Time Stamp, and Cropping
Choose printer default to print at current printer settings.
Only options
supported by the current printer can be selected. Note that print quality may
drop if small crops are printed at large sizes.
A See Also
See page 420 for information on what to do if an error occurs during
printing.
Option Description
Page size
Menu of page size options will be displayed (pg. 266).
Press 1 or 3 to choose page size (to print at default
page size for current printer, select [Printer default]),
then press J to select and return to previous menu.
Border
Menu of border options will be displayed (pg. 266).
Press
1 or 3 to choose print style from [Printer default]
(default for current printer), [Print with border] (print
photo with white border), or [No border], then press J
to select and return to previous menu.
Time
stamp
Menu of time stamp options will be displayed (pg. 266).
Press 1 or 3 to choose [Printer default] (default for
current printer), [Print time stamp] (print time and date
of recording on photo), or [No time stamp], then press J
to select and return to previous menu.
271
Q
❚❚ Creating Index Prints
To create an index print of all JPEG pictures on the memory card,
select [Index print] in Step 2 of “Printing Multiple Pictures”
(pg. 268).
Note that if the memory card contains more than 256
pictures, only the first 256 images will be printed.
1 Select [Index print].
Highlight [Index print] in the
PictBridge menu (pg. 268) and
press 2.
The confirmation dialog shown at right
will be displayed.
2 Display printing options.
Press J to display PictBridge printing options.
3 Adjust printing options.
Choose page size, border, and time
stamp options as described on page 270
(a warning will be displayed if the
selected page size is too small).
4 Start printing.
Highlight [Start printing] and press J to
start printing.
To cancel before printing
is complete, press J.
272
Q
❚❚ Creating a DPOF Print Order: Print Set
The [Print set (DPOF)] option in the playback menu is used to
create digital “print orders” for PictBridge-compatible printers and
devices that support DPOF.
Selecting [Print set (DPOF)] from the
playback menu displays the menu shown in Step 1.
1 Choose [Select/set].
Highlight [Select/set] and press
2.
2 Select pictures.
Use the multi selector to scroll
through the pictures on the
memory card.
To display the
current picture in full screen,
press N button.
To select the
current picture for printing,
press the L button and press
1.
The picture will be marked
with a Z icon and the number
of prints will be set to 1.
Keeping the L button
pressed, press 1 or 3 to specify the number of prints (up to
99; to deselect the picture, press 3 when the number of prints
is 1).
Press J when all the desired pictures have been
selected.
L button
273
Q
3 Select imprint options.
Highlight the following options and
press 2 to toggle the highlighted
option on or off (to complete the print
order without including this
information, proceed to Step 4).
[Data imprint]: Print shutter speed and aperture on all pictures
in print order.
[Imprint date]: Print date of recording on all pictures in print
order.
4 Complete the print order.
Highlight [Done] and press J
to complete the print order.
D Print Set
To print the current print order when the camera is connected to a
PictBridge printer, select [Print (DPOF)] in the PictBridge menu and follow
the steps in “Printing Multiple Pictures” to modify and print the current
order (pg. 268).
DPOF date and data imprint options are not supported
when printing via direct USB connection; to print the date of recording on
photographs in the current print order, use the PictBridge [Time stamp]
option.
The Print Set option can not be used if there is not enough space on the
memory card to store the print order.
Images created at image quality settings of NEF (RAW; pg. 66) can not be
selected for printing using this option.
Print orders may not print correctly if images are deleted using a
computer or other device after the print order is created.
274
Q
Viewing Photographs on TV
The supplied EG-D2 audio/video (A/V) cable can be used to
connect the D3X to a television or VCR for playback or recording.
A type A High-Definition Multimedia Interface (HDMI) cable
(available separately from commercial sources) can be used to
connect the camera to high-definition video devices.
Standard Definition Devices
To connect the camera to a standard television:
1 Turn the camera off.
Always turn the camera off before connecting or
disconnecting the A/V cable.
2 Connect the supplied A/V cable as shown.
3 Tune the television to the video channel.
Connect to video
device
Connect to
camera
Video
(yellow)
Audio
(white)
275
Q
4 Turn the camera on and press K button.
During playback, images will be displayed both on the
television screen and in the camera monitor.
A Video Mode (pg. 348)
Be sure that the video standard matches the standard used in the video
device.
Note that resolution will drop when images are output on a PAL
device.
A Television Playback
Use of an EH-6 AC adapter (available separately) is recommended for
extended playback.
When the EH-6 is connected, the camera monitor-off
delay will be fixed at ten minutes and the exposure meters will no longer
turn off automatically.
Note that the edges may not be visible when
photographs are viewed on a television screen.
A Audio Output (pg. 254)
Set [HDMI/audio-video output] to play back or record voice memos on the
video device.
A Slide Shows
The [Slide show] option in the playback menu can be used for automated
playback (pg. 288).
276
Q
High-Definition Devices
The camera can be connected to HDMI devices using a type A
HDMI cable (available separately from commercial sources).
1 Turn the camera off.
Always turn the camera off before connecting or
disconnecting an HDMI cable.
2 Connect the HDMI cable as shown.
3 Tune the device to the HDMI channel.
4 Turn the camera on and press K button.
During playback, images will be displayed on the high-
definition television or monitor screen; the camera monitor
will remain off.
A HDMI (pg. 348)
At the default setting of [Auto], the camera automatically selects the
appropriate HDMI format for the high-definition device.
The HDMI format
can be chosen using the [HDMI] option in the setup menu (pg. 348).
Connect to high-
definition device
Connect to
camera
U
277
U
Menu Guide
This chapter describes the options available in the camera menus.
D The Playback Menu: Managing Images ............... pg. 278
C
The Shooting Menu: Shooting Options................. pg. 290
A Custom Settings: Fine-Tuning
Camera Settings........................................................ pg. 302
B The Setup Menu: Camera Setup............................... pg. 346
N The Retouch Menu: Creating
Retouched Copies..................................................... pg. 363
O My Menu: Creating a Custom Menu....................... pg. 376
278
U
DThe Playback Menu:
Managing Images
The playback menu contains the options listed below.
For
information on using the playback menu, see “Tutorial: Camera
Menus” (pg. 26).
Option See page
Delete 281
Playback folder 281
Hide image 281
Display mode 282
Copy image(s) 283
Image review 287
After delete 287
Rotate tall 287
Slide show 288
Print set (DPOF) 289
279
U
Selecting Multiple Pictures
To select multiple pictures for [Delete] (pg. 281), [Hide image]
(pg. 281), [Print set (DPOF)] (pg. 272), and direct printing (pg. 268):
1 Highlight a picture.
To view the highlighted picture
full screen, press and hold the
N button.
If two memory cards are
inserted, the slot can be selected by
holding the N button and pressing 1.
The menu shown at right will be
displayed (pg. 228); highlight the desired
slot and press J.
2 Press the center of the
multi selector to select the
highlighted picture.
Selected pictures are marked
by an icon.
When selecting
pictures for printing, press the
L button and press 1 or 3
to choose the number of copies.
280
U
3 Repeat steps 1 and 2 to select additional pictures.
To deselect a picture, highlight it and press center of multi
selector.
4 Press J to complete the operation.
A confirmation dialog will be displayed;
highlight [Yes] and press J.
J button
281
U
Delete
Select this option to delete pictures and their associated voice
memos.
Protected and hidden images will not be deleted.
Playback Folder
Choose a folder for playback.
Hide Image
Hide or reveal selected pictures.
Hidden pictures are visible only in
the [Hide image] menu and can only be deleted by formatting the
memory card.
D Protected and Hidden Images
Revealing a protected image will also remove protection from the image.
Option Description
Q
Selected Delete selected pictures.
R
All
Delete all pictures in the folder currently selected for
playback (pg. 281). If two memory cards are inserted, a
slot selection dialog will be displayed before deletion.
Option Description
NCD3X
(default)
Pictures in all folders created with the D3X will be
visible during playback.
All Pictures in all folders will be visible during playback.
Current
Only pictures in the current folder will be visible
during playback.
Option Description
Select/set Hide or reveal selected pictures.
Deselect all? Reveal all pictures.
282
U
Display Mode
Choose the information available in the
playback photo information display
(pg. 229).
Press 1 or 3 to highlight an
option, then press 2 to select the option for
the photo information display.
A L appears
next to selected items; to deselect, highlight
and press 2.
To return to the playback
menu, highlight [Done] and press J.
Option Description
Basic photo info
Focus point
Active focus point (or, in single-servo AF, focus point
where focus first locked) is shown in red in photo
information display.
No focus point is displayed if
camera was unable to focus using continuous-servo
autofocus or if continuous-servo autofocus was used
with auto-area AF.
Detailed photo info
Highlights
Highlights for master RGB channel and for individual
red, green, and blue channels are shown in photo
information display.
Very bright areas blink on and off.
RGB
histogram
Red, green, and blue histograms are displayed in photo
information display.
Data
Shooting data pages (including camera name,
metering, exposure, focal length, white balance, and
image options) appear in photo information display.
283
U
Copy Image(s)
Copy photographs from the memory card in slot 1 to the memory
card in slot 2.
1 Choose [Select image(s)].
Highlight [Select image(s)] and
press 2.
2 Choose the source folder.
Highlight the folder containing
the images to be copied and
press 2.
Option Description
i
Select image(s)
Select photographs from memory card in slot 1.
j
Select destination
folder
Select destination folder on memory card in
slot 2.
Copy image(s)?
Copy selected photographs to specified
destination.
284
U
3 Preselect all or protected
images.
Highlight one of the following
options and press 2:
[Deselect all]: No images will be
preselected.
Choose this option when selecting individual
images by hand.
[Select all images]: Preselect all images in the current folder.
Choose this option when selecting all or most images in the
current folder to be copied.
[Select protected images]: Preselect all protected images in the
current folder.
4 Select images.
Images preselected in Step 3
are marked by a L icon. To
select additional images or
deselect preselected pictures,
highlight the image and press
the center of the multi selector. Press J to return to the [Copy
image(s)] menu when selection is complete.
5 Choose [Select destination
folder].
Highlight [Select destination
folder] and press 2.
285
U
6 Choose a selection
method.
Highlight one of the following
options and press 2.
7 Select a destination folder.
Enter the desired folder number or highlight the destination
folder and press J to select the folder and return to the [Copy
image(s)] menu.
8 Select [Copy image(s)?].
Highlight [Copy image(s)?] and
press 2.
Option Description
Select folder
by number
Enter number of destination
folder
(pg. 294).
Select folder
from list
Select destination folder from
list.
286
U
9 Select [Yes].
A confirmation dialog will be
displayed. Highlight [Yes] and
press J.
D Copy Image(s)?
Images can only be copied if there is sufficient space on the destination
memory card. Hidden pictures can not be copied.
If the destination folder contains a file
with the same name as a file selected
for copying, a warning will be
displayed. To replace the existing file,
highlight [Replace existing image] or
[Replace all] and press J. Hidden or
protected files in the destination
folder will not be replaced.
Select [Skip] to cancel replacement and proceed to copy remaining files.
Select [Cancel] to cancel before copying is complete.
Copies have the same protect marking as the original; print marking is not
copied. Voice memos will be copied with their associated images.
287
U
Image Review
Choose whether pictures are automatically displayed in the
monitor immediately after shooting.
After Delete
Choose the picture displayed after an image is deleted.
Rotate Tall
Choose whether to rotate “tall” (portrait-orientation) pictures for
display during playback.
Note that because the camera itself is
already in the appropriate orientation during shooting, images are
not rotated automatically during image review (pg. 228).
Option Description
On
Pictures are automatically displayed in the monitor after
shooting.
Off (default) Pictures can only be displayed by pressing K button.
Option Description
S
Show next
(default)
Display following picture.
If deleted picture was last
frame, previous picture will be displayed.
T
Show
previous
Display previous picture.
If deleted picture was first
frame, following picture will be displayed.
U
Continue as
before
If user was scrolling through pictures in order
recorded, following picture will be displayed as
described for [Show next].
If user was scrolling
through pictures in reverse order, previous picture
will be displayed as described for [Show previous].
Option Description
On
Tall” (portrait-orientation) pictures are automatically
rotated for display in the camera monitor.
Pictures taken
with [Off] selected for [Auto image rotation] (pg. 351) will
be displayed in “wide” (landscape) orientation.
Off
(default)
Tall” (portrait-orientation) pictures are displayed in
“wide” (landscape) orientation.
288
U
Slide Show
Create a slide show of the pictures in the current playback folder
(pg. 281).
Hidden images (pg. 281) are not displayed.
To start the slide show, highlight [Start] and press J.
The
following operations can be performed while the slide show is in
progress:
Option Description
Start Start slide show.
Frame interval Choose how long each picture will be displayed.
Audio playback
Display menu of voice memo playback options
(pg. 289).
To Press Description
Skip back/skip
ahead
Press 4 to return to previous frame, 2 to skip
to next frame.
View additional
photo info
Change photo info displayed (pg. 229).
Pause slide show J
Pause slide show (see following page). Voice
memo playback may continue after J button
has been pressed.
Exit to playback
menu
G End slide show and return to playback menu.
Exit to playback
mode
K
End slide show and exit to full-frame (pg. 226)
or thumbnail playback (pg. 241).
Exit to shooting
mode
Press shutter-release button halfway to return
to shooting mode.
289
U
A dialog shown at right is displayed when
the show ends or when the J button is
pressed to pause playback.
Select [Restart]
to restart (if the slide was paused, the show
will resume from the next slide) or [Exit] to
return to the playback menu.
❚❚ Audio Playback
Choose [On] to play voice memos during slide shows. The
following options will be displayed:
Choose [Off] (the default option) to disable voice memo playback
during slide shows.
Print Set (DPOF)
Choose [Select/set] to select pictures for printing on a DPOF-
compatible device (pg. 272).
Choose [Deselect all?] to remove all
pictures from the current print order.
Option Description
Frame interval
Playback ends when next frame is displayed, even if
entire memo has not been played.
Length of
voice memo
Next frame is not displayed until entire memo has been
played, even if frame interval is shorter than voice
memo.
290
U
C The Shooting Menu: Shooting
Options
The shooting menu contains the options listed below. For
information on using the shooting menu, see “Tutorial: Camera
Menus” (pg. 26).
Option See page
Shooting menu bank 291
Reset shooting menu 293
Active folder 293
File naming 296
Slot 2 72
Image quality 66
Image size 70
Image area 60
JPEG compression 68
NEF (RAW) recording 69
White balance 140
Set Picture Control 162
Manage Picture Control 170
Color space 183
Active D-Lighting 181
Vignette control 299
Long exp. NR 300
High ISO NR 300
ISO sensitivity settings 104
Live view 90
Multiple exposure 206
Interval timer shooting 211
291
U
Shooting Menu Bank
Shooting menu options are stored in one of four banks. With the
exceptions of [Interval timer shooting], [Multiple exposure], and
modifications to Picture Controls (quick adjust and other manual
adjustments), changes to settings in one bank have no effect on
the others. To store a particular combination of frequently-used
settings, select one of the four banks and set the camera to these
settings. The new settings will be stored in the bank even when
the camera is turned off, and will be restored the next time the
bank is selected. Different combinations of settings can be stored
in the other banks, allowing the user to switch instantly from one
combination to another by selecting the appropriate bank from
the bank menu.
The default names for the four shooting menu banks are A, B, C,
and D. A descriptive caption can be added using the [Rename]
option as described below.
A Shooting Menu Bank
The top control panel and shooting information
displays show the current shooting menu bank.
❚❚ Renaming Shooting Menu Banks
Selecting [Rename] in the [Shooting menu bank] menu displays
the list of shooting menu banks shown in Step 1.
1 Select a bank.
Highlight the desired bank and
press 2.
SHOOT
CUSTOM
292
U
2 Enter a name.
To move the cursor in the name
area, press the N button and
press 4 or 2. To enter a new
letter at the current cursor
position, use the multi selector
to highlight the desired
character in the keyboard area
and press the center of the multi selector. To delete the
character at the current cursor position, press the O button. To
return to the shooting menu without changing the bank
name, press the G button.
Bank names can be up to twenty characters long. Any
characters after the twentieth will be deleted.
3 Save changes and exit.
After editing the name, press J to save
changes and exit.
The [Shooting menu bank] menu will
be displayed.
Name area
Keyboard area
J button
293
U
Reset Shooting Menu
Choose whether to restore default settings for the current
shooting menu bank. See page 423 for a list of default settings.
With the exceptions of image quality, image size, white balance,
and ISO sensitivity, shooting menu settings are not reset when a
two-button reset (pg. 204) is performed.
Active Folder
Select the folder in which subsequent images will be stored.
❚❚ New Folder Number
1 Select [New folder
number].
Highlight [New folder number]
and press 2.
Option Description
Ye s Restore defaults for the current shooting menu bank.
No (default) Exit without changing shooting menu settings.
294
U
2 Choose a folder number.
Press the 4 or 2 to highlight a digit, press 1 or 3 to change.
If a folder with the selected number already exists, a W, X, or
Y icon will be displayed to the left of the folder number:
W: Folder is empty.
X: Folder is partially full.
Y: Folder contains 999 pictures or a picture numbered 9999.
No further pictures can be stored in this folder.
3 Save changes and exit.
Press J to complete the operation and return to the shooting
menu (to exit without changing the active folder, press the
G button). If a folder with the specified number does not
already exist, a new folder will be created. Subsequent
photographs will be stored in the selected folder unless it is
already full.
295
U
❚❚ Select Folder
1 Choose [Select folder].
Highlight [Select folder] and press 2.
2 Highlight a folder.
Press 1 or 3 to highlight a
folder.
3 Select the highlighted folder.
Press J to select the highlighted folder and return to the
shooting menu (to exit without changing the active folder,
press the G button). Subsequent photographs will be
stored in the selected folder.
D Folder and File Numbers
If the current folder is numbered 999 and contains 999 pictures or a
picture numbered 9999, the shutter-release will be disabled and no
further photographs can be taken. To continue shooting, create a folder
with a number less than 999, or select an existing folder with a number
less than 999 and less than 999 images.
A Number of Folders
Additional time may be required for camera startup if the memory card
contains a very large number of folders.
296
U
File Naming
Photographs are saved using file names consisting of “DSC_” or, in
the case of images that use the Adobe RGB color space, “_DSC”,
followed by a four-digit number and a three-letter extension (e.g.,
“DSC_ 0001.JPG”). The [File naming] option is used to select three
letters to replace the “DSC” portion of the file name. For
information on editing file names, see steps 2 and 3 of “Renaming
Shooting Menu Banks” (pg. 292). Note that the portion of the
name that can be edited is a maximum of three characters long.
A Extensions
The following extensions are used: “.NEF” for NEF (RAW) images, “.TIF” for
TIFF (RGB) images, “.JPG” for JPEG images, and “.NDF” for dust off reference
data.
Slot 2
Choose the role played by the secondary card slot when two
memory cards are inserted in the camera (pg. 72).
Image Quality
Choose image quality (pg. 66).
297
U
Image Size
Choose the size at which pictures are recorded (pg. 70).
Image Area
Although the D3X can record photographs with the same
diagonal picture angle as a 35mm format camera using a 3 : 2
aspect ratio, it can also be used to record photographs with the
smaller DX picture angle or the 5 : 4 aspect ratio (pg. 60).
JPEG Compression
Choose whether to compress JPEG images to a fixed size or to vary
file size for improved image quality (pg. 68).
NEF (RAW) Recording
Choose compression and bit-depth options for NEF (RAW) images
(pg. 69).
White Balance
Adjust white balance settings (pg. 140).
298
U
Set Picture Control
Select from the Picture Controls provided with the camera to
instantly adjust image processing settings (pg. 162).
Manage Picture Control
Save and modify custom Picture Control combinations, or copy
custom Picture Controls to or from the memory card (pg. 170).
Color Space
Choose from sRGB and Adobe RGB color spaces (pg. 183).
Active D-Lighting
This option can be used to prevent loss of detail in highlights and
shadows (pg. 181). The default setting is [Off].
299
U
Vignette Control
Vignetting” is a drop in brightness at the edges of a photograph.
[Vignette control] reduces vignetting for type G and D lenses (DX
and PC lenses excluded).
Its effects vary from lens to lens and are
most noticeable at maximum aperture.
Choose from [High],
[Normal] (the default setting), [Low], and [Off].
A Vignette Control
Depending on the scene, shooting conditions, and type of lens, TIFF and
JPEG images may exhibit unevenness or variations in peripheral
brightness, while custom Picture Controls and Nikon Picture Controls that
have been modified from default settings may not produce the desired
effect. Take test shots and view the results in the monitor.
Vignette
control does not apply to multiple exposures (pg. 206), DX-format images
(pg. 60), or images created with [Image overlay] (pg. 371).
The effects of
vignette control can not be previewed in live view (pg. 90).
300
U
Long Exp. NR (Long Exposure Noise Reduction)
Choose whether to reduce noise in pictures taken at slow shutter
speeds.
High ISO NR
Photographs taken at high ISO sensitivities can be processed to
reduce “noise.
Option Description
On
Photographs taken at shutter
speeds slower than 8s are
processed to reduce noise.
While photographs are being
processed, “lm” will blink
in the shutter speed/aperture
displays for a period of time
approximately equal to the
current shutter speed. In
continuous release mode, frame
rates will slow and the capacity of the memory buffer will
drop. Photographs can not be taken until processing is
complete and “lm” has cleared from the displays.
Noise reduction will not be performed if the camera is
turned off before processing is complete.
Off (default) Long exposure noise reduction off.
Option Description
S High Noise reduction is performed at ISO sensitivities of
ISO 500 and higher. While photographs are being
processed, the capacity of the memory buffer will drop.
Choose the amount of noise reduction performed from
[High], [Normal], and [Low].
T
Normal
(default)
U Low
Off
Noise reduction is only performed at sensitivities of
Hi 0.3 and higher. The amount of noise reduction is less
than the amount performed when [Low] is selected for
[High ISO NR].
SHOOT
CUSTOM
301
U
ISO Sensitivity Settings
Adjust ISO sensitivity and ISO sensitivity auto control settings
(pp. 104, 106).
Live View
Choose a live view mode and the release mode that will be used
when the camera is in live view mode (pg. 91).
Multiple Exposure
Create a single photograph from two to ten exposures (pg. 206).
Interval Timer Shooting
Take photographs automatically at pre-selected intervals. Use for
time-lapse movies of such subjects as flowers opening or
butterflies emerging from cocoons (pg. 211).
302
U
ACustom Settings:
Fine-Tuning Camera Settings
Custom Settings are used to customize
camera settings to suit individual
preferences.
In addition to Custom
Settings B ([Custom setting bank]) and
A ([Reset custom settings]), settings in
the Custom Settings menu are divided
into the six groups shown at right.
Custom Setting groups
Main menu
B: Custom setting
bank (pg. 304)
A: Reset custom
settings (pg. 304)
303
U
The following Custom Settings are available:
Custom Setting Page
B Custom setting bank 304
A Reset custom settings 304
a Autofocus
a1 AF-C priority selection 305
a2 AF-S priority selection 306
a3 Dynamic AF area 307
a4 Focus tracking with lock-on 309
a5 AF activation 309
a6 Focus point illumination 310
a7 Focus point wrap-around 311
a8 AF point selection 311
a9 B button 312
a10 Vertical B button 313
b Metering/exposure
b1 ISO sensitivity step value 314
b2 EV steps for exposure cntrl. 314
b3 EV steps for exposure comp. 314
b4 Easy exposure compensation 315
b5 Center-weighted area 316
b6 Fine tune optimal exposure 316
c Timers/AE lock
c1 Shutter-release button AE-L 318
c2 Auto meter-off delay 318
c3 Self-timer delay 319
c4 Monitor off delay 319
d Shooting/display
d1 Beep 320
d2 Shooting speed 321
d3 Max. continuous release 321
d4 File number sequence 322
d5 Control panel/viewfinder 323
d6 Shooting info display 324
d7 LCD illumination 325
d8 Exposure delay mode 325
e Bracketing/flash
e1 Flash sync speed 326
e2 Flash shutter speed 327
e3 Modeling flash 327
e4 Auto bracketing set 328
e5 Auto bracketing (Mode M) 329
e6 Bracketing order 330
f Controls
f1 Multi selector center button 331
f2 Multi selector 332
f3 Photo info/playback 332
f4 Assign FUNC. button 333
f5 Assign preview button 339
f6 Assign AE-L/AF-L button 340
f7 Customize command dials 341
f8 Release button to use dial 343
f9 No memory card? 344
f10 Reverse indicators 345
Custom Setting Page
304
U
B: Custom Setting Bank
Custom Settings are stored in one of four banks.
Changes to
settings in one bank have no effect on the others.
To store a
particular combination of frequently-used settings, select one of
the four banks and set the camera to these settings.
The new
settings will be stored in the bank even when the camera is turned
off, and will be restored the next time the bank is selected.
Different combinations of settings can be stored in the other
banks, allowing the user to switch instantly from one combination
to another by selecting the appropriate bank from the bank menu.
The default names for the four Custom Settings banks are A, B, C,
and D.
A descriptive caption can be added using the [Rename]
option as described on page 291.
A Custom Settings Bank
The bank letter appears in the top control panel
and shooting information displays. If settings in
the current bank have been modified from
default values, an asterisk will be displayed
adjacent to the altered settings in the second
level of the Custom Settings menu.
A: Reset Custom Settings
Choose whether to restore default settings for the current Custom
Settings bank.
See page 424 for a list of default settings.
Custom
Settings are not reset when a two-button reset is performed.
Option Description
Ye s Restore defaults for the current Custom Settings bank.
No (default) Exit without changing Custom Settings.
SHOOT
CUSTOM
305
U
a1: AF-C Priority Selection
This option controls whether
photographs can be taken
whenever the shutter-release
button is pressed (release priority)
or only when the camera is in focus
(focus priority) in continuous-servo
AF.
To select continuous-servo AF,
rotate the focus mode selector to C.
Regardless of the option selected, focus will not lock when the in-
focus indicator (
I) is displayed.
The camera will continue to adjust
focus until the shutter is released.
a: Autofocus
Option Description
G
Release
(default)
Photos can be taken whenever the shutter-release
button is pressed.
E
Release +
focus
Photos can be taken even when the camera is not in
focus.
In continuous mode, frame rate slows for
improved focus if the subject is dark or low contrast.
F Focus
Photos can only be taken when the in-focus indicator
(I) is displayed.
Focus mode selector
306
U
a2: AF-S Priority Selection
This option controls whether
photographs can be taken only
when the camera is in focus (focus
priority) or whenever the shutter-
release button is pressed (release
priority) in single-servo AF.
To
select single-servo AF, rotate the
focus mode selector to S.
Regardless of the option selected, if the in-focus indicator (
I) is
displayed focus will lock while the shutter-release button is
pressed halfway.
Focus lock continues until the shutter is released.
Option Description
G Release
Photos can be taken whenever the shutter-release
button is pressed.
F
Focus
(default)
Photos can only be taken when the in-focus indicator
(I) is displayed.
Focus mode selector
307
U
a3: Dynamic AF Area
If the subject leaves the selected focus point when dynamic-area
AF (I; pg. 76) is selected in continuous-servo AF (focus mode C;
pg. 74), the camera will focus based on information from
surrounding focus points.
Choose the number of points from 9,
21, and 51 based on subject movement.
Only active focus point is displayed in the viewfinder. Remaining
focus points provide information to assist focus operation.
Option Description
c
9 points
(default)
If the subject leaves the selected focus point, the
camera will focus based on information from the
surrounding eight focus points.
Choose when
there is time to compose the photograph or when
photographing subjects that are moving
predictably (e.g., runners or race cars on a track).
d
21 points
If the subject leaves the selected focus point, the
camera will focus based on information from the
surrounding 20 focus points.
Choose when
photographing subjects that are moving
unpredictably (e.g., players at a football game).
e
51 points
If the subject leaves the selected focus point, the
camera will focus based on information from the
surrounding 50 focus points.
Choose when
photographing subjects that are moving quickly
and can not be easily framed in the viewfinder
(e.g., birds).
308
U
A 3D-Tracking
When the shutter-release button is pressed halfway, the colors in the area
surrounding the focus point are stored in the camera.
Consequently 3D-
tracking may not produce the desired results with subjects that are the
same color as the background or that occupy a very small area of the
frame.
A See Also
For information on using the Fn button and command dials to select the
number of focus points for dynamic-area AF, see Custom Setting f4
([Assign FUNC. button]) > [FUNC. button+dials] > [Dynamic AF area] (pg.
336).
f
51 points
(3D-tracking)
If the subject leaves the selected focus point, the
camera will use 3D-tracking to track the subject
and select a new focus point as required.
Use to
quickly compose pictures with subjects that are
moving erratically from side to side (e.g., tennis
players).
If the subject leaves the viewfinder,
remove your finger from the shutter-release button
and recompose the photograph with the subject in
the selected focus point.
Option Description
309
U
a4: Focus Tracking with Lock-On
This option controls how autofocus adjusts to sudden large
changes in the distance to the subject.
a5: AF Activation
This option controls whether both the shutter-release button and
the B button can be used to initiate autofocus, or whether
autofocus is only initiated when the B button is pressed.
Option Description
C Long When the distance to the subject changes abruptly, the
camera waits for the specified period (long, normal, or
short) before adjusting the distance to the subject.
This
prevents the camera from refocusing when the subject is
briefly obscured by objects passing through the frame.
D
Normal
(default)
E Short
Off
The camera immediately adjusts focus when the distance
to the subject changes.
Use when photographing a series
of subjects at varying distances in quick succession.
Option Description
Shutter/
AF-ON
(default)
Autofocus can be performed with the B button or by
pressing the shutter-release button halfway.
B only Autofocus can only be performed using the B button.
310
U
a6: Focus Point Illumination
The options in this menu control whether or not the focus points
are illuminated.
Option Description
Manual
focus mode
Choose [On] (the default setting) to display the active
focus point in manual focus mode.
Continuous
mode
Choose [On] (the default setting) to display the active
focus point in C
H (continuous high-speed) and CL
(continuous low-speed) modes.
Focus point
brightness
Choose the brightness of the focus point display in the
viewfinder from [Extra high], [High], [Normal] (the default
setting), and [Low].
311
U
a7: Focus Point Wrap-Around
Choose whether focus-point selection “wraps around” from one
edge of the viewfinder to another.
a8: AF Point Selection
Choose the number of focus points available for manual focus-
point selection.
Option Description
Wrap
Focus-point selection “wraps
around” from top to bottom,
bottom to top, right to left, and left
to right, so that, for example,
pressing 2 when a focus point at
the right edge of the viewfinder display is highlighted (q)
selects the corresponding focus point at the left edge of the
display (w).
No wrap
(default)
The focus-area display is bounded by the outermost focus
points so that, for example, pressing 2 when a focus point at
the right edge of the display is selected has no effect.
Option Description
B
51 points
(default)
Choose from the 51 focus points
shown at right.
A 11 points
Choose from the 11 focus points
shown at right.
Use for quick
focus-point selection.
q
w
312
U
a9: AF-ON Button
Choose the function performed when the
B button is pressed.
Option Description
A
B
(default)
Pressing the B button initiates autofocus.
B AE/AF lock
Focus and exposure lock while the B button is
pressed.
C AE lock only Exposure locks while the B button is pressed.
D
AE lock
(Reset on
release)
Exposure locks when the B button is pressed, and
remains locked until the button is pressed a second
time, the shutter is released, or the exposure meters
turn off.
E
AE lock
(Hold)
Exposure locks when the B button is pressed, and
remains locked until the button is pressed a second
time or the exposure meters turn off.
F AF lock only Focus locks while the B button is pressed.
313
U
a10: Vertical AF-ON Button
Choose the function assigned to the B
button for vertical shooting.
Option Description
G Same as AF-ON
Both B buttons perform the function selected
for Custom Setting a9.
A
AF-ON
(default)
Pressing the vertical B button initiates
autofocus.
B AE/AF lock
Focus and exposure lock while the vertical B
button is pressed.
C AE lock only
Exposure locks while the vertical B button is
pressed.
D
AE lock (Reset
on release)
Exposure locks when the vertical B button is
pressed, and remains locked until the button is
pressed a second time, the shutter is released, or
the exposure meters turn off.
E AE lock (Hold)
Exposure locks when the vertical B button is
pressed, and remains locked until the button is
pressed a second time or the exposure meters
turn off.
F AF lock only
Focus locks while the vertical B button is
pressed.
314
U
b1: ISO Sensitivity Step Value
b2: EV Steps for Exposure Cntrl.
This option determines whether adjustments to shutter speed,
aperture, and bracketing are made in increments equivalent to
1
/3 EV,
1
/2 EV, or 1 EV.
b3: EV Steps for Exposure Comp.
b: Metering/Exposure
This option determines whether adjustments
to sensitivity are made in increments
equivalent to
1
/3 EV,
1
/2 EV, or 1 EV.
Option
H
1/3 step
(default)
I 1/2 step
J 1 step
Option Description
H
1/3 step
(default)
Changes to shutter speed and aperture are in increments
equivalent to
1
/3 EV.
The bracketing increment can be
selected from
1
/3,
2
/3, and 1 EV.
I 1/2 step
Changes to shutter speed and aperture are in increments
equivalent to
1
/2 EV.
The bracketing increment can be
selected from
1
/2 and 1 EV.
J 1 step
Changes to shutter speed and aperture are in increments
equivalent to 1 EV.
The bracketing increment is set to 1 EV.
This option determines whether adjustments
to exposure compensation are made in
increments equivalent to
1
/3 EV,
1
/2 EV, or 1 EV.
Option
H
1/3 step
(default)
I 1/2 step
J 1 step
315
U
b4: Easy Exposure Compensation
This option controls whether the E button is needed to set
exposure compensation (pg. 128).
If [On (Auto reset)] or [On] is
selected, the 0 at the center of the exposure display will blink even
when exposure compensation is set to ±0.
A Change Main/Sub
The dial used to set exposure compensation when [On (Auto reset)] or
[On] is selected for Custom Setting b4 ([Easy exposure compensation])
depends on the option selected for Custom Setting f7 ([Customize
command dials]) > [Change main/sub] (pg. 341).
Option Description
K
On (Auto
reset)
Exposure compensation is set by rotating one of the
command dials (see note below). The setting
selected using the command dial is reset when the
camera or exposure meters turn off (exposure
compensation settings selected using the E button
are not reset).
On
As above, except that the exposure compensation
value selected using the command dial is not reset
when the camera or exposure meters turn off.
Off
(default)
Exposure compensation is set by pressing the E
button and rotating the main command dial.
Customize command dials > Change main/sub
Off (default) On
Exposure
mode
e Sub-command dial Sub-command dial
f Sub-command dial Main command dial
g Main command dial Sub-command dial
h N/A
316
U
b5: Center-Weighted Area
Note that unless [Average] is selected, the diameter is fixed at
12 mm when a non-CPU lens is used, regardless of the setting
selected for [Non-CPU lens data] in the setup menu (pg. 218).
When [Average] is selected, the average of the entire frame will be
used for both CPU and non-CPU lenses.
b6: Fine Tune Optimal Exposure
Use this option to fine-tune the exposure value selected by the
camera.
Exposure can be fine tuned separately for each metering
method by from +1 to –1 EV in steps of
1
/6 EV.
1 Select Custom Setting b6.
Highlight Custom Setting b6
([Fine tune optimal exposure])
and press 2.
2 Select [Yes].
The message shown at right
will be displayed; highlight
[Yes] and press 2 to proceed,
or select [No] to exit without
altering exposure.
When calculating exposure, center-
weighted metering assigns the greatest
weight to a circle in the center of the frame.
The diameter (φ) of this circle can be set to
8, 12, 15, or 20 mm or to the average of the
entire frame.
Option
L φ 8mm
M φ 12 mm (default)
N φ 15 mm
O φ 20 mm
P Average
317
U
3 Select a metering method.
Highlight [Matrix metering],
[Center-weighted], or [Spot
metering] and press 2.
4 Choose an exposure value.
Press 1 or 3 to choose an
exposure value from +1 to –1
EV.
Press J to save changes
and exit.
D Fine-Tuning Exposure
Exposure can be fine-tuned separately for each Custom Settings bank and
is not affected by two-button resets.
Note that as the exposure
compensation (E) icon is not displayed, the only way to determine how
much exposure has been altered is to view the amount in the fine-tuning
menu.
Exposure compensation (pg. 128) is preferred in most situations.
318
U
c1: Shutter-Release Button AE-L
At the default setting of [Off], exposure only locks when the AE-L/
AF-L button is pressed.
If [On] is selected, exposure will also lock
when the shutter-release button is pressed halfway.
c2: Auto Meter-off Delay
Choose a shorter meter-off delay for longer battery life.
c: Timers/AE Lock
This option controls how long the camera
continues to meter exposure when no
operations are performed. Choose from 4 s,
6s, 8s, 16s, 30s, 1minute, 5minutes,
10 minutes, 30 minutes, or until the camera is
turned off ([No limit]). The shutter-speed and
aperture displays in the top control panel and
viewfinder turn off automatically when the
exposure meters turn off.
Option
Q 4s
R 6s (default)
S 8s
T 16 s
U 30 s
V 1min.
W 5min.
X 10 min.
Y 30 min.
Z No limit
319
U
c3: Self-Timer Delay
c4: Monitor off Delay
This option controls the length of the shutter
release delay in self-timer mode. Choose from
2 s, 5 s, 10 s, and 20 s.
Option
a 2s
b 5s
c 10 s (default)
d 20 s
This option controls how long the monitor
remains on when no operations are
performed. Choose from 10 s, 20 s, 1 minute, 5
minutes, or 10 minutes. Choose a shorter
monitor-off delay for longer battery life.
Regardless of the setting chosen, the monitor
remains on if no operations are performed for
about ten minutes when the camera is
powered by an optional EH-6 AC adapter.
Option
e 10 s
f 20 s (default)
g 1min.
h 5min.
i 10 min.
320
U
d1: Beep
Choose [High] or [Low] to sound a beep when the self-timer is
used or the camera focuses in single-servo autofocus (note that a
beep will not sound if [Release] is selected for Custom Setting a2
([AF-S priority selection], pg. 306).
d: Shooting/Display
Option Description
y High
Choose the pitch of the beep
from [High] and [Low].
A c
icon is displayed in the top
control panel and shooting
information displays.
z Low
Off (default) Turn the beep speaker off.
SHOOT
CUSTOM
321
U
d2: Shooting Speed
Choose the maximum frame advance rate for CH (continuous high-
speed) and C
L (continuous low-speed) modes. Note that the frame
advance rate may drop below the selected value at slow shutter
speeds, or when using VR (vibration reduction) mode with VR
lenses.
d3: Max. Continuous Release
The maximum number of shots that can be taken in a single burst
in continuous mode can be set to any value between 1 and 130.
A The Memory Buffer
Regardless of the option selected for Custom Setting d3, shooting will
slow when the memory buffer fills. See page 427 for more information on
the capacity of the memory buffer.
Option Description
Continuous
high-speed
In C
H (continuous high-speed) mode, the frame advance
rate for DX format (pg. 61) can be selected from 5 (the
default setting), 6, and 7 frames per second (fps).
Regardless of the setting chosen, the maximum frame rate
for other formats is fixed at 5 fps.
Continuous
low-speed
Choose the frame advance rate for C
L (continuous low-
speed) mode from values between 1 and 5 fps. The default
setting is 3 fps.
322
U
d4: File Number Sequence
When a photograph is taken, the camera names the file by adding
one to the last file number used.
This option controls whether file
numbering continues from the last number used when a new
folder is created, the memory card is formatted, or a new memory
card is inserted in the camera.
D File Number Sequence
If the current folder is numbered 999 and contains either 999
photographs or a photograph numbered 9999, the shutter-release button
will be disabled and no further photographs can be taken.
Choose [Reset]
for Custom Setting d4 ([File number sequence]) and then either format
the current memory card or insert a new memory card.
Option Description
On
(default)
When a new folder is created, the memory card
formatted, or a new memory card inserted in the
camera, file numbering continues from the last number
used or from the largest file number in the current
folder, whichever is higher.
If a photograph is taken
when the current folder contains a photograph
numbered 9999, a new folder will be created
automatically and file numbering will begin again from
0001.
Off
File numbering is reset to 0001 when a new folder is
created, the memory card is formatted, or a new
memory card is inserted in the camera.
Note that a
new folder is created automatically if a photograph is
taken when the current folder contains 999
photographs.
J
Reset
Same as for [On], except that the next photograph
taken is assigned a file number by adding one to the
largest file number in the current folder.
If the folder is
empty, file numbering is reset to 0001.
323
U
d5: Control Panel/Viewfinder
Choose the information displayed in the viewfinder and rear
control panel.
Option Description
Rear control
panel
Choose from [ISO sensitivity] (y; the default setting) and
[Exposures remaining] (g). If [Exposures remaining] is
selected, ISO sensitivity will only be displayed while the
ISO button is pressed.
Viewfinder
display
Choose from [Frame count] (h; the default setting) and
[Exposures remaining] (g). Note that regardless of the
option selected, memory buffer capacity will be shown
while the shutter-release button is pressed.
324
U
d6: Shooting Info Display
At the default setting of [Auto] (AUTO), the color of the lettering in
the information display (pg. 14) will automatically change from
black to white or white to black to maintain contrast with the
background.
To always use the same color lettering, select
[Manual] and choose [Dark on light] (B; black lettering) or [Light on
dark] (W; white lettering).
Monitor brightness will automatically be
adjusted for maximum contrast with the selected text color.
Dark on light Light on dark
325
U
d7: LCD Illumination
At the default setting of [Off ], the control panel backlights (LCD
illuminators) will only light while the power switch is rotated
toward D.
If [On] is selected, the control panels will be illuminated
while the exposure meters are active (pg. 50).
Select [Off] for
increased battery life.
d8: Exposure Delay Mode
At the default setting of [Off], shutter is released when the shutter-
release button is pressed.
When shooting with [Tripod] selected in
live view mode (pg. 94) or in situations where the slightest camera
movement can blur pictures, [On] can be selected to delay shutter
release until about 1 s after the shutter-release button is pressed
and the mirror is raised.
326
U
e1: Flash Sync Speed
This option controls flash sync speed.
A Fixing Shutter Speed at the Flash Sync Speed Limit
To fix shutter speed at the sync speed limit in shutter-priority auto or
manual exposure modes, select the next shutter speed after the slowest
possible shutter speed (30 s or bulb).
An X (flash sync indicator) will be
displayed in the viewfinder and top control panel.
e: Bracketing/Flash
Option Description
1/250 s (Auto FP)
Auto FP high-speed sync is used with SB-900, SB-800,
SB-600, and SB-R200 flash units.
If other flash units
are used, shutter speed is set to
1
/250 s.
When the
camera shows a shutter speed of
1
/250 s in exposure
mode e or g, auto FP high-speed sync will be
activated if the actual shutter speed is faster than
1
/250 s.
1/250 s (default) Flash sync speed set to
1
/250 s.
1/200 s Flash sync speed set to
1
/200 s.
1/160 s Flash sync speed set to
1
/160 s.
1/125 s Flash sync speed set to
1
/125 s.
1/100 s Flash sync speed set to
1
/100 s.
1/80 s Flash sync speed set to
1
/80 s.
1/60 s Flash sync speed set to
1
/60 s.
327
U
e2: Flash Shutter Speed
This option determines the slowest shutter speed available when
using front- or rear-curtain sync or red-eye reduction in
programmed auto or aperture-priority auto exposure modes
(regardless of the setting chosen, shutter speeds can be as slow as
30 s in shutter-priority auto and manual exposure modes or at
flash settings of slow sync, slow rear-curtain sync, or red-eye
reduction with slow sync).
Options range from
1
/60 s ([1/60 s], the
default setting) to 30 s ([30 s]).
e3: Modeling Flash
If [On] (the default setting) is selected when the camera is being
used with an optional flash unit that supports the Nikon Creative
Lighting System (CLS; pg. 186), the flash unit mounted on the
camera and any CLS-compatible remote flash units will emit a
modeling flash when the camera depth-of-field preview button is
pressed (pg. 113). No modeling flash is emitted if [Off] is selected.
328
U
e4: Auto Bracketing Set
Choose the setting or settings bracketed when auto bracketing
(pg. 130) is in effect.
Choose [AE & flash] (j; the default setting) to
perform both exposure and flash-level bracketing, [AE only] (k) to
bracket only exposure, [Flash only] (l) to perform only flash-level
bracketing, or [WB bracketing] (m) to perform white-balance
bracketing (pg. 135).
Note that white balance bracketing is not
available at image quality settings of NEF (RAW) or
NEF (RAW) + JPEG.
329
U
e5: Auto Bracketing (Mode M)
This option determines which settings are affected when [AE &
flash] or [AE only] is selected for Custom Setting e4 in manual
exposure mode.
Flash bracketing is performed only with i-TTL or AA flash control.
If
a setting other than [Flash only] is selected and a flash is not used,
ISO sensitivity will be fixed at the value for the first shot, regardless
of the setting selected for ISO sensitivity auto control (pg. 106).
Option Description
F
Flash/speed
(default)
Camera varies shutter speed (Custom Setting e4 set
to [AE only]) or shutter speed and flash level
(Custom Setting e4 set to [AE & flash]).
G
Flash/speed/
aperture
Camera varies shutter speed and aperture (Custom
Setting e4 set to [AE only]) or shutter speed,
aperture, and flash level (Custom Setting e4 set to
[AE & flash]).
H
Flash/
aperture
Camera varies aperture (Custom Setting e4 set to
[AE only]) or aperture and flash level (Custom
Setting e4 set to [AE & flash]).
I
Flash only
Camera varies flash level only (Custom Setting e4
set to [AE & flash]).
330
U
e6: Bracketing Order
At the default setting of [MTR]>[under]>[over] (H), bracketing is
performed in the order described on pages 132 and 136.
If
[Under]>[MTR]>[over] (I) is selected, shooting will proceed in
order from the lowest to the highest value.
331
U
f1: Multi Selector Center Button
This option determines what operations can be performed by
pressing the center of the multi selector in shooting, live view, and
playback modes.
❚❚ Shooting Mode
Selecting [Shooting mode] displays the following options:
❚❚ Playback Mode
Selecting [Playback mode] displays the following options:
f: Controls
Option Description
J
Select center
focus point
(default)
Pressing the center of the multi selector in
shooting mode selects the center focus point.
Not used
Pressing the center of the multi selector has no
effect when the camera is in shooting mode.
Option Description
n
Thumbnail
on/off
(default)
Press the center of the multi selector to toggle between
full-frame and thumbnail playback.
o
View
histograms
In both full-frame and thumbnail playback, a histogram
is displayed while the center of the multi selector is
pressed.
p
Zoom on/
off
Press the center of the multi selector to toggle between
full-frame or thumbnail playback and playback zoom.
Choose the initial zoom setting from [Low
magnification], [Medium magnification], and [High
magnification].
The zoom display will center on the
active focus point.
332
U
❚❚ Live View
Selecting [Live view] displays the following options:
f2: Multi Selector
If [Reset meter-off delay] is selected, operating the multi selector
when the exposure meters are off (pg. 50) will activate the
exposure meters.
If [Do nothing] (the default option) is selected,
the exposure meters will not be activated when the multi selector
is pressed.
f3: Photo Info/Playback
At the default setting of [Info13/Playback42], pressing 1 or 3
in full-frame playback changes the photo information displayed,
while pressing 4 or 2 displays additional images.
To reverse the
role of the multi selector buttons so that pressing 1 or 3 displays
additional images and pressing 4 or 2 changes the photo
information displayed, select [Info42/Playback13].
Option Description
J
Select center
focus point
(default)
Pressing the center of the multi selector in live
view selects the center focus point.
p
Zoom on/off
Press the center of the multi selector to toggle
zoom on and off.
Choose the initial zoom
setting from [Low magnification], [Medium
magnification], and [High magnification]. The
zoom display will center on the active focus
point.
Not used
Pressing the center of the multi selector has no
effect in live view.
333
U
f4: Assign FUNC. Button
Choose the role played by the Fn button,
either by itself ([FUNC. button press]) or
when used in combination with the
command dials ([FUNC. button+dials]).
❚❚ FUNC. Button Press
Selecting [FUNC. button press] for Custom Setting f4 displays the
following options:
Option Description
q
Preview
*
Press the Fn button to preview depth of field
(pg. 113).
r
FV lock
*
Press the Fn button to lock flash value (SB-900,
SB-800, SB-600, SB-400, and SB-R200 flash units only,
pg. 198).
Press again to cancel FV lock.
B
AE/AF lock
Focus and exposure lock while the Fn button is
pressed.
C
AE lock only Exposure locks while the Fn button is pressed.
D
AE lock
(Reset on
release)
*
Exposure locks when the Fn button is pressed, and
remains locked until the button is pressed a second
time, the shutter is released, or the exposure meters
turn off.
E
AE lock
(Hold)
*
Exposure locks when the Fn button is pressed, and
remains locked until the button is pressed a second
time or the exposure meters turn off.
F
AF lock only Focus locks while the Fn button is pressed.
s
Flash off
The flash will not fire in photos taken while the Fn
button is pressed.
334
U
Note that none of these options can be combined with [FUNC.
button+dials] > [Dynamic AF area]; see page 336.
t
Bracketing
burst
If the Fn button is pressed while exposure or flash
bracketing is active in single frame release mode, all
shots in the current bracketing program will be taken
at 5 fps while the shutter-release button is pressed.
If
white balance bracketing is active or continuous
release mode (mode C
H or CL) is selected, the camera
will repeat the bracketing burst while the shutter-
release button is held down.
L
Matrix
metering
Matrix metering is activated while the Fn button is
pressed.
M
Center-
weighted
Center-weighted metering is activated while the Fn
button is pressed.
N
Spot
metering
Spot metering is activated while the Fn button is
pressed.
u
Virtual
horizon
*
The electronic analog exposure displays act as a tilt
meter (pg. 335).
D Playback
*
The Fn button performs the same function as the K
button.
Choose when using a long lens or in other
situations in which it is difficult to operate the K
button with your left hand.
O
Access top
item in My
Menu
*
Press the Fn button to jump to the top item in “MY
MENU.
Select this option for quick access to a
frequently-used menu item.
None
(default)
No operation is performed when the Fn button is
pressed.
* This option can not be used in combination with [FUNC. button+dials] (pg. 336).
Selecting this options displays a message and sets [FUNC. button+dials] to
[None]. If another option is selected for [FUNC. button+dials] while this setting is
active, [FUNC. button press] will be set to [None].
Option Description
335
U
A Virtual Horizon
When [Virtual horizon] is selected for [FUNC. button press], the electronic
analog exposure displays in the viewfinder and top control panel act as a
horizontal level when the Fn button is pressed.
Note that the display may not be accurate when the camera is tilted at a
sharp angle forward or back.
Camera tilted right Camera level Camera tilted left
Control panel
Viewfinder
336
U
❚❚ FUNC. Button+Dials
Selecting [FUNC. button+dials] for Custom Setting f4 displays the
following options:
Option Description
i
Choose
image area
(FX/DX/5:4)
(default)
The Fn button and main command dial can be used
to select the image area from FX, DX, and 5 : 4 (pg.
60). The image area can not be changed while
shooting a multiple exposure (pg. 206).
m
Choose
image area
(FX/DX)
The Fn button and main command dial can be used
to switch between FX and DX image areas. The
image area can not be changed while shooting a
multiple exposure.
v
1 step spd/
aperture
If the Fn button is pressed when the command dials
are rotated, changes to shutter speed (exposure
modes f and h) and aperture (exposure modes g
and h) are made in increments of 1 EV, regardless of
the option selected for Custom Setting b2 ([EV steps
for exposure cntrl.], pg. 314).
w
Choose non-
CPU lens
number
Press the Fn button and rotate a command dial to
choose a lens number specified using the [Non-CPU
lens data] option (pg. 218).
x
Focus point-
selection
Press the Fn button and rotate the command dials
for vertical shooting to choose a focus point
(pg. 337).
n
Shooting
menu bank
If this option is selected, the shooting menu bank
can be selected by pressing the Fn button and
rotating a command dial.
z
Dynamic AF
area
When I (dynamic-area AF) is selected in focus
mode C (continuous-servo autofocus), the number
of focus points (pg. 307) can be selected by pressing
the Fn button and rotating a command dial.
The
focus points used for dynamic-area AF are displayed
in the viewfinder while the Fn button is pressed; if
[51 points (3D-tracking)] is selected, “3D” will be
displayed in the viewfinder.
None
No operation is performed when the command
dials are rotated while the Fn button is pressed.
337
U
Portrait (Tall-Orientation) Photographs
To use the command dials to select the focus point when framing
shots in portrait (“tall”) orientation:
1 Choose [Focus point-selection].
Select [Focus point-selection] for
Custom Setting f4 ([Assign FUNC.
button]) > [FUNC. button+dials].
2 Unlock the shutter-release
button for vertical
shooting.
Vertical shutter-release button
lock
338
U
3 Select the focus point.
With the camera in portrait (“tall”) orientation, select a focus
point by pressing the Fn button and rotating the command
dials for vertical shooting. Use the main command dial to
move the focus area selection left or right, the sub-command
dial to move it up or down.
Main command dial for vertical shooting
Sub-command dial for vertical shooting
+
+
Fn button Main command dial
for vertical shooting
Fn button Sub-command dial
for vertical shooting
339
U
f5: Assign Preview Button
Choose the role played by the depth-of-field
preview button, either by itself ([Preview
button press]) or when used in combination
with the command dials ([Preview +
command dials]).
The options available are
the same as for [FUNC. button press]
(pg. 333) and [FUNC. button+dials] (pg. 336), except that the
default option for [Preview button press] is [Preview] and that
[Preview + command dials] lacks a [Focus point-selection] option
(the default setting for [Preview + command dials] is [None]).
340
U
f6: Assign AE-L/AF-L Button
Choose the role played by the AE-L/AF-L
button, either by itself ([AE-L/AF-L button
press]) or when used in combination with the
command dials ([AE-L/AF-L+command
dials]).
The options available for [AE-L/AF-L
button press] are the same as for [FUNC.
button press] (pg. 333), except that [AE-L/AF-L button press]
defaults to [AE/AF lock] and has an additional B option (if this
option is selected, pressing the AE-L/AF-L button has the same effect
as pressing the B button to initiate autofocus).
The options
available for [AE-L/AF-L+command dials] are the same as for
[FUNC.
button+dials] (pg. 336), except that [AE-L/AF-L +command
dials] defaults to [None] and lacks [1 step spd/aperture] and [Focus
point-selection] options.
341
U
f7: Customize Command Dials
This option controls the operation of the main and sub-command
dials.
Option Description
Reverse
rotation
Controls the direction of the command dials.
Choose [No]
(the default option) for normal command dial operation, or
[Yes] to reverse the rotation of the command dials.
This
setting also applies to the command dials for vertical
shooting.
Change
main/sub
At the default setting of [Off], the main command dial
controls shutter speed and the sub-command dial controls
aperture.
If [On] is selected, the main command dial will
control aperture and the sub-command dial shutter speed.
If [On (Mode A)] is selected, the main command dial will be
used to set aperture in exposure mode g only. This setting
also applies to the command dials for vertical shooting.
342
U
D Live View
When using a CPU lens equipped with an aperture ring in live view, select
[Sub-command dial] for [Aperture setting].
Aperture
setting
At the default setting of [Sub-command dial], aperture can
only be adjusted with the sub-command dial (or with the
main command dial if [On] is selected for [Change main/
sub]).
If [Aperture ring] is selected, aperture can only be
adjusted with the lens aperture ring and the camera aperture
display will show aperture in increments of 1 EV (aperture for
type G lenses is still set using the sub-command dial).
If
[Aperture ring] is selected and a CPU lens with an aperture
ring is attached when the mode dial is rotated to a, live view
will not start and the shutter release will be disabled.
Note
that regardless of the setting chosen, the aperture ring must
be used to adjust aperture when a non-CPU lens is attached.
Menus
and
playback
At the default setting of [Off], the multi selector is used to
choose the picture displayed during full-frame playback,
highlight thumbnails, and navigate menus.
If [On] is selected,
the main command dial can be used to choose the picture
displayed during full-frame playback, move the cursor left or
right during thumbnail playback, and move the menu
highlight bar up or down.
The sub-command dial is used to
display additional photo information in full-frame playback
and to move the cursor up or down during thumbnail
playback.
While menus are displayed, rotating the sub-
command dial right displays the sub-menu for the selected
option, while rotating it left displays the previous menu.
To
make a selection, press 2, the center of the multi selector, or
J.
Option Description
343
U
f8: Release Button to Use Dial
This option allows adjustments that are normally made by holding
a button and rotating a command dial to be made by rotating the
command dial after the button is released.
At the default setting
of [No], the button must be pressed while the command dial is
rotated.
If [Yes] is selected, the setting can be changed by rotating
the command dial after the button is released.
Setting ends when
the button is pressed again, the shutter-release button is pressed
halfway, or any of the I, E, t, M, ISO, QUAL, or WB button is
pressed.
Except when [No limit] is selected for Custom Setting c2
[Auto meter-off delay], setting will also end when the exposure
meters turn off.
344
U
f9: No Memory Card?
At the default setting of [Enable release], the shutter can be
released when no memory card is inserted, although no pictures
will be recorded (they will however be displayed in the monitor in
demo mode).
If [Release locked] is selected, the shutter-release
button is only enabled when a memory card is inserted in the
camera.
Note that when photographs are being captured to a
computer using Camera Control Pro 2 (available separately),
photographs are not recorded to the camera memory card and the
shutter will be enabled regardless of the setting chosen for this
option.
345
U
f10: Reverse Indicators
At the default setting of (V), the exposure
indicators in the top control panel and shooting information
display are displayed with positive values on the left and negative
values on the right.
Select (W) to display
negative values on the left and positive values on the right.
346
U
B
The Setup Menu: Camera Setup
The setup menu contains the options listed below.
For
information on using the setup menu, see “Tutorial: Camera
Menus” (pg. 26).
Option See page
Format memory card 347
LCD brightness 347
Lock mirror up for cleaning
1
400
Video mode 348
HDMI 348
World time 349
Language 349
Image comment 350
Auto image rotation 351
Voice memo 248
Voice memo overwrite 249
Voice memo button 249
Audio output 254
USB 352
Dust off ref photo 353
Battery info 355
Wireless transmitter
2
261
Image authentication 356
Copyright information 357
Save/load settings 358
GPS 221
Virtual horizon 360
Non-CPU lens data 218
AF fine tune 361
Firmware version 362
1 Not available when battery is low.
2 Only available when optional WT-4 wireless transmitter is connected and
[MTP/PTP] selected for [USB] (pg. 352).
347
U
Format Memory Card
Format the card in the selected slot.
Note that formatting
permanently deletes all pictures and other data on the card.
Before
formatting, be sure to make backup copies as required.
D During Formatting
Do not turn the camera off or remove memory cards during formatting.
A Two-Button Format
Memory cards can also be formatted by pressing the Q (O and I)
buttons for more than two seconds (pg. 45).
LCD Brightness
Press 1 or 3 to choose from seven settings
for monitor brightness.
Choose higher
values for increased brightness, lower values
for reduced brightness.
A See Also
For information on adjusting monitor brightness
in live view, see page 99.
Lock Mirror up for Cleaning
Lock the mirror in the up position to allow inspection or manual
cleaning of the low-pass filter that protects the camera image
sensor (pg. 400).
348
U
Video Mode
When connecting the camera to a television or VCR via the A/V out
connector, be sure the camera video mode matches the device
video standard (NTSC or PAL).
HDMI
The camera is equipped with an HDMI (High-Definition
Multimedia Interface) connector, allowing pictures to be played
back on high-definition televisions or monitors using a type A
cable (available separately from commercial suppliers).
Before
connecting the camera to high-definition device, choose the
HDMI format from the options below.
The camera monitor turns off automatically when an HDMI device
is connected.
Option Description
v Auto (default)
The camera automatically selects the
appropriate format.
J 480p (progressive) 640 × 480 (progressive) format
K 576p (progressive) 720 × 576 (progressive) format
L 720p (progressive) 1,280 × 720 (progressive) format
M 1080i (interlaced) 1,920 × 1,080 (interlaced) format
349
U
World Time
Change time zones, set the camera clock, choose the date display
order, and turn daylight saving time on or off.
Language
Choose a language for camera menus and messages.
The
following options are available.
Option Description
Time zone
Choose a time zone.
The camera clock is automatically
set to the time in the new time zone.
Date and time Set the camera clock (pg. 40).
Date format
Choose the order in which the day, month, and year are
displayed.
Daylight
saving time
Turn daylight saving time on or off.
The camera clock
will automatically be advanced or set back one hour.
The default setting is [Off].
German
English
Spanish
Finnish
French
Italian
Dutch
Polish
Portuguese
Russian
Swedish
Traditional Chinese
Simplified Chinese
Japanese
Korean
350
U
Image Comment
Add a comment to new photographs as they are taken.
Comments can be viewed in ViewNX (supplied) or Capture NX 2
(available separately; pg. 391).
The comment is also visible on the
third shooting data page in the photo information display.
[Done]: Save changes and return to the setup menu.
[Input comment]: Input a comment as described on page 292.
Comments can be up to 36 characters long.
[Attach comment]: Select this option to
attach the comment to all subsequent
photographs.
[Attach comment] can be
turned on and off by highlighting it and
pressing 2.
351
U
Auto Image Rotation
Photographs taken while [On] (the default option) is selected
contain information on camera orientation, allowing them to be
rotated automatically during playback (pg. 287) or when viewed in
ViewNX (supplied) or Capture NX 2 (available separately; pg. 391).
The following orientations are recorded:
Camera orientation is not recorded when [Off] is selected.
Choose
this option when taking photographs with the lens pointing up or
down.
A Rotate Tall
To automatically rotate “tall” (portrait-orientation) photographs for
display during playback, select [On] for the [Rotate tall] option in the
playback menu (pg. 287). Note that because the camera itself is already in
the appropriate orientation during shooting, images are not rotated
automatically during image review (pg. 228).
Voice Memo
The voice memo menu contains options for recording voice
memos during shooting.
See “Voice Memos: Recording Voice
Memos” (pg. 248).
Landscape (wide)
orientation
Camera rotated 90°
clockwise
Camera rotated 90°
counter-clockwise
352
U
Voice Memo Overwrite
This option determines whether the voice memo for the last
photograph recorded can be overwritten when the camera is in
shooting mode.
See “Voice Memos: Recording Voice Memos”
(pg. 249).
Voice Memo Button
This option controls the operation of the H button.
See “Voice
Memos: Recording Voice Memos” (pg. 249).
Audio Output
Choose output options for voice memo playback.
See “Voice
Memos: Playing Voice Memos” (pg. 254).
USB
Choose a USB option for connection to a computer or PictBridge
printer.
Choose [MTP/PTP] (the default setting) when connecting
to a PictBridge printer or an optional WT-4 wireless transmitter or
when using Camera Control Pro 2 (available separately; see page
391).
See page 257 for information on selecting a USB option for
use with Nikon Transfer (supplied).
353
U
Dust off Ref Photo
Acquire reference data for the Image Dust Off option in
Capture NX 2 (available separately; for more information, see the
software manual).
[Dust off ref photo] is available only when a CPU lens is mounted
on the camera.
A non-DX lens with a focal length of at least 50 mm
is recommended.
When using a zoom lens, zoom all the way in.
1 Select [Start].
Highlight [Start] and press J.
The message shown at right will be
displayed and “rEF” will appear in the
viewfinder and top control panel.
To exit
without acquiring image dust off data,
press G.
2 Frame a featureless white object in the viewfinder.
With the lens about ten centimeters (four inches) from a well-
lit, featureless white object, frame the object so that it fills the
viewfinder and then press the shutter-release button halfway.
In autofocus mode, focus will automatically be set to infinity;
in manual focus mode, set focus to infinity manually.
354
U
3 Acquire dust off reference data.
Press the shutter-release button the rest of the way down to
acquire Image Dust Off reference data.
The monitor turns off
when the shutter-release button is pressed.
If the reference object is too bright or too
dark, the camera may be unable to
acquire Image Dust Off reference data
and the message shown at right will be
displayed.
Choose another reference
object and repeat the process from
step 1.
D Image Dust Off Reference Data
The same reference data can be used for
photographs taken with different lenses or at
different apertures.
Reference images can not be
viewed using computer imaging software.
A grid
pattern is displayed when reference images are
viewed on the camera; histograms and highlights
are not displayed.
355
U
Battery Info
View information on the battery currently
inserted in the camera.
Item Description
Bat. meter The current battery level expressed as a percentage.
Pic. meter
The number of times the shutter has been released with the
current battery since the battery was last charged.
Note
that the camera may sometimes release the shutter without
recording a photograph, for example when measuring
preset white balance.
Calibration
[j]: Due to repeated use and recharging, calibration is
required to ensure that battery level can be measured
accurately; recalibrate battery before charging (pg. 437).
[—]: Calibration not required.
Charging life
A five-level display showing battery age.
0 (k) indicates
that battery performance is unimpaired, 4 (l) that the
battery has reached the end of its charging life and should
be replaced.
Note that batteries charged at temperatures
under about 5 °C (41 °F) may show a temporary drop in
charging life; the charging life display will however return to
normal once the battery has been recharged at a
temperature of about 20 °C (68 °F) or higher.
356
U
Wireless Transmitter
This option is used to adjust settings for connection to a wireless
network, using an optional WT-4 wireless transmitter. See
“Connections: Wireless and Ethernet Networks” (pg. 261).
Image Authentication
Choose whether to embed image authentication information in
new photographs as they are taken, allowing alterations to be
detected using Nikons optional Image Authentication software.
Image authentication information can not be embedded in
existing photographs.
Photographs taken with image
authentication on are marked with a p icon on the file information
and overview data pages of the photo information display (pp.
230, 240).
D Camera Control Pro 2
Image authentication information is not embedded in TIFF (RGB)
photographs recorded directly to a computer using Camera Control Pro 2
(available separately).
A Copies
Image authentication information is not embedded in copies created
using the options in the retouch menu (pg. 363).
Option Description
s On
Image authentication information embedded in new
photographs as they are taken.
Off
(default)
Image authentication information not embedded in
new photographs.
357
U
Copyright Information
Add copyright information to new photographs as they are taken.
Copyright information is visible on the fourth shooting data page
in the photo information display (pg. 237) and can be viewed
using ViewNX (supplied) or Capture NX 2 (available separately; pg.
391).
[Done]: Save changes and return to the setup menu.
[Artist]: Enter a photographer name as described on page 292.
Photographer names can be up to 36 characters long.
[Copyright]: Enter the name of the copyright holder as described
on page 292. Copyright holder names can be up to 54 characters
long.
[Attach copyright information]: Select this
option to attach copyright information to
all subsequent photographs. [Attach
copyright information] can be turned on
and off by highlighting it and pressing 2.
D Copyright Information
To prevent unauthorized use of the artist or copyright holder names,
make sure that [Attach copyright information] is not selected and that the
[Artist] and [Copyright] fields are blank before lending or transferring the
camera to another person. Nikon does not accept liability for any
damages or disputes arising from the use of the [Copyright information]
option.
358
U
Save/Load Settings
Select [Save settings] to save the following settings to the memory
card in slot 1 (if the memory card is full, an error will be displayed;
pg 417).
Menu Option
Playback
Display mode
Image review
After delete
Rotate tall
Shooting
(all banks)
Shooting menu bank
File naming
Slot 2
Image quality
Image size
Image area
JPEG compression
NEF (RAW) recording
White balance (with fine tuning and presets d-0–d-4)
Set Picture Control
Color space
Active D-Lighting
Vignette control
Long exp.
NR
High ISO NR
ISO sensitivity settings
Live view
Custom settings
(all banks)
All Custom Settings except [Reset custom settings]
359
U
Settings saved using the D3X can be restored by selecting [Load
settings].
Note that [Save/load settings] is only available when a
memory card is inserted in slot 1, and that the [Load settings]
option is only available if the card in slot 1 contains saved settings
(the memory card in slot 2 can not be used to save or load
settings).
A Saved Settings
Settings are saved in a file named NCSETUP3.
The camera will not be able
to load settings if the file name is changed.
Setup
Video mode
HDMI
World time (excepting date and time)
Language
Image comment
Auto image rotation
Voice memo
Voice memo overwrite
Voice memo button
Audio output
USB
Image authentication
Copyright information
GPS
Non-CPU lens data
My Menu/
Recent Settings
All My Menu items
All recent settings
Choose tab
Menu Option
360
U
GPS
Adjust settings for connection to a GPS unit (pg. 221).
Virtual Horizon
Display a virtual horizon based on
information from the camera orientation
sensor.
D Tilting the Camera
The virtual horizon display is not accurate when
the camera is tilted at a sharp angle forward or
back.
A See Also
For information on using the electronic analog exposure displays as a tilt
meter, see Custom Setting f4 ([Assign FUNC. button] > [FUNC. button
press]; pg. 334).
For information on displaying a virtual horizon in live
view, see page 99.
Non-CPU Lens Data
By specifying lens data (lens focal length and maximum aperture)
for up to nine non-CPU lenses, the user can gain access to a variety
of CPU lens functions
(pg. 218).
361
U
AF Fine Tune
Fine-tune focus for up to 20 lens types. AF tuning is not
recommended in most situations; use only when required.
Option Description
AF fine
tune
(On/Off)
[On]: Turn AF tuning on.
[Off] (default): Turn AF tuning off.
Saved
value
Tune AF for the current lens (CPU
lenses only).
Press 1 or 3 to
choose a value between +20 and
–20.
Values for up to 20 lens types
can be stored.
Only one value can
be stored for each type of lens.
Default
Choose the AF tuning value used
when no previously saved value
exists for the current lens (CPU
lenses only).
Move focal
point away
from camera.
Current
value
Move focal
point toward
camera.
Previous
value
362
U
D AF Tuning
The camera may be unable to focus at minimum range or at infinity when
AF tuning is applied.
D Live View (Tripod) Mode
Tuning is not applied to contrast-detect autofocus when [Tripod] is
selected in live view mode (pg. 94).
A Saved Value
Only one value can be stored for each type of lens.
If a teleconverter is
used, separate values can be stored for each combination of lens and
teleconverter.
Firmware Version
View the current camera firmware version.
List
saved
values
List previously saved AF tuning values.
If a value exists for the
current lens, it will be shown with a V icon.
To delete a lens
from the list, highlight the desired lens and press O.
To change
a lens identifier (for example, to choose an identifier that is the
same as the last two digits of the lens serial number to
distinguish it from other lenses of the same type in light of the
fact that [Saved value] can be used with only one lens of each
type), highlight the desired lens and press 2.
The menu shown at right will be
displayed; press 1 or 3 to choose an
identifier and press J to save changes
and exit.
Option Description
363
U
N The Retouch Menu:
Creating Retouched Copies
The options in the retouch menu are used to create trimmed, or
retouched copies of the photographs on the memory card.
The
retouch menu is only displayed when a memory card containing
photographs is inserted in the camera.
For information on using
the shooting menu, see “Tutorial: Camera Menus” (pg. 26).
Option See page
i D-Lighting
*
366
j Red-eye correction
*
367
k Trim 368
l Monochrome
*
369
m Filter effects
*
370
n Color balance
*
370
o Image overlay 371
p Side-by-side comparison 374
* Not available with photographs taken with [Monochrome] selected for [Set
Picture Control] (pg. 164).
364
U
Creating Retouched Copies
1 Select an item in the
retouch menu.
Press 1 or 3 to highlight an
item, 2 to select.
Depending
on the option selected, a menu
may be displayed; highlight an
option and press 2.
2 Select a picture.
The pictures on the memory
card will be displayed.
Use the
multi selector to highlight a
picture (to view the
highlighted picture full screen,
press and hold the N button).
If two memory cards are inserted, the
slot can be selected by holding the N
button and pressing 1.
The menu
shown at right will be displayed
(pg. 228); highlight the desired slot and
press J.
3 Display retouch options.
Press J to display retouch options (see
the section for the selected option for
details).
To exit without creating a
retouched copy, press G.
365
U
4 Create a retouched copy.
Press J to create a retouched copy.
Retouched copies are indicated by a N
icon.
D Retouching Copies
Copies created with [Trim] can not be further modified.
D-lighting,
red-eye correction, filter effects, and color balance can not be applied to
monochrome copies.
Otherwise the options in the retouch menu can
each be applied once to existing copies, although this may result in loss of
detail.
A Image Quality
Except in the case of copies created with [Trim] (pg. 369) and [Image
overlay], copies created from JPEG images are the same size and quality as
the original, copies created from NEF (RAW) photos are saved as large
fine-quality JPEG images, and copies created from TIFF (RGB) photos are
saved as fine-quality JPEG images of the same size as the original.
Size-
priority compression is used when copies are saved in JPEG format.
366
U
D-Lighting
D-Lighting brightens shadows, making it ideal for dark or backlit
photographs.
Press 1 or 3 to choose the amount of
correction performed.
The effect can be
previewed in the edit display.
Press J to
copy the photograph.
Before After
367
U
Red-Eye Correction
This option is used to correct “red-eye”
caused by the flash and is available only with
photographs taken using the flash.
The
photograph selected for red-eye correction is
previewed as shown at right.
Confirm the
effects of red-eye correction and create a
copy as described in the following table.
Note that red-eye
correction may not always produce the expected results and may
in very rare circumstances be applied to portions of the image that
are not affected by red-eye; check the preview thoroughly before
proceeding.
To Use Description
Zoom in
N
+
Press N button
and rotate main
command dial right
to zoom in, left to
zoom out.
While
photo is zoomed in,
press N and use
multi selector to view areas of image not
visible in monitor.
Keep multi selector
pressed to scroll rapidly to other areas of
frame.
While N button is pressed, area
currently visible in monitor is indicated by
yellow border.
Press J to cancel zoom.
Zoom out
N
+
View other
areas of
image
N
+
Cancel
zoom
J
Create
copy
J
If the camera detects red-eye in the
selected photograph, a copy will be created
that has been processed to reduce its
effects.
No copy will be created if the
camera is unable to detect red-eye.
368
U
Trim
Create a cropped copy of the selected
photograph.
The selected photograph is
displayed with the selected crop shown in
yellow; create a cropped copy as described in
the following table.
To Use Description
Reduce size
of crop
N
+
Press N button and rotate main
command dial right to reduce the size of
the crop.
Increase size
of crop
N
+
Press N button and rotate main
command dial left to increase the size of
the crop.
Change crop
aspect ratio
Rotate the main command dial to switch
between aspect ratios of 3 : 2, 4 : 3, and
5:4.
Move crop
Use multi selector to move crop to other
area of image.
Preview crop
Press center of multi selector to preview
cropped image.
Create copy
J
Save the current crop as a separate file.
369
U
A Trim: Image Quality and Size
Copies created from NEF (RAW), NEF (RAW) + JPEG, or TIFF (RGB) photos
have an image quality (pg. 66) of JPEG fine; cropped copies created from
JPEG photos have the same image quality as the original.
The size of the
copy varies with crop size and aspect ratio.
Monochrome
Copy photographs in [Black-and-white],
[Sepia], or [Cyanotype] (blue and white
monochrome).
Selecting [Sepia] or [Cyanotype]
displays a preview of the selected
image; press 1 to increase color
saturation, 3 to decrease.
Press J
to create a monochrome copy.
Aspect ratio Possible sizes
3:2
4,864 × 3,240, 3,424 × 2,280, 2,560 × 1,704, 1,920 × 1,280,
1,280 × 856, 960 × 640, 640 × 424
4:3
4,864 × 3,648, 3,424 × 2,568, 2,560 × 1,920, 1,920 × 1,440,
1,280 × 960, 960 × 720, 640 × 480
5:4
4,560 × 3,648, 3,216 × 2,568, 2,400 × 1,920, 1,808 × 1,440,
1,200 × 960, 896 × 720, 608 × 480
Increase
saturation
Decrease
saturation
370
U
Filter Effects
Choose from the following color filter effects.
After adjusting filter
effects as described below, press J to copy the photograph.
Color Balance
Use the multi selector to create a copy with
modified color balance as shown below.
The
effect is displayed in the monitor together
with red, green, and blue histograms
(pg. 232) giving the distribution of tones in
the copy.
Press J to copy the photograph.
A Creating JPEG Copies of NEF (RAW) Pictures
To create a JPEG copy of an NEF (RAW) picture, select the NEF (RAW)
picture for [Color balance] and press
J without modifying color balance.
The JPEG copy will have an image quality of “fine” and a size of [L].
Option Description
Skylight
Creates the effect of a skylight
filter, making the picture less
blue.
The effect can be
previewed in the monitor as
shown at right.
Warm filter
Creates a copy with warm tone filter effects, giving the
copy a “warm” red cast.
The effect can be previewed in
the monitor.
Increase amount of magenta
Increase amount of green
Increase
amount of
blue
Increase
amount of
amber
371
U
Image Overlay
Image overlay combines two existing NEF (RAW) photographs to
create a single picture that is saved separately from the originals
with results that are noticeably better than photographs
combined in an imaging application because they make use of
RAW data from the camera image sensor.
The new picture is saved
at current image quality and size settings; before creating an
overlay, set image quality and size (pp. 66, 70; all options are
available).
To create a NEF (RAW) copy, choose an image quality of
[NEF (RAW)].
1 Select [Image overlay].
Highlight [Image overlay] in
the retouch menu and press 2.
The dialog shown at right will
be displayed, with [Image 1]
highlighted.
2 Display NEF (RAW) images.
Press J.
A picture selection
dialog will be displayed.
3 Highlight a photograph.
Press 134 or 2 to highlight
the first photograph in the
overlay.
To view the
highlighted photograph full
frame, press and hold the N
button.
372
U
4 Select the highlighted
photograph.
Press J to select the
highlighted photograph and
return to the preview display.
The selected image will appear
as [Image 1].
5 Set gain.
Optimize exposure for the
overlay by pressing 1 or 3 to
select the gain for image 1
from values between 0.1 and
2.0.
The default value is 1.0;
selecting 0.5 cuts gain in half, while selecting 2.0 doubles gain.
The effects of gain are visible in the [Preview] column.
6 Select the second
photograph.
Press 4 or 2 to highlight
[Image 2].
Repeat Steps 2–5 to
select the second photo and
adjust gain.
7 Highlight the [Preview]
column.
Press 4 or 2 to highlight the
[Preview] column.
373
U
8 Preview the overlay.
Press 1 or 3 to highlight
[Overlay] and press J (to save
the overlay without displaying
a preview, highlight [Save] and
press J).
To return to Step 7
and select new photos or
adjust gain, press N.
9 Save the overlay.
Press J while the preview is
displayed to save the overlay.
After an overlay is created, the
resulting image will be
displayed full-frame in the
monitor.
D Image Overlay
Only NEF (RAW) photographs created with the D3X can be selected for
image overlay.
Other images are not displayed in the selection screen.
Only NEF (RAW) photographs with the same image area and bit-depth can
be combined.
The overlay has the same photo info (including date of recording,
metering, shutter speed, aperture, exposure mode, exposure
compensation, focal length, and image orientation) and values for white
balance and picture control as the photograph selected for [Image 1].
Overlays saved in NEF (RAW) format use the compression selected for
[Type] in the [NEF (RAW) recording] menu and have the same bit depth as
the original images; JPEG overlays are saved using size-priority
compression.
+
374
U
Side-by-Side Comparison
Compare retouched copies to the original photographs.
1 Select [Side-by-side
comparison].
Highlight [Side-by-side
comparison] and press 2 to
display a picture-selection
dialog.
2 Select a picture.
Use the multi selector to
highlight a picture and press
J.
Only retouched copies
(shown by a N icon) or
photographs that have been
retouched can be selected.
To view the highlighted
photograph full frame, press and hold the N button.
375
U
3 Compare the copy with the
original.
The source image is displayed
on the left, the retouched copy
on the right, with the options
used to create the copy listed
at the top of the display.
Press
the multi selector in the
direction indicated by the
arrow adjacent to the
highlighted image (1 3 4 or 2) to switch between the
source image and the retouched copy.
To view the
highlighted picture full frame, press and hold the N button.
If the copy was created from two images using [Image
overlay], press 1 or 3 to view the other source image.
To exit
to playback mode, press the G button. To return to Step 2
with the highlighted image selected, press J or the center of
the multi selector.
D Side-by-Side Comparison
The source image will not be displayed if the copy was created from a
photograph that has since been deleted, is currently protected (pg. 244)
or hidden (pg. 281), or contains embedded image authentication
information (pg. 356).
Options used to
create copy
Source
image
Retouched
copy
376
U
O My Menu:
Creating a Custom Menu
The [My Menu] option can be used to create and edit a customized
list of options from the playback, shooting, Custom Settings,
setup, and retouch menus for quick access (up to 20 items).
If
desired, recent settings can be displayed in place of My Menu (pg.
380).
Options can be added, deleted, and reordered as described below.
For information on basic menu operations, see “Tutorial: Camera
Menus” (pg. 26).
Adding Options to My Menu
1 Select [Add items].
In My Menu (O), highlight [Add
items] and press 2
2 Select a menu.
Highlight the name of the
menu containing the option
you wish to add and press 2.
3 Select an item.
Highlight the desired menu
item and press J.
377
U
4 Position the new item.
Press 1 or 3 to move the new
item up or down in My Menu.
Press J to add the new item.
5 Add more items.
The items currently displayed in My
Menu are indicated by a check mark.
Items indicated by a V icon can not be
selected.
Repeat steps 1–4 to select
additional items.
378
U
Deleting Options from My Menu
1 Select [Remove items].
In My Menu (O), highlight [Remove items] and press 2.
2 Select items.
Highlight items and press 2 to
select or deselect.
Selected
items are indicated by a check
mark.
3 Select [Done].
Highlight [Done] and press J.
A confirmation dialog will be
displayed.
4 Delete the selected items.
Press J to delete the selected
items.
A Deleting Items in My Menu
To delete the item currently highlighted in My Menu, press the O button.
A confirmation dialog will be displayed; press O again to remove the
selected item from My Menu.
379
U
Reordering Options in My Menu
1 Select [Rank items].
In My Menu (O), highlight [Rank items] and press 2.
2 Select an item.
Highlight the item you wish to
move and press J.
3 Position the item.
Press 1 or 3 to move the
item up or down in My Menu
and press J.
Repeat Steps 2–3
to reposition additional items.
A Reordering Items in My Menu
The item currently highlighted in My Menu can be moved up or down by
pressing the N button and pressing 1 or 3. Release the N button
when the operation is complete.
380
U
Displaying Recent Settings
To display the twenty most recently used settings, select [Recent
settings] for [My Menu] > [Choose tab].
1 Select [Choose tab].
In My Menu (O), highlight
[Choose tab] and press 2.
2 Select [Recent Settings].
Highlight [Recent settings] and
press J. The name of the menu
will change from “MY MENU” to
“RECENT SETTINGS.
Menu items will be added to the top of the recent settings menu
as they are used. To view My Menu again, select [My Menu] for
[Recent settings] > [Choose tab].
n
381
n
Technical Notes
– Camera Care, Options, and Resources
This chapter covers the following topics:
Compatible Lenses......................................................... pg. 382
Other Accessories........................................................... pg. 387
Caring for the Camera ................................................... pg. 395
Storage .............................................................................................. pg. 395
Cleaning............................................................................................ pg. 395
Replacing the Focusing Screen ................................................ pg. 396
Replacing the Clock Battery....................................................... pg. 398
The Low-Pass Filter........................................................................ pg. 400
Caring for the Camera and Battery: Cautions ........... pg. 403
Troubleshooting............................................................. pg. 407
Error Messages................................................................ pg. 414
Appendix ......................................................................... pg. 421
Specifications.................................................................. pg. 431
382
n
Compatible Lenses
1 IX-Nikkor lenses can not be used.
2 Vibration Reduction (VR) supported with VR lenses.
3 Spot metering meters selected focus point.
4 The camera’s exposure metering and flash control systems do not work
properly when shifting and/or tilting the lens, or when an aperture other than
the maximum aperture is used.
5 Can not be used with shifting or tilting.
6 Manual exposure mode only.
7 Can be used with AF-S and AF-I lenses only (pg. 385).
8 With maximum effective aperture of f/5.6 or faster.
Camera setting
Focus mode
Exposure
mode
Metering system
Lens/accessory
S
C
M (with
electronic
rangefinder)
M
P
S
A
M
a
Z
b
3D Color
CPU lenses
1
Type G or D AF Nikkor
2
AF-S, AF-I Nikkor
✔✔✔
3
PC-E NIKKOR series
5
✔✔
5
5
5
3,5
PC Micro 85mm
f/2.8D
4
5
6
3
AF-S / AF-I Teleconverter
7
8
8
✔✔✔✔
3
Other AF Nikkor
(except lenses for F3AF)
9
9
✔✔✔ ✔✔
3
AI-P Nikkor
10
✔✔✔ ✔✔
3
Non-CPU lenses
11
AI-, AI-modified, Nikkor or
Nikon Series E lenses
12
10
13
14
15
Medical-Nikkor 120mm
f/4
✔✔
16
———
Reflex-Nikkor
13
——
15
PC-Nikkor
5
17
——
AI-type Teleconverter
18
8
13
14
15
PB-6 Bellows Focusing
Attachment
19
8
20
——
Auto extension rings
(PK-series 11A, 12, or 13;
PN-11)
8
13
——
383
n
9 When focusing at minimum focus distance with AF 80–200mm f/2.8, AF 35–
70mm f/2.8, AF 28–85mm f/3.5–4.5 <New>, or AF 28–85mm f/3.5–4.5 lens at
maximum zoom, in-focus indicator may be displayed when image on matte
screen in viewfinder is not in focus.
Adjust focus manually until image in
viewfinder is in focus.
10 With maximum aperture of f/5.6 or faster.
11 Some lenses can not be used (see page 384).
12 Range of rotation for AI 80–200mm f/2.8 ED tripod mount is limited by camera
body.
Filters can not be exchanged while AI 200–400mm f/4 ED is mounted on
camera.
13 If maximum aperture is specified using [Non-CPU lens data] (pg. 218), aperture
value will be displayed in viewfinder and top control panel.
14 Can be used only if lens focal length and maximum aperture are specified using
[Non-CPU lens data] (pg. 218).
Use spot or center-weighted metering if desired
results are not achieved.
15 For improved precision, specify lens focal length and maximum aperture using
[Non-CPU lens data] (pg. 218).
16 Can be used in manual exposure modes at shutter speeds slower than
1
/125 s.
17 Exposure determined by presetting lens aperture.
In aperture-priority auto
exposure mode, preset aperture using lens aperture ring before performing AE
lock and shifting lens.
In manual exposure mode, preset aperture using lens
aperture ring and determine exposure before shifting lens.
18 Exposure compensation required when used with AI 28–85mm f/3.5–4.5, AI 35–
105mm f/3.5–4.5, AI 35–135mm f/3.5–4.5, or AF-S 80–200mm f/2.8D.
See
teleconverter manual for details.
19 Requires PK-12 or PK-13 auto extension ring.
PB-6D may be required
depending on camera orientation.
20 Use preset aperture.
In aperture-priority auto exposure mode, set aperture
using focusing attachment before determining exposure and taking
photograph.
PF-4 Reprocopy Outfit requires PA-4 Camera Holder.
384
n
D Incompatible Accessories and Non-CPU Lenses
The following accessories and non-CPU lenses can
NOT be used with the
D3X:
TC-16AS AF teleconverter
Non-AI lenses
Lenses that require the AU-1
focusing unit (400mm f/4.5, 600mm
f/5.6, 800mm f/8, 1200mm f/11)
Fisheye (6mm f/5.6, 7.5mm f/5.6,
8mm f/8, OP 10mm f/5.6)
2.1cm f/4
Extension Ring K2
180–600mm f/8 ED (serial numbers
174041–174180)
360–1200mm f/11 ED (serial
numbers 174031–174127)
200–600mm f/9.5 (serial numbers
280001–300490)
AF lenses for the F3AF (AF 80mm f/
2.8, AF 200mm f/3.5 ED, AF
Teleconverter TC-16)
PC 28mm f/4 (serial number 180900
or earlier)
PC 35mm f/2.8 (serial numbers
851001–906200)
PC 35mm f/3.5 (old type)
Reflex 1000mm f/6.3 (old type)
Reflex 1000mm f/11 (serial numbers
142361–143000)
Reflex 2000mm f/11 (serial numbers
200111–200310)
A Lens f-number
The f-number given in lens names is the maximum aperture of the lens.
A Recognizing CPU and Type G and D Lenses
CPU lenses can be identified by the presence of CPU contacts, type G and
D lenses by a letter on the lens barrel.
Type G lenses are not equipped
with a lens aperture ring.
Aperture ring
CPU lens Type G lens Type D lens
CPU contacts
385
n
A The AF-S/AF-I Teleconverter
The AF-S/AF-I teleconverter can be used with the following AF-S and AF-I
lenses:
AF-S VR Micro 105mm f/2.8G ED
1
AF-S VR 200mm f/2G ED
AF-S VR 300mm f/2.8G ED
AF-S 300mm f/2.8D ED II
AF-S 300mm f/2.8D ED
AF-I 300mm f/2.8D ED
AF-S 300mm f/4D ED
2
AF-S 400mm f/2.8D ED II
AF-S 400mm f/2.8D ED
AF-I 400mm f/2.8D ED
AF-S 500mm f/4D ED II
2
AF-S 500mm f/4D ED
2
AF-I 500mm f/4D ED
2
AF-S 600mm f/4D ED II
2
AF-S 600mm f/4D ED
2
AF-I 600mm f/4D ED
2
AF-S VR 70–200mm f/2.8G ED
AF-S 80–200mm f/2.8D ED
AF-S VR 200–400mm f/4G ED
2
AF-S NIKKOR 400mm f/2.8G ED VR
AF-S NIKKOR 500mm f/4G ED VR
2
AF-S NIKKOR 600mm f/4G ED VR
2
1 Autofocus not supported.
2 Autofocus not supported when used with AF-S Teleconverter TC-17E II/TC-20E II.
A Compatible Non-CPU Lenses
If lens data are specified using [Non-CPU lens data] (pg. 218), many of the
features available with CPU lenses can also be used with non-CPU lenses.
If lens data are not specified, color matrix metering can not be used, and
center-weighted metering is used when matrix metering is selected.
Non-CPU lenses can only be used in exposure modes g and h, when
aperture must be set using the lens aperture ring.
If the maximum
aperture has not been specified using [Non-CPU lens data], the camera
aperture display will show the number of stops from maximum aperture;
the actual aperture value must be read off the lens aperture ring.
Aperture-priority auto will be selected automatically in exposure modes e
and f.
The exposure-mode indicator (e or f ) in the top control panel will
blink, and g will be displayed in the viewfinder.
386
n
A Picture Angle and Focal Length
The D3X can be used with Nikon lenses for 35mm (135) format cameras.
If
[Auto DX crop] is on (the default setting) and a 35mm format lens is
attached, the picture angle will be the same as a frame of 35mm film
(35.9 × 24.0 mm); if a DX lens is attached, the picture angle will
automatically be adjusted to 23.6 × 15.7 mm (DX format).
To choose a picture angle different from that of the current lens, turn
[Auto DX crop] off and select from [FX format (36 × 24)], [DX format
(24 × 16)], and [5 : 4 (30 × 24)].
If a 35mm format lens is attached, the
picture angle could be reduced by 1.5 × by selecting [DX format (24 × 16)],
exposing a smaller area, or the aspect ratio could be changed by selecting
[5 : 4 (30 × 24)].
The [DX format (24 × 16)] picture angle is about 1.5 times smaller than the
35mm format picture angle, while the [5 : 4 (30 × 24)] picture angle is
about 1.1 times smaller.
To calculate the focal length of lenses in 35mm
format when [DX format (24 × 16)] is selected, multiply the focal length of
the lens by about 1.5, or by about 1.1 when [5 : 4 (30 × 24)] is selected (for
example, the effective focal length of a 50mm lens in 35mm format would
be 75 mm when [DX format (24 × 16)] is selected, or 55 mm when [5 : 4
(30 × 24)] is selected).
Lens
[FX format (36 × 24)] picture size (35.9 × 24.0 mm,
equivalent to 35mm format camera)
Picture diagonal
[DX format (24 × 16)] picture size
(23.6 × 15.7 mm, equivalent to DX
format camera)
[5 : 4 (30 × 24)] picture size
(30.0 × 24.0 mm)
Picture angle ([FX format (36 × 24)];
35mm format)
Picture angle ([DX format (24 × 16)]; DX format)
Picture angle ([5 : 4 (30 × 24)])
387
n
Other Accessories
At the time of writing, the following accessories were available for
the D3X.
Power
sources
Rechargeable Li-ion Battery EN-EL4a, EN-EL4 (pp. 32, 34): Additional
EN-EL4a/EN-EL4 batteries are available from local retailers
and Nikon service representatives.
These batteries can be
recharged and calibrated using an MH-22 or MH-21 quick
charger.
Quick Charger MH-22, MH-21 (pp. 32, 437): The MH-
22,
MH-21 can
be used to recharge and calibrate EN-EL4a and EN-EL4
batteries.
AC Adapter EH-6: The EH-6 can be used to power the camera for
extended periods.
Wireless
LAN
adapters
Wireless Transmitter WT-4: Connects the camera to wireless and
Ethernet networks.
The photographs on the camera
memory card can be viewed by computers on the same
network or copied to a computer for long-term storage.
The
camera can also be controlled from any computer on the
network using Camera Control Pro 2 (available separately).
Note that the WT-4 requires an independent power source;
an EH-6 AC adapter or an EN-EL3e battery is recommended.
See the WT-4 manual for details.
388
n
Viewfinder
eyepiece
accessories
Focusing Screens (pg. 396): The focusing screens available for
the D3X are listed below.
Magnifier DG-2: The DG-2 magnifies the scene displayed in the
viewfinder.
Use for close-up photography, copying,
telephoto lenses, and other tasks that call for added
precision.
DK-18 eyepiece adapter (available separately)
required.
Antifog Finder Eyepiece DK-14, DK-17A: These viewfinder eyepieces
prevent fogging in humid or cold conditions.
The DK-17A is
equipped with a safety lock.
Rubber Eyepiece Cup DK-19: The DK-19 makes the image in the
viewfinder easier to see, preventing eye fatigue.
Type B
Brite View
clear-matte
VI focusing
screen
A type B focusing screen
is supplied with the
camera.
Type E
clear-matte
VI focusing
screen
Type E focusing screens
are etched with a grid,
making them suitable
for copying and
architectural
photography.
Best
results are achieved with
PC-Nikkor lenses.
389
n
Viewfinder
eyepiece
accessories
Diopter-adjustment viewfinder lenses: To accommodate
individual differences in vision, viewfinder lenses are
available with diopters of –3, –2, 0, +1, and +2 m
–1
(values
with camera diopter control centered at –1 m
–1
).
Use
diopter adjustment lenses only if the desired focus can not
be achieved with the built-in diopter adjustment control (–3
to +1 m
–1
).
Test diopter adjustment lenses before purchase
to ensure that the desired focus can be achieved. The
DK-17C is equipped with a safety lock.
Magnifying Eyepiece DK-17M: The DK-17M magnifies the view
through the viewfinder by approximately 1.2
× for greater
precision when framing.
Right-Angle Magnifying Viewing Attachment DR-5/Right-Angle Viewing
Attachment DR-4: The DR-5 and DR-4 attach to the viewfinder
eyepiece at a right angle, allowing the image in the
viewfinder to be viewed from above when the camera is in
the horizontal shooting position. The DR-5 can also magnify
the view through the viewfinder by 2 × for greater precision
when framing (note that the edges of the frame will not be
visible when the view is magnified).
Eyepiece Adapter DK-18: The DK-18 is used when attaching the
DG-2 Magnifier or DR-3 Right-Angle Viewing Attachment to
the D3X.
390
n
Filters
Nikon filters can be divided into three types: screw-in, slip-in,
and rear-interchange.
Use Nikon filters; filters manufactured
by other makers may interfere with autofocus or electronic
range finding.
The D3X can not be used with linear polarizing filters.
Use
the C-PL circular polarizing filter instead.
Use NC and L37C filters to protect the lens.
To prevent moiré, use of a filter is not recommended when
the subject is framed against a bright light, or when a bright
light source is in the frame.
Center-weighted metering is recommended with filters with
exposure factors (filter factors) over 1× (Y44, Y48, Y52, O56,
R60, X0, X1, C-PL, ND2S, ND4, ND4S, ND8, ND8S, ND400, A2,
A12, B2, B8, B12).
Optional
flash units
Nikon Speedlights SB-900, SB-800, SB-600, and SB-400
Nikon Wireless Remote Speedlight SB-R200 (Controlled remotely
using the SB-900, SB-800 flash unit or SU-800 wireless
Speedlight commander.)
Wireless Speedlight Commander SU-800
See page 187 for more information.
Water
guards
Water Guard WG-AS1: The optional WG-AS1 is a water guard that
covers the base of SB-900 flash units mounted on the D3X,
increasing the SB-900’s splash resistance by protecting the
accessory shoe contacts from rain and spray.
PC card
adapters
EC-AD1 PC Card Adapter: The EC-AD1 PC card adapter allows
Type I CompactFlash memory cards to be inserted in
PCMCIA card slots.
391
n
Software
Capture NX 2: A complete photo editing package with such
advanced editing features as selection control points and an
auto retouch brush.
Camera Control Pro 2: Control the camera remotely from a
computer and save photographs directly to the computer
hard disk.
Image Authentication: Determine whether photographs taken
with image authentication on have been modified after
shooting.
Note: Use the latest versions of Nikon software.
Most Nikon
software offers an auto update feature when the computer is
connected to the Internet.
Body cap
BF-1B and BF-1A Body Caps: The body cap keeps the mirror,
viewfinder screen, and low-pass filter free of dust when a
lens is not in place.
392
n
Remote
terminal
accessories
The D3X is equipped with a ten-pin
remote terminal for remote control
and automatic photography.
The
terminal is provided with a cap, which
protects the contacts when the
terminal is not in use.
The following
accessories can be used (all lengths are approximate):
Remote Cord MC-22: Remote shutter release with blue, yellow,
and black terminals for connection to a remote shutter-
triggering device, allowing control via sound or electronic
signals (length 1 m /3 ft. 3 in.).
Remote Cord MC-30: Remote shutter release; can be used to
reduce camera shake or keep the shutter open during a time
exposure (length 80 cm /2 ft. 7 in.).
Remote Cord MC-36: Remote shutter release; can be used for
interval timer photography or to reduce camera shake or
keep the shutter open during a time exposure.
Equipped
with back-lit control panel, shutter-release lock for use in
bulb photography, and timer that beeps at one-second
intervals (length 85 cm /2 ft. 9 in.).
Extension Cord MC-21: Can be connected to ML-3 or MC-series
20, 22, 23, 25, 30, or 36.
Only one MC-21 can be used at a
time (length 3 m /9 ft. 10 in.).
Connecting Cord MC-23: Connects two cameras for simultaneous
operation (length 40 cm /1 ft. 4 in.).
393
n
Remote
terminal
accessories
Adapter Cord MC-25: Ten-pin to two-pin adapter cord for
connection to devices with two-pin terminals, including the
MW-2 radio control set, MT-2 intervalometer, and ML-2
modulite control set (length 20 cm /8 in.).
GPS Adapter Cord MC-35 (pg. 221): Connects GPS devices to D3X
via PC cable supplied by manufacturer of GPS device,
allowing latitude, longitude, altitude, Coordinated Universal
Time (UTC, pg. 224), and heading to be recorded with
photographs (length 35 cm /14 in.).
GPS Unit GP-1 (pg. 221): Record latitude, longitude, altitude,
and UTC time with pictures.
Modulite Remote Control Set ML-3: Allows infrared remote control
at ranges of up to 8 m (26 ft.).
394
n
❚❚ Approved Memory Cards
The following cards have been tested and approved for use in the
D3X:
Other cards have not been tested.
For more details on the above
cards, please contact the manufacturer.
SanDisk
Extreme IV SDCFX4
8GB
4GB
2GB
Extreme III SDCFX3
8GB
4GB
2GB
1GB
Ultra II SDCFH
8GB
4GB
2GB
1GB
Standard SDCFB
4GB
2GB
1GB
Lexar Media
Professional
UDMA
300 ×
8GB
4GB
2GB
Platinum II
80 ×
2GB
1GB
512 MB
60 × 4 GB
Professional
133 × WA
8GB
4GB
2GB
1GB
80 × Lt
2GB
512 MB
Microdrive
DSCM-11000 1 GB
3K4-2 2 GB
3K4-4 4 GB
3K6 6 GB
395
n
Caring for the Camera
Storage
When the camera will not be used for an extended period, remove
the battery, and store the battery in a cool, dry area with the
terminal cover in place.
To prevent mold or mildew, store the
camera in a dry, well-ventilated area.
Do not store your camera
with naphtha or camphor moth balls or in locations that:
are poorly ventilated or subject to humidities of over 60%
are next to equipment that produces strong electromagnetic
fields, such as televisions or radios
are exposed to temperatures above 50 °C (122 °F) or below
1C (1F)
Cleaning
Do not use alcohol, thinner, or other volatile chemicals.
Camera
body
Use a blower to remove dust and lint, then wipe gently with a
soft, dry cloth.
After using the camera at the beach or seaside,
wipe off sand or salt with a cloth lightly dampened in distilled
water and dry thoroughly.
Important: Dust or other foreign
matter inside the camera may cause damage not covered under
warranty.
Lens,
mirror, and
viewfinder
These glass elements are easily damaged.
Remove dust and
lint with a blower.
If using an aerosol blower, keep the can
vertical to prevent the discharge of liquid.
To remove
fingerprints and other stains, apply a small amount of lens
cleaner to a soft cloth and clean with care.
Monitor
Remove dust and lint with a blower.
When removing
fingerprints and other stains, wipe the surface lightly with a
soft cloth or chamois leather.
Do not apply pressure, as this
could result in damage or malfunction.
396
n
Replacing the Focusing Screen
A type B clear-matte VI focusing screen is inserted in the camera at
shipment.
To insert an optional type E clear-matte VI focusing
screen for D3X cameras (pg. 388):
1 Remove the lens.
Turn the camera off and remove the lens.
2 Unlatch the screen holder.
Using the tweezers supplied with the
focusing screen, pull the focusing screen
latch towards you.
The screen holder will
spring open.
3 Remove the existing screen.
Remove the existing screen, using the
supplied tweezers and being careful to
handle the screen by the tab to avoid
scratches.
4 Insert the replacement screen.
Using the tweezers and handling the
screen by the tab, set the replacement
screen in the holder.
397
n
5 Latch the screen holder.
Push the front edge of holder upward
until it clicks into place.
D Replacing Focusing Screens
Do not touch the surface of the mirror or focusing screens.
A Framing Grids
The display in type E focusing screens may be slightly out of position
depending on how the focusing screen is placed.
398
n
Replacing the Clock Battery
The camera clock is powered by a CR1616 lithium battery with a
life of about four years.
If the B icon is displayed in the top
control panel while the exposure meters are on, the battery is
running low and needs to be replaced.
When the battery is
exhausted, the B icon will blink while the exposure meters are
on.
Photographs can still be taken but will not be stamped with
the correct time and date, and interval timer photography will not
function correctly.
Replace the battery as described below.
1 Remove the main battery.
The clock battery chamber is located on the roof of the main
battery chamber.
Turn the camera off and remove the
EN-EL4a battery.
2 Open the clock battery chamber.
Slide the clock battery chamber cover
toward the front of the main battery
chamber.
3 Remove the clock battery.
4 Insert the replacement battery.
Insert a new CR1616 lithium battery so
that the positive side (the side marked
with “+” and the battery name) is visible.
399
n
5 Close the clock battery chamber.
Slide the clock battery chamber cover
towards the back of the main battery
chamber until it clicks into place.
6 Replace the main battery.
Reinsert the EN-EL4a.
7 Set the camera clock.
Set the camera to the current date and
time (pg. 40).
Until the date and time
have been set, the B icon will flash in
the top control panel.
ACAUTION
Use only CR1616 lithium batteries. Using another type of battery could
cause an explosion.
Dispose of used batteries as directed.
D Inserting the Clock Battery
Insert the clock battery in the correct orientation.
Inserting the battery
incorrectly could not only prevent the clock from functioning but could
damage the camera.
400
n
The Low-Pass Filter
The image sensor that acts as the cameras picture element is fitted
with a low-pass filter to prevent moiré.
If you suspect that dirt or
dust on the filter is appearing in photographs, you can clean the
filter as described below.
Note, however, that the filter is
extremely delicate and easily damaged.
Nikon recommends that
the filter be cleaned only by Nikon-authorized service personnel.
1 Charge the battery or connect an AC adapter.
A reliable power source is required when inspecting or
cleaning the low-pass filter.
If the battery level is below J
(60%), turn the camera off and insert a fully-charged EN-EL4a
battery or connect an optional EH-6 AC adapter.
2 Select [Lock mirror up for cleaning].
Remove the lens and turn the camera on.
Highlight [Lock mirror up for cleaning] in
the setup menu (pg. 346) and press 2
(note that this option is not available at
battery levels of J or below).
3 Press J.
The message shown at right will be
displayed in the monitor and a row of
dashes will appear in the top control
panel and viewfinder.
To restore
normal operation without inspecting
the low-pass filter, turn the camera off.
401
n
4 Raise the mirror.
Press the shutter-release
button all the way down.
The mirror will be raised and
the shutter curtain will open, revealing the low-pass filter.
The
display in the viewfinder will turn off and the row of dashes in
the top control panel will blink.
5 Examine the low-pass filter.
Holding the camera so that light falls on
the low-pass filter, examine the filter for
dust or lint.
If no foreign objects are
present, proceed to Step 7.
6 Clean the filter.
Remove any dust and lint from the filter
with a blower.
Do not use a blower-
brush, as the bristles could damage the
filter.
Dirt that can not be removed with
a blower can only be removed by Nikon-
authorized service personnel.
Under no circumstances should
you touch or wipe the filter.
7 Turn the camera off.
The mirror will return to the down position and the shutter
curtain will close.
Replace the lens or body cap.
402
n
D Use a Reliable Power Source
The shutter curtain is delicate and easily damaged.
If the camera powers
off while the mirror is raised, the curtain will close automatically.
To
prevent damage to the curtain, observe the following precautions:
Do not turn the camera off or remove or disconnect the power source
while the mirror is raised.
If the battery runs low while the mirror is raised, a beep will sound and
the self-timer lamp will blink to warn that the shutter curtain will close
and the mirror will be lowered after about two minutes.
End cleaning or
inspection immediately.
D Foreign Matter on the Low-Pass Filter
Nikon takes every possible precaution to prevent foreign matter from
coming into contact with the low-pass filter during production and
shipping.
The D3X, however, is designed to be used with interchangeable
lenses, and foreign matter may enter the camera when lenses are
removed or exchanged.
Once inside the camera, this foreign matter may
adhere to the low-pass filter, where it may appear in photographs taken
under certain conditions.
To protect the camera when no lens is in place,
be sure to replace the body cap provided with the camera, being careful
to first remove all dust and other foreign matter that may be adhering to
the body cap.
Should foreign matter find its way onto the low-pass filter, clean the filter
as described above, or have the filter cleaned by authorized Nikon service
personnel.
Photographs affected by the presence of foreign matter on the
filter can be retouched using Capture NX 2 (available separately; pg. 391)
or the clean image options available in some third-party imaging
applications.
D Servicing the Camera and Accessories
The camera is a precision device and requires regular servicing.
Nikon
recommends that the camera be inspected by the original retailer or
Nikon service representative once every one to two years, and that it be
serviced once every three to five years (note that fees apply to these
services).
Frequent inspection and servicing are particularly
recommended if the camera is used professionally.
Any accessories
regularly used with the camera, such as lenses or optional Speedlights,
should be included when the camera is inspected or serviced.
403
n
Caring for the Camera and
Battery: Cautions
Do not drop: The product may
malfunction if subjected to strong
shocks or vibration.
Keep dry: This product is not
waterproof, and may malfunction
if immersed in water or exposed to
high levels of humidity.
Rusting of
the internal mechanism can cause
irreparable damage.
Avoid sudden changes in temperature:
Sudden changes in temperature,
such as occur when entering or
leaving a heated building on a cold
day, can cause condensation inside
the device.
To prevent
condensation, place the device in a
carrying case or plastic bag before
exposing it to sudden changes in
temperature.
Keep away from strong magnetic fields:
Do not use or store this device in
the vicinity of equipment that
generates strong electromagnetic
radiation or magnetic fields.
Strong static charges or the
magnetic fields produced by
equipment such as radio
transmitters could interfere with
the monitor, damage data stored
on the memory card, or affect the
products internal circuitry.
Do not leave the lens pointed at the sun:
Do not leave the lens pointed at
the sun or other strong light
source for an extended period.
Intense light may cause the image
sensor to deteriorate or produce a
white blur effect in photographs.
404
n
Cleaning: When cleaning the camera
body, use a blower to gently
remove dust and lint, then wipe
gently with a soft, dry cloth.
After
using the camera at the beach or
seaside, wipe off any sand or salt
using a cloth lightly dampened in
pure water and then dry the
camera thoroughly.
In rare
instances, static electricity may
cause the LCD displays to light up
or go dark.
This does not indicate a
malfunction, and the display will
soon return to normal.
The lens and mirror are easily
damaged.
Dust and lint should be
gently removed with a blower.
When using an aerosol blower,
keep the can vertical to prevent
discharge of liquid.
To remove
fingerprints and other stains from
the lens, apply a small amount of
lens cleaner to a soft cloth and
wipe the lens carefully.
See “The Low-Pass Filter” (pg. 400)
for information on cleaning the
low-pass filter.
Lens contacts: Keep the lens contacts
clean.
Do not touch the shutter curtain: The
shutter curtain is extremely thin
and easily damaged.
Under no
circumstances should you exert
pressure on the curtain, poke it
with cleaning tools, or subject it to
powerful air currents from a
blower.
These actions could
scratch, deform, or tear the curtain.
The shutter curtain may appear to
be unevenly colored, but this has
no affect on pictures and does not
indicate a malfunction.
Storage: To prevent mold or mildew,
store the camera in a dry, well-
ventilated area.
If you are using an
AC adapter, unplug the adapter to
prevent fire.
If the product will not
be used for an extended period,
remove the battery to prevent
leakage and store the camera in a
plastic bag containing a desiccant.
Do not, however, store the camera
case in a plastic bag, as this may
cause the material to deteriorate.
Note that desiccant gradually loses
its capacity to absorb moisture and
should be replaced at regular
intervals.
To prevent mold or mildew, take
the camera out of storage at least
once a month.
Turn the camera on
and release the shutter a few times
before putting it away.
Store the battery in a cool, dry
place.
Replace the terminal cover
before putting the battery away.
405
n
Turn the product off before removing or
disconnecting the power source: Do not
unplug the product or remove the
battery while the product is on or
while images are being recorded or
deleted.
Forcibly cutting power in
these circumstances could result in
loss of data or in damage to
product memory or internal
circuitry.
To prevent an accidental
interruption of power, avoid
carrying the product from one
location to another while the AC
adapter is connected.
Dry the accessory shoe cover: If the
camera is used in the rain, water
may penetrate the supplied BS-2
accessory shoe cover. Remove and
dry the accessory shoe cover after
using the camera in the rain.
Notes on the monitor: The monitor
may contain a few pixels that are
always lit or that do not light.
This
is common to all TFT LCD monitors
and does not indicate a
malfunction.
Images recorded
with the product are unaffected.
Images in the monitor may be
difficult to see in a bright light.
Do not apply pressure to the
monitor, as this could cause
damage or malfunction.
Dust or
lint on the monitor can be removed
with a blower.
Stains can be
removed by wiping lightly with a
soft cloth or chamois leather.
Should the monitor break, care
should be taken to avoid injury
from broken glass and to prevent
liquid crystal from the monitor
touching the skin or entering the
eyes and mouth.
406
n
Batteries: Dirt on the battery
terminals can prevent the camera
from functioning and should be
removed with a soft, dry cloth
before use.
Batteries may leak or explode if
improperly handled.
Observe the
following precautions when
handling batteries:
Turn the product off before
replacing the battery.
The battery may become hot when
used for extended periods.
Observe due caution when
handling the battery.
Use only batteries approved for
use in this equipment.
Do not expose the battery to flame
or excessive heat.
After removing the battery from
the camera, be sure to replace the
terminal cover.
Charge the battery before use.
When taking photographs on
important occasions, ready a spare
EN-EL4a/EN-EL4 battery and keep
it fully charged.
Depending on
your location, it may be difficult to
purchase replacement batteries on
short notice.
On cold days, the capacity of
batteries tends to decrease.
Be
sure the battery is fully charged
before taking photographs outside
in cold weather.
Keep a spare
battery in a warm place and
exchange the two as necessary.
Once warmed, a cold battery may
recover some of its charge.
Continuing to charge the battery
after it is fully charged can impair
battery performance.
Used batteries are a valuable
resource.
Please recycle used
batteries in accord with local
regulations.
407
n
Troubleshooting
If the camera fails to function as expected, check the list of
common problems below before consulting your retailer or Nikon
representative.
Refer to the page numbers in the right-most
column for more information.
❚❚ Display
A A Note on Electronically-Controlled Cameras
In extremely rare instances, unusual characters may appear in the monitor
or control panels and the camera may stop functioning.
In most cases,
this phenomenon is caused by a strong external static charge.
Turn the
camera off, remove and replace the battery, and turn the camera on again,
or, if you are using an AC adapter (available separately), disconnect and
reconnect the adapter and turn the camera on again.
In the event of
continued malfunction, contact your retailer or Nikon-authorized service
representative.
Note that disconnecting the power source as described
above may result in loss of any data not recorded to the memory card at
the time the problem occurred.
Data already recorded to the card will not
be affected.
Problem Solution Page
Viewfinder is out of focus.
Adjust viewfinder focus or use
optional diopter adjustment lenses.
47, 389
Viewfinder is dark. Insert a fully-charged battery. 48
Displays turn off without
warning.
Choose longer delays for Custom
Setting c2 ([Auto meter-off delay])
or c4 ([Monitor off delay]).
318, 319
Unusual characters
appear in control panels.
See “A Note on Electronically-
Controlled Cameras,” below.
407
Control panel or
viewfinder displays are
unresponsive and dim.
The response times and brightness
of these displays varies with
temperature.
408
n
❚❚ Shooting
Problem Solution Page
Camera takes time to turn
on.
Delete files or folders.
Shutter-release disabled.
Memory card is full or not
inserted.
42, 49
CPU lens with aperture ring
attached but aperture not locked
at highest f-number.
If B is
displayed in the top control panel,
select [Aperture ring] for Custom
Setting f7 ([Customize command
dials]) > [Aperture setting] to use
lens aperture ring to adjust
aperture.
384
Exposure mode S selected with
A selected for shutter speed.
116
Photos are out of focus.
Rotate focus-mode selector to S
or C.
74
Camera unable to focus using
autofocus: use manual focus or
focus lock.
80, 83
409
n
Full range of shutter
speeds not available.
Flash in use.
Flash sync speed can
be selected using Custom Setting
e1 ([Flash sync speed]); when using
optional SB-900, SB-800, SB-600, or
SB-R200 Speedlight, choose [1/250
s (Auto FP)] for full range of shutter
speeds.
326
Focus does not lock when
shutter-release button is
pressed halfway.
Camera is in focus mode C: use AE-L/
AF-L button to lock focus.
81
Image size can not be
changed.
[Image quality] set to [NEF (RAW)]. 70
Can not select focus point
Unlock focus selector lock.
78
Auto-area AF selected for focus
mode: choose another mode.
76
The camera is in playback mode.
225
The camera is in menu operation.
277
Press shutter-release button
halfway to turn monitor off or
activate exposure meters.
50
Camera is slow to record
photos.
Turn long exposure noise reduction
off.
300
Photos not recorded in
live view mode.
Sound of mirror clicking down
when shutter-release button was
pressed halfway in hand-held
mode was mistaken for sound of
shutter.
93
Unless [Release] is chosen for
Custom Setting a2 ([AF-S priority
selection]), shutter release is
disabled if camera is unable to
focus when focus mode S is
selected in hand-held mode.
93, 306
Problem Solution Page
410
n
Randomly-spaced bright
pixels (“noise”) appear in
photos.
Choose lower ISO sensitivity or
turn high ISO noise reduction on.
104, 300
Shutter speed is slower than 8 s:
use long exposure noise
reduction.
300
Photos are blotched or
smeared.
Clean lens.
Clean low-pass filter.
400
Colors are unnatural.
Adjust white balance to match
light source.
140
Adjust [Set Picture Control]
settings.
162
Can not measure white
balance.
Subject is too dark or too bright. 152
Image can not be selected
as source for preset white
balance.
Image was not created with D3X. 155
White balance bracketing
unavailable.
NEF (RAW) or NEF+JPEG image
quality option selected for image
quality.
66
Multiple exposure mode is in
effect.
209
Problem Solution Page
411
n
Effects of Picture Control
differ from image to
image.
A” (auto) is selected for
sharpening, contrast, or saturation.
For consistent results over a series
of photographs, choose a setting
other than “A” (auto).
168
Metering can not be
changed.
Autoexposure lock is in effect. 127
Exposure compensation
can not be used.
Choose exposure mode e, f, or g. 128
Reddish areas appear in
photos.
Reddish areas and uneven textures
may appear in long time-
exposures.
Turn long exposure
noise reduction on when shooting
at shutter speeds of “A”.
300
Textures are uneven.
Problem Solution Page
412
n
❚❚ Playback
Problem Solution Page
Flashing areas appear
in images.
Press 1 or 3 to choose photo
information displayed.
229, 282
Shooting data appear
on images.
A graph appears
during playback.
NEF (RAW) image is
not played back.
Photo was taken at image quality of NEF
+ JPEG.
67
Some photos are not
displayed during
playback.
Select [All] for [Playback folder]. 281
Tall” (portrait)
orientation photos
are displayed in
“wide” (landscape)
orientation.
Select [On] for [Rotate tall]. 287
Photo was taken with [Off] selected
for [Auto image rotation].
351
Camera was pointed up or down
when photo was taken.
351
Can not delete photo. Photo is protected: remove protection. 244
Message is displayed
stating that no
images are available
for playback.
Select [All] for [Playback folder]. 281
Can not change print
order.
Memory card is full: delete photos. 49
Can not select photo
for printing.
Photo is in NEF (RAW) format.
Transfer
to computer and print using supplied
software or
Capture NX 2
.
262
Can not print photos.
Set [USB] to [MTP/PTP]. 352
NEF (RAW) and TIFF photos can not be
printed by direct USB connection. Use
DPOF print service (TIFF images only)
or transfer to computer and print using
supplied software or Capture NX 2.
262
Photo is not
displayed on TV.
Choose correct video mode. 348
413
n
❚❚ Miscellaneous
Photo is not
displayed on high-
definition video
device.
Confirm that HDMI cable (available
separately) is connected.
276
Can not copy photos
to computer.
Choose correct [USB] option. 257
Photos not displayed
in Capture NX 2.
Update software to latest version. 391
Can not use Camera
Control Pro 2.
Set [USB] to [MTP/PTP].
257
Computer displays
NEF (RAW) images
differently from
camera.
Third-party software does not display
effects of Picture Controls, active
D-Lighting, or vignette control.
Use
ViewNX (supplied) or Capture NX 2
(available separately).
Problem Solution Page
Date of recording is
not correct.
Set camera clock. 40
Menu item can not be
selected.
Some options are not available at
certain combinations of settings.
Note
that [Battery info] option is not available
when camera is powered by optional
EH-6 AC adapter.
355
Problem Solution Page
414
n
Error Messages
This section lists the indicators and error messages that appear in
the viewfinder, top control panel, and monitor.
Indicator
Problem Solution Page
Control
panel
View-
finder
B
(blinks)
Lens aperture ring is
not set to minimum
aperture.
Set ring to minimum
aperture (largest
f-number).
38
H d Low battery.
Ready a fully-charged
spare battery.
48
H
(blinks)
d
(blinks)
Battery exhausted. Replace battery.
32, 34
G
(blinks)
d
(blinks)
Battery can not be
used.
Contact Nikon-
authorized service
representative.
B
(blinks)
Camera clock is not set. Set camera clock. 40
F
No lens attached, or
non-CPU lens attached
without specifying
maximum aperture.
Aperture shown in
stops from maximum
aperture.
Aperture value will be
displayed if maximum
aperture is specified.
218
24
(blinks)
Camera unable to focus
using autofocus.
Focus manually. 83
415
n
q
Subject too bright;
photo will be
overexposed.
Use a lower ISO
sensitivity.
104
Use optional ND filter.
In exposure mode:
390
f Increase shutter
speed
116
g Choose a smaller
aperture (larger
f-number)
118
Indicator
Problem Solution Page
Control
panel
View-
finder
416
n
r
Subject too dark; photo
will be underexposed.
Use a higher ISO
sensitivity.
104
Use optional flash.
In
exposure mode:
187
f Lower shutter
speed
116
g Choose a larger
aperture (smaller
f-number)
118
A
(blinks)
A selected in
exposure mode f.
Change shutter speed
or select manual
exposure mode.
116, 120
(blinks)
c
(blinks)
Optional flash unit that
does not support i-TTL
flash control attached
and set to TTL.
Change flash mode
setting on optional
flash unit.
191
c
(blinks)
If indicator blinks for 3s
after flash fires, photo
may be underexposed.
Check photo in
monitor; if
underexposed, adjust
settings and try again.
191
Indicator
Problem Solution Page
Control
panel
View-
finder
417
n
Y
(blinks)
Flash unit that does not
support red-eye
reduction attached and
flash sync mode set to
red-eye reduction.
Change flash sync
mode or use flash unit
that supports red-eye
reduction.
189
A
(blinks)
g
(blinks)
Memory insufficient to
record further photos
at current settings, or
camera has run out of
file or folder numbers.
Reduce quality or
size.
66, 70
Delete photographs. 281
Insert new memory
card.
42
O
(blinks)
Camera malfunction.
Release shutter.
If error
persists or appears
frequently, consult
Nikon-authorized
service representative.
Indicator
Problem Solution Page
Control
panel
View-
finder
418
n
Indicator
Problem Solution PageMonitor
Control
panel
No memory
card.
S
Camera cannot
detect memory
card.
Turn camera off and
confirm that card is
correctly inserted.
42
This memory
card cannot
be used.
Card may be
damaged.
Insert another
card.
(blinks)
Error accessing
memory card.
Use Nikon-
approved card.
394
Check that contacts
are clean.
If card is
damaged, contact
retailer or Nikon
representative.
Unable to create
new folder.
Delete files or insert
new memory card.
42, 281
This card is
not
formatted.
Format the
card.
C
(blinks)
Memory card has
not been formatted
for use in camera.
Format memory card
or insert new
memory card.
42, 45
419
n
Folder
contains no
images.
No images on
memory card or in
folder(s) selected
for playback.
Select folder
containing images
from [Playback folder]
menu or insert
different memory
card.
42, 281
All images are
hidden.
All photos in
current folder are
hidden.
No images can be
played back until
another folder has
been selected or
[Hide image] used to
allow at least one
image to be
displayed.
281
File does not
contain image
data.
File has been
created or modified
using a computer
or different make of
camera, or file is
corrupt.
File can not be played
back on camera.
Cannot select
this file
Memory card does
not contain images
that can be
retouched.
Images created with
other devices can not
be retouched.
364
Indicator
Problem Solution PageMonitor
Control
panel
420
n
Check printer. Printer error.
Check printer.
To
resume, select
[Continue] (if
available).
263
*
Check paper.
Paper in printer is
not of selected size.
Insert paper of
correct size and select
[Continue].
263
*
Paper jam.
Paper is jammed in
printer.
Clear jam and select
[Continue].
263
*
Out of paper.
Printer is out of
paper.
Insert paper of
selected size and
select [Continue].
263
*
Check ink
supply.
—Ink error.
Check ink.
To resume,
select [Continue].
263
*
Out of ink. Printer is out of ink.
Replace ink and
select [Continue].
263
*
* See printer manual for more information.
Indicator
Problem Solution PageMonitor
Control
panel
421
n
Appendix
The Appendix covers the following topics:
Defaults ................................................................................................ pg. 422
Memory Card Capacity ................................................................. pg. 427
Exposure Program .......................................................................... pg. 430
422
n
Defaults
The following defaults are restored either with a two-button reset
or using [Reset shooting menu] or [Reset custom settings].
❚❚ Defaults Restored with a Two-Button Reset (pg. 204)
1
Option Default
Shooting
menu
2
[ISO sensitivity] (pg. 104) 100
[Image quality] (pg. 66) JPEG normal
[Image size] (pg. 70) L
[White balance] (pg. 140) Auto
Fine tuning (pg. 143) Off
[Choose color temp.]
(pg. 147) 5000 K
Other
settings
Focus point (pg. 78) Center
Exposure mode (pg. 112) Programmed auto
Flexible program (pg. 115) Off
Shutter speed and aperture lock (pg. 123) Off
AE lock hold (pg. 125) Off
Exposure compensation (pg. 128) Off
Bracketing (pg. 130) Off
Flash mode (pg. 194) Front-curtain sync
FV lock (pg. 198) Off
Multiple exposure (pg. 206) Off
1 If the current Picture Control has been modified, existing settings for
the Picture Control will also be restored.
2 Only the settings in the bank currently selected using the [Shooting
menu bank] option will be reset (pg. 291).
Settings in all other banks
are unaffected.
423
n
❚❚ Defaults Restored with [Reset Shooting Menu] (pg. 293)
1
Option Default
[File naming] (pg. 296) DSC
[Slot 2] (pg. 72) Overflow
[Image quality] (pg. 66) JPEG normal
[Image size] (pg. 70) Large
[Image area] (pg. 60)
[Auto DX crop] (pg. 60) On
[Choose image area] (pg. 61) FX format (36 × 24)
[JPEG compression] (pg. 68) Size priority
[NEF (RAW) recording] (pg. 69)
[Type] (pg. 69) Lossless compressed
[NEF (RAW) bit depth] (pg. 69) 12-bit
[White balance] (pg. 140) Auto
Fine tuning (pg. 143) Off
[Choose color temp.] (pg. 147) 5000K
[Set Picture Control] (pg. 162) Standard
[Color space] (pg. 183) sRGB
[Active D-Lighting] (pg. 181) Off
[Vignette control] (pg. 299) Normal
[Long exp.
NR] (pg. 300) Off
[High ISO NR] (pg. 300) Normal
[ISO sensitivity settings] (pg. 104)
[ISO sensitivity] (pg. 104) 100
[ISO sensitivity auto control] (pg. 106) Off
[Live view] (pg. 90)
[Live view mode] (pg. 91) Hand-held
[Release mode] (pg. 91) Single frame
[Multiple exposure] (pg. 206) Reset
2
[Interval timer shooting] (pg. 211) Reset
3
1 With the exception of [Multiple exposure] and [Interval timer
shooting], only settings in the current shooting menu bank will be
reset.
2 Applies to all banks.
[Reset shooting menu] can not be selected while
shooting is in progress.
3 Applies to all banks.
Shooting ends when reset is performed.
424
n
❚❚ Defaults Restored with [Reset Custom Settings] (pg. 304)
*
Option Default
a1 [AF-C priority selection] (pg. 305) Release
a2 [AF-S priority selection] (pg. 306) Focus
a3 [Dynamic AF area] (pg. 307) 9 points
a4 [Focus tracking with lock-on] (pg. 309) Normal
a5 [AF activation] (pg. 309) Shutter/AF-ON
a6
[Focus point illumination] (pg. 310)
[Manual focus mode] On
[Continuous mode] On
[Focus point brightness] Normal
a7 [Focus point wrap-around] (pg. 311) No wrap
a8 [AF point selection] (pg. 311) 51 points
a9 [AF-ON button] (pg. 312) AF-ON
a10 [Vertical AF-ON button] (pg. 313) AF-ON
b1 [ISO sensitivity step value] (pg. 314) 1/3 step
b2 [EV steps for exposure cntrl.] (pg. 314) 1/3 step
b3 [EV steps for exposure comp.] (pg. 314) 1/3 step
b4 [Easy exposure compensation] (pg. 315) Off
b5 [Center-weighted area] (pg. 316)
ø 12 mm
b6
[Fine tune optimal exposure] (pg. 316)
[Matrix metering] 0
[Center-weighted] 0
[Spot metering] 0
c1 [Shutter-release button AE-L] (pg. 318) Off
c2 [Auto meter-off delay] (pg. 318) 6 s
c3 [Self-timer delay] (pg. 319) 10 s
c4 [Monitor off delay] (pg. 319) 20 s
* Only the settings in the bank currently selected using the [Custom
setting bank] option will be reset (pg. 304).
Settings in all other banks
are unaffected.
425
n
d1 [Beep] (pg. 320) Off
d2
[Shooting speed] (pg. 321)
[Continuous high-speed] 5 fps
[Continuous low-speed] 3 fps
d3 [Max.
continuous release] (pg. 321) 130
d4 [File number sequence] (pg. 322) On
d5
[Control panel/viewfinder] (pg. 323)
[Rear control panel] ISO sensitivity
[Viewfinder display] Frame count
d6 [Shooting info display] (pg. 324) Auto
d7 [LCD illumination] (pg. 325) Off
d8 [Exposure delay mode] (pg. 325) Off
e1 [Flash sync speed] (pg. 326) 1/250 s
e2 [Flash shutter speed] (pg. 327) 1/60 s
e3 [Modeling flash] (pg. 327) On
e4 [Auto bracketing set] (pg. 328) AE & flash
e5 [Auto bracketing (Mode M)] (pg. 329) Flash/speed
e6 [Bracketing order] (pg. 330) MTR > under > over
Option Default
426
n
f1
[Multi selector center button] (pg. 331)
[Shooting mode] Select center focus point
[Playback mode] Thumbnail on/off
[Live view] Select center focus point
f2 [Multi selector] (pg. 332) Do nothing
f3 [Photo info/playback] (pg. 332)
Info /Playback
f4
[Assign FUNC.
button] (pg. 333)
[FUNC.
button press] None
[FUNC.
button+dials]
Choose image area
(FX/DX/5:4)
f5
[Assign preview button] (pg. 339)
[Preview button press] Preview
[Preview+command dials] None
f6
[Assign AE-L/AF-L button] (pg. 340)
[AE-L/AF-L button press] AE/AF lock
[AE-L/AF-L+command dials] None
f7
[Customize command dials] (pg. 341)
[Reverse rotation] (pg. 341) No
[Change main/sub] (pg. 341) Off
[Aperture setting] (pg. 342) Sub-command dial
[Menus and playback] (pg. 342) Off
f8 [Release button to use dial] (pg. 343) No
f9 [No memory card?] (pg. 344) Enable release
f10 [Reverse indicators] (pg. 345)
Option Default
427
n
Memory Card Capacity
The following table shows the approximate number of pictures
that can be stored on a 4 GB SanDisk Extreme IV (SDCFX4) card at
different image quality, image size, and image area settings.
❚❚ FX format (36 × 24) Image Area
Image quality Image size File size
1
No.
of images
1
Buffer capacity
2
NEF (RAW), Lossless
compressed, 12-bit
27.6 MB 100 24
NEF (RAW), Lossless
compressed, 14-bit
35.6 MB 77 28
NEF (RAW),
Compressed, 12-bit
23.0 MB 137 26
NEF (RAW),
Compressed, 14-bit
29.4 MB 114 34
NEF (RAW),
Uncompressed,
12-bit
38.9 MB 100 22
NEF (RAW),
Uncompressed,
14-bit
50.6 MB 77 21
TIFF (RGB)
L73.5MB53 22
M41.5MB94 23
S 18.6 MB 210 30
JPEG fine
3
L 14.1 MB 277 44
M7.9MB491 78
S 3.6 MB 1000 80
JPEG normal
3
L7.1MB552 61
M4.0MB976 80
S 1.8 MB 2100 83
JPEG basic
3
L 3.6 MB 1000 69
M 2.1 MB 1800 82
S 0.9 MB 4100 83
428
n
❚❚ DX Format (24 × 16) Image Area
Image quality Image size File size
1
No.
of images
1
Buffer capacity
2
NEF (RAW), Lossless
compressed, 12-bit
12.1 MB 229 32
NEF (RAW), Lossless
compressed, 14-bit
15.5 MB 176 52
NEF (RAW),
Compressed, 12-bit
10.1 MB 313 38
NEF (RAW),
Compressed, 14-bit
12.9 MB 260 83
NEF (RAW),
Uncompressed,
12-bit
17.0 MB 229 29
NEF (RAW),
Uncompressed,
14-bit
22.1 MB 176 32
TIFF (RGB)
L 31.7 MB 123 24
M 17.9 MB 218 29
S 8.1 MB 484 40
JPEG fine
3
L 6.1 MB 644 76
M 3.4 MB 1100 130
S 1.6 MB 2400 130
JPEG normal
3
L 3.1 MB 1200 130
M 1.8 MB 2200 130
S 0.8 MB 4800 130
JPEG basic
3
L 1.6 MB 2400 130
M 0.9 MB 4100 130
S 0.4 MB 8900 130
429
n
1 All figures are approximate.
File size varies with scene recorded.
2 Maximum number of exposures that can be stored in memory buffer at ISO 100.
Drops if [Optimal quality] is selected for [JPEG compression], ISO sensitivity is set
to P or higher, [High ISO NR] is on when auto ISO sensitivity control is on or
ISO sensitivity is set to 500 or higher, or long exposure noise reduction, active
D-Lighting or image authentication is on.
3 Figures assume [JPEG compression] is set to [Size priority].
Selecting [Optimal
quality] increases the file size of JPEG images; number of images and buffer
capacity drop accordingly.
A d3—Max. Continuous Release (pg. 321)
The maximum number of photographs that can be taken in a single burst
can be set to any amount between 1 and 130.
430
n
Exposure Program
The exposure program for programmed auto is shown in the
following graph:
The maximum and minimum values for EV vary with ISO
sensitivity; the above graph assumes an ISO sensitivity of ISO 100
equivalent.
When matrix metering is used, values over 16
1
/3 EV
are reduced to 16
1
/3 EV.
-4
-3
12
13
-2
-1
0
1
2
3
4
5
6
7
8
9
10
11
30" 15"
8"
4" 2" 1" 2 4 8 15 30 60
125 250 500
1000
2000 4000
8000
22
21
20
19
18
17
16
15
14
[
EV
]
23
f/1.4
f/1
f/2
f/2.8
f/4
f/5.6
f/8
f/11
f/16
f/22
f/32
f/1.4 − f/16
16
1
/
3
ISO 100; lens with maximum aperture of f/1.4 and minimum
aperture of f/16 (e.g., AF 50mm f/1.4 D)
Shutter speed
Aperture
431
n
Specifications
❚❚ Nikon D3X Digital Camera
Type
Type Single-lens reflex digital camera
Lens mount Nikon F mount (with AF coupling and AF contacts)
Effective pixels
Effective pixels 24.5 million
Image sensor
Image sensor 35.9 × 24.0 mm CMOS sensor (Nikon FX format)
Total pixels 25.72 million
Dust-reduction System Image Dust Off reference data (optional Capture NX 2
software required)
Storage
Image size (pixels) FX format (36 × 24) image area
6,048 × 4,032 (L) 4,544 × 3,024 (M) 3,024 × 2,016 (S)
DX format (24 × 16) image area
3,968 × 2,640 (L) 2,976 × 1,976 (M) 1,984 × 1,320 (S)
5 : 4 (30 × 24) image area
5,056 × 4,032 (L) 3,792 × 3,024 (M) 2,528 × 2,016 (S)
File format NEF (RAW): 12 or 14 bit, lossless compressed,
compressed, or uncompressed
TIFF (RGB)
JPEG: JPEG-Baseline compliant with fine (approx. 1 : 4),
normal (approx. 1 : 8), or basic (approx. 1 : 16)
compression ([Size priority]); [Optimal quality]
compression available
NEF (RAW)+JPEG: Single photograph recorded in both
NEF (RAW) and JPEG formats
Picture Control System Can be selected from Standard, Neutral, Vivid,
Monochrome; storage for up to nine custom Picture
Controls
Media Type I and II CompactFlash memory cards (UDMA
compliant); microdrives
432
n
Double slot Slot 2 can be used for overflow or backup storage or for
separate storage of NEF (RAW) and JPEG images
File system DCF (Design Rule for Camera File System) 2.0, DPOF
(Digital Print Order Format), Exif 2.21 (Exchangeable
Image File Format for Digital Still Cameras), PictBridge
Viewfinder
Viewfinder Eye-level pentaprism single-lens reflex viewfinder
Frame coverage FX format: Approx. 100% horizontal and 100% vertical
DX format: Approx. 97% horizontal and 97% vertical
5 : 4: Approx. 97% horizontal and 100% vertical
Magnification Approx. 0.7 × (50-mm f/1.4 lens at infinity, –1.0 m
–1
)
Eyepoint 18 mm (–1.0 m
–1
)
Diopter adjustment –3+1 m
–1
Focusing screen Ships with type B BriteView Clear Matte VI screen
Reflex mirror Quick return
Depth-of-field preview When depth of field preview button is pressed, lens
aperture is stopped down to value selected by user (g
and h modes) or by camera (e and f modes)
Lens aperture Instant return, electronically controlled
Lens
Compatible lenses DX AF Nikkor: All functions supported
Type G or D AF Nikkor: All functions supported (PC Micro-
Nikkor does not support some functions).
IX Nikkor
lenses not supported.
Other AF Nikkor: All functions supported except 3D
color matrix metering II.
Lenses for F3AF not
supported.
AI-P Nikkor: All functions supported except 3D color
matrix metering II
Non-CPU: Can be used in exposure modes g and h;
electronic rangefinder can be used if maximum
aperture is f/5.6 or faster; color matrix metering and
aperture value display supported if user provides
lens data (AI lenses only)
Storage
433
n
Shutter
Type Electronically-controlled vertical-travel focal-plane
shutter
Speed
1
/8000 – 30 s in steps of
1
/3,
1
/2, or 1 EV, bulb, X250
Flash sync speed X=
1
/250 s; synchronizes with shutter at
1
/250 s or slower
Release
Release mode S (single frame), CL (continuous low speed), CH
(continuous high speed), a (live view), E (self-timer),
M
UP (mirror up)
Frame advance rate DX format (24 × 16): Up to 5 fps (CL) or 5–7 fps (CH)
Other image areas: Up to 5 fps
Self-timer Can be selected from 2, 5, 10, and 20 s duration
Exposure
Metering TTL exposure metering using 1,005-segment RGB
sensor
Metering method Matrix: 3D color matrix metering II (type G and D
lenses); color matrix metering II (other CPU lenses);
color matrix metering available with non-CPU lenses
if user provides lens data
Center-weighted: Weight of 75% given to12-mm circle
in center of frame.
Diameter of circle can be changed
to 8, 15, or 20 mm, or weighting can be based on
average of entire frame (non-CPU lenses use 12-mm
circle or average of entire frame)
Spot: Meters 4-mm circle (about 1.5% of frame)
centered on selected focus point (on center focus
point when non-CPU lens is used)
Range (ISO 100, f/1.4
lens, 20 °C/68 °F)
Matrix or center-weighted metering: 020 EV
Spot metering: 220 EV
Exposure meter coupling Combined CPU and AI
Exposure mode Programmed auto with flexible program (e); shutter-
priority auto (f); aperture priority auto (g); manual (h)
Exposure compensation –5 – +5 EV in increments of
1
/3,
1
/2, or 1 EV
Exposure bracketing 29 frames in steps of
1
/3,
1
/2,
2
/3, or 1 EV
Flash bracketing 29 frames in steps of
1
/3,
1
/2,
2
/3, or 1 EV
434
n
White balance
bracketing
29 frames in steps of 1, 2, or 3
Exposure lock Luminosity locked at detected value with AE-L/AF-L
button
ISO sensitivity
(Recommended
Exposure Index)
ISO 100 – 1600 in steps of
1
/3,
1
/2, or 1 EV.
Can also be
set to approx. 0.3, 0.5, 0.7, or 1 EV (ISO 50 equivalent)
below ISO 100 or to approx. 0.3, 0.5, 0.7, 1, or 2 EV (ISO
6400 equivalent) above ISO 1600.
Active D-Lighting Can be selected from [Auto], [Extra high], [High],
[Normal], [Low], or [Off ]
Focus
Autofocus Nikon Multi-CAM 3500FX autofocus sensor module
with TTL phase detection, fine-tuning, 51 focus points
(including 15 cross-type sensors)
Detection range –1 – +19 EV (ISO 100, 20 °C/68 °F)
Lens servo Autofocus: Single-servo AF (S); continuous-servo AF (C);
predictive focus tracking automatically activated
according to subject status
Manual (M): Electronic range finding supported
Focus point Can be selected from 51 or 11 focus points
AF-area mode Single-point AF, dynamic-area AF, auto-area AF
Focus lock Focus can be locked by pressing shutter-release button
halfway (single-servo AF) or by pressing AE-L/AF-L
button
Flash
Flash control TTL: i-TTL balanced fill-flash and standard i-TTL flash
for digital SLR using combined 1,005-segment RGB
sensor are available with SB-900, SB-800, SB-600, or
SB-400
Auto aperture: Available with SB-900 or SB-800 and CPU
lens
Non-TTL auto: Supported flash units include SB-900,
SB-800, SB-28, SB-27, and SB-22s
Distance-priority manual
: Available with SB-900 and SB-800
Flash mode Front curtain sync, slow sync, rear-curtain sync, red-eye
reduction, red-eye reduction with slow sync
Exposure
435
n
Flash-ready indicator Lights when Speedlight such as SB-900, SB-800,
SB-600, SB-400, SB-80DX, SB-28DX, or SB-50DX is fully
charged; blinks after flash is fired at full output
Accessory shoe ISO 518 hot shoe with sync and data contacts and
safety lock
Nikon Creative Lighting
System (CLS)
Advanced Wireless Lighting supported with SB-900,
SB-800, or SU-800 as commander and SB-900, SB-800,
SB-600, or SB-R200 as remotes; Auto FP High-Speed
Sync and modeling illumination supported with all
CLS-compatible flash units except SB-400; Flash Color
Information Communication and FV lock supported
with all CLS-compatible flash units
Sync terminal ISO 519 sync terminal with locking thread
White balance
White balance Auto (TTL white-balance with main image sensor and
1,005 segment RGB sensor); 7 manual modes with fine-
tuning; color temperature setting
Live view
Modes Hand-held, tripod
Autofocus Hand-held: Phase-detection AF with 51 focus points
(including 15 cross-type sensors)
Tripod: Contrast-detect AF anywhere in frame
Monitor
Monitor 3-in., 920,000-dot (VGA), low-temperature polysilicon
TFT LCD with 170 ° viewing angle, 100% frame
coverage, and brightness adjustment
Playback
Playback Full-frame and thumbnail (four or nine images)
playback with playback zoom, slide show, histogram
display, highlight display, auto image rotation, image
comment (up to 36 characters), and voice memo input
and playback
Interface
USB Hi-Speed USB
Video output Can be selected from NTSC and PAL
Flash
436
n
Unless otherwise stated, all figures are for a camera with a fully-charged
battery operating at an ambient temperature of 20 °C (68 °F).
Nikon reserves the right to change the specifications of the hardware and
software described in this manual at any time and without prior notice.
Nikon will not be held liable for damages that may result from any mistakes
that this manual may contain.
HDMI output Type A HDMI connector; camera monitor turns off
when HDMI cable is connected
Ten-pin remote terminal Can be used to connect optional remote control, GP-1
GPS unit, or GPS device compliant with NMEA0183
version 2.01 or 3.01 (requires optional MC-35 GPS
adapter cord and cable with D-sub 9-pin connector)
Supported languages
Supported languages Chinese (Simplified and Traditional), Dutch, English,
Finnish, French, German, Italian, Japanese, Korean,
Polish, Portuguese, Russian, Spanish, Swedish
Power source
Battery One rechargeable Li-ion EN-EL4a battery
AC adapter EH-6 AC adapter (available separately)
Tripod socket
Tripod socket
1
/4 in. (ISO 1222)
Dimensions/weight
Dimensions (W × H × D) Approx. 159.5 × 157 × 87.5 mm (6.3 × 6.2 × 3.4 in.)
Weight Approx. 1,220 g (2 lb 11 oz.) without battery, memory
card, body cap, or accessory shoe cover
Operating environment
Temperature 0–40 °C (32–104 °F)
Humidity Less than 85% (no condensation)
Interface
437
n
Calibrating Batteries
The MH-22 quick charger is equipped with a battery calibration
feature.
Calibrate the battery as required to ensure the accuracy of
the camera and charger battery level displays.
If the calibration lamp for the current
battery chamber blinks when a
battery is inserted, the battery needs
to be calibrated.
To begin
calibration, press the calibration
button for the current chamber for
about a second.
The time needed to
calibrate the battery is shown by the
charge and calibration lamps:
When calibration is complete, the calibration and charge lamps
will turn off and charging will begin immediately.
Although calibration is recommended for accurate measurement
of battery charge state, calibration need not be performed when
the calibration lamp blinks.
Once begun, calibration can be
interrupted as desired.
If the calibration button is not pressed while the calibration lamp
is blinking, normal charging will begin after about ten seconds.
To interrupt calibration, press the calibration button again.
Calibration will end and charging will begin.
Approximate time needed
to recalibrate battery
Calibration
lamp
Charge lamps
2 h 4 h 6 h
Over 6 hours K (glows) K (glows) K (glows) K (glows)
4 – 6 hours K (glows) K (glows) K (glows) JK (off)
2 – 4 hours K (glows) K (glows) JK (off) JK (off)
Under 2 hours K (glows) JK (off) JK (off) JK (off)
Chamber
lamps (green)
Charge lamps
(green)
Calibration
lamps (yellow)
Calibration
buttons
438
n
D Battery Warning
If the chamber and calibration lamps flash on and off in sequence when
no battery is inserted, there is a problem with the charger.
If the chamber
and calibration lamps flash on and off in sequence when a battery is
inserted, a problem has occurred with the battery or charger during
charging.
Remove the battery, unplug the charger, and take the battery
and charger to a Nikon-authorized service representative for inspection.
A Charging and Calibrating Two Batteries
The MH-22 charges only one battery at a time.
If batteries are inserted in
both chambers, they will be charged in the order inserted.
If the
calibration button for the first battery is pressed, the second battery can
not be calibrated or charged until calibration and charging of the first
battery are complete.
439
n
MH-22 quick charger
Rated input AC 100–240 V (50/60 Hz)
Rated output DC 12.6 V/1,200 mA
Supported batteries Nikon EN-EL4a/EN-EL4 rechargeable Li-ion batteries
Charging time per
battery
Approx. 2 hours and 25 minutes (EN-EL4a) or 1 hour
and 40 minutes (EN-EL4) when battery is fully
discharged
Operating temperature 0–40 °C (+32–104 °F)
Dimensions (W×H×D) Approx. 160 × 85 × 50.5 mm (6.3 × 3.3 × 2.0 in.)
Length of cord Approx. 1800 mm (5 ft. 11 in.)
Weight Approx. 260 g (9.1 oz.), excluding power cable
EN-EL4a rechargeable Li-ion battery
Type Rechargeable lithium-ion battery
Rated capacity 11.1 V/2,500 mAh
Dimensions (W×H×D) Approx. 56.5 × 27 × 82.5 mm (2.2 × 1.1 × 3.2 in.)
Weight Approx. 180 g (6.3 oz.), excluding terminal cover
440
n
A Supported Standards
DCF Version 2.0: The Design Rule for Camera File System (DCF) is a standard
widely used in the digital camera industry to ensure compatibility
among different makes of camera.
DPOF: Digital Print Order Format (DPOF) is an industry-wide standard that
allows pictures to be printed from print orders stored on the memory
card.
Exif version 2.21: The camera supports Exif (Exchangeable Image File
Format for Digital Still Cameras) version 2.21, a standard in which
information stored with photographs is used for optimal color
reproduction when the images are output on Exif-compliant printers.
PictBridge: A standard developed through cooperation with the digital
camera and printer industries, allowing photographs to be output
directly to a printer without first transferring them to a computer.
HDMI: High-Definition Multimedia Interface is a standard for multimedia
interfaces used in consumer electronics and AV devices capable of
transmitting audiovisual data and control signals to HDMI-compliant
devices via a single cable connection (the camera uses a type A
connector).
441
n
A Battery Life
The number of shots that can be taken with a fully-charged EN-EL4a
battery (2,500 mAh) varies with the condition of the battery, temperature,
and how the camera is used.
Sample figures are given below.
CIPA standard: Approximately 4,400 shots. Measured at 23 °C/73.4 °F (±2 °C/
3.6 °F) with an AF-S NIKKOR 24–70mm f/2.8G ED lens under the following
test conditions: lens cycled from infinity to minimum range and one
photograph taken at default settings once every 30 s. Live view not used.
Nikon standard: Approximately 5,300 shots. Measured at 20 °C/68 °F with an
AF-S VR 70–200mm f/2.8 ED lens under the following test conditions: image
quality set to JPEG normal, image size set to L (large), shutter speed
1
/250 s,
shutter-release button pressed halfway for three seconds and focus cycled
from infinity to minimum range three times; six shots are then taken in
succession and monitor turned on for five seconds and then turned off; cycle
repeated once exposure meters have turned off.
The following can reduce battery life:
Using the monitor
Keeping the shutter-release button pressed halfway
Repeated autofocus operations
Taking NEF (RAW) or TIFF (RGB) photographs
Slow shutter speeds
Using the optional WT-4 wireless transmitter
Using the optional GP-1 GPS unit
Using VR (vibration reduction) mode with VR lenses
To ensure that you get the most from rechargeable Nikon EN-EL4a
batteries:
Keep the battery contacts clean.
Soiled contacts can reduce battery
performance.
Use batteries immediately after charging.
Batteries will lose their charge
if left unused.
Check the condition of the battery regularly using the [Battery info]
option in the setup menu (pg. 355).
If [j] is displayed for
[Calibration], calibrate the battery using the MH-22 quick charger.
442
Index
Menu items and options in the camera monitor are shown in brackets ([ ]).
Symbols
K (Single-point AF), 76, 77
I (Dynamic-area AF), 76, 77
H (Auto-area AF), 76, 77
S, 86
C
L, 86, 88, 321
C
H, 86, 88, 321
a, 90
E (Self-timer), 100
M
UP, 102
a (Matrix), 110, 317
Z (Center-weighted), 110, 316, 317
b (Spot), 110, 317
e (Programmed auto), 114
f (Shutter-priority auto), 116
g (Aperture-priority auto), 118
h (Manual), 120
Q (Help), 31
t (Memory buffer), 55, 89, 427
L (Preset manual), 141, 148
Numerics
1,005-segment RGB sensor, 140, 193
3D color matrix metering II, 110, 111
3D-tracking, 308
A
A/V, 4, 274
cable, i, 274
AC adapter, 387
Accessories, 387
[Active D-Lighting], 181
[Active folder], 293
AE-L, 81, 125, 340
AF, 74, 305
[AF activation], 309
AF assist, 192
[AF fine tune], 361
[AF point selection], 311
AF-area brackets, 12
AF-area mode, 76
auto-area AF, 76, 77
dynamic-area AF, 76, 77, 307
single-point AF, 76, 77
[AF-C priority selection], 305
[AF-ON button], 312
B button, 75, 94, 312
B button for vertical shooting, 75,
313
[AF-S priority selection], 306
[After delete], 287
A-M switch, 37
Amber, 144, 370
Aperture, 38, 112, 118, 124
lock, 124
maximum, 84, 218
minimum, 112, 430
Aperture-priority auto, 118
[Assign AE-L/AF-L button], 340
[Assign FUNC. button], 333
[Assign preview button], 339
Audio, 254, 288, 289, 352
[Audio output], 254, 352
Auto bracketing, 130, 328, 329
[Auto bracketing (Mode M)], 329
[Auto bracketing set], 328
[AE & flash], 131, 328
[AE only], 131, 328
[Flash only], 131, 328
[WB bracketing], 135, 328
Auto FP high-speed sync, 186, 194, 326
[Auto image rotation], 351
Auto meter off, 318
[Auto meter-off delay], 318
Auto-area AF, 76, 77
Autofocus, 74, 76, 78, 80, 82, 305–313
B
Backlight, 10, 325
443
Battery, xviii–xix, 32–36, 406
[Battery info], 355
[Beep], 320
Body cap, 4, 37, 391
Bracketing, 130, 328, 329
exposure, 130, 328
flash, 130, 328
white balance, 130, 135, 328
[Bracketing order], 330
Bulb, 122
Burst, 89, 321, 334
C
C, 74, 305
Calibrating, 437
calibration, 355, 437
charging, 32
info, 355
Camera Control Pro 2, 256, 391
Capture NX 2, 66, 353, 391
Center-weighted, 110, 316, 317
[Center-weighted area], 316
Clock, 40, 41
CLS, 186
[Color balance], 370
[Color space], 183
[Adobe RGB], 183
[sRGB], 183
Color space, 183, 240
Color temperature, 140, 142, 147
CompactFlash, 42
Computer, 256
Control panel, 8–11
[Control panel/viewfinder], 323
[Copy image(s)], 283
Copying images, 283
Copyright, 237, 357
[Copyright information], 357
CPU contacts, 384
CPU lens, 38, 384
Creative Lighting System, 186
Crop, 267, 368
[Custom setting bank], 304
Custom Settings, 302
Custom Settings Menu, 302
[Customize command dials], 341
D
Date and time, 40, 349
Daylight saving time, 40, 349
DCF version 2.0, 440
Default settings, 204, 422
restoring, 204
[Delete], 281
[All], 281
[Selected], 281
Delete, 58, 245, 281
all images, 281
current image, 245
selected images, 281
Digital Print Order Format, 262, 440
Diopter, 3, 47, 389
adjustment control, 47
adjustment lens, 389
[Display mode], 282
[D-Lighting], 366
DPOF, 262
[Dust off ref photo], 353
[Dynamic AF area], 307
[51 points (3D-tracking)], 308
Dynamic-area AF, 76, 77, 307
E
[Easy exposure compensation], 315
Electronic analog exposure display,
120, 122, 128
Ethernet, 261, 387
[EV steps for exposure cntrl.], 314
[EV steps for exposure comp.], 314
Exif version 2.21, 440
Exposure, 109, 112, 125, 128, 130
bracketing, 130
lock, 125
meters, 50, 318
mode, 112
aperture-priority auto, 118
manual, 120
programmed auto, 114
shutter-priority auto, 116
Exposure bracketing, 130
444
Menu items and options in the camera monitor are shown in brackets ([ ]).
Exposure compensation, 128
[Exposure delay mode], 325
Exposure preview, 96, 99
F
File information, 230
[File naming], 296
[File number sequence], 322
[Filter effects], 370
[Skylight], 370
[Warm filter], 370
[Fine tune optimal exposure], 316
[Firmware version], 362
Flash, 130, 185, 194, 327, 328
bracketing, 130, 328
control, 193
i-TTL balanced-fill flash for digital
SLR, 193
standard i-TTL flash for digital SLR,
193
mode, 194
modeling, 327
monitor pre-flash, 186
range, 197
ready indicator, 191, 199
sync speed, 326
sync terminal, 201
[Flash shutter speed], 327
[Flash sync speed], 326
flexible, 115
Fn button, 64, 198, 333
f-number, 38, 112
Focal length, 218
Focal plane mark, 84
Focus, 74
autofocus, 74, 76, 78, 80, 82
contrast-detect, 90, 95, 97
phase-detection, 90
electronic rangefinder, 84, 382
indicator, 55, 74, 84, 305, 306
lock, 80, 82, 312
mode, 74, 305, 306
continuous-servo AF, 74, 305
manual, 74, 83, 92
single-servo AF, 74, 306
point, 51, 78, 311
contrast-detect, 90, 95, 97
tracking, 75, 77, 309
3D, 76, 77, 308
predictive, 75
[Focus point illumination], 310
[Focus point wrap-around], 311
[Focus tracking with lock-on], 309
Focusing screen, 388, 396
type B clear-matte VI, 388
type E clear-matte VI, 388
Format, 45, 347
[Format memory card], 347
Front-curtain sync, 194
FV lock, 198, 333
G
[GPS], 221
GPS, 221, 229, 238
connecting, 222
data, 229, 238
unit, 221, 393
GPS data, 238
H
[HDMI], 348
HDMI, 276, 348, 440
Help, 31
Hi, 105
[Hide image], 281
High definition, 274, 276, 348, 440
[High ISO NR], 300
Highlights, 231, 232, 282
Histogram, 232, 282
I
[Image area], 60, 63
[5:4 (30x24)], 61
[Auto DX crop], 60, 63
[Choose image area], 61, 63
[DX format (24x16)], 61
445
[FX format (36x24)], 61
Image area, 38, 60, 70, 297
[Image authentication], 356
[Image comment], 350
Image Dust Off, 353
[Image overlay], 371
[Image quality], 66
Image quality, 66
[Image review], 287
[Image size], 70
Image size, 70
[Index print], 271
In-focus indicator, 55, 74, 84, 305, 306
Information, 14, 229, 324
[Interval timer shooting], 211
Interval timer shooting, 211
[ISO sensitivity], 104
[ISO sensitivity auto control], 106
[Maximum sensitivity], 106
[Minimum shutter speed], 106
[ISO sensitivity settings], 105
ISO sensitivity, 103
[ISO sensitivity step value], 314
i-TTL, 186, 193
J
JPEG, 66, 68, 72
[JPEG compression], 68
[Optimal quality], 68
[Size priority], 68
L
L, 70
LAN, 387
[Language], 39, 349
LCD, 10, 325, 347, 404, 405
[LCD brightness], 347
[LCD illumination], 325
Lens, 37, 84, 382
attaching, 37
cap, 37, 38
cap, rear, 37
compatible, 382
CPU, 38, 384
distance information, 193
focus ring, 38
mounting index, 37, 38
non-CPU, 218, 385
data, 219
removing, 38
type D, 384
type G, 384
[Live view], 90
[Live view mode], 91, 94
[Hand-held], 91
[Tripod], 94
[Release mode], 91
Live view, 90–99
Lo, 105
[Lock mirror up for cleaning], 347
[Long exp. NR], 300
M
M (manual focus mode), 74, 83
M (medium), 70
Magenta, 144, 370
[Manage Picture Control], 170
Manual, 83, 92, 120
Mass Storage, 257, 352
Matrix, 110, 317, 334
[Max. continuous release], 321
Memory buffer, 88, 89
Memory card, 42, 347, 394
capacity of, 427
formatting, 45, 347
slot, 42, 156, 228
Metering, 110, 317, 334
center-weighted, 110
matrix, 110
selector, 53, 111
spot, 110
Microdrive, 6, 42, 394
Mirror, 86, 102
lock up for cleaning, 400
[Modeling flash], 327
Monitor, 14, 57, 90, 226, 229, 319, 395
Monitor brightness, 99, 347
[Monitor off delay], 319
[Monochrome], 369
[Black-and-white], 369
446
Menu items and options in the camera monitor are shown in brackets ([ ]).
[Cyanotype], 369
[Sepia], 369
Mounting index, 37, 38
MTP/PTP, 257, 352
[Multi selector], 332
[Multi selector center button], 331
[Multiple exposure], 206
Multiple exposure, 206
[My Menu], 376
[Add items], 376
[Rank items], 379
[Remove items], 378
N
NEF, 66, 69
NEF (RAW), 66, 69
[NEF (RAW) recording], 69
[NEF (RAW) bit depth], 69
[12-bit], 69
[14-bit], 69
[Type], 69
[Compressed], 69
[Lossless compressed], 69
[Uncompressed], 69
Nikon Transfer, 256, 259
[No memory card?], 344
[Non-CPU lens data], 218
O
Overview data, 239, 240
P
PC, 222, 259
Photo info, 229
[Photo info/playback], 332
PictBridge, 263, 440
Picture angle, 60, 297, 386
Picture Controls, 162
Playback, 57, 225, 274
folder, 281
full-frame, 226
information, 229
menu, 278
slide show, 288
thumbnail, 241, 331
zoom, 243
[Playback folder], 281
[Print (DPOF)], 268
[Border], 270
[Page size], 270
[Start printing], 270
[Time stamp], 270
Print options (PictBridge [Setup]
menu), 266
[Border], 266
[Cropping], 267
[No. of copies], 266
[Page size], 266
[Start printing], 267
[Time stamp], 266
[Print select], 268
[Border], 270
[Page size], 270
[Start printing], 270
[Time stamp], 270
[Print set (DPOF)], 272
Printing, 262
Programmed auto, 114
Protecting photographs, 244
R
Rear-curtain sync, 194
[Red-eye correction], 367
Red-eye reduction, 194
Red-eye reduction with slow sync, 195
[Release button to use dial], 343
Release mode, 85
continuous, 86, 88
high speed, 86, 88
low speed, 86, 88
live view, 86, 90
mirror up, 86, 102
self-timer, 86, 100
single frame, 86
Remote cord, 392
Reset, 204, 293, 304, 422
447
[Reset custom settings], 304
[Reset shooting menu], 293
[Reverse indicators], 345
RGB color space, 184
RGB histogram, 232, 282
[Rotate tall], 287
S
S (single-point AF), 76
S (single-servo AF), 74, 80
S (small), 70
[Save/load settings], 358
Saving camera settings, 358
[Self-timer delay], 319
Sensitivity, 103
[Set Picture Control], 164
[Monochrome], 164
[Filter effects], 167, 169
[Toning], 167, 169
[Neutral], 164
[Standard], 164
[Vivid], 164
Setup menu, 346
Shooting data, 234, 235, 236, 237
[Shooting info display], 324
Shooting menu, 290
[Shooting menu bank], 291
[Shooting speed], 321
Shutter speed, 116, 123
auto FP high-speed sync, 186, 194,
326
flash sync speed, 194, 326
lock, 123
Shutter-priority auto, 116
Shutter-release button, 3, 56
[Shutter-release button AE-L], 318
[Side-by-side comparison], 374
Single-point AF, 76
Size, 70
[Slide show], 288
[Frame interval], 288
Slide show, 288
[Slot 2], 72, 296
[Backup], 72
[Overflow], 72
[RAW Slot 1-JPEG Slot 2], 72
Slot selection, 156, 228, 279, 364
Slow sync, 194
Speedlight, 186
Spot, 110, 317
T
Television, 274
Ten-pin remote terminal, 4, 221, 392
Thumbnail, 241, 331
TIFF (RGB), 66
Time, 40, 349
Time exposure, 392
Timer, 100, 211
[Trim], 368
Two-button reset, 204
U
[USB], 257, 352
[Mass Storage], 257, 352
[MTP/PTP], 257, 352
USB, 256, 352
cable, i, 256
V
[Vertical AF-ON button], 313
Vertical shutter-release button lock,
337
Video, 274, 348
[Video mode], 348
Viewfinder, xviii, 6, 7, 12, 47, 388, 389,
407
eyepiece, 47, 100, 213, 388, 389
focus, 47
ViewNX, 163, 350
[Vignette control], 299
[Virtual horizon], 360
Virtual horizon, 99, 335, 360
[Voice memo], 248, 351
Voice memo, 227, 246, 247–254
[Voice memo button], 249, 352
[Voice memo overwrite], 249, 352
W
WB, 6, 146
[White balance], 140
[Auto], 140
448
Menu items and options in the camera monitor are shown in brackets ([ ]).
[Choose color temp.], 141
[Cloudy], 141
[Direct sunlight], 140
[Flash], 141
[Fluorescent], 140
[Incandescent], 140
[Preset manual], 141
[Shade], 141
White balance, 139
bracketing, 130, 135
preset manual, 141, 148
Wireless, 187, 261, 262, 356, 387
network, 261
transmitter, 261, 356
[Wireless transmitter], 356
[World time], 40, 349
[Date and time], 349
[Date format], 349
[Daylight saving time], 349
[Time zone], 349
WT-4, 261, 262, 356, 387
Printed in Japan
SB0C04(11)
6MB03911-04
No reproduction in any form of this manual, in whole or in part
(except for brief quotation in critical articles or reviews), may be
made without written authorization from NIKON CORPORATION.
19


Need help? Post your question in this forum.

Forumrules


Report abuse

Libble takes abuse of its services very seriously. We're committed to dealing with such abuse according to the laws in your country of residence. When you submit a report, we'll investigate it and take the appropriate action. We'll get back to you only if we require additional details or have more information to share.

Product:

For example, Anti-Semitic content, racist content, or material that could result in a violent physical act.

For example, a credit card number, a personal identification number, or an unlisted home address. Note that email addresses and full names are not considered private information.

Forumrules

To achieve meaningful questions, we apply the following rules:

Register

Register getting emails for Nikon D3X at:


You will receive an email to register for one or both of the options.


Get your user manual by e-mail

Enter your email address to receive the manual of Nikon D3X in the language / languages: English as an attachment in your email.

The manual is 18,41 mb in size.


You will receive the manual in your email within minutes. If you have not received an email, then probably have entered the wrong email address or your mailbox is too full. In addition, it may be that your ISP may have a maximum size for emails to receive.

Others manual(s) of Nikon D3X

Nikon D3X User Manual - German - 476 pages

Nikon D3X User Manual - Dutch - 476 pages

Nikon D3X User Manual - French - 476 pages


The manual is sent by email. Check your email

If you have not received an email with the manual within fifteen minutes, it may be that you have a entered a wrong email address or that your ISP has set a maximum size to receive email that is smaller than the size of the manual.

The email address you have provided is not correct.

Please check the email address and correct it.

Your question is posted on this page

Would you like to receive an email when new answers and questions are posted? Please enter your email address.


Info