252 253
Ro
En
Jp
Fr
Es
Pt
Ru
Se
Nl
De
It
Dk
Pl
Hu
Cz
Fi
No
Ro
En
Jp
Fr
Es
Pt
Ru
Se
Nl
De
It
Dk
Pl
Hu
Cz
Fi
No
Sumar operaţii
Atenţie — f
reglare
cele specificate aici, pot duce la e
radiaţii periculoase
1.Instalarea unei baterii în compartimentul
bateriei. (Vezi "Înlocuirea ba
2. Reglajul dioptric
Reglaţi dioptriile pentru a obţine o imagine clară pe
ecranul L
Mai întâi, rotiţi inelul de reglare a dioptriilor în sens
antiorar până se opreşte complet
aparatul pentru a activa L
telemetrul laser Nikon. Rotiţi inelul de reglare
a dioptriilor în sens orar
focalizează.
Dacă dioptriile nu sunt reglate pentru a corespunde
vederii dvs., aţi put
subiectul.
3. Măsurarea
Î
reglarea unităţilor de măsură.
Measurement
1. Press the POWER button for power-on.
(Power turns off 8 seconds after the last
operation.)
Immediately after power-on.
(Initializing)
Stand-by. Target focusing.
2. Aim at the target
.
3. Press POWER button once to start
continuous measurement for 8 seconds.
(Single measurement mode is not
available with this laser rangefinder.)
Measuring.
4. For 8 seconds, the internal display shows “distance” and “fail to measure” indicator alternately.
(Laser irradiation mark is blinking.)
Failure to measure or
unable to measure distance.
Displays the measured
figure. (Target 1)
Displays the measured
figure. (Target 2)
5. After continuous measurement, the measured results are displayed for 8 seconds, then power
turns off.
If you press the POWER button during power-on (while the internal display is lit), another
8-second measurement starts.
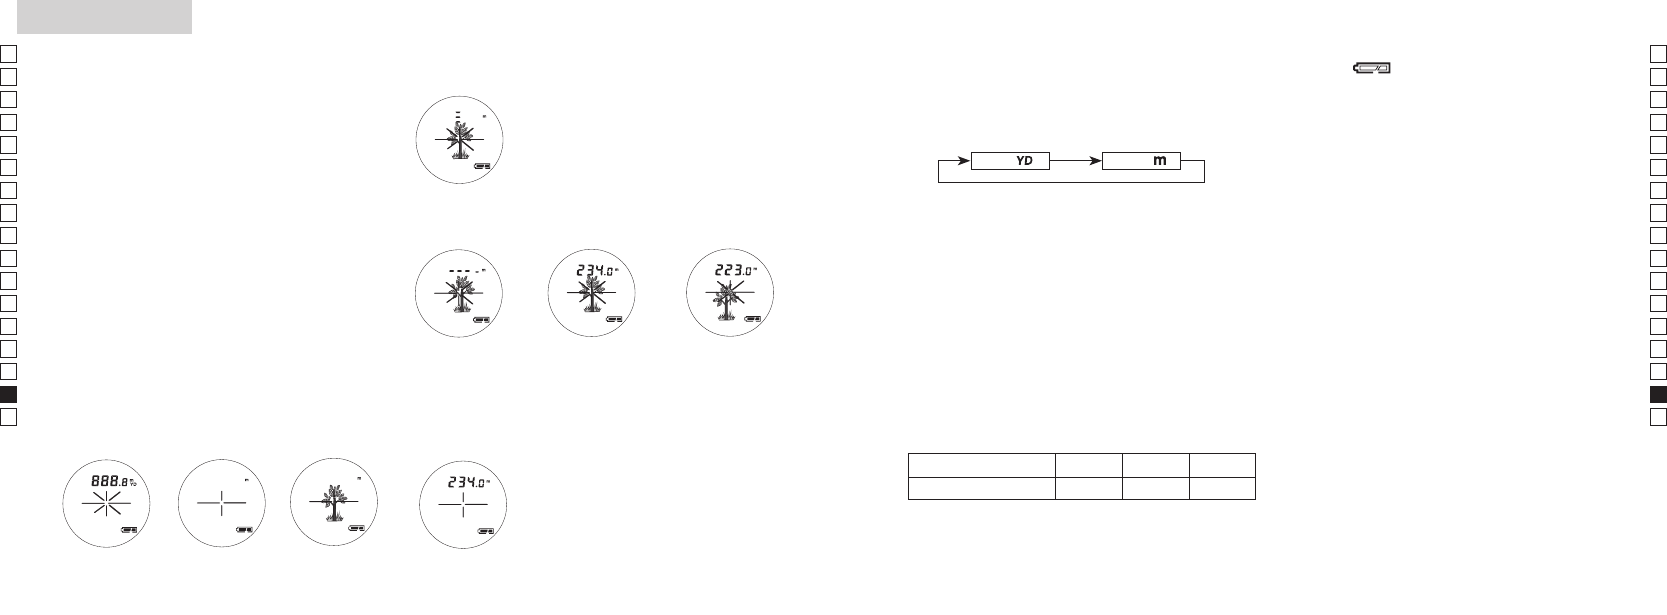
1. Apăsaţi butonul
POWER pentru
pornire.
2. îndreptaţi către
ţintă.
Imediat după pornire.
(Iniţializare)
Aşteptare. V
3. Apăsaţi butonul POWER (PORNIRE) o dată pentru a porni măsurarea
continuă timp de 8 secunde. (Modul o singură măsurare nu est
disponibil cu acest telemetru laser
Măsurare.
4.
şi "eroare de măsurar
Eroare de măsurare
sau imposibilitate de a
măsura distanţa.
Afişează figura
măsurată. (
Afişează figura
măsurată. (
Measurement
1. Press the POWER button for power-on.
(Power turns off 8 seconds after the last
operation.)
Immediately after power-on.
(Initializing)
Stand-by. Target focusing.
2. Aim at the target
.
3. Press POWER button once to start
continuous measurement for 8 seconds.
(Single measurement mode is not
available with this laser rangefinder.)
Measuring.
4. For 8 seconds, the internal display shows “distance” and “fail to measure” indicator alternately.
(Laser irradiation mark is blinking.)
Failure to measure or
unable to measure distance.
Displays the measured
figure. (Target 1)
Displays the measured
figure. (Target 2)
5. After continuous measurement, the measured results are displayed for 8 seconds, then power
turns off.
If you press the POWER button during power-on (while the internal display is lit), another
8-second measurement starts.
5. După măsurarea continuă, sunt afişate r
timp de 8 secunde, apoi aparatul se opreşte
butonul POWER (PORNIRE) în timpul pornirii (în timp ce afişajul
intern este activ), porneşte o altă măsurare de 8 secunde.
Când măsuraţi distanţa până la un jalon la un parcurs de golf
exemplu, scanarea jalonului în timpul măsur
uşor măsurarea. Dacă nu există obiecte între dvs
scurt rezultat este distanţa până la jalon.
4. Selectarea unităţilor de măsură din afișaj (reglarea
implicită din fabrică este yard)
1.
2. butonul MODE (2 secunde
sau mai mult).
3.
butonul MODE.
4.
fi convertite şi afişate în unitatea de măsur
de dvs.
Metru [ ]Ya [ ]
6. Indicarea bateriei descărcate
Clipirea indică faptul că tensiunea bateriei
este mică şi bateria trebuie înlocuită. (Vezi
"Înlocuirea bateriei")
7. Lumina de fundal
Folosiţi lumina de fundal pen
L
Prin apăsarea scurtă a butonului MODE (mai puţin
de 2 secunde) în timp ce alimentarea este pornită,
lumina de fundal pate fi pornită şi oprită. Lumina
de fundal poate fi oprită şi prin oprirea alimentării
telemetrului laser
fi oprită când alimentarea telemetrului laser va fi
pornită din nou.
5. Afișarea distanţ
COOLSHO
ţinte.
Când obţineţi rezultate dif
de măsurare, el va afişa distan
apropiată ţintă pe panul L
de. ex.) Când măsuraţi un c
V
Acest lucru este f
Pom Gard Casă
Distanţa până la ţintă 115 m 123 m 128 m