236 237
Cz
En
Jp
Fr
Es
Pt
Ru
Se
Nl
De
It
Dk
Pl
Hu
Fi
No
Ro
Cz
En
Jp
Fr
Es
Pt
Ru
Se
Nl
De
It
Dk
Pl
Hu
Fi
No
Ro
Prov
Používání o
vykonávání postupů jinak, než jsou uveden
této příručc
nebezpečnému záření.
1.
"Výměna baterie")
2. Dioptrické nastavení
Nastavte dioptrii pro získání jasného obrazu na LCD
Nejdříve otáčejte kroužkem dioptrického nastavení
proti směru hodinových ručiček až se úplně zastaví.
Potom zapnět
se díváte přes laser Nikon. O
kroužkem dioptrického nastavení ve směru
hodinových ručiček až se displej zaostří.
Pokud není dioptrie nastavena tak, aby odpovídala
vašemu zraku, možná nebudete schopen sprá
zaostřit svůj předmět.
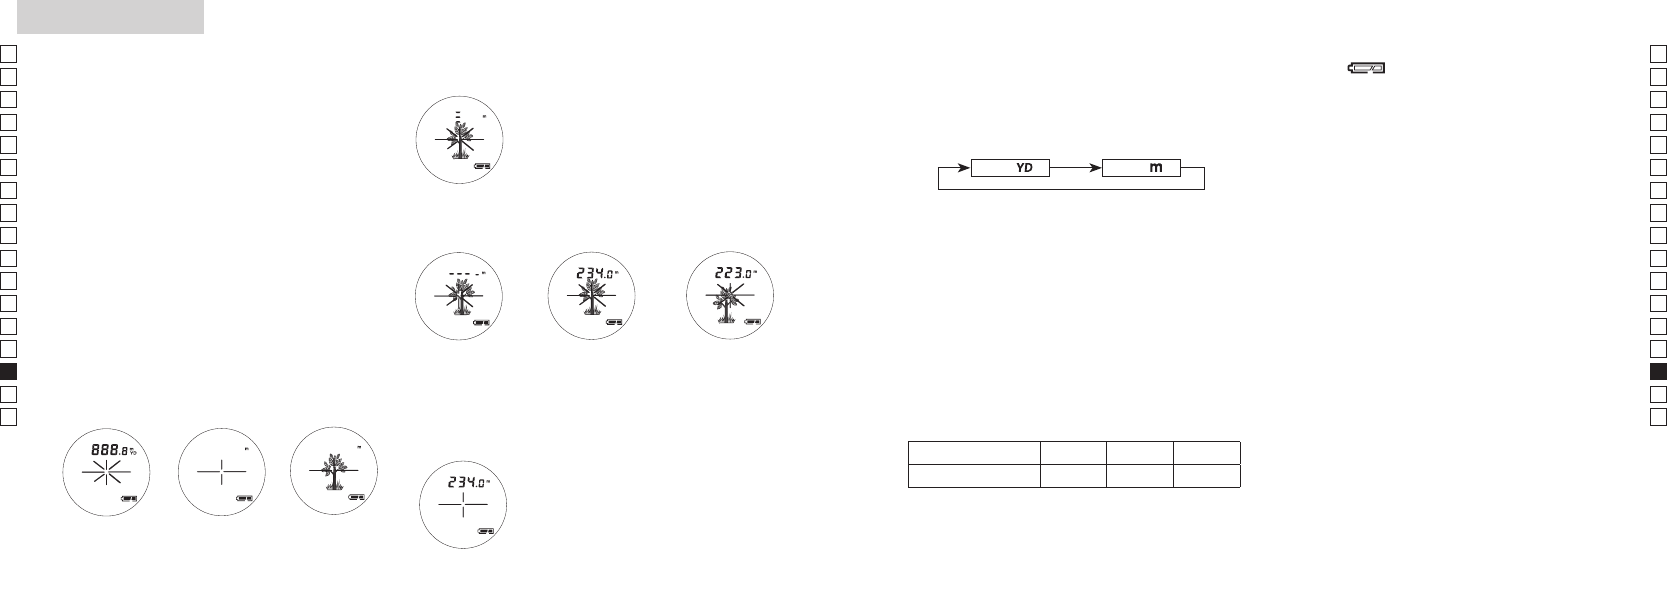
3. Měření
Před měřením zkontrolujt
Measurement
1. Press the POWER button for power-on.
(Power turns off 8 seconds after the last
operation.)
Immediately after power-on.
(Initializing)
Stand-by. Target focusing.
2. Aim at the target
.
3. Press POWER button once to start
continuous measurement for 8 seconds.
(Single measurement mode is not
available with this laser rangefinder.)
Measuring.
4. For 8 seconds, the internal display shows “distance” and “fail to measure” indicator alternately.
(Laser irradiation mark is blinking.)
Failure to measure or
unable to measure distance.
Displays the measured
figure. (Target 1)
Displays the measured
figure. (Target 2)
5. After continuous measurement, the measured results are displayed for 8 seconds, then power
turns off.
If you press the POWER button during power-on (while the internal display is lit), another
8-second measurement starts.
1. Stiskněte tlačítko
POWER pro zapnutí.
2. Zamiřte na cíl.
3. Jedním stisknutím tlačítka POWER spustíte tr
8 sekund. (Režim jednotlivého měření není u tohoto laser
dálkoměru k dispozici.)
Měření.
4. Po dobu 8 sekund se bude na vnitřním displeji střídavě zobr
ukazatel
Porucha měření nebo
neschopen změř
vzdálenost.
Zobrazí
naměřenou
hodnotu. (Cíl 1)
Zobrazí naměřenou
hodnotu. (Cíl 2)
Measurement
1. Press the POWER button for power-on.
(Power turns off 8 seconds after the last
operation.)
Immediately after power-on.
(Initializing)
Stand-by. Target focusing.
2. Aim at the target
.
3. Press POWER button once to start
continuous measurement for 8 seconds.
(Single measurement mode is not
available with this laser rangefinder.)
Measuring.
4. For 8 seconds, the internal display shows “distance” and “fail to measure” indicator alternately.
(Laser irradiation mark is blinking.)
Failure to measure or
unable to measure distance.
Displays the measured
figure. (Target 1)
Displays the measured
figure. (Target 2)
5. After continuous measurement, the measured results are displayed for 8 seconds, then power
turns off.
If you press the POWER button during power-on (while the internal display is lit), another
8-second measurement starts.
5. Po trvalém měření se naměřené výsledky zobrazí na dobu 8
sekund a potom se vypne napájení. Pokud stisknete během
zapínání tlačítko POWER (při rozsvíceném vnitřním displeji),
spustí se další 8 sekundové měření.
Při měření vzdálenosti k praporku na golf
jednodušší s použitím skenování sloupku praporku během měření.
Pokud nejsou mezi vámi a sloupem praporku žádné předměty
nejkratší výsledek je vzdálenost ke sloupu praporku.
4.
(Implicitní nastavení je yard)
1
2.
dé
3.
MODE.
4.
konver
jednotká
Metr [ ]Y ]
6. Ukaz
Blikání indik nap bateri
bater
7
Použijte p
Kr
sek
v
v
bud
dálkomě
5. Zobrazení vzdálenosti
COOLSH
Při získ
měření přís na LCD pane
nejb
napří
bud
T
Strom P Dům
Vzdálenost k cíli 115 m 123 m 128
Okamžitě
po zapnutí.
(Inicializace)
Pohotov
režim.
Zamíření na cíl.