220 221
Dk
En
Jp
Fr
Es
Pt
Ru
Se
Nl
De
It
Pl
Hu
Cz
Fi
No
Ro
Dk
En
Jp
Fr
Es
Pt
Ru
Se
Nl
De
It
Pl
Hu
Cz
Fi
No
Ro
Sammendrag om betjening
Advarsel — Brug af betjeninger og justeringer
eller udførsel af andre proc
specificeret heri, kan resulter
farlig bestråling.
1.
"Udskiftning af batteri")
2. Justering af diopter
I
displayet.
Drej først diopterjusteringshjulet mod uret,
indtil det ikke k
tændes for strømmen f
kigger ind i Nikon laser-afstandsmåleren. Drej
diopterjusteringshjulet med uret, indtil visningen
kommer i fokus.
Hvis diopter ik
fokusere tydeligt på dit motiv
3. Måling
Før måling skal du huske at tjekke indstillingen for
enheder
Measurement
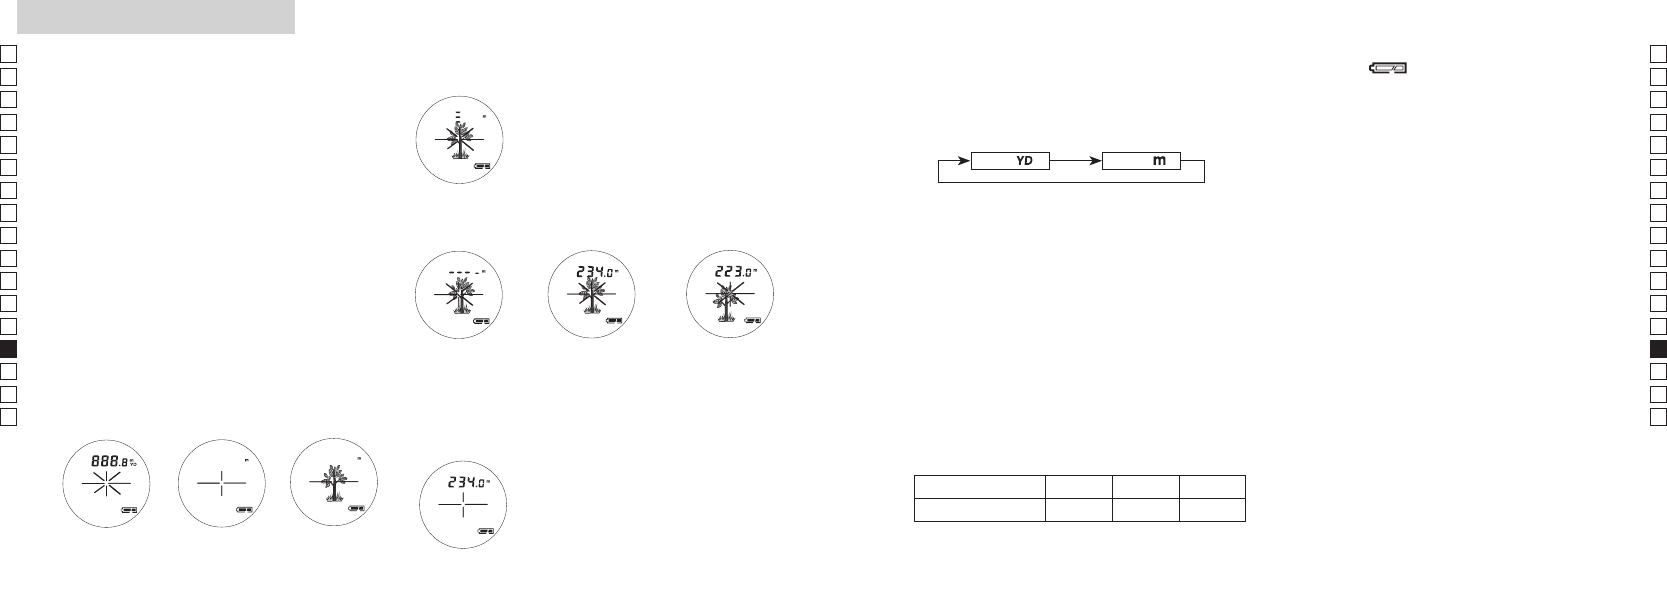
1. Press the POWER button for power-on.
(Power turns off 8 seconds after the last
operation.)
Immediately after power-on.
(Initializing)
Stand-by. Target focusing.
2. Aim at the target
.
3. Press POWER button once to start
continuous measurement for 8 seconds.
(Single measurement mode is not
available with this laser rangefinder.)
Measuring.
4. For 8 seconds, the internal display shows “distance” and “fail to measure” indicator alternately.
(Laser irradiation mark is blinking.)
Failure to measure or
unable to measure distance.
Displays the measured
figure. (Target 1)
Displays the measured
figure. (Target 2)
5. After continuous measurement, the measured results are displayed for 8 seconds, then power
turns off.
If you press the POWER button during power-on (while the internal display is lit), another
8-second measurement starts.
Measurement
1. Press the POWER button for power-on.
(Power turns off 8 seconds after the last
operation.)
Immediately after power-on.
(Initializing)
Stand-by. Target focusing.
2. Aim at the target
.
3. Press POWER button once to start
continuous measurement for 8 seconds.
(Single measurement mode is not
available with this laser rangefinder.)
Measuring.
4. For 8 seconds, the internal display shows “distance” and “fail to measure” indicator alternately.
(Laser irradiation mark is blinking.)
Failure to measure or
unable to measure distance.
Displays the measured
figure. (Target 1)
Displays the measured
figure. (Target 2)
5. After continuous measurement, the measured results are displayed for 8 seconds, then power
turns off.
If you press the POWER button during power-on (while the internal display is lit), another
8-second measurement starts.
1.
knappen for at tænde.
2. Sigt mod målet.
Straks efter
tænding.
(Initialiserer)
Standby Sigter mod målet.
3.
sekunder
afstandsmåler
Måler
4. I 8 sekunder viser det interne display skiftevis "afstand" og "måling
mislykket"
Kunne ikke måle
eller kunne ikke måle
afstand.
Viser afstanden i
tal (Mål 1).
Viser afstanden i tal
(Mål 2).
Measurement
1. Press the POWER button for power-on.
(Power turns off 8 seconds after the last
operation.)
Immediately after power-on.
(Initializing)
Stand-by. Target focusing.
2. Aim at the target
.
3. Press POWER button once to start
continuous measurement for 8 seconds.
(Single measurement mode is not
available with this laser rangefinder.)
Measuring.
4. For 8 seconds, the internal display shows “distance” and “fail to measure” indicator alternately.
(Laser irradiation mark is blinking.)
Failure to measure or
unable to measure distance.
Displays the measured
figure. (Target 1)
Displays the measured
figure. (Target 2)
5. After continuous measurement, the measured results are displayed for 8 seconds, then power
turns off.
If you press the POWER button during power-on (while the internal display is lit), another
8-second measurement starts.
5. Efter fortsat måling vises målingsresultaterne i 8 sekunder
derefter slukkes. Hvis du tryk
opstart (mens det interne display er aktivt), starter en ny
8-sekunders måling.
Når f.eks
scanning af flagpinden under målingen give en lettere måling
Hvis der ikke er nogen genstande mellem dig og flagpinden, er det
korteste resultat afstanden til flagpinden.
4. (fabriksindstillingen er yard)
1.
2.
sekunder eller længere).
3.
knappen.
4.
konverterede og vist i den målingsenhed, du har
valgt.
Meter [ ]Ya [ ]
6. Angivelse af la
Blinkende angiver
svag, og batteriet skal udskiftes. (Se "Udskif
batteri")
7. Baggrundslys
Brug baggrundslyset til at se L
under mørke forhold.
Baggrundslyset kan tændes og slukkes ved at
tryk
knappen. Baggrundslyset kan også sluk
ved at slukke for laser-afstandsmåler
tilfælde vil baggrundslyset være slukket, når laser-
afstandsmåleren tændes igen.
5. Afstandsvisning
COOLSHO
nærmeste mål.
Når der opnås forskellige resultat
vil Nikon laser-afstandsmåleren vise afstanden til det
nærmeste mål på L
Eks.: Når der måles et træ, der står f
"115 m" (afstanden til træet) vises
Dette er nyttigt ved golf
Tr Hegn Hus
Afstand til målet 115 m 123 m 128 m