188 189
Fi
En
Jp
Fr
Es
Pt
Ru
Se
Nl
De
It
Dk
Pl
Hu
Cz
No
Ro
Fi
En
Jp
Fr
Es
Pt
Ru
Se
Nl
De
It
Dk
Pl
Hu
Cz
No
Ro
Käytön tiivistelmä
Huomautus — ohjainten, säätimien tai
toimintojen käyttäminen muuhun tark
tai muulla kuin tässä esitetyllä tavalla v
aiheuttaa altistumisen säteilylle.
1.
vaihto
2. Diopterin säätäminen
Säädä diopteria selkeän kuvan saamiseksi
nestekidenäyttöön.
K
kunnes se pysähtyy. K
jolloin nestekidenäyttö aktivoituu katsoessasi
Nikon Laser -etäisy
säätörengasta m
tarkentuu.
Jos diopterin säätö ei vastaa paljaan silmän
näkötarkkuutta, kohteen valitseminen ei ehkä ole
mahdollista.
3. Mittaus
Varmista asetukset ennen mittaamista.
Measurement
1. Press the POWER button for power-on.
(Power turns off 8 seconds after the last
operation.)
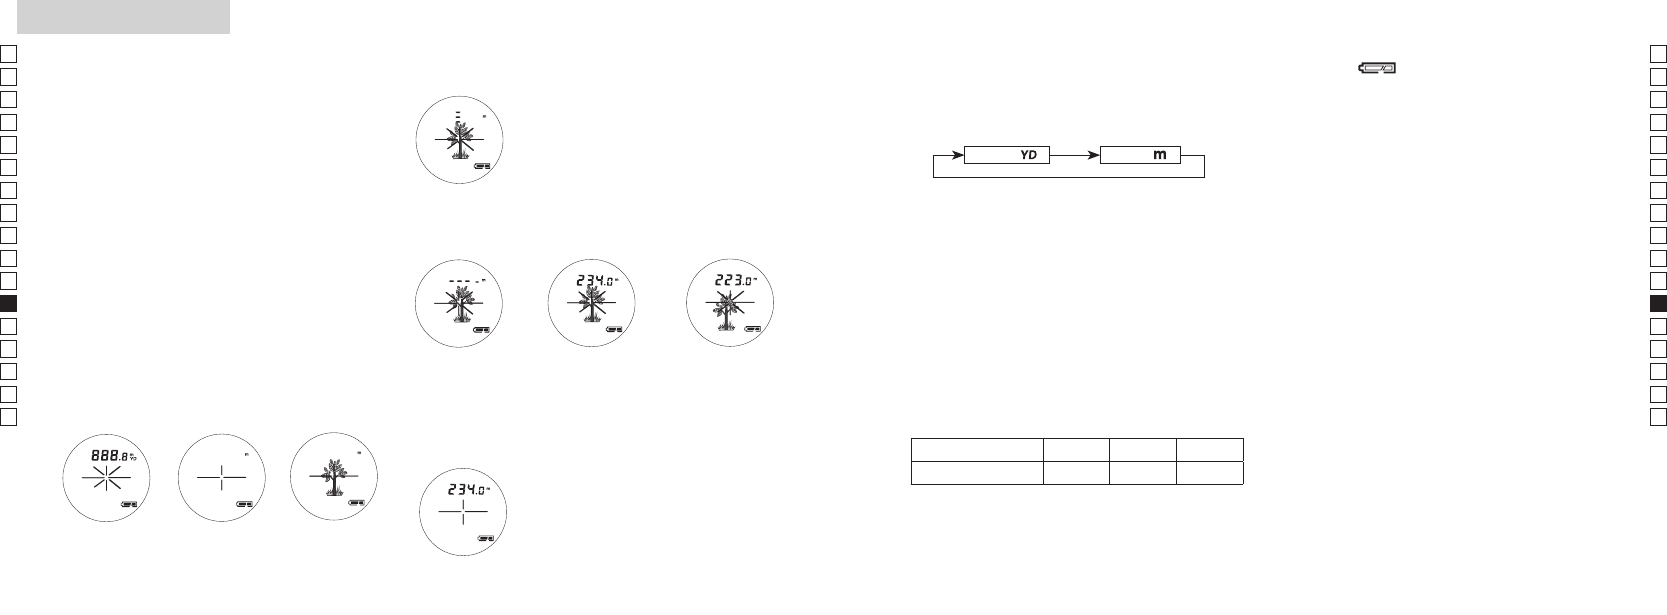
Immediately after power-on.
(Initializing)
Stand-by. Target focusing.
2. Aim at the target
.
3. Press POWER button once to start
continuous measurement for 8 seconds.
(Single measurement mode is not
available with this laser rangefinder.)
Measuring.
4. For 8 seconds, the internal display shows “distance” and “fail to measure” indicator alternately.
(Laser irradiation mark is blinking.)
Failure to measure or
unable to measure distance.
Displays the measured
figure. (Target 1)
Displays the measured
figure. (Target 2)
5. After continuous measurement, the measured results are displayed for 8 seconds, then power
turns off.
If you press the POWER button during power-on (while the internal display is lit), another
8-second measurement starts.
Measurement
1. Press the POWER button for power-on.
(Power turns off 8 seconds after the last
operation.)
Immediately after power-on.
(Initializing)
Stand-by. Target focusing.
2. Aim at the target
.
3. Press POWER button once to start
continuous measurement for 8 seconds.
(Single measurement mode is not
available with this laser rangefinder.)
Measuring.
4. For 8 seconds, the internal display shows “distance” and “fail to measure” indicator alternately.
(Laser irradiation mark is blinking.)
Failure to measure or
unable to measure distance.
Displays the measured
figure. (Target 1)
Displays the measured
figure. (Target 2)
5. After continuous measurement, the measured results are displayed for 8 seconds, then power
turns off.
If you press the POWER button during power-on (while the internal display is lit), another
8-second measurement starts.
1. Paina POWER-painiketta. 2.
Kun virran
päällekytkennän
painiketta on
painettu.(Alustus)
Valmiustila. Kohteen valinta.
3. Paina POWER-painiketta kerran aloittaaksesi jatkuvan mittaamisen
8 sekunnin ajaksi. (
etäisyysmittarilla.)
Mittaus käynnissä.
4. Sisäinen näyttö esittää 8 sekunnin ajan joko "etäisyyden" tai
"epäonnistuneen mittauksen" merkintää vaihtoehtoisesti.
(Lasersäteilyn merkintä vilkkuu.)
Mittaus epäonnistui
tai etäisyyttä ei voi
mitata.
Näyttää mitatun
kuvan. (Kohde 1)
Näyttää mitatun
kuvan. (Kohde 2)
Measurement
1. Press the POWER button for power-on.
(Power turns off 8 seconds after the last
operation.)
Immediately after power-on.
(Initializing)
Stand-by. Target focusing.
2. Aim at the target
.
3. Press POWER button once to start
continuous measurement for 8 seconds.
(Single measurement mode is not
available with this laser rangefinder.)
Measuring.
4. For 8 seconds, the internal display shows “distance” and “fail to measure” indicator alternately.
(Laser irradiation mark is blinking.)
Failure to measure or
unable to measure distance.
Displays the measured
figure. (Target 1)
Displays the measured
figure. (Target 2)
5. After continuous measurement, the measured results are displayed for 8 seconds, then power
turns off.
If you press the POWER button during power-on (while the internal display is lit), another
8-second measurement starts.
5. Jatkuvan mittauksen jälkeen mitattuja tuloksia näytetään 8
sekunnin ajan, jonka jälkeen vir
painat POWER-painiketta virran ollessa päällä (kun sisäinen
näyttö on aktiivinen), uusi 8 sekunnin mittaus alkaa.
Kun mittaat esimerkiksi lipputangon etäisyyttä golfkentällä,
lipputangon skannaaminen mittauksen aikana tuottaa mitan
helpommin. Jos sinun ja lipputangon välissä ei ole haittaavia
esteitä, etäisyys lipputankoon on lyhin annettu tulos.
4. Näyttöyksik(Oletusasetus on jaardia.)
1.
2.
tai pidempi aika).
3.
painike.
4.
näytetään valitsemassasi mittayksikössä.
Metriä [ ]Jaardia [ ]
6. Pariston alhaisen var
Vilkkuva ilmoittaa, että pariston varaus on
matalalla tasolla ja paristo on vaihdettava uuteen.
(Katso "Pariston vaihto
7. T
Käytä taustavaloa nähdäksesi nestekidenäytön
pimeässä säässä.
Kun painat lyhy
kuin 2 sekuntia) virran ollessa päällä, taustavalo
voidaan kytkeä päälle ja pois.
sammuttaa myös kytkemällä etäisyysmittarin virta
pois päältä.
sammutettuna, kun etäisyysmittari kytketään
uudelleen päälle.
5. Etäisyyden näyttö
COOLSHO
esivalintajärjestelmää.
Kun yksittäisellä mittauksella saadaan erilaisia
tuloksia, se näyttää etäisyyden lähimpään kohteeseen
nestekidenäytöllä.
Esim.) mitataan talon edessä oleva puu;
"115 m" (etäisyys puuhun) näytetään.
T
Puu Aita T
Etäisyys kohteeseen 115 m 123 m 128