156 157
En
Jp
Fr
Es
Pt
Ru
Se
Nl
De
It
Dk
Pl
Hu
Cz
Fi
No
Ro
En
Jp
Fr
Es
Pt
Ru
Se
Nl
De
It
Dk
Pl
Hu
Cz
Fi
No
Ro
Resumo Operacional
Cuidado — O uso de con
ex
especificados nestas instruções podem resultar
em exposição a radiações perigosas.
1.
(Ver "T
2. Ajuste da dioptria
Ajuste a dioptria para obter uma imagem nítida no
L
Em primeiro lugar
dioptria no sentido anti-horário até que este pare
completamente. Em seguida, ligue a ener
ativar o L
a Laser Nikon. Gire o anel de ajuste da dioptria no
sentido horário até que o visor entre em f
Se a dioptr
à sua visão, v
corretamente no seu objeto
3. Medição
Antes de medir
da unidade.
Measurement
1. Press the POWER button for power-on.
(Power turns off 8 seconds after the last
operation.)
Immediately after power-on.
(Initializing)
Stand-by. Target focusing.
2. Aim at the target
.
3. Press POWER button once to start
continuous measurement for 8 seconds.
(Single measurement mode is not
available with this laser rangefinder.)
Measuring.
4. For 8 seconds, the internal display shows “distance” and “fail to measure” indicator alternately.
(Laser irradiation mark is blinking.)
Failure to measure or
unable to measure distance.
Displays the measured
figure. (Target 1)
Displays the measured
figure. (Target 2)
5. After continuous measurement, the measured results are displayed for 8 seconds, then power
turns off.
If you press the POWER button during power-on (while the internal display is lit), another
8-second measurement starts.
1. Pressione o botão POWER
para ligar a energia.
2. Mire no alvo.
Imediatamente
após ligar a energia.
(Inicialização)
Em espera. Mira do alvo.
3. Pressione o botão POWER uma vez par
8 segundos. (O modo de medição simples não está disponível nest
modelo de telêmetro a laser).
Medição.
4. Por 8 segundos, o visor in
“
irradiação do laser está piscando).
F
distância.
Exibe o número
medido (Alvo 1).
Exibe o número
medido (Alvo 2).
Measurement
1. Press the POWER button for power-on.
(Power turns off 8 seconds after the last
operation.)
Immediately after power-on.
(Initializing)
Stand-by. Target focusing.
2. Aim at the target
.
3. Press POWER button once to start
continuous measurement for 8 seconds.
(Single measurement mode is not
available with this laser rangefinder.)
Measuring.
4. For 8 seconds, the internal display shows “distance” and “fail to measure” indicator alternately.
(Laser irradiation mark is blinking.)
Failure to measure or
unable to measure distance.
Displays the measured
figure. (Target 1)
Displays the measured
figure. (Target 2)
5. After continuous measurement, the measured results are displayed for 8 seconds, then power
turns off.
If you press the POWER button during power-on (while the internal display is lit), another
8-second measurement starts.
5. Após a medição contínua, os resultados medidos são exibidos
por 8 segundos e, depois, a energia é desligada. Se v
pressionar o botão POWER quando a energia estiver ligada
(enquanto o visor interno estiver ativ
medição de 8 segundos.
Por ex
um campo de golfe, a scanerização da bandeira durant
permite uma medição mais fácil. Se não houver objetos entre si e a
bandeira, o resultado mais curto é a distância até à bandeira.
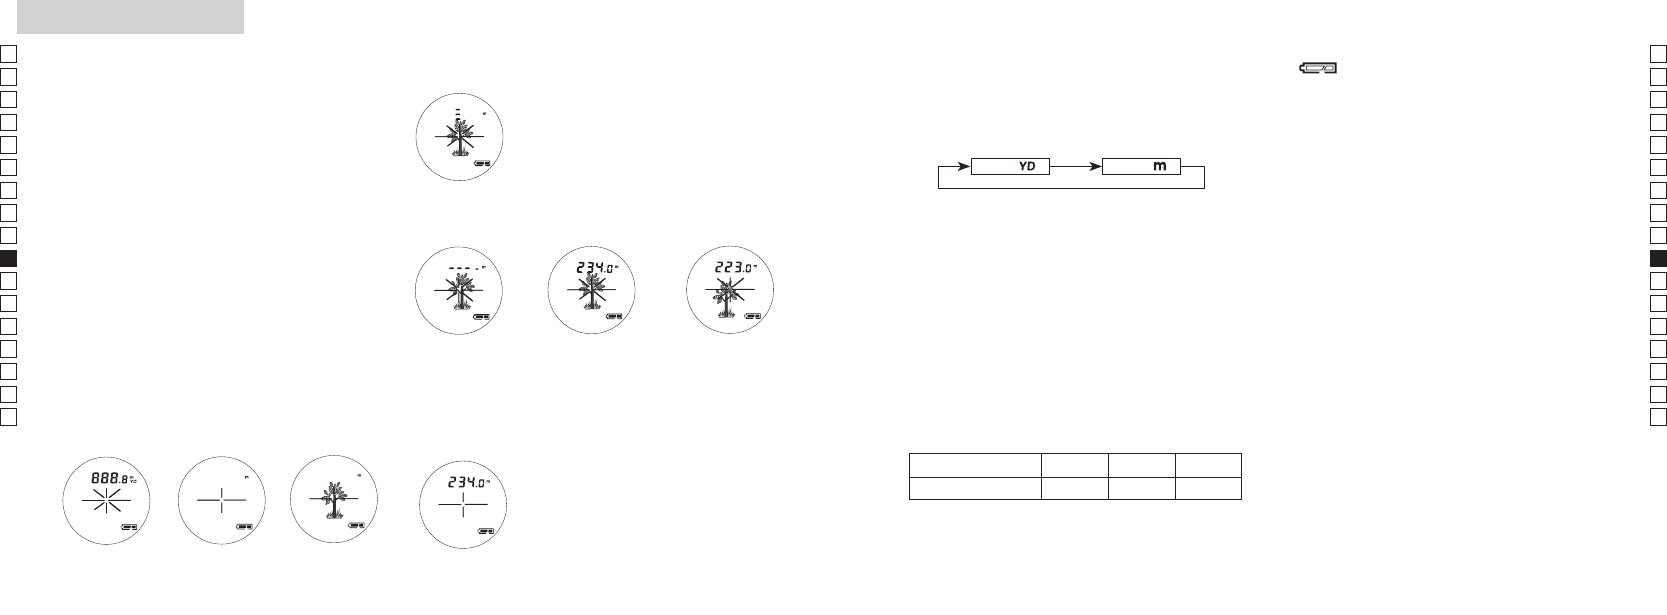
4. Seleção da unidade de exibição
(o ajuste default é jardas)
1.
2.
3.
botão MODE.
4.
convertidos e exibidos na unidade de medida que
você selecionou.
Metro [ ]Jarda [ ]
6. Indicação de pilha fraca
piscando indica que a energia energia da
pilha está baixa e que a pilha deve ser trocada. (Ver
"Tr
7. Luz negra
Use a luz negra para v
Pressionando br
de 2 segundos) enquanto a energia está ligada,
se pode ligar e desligar a luz negra. A luz negra
também pode ser ligada ao desligar o telêmetro
a laser
quando o telêmetro a laser for no
5. Exibição da distância
O COOLSHO
Al
Ao obter resultados dif
medição simples, ele exibirá a distância até o alv
próximo no visor L
Ex.: Ao medir uma árvore na frente de uma casa;
"115 m" (distância até a árvore) será exibido
Isto é útil no golf
Ár Cerca Casa
Distância até o Alvo 115 m 123 128 m