140 141
Ru
En
Jp
Fr
Es
Pt
Se
Nl
De
It
Dk
Pl
Hu
Cz
Fi
No
Ro
Ru
En
Jp
Fr
Es
Pt
Se
Nl
De
It
Dk
Pl
Hu
Cz
Fi
No
Ro
.
,
, ,
1.
" ")
2.
Выполните диоптрийную настройку для
получения четког
Сна
против часовой стрелки до предела. Зат
включите пит
глядя при этом через лазерный дальномер Nikon.
Поворачивайт
полной фокусировки дисплея.
Ес
соответ
тру
3.
Перед измерением обязательно проверь
настройку прибора.
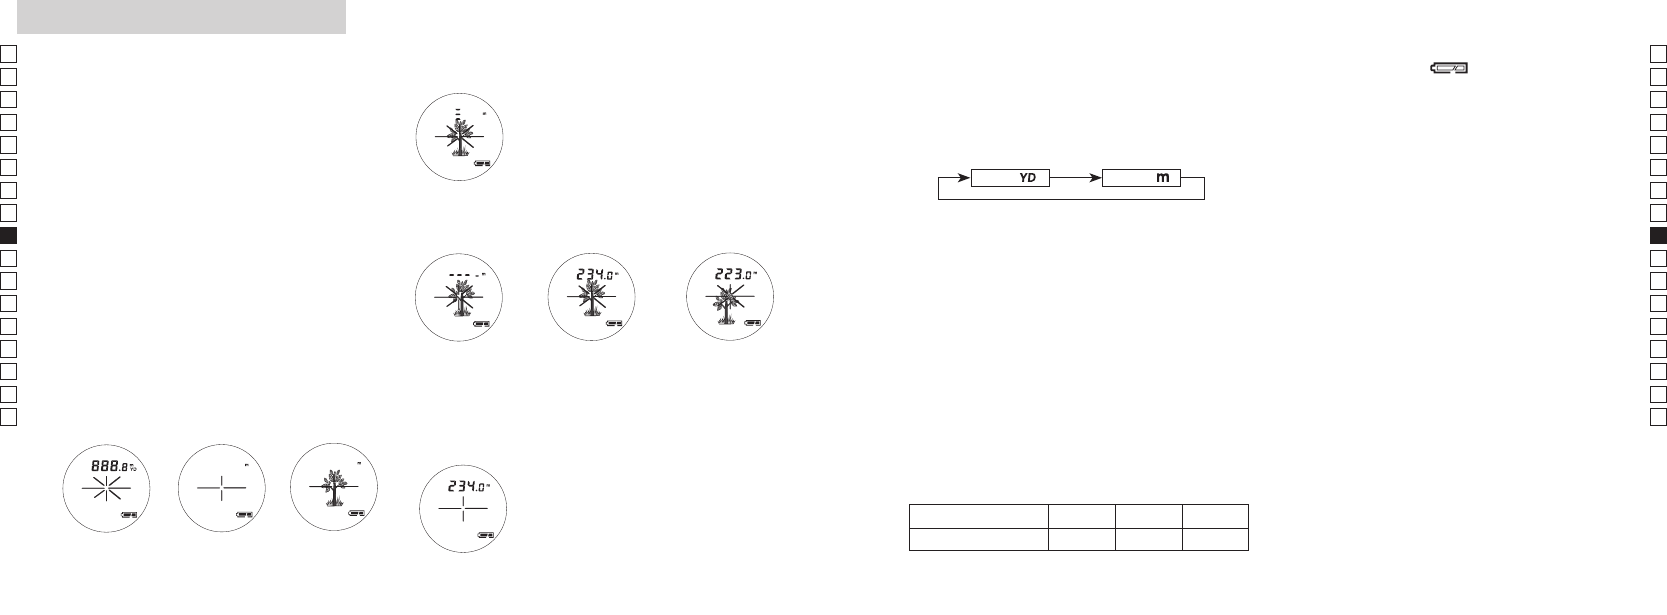
Measurement
1. Press the POWER button for power-on.
(Power turns off 8 seconds after the last
operation.)
Immediately after power-on.
(Initializing)
Stand-by. Target focusing.
2. Aim at the target
.
3. Press POWER button once to start
continuous measurement for 8 seconds.
(Single measurement mode is not
available with this laser rangefinder.)
Measuring.
4. For 8 seconds, the internal display shows “distance” and “fail to measure” indicator alternately.
(Laser irradiation mark is blinking.)
Failure to measure or
unable to measure distance.
Displays the measured
figure. (Target 1)
Displays the measured
figure. (Target 2)
5. After continuous measurement, the measured results are displayed for 8 seconds, then power
turns off.
If you press the POWER button during power-on (while the internal display is lit), another
8-second measurement starts.
1. Для вк
кнопку POWER (Питание). 2. Направь
Сразу же после
включения питания.
(Инициализация)
Режим ожидания. Наведение на
цель.
3. Сразу же нажмит
непрерывного измерения в те
измерения недоступен в данном лазерном да
Измерение.
4. В течение 8 секунд на внутреннем дисплее бу
отображаться индикат
(Мигает значок лазерног
Не удалось измерить
или невозможно
измерить расстояние.
Выведение на
дисплей резуль
измерения. (Цель 1)
Выведение на
дисплей резуль
измерения. (Цель 2)
Measurement
1. Press the POWER button for power-on.
(Power turns off 8 seconds after the last
operation.)
Immediately after power-on.
(Initializing)
Stand-by. Target focusing.
2. Aim at the target
.
3. Press POWER button once to start
continuous measurement for 8 seconds.
(Single measurement mode is not
available with this laser rangefinder.)
Measuring.
4. For 8 seconds, the internal display shows “distance” and “fail to measure” indicator alternately.
(Laser irradiation mark is blinking.)
Failure to measure or
unable to measure distance.
Displays the measured
figure. (Target 1)
Displays the measured
figure. (Target 2)
5. After continuous measurement, the measured results are displayed for 8 seconds, then power
turns off.
If you press the POWER button during power-on (while the internal display is lit), another
8-second measurement starts.
5. После непрерывного измерения резуль
отображают
кнопку POWER
дисплей активен), начнет
При измерении расстояния, например, до флага на поле для
гольфа, сканированиефлага во время измерения облегчит
получение резуль
препятствий, самым быстрым резуль
флага.
4.
(настройка по умолчанию: ярды.)
1.
включена.
2.
или дольше).
3.
кнопку MODE.
4.
конвертирую
соответ
Метры [ ]Ярды [ ]
6.
Мигающий значок указывает на низкий
уровень энергии батареи и необ
замены батареи. (См. "Замена бат
7.
Используйте по
панель ЖКИ в темнот
Нажмите и в т
времени (менее 2 секунд) удерживай
MODE (Режим) для включения и вык
подсветки. Под
путем отключения питания лазерного
дальномера. В этом случае при повт
включении лазерного дальномера подсветка
буд
5.
В приборе COOLSHO
переключения приоритета ближайшей цели.
При получении разных резуль
операции измерения прибор выведет расстояние до
ближайшей цели на панель ЖКИ (LCD).
Hапример, при измерении расстояния до дерева,
кот
Бу
Это полезно при игре в гольф.
Дерево Забор Дом
Расст 115 м 123 128 м