60 61
Fr
En
Jp
Es
Pt
Ru
Se
Nl
De
It
Dk
Pl
Hu
Cz
Fi
No
Ro
Fr
En
Jp
Es
Pt
Ru
Se
Nl
De
It
Dk
Pl
Hu
Cz
Fi
No
Ro
Mode d'emploi
Attention — L
performances de procédure autres que c
spécifiés dans ce manuel peut entraîner une
exposition à des ra
1.
à cet effet. (Reportez-vous à la section
« Remplacement de la pile »).
2. Correction dioptrique
Réglez la correction dioptrique pour obtenir une
image nette sur l'écran A
T
dans le sens antihoraire jusqu'à ce qu'
totalement en butée. Ensuit
sous tension pour activer l'écran ACL quand v
regardez dans le
bague de réglage dioptrique dans le sens horaire
jusqu'à ce que l'affichage soit net.
Si la correction dioptrique ne correspond pas à
votre vue
mise au point sur le sujet.
3. Mesure
Avant de prendre les mesur
paramètres du dispositif
Measurement
1. Press the POWER button for power-on.
(Power turns off 8 seconds after the last
operation.)
Immediately after power-on.
(Initializing)
Stand-by. Target focusing.
2. Aim at the target
.
3. Press POWER button once to start
continuous measurement for 8 seconds.
(Single measurement mode is not
available with this laser rangefinder.)
Measuring.
4. For 8 seconds, the internal display shows “distance” and “fail to measure” indicator alternately.
(Laser irradiation mark is blinking.)
Failure to measure or
unable to measure distance.
Displays the measured
figure. (Target 1)
Displays the measured
figure. (Target 2)
5. After continuous measurement, the measured results are displayed for 8 seconds, then power
turns off.
If you press the POWER button during power-on (while the internal display is lit), another
8-second measurement starts.
1. Appuyez sur le bouton POWER pour
mettre l'appareil sous tension.
2. V
Immédiatement après
la mise sous tension
(initialisation).
En veille. Cible visée.
3. Appuyez une fois sur le bouton POWER pour pr
continue pendant 8 secondes. (L
disponible sur ce télémètre laser).
Mesure en cours.
4. L
échec de la mesure » pendant 8 secondes. (L
laser clignote lors de la prise de mesure).
mesure de distance
impossible.
Affiche les
résultats mesurés.
(Cible 1)
Affiche les résultats
mesurés. (Cible 2)
Measurement
1. Press the POWER button for power-on.
(Power turns off 8 seconds after the last
operation.)
Immediately after power-on.
(Initializing)
Stand-by. Target focusing.
2. Aim at the target
.
3. Press POWER button once to start
continuous measurement for 8 seconds.
(Single measurement mode is not
available with this laser rangefinder.)
Measuring.
4. For 8 seconds, the internal display shows “distance” and “fail to measure” indicator alternately.
(Laser irradiation mark is blinking.)
Failure to measure or
unable to measure distance.
Displays the measured
figure. (Target 1)
Displays the measured
figure. (Target 2)
5. After continuous measurement, the measured results are displayed for 8 seconds, then power
turns off.
If you press the POWER button during power-on (while the internal display is lit), another
8-second measurement starts.
5. Une fois la mesure continue eff
s'affichent pendant 8 secondes, puis l'appareil se met hors
tension. Si vous appuyez sur le bouton POWER lorsque l'appar
est sous tension (pendant que l'affichage interne est éclairé),
une autre mesure de 8 secondes s'initie.
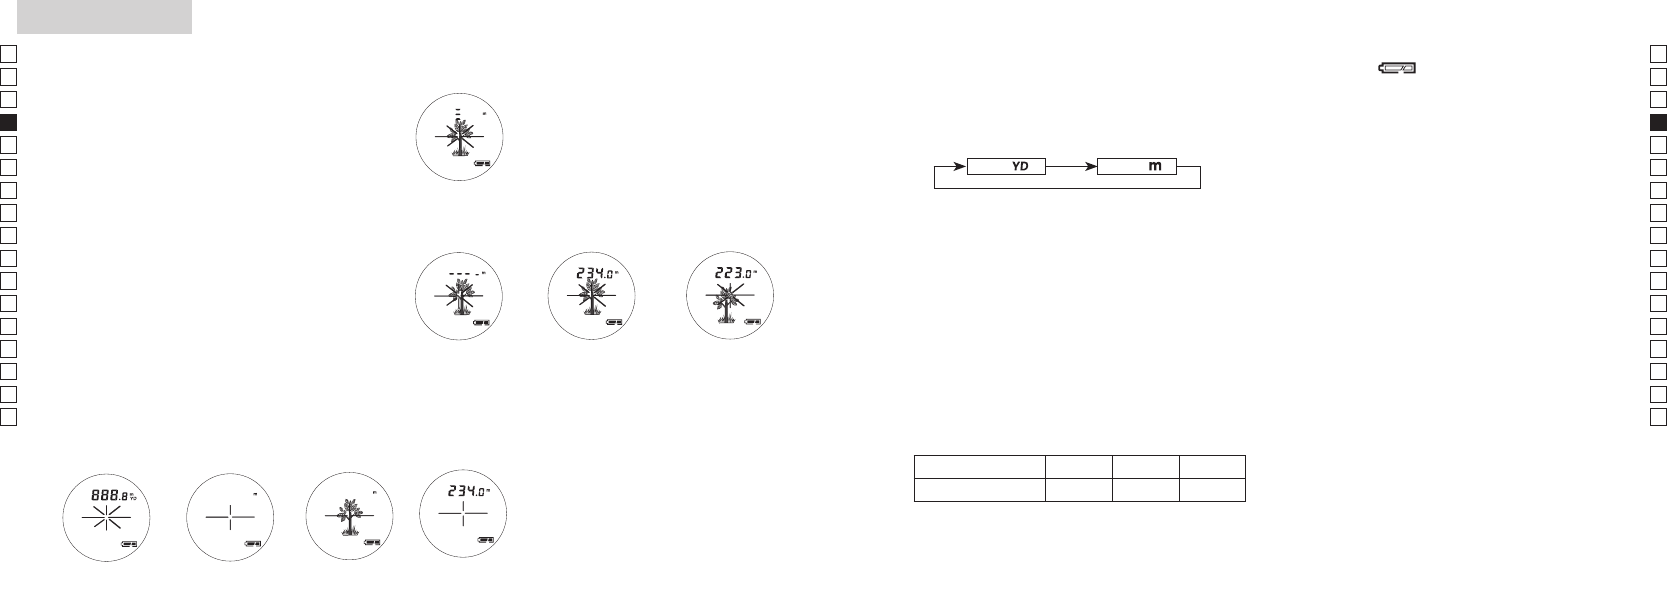
Lorsque vous mesurez la distanc
de golf, par ex
d'obtenir un résultat plus facilement. Si il y a des objets en
et le drapeau, la distance la plus courte est la distance au drapeau.
4. Sélection de l'unité d'affichage
(le réglage par défaut est le yard)
1. Assurez-vous que l'
2.
pendant 2 secondes ou plus.
3.
relâchez la pression sur le bouton.
4.
sont conv
Mètre [ ]Ya [ ]
6. Indication de charge faible
Le symbole clignotant indique que la
charge restante de la pile est faible et qu'
être remplacée
Remplacement de la pile »).
7. Rétroéclairage
Utilisez le rétroéclairage pour voir l'
l'obscurité.
En appuyant brièvement sur le bouton MODE
(moins de 2 secondes) lorsque l'appareil est
sous tension, on peut activer ou désactiver le
rétroéclairage
désactivé en éteignant le télémètre laser
ce cas, le rétr
rallumera le télémètre laser
5. Affichage de distance
Le C
plus proche.
Si vous obtenez des résultats diff
mesure unique, il affichera sur l'
la cible la plus proche.
Par ex
une maison;
« 115m » (distance jusqu'à l'arbre) s'affichera.
Ceci est utile pour le golf
Arbre Clôture Maison
Distance à la cible 115 m 123 m 128 m