44 45
Es
En
Jp
Fr
Pt
Ru
Se
Nl
De
It
Dk
Pl
Hu
Cz
Fi
No
Ro
Es
En
Jp
Fr
Pt
Ru
Se
Nl
De
It
Dk
Pl
Hu
Cz
Fi
No
Ro
Resumen operativ
Precaución: La utilización de contr
parámetros de proc
aquí indicados puede provocar una e
radiaciones peligrosas.
1.
batería (consulte "
2. Ajuste de dioptrías
Ajuste las dioptrías para conseguir una imagen clara
en el L
En primer lugar gire el aro de ajuste de dioptrías en
sentido contrario al de las agujas del reloj hasta que
llegue a su tope. Después encienda el aparato par
activar el LCD cuando mir
láser Nikon. Gire el aro de ajuste de dioptrías en el
sentido de las agujas del reloj hasta que la pantalla
quede enfocada.
Si no ajusta las dioptrías a su graduación, quizás no
pueda enfocar correctamente su sujeto
3. Medición
Antes de medir asegúrese de confirmar el ajuste de
la unidad.
Measurement
1. Press the POWER button for power-on.
(Power turns off 8 seconds after the last
operation.)
Immediately after power-on.
(Initializing)
Stand-by. Target focusing.
2. Aim at the target
.
3. Press POWER button once to start
continuous measurement for 8 seconds.
(Single measurement mode is not
available with this laser rangefinder.)
Measuring.
4. For 8 seconds, the internal display shows “distance” and “fail to measure” indicator alternately.
(Laser irradiation mark is blinking.)
Failure to measure or
unable to measure distance.
Displays the measured
figure. (Target 1)
Displays the measured
figure. (Target 2)
5. After continuous measurement, the measured results are displayed for 8 seconds, then power
turns off.
If you press the POWER button during power-on (while the internal display is lit), another
8-second measurement starts.
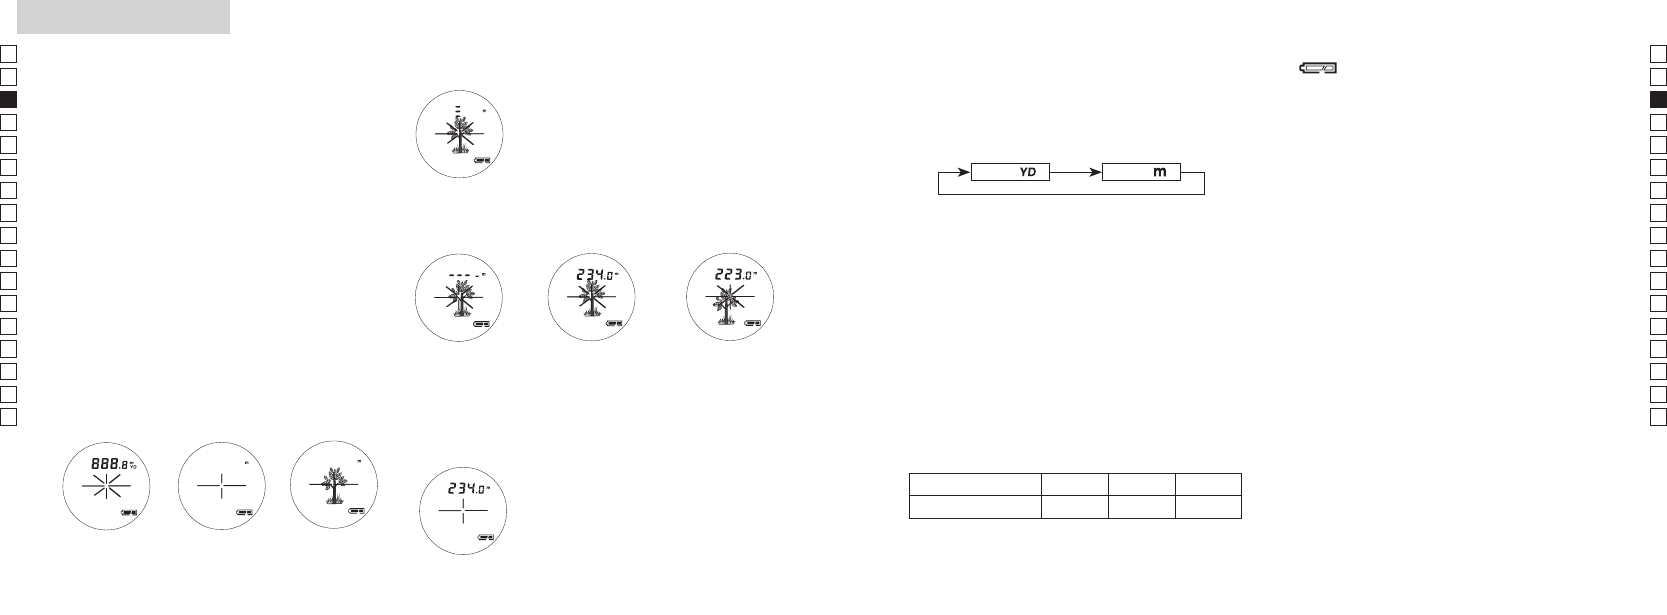
1. Presione el botón
POWER para encender
2.
Inmediatamente
después del encendido
(inicializando).
Modo de espera. Apuntar al sujeto
3.
ocho segundos (en este telémetro no está disponible el modo de
medición única).
Medición
4.
alternativamente los indicadores "distancia
(destella la marca de radiación láser
Medición fallida o
distancia.
Muestra la cifra
medida (Sujeto 1)
Muestra la cifra
medida (Sujeto 2)
Measurement
1. Press the POWER button for power-on.
(Power turns off 8 seconds after the last
operation.)
Immediately after power-on.
(Initializing)
Stand-by. Target focusing.
2. Aim at the target
.
3. Press POWER button once to start
continuous measurement for 8 seconds.
(Single measurement mode is not
available with this laser rangefinder.)
Measuring.
4. For 8 seconds, the internal display shows “distance” and “fail to measure” indicator alternately.
(Laser irradiation mark is blinking.)
Failure to measure or
unable to measure distance.
Displays the measured
figure. (Target 1)
Displays the measured
figure. (Target 2)
5. After continuous measurement, the measured results are displayed for 8 seconds, then power
turns off.
If you press the POWER button during power-on (while the internal display is lit), another
8-second measurement starts.
5.
medidos durante 8 segundos y después se apaga la corriente.
Si presiona el botón POWER con el aparato enc
pantalla interna activa) se inicia otra medición de ocho segundos.
Al medir la distancia a la bandera en un campo de golf
ejemplo, escanear la bandera durant
la medición con más facilidad. Si no hay objetos entr
bandera, el resultado menor es la distancia a la bandera.
4. Selección de la unidad de visualización
(el ajuste predeterminado es la yar
1.
2.
más).
3.
suelte el botón MODE.
4.
visualizarán en la unidad de medición seleccionada.
Metro [ ]Y ]
6. Indicación de batería baja
destellante indica que la carga de la bat
está baja y debe ser sustituida (consulte "Cambio de
la batería").
7. Retroiluminación
Utilice la retroiluminación para v
la oscuridad.
Su pulsa brevemente (menos de dos segundos)
el botón MODE con el aparato enc
retroiluminación puede encenderse y apagarse
La retroiluminación también puede apagarse
apagando el telémetro láser
cuando se vuelva a encender el telémetro láser la
retroiluminación se encenderá de nuev
5. Visualización de la distancia
El COOLSHO
sujeto.
Si se obtienen resultados distintos con una sola
operación de medición, mostrará en el panel L
distancia al sujeto más cercano
p.ejcasa;
Se mostrará "115 m" (distancia al árbol).
Esto resulta útil para el golf
Árbol Valla Casa
Distancia al objetivo 115 m 123 m 128 m