•i-mode and i-mode logos are trademarks or registered trademarks of NTT DoCoMo.
For the purpose of improvement, the specifications for this product and its accessories
are subject to complete or partial change without prior notice.
iv
Before You Start
Before You Start
User’s manual conventions
The instructions in this user’s manual make use of the shortcuts selection except special cases.
The following markers are used throughout the user’s manual to attract your attention:
/This type of paragraph will contain details of where to find information related to the topic in question.
2This type of paragraph will contain information worth noting.
,This type of paragraph will contain important information.
☛This type of description will contain procedures to operate your phone.
Menu shortcuts selection
The alternative shortcuts method of selection lets you jump straight to a menu or function without highlighting an icon and scrolling through the
intermediate menu options. The selection is made by pressing numbers which relate to the displayed menu options.
2The instructions in this user’s manual make use of the shortcuts selection, except in special cases.
Reading the titles
Some titles in this manual contain information on how to access the functions. In these titles, M stands for , the numbers indicate the menu shortcut
numbers (see “Overview of menu function” on page x for details) and ... (three periods) indicate that there are more operations described in the
paragraph.
Reading the procedures
“Highlight” means to use the four way navigation keys (▲▼) to move the area emphasized with different colouring.
“Select” means to highlight an item and then press
.
Procedures are written omitting the verb “press”, except in some special cases.
For example, 12 means to:
☛ Start from the standby screen➔ Press to display the Main menu screen
☛ Press 1 to display the Settings screen➔ Press 2 to display the Phone modes screen
Simple procedures are connected by arrows (➔).
Check box/Radio button
A check box enables/disables an option out of a set of options, and multiple check boxes can be selected at the same time. On the other hand, selecting
a radio button automatically cancels the previous selection, so only one radio button can be selected at one time.
A check box/radio button option can be selected/cancelled by highlighting it and pressing .
▼
▼
v
Before You Start
Display information
,The Liquid Crystal Displays (LCD) on your phone are manufactured using high-precision technology. Even so, the LCD may contain pixels
(dots) that fail to light or that remain permanently lit. Note that this is normal and does not indicate a problem with your display.
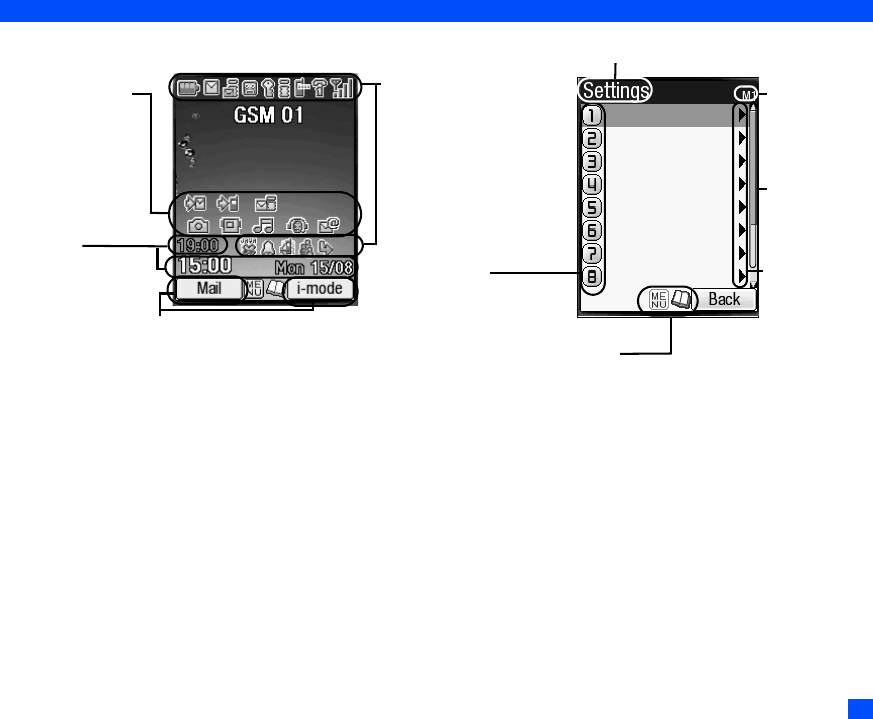
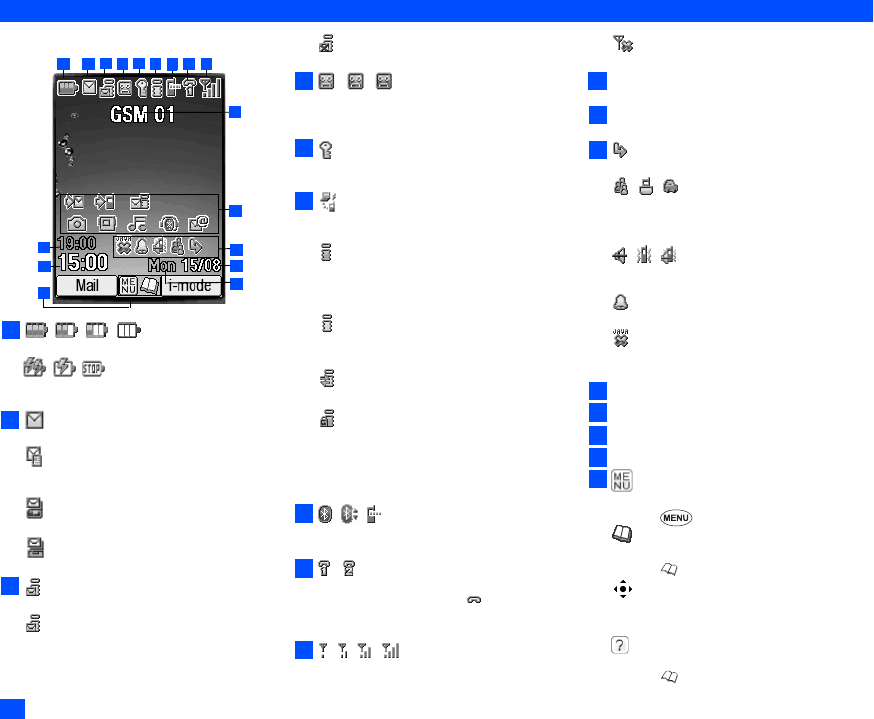
Status bar area
This area contains icons
which indicate the battery
strength, new SMS/MMS
message(s), signal
strength, etc. (see pageviii).
SK1/SK2
This area contains context
sensitive descriptions of the
Softkeys’ functions appropriate
for the current screen.
Shortcut number
Press the appropriate number to
jump straight to a next menu.
The row colour is changed when
selected (e.g. to activate/
deactivate a facility).
Help icons
Displayed when you can use the
key represented by these icons
(see page viii).
Next menu icon
Displayed when
you can press
or the shortcut
number to show
the next menu.
▼
Page scroll bar
Displayed when
you can press
▼
to scroll to the
next page.
Shortcut
menu number
The current
menu number
is displayed.
Menu title
Desktop icon area
This area contains the
automatically displayed
and the manually created
desktop icons. They
provide shortcuts to
certain items/functions.
Help area
This area contains clock
information and help
information appropriate
for the current screen
(e.g. key presses
remaining when
composing a message).
vi
Before You Start
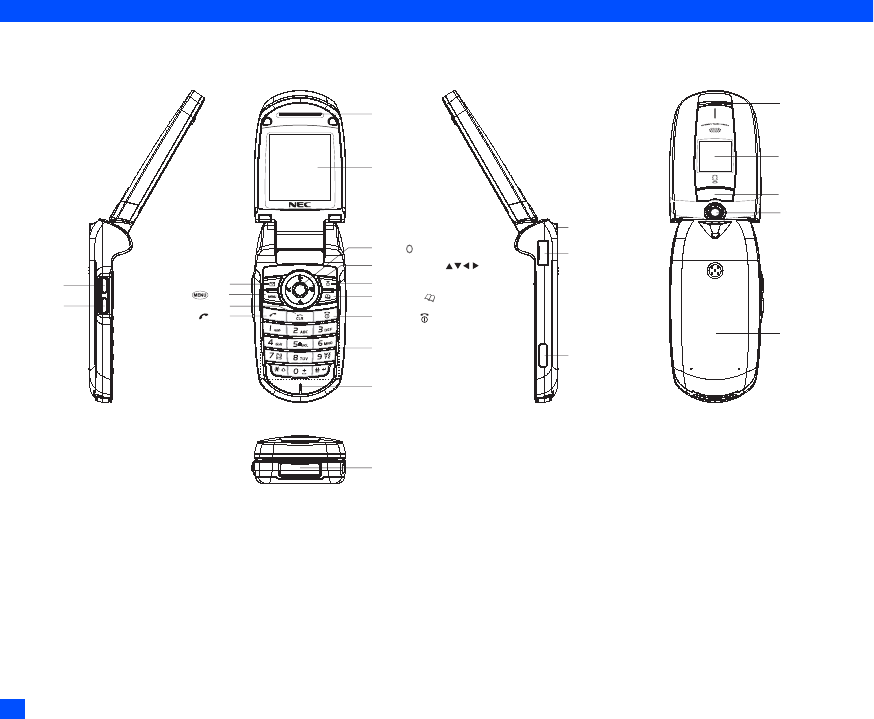
Parts and functions
,Be careful not to put your finger or foreign objects in the hinge of the phone when your phone is opened.
Side up key
Side down key
Softkey 1 (SK1)
Celar (CLR)/Back key
Alphanumeric keys
Select ( ) key
End/on-off ( ) key
Softkey 2 (SK2)
Mouthpiece
Charger connector cover
Through-hole for straps
IR port
Earphone jack cover
Rear cover for battery
Speaker
Camera
LED/Light
2nd-LCD
Phonebook ( ) key
MENU ( ) key
Send ( ) key
Main-LCD
Earpiece
4 way navigation ( ) key
vii
Before You Start
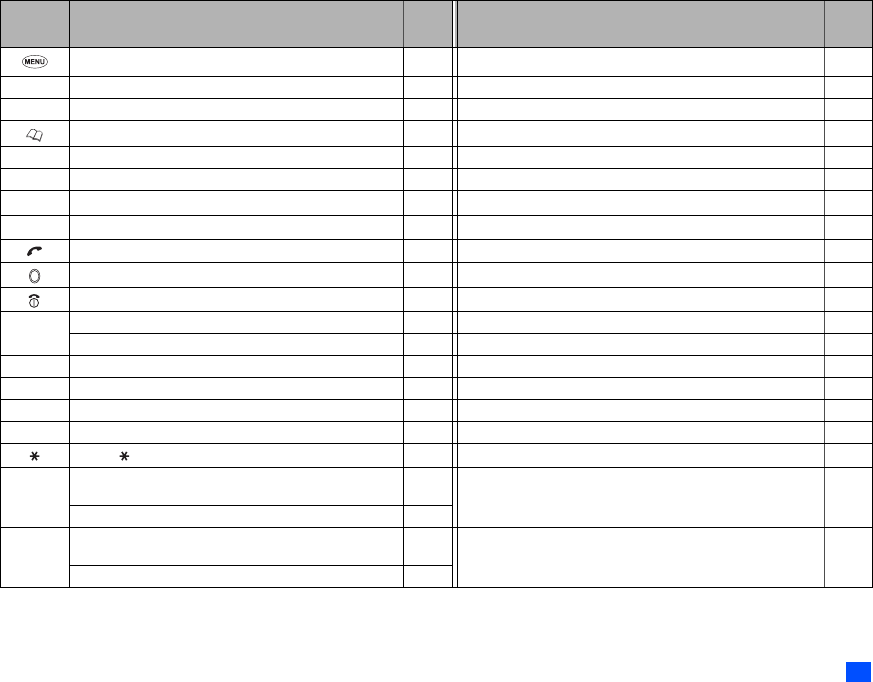
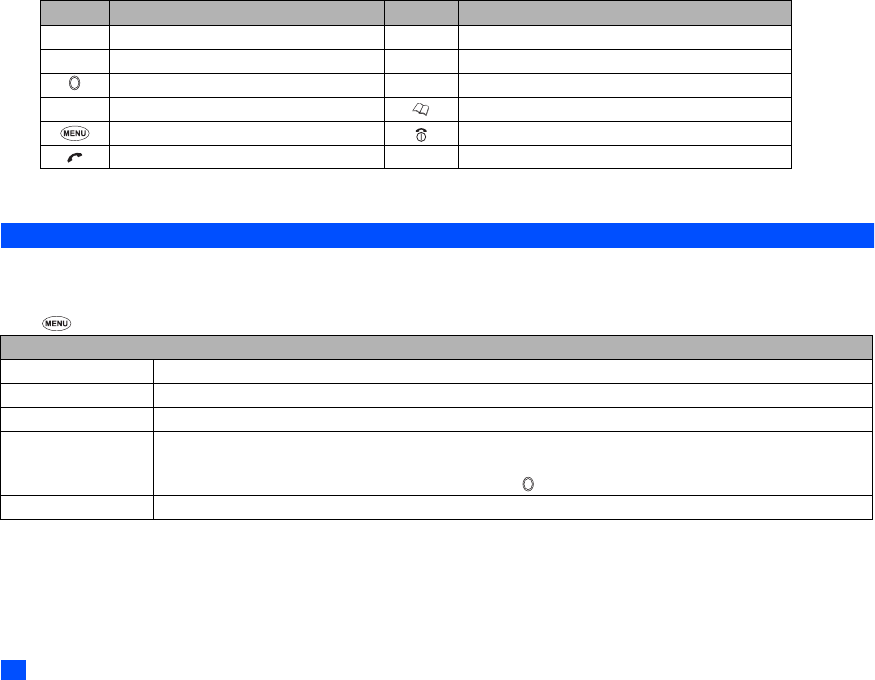
Keypad shortcuts
The following operations are available from the standby screen.
KeyOperation that involves pressing a key
See
page
Operation that involves pressing and holding a key
See
page
Accessing the Main menu screenxSetting/Cancelling the Side key lock20
SK1Accessing the Mail screen40Accessing the Inbox screen41
SK2 Accessing the i-mode menu screen37Accessing the Java™ applications screen63
Accessing the Phonebook list screen45Accessing the Message screen26
▲Accessing the Phone modes screen21Setting the phone to Meeting mode/Returning to the previous mode21
▼Accessing the My data screen58Accessing the voice recall8
Accessing the received calls list11––
Accessing the missed calls list11––
Accessing the dialled calls list11––
Highlighting a desktop icon19Accessing the homepage38
Ending a call or returning to the standby screen–Powering off5
CLR
Cancelling the Cell Broadcast message display32Deleting all the automatically displayed desktop icons18
Deleting character or returning to the previous screen–Deleting all characters when you enter text–
1Entering phone numbers5Calling the Voice mail centre51
2 to 9Entering phone numbers5One-touch dial to the corresponding number in the phonebook (SIM)7
0Entering phone numbers5Entering + when you make an international call14
#Entering #5Entering a pause–
Entering
5Switching the ALS line 1/2 (if the SIM card supports ALS)20
Side up
Accessing the volume control screen when your phone is open
(Use ▲▼, Side keys or 0 to 9 keys to adjust the volume.)
20
Accessing the camera view finder screen52
Activating the ring silencer function when you receive a call20
Side down
Accessing the volume control screen when your phone is open
(Use ▲▼, Side keys or 0 to 9 keys to adjust the volume.)
20
Turning on the light
(To turn it off, press any key or open/close your phone.)
–
Activating the ring silencer function when you receive a call20
▼
▼
viii
Before You Start
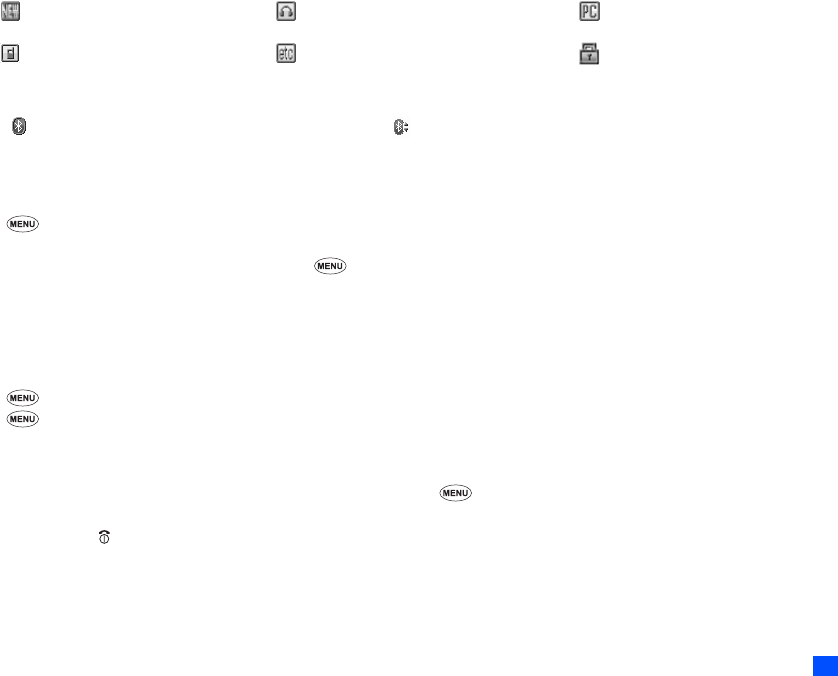
LCD and displayed icons
Main-LCD
Indicates the battery level.
Indicates the battery charging status (fast, slow,
stop).
Indicates that there is a new SMS in your phone.
Indicates that there is a new SMS on the
network.
Indicates that the SIM memory is full.
Indicates that the Inbox in your phone is full.
(pink)
Indicates that there are mail and MMS on the server.
(yellow)
Indicates that there is a new mail/MMS in your phone.
2This yellow icon blinks while a mail/MMS is being
downloaded.
Indicates that the memory for mail/MMS is full.
(red, green/red, green)
Indicates that new voice mail messages are on
the network (No ALS or ALS Line 1/ALS Line 1
and 2/ALS Line 2).
Indicates secured communication on WTLS in
i-mode browsing.
Indicates that your phone is connected to a
GPRS modem such as PC.
(gray)
Indicates that the phone is in the GSM (Global
System for Mobile communication) network
service area and GPRS is active.
(yellow)
Indicates that the GPRS is available and i-mode
(PDP Context) is active.
Indicates that the i-mode connection is carried out.
Indicates that the i-mode lock is on.
2No icon appears when the phone is outside the
GSM network service area, or when the phone is
in the GSM network service area and GPRS is
not attached.
Indicates that Bluetooth is set to on, Bluetooth is
in operation, IR modem is set to on.
Indicates the line status (No ALS or ALS Line 1/
ALS Line 2). The icon with displayed in red
indicates that the ALS line 1 or 2 is unencrypted/
no ALS.
Indicates the signal strength level.
Appears when you are outside the service area.
Network name (indicated in orange when using
roaming service)
Desktop icons
See “Desktop icons” on page 18 for details
Indicates the call diversion is set.
Indicates the Meeting mode, Pocket mode, Car
mode.
2No icon appears for the Normal mode.
Indicates sound-off, vibrator-on, sound-off/
vibrator-on.
Indicatesalarm-on.
Indicates the auto start of a Java™ application
has failed.
Date
Day of week
Remote time
Local time
Indicates that you can use the options menu by
pressing .
Indicates that you can use the phonebook list by
pressing .
Indicates the usable keys in black, while using
i-mode or a Java™ application is in operation.
Indicates that the help display is available by
pressing when using SIM toolkit.
3
4
2
5
1
6
7
89
10
11
12
13
14
15
17
16
1
2
3
4
5
6
7
8
9
10
11
12
13
14
15
16
17
ix
Before You Start
Indicates that a Java™ application is in operation.
<When the camera/video view finder is in
operation>
Indicates single/burst mode (camera).
Indicates the video mode is on or the video is
recording.
Indicates that the self timer is on.
Indicates the quality of the picture (super fine,
fine, normal, economy or super economy).
Indicates the quality of the video.
Indicates the photo/video screen size.
Indicates the shooting environment.
Indicates the brightness setting. The “+2” setting
is the brightest.
Indicates the zoom level.
<When the video preview is in operation>
Indicates the video mode is set to on, the video is
playing, on pause, fast forwarding, or rewinding.
Indicates the track information of the video (the
video only, the audio only, and the video and audio).
Indicates the video is played in normal/enlarged
screen size.
Displays the current volume level. The 0 is mute
and 9 is the maximum.
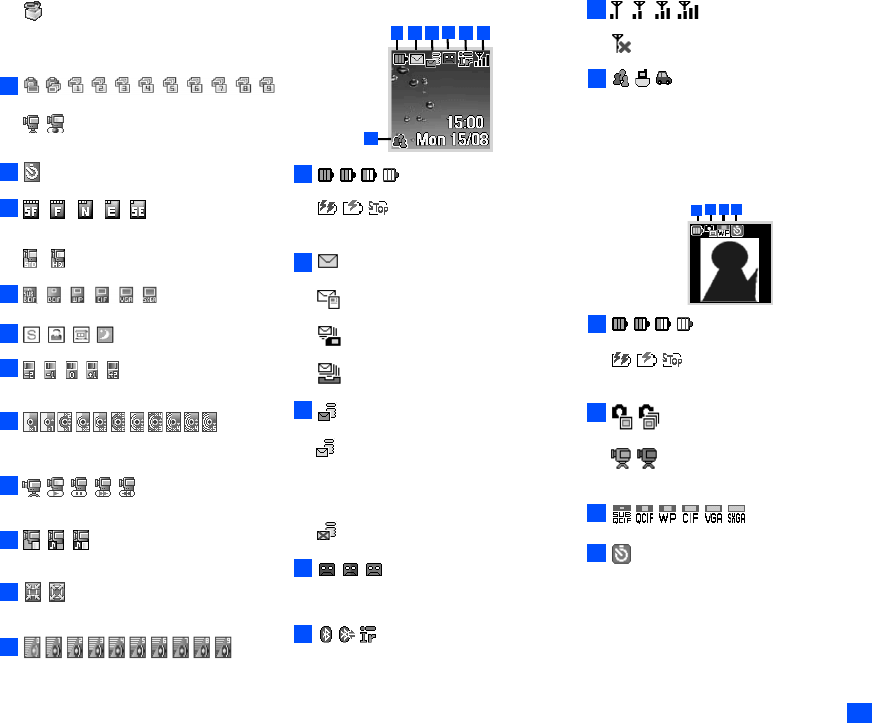
2nd-LCD
Indicates the battery level.
Indicates
the battery charging status (fast, slow,
stop).
Indicates that there is a new SMS in your phone.
Indicates
that there is a new SMS on the network.
Indicates that the SIM memory is full.
Indicates that the Inbox in your phone is full.
(pink)
Indicates that there are mail and MMS on the server.
(yellow)
Indicates that there is a new mail/MMS in your
phone.
2This yellow icon blinks while a mail/MMS is being
downloaded.
Indicates that the memory for a mail/MMS is full
(red, green/red, green)
Indicates that a new voice mail message is on
the network (No ALS or ALS Line 1/ALS Line 1
and 2/ALS Line 2).
Indicates the Bluetooth is on, Bluetooth is in
active, IR modem is set to on.
Indicates the signal strength level.
Appears when you are outside the service area.
Indicates that the phone is in the Meeting/Pocket/
Car mode.
2No icon appears for the Normal mode.
<When 2nd-LCD is used as the camera
view finder screen>
Indicates the battery level.
Indicates
the battery charging status (fast, slow,
stop).
Indicates single or burst mode of the camera.
(blue, red)
Indicates that the video mode is on or the video
is recording.
Indicates the photo/video screen size.
Indicates that the self timer is on.
2
3
4
5
6
7
8
2
4
7
8
4
6
1
2
7
5
3
1
2
3
4
5
6
7
9
10
11
8
8
9
10
11
x
Before You Start
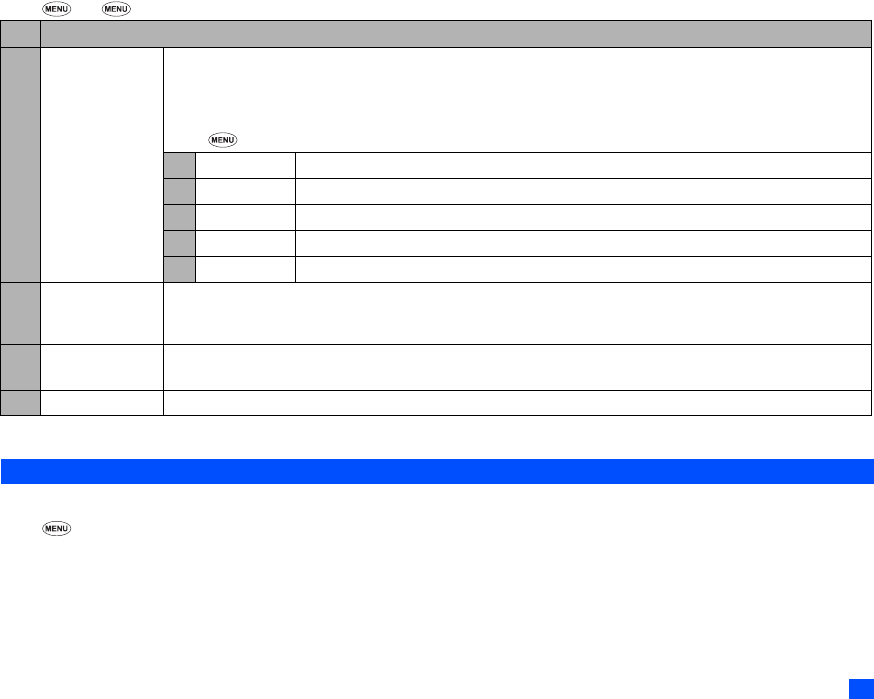
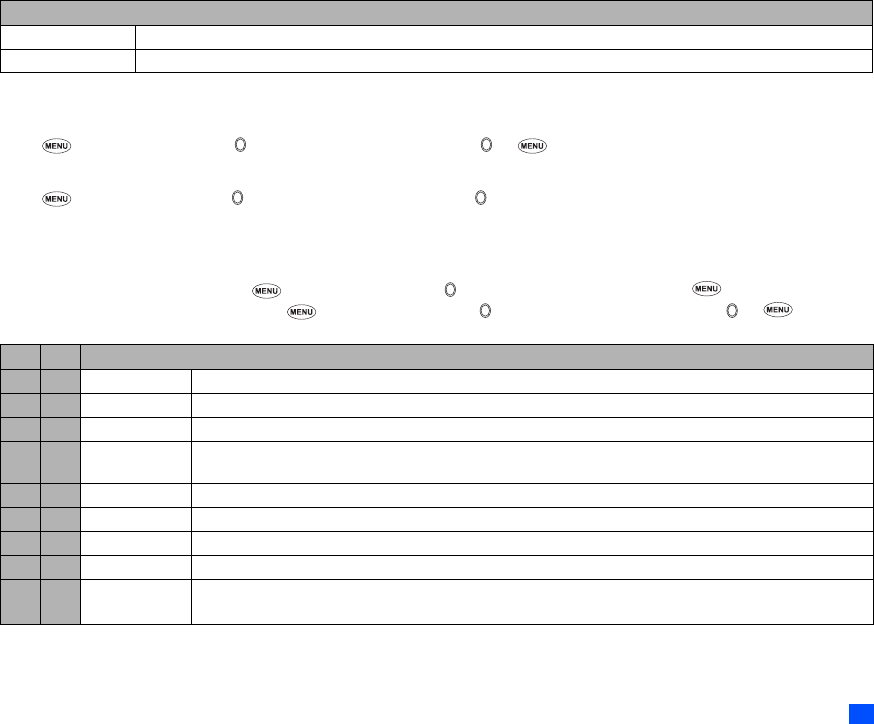
Overview of menu function
➡
➡
➡
➡
Standby screenMain menu screen
CLR
The Main menu has a set of icons for its top levels of options which can be selected either
using a combination of the 4-way navigation key (▲ ▼
) and (menu selection),
or just the keypad (shortcuts selection).
2The title of the selected option will be displayed in the Help area.
2SIM toolkit icon is displayed only when your SIM card supports this function.
2With the Main menu screen displayed, 0 to display your own number.
▼
▼
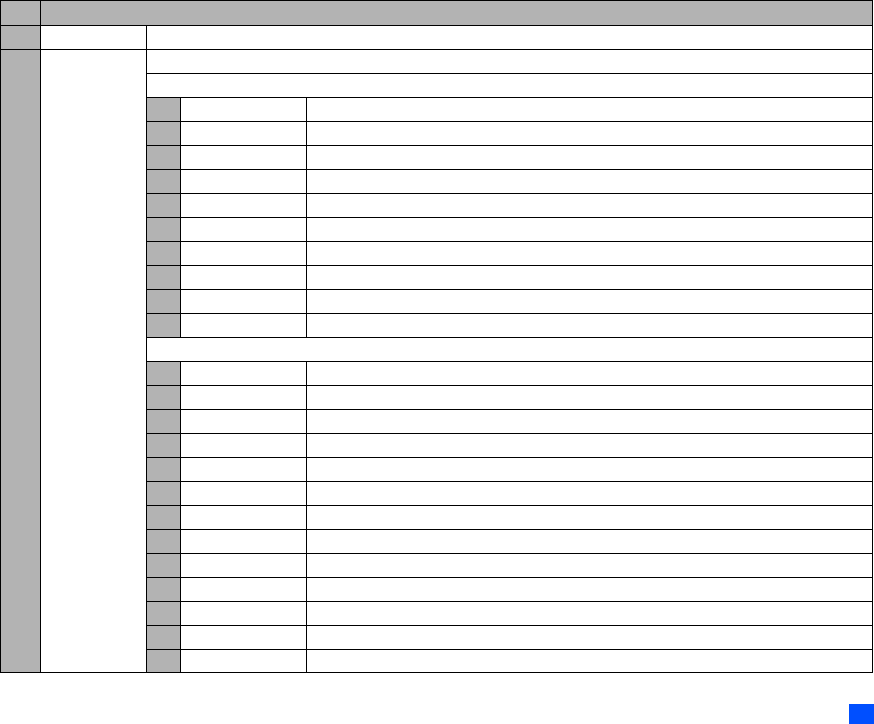
KeyMain menuSecond level menu
1 SettingsPhone
Phone modes
Main-LCD
2nd-LCD
Power saving
Calls
Security
Network
Reset settings
2MessageInbox
Drafts
Outbox
Sent
Folder1
Folder2
CB
KeyMain menuSecond level menu
7JavaPrograms
Prog backlight
8AccessoryMP3 player
Calculator
Clock alarm
Scheduler
ToDo list
Notepad
Voice memo
Currency
External connection
Synchronization
9SIM toolkit
KeyMain menuSecond level menu
3i-modei-mode
Settings
4PhonebookLists
Information #
Call options
5CameraCamera
Video recorder
6My dataVideos
Sounds
Pictures
MP3
Getting Started1
Basic Calls & Phone Use5
Text Entry15
Desktop icons18
Settings (M1)20
Message (M2)26
i-mode (M3)32
Phonebook (M4)45
Camera (M5)52
My data (M6)58
Java™ (M7)63
Accessory (M8)64
Bluetooth (M891)73
IR Data Exchange76
Index78
xii
Contents
Emergency Services and Safety Precautionsi
Before You Startiv
User’s manual conventions............................................. iv
Using Bluetooth connection...........................................73
IR Data Exchange76
Positioning of the phones...............................................76
IR send...........................................................................76
IR receive (M8921)........................................................77
IR modem (M8922)........................................................77
Index78
xiv
Memo
Memo
1
Getting Started
Getting Started
Preparing the phone
Before trying to use your phone, make sure that a valid Subscriber Identity Module (SIM) card is inserted and the battery is charged.
SIM card
Before using your phone, you must sign-up with one of the digital network service providers. In addition to your subscription details you will receive a
personal SIM (Subscriber Identity Module) card which is inserted into your phone.
If the SIM card is removed, the phone becomes unusable until a valid SIM card is fitted. It is possible to transfer your SIM card to another compatible
phone and resume your network subscription. The screen on your phone will display appropriate messages if no SIM card is fitted.
,If the phone, or the SIM card, is lost or stolen then you should contact your service provider immediately in order to bar it from use.
2The phone supports a number of languages and the keyboard symbols have been chosen for world-wide operation.
2The digital technology of your phone helps to ensure that your conversations are kept secure.
2The SIM card contains personal data such as your electronic phonebook, messages (see “Message (M2)” on page 26) and also details of the network
services you have subscribed to. The phone will not work (except for emergency calls on some networks) unless a valid SIM card is fitted.
,Be sure to turn the phone off before inserting and removing a SIM card. Otherwise damage to the SIM card can occur.
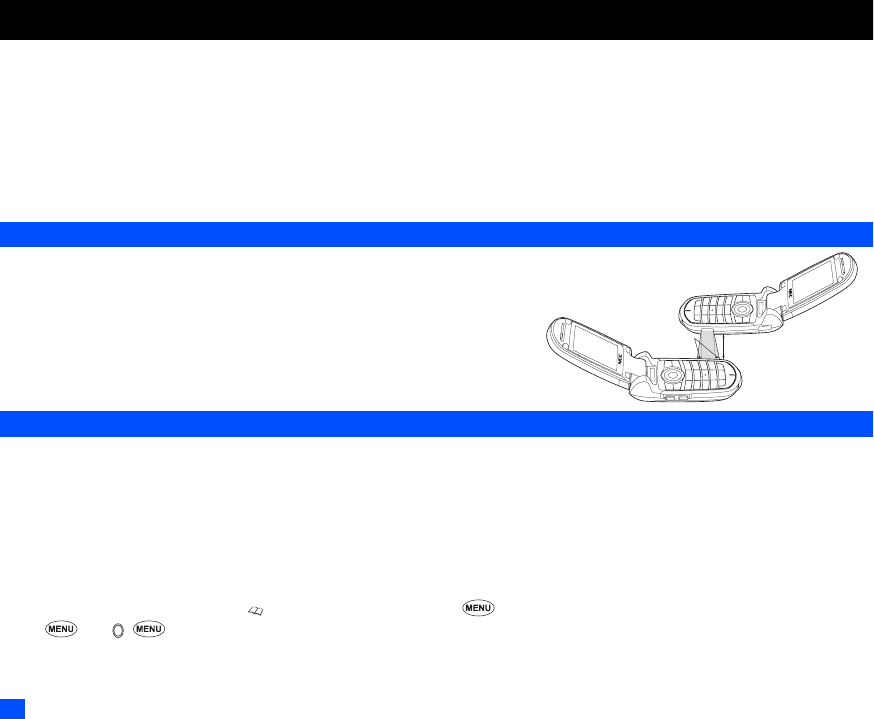
Inserting a SIM card
,Be sure to turn the phone off before removing the battery pack.
☛ While pressing down the areas marked with of the rear cover as indicated by arrow ➀, slide the rear cover about 3 mm in the direction of
arrow ➁ with your finger tip. Then, lift the cover up in the direction of arrow ➂ to remove it.
☛ Lift the finger tab of the battery pack up in the direction of arrow ➃. Then lift the battery pack out in the direction of arrow ➄.
☛ With the metal part facing down, insert the straight end of the SIM card under the holder in the direction of arrow ➅. Slide the SIM card all the way
until it reaches the end.
,Be careful not to damage electric parts of the SIM holder when inserting a SIM card.
☛ Insert the two tabs on the battery pack into the slots on the phone in the direction of arrow ➇, making sure that the tabs on the battery pack fit
properly into the slots on the phone. Then, press the battery pack down in the direction of arrow ➈ to clip it into the phone.
,Make sure that the battery pack is securely attached to the phone and align the rear cover with the grooves on the phone so that there is a gap
of about 3 mm at the end of the cover. After making sure that there is no gap between the rear cover and the phone body, slide the rear cover in
the direction of arrow ➉ until you hear a click.
2
Getting Started
.
,If the SIM card is not fully inserted when the battery is replaced, damage to the SIM card can occur.
/If the SIM card is already fitted, see “Start-up” on page 4.
Removing a SIM card
☛
With the battery removed, push the short and straight end of the SIM card with your thumb to slide it gently in the direction of arrow ➆➔ Lift the
SIM card after it is completely removed from the holder.
,Be careful not to damage electric parts of the SIM holder when removing a SIM card.
Rear cover
About 3 mm
Battery
Finger tab
Holde
r
SIM card
About 3 mm
Check that there is no gap
between the rear cover
and the phone body.
Tabs
Slots
3
Getting Started
Charging the battery
Before trying to use your phone, insert the phone’s battery, and connect the NEC battery charger (AC adapter) supplied with your phone to a suitable
mains power socket.
☛ Pull open the charger connector cover gently.
,Be careful when handling the charger connector cover. Do not pull strongly.
☛ With the arrow marks of the charger plug facing up, hold the buttons on both sides of
the charger plug with your thumb and index finger.
☛ Press the buttons as indicated by the arrow marks on the charger plug and insert the
plug into the charger connector.
,Make sure to insert the charger plug with the arrow marks facing up. Otherwise,
damage to the charger connector can occur when disconnecting the charger plug.
2If your phone is turned on and charging starts, the battery charging icon will be
displayed. LED will turn on in red while charging. When charging is complete, the LED
will turn off.
2You are recommended to switch off the phone while charging. If you need to receive
calls, your phone can be switched on and left in standby while being charged,
although the total time taken to charge is then increased.
☛ After the charging is complete, press the buttons of the charger plug as indicated by
the arrow marks on the charger plug (➀) and gently pull straight out of the charger
connector (➁).
,Make sure to press both buttons when disconnecting the charger plug from the
charger connector. If you pull the charger plug forcibly without pressing the
buttons, damage to the charger connector can occur.
The icons show the charging status of battery.
Fast battery charging Slow battery charging while the phone is in use Battery charging stopped due to overheat
,Using any battery pack, AC adapter, vehicle power adapter (option) not specified by NEC for use with this phone can be dangerous and
may invalidate any warranty and approval given to the cellphone. Do not leave the charger connected to the mains supply when it is not
in use.
,Do not try to charge the battery if the ambient temperature is below 5°C (41°F) or above 35°C (95°F).
,DO NOT connect a charger or any other external DC source until the phone’s battery is inserted.
2If the phone does not respond, please wait for a few minutes. The charging will then start.
2If you use the phone while charging, handle the phone carefully since the cable or adapter is connected.
2If you make/receive a call while charging, the charging may temporarily be interrupted.
2Charging takes approximately 3 hours with your phone turned off.
2Even if the phone remains connected to the charger, battery residual capacity may decrease when the phone is used for video recording, playing or
other battery consuming operation.
Charger connector
Charger plug
Arrow marks
Press
Press
Make sure to hold the charger plug with the arrow
marks facing up and press both buttons.
Charger connector
Charger plug
Press
Press
Pull straight
Make sure to press both buttons and gently pull
the charger plug straight.
4
Getting Started
,IMPORTANT BATTERY CHARGING INFORMATION
Charging a very low battery
The battery’s charge continues to drop after the low battery warning is displayed. In extreme cases where the battery is left uncharged for some
considerable time after this warning, a trickle charge is used to slowly top-up the battery to the safe level at which the fast charging can begin.
The phone can be in trickle charge for a few minutes before the fast charging starts.
Standby and talk times
Your phone works closely with the network you are using to provide the services you need, and the standby and talk times achieved will depend on how
you use the phone and choices made by the network operator.
In particular, factors such as your location within the network, the frequency at which this location is updated, the type of SIM card you have, your
reception of area messages or cell broadcast messages and the use of full rate or enhanced full rate speech, will affect both standby and talk times.
Checking the battery
☛ Check icon at the top of the standby screen.
The number of blocks on the icon shows the charge of your battery pack.
Full battery power Partial battery power Low battery power Battery empty
Low battery alarm
When the battery voltage falls below the working level, a low battery warning is displayed on the screen accompanied by LED illumination and a short
tone along with an empty battery icon. The phone will automatically power down shortly afterwards.
2Please charge the battery as much as possible when the battery is very low.
Other battery alarms
Your phone may display warnings when the battery temperature is too high, or the voltage of the battery or the charger is over the appropriate level.
Follow the instruction given by these warnings immediately.
Start-up
Switching the phone on
☛
Hold down for about a second to switch on. The screen will display the selected greeting (if set, see page 22) and the phone is then in standby.
2You may need to charge the battery before using your phone.
2When your phone is turned on, the specified ringer may sound.
2If your phone is accidentally turned off while downloading or deleting Java™ application, it will take longer than usual to start up the phone the next
time you turn on the power.
5
Basic Calls & Phone Use
Switching the phone off
☛
Hold down until the display shows the switch off message.
PIN code
The SIM card issued by your service provider has a security feature called PIN code protection. The Personal Identification Number (PIN) is a number
put on to the card by your service provider, and is 4 to 8 digits long. Some service providers supply SIM cards which will cause your phone to prompt for
a PIN code when it is turned on. If this is the case, enter your code with the phone’s keypad. If you insert a SIM card other than your own, information
such as call logs may be lost (see “Security (M17)” on page 24 for details).
Basic Calls & Phone Use
Making basic calls
You make a simple call in the same way as you would with a normal phone, except that you need to press after entering the area Subscriber Trunk
Dialling (STD) code and the phone number. To make international calls, you must first enter the international dialling code (see page 14).
2Use the full STD area code even if you are calling to a person in the same town. If the numbers are too long to be displayed within one line, after
pressing , excess part is deleted and ‘...’ is added at its end.
2The main-LCD display shows the strength of the radio signal that links your phone to the network. The maximum signal strength is shown by 4 shaded
blocks and the minimum signal strength by 1 block.
Starting a call
☛
Key in the phone number. Check the number on the display ➔ or SK1 to send the input number to start the call
☛ Before the other party answers the call, you can end the call by pressing briefly, pressing SK2 or closing your phone. When you use the
headset, you can also end the call by pressing and holding the button on it.
2When connecting a wired headset and Bluetooth headset at the same time, the wired headset will not work.
When the call is sent, the screen displays the number called, the name stored in the phonebook and a connection graphic or a Calling Line Identification
(CLI) picture that has been allocated to the number called (see page 49).
Correcting mistakes
Use the and to move the cursor and then CLR to clear individual digits, or hold down CLR to completely clear a phone number.
Ending a call
☛ While talking, SK2 or briefly, or close your phone. The phone returns to the standby screen.
2If is held down, your phone will turn off.
▼
▼
6
Basic Calls & Phone Use
2When you use the headset, you can also end a call by pressing and holding the button on it.
2When connecting a wired headset and Bluetooth headset, the wired headset will not work.
2You cannot end a call by closing your phone when the headset is connected.
Receiving an incoming call
When someone calls your number, the ringer will play (if set - see page 21), the LED glows in the specified colour, and the phone number of the caller
may be displayed if the calling line identification facility is available and the caller has activated the feature. If the caller’s phone number has been related
and stored in your phonebook with a name and a CLI picture (see page49), that name and picture will be displayed. If the caller has withheld their identity,
the screen will give a message that the caller’s number is being withheld. If the origin of the call cannot be determined, no information is displayed on
the screen.
2You also have options for holding and forwarding calls. These options depend on your network and your subscription arrangements.
Accepting an incoming call
☛
While receiving an incoming call, or SK1
2When you use the headset, you can also accept an incoming call by pressing the button on it.
2When connecting a wired headset and Bluetooth headset, the wired headset will not work.
2When Auto answer function (see page 22) is set to on and a headset is connected to the phone, the incoming call is automatically accepted after
several rings.
2You can accept an incoming call by opening your phone, when Fold answer function (see page 20) is set to on.
2You can set your phone to answer a call when any key is pressed (see “Any key answer” on page 20).
Rejecting an incoming call
☛
While receiving an incoming call, or SK2 briefly or close your phone.
2When you use the headset, you can also reject an incoming call by pressing and holding the button on it.
2You cannot reject a call by closing your phone when the headset is connected.
2When connecting a wired headset and Bluetooth headset, the wired headset will not work.
If your phone receives a call and you do not answer it, the main-LCD will display a desktop icon of the phone number (or the name if stored) of the caller
(if available).If your phone is closed, the 2nd-LCD will also display a missed call icon, and you can display the details by pressing Side up.
This information is stored in the missed calls list. Up to 20 missed calls are stored in this list.
2If you are making a call, the phone gives priority to receiving a call unless you have already pressed .
/See also: “Call diversion (M161)” on page 12 and “Call waiting and holding (M162)” on page 13.
/See also: “Call options (M43)” on page10.
7
Basic Calls & Phone Use
Unsuccessful calls
If dialled call is not successfully connected, the display will give an appropriate message.
If your phone has the auto redial function activated, the number will be automatically called again after a short delay (see page 13).
Emergency calls
The standard emergency number of 112 can be used.
☛ Key in 1 1 2➔ or SK1 to connect the call to the local emergency services.
2On some networks, emergency calls can be made using the 112 number without a SIM card inserted.
Last number redial
You can redial the last number you called.
☛ Ensure that the standby screen is displayed and no phone number is shown ➔ twice to dial the last number you called.
/See also: “Call options (M43)” on page 10.
One-touch dial
One-touch dial for the phonebook (SIM) is available by pressing and holding the number keys between 2 and 9.
2A number for the One-touch dial corresponds to the location number in the phonebook (SIM).
2One-touch dial is available only for the phone numbers with the location number 2 to 9 stored in the phonebook (SIM).
Fast dialling
You can make a call to the phone number in the phonebook (Phone/SIM) with just a few press of button.
To fast-dial the phone number in the phonebook (SIM), use the following procedure:
☛ From the standby screen, key in the Location number of a personal data in the phonebook (SIM) ➔#. The corresponding personal data is
displayed.
☛ to dial the phone number.
To fast-dial the phone number in the phonebook (Phone), use the following procedure:
☛ From the standby screen, key in the Abbreviated Dialing Number (ADN) of a personal data in the phonebook (Phone) ➔. The corresponding
personal data is displayed.
☛ Use the and keys to choose the phone number (if there are more than one), then to dial the phone number.
▼
▼
8
Basic Calls & Phone Use
Displaying your own phone number (M0/M416)
☛0 or 416
Voice recall
You can store up to 10 voice recall recordings which can be allocated to a personal data stored in the phonebook (Phone). To store the voice recall
sound, see page 49. To use the voice recall function, use the following procedure:
☛ Press and hold ▼
2When you use the headset, you can also activate the voice recall function by pressing and holding the button on it from the standby screen.
☛ Within 4 seconds, say the word or words you have recorded to identify the record you wish to recall. If the word or words were recognized, the
first phone number of the personal data stored in the phonebook (Phone) will be called automatically.
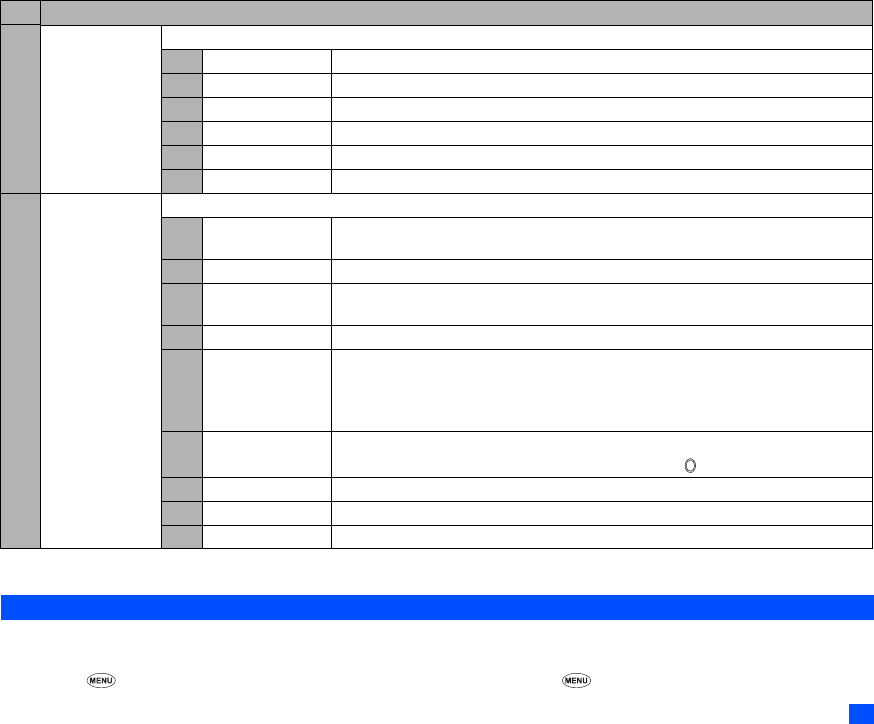
Options menu (during a call)
☛ During a call, to display the options menu
2Depending on the conditions, some options may be displayed in gray and not be available.
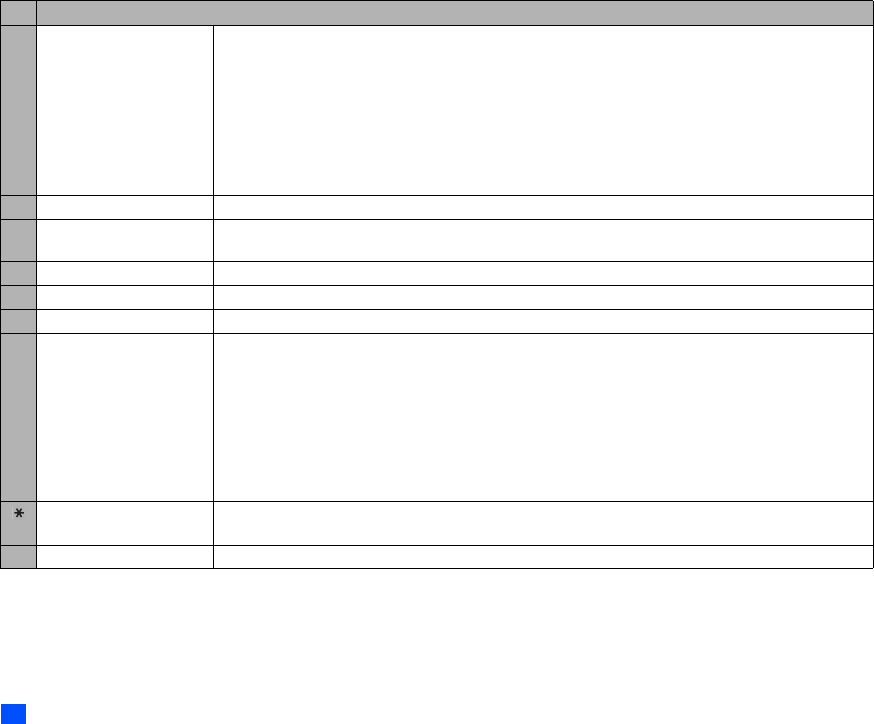
No.Options menu (during a call)
1Main menuDisplays the Main menu screen. See “Overview of menu function” on page x for details.
2Hold/RetrievePuts the call(s) on hold or retrieves the call(s).
3Mute/UnmuteMutes or unmutes your voice to all active calls.
4Transfer callEnables to transfer the call and connect other parties.
2After transferring the call, your call will be dropped.
5Add to conferenceMerges calls and makes a multi-party call.
6Private callMake a private call to the highlighted party within the multi-party call.
7Record callRecords the call while talking.
8Disconnect partyDisconnects the highlighted party.
9Switch call to Bluetooth/Switch
call to phone
Switches the audio path state of the call.
2You can also switch call to Bluetooth or phone by pressing and holding #.
2This option is available only when the Bluetooth device is connected to the phone.
0Bluetooth OnActivates the Bluetooth device.
9
Basic Calls & Phone Use
Putting a call on hold
☛ Toput the received or dialled call on hold, SK1 or2. To retrieve the call, SK1 or 2 again.
Mute
You can mute the sound from the mouthpiece during a call. When your call is muted, the other party cannot hear any sound from your phone, but you
can still hear the sound from the other party.
☛ To mute the sound during a call, 3.To retrieve the sound, 3 again.
2The mute function is automatically released after the call ends.
2The mute function is not available while using the headset.
Call transfer
When you have an active call and a held call, you can transfer the call and connect the two parties, then you can drop from the line while leaving those
two calls active.
☛ To transfer the call, 4.
2After dropping from the call with the other two parties, if you have a call waiting, you can proceed the call with it.
,Call transfer facility is SIM dependent.
Multi-party calls
If your SIM card is multi-party enabled, you can make a conference call to more than one caller. To create the multi-party calls, at least 3 parties, including
the host, are needed.
Receiving the second call
☛ SK1 or to accept the second call ➔SK2 or 5 to merge both calls to initiate a multi-party call.
2When you accept the second call, the first call will be put on hold.
Making the second call
☛ SK1 to put the first call on hold ➔Key in the phone number ➔SK1 or to make the second call ➔After the second participant answers, SK2
or5 to merge both calls to initiate a multi-party call.
Putting the multi-party calls on hold
☛ SK1 or 2 to put all calls on hold ➔To retrieve the call, SK1 or 2 again.
2You can put the multi-party calls on hold only when you are a host of the multi-party calls.
10
Basic Calls & Phone Use
Making a private call
While on the multi-party call, you can make a private call to a specific party.
☛ To make a private call, highlight the desired party you want to make a private call to ➔ 6
☛ To end a private call and return to the normal multi-party call ➔5
2While you are on a private call, other parties can continue with their conversation.
2You can make a private call only when you are a host of the multi-party calls.
Ending the multi-party calls
☛
To end the multi-party calls, or SK2.
☛ To disconnect a specific party on a multi-party call, highlight the party you wish to disconnect ➔8
2You can disconnect a specific party on the multi-party calls only when you are a host of the multi-party calls.
,Multi-party call facilities are network dependent.
Recording a call
You can record the conversation during the call.
☛ During a call, press and hold ▼ or 7 to display the Voice memo screen ➔ SK1 to start the recording ➔SK1 to pause and SK2 to stop the
recording
2To play the recording, see “Recording/playing voice memo or setting speaker” on page 71.
Scratchpad number
Your phone has a scratchpad facility that enables you to take down a phone number during a call and then make a call to it when you have finished.
This scratchpad number can be stored in memory for future use.
Noting & calling a scratchpad number
☛
During a call, key in the number to be placed in the scratchpad. It will be shown on your phone’s screen ➔ when the call is finished. The number
will still be displayed ➔ to dial the displayed number.
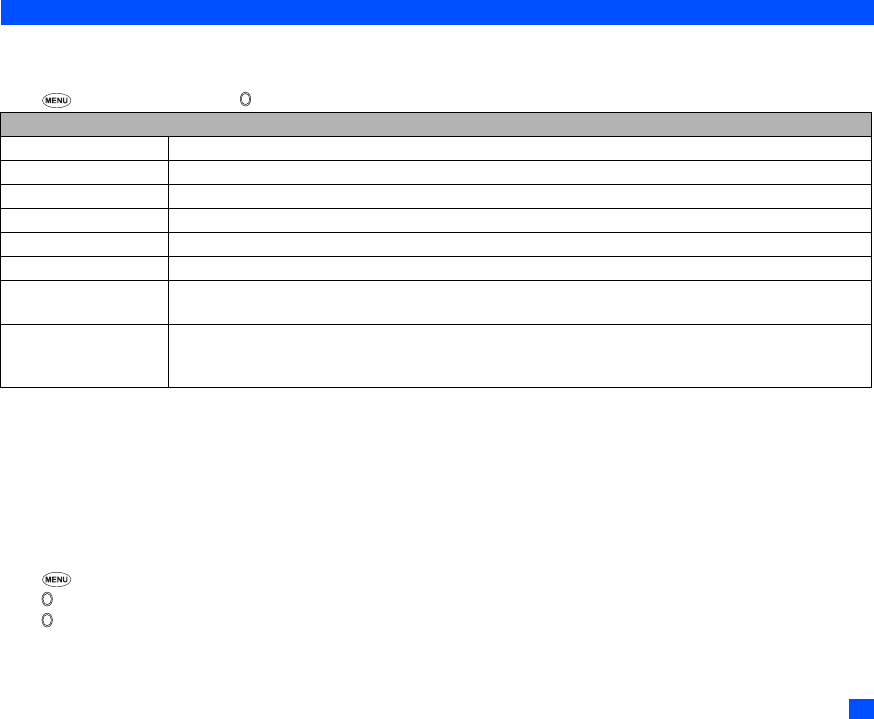
Call options (M43)
From Call options, you can display the list of missed, received and dialled calls, the duration of the last call made and all calls, charge information and
the redial blacklist.
11
Basic Calls & Phone Use
☛4 3to display the Call options screen.
2Depending on the conditions, some options may be displayed in gray and not be available.
Display missed/received/dialled calls Options menu (M431M/M432M/M433M)
☛
or 431 for missed calls, or432 for received calls, or or433 fordialled calls.
☛ Highlight a number in the list ➔
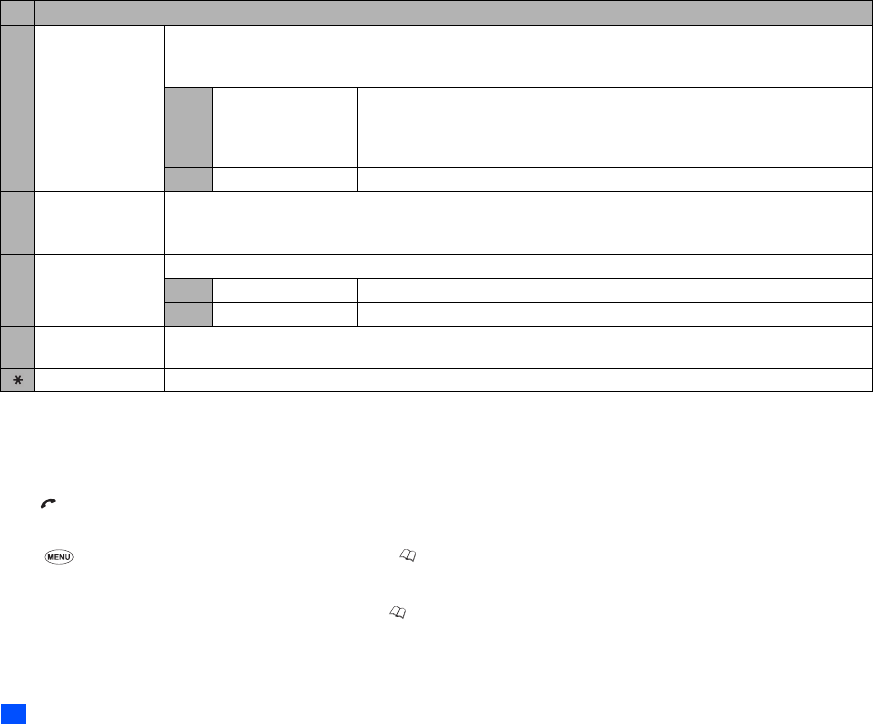
No.Call options
1Missed calls Displays the list of missed calls. You can also access this function by pressing from the standby screen.
2Received callsDisplays the list of received calls. You can also access this function by pressing from the standby screen.
3Dialled callsDisplays the list of dialled calls. You can also access this function by pressing from the standby screen.
4Last call durationDisplays the duration of the last call made on your phone.
☛ SK1 to reset the display to zero.
5Total calls durationDisplays the duration of the total calls made on your phone.
☛ SK1➔1 to reset the duration of the total dialled calls, 2 to reset the duration of the total received calls, or 3 to
reset the duration of all calls.
6Charge infoDisplays the charge information (Advice of Charge - AoC).
,The AoC facility is SIM card and network dependent.
2To reset the display to zero, set the maximum charges or edit the unit price, you may be prompted to enter the
PIN2 code.
1Total chargeDisplays the total charge.
☛ SK1 to reset the display to zero.
2Maximum chargeDisplays the maximum charge.
☛ Key in the maximum number of units allowed➔SK1
3Unit priceDisplays the unit price.
☛ Highlight the whole number (integer), the decimal number or the currency field ➔Key
in the required value for the whole number and decimal number fields. For the currency
field, key in the currency type using a maximum of three characters ➔SK1
7Redial blacklistAccesses the numbers in the blacklist.
2If dialled call is not successfully connected (e.g. number busy), the auto redial facility will be offered (see page 13).
If you have set auto redial and the call still fails, the number called will be added to the blacklist.
▼
▼
▼
▼
12
Basic Calls & Phone Use
2Depending on the conditions, some options may be displayed in gray and not be available.
Call settings (M16)
From the Calls screen, you can change various call settings: the call diversion, call waiting and holding, auto redial and line identification.
Call diversion (M161)
Setting Call diversion
☛1 61➔ or to select the type of call you wish to divert from Speech, Data or Fax.
2 There will be a delay while your phone checks its divert status with your network.
☛ Highlight one of the conditions ➔When the phone number field of a divert condition is highlighted, either enter the phone number to divert to, or
delete any existing phone number.
☛ If you have made any mistake, highlight the appropriate field ➔SK1 to clear any mistakes.
☛ If the settings are correct,
,There will be a short delay while the network sends the divert status of your phone.
,There may be an additional charge for this service depending on your network.
,There may be unavailable settings depending on your network.
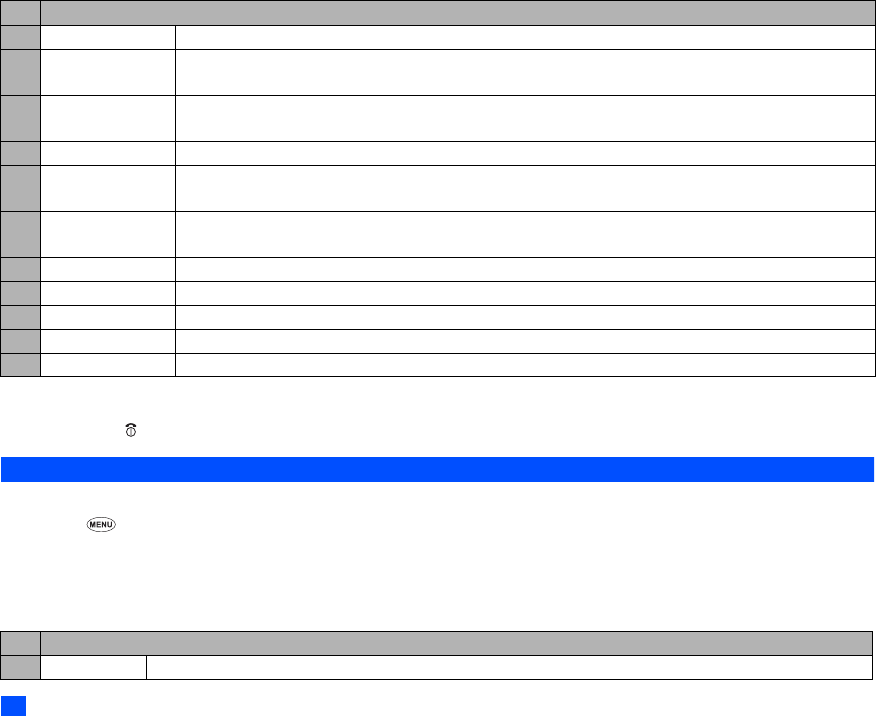
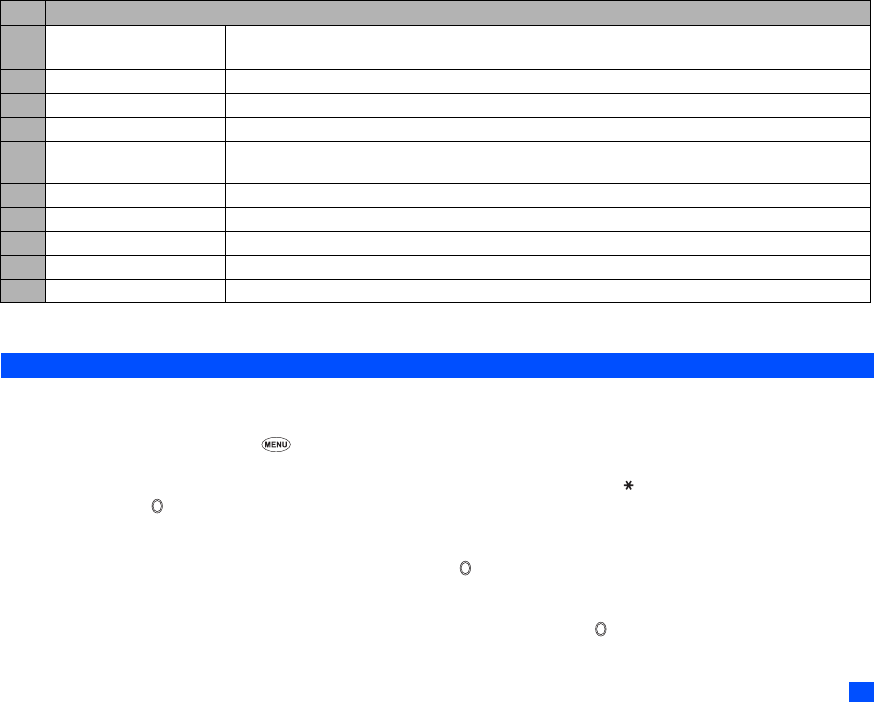
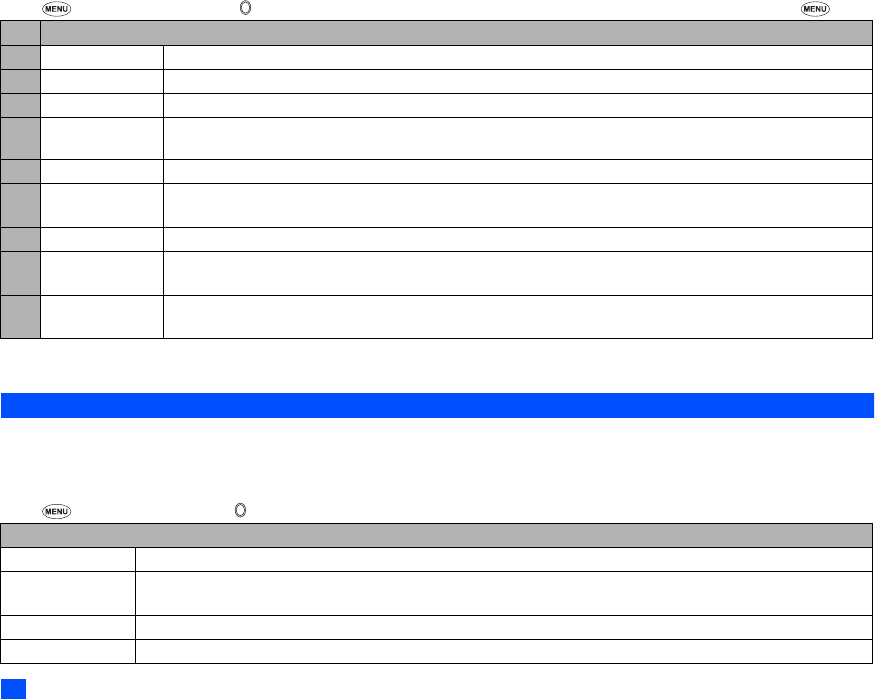
No.Missed calls/Received calls/Dialled calls Options menu
1Call Calls the current number.
2Create messageCreates a new message to the highlighted phone number.
3Add to phonebookAdds the current number to the phonebook.
☛ 1 to add it as a new personal data, 2 to add it to an existing personal data ➔Press the appropriate number for
the storage destination ➔Press the appropriate number for the phonebook data field to copy the current
number to.
4Delete oneDeletes the current number.
5Delete allDeletes all the numbers in the list.
6InfoDisplays information on the current number.
7Add desktop iconCreates a desktop icon of the selected number.
8Items/PageSelects either to display 4 or 8 phone numbers in one screen.
▼
▼
13
Basic Calls & Phone Use
Call diversion edit options menu
☛ Highlight the required edit field ➔
2Depending on the conditions, some options may be displayed in gray and not be available.
Call waiting and holding (M162)
This facility informs you that another call is being made to your phone while an existing call is in progress.
Setting up call waiting
☛1 62➔11 to activate, 12 to deactivate the call waiting, or 2 to check the status of call waiting.
Using call waiting
☛ If you are on a call and another comes in, you will be alerted by a beep in the earpiece ➔SK1 to accept the incoming call.
☛ To switch the calls, SK1
☛ To merge the calls, SK2 (see “Multi-party calls” on page 9).
☛ To end the current call,
☛ To retrieve the held call SK1
Auto redial (M163)
With the auto redial facility, your phone will redial a number up to 10 times if the first attempt fails. A tone will be heard at each redial attempt. Your phone
cannot connect a call if the other party is busy or if there are network problems. Pressing SK2 during a redial attempt will abort it.
☛1 63➔1 to activate or 2 to deactivate the auto redial facility.
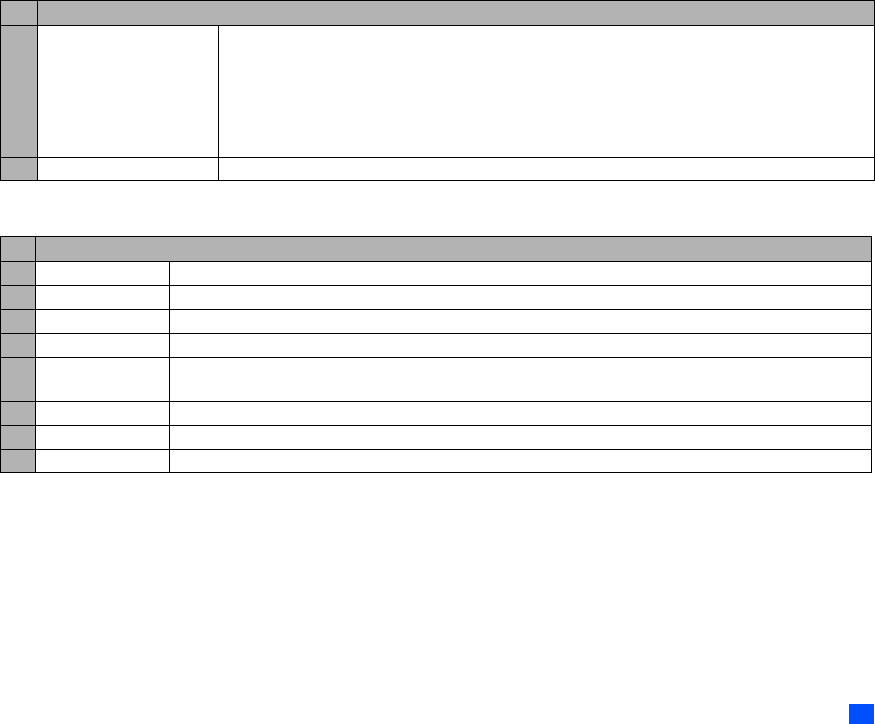
No.Call diversion edit options menu
1Copy Copies the number in the edit field.
2PastePastes the previously copied number.
3Disable all Disables the numbers from all the fields.
4Phonebook Displays the phonebook to insert a number in the edit field.
5Add to phonebookAdds the number to the phonebook as a new personal data or saves the number in an existing personal data.
14
Basic Calls & Phone Use
Line ID (M164)
,The line ID (identification) facility is network dependent.
The line ID facility enables you to choose whether or not to send your own phone number when you make a call
and also whether or not to display a caller’s phone number when you receive a call.
☛1 64 to display the Line ID screen with a ✔ over an activated line and a ✘ over a deactivated line.
☛ To set the status of each line (see the table on the right), highlight a line (the line will flash when selected).
☛ SK1 to set the line identification on or off ➔ to save the current settings.
International dialling codes
When you make an international call from any country, you must start by dialling a special international access code. Your phone has the facility to prefix
a + symbol to the numbers, so that you need not enter the access code for the country that you are calling from.
Entering international dialling codes
☛
Hold down 0. The 0 character displayed will change to a + character ➔Key in the country code, area code, and phone number that you wish to call.
The UK country code is always 44, no matter what country you are dialling from. For example, a typical UK number of 0131 1234567 is entered as:
Roaming
,You will be charged for calls forwarded to you while roaming.
The roaming facility enables you to use your phone in many parts of the world and pay all charges through your normal service provider. Your network
operator usually has agreements with named networks in other countries so that automatic roaming can take place with these named networks.
The phone also allows you to set network preferences of your own.
When dialling, you will need to add the international access codes if required. So, storing all numbers with the codes (such as +44 for UK) is helpful
(see “Entering international dialling codes”).
2Before leaving your home country, you should select any preferences such as bar calls or call diversion.
Setting Automatic or Manual network selection (M181)
☛
181➔1 to select the automatic mode or 2 to select the manual mode.
,Before you manually select a network, ensure it is covered under the agreement you have with your service provider.
New search (M182)
☛
182 to search the available networks➔Highlight the desired network ➔ to connect to it.
International access country codearea codephone number
+441311234567
Line typeSetting
OutgoingSend own #
Show connected #
IncomingShow Incoming #
Return own #
15
Text Entry
Viewing/editing network list (M183)
,Before editing your network list, please consult with your service provider.
☛183 to read the network list in the SIM memory ➔Highlight the required network ➔
2Depending on the conditions, some options may be displayed in gray and not be available.
Selecting the frequency band (M184)
You have to select the frequency band to suit the location.
☛184➔Select the required frequency band.
2Frequency bands must be adjusted to suit the location when roaming (Europe, US, etc.), for the phone to work properly.
Text Entry
This section describes how you enter text.
Mode change
☛ With a text entry screen displayed, SK1 to change the text entry mode: T9
®
English text, Normal text (ABC), Numeric input
T9
®
English text input
Your phone incorporates T9
®
Text Input, enabling fast, easy and intuitive text input. For each letter to be keyed in, you only need to press the
alphanumeric key once. The screen will display the word you may require based on the internal English dictionary of your phone.
☛ With a text entry screen displayed, SK1 until the entry mode is T9
®
English input.
i) For example, to enter “Good”:
☛4 6 6 3, and then 0 to confirm the word.
ii) To enter “Peter is good”:
☛ to shift to upper case (for one letter). You will see a green arrow in the Help area.
☛ 7 3 8 3 7 to display “Peter”, and then 0 to confirm.
☛ 4 7 to display “is”, and then 0 to confirm.
No.SIM list Options menu
1Add Adds a new network to the list.
2MoveMoves the highlighted network within the list.
☛ Use ▲ and ▼ to move the network ➔SK1
3RemoveDeletes the highlighted network.
16
Text Entry
☛ 4 6 6 3 to display “good”, and then 0 to confirm and the sentence is completed.
Normal text input
☛ With a text entry screen displayed, SK1 until the entry mode is Normal text (ABC) input.
☛ Use alphanumeric keys to enter letters. For example, to enter “e,” press 3 twice; to enter “f,” press 3 three times. For other functions, see the table
below
2When you are in the Normal text (ABC) input, any word entered that is not in the T9
®
dictionary will be added automatically.
KeyFunction
0Confirms a word and inserts a space.
1Inserts a period or a single quote as in “Let’s”, “we’re”, “it’s”, etc.
SK1(List)Displays the list of other matching words.
SK1(Spell?)Activates the spell mode which temporarily deactivates T9
®
for you to spell the word in Normal text input. The
spell mode ends when you key in 0 to enter a space, or SK1(T9).
SK2(Dismiss)Cancels the T9
®
matching word list.
SK2(Next) or #Displays the next candidate.
or Places the cursor.
0 to 9 (press and hold)Inserts the number.
CLRDeletes any character.
Toggles between lower case, shift (upper case for one letter) and caps lock (permanent upper case).
(press and hold)Press and hold to activate the highlight mode (see “Highlight mode” on page 31 for details).
#Activates symbol mode when no word is highlighted.
KeyFunction
Toggles between lower case, shift (upper case for one letter) and caps lock (permanent upper case).
(press and hold)Press and hold to activate the highlight mode (see “Highlight mode” on page 31 for details).
0Inserts a space.
0 to 9 (press and hold)Inserts the number.
CLRDeletes any character.
or Places the cursor.
#Activates symbol mode.
▼
▼
▼
▼
17
Text Entry
2If you have made a mistake, use ▲ ▼ to place the cursor to the left or the right of the incorrect character (depending on the Clear mode setting,
see page 32 for details) and then CLR.
2When entering normal (ABC) text, and the character you require is displayed, use to move to the next character position (if you wait for more than
1 second, the cursor will move one character to the right automatically).
Numeric input
☛ With a text entry screen displayed, SK1 until the entry mode is Numeric input.
2You can also press and hold the number key to insert the number in T9
®
/Normal text input mode.
☛ Use alphanumeric keys to enter numbers.
Key allocations
Whenever you need to enter text (for messages, storing names with numbers, etc.), successive presses of an alphanumeric key will display different
characters. Pressing in T9
®
English text input or Normal text (ABC) input toggles between lower case, shift (upper case for one letter) and caps lock
(permanent upper case). When a text entry screen is displayed, pressing SK1 enables you to select Normal text input (ABC), T9
®
Text input (T9) or
Numeric input (123).
2Depending on the types of text entry screens, not all types of text entry modes are available.
Symbol mode
In the symbol mode, pressing each key will input a symbol according to its position on the Symbols screen. By pressing # in a text entry mode, the
Symbols screen will be displayed. Use ▲ and ▼ to select the row, and then press the appropriate number on the column of the required symbol.
▼
▼
▼
18
Desktop icons
Desktop icons
Desktop icons are shortcuts to functions or items. You can activate a desktop icon on the standby screen (desktop) in stead of following the menu and
pressing the shortcut numbers.
The desktop icons are displayed in two rows on the standby screen. See “LCD and displayed icons” on page viii for the actual location of the desktop
icon area.
There are two types of desktop icons: the automatically displayed and the manually created.
Automatically displayed desktop icons
The following automatically displayed icons are displayed on the upper row of the desktop icon area:
2You can delete all the automatically displayed icons by pressing and holding CLR on the standby screen.
2If you turn the phone off, all the automatically displayed desktop icons are deleted.
Manually created desktop icons
The following manually created icons are displayed on the lower row of the desktop icon area
Icon nameImageDescription
Missed callDisplayed when there is a new entry in the Missed calls list.
Missed messageDisplayed when there is a new message you have not acknowledged.
Missed MailDisplayed when there is a new Mail you have not acknowledged.
PictureDisplays the image file.ToDo listDisplays the ToDo list screen.
NoteDisplays the note.NotepadDisplays the Add new screen for Notepad.
CameraDisplays the camera view finder screen.Voice memo
recorder
Displays the New record screen for Voice
memo.
VideoDisplays the video view finder screen.CurrencyDisplays the Currency screen.
MP3 playerDisplays the MP3 player screen.BluetoothDisplays the Bluetooth screen.
19
Desktop icons
Creating a desktop icon manually
☛
Highlight the required function (Camera/Video/MP3 player/Calculator/Clock alarm/Scheduler/ToDo list/Notepad/Voice memo/Currency/Bluetooth)
or display the item (image file/note file/phone number/Email address/URL).
☛ For functions, SK1
☛ For items, to display the Options menu and select Add desktop icon (for an image/note file, this menu is under Use item)
2For Camera/Video/MP3 player, you can also display the Options menu and select Add desktop icon (for Camera/Video, this menu is under
Other settings).
2You can create up to 10 desktop icons.
2If you have more than 5 desktop icons, an arrow will be displayed to indicate that you can scroll for more icons.
2The phone number, Email address or URL desktop icon data will not be updated when the original data is modified. Delete the old desktop icon
and create a new one in such a case.
2When you create a desktop icon of an image file or notepad file, the file will be automatically protected. The default title will be the file name. Evenif
this title is changed, the original file name will remain the same.
2Each manually created desktop icon has a title that you can edit.
Activating a desktop icon
☛
➔Highlight the required desktop icon ➔
2If you do not press any key for three minutes after highlighting a desktop icon, the highlight is cancelled and the screen goes back to the normal
standby screen.
2If you activate an automatically displayed desktop icon, it will be deleted automatically.
Desktop icon Options menu
☛
Highlight a desktop icon ➔
No.Desktop icon Options menu
1Edit titleEdits the title of the highlighted desktop icon.
2Delete oneDeletes the highlighted desktop icon.
3Delete allDeletes all the manually created desktop icons.
20
Settings (M1)
Settings (M1)
Phone (M11)
☛1 1
No.Phone
1Voice
volume
Adjusts the sound volume output from the earpiece.
☛ Use ▲▼, Side keys or alphanumeric keys(0 to 9)to adjust the volume.
2You can also press the Side keys to display the volume control screen and to adjust the volume setting.
2During a call, you can press the Side keys to adjust the setting of the volume as required.
2When you change this setting while a headset is connected, the changed volume will be valid only when you have a headset connected.
2While using a Bluetooth headset, you cannot change the volume.
2Answer
options
1Any key
answer
On: Any key (except , SK2, the Side keys) is valid to answer a call.
Off: Only and SK1 are valid to answer a call.
2Ring silencer
On
: Pressing one of the
Side
keys stops the ringer sound and the vibrator while receiving a call with the phone closed.
2This function cannot be used if the Side keys are locked.
3Fold answerOn: You can answer an incoming call by opening your phone.
3Side keyDisable: Side keys are locked while your phone is folded.
2You can also lock/unlock the Side keys by pressing and holdingon the standby screen.
4ALS setup
,The Alternate Line Service (ALS) facility is SIM card and network dependent.
If your SIM card supports ALS, you can setup which line to use for Outgoing call or Voice mail.
5Clock1Show clockSets to display the local time, both the local and remote times or no time on the main-LCD.
2Set timeSets the time for the local or remote time.
3Set dateSets the date.
4Set date formatSelects the date display format.
5Set time formatSelects the time display format from 12 hour or 24 hour.
6Set timezoneSets the timezone. (A ✔ is placed on the currently selected timezone.)
☛Highlight the required timezone ➔ SK1 to save the change.
2If the highlighted timezone has Daylight Saving, a check box will be displayed at the bottom of the screen.
to activate (✔)/deactivate the setting.
7Set start daySelects whether to start the week on Sunday or Monday.
2This setting affects the functions related to the day of the week, such as Scheduler. (See “Scheduler
(M84)” on page 67 for details.)
21
Settings (M1)
Phone modes (M12)
Your phone can be set to one of the following modes: Normal mode, Meeting mode, Pocket mode or Car mode.
,Any changes made to the settings while in a particular mode will be stored and used when that mode is selected again.
Selecting your phone mode
☛ ▲ or 12 ➔ Press the appropriate key for the required mode.
2You can also set the Meeting mode or return to the previous mode by pressing and holding ▲ on the standby screen.
Editing the mode settings
☛
▲or 12 ➔Highlight the required mode ➔SK1➔ Press the appropriate number for the required setting in the following table.
2For any volume setting, use ▲▼, Side keys or alphanumeric keys(0 to 9).
2When you change any volume setting while a headset is connected, the changed volume will be valid only when you have a headset connected.
6LanguageSelects the language the phone displays.
2When you have switched the language to be displayed, please wait until the new setting becomes active.
7LEDSelects the Light Emitting Diode (LED) colour for incoming calls/SMS/Mail or during a call.
2If the personal setting or the Group setting for the LED colour is also set in the phonebook, it has priority over this LED setting.
(See “Allocating a LED colour” on page 49 for details.)
8Earphone
type
Selects the earphone type from Stereo or Monaural, depending on your earphones (headset).
No.Phone mode setting
1RingerSelects the Sound or Video for incoming calls. (See “Sounds (M62)” on page 58 or “Videos (M61)” on page 58 for details.)
2If the Video is set, it will sound and will be displayed regardless of the CLI picture setting for the personal data in
Phonebook. (See “Allocating a picture as a CLI” on page 49.)
2Ringer volumeSets the sound volume for incoming calls.
2While receiving a call with your phone open, the ringer volume can also be adjusted by pressing the Side keys.
2While using a wired headset, you can set the volume for the wired headset. The volume settings for the wired headset
and the speaker of the phone are saved individually.
2While using a Bluetooth headset and a Bluetooth hands-free kit, however, the volume setting for the speaker of the
phone is used.
3SMS toneSelects the ringtone for incoming SMS messages. (See “Sounds (M62)” on page 58 for details.)
No.Phone
22
Settings (M1)
2If the selected mode is Car mode, the backlight will always be turned on. This will accelerate the battery consumption.
Main-LCD (M13)
☛1 3
4SMS tone
volume
Sets the sound volume for incoming SMS messages.
5Mail toneSelects the ringtone for incoming Mail or MMS messages. (See “Sounds (M62)” on page 58 for details.)
6Mail tone volumeSets the sound volume for incoming Mail or MMS messages.
7Key toneTurns on/off the key tone.
8Service toneTurns on/off the service tone.
9Alarm volumeSets the sound volume for Clock alarm and Schedule alarm.
0VibratorTurns on/off the vibrator function.
Earphone
setting
Selects the sound output from Earphone & Speaker or Earphone.
2This option affects the wired headset.
#Auto answerSelects whether to answer an incoming call automatically.
2To use the Auto answer function, connect the headset to your phone and set the earphone volume to 1 or higher. If the
earphone volume is set to 0, you must turn the vibrator ON to use the Auto answer.
2The Auto answer function only applies to the first incoming call. When you have another incoming call, you have to
answer it manually.
No.Main-LCD
1GreetingsSelects the greeting which is displayed on the main-LCD during phone start-up from No greeting, Text or Animation.
☛ If you select Text greeting, SK1 to edit the greeting text. Key in a greeting text and .
2WallpaperSelects a picture or video file to use as the background for the main-LCD.
3Main menu styleSelects and resets the background and icons for the Main menu screen.
4Colour styleSelects the phone’s colour theme.
No.Phone mode setting
23
Settings (M1)
2nd-LCD (M14)
☛1 4
Power saving (M15)
☛1 5
2If the selected mode is Car mode, this function is displayed in gray and is not available.
Calls (M16)
☛1 6
/For settings provided on the Calls screen, see “Call settings (M16)” on page 12.
No.2nd-LCD
1Clock/Event displaySelects which items to display on the 2nd-LCD from Clock & Event, Clock only, Event only or Off.
2WallpaperSelects a picture file to use as the background for the 2nd-LCD.
3Clock selectionSelects the type of clock to be displayed on the 2nd-LCD.
2When selecting Digital 2 clock, no icon will be displayed in the standby screen of the 2nd-LCD.
4Incoming call No.Turns on/off the function to display the incoming call number on 2nd-LCD.
5ContrastSets the contrast level of the 2nd-LCD.
☛ Use ▲, ▼ or Side keys to adjust the contrast. The contrast gauge is displayed on the 2nd-LCD.
No.Power saving
1Level settingSelects the power saving level from Level 1 (minimum power save setting), Level 2 (moderate) or Level 3 (maximum).
2The main-LCD backlight will turn dim and then turn off after a given amount of time with no operation.
2When the phone is folded, Power saving level also applies to the 2nd-LCD.
2Function key LEDSelects whether to flash the LED of SK1 and SK2 when the main-LCD and its backlight are turned off.
2If the selected mode is Car mode or the camera view finder screen is displayed, the main-LCD backlight will always
be on.
24
Settings (M1)
Security (M17)
☛1 7
The security settings will help to protect your phone from improper and unauthorized use. You may be required to enter one of the five codes (shown
below). When the phone prompts you for one of these codes, key in the appropriate number.
•PIN code (provided by your network service provider to protect your SIM card if it is stolen)
•PIN2 code (provided by your network service provider for charge information and Fixed dialling services protection)
•PUK code (personal unblocking key in case you forget PIN code)
•PUK2 code (personal unblocking key in case you forget PIN2 code)
•Security code
,If you forget any of these codes, ALWAYS contact your service provider as they are the ONLY source for your codes.
PIN code
Your phone can be set up so that your PIN code must be entered at power up before the phone can be used at all. If the PIN code is not entered, not
even incoming calls can be answered. Entering your PIN code incorrectly 3 times (not necessarily in the same session) will invalidate the correct PIN
code. In such a case you will have to contact your service provider for a PUK code to unblock your SIM card.
2Some SIM cards are set up so that PIN number entry cannot be turned off.
2When SIM PIN lock is enabled, you can change the PIN code.
PIN2 code
Your phone supports advanced feature that may require a PIN2 code to be entered before they can be accessed or modified. Entering your PIN2 code
incorrectly 3 times (not necessarily in the same session) will invalidate the correct PIN2 code. In this case you will have to contact your service provider
for a PUK2 code.
,The PIN2 code is SIM card related and may only be available from your service provider.
No.Security
1Change PINsChanges the PIN or PIN2 code (PIN activate setting must be turned on to change the PIN code).
2PIN activateTurns on/off the PIN code entry required at starting up the phone.
3Change
security code
Changes the security code which is used to set some of functions and unlock the Personal Information Manager (PIM)
features.
2The default setting of the security code is “0000”.
4Phone lockTurns on/off the Phone lock function which will lock the phone: you can only make emergency calls or enter the security code.
After entering the correct security code, you can use the phone normally.
2Upon power-up, you are prompted to enter the security code if the Phone lock was active when the phone was powered down.
25
Settings (M1)
Network (M18)
☛1 8
/For settings provided on the Network screen, see “Roaming” on page 14.
Reset settings (M19)
☛1 9
This function will reset your phone to its factory settings.
,By restoring the factory settings, any changes you have made to your phone EXCEPT the following will return to the factory settings
(the following data/settings will not be reset):
•Settings: Set time for Local time, Set date, Language, all settings in Calls other than Auto redial, all Security settings other than Change security
code, SIM list settings in Network.
•Call options: Information in Charge info.
•Phonebook: All Phonebook entries. The settings for Groups.
•Accessory: All Schedule, ToDo, Notepad and Voice memo entries. All the settings other than Clock alarm, Play list for MP3 player, View events for
Scheduler, Sort for ToDo, and Timer setting and My phone settings for Bluetooth.
•i-mode: All Bookmarks, Saved pages, Go to webpage, and Mail settings. All the i-mode related settings.
•Java™: All the Java™ applications.
•Message: All the stored messages. The settings for SMS centre, Validity period for SMS and Language for Cell Broadcast.
•My data: All stored files.
5Bar callsYou can bar the following calls made/received on your phone: all outgoing (dialled) calls, international outgoing (dialled) calls,
international outgoing (dialled) calls except to home, all incoming (received) calls or Incoming (received) calls when roaming.
,Bar calls facilities are network services and may require a password.
1Change settings☛ Highlight the type of restriction and the call type, and then ➔ to save changes.
☛ Key in your bar calls password to verify user identification to the network ➔SK1 to confirm
and save changes to the network.
2The selected settings have red bars over their icons.
2Set passwordChanges the bar calls password.
6Fixed diallingTurns on/off the fixed dialling which restricts the use of dialled number to only the Fixed Dialling Numbers (FDN).
,The FDN facility is network dependent.
/See also: “Fixed dialling numbers (FDN)” on page 45.
No.Security
26
Message (M2)
Message (M2)
Message overview
Message services
Your phone supports the following messaging services:
• Short Messaging Service (SMS) allows you to send short messages (160 half-pitch characters max.) to one or more phone numbers. To send an
SMS message, the destination phone number must be a mobile phone with an SMS service subscription. SMS service also supports Enhanced
Messaging Service (EMS) for which the maximum length of the message you can send depends on the number of linked messages (maximum of
10 linked messages are available).
• Mail (i-mode messaging service) allows you to send a message to not only other cellphones but also to PCs and other devices that uses Email
addresses. You can attach files from Pictures, Videos and Sounds in My data (see page 58). Mail facility is available from the Mail screen under
the i-mode facility. For details on the mail service, see “i-mode (M3)” on page 32.
• Multimedia Messaging Service (MMS) is a service that allows you to send messages of a slideshow of text and multimedia files. When you receive
an MMS message, you will be notified by a message from the MMS centre. You can either automatically or manually receive the contents of an
MMS message. MMS facility is available from the Mail screen under the i-mode facility. For details on the mail service, see “i-mode (M3)” on
page 32.
,The Message Services are network dependent.
Sending/Receiving messages
While an SMS message is being sent or received, a name or a number will be displayed (if a name has been stored with the number in your phonebook).
The received messages are stored on the SIM card or in your phone memory. When you receive a message, your phone will ring, a new message icon
will be shown on your phone’s display and its LED will glow.
2Please delete the unnecessary messages in the folders from time to time. The phone cannot receive any messages when the Inbox folder is full.
Message screen
☛
To display the Message screen, 2 or press and hold ➔ Press the appropriate key for the required option.
No.Message screen menu
1InboxThe received messages are stored here.
2DraftsThe messages currently being edited are stored here.
3OutboxThe messages that failed to be sent are stored here.
4SentThe sent messages are stored here.
27
Message (M2)
2If there is no message in a message list, the list will be displayed in gray and you cannot select it.
Reading a message (M21)
☛ To display the Message view screen of a new message, 21 or press and holdthen 1 ➔ Highlight the new message ➔
☛ The new (unread) messages are displayed in bold.If the message cannot be displayed in one page, use ▲ and ▼ to scroll through the message.
The following icons will be displayed.
Message Options menu (M2M)
☛
2 or press and hold then
5, 6Folder1/Folder2The messages moved by Move msg (see “Message list Options menu” on page 28) are stored here.
7CBThe received broadcast messages are saved. See “Cell broadcast (M27)” on page 32 for details.
Highlighted message stored in the phone memorySMS messages filtered by location (SIM)
Sorting
status icons
Messages sorted by Date
SMS messages filtered by location (the phone
memory)
Messages sorted by NameFiltered SMS messages
Messages sorted by Read/Unread statusSent message
status icons
Sent but failed message
Messages sorted by SizeSent message
Messages sorted by Ascending order
Messages sorted by Descending order
No.Message Options menu
1SMS settings1SMS centreEdits the SMS centre number (this number is saved in the SIM card).
2Auto displayTurns on/off the automatic display function that displays the received SMS messages
automatically.
3Receipt requestSelects whether to request a receipt of the sent SMS messages.
No.Message screen menu (Continued)
28
Message (M2)
,The receipt request and linking of SMS messages are network dependant.
2Depending on the selected folder, some options may be displayed in gray and not be available.
Message list Options menu
☛
Display the message list in the Inbox, Drafts, Outbox, Sent, CB, Folder1 or Folder2 ➔
1SMS settings
(Continued)
4Max linked msgsSets the maximum number of linked SMS messages. This function divides an SMS with the
message text exceeding the maximum number of characters allowed into multiple messages.
5Validity periodSelects the period of time an SMS message is stored at the SMS centre, while trying to deliver
the message.
2CB settings1Enable1 to receive none, 2 to receive all, or 3 to specify a list of Cell Broadcast Message Identifier
(CBMI) to receive broadcast from.
2LanguagesSelects which language to receive the cell broadcast messages in.
3View msg statusDisplays the information on the number of messages in the phone, the size of free/used memories, SMS units in the phone/
SIM, and complete/incomplete SMS units.
4Rename folderRenames Folder1 and Folder2.
5View allDisplays all the messages in all folders on the same list.
6Msg filterSets the type(s) of messages to be displayed by selecting the desired filter option.
No.Message list Options menu
1ReplyReplies to the sender of the highlighted message.
2Reply allReplies to the sender and all other recipients of the highlighted message.
3DeleteDeletes the highlighted message.
4Delete allDeletes all the messages in the current folder.
5ForwardForwards the message text of the highlighted message.
6Msgs/pageSelects either to display 3 or 7 messages in one screen.
7Move msgMoves the highlighted message to Inbox or Folder1/2, or copies to SIM or Phone.
8Sort msgBy:Sorts the messages by date, name, read/unread status or size.
Order:Sorts the messages in ascending or descending order.
9SearchSearches messages by alphabets.
0View detailsDisplays the detailed information on the highlighted message.
No.Message Options menu (Continued)
29
Message (M2)
2Depending on the selected folder, the menu number and available options may vary.
2Depending on the selected folder, some options may be displayed in gray and not be available.
Message view Options menu
☛
Display the message list in the Inbox, Drafts, Outbox, Sent, CB, Folder1 or Folder2 ➔ Highlight a message ➔➔
2Depending on the conditions, some options may be displayed in gray and not be available.
2The reply facility uses the phone number of the person who sent the message.
2The Save object Options menu will be displayed only if an object is highlighted.
Option mode Options menu
☛
Display the message list in the Inbox, Drafts, Outbox, Sent, CB, Folder1 or Folder2 ➔ Highlight a message ➔➔9// to highlight
a phone number, Email address or URL in the message ➔
The columns show the menu numbers for P: Phone number highlighted, E: Email address highlighted and U: URL highlighted
–Add desktop iconCreates a desktop icon of the sender or recipient of the highlighted message (Inbox, Sent, Folder1, Folder2, and Drafts
only).
–EditEdits the highlighted message (Drafts and Outbox only).
–ResendResends the highlighted message in the folder (Outbox only).
The entire message or only the packets that failed to reach the recipient(s) can be sent.
No.Message view Options menu
1ReplyReplies to the sender of the highlighted message.
2Reply allReplies to the sender and all other recipients of the highlighted message.
3DeleteDeletes the highlighted message.
4View detailsDisplays detailed information on the highlighted message.
5ForwardForwards the message text of the highlighted message.
6Save objectSaves the highlighted object to a folder in My data.
7Move msgMoves the highlighted message to Inbox or Folder1/2, or copies to SIM or Phone.
8Highlight modeActivates the Highlight mode (see “Highlight mode” on page 31 for details).
9Option modeActivates the Option mode to highlight the phone number, Email address, URL or attached file.
0Add desktop iconCreates a desktop icon of the sender or recipient of the highlighted message.
No.Message list Options menu (Continued)
▼
▼
30
Message (M2)
.
Creating a message
☛To display the Message composer screen, 2 and SK1,orpress and hold
then SK1
☛To address the message, highlight the To field ➔➔ Input the required phone
number ➔
2To scroll the phone numbers in the To field, or
☛To key in the message, highlight the Message field ➔➔ Key in the message
➔
2Pressing while keying in the To/Message field displays the Message edit
Options menu screen.
☛SK1 to send the message.
2When you are in the ABC (normal text) mode, any word entered that is not in the
T9
®
dictionary will be added automatically.
2When you are keying in your message, SK1 to change the text entry mode.
2If you display another screen or receive a call while you are editing a message more
than 1 character, the message will be saved automatically in Drafts.
Message composer Options menu
☛
2 and SK1 orpress and holdthen SK1 ➔ Highlight To or Message field ➔
PEUOption mode Options menu
11–Add to phonebookAdds the highlighted phone number or Email address to a phonebook.
2––Dial phone numberDials the selected phone number.
––1Add to bookmarkAdds the highlighted URL to the bookmarks.
––2Go to URLActivates the web browser to access the highlighted URL.
323Create messageCreates a new message with the highlighted phone number/Email address/URL in the To field, the
message text, or the slide text.
43–Add desktop iconCreates a desktop icon of the highlighted phone number/Email address.
544View modeDeactivates the Option mode.
No.Message composer Options menu
1Add/EditAdds or edits a recipient phone number or a message.
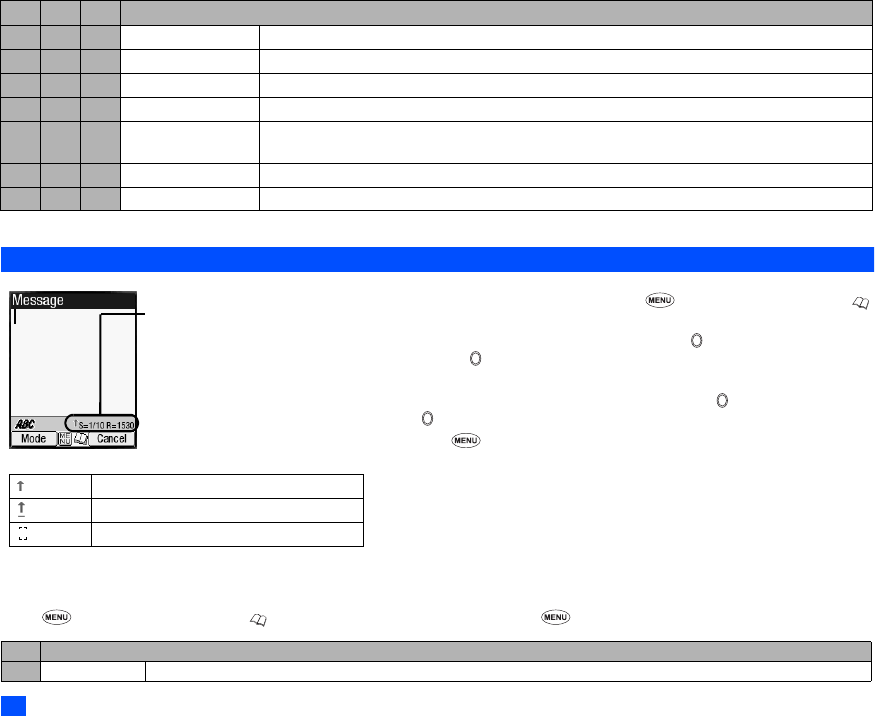
Help area
This area contains the
information on the message.
S indicates the size of the
message equivalent to the
number of SMS messages, and
R indicates the remaining
number of characters
available.
(green)
Indicates that an upper case letter will be input next.
(red)
Indicates the capital lock.
(no arrow)
Indicates that a lower case letter will be input next.
▼
▼
31
Message (M2)
2Depending on the selected field, some options may be displayed in gray and not be available.
Message edit Options menu
☛
2 and SK1 orpress and holdthen SK1 ➔ Highlight To or Message field ➔➔
2Preview msg Displays a message preview screen.
3DeleteDeletes the highlighted recipient, message, or object.
4Delete allDeletes all the recipients.
5SaveSaves the message in Drafts folder.
6PhonebookDisplays the phonebook list to insert a recipient phone number.
7Resend listInserts a phone number from the resend list.
2You can delete the highlighted phone number from the resend list or the entire resend list by pressing 1 or
2 respectively.
8InsertInserts a new recipient phone number (To field only).
9Address listDisplays the recipients of the message (To field only).
No.Message edit Options menu
1Text colourSelects the colour of text and background.
2Text formatSelects the font size (small, normal or large) and font style (bold, italics, underline or strikethrough).
3Text alignmentSets the text alignment (left, centred or right).
4PastePastes the text which has been copied onto the clipboard in the Highlight mode.
2This function can be used only when text has been copied or cut in the Highlight mode.
5Highlight modeActivates the Highlight mode at the cursor position.
2You can also activate the Highlight mode by pressing and holding .
2This function can only be used when text has been entered.
2To toggle the Highlight mode on/off, SK1 and to go back to the normal mode, CLR
☛ To display the following Highlight mode Options menu, .
1Text colourSelects the colour of text and background.
2Text formatSelects the font size (small, normal or large) and font style (bold, italics, underline or
strikethrough).
3CopyCopies the highlighted part of text onto the clipboard.
4CutCuts the highlighted part of text.
5DeleteDeletes the highlighted part of text.
6Select wordSelects (highlights) the nearest word to the current cursor position.
7Select paragraphSelects (highlights) the nearest paragraph to the current cursor position.
No.Message composer Options menu (Continued)
32
i-mode (M3)
2Depending on the conditions, some options may be displayed in gray and not be available.
Cell broadcast (M27)
Cell broadcast (CB) messages (e.g. weather reports, news) are sent by the network to all phones in a certain area.
☛ 2 7
2The Cell broadcast message display on the standby screen is erased by pressing CLR.
,Broadcast messages service is network dependent. Please contact your service provider for details.
i-mode (M3)
Using your phone’s browser facility, you can enjoy i-mode services such as browsing information on i-mode sites (programs) and other Internet web
pages, and sending/receiving i-mode messages which include the mail and MMS (including attachment).
2You can download melody files, images, animations, videos and Java™ applications to your phone’s memory. Some files with restrictions cannot be
saved to your phone's memory, even though they can be downloaded and played or displayed.
/For the definitions of the icons related to i-mode, see “LCD and displayed icons” on page viii.
i-mode operation guide
You can access various i-mode functions by selecting the menus on the main four i-mode related screens: i-mode screen, i-mode menu screen, iMenu
screen and Mail screen. The following table gives an outline of the procedures related to the i-mode services.
5Highlight mode
(Continued)
8Select allSelects (highlights) the entire text.
9Save to text fileSaves the highlighted part of text as a text file in the list of Notepad.
6Insert objectInserts Text, Sound, Still image, Animation, Emoticon, or Pictograph into the message at the cursor position.
7T9 LanguageSelects the language for T9
®
text input.
8Edit settingsSets the Write mode (Insert or Overwrite) and Clear mode (Backspace or Delete).
ActionProcedure
Browsing the i-mode sites/Internet web pages
Display the homepage
☛ Press and hold or SK2 ➔ 6➔3
2You need to set the homepage URL in Set homepage beforehand (see “Set homepage” on page 39).
Display a web page
☛ SK2 ➔ 6 ➔1 to key in the address, or 2 to select an address in the history.
Reload the current page
☛ While browsing a webpage, 1
Display the URL of the current page
☛ While browsing a webpage, 2
No.Message edit Options menu
▼
▼
33
i-mode (M3)
Mail/MMS operations
Creating a new mail
☛ SK1➔ 1
☛ Set the addressee.
Highlight the To field ➔➔ key in the destination ➔
To refer to the phonebook, ➔ Open phonebk. to retrieve the destination
Bookmark a web page
☛ With the web page you want to bookmark displayed, 1
Display a bookmarked web page
☛ SK2 and 5 (while browsing a webpage, 2) ➔ highlight a bookmark ➔
Save a web page
☛ With the page to save displayed, 4
Display a saved page
☛ SK2 ➔ 7➔ highlight a saved page ➔
Save an image
☛ With the page including the image to save displayed, 3➔
Save a phone number
☛ With the highlighted phone number to on the page, 5
Display the certificate information
of the current page
☛ With a page displayed, 6
2You can also refer to a saved page’s certificate information by displaying the page and 3.
Download a file
☛ Highlight the link to the file to download ➔➔ When the download is completed, save the file and
check that the downloaded file is stored in My data (see page 58) or the Applications screen of Java™
(see page 63).
Returning to the previous screen/
moving forward to the next screen
☛ While connecting to i-mode, to return to the previous screen (if any), or to move forward to the
next screen (if any).
Mail/MMS
Create a mail
☛ SK1➔1 (for details, see “Creating a new mail” on page 33)
Create an MMS
☛ SK1➔2 (for details, see “Creating a new MMS” on page 34)
Read a mail /MMS
☛ SK1➔3➔ Highlight a message ➔
Check for new mail/MMS
☛ SK1➔6
Settings for i-mode
Change the mail settings
☛ SK1➔7 (for details, see “Mail settings” on page 43)
Change the browser settings
☛ SK2➔ 8 (for details, see “Settings” on page 37)
Change the phone settings related
to i-mode
☛ 3 2 (for details, see page 37)
ActionProcedure
▼
▼
34
i-mode (M3)
To send the mail to more than one addressee, ➔ Add To/Cc/Bcc
To change the To/Cc/Bcc status of an already set addressee, highlight the destination ➔➔ Change to To/Cc/Bcc
To delete an already set addressee, highlight the To field ➔➔ Del. address
☛ Key in the subject.
Highlight the Subject field ➔➔ key in the subject ➔
☛ Key in the message.
Highlight the Message field ➔➔ key in the message ➔
To attach a header, ➔ Attach header
To attach a signature, ➔ Attach sign
☛ Attach a file if necessary
Highlight the Attachment field ➔➔ select a file to attach from the My data screen
To delete an already attached file, highlight the attachment field ➔➔ Delete attachment
To preview the attached file, highlight the attachment field ➔➔ Play/View file
2You can attach files up to 69 KB in total, or 10 files.
☛ To send the mail, highlight Send ➔
☛ To save the mail, highlight Save ➔
To delete the currently edited mail, ➔ Del. mail
Creating a new MMS
☛ SK1➔ 2➔ The Compose menu screen is displayed
☛ Using Compose menu options, create an MMS (for details, see the table “Compose menu options” on page 34) ➔ SK2 ➔ The Compose MMS
screen is displayed
☛ Set the addressee and key in the subject (see “Creating a new mail” on page 33 for details).
☛ To send the MMS, highlight Send ➔
☛ To save the MMS, highlight Save ➔
Composing an MMS
☛ From the Compose MMS or Edit MMS screen, highlight Attachment ➔➔ The slide is displayed ➔
No.Compose menu options
–Add/Delete media1Add/Delete textAdds new text data or deletes the text data in the text field on the slide.
2Add/Delete imageAdds an image file or deletes the image file in the image field on the slide.
3Add/Delete audioAdds a sound file or deletes the sound file in the sound field on the slide.
4Add/Delete videoAdds a video file or deletes the video file on the slide.
35
i-mode (M3)
2Depending on the conditions, some options may be displayed in gray and not be available.
☛ When you finish editing attachment, SK2 or select Exit from Compose menu options to return to the Compose MMS screen.
☛ If necessary, edit the composed MMS using the Edit menu options menu (see “Using the Edit menu options” for details).
–ExitShifts to the Compose MMS screen.
–SaveSaves the currently created MMS.
–PreviewDisplays the created slides in order from the beginning at the preset playback time for each.
–Add slide1Add slideAdds a new slide after the currently displayed slide.
2Insert slideInserts a new slide just before the currently displayed slide.
–Delete slideDeletes the currently displayed slide.
–Text colourSelects the Text colour from the 16 different colours.
–Background colourSelects the Background colour from the 16 different colours.
–Set Fit modeSelects the size in which the image/video is displayed.
2This setting will be applied to all the slides.
1HiddenDisplays the image/video in the actual size.
2FillDisplays the image/video in the reduced size so that the height and width fit into the image/
video display area.
3MeetDisplays the image/video in the reduced size so that the longer side of the height or width
fits the corresponding side of the image/video display area.
4SliceDisplays the image/video in the reduced size so that the shorter side of the height or width
fits the corresponding side of the image/video display area.
–Options Sets the length of time a slide is displayed, and sets the beginning and end times for text, image or sound within that
slide display time.
2You cannot set the beginning and end time for video files.
–Resize regionChanges the region size of the image/video field and the text field, using the ▲ and ▼ keys.
–Switch positionsSwitches positioning of the image/video field and text field on the slide.
–Previous slideDisplays the previous slide.
–Next slideDisplays the next slide.
No.Compose menu options (Continued)
36
i-mode (M3)
Using the Edit menu options
☛ From the Compose mail/Compose MMS/Edit mail/Edit MMS screen, to display the Edit menu options.
2Depending on the conditions, some options may be displayed in gray and not be available.
Reading a received mail/MMS
☛ SK1➔ 3➔ The list of mail/MMS in the Inbox folder will be displayed.
☛ Highlight the message to read ➔ ➔ The message content will be displayed. Scroll the message content.
☛ To view the previous message , to view the next message,
2While reading a received mail/MMS in the Inbox folder, you can use various functions. See “Inbox” on page 41.
2If Auto play is on (see “Auto play” on page 43), the MMS/attachment will be automatically played/displayed. If not, SK1 to start playing.
2You can change the font size of mail text by pressing and holding the and . enlarges the font size, while reduces it.
i-mode screen
From the i-mode screen you can change the i-mode related settings of your phone.
☛3➔ The i-mode screen will be displayed.
No.Edit menu options
–SendSends the mail.
–SaveSaves the mail being edited to the draft folder.
–Attach fileAttaches a file to the mail.
–Delete attachmentDeletes the attached file(s).
–Play/View filePlays or displays the attached file.
–Open phonebk.Adds the destination directly from the phonebook.
–Add To/Cc/BccAdds a To/Cc/Bcc field.
–Change to To/Cc/BccChanges the highlighted Cc/Bcc/To field to a To/Cc/Bcc field.
–Del. addressDeletes a destination field.
–Attach header/sign.Attaches a stored opening sentence at the start or a stored signature at the end of the text.
–Del. messageDeletes the message of the mail being edited.
–Del. mailDeletes the new message currently edited.
▼
▼
▼
▼
▼
▼
37
i-mode (M3)
i-mode menu screen
From the i-mode menu screen you can access to the iMenu/Mail/Message screen, your bookmarks, the entry screen for a URL to be displayed, the
access history, the saved pages, the list of Java™ applications and the browser settings.
☛ SK2 or 31 to display the i-mode menu screen.
No.i-mode screen menus
1i-modeDisplays the i-mode menu screen (For details, see “i-mode menu screen menus” ).
2Settings1Ringer timeSets the ringtone duration to 3-10 seconds for incoming mail/MMS.
2Connection No.Selects the connection number settings to use. The following settings are available:
1, 2, 3User setting 1/2/3Uses and changes the following settings.
1Access point
2i-mode server (Gateway address)
3Portal server (i-mode server)
4MailMail server
2nd Mail server
Confirmation site
5User dataUser name
Password
6Port No.HTTP Port No.
SSL Port No.
3i-mode lockLocks the i-mode function, including mail/MMS.
No.i-mode menu screen menus (Sheet 1 of 3)
1iMenuAccesses the iMenu screen. (See “iMenu screen” on page 39.)
2MailDisplays the Mail screen, on which you can display received mail/MMS, saved draft messages and sent messages, and
also create new mail/MMS (see “Mail screen” on page 40).
3Java applicationDisplays the list of Java™ applications (see “Java™ (M7)” on page 63 for details).
4SMSDisplays the Message screen, on which you can read received SMS, saved draft SMS and sent SMS, and also create new
SMS (see “Message (M2)” on page 26).
38
i-mode (M3)
5BookmarksDisplays the list of bookmarked web pages.
Bookmarks options menu
1OpenDisplays the highlighted bookmark.
2Copy addressCopies the highlighted bookmark URL.
3Edit titleEdits the title of the highlighted bookmark.
4Add desktop iconCreates a desktop icon of the URL of the selected bookmark.
5Create messageCreates a new message with the highlighted bookmark address in the message text.
6Delete oneDeletes the highlighted bookmark.
7Delete allDeletes all the bookmarks.
6Go to webpageDisplays the URL you key in, the URL in the address history, or the homepage.
1Enter addressPrompts you to key in a web page address.
2Address historyDisplays the list of addresses in the access history for you to select from.
Address history Options menu
Add desktop icon: Creates a desktop icon of the URL of the selected history.
Create message: Creates a message with the URL of the selected history in the text.
Delete one: Deletes the highlighted address.
Delete all: Deletes all the addresses in the list.
3Go to homeDisplays the homepage set in Set homepage (See “Set homepage” on page 39).
2This menu is not available, if Set homepage of i-mode menu screen is not set.
0BackReturns to the i-mode menu screen.
7Saved pagesDisplays the list of saved pages. Saved pages are stored in your phone memory so you can see them offline.
Saved pages list Options menu
1OpenDisplays the current saved page.
2Edit titleEdits the title of the current saved page.
3Protect On/OffProtects or unprotects the current page.
4Delete oneDeletes the current saved page.
5Delete allDeletes all the saved pages excluding the protected.
6Delete all + Pr.Deletes all the saved pages including the protected.
No.i-mode menu screen menus (Sheet 2 of 3)
39
i-mode (M3)
2Depending on the conditions, some options may be displayed in gray and not be available.
iMenu screen
From the iMenu screen you can access the various services, and also use the function menus of your browser such as adding a bookmark, saving a web
page and creating a message.
☛ SK2 or 31 to display the i-mode menu screen ➔ 1 to display the iMenu screen ➔ to display the browser options menu.
7Saved pages
(Continued)
Saved pages details Options menu
1Save imageSaves an image as a file on the current saved page.
2Edit titleEdits the title of the current saved page.
3Certificate infoDisplays the certificate information on the current saved page.
4Page infoDisplays the URL on the current saved page.
5Protect On/OffProtects or unprotects the current page.
6DeleteDeletes the current saved page.
8SettingsChanges the settings of your browser.
1Set time outDisconnects the connection after the set time. You can set 60 seconds or 90 seconds, or
disable this function.
2Load imagesSets whether to display images contained in web pages.
3Wrap textSets whether to display text as is on web pages and mail/attachment text, or wrap it to fit
your phone’s screen.
4CertificatesDisplays the certificate information and validates/invalidates a certificate.
5Send terminal infoSets whether to display a confirmation message before sending the terminal information to
the Information Providers (IPs).
,If you agree to send private information (e.g. production serial No. and SIM No.) to
the IPs via the Internet, it may be obtained by others.
6Set homepageValidates the homepage and sets the URL.
2You can display the homepage by pressing and holding from the standby screen.
7Video auto playSets whether to play a video file automatically after the download is completed.
8Check settingsDisplays all the options set for the settings (browser).
0BackReturns to the i-mode menu screen (see “i-mode menu screen” on page 37).
No.i-mode menu screen menus (Sheet 3 of 3)
40
i-mode (M3)
,If you agree to send private information (e.g. production serial No. and SIM No.) to the IPs via the Internet, it may be obtained by others.
2Pressing CLR or may not bring back the previous screen. Screen operations depend on the current screen content.
Mail screen
From the Mail screen you can use the i-mode message services.
☛ SK1 or 31 2 to display the Mail screen.
2The available options differ depending on the operators.
2If an error occurs while sending mail, it will be saved in the Draft folder as an unsent mail.
2The same mail can be sent to up to five addresses.
2If you save a mail while editing, it will be saved in the Draft folder.
No.Browser options menu
–Add bookmarkBookmarks the current page.
–BookmarksDisplays the Bookmark list.
2This option is displayed only when one or more bookmarks are registered.
–Save imageSaves an image on the current page.
2This option is displayed only when one or more images are displayed on the current screen.
–Save pageSaves the current page.
–Add to phonebookSaves the phone number displayed in the current page in the phonebook.
2This option is displayed only when one or more phone numbers are displayed on the current screen.
–Certificate infoDisplays the server certificate of the current page.
2This option is displayed only when the current page is a SSL page.
–Go to webpageDisplays a page by keying in the URL or using the access history (see “Go to webpage” on page38).
–ReloadUpdates the data on the current page.
–Page infoDisplays the URL of the current page.
–Add desktop iconCreates a desktop icon of the URL of the current page.
–Create messageCreates a new message with the highlighted phone number or Email address in the message text.
No.Mail screen menus (Sheet 1 of 5)
1Compose mailDisplays the Compose mail screen (see “Creating a new mail” on page 33).
41
i-mode (M3)
2Compose MMSDisplays the Compose MMS screen (see “Creating a new MMS” on page 34).
3InboxDisplays the list of received mail/MMS.
Inbox list Options menu
–Show allDisplays all the received mail/MMS.
–Show unreadDisplays only the unread mail/MMS.
–Show readDisplays only the read mail/MMS.
–Show protect.Displays only the protected mails/MMS.
–Delete oneDeletes the currently selected mail/MMS.
–Delete read mailDeletes all the read mails except protected mails/MMS.
–Delete allDeletes all the mails/MMS.
–Title sortSorts the received mails/MMS by title.
–Address sortSorts the received mails/MMS by address.
–Date sortSorts the received mails/MMS by date.
Inbox details Options menu
–ReplyReplies to the received mail/MMS.
–Reply quotedReplies to the received mail quoted.
–Reply allReplies to the sender and all the recipients of a mail/MMS.
–Reply quoted allReplies to the sender and all the recipients of a mail quoted.
–ForwardForwards the received mail/MMS.
–DeleteDeletes the received mail/MMS you are viewing.
–Add desktop iconCreates a desktop icon that creates a new message to the sender.
–Save addressSaves the address of the sender into the phonebook.
–Save selectionSaves the highlighted phone number into the phonebook.
–Create messageCreates a new message with the highlighted Email address or phone number.
–Save melodySaves the melody attached to the received mail.
–Save attachmentSaves the attached file.
–Copy messageCopies the message text.
No.Mail screen menus (Sheet 2 of 5)
42
i-mode (M3)
3Inbox
(Continued)
–Copy subjectCopies the desired subject text.
–Copy addressCopies the desired address.
–Play attachmentPlays the attachment content based on the content setting.
Play attachment Options menu
1Copy textCopies the text data on the slide.
2Save imageSaves the image file on the slide.
3Save audioSaves the audio file on the slide.
4Save videoSaves the video file on the slide.
–Browse attachmentPlays the attachment content manually.
Browse attachment Options menu
1Copy textCopies the text data on the slide.
2Save imageSaves the image file on the slide.
3Save audioSaves the audio file on the slide.
4Save videoSaves the video file on the slide.
5Save selectionSaves the highlighted phone number, Email address or URL
to the phonebook or bookmarks.
6Create messageCreates a message to the destination in the slide text.
7Play slidePlays the highlighted slide.
–Protect On/OffProtects or unprotects the received mail/MMS.
4Sent mailDisplays the list of sent mail/MMS.
Sent mail list Options menu
–Title sortSorts the sent mail/MMS by their titles.
–Address sortSorts the sent mail/MMS by their first destination addresses.
–Date sortSorts the sent mail/MMS by the date they were sent.
–Delete oneDeletes the selected mail/MMS.
–Delete allDeletes all the sent mail/MMS.
–Delete all + Pr.Deletes all the sent mail/MMS including the protected.
No.Mail screen menus (Sheet 3 of 5)
43
i-mode (M3)
4Sent mail
(Continued)
Sent mail details Options menu
–Re-editDisplays the composer to edit the sent mail/MMS again.
–DeleteDeletes the sent mail.
–Add desktop iconCreates a desktop icon that creates a new message to the addressee.
–Save addressSaves the destination address to the phonebook.
–Save selectionSaves the phone number and mail address contained in the message part.
–Create messageCreates a new message to the highlighted Email address or phone number.
–Copy messageStarts the copy mode in the message part.
–Copy subjectStarts the copy mode in the subject part.
–Play attachmentPlays the attachment content based on the content setting (see “Play attachment” on page 42).
–Browse attachmentPlays the attachment content manually (see “Browse attachment” on page 42).
–Protect On/OffProtects or unprotects the received mail/MMS.
5DraftDisplays the unsent and the saved draft mail/MMS.
Draft Options menu
1Delete oneDeletes the selected mail/MMS.
2Delete allDeletes all mail/MMS.
6Check new mailChecks if there is any new i-mode messages (mail/MMS) for you stored at the mail server.
7Mail settingsChanges the mail settings.
1Edit headerEdits the header to be added at the beginning of a mail, and sets whether to add it automatically.
☛ Highlight the checkbox ➔ to place a check, to automatically add a header.
☛ Highlight the text box ➔ to edit the header ➔ Edit the text ➔
2Edit signatureEdits the signature to be added at the end of a mail, and sets whether to add it automatically.
☛ Highlight the checkbox ➔ to place a check, to automatically add the signature.
☛ Highlight the text box ➔ to edit the signature ➔ Edit the text ➔
3Reply markerEdits the reply markers to be added when replying to a mail with quotations from the original.
☛ Highlight the text box ➔ to edit the reply marker ➔ Edit the text ➔
4Auto playSets whether to automatically play or display the sound, image or video file attached, when you
open the mail.
No.Mail screen menus (Sheet 4 of 5)
44
i-mode (M3)
2Depending on the conditions, some options may be displayed in gray and not be available.
i-mode glossary
The following defines the basic terms used in this section.
7Mail settings
(Continued
5Auto receptionSets whether to automatically retrieve a mail after receiving the incoming mail notification.
2When set to on, your phone will automatically receive mail. If set to off, you will have to
manually retrieve from your i-mode service provider using the Check new mail of Mail
screen menus (see “Check new mail” on page 43).
6Receive
attachment
Sets the attachment file type that can be received.
☛ Highlight the file type ➔ to place a check.
7Attachment dataSelects whether to receive Melody For i-mode (MFi) files attached to a mail.
8Font sizeSets the font size to display the mail.
9Check settingsDisplays the values set to the above mail settings.
0BackReturns to the Mail screen.
0BackReturns to the i-mode menu screen.
TermDefinition
Site (program)An Internet contents page especially designed for i-mode users, which can be accessed from your i-mode top screen of your IP.
MailMail is the messaging service of i-mode. You can not only exchange messages with other cellphones, but also with PCs, PDAs, etc.
MMSMultimedia Messaging Service lets you send messages with image/video/sound files attached. The MMS type message is also
referred to as an MMS.
Access historyYour phone stores up to 10 URLs you have accessed. You can refer to this list when you want to go to a web page you have
accessed recently.
Web pageAn Internet contents page compatible to i-mode services, which can be browsed using your phone, including the sites (programs).
BookmarkA bookmark contains the URL of a web page. You can save up to 50 bookmarks and use them for easier accesses.
Certificate
information
If you are displaying a Secure Sockets Layer (SSL) page designed to enable safe data transmission, you will be able to see its
certificate information.
IPInformation Provider. Your IP provides you the i-mode sites (programs).
Home pageA web page that is set in your profile as the page to connect to when you press and hold from the standby screen.
Saved pagesYou can save up to 20 web pages in your phone memory, for quick off-line access.
No.Mail screen menus (Sheet 5 of 5)
45
Phonebook (M4)
Phonebook (M4)
Phonebook types
Your phone can have up to 7 directories stored on your SIM card and in your phone memory: Complete (a list of all the numbers stored in the ADN and
FDN), personal directories (ADN) in the SIM card, personal directories (ADN) in the phone memory, Service Dialling Numbers (SDN), Fixed Dialling
Numbers (FDN), Own number and Voice mail number.
2When viewing any of the directories described, you can switch to the other directories (if your SIM card supports them) by pressing .
2The maximum number of phone numbers that can be stored on a SIM card is the total of the ADN, FDN and SDN directories.
2When you activate the phonebook, the directory which you were referring to the last time will open.
Personal directory (ADN)
These numbers are known as abbreviated dialling numbers (ADN). There are two types of ADN, one is the phonebook stored in the phone memory
(the phonebook (Phone)) and the other is the phonebook stored on the SIM card (the phonebook (SIM)).
Phonebook (SIM)
Up to 255 personal data can be stored in the SIM card. Each personal data contains a phone number, a name and a location number.
2The number of phone numbers that can be stored on a SIM card depends on the SIM card capability.
Phonebook (Phone)
Up to 500 personal data can be stored in your phone memory. Each personal data is given a location number (1 to 500), and it can be allocated to a
group. To each personal data, you can set the following: 7 phone numbers (Home, Mobile, Work, Data, Fax, Other phone x 2), 2 Email addresses,
2 descriptive information, Group, Voice tag, LED colour, Picture, Ringer and Location number.
2Up to 10 phone numbers can have a voice recognition recording allocated to them.
Fixed dialling numbers (FDN)
Fixed dialling numbers are a means of limiting which numbers can be called from your phone. With the FDN feature switched on (see page 25), you can
call with your phone the numbers you have stored in this phonebook and the emergency number only.
,Although FDN is supported by your phone, it must be present on your SIM card - check with your service provider.
Service dialling numbers (SDN)
The numbers stored in the SDN directory are pre-installed by your service provider. They will call numbers and services as agreed with your supplier
(e.g. customer enquiries, billing information, sportslines, weatherlines, etc.) and cannot be edited by you.
,Although SDN is supported by your phone, it must be present on your SIM card - check with your service provider.
46
Phonebook (M4)
Accessing your phonebook (M4)
You can store personal information in the phonebook of your phone or your SIM card.
Displaying a personal data (M41)
☛
4 1 and the appropriate key for the desired directory or until the required directory is displayed ➔Highlight the required personal data
➔
Displaying information about your phonebook (M42)
☛
42 to display the information about your phonebook.
2This function is SIM dependent.
Call options (M43)
☛
43 to display the Call options screen.
2For details on the Call options screen, see “Call options (M43)” on page 10.
Phonebook list Options menu
☛41 and the appropriate key for the desired directory or until the required directory is displayed ➔Highlight the required personal data
➔
No.Phonebook list Options menu
1Add newAdds a new personal data to Phone/SIM/FDN.
2EditDisplays the data edit screen to edit the currently highlighted personal data.
2When editing the data in FDN, you will be prompted to enter PIN2 code.
Phonebook list screenPersonal data screen
SK2
Abbreviated dialing number (ADN)
Abbreviated dialing number (ADN)
47
Phonebook (M4)
3CopyCopies personal data to another phonebook (see “Copying and moving personal data” on page 50 for details).
1Current copyCopies the currently highlighted personal data.
2Package copyCopies the selected data in the list.
4MoveMoves the currently highlighted personal data to SIM, Phone, FDN, Own number or Voice mail number.
5DeleteDeletes personal data.
1Delete currentDeletes the currently highlighted personal data.
2Delete allDeletes all the data in the list.
6GroupsEditing the group information
☛ Highlight the group you wish to edit ➔SK1 and highlight the required field
☛ To rename the group name, select Groupnamefield ➔Key in the name of the group ➔
☛ To set information on the selected group, select Infofield ➔Key in the info ➔
☛ To select the LED colour, select LEDfield ➔1➔Highlight the desired colour ➔
☛ To select the CLI picture, select Picture field ➔1 for Picture ➔Highlight the desired picture ➔
☛ To select the ringer, select Ringer field ➔ 1 for Sound or 2 for Video ➔Highlight the desired ringtone or video➔
☛ SK1 to set the change
2If the personal settings for the LED colour, CLI picture, or the ringer are also set, they have priority over those of the
Group settings.
Group member list screen Options menu
☛ Highlight the group you wish to edit ➔to display the list of group members ➔ Highlight the member ➔
1CallCalls the highlighted member.
2Create messageCreates a new message to the highlighted member.
3Add newCreates a new phonebook entry to join the group.
4Add to groupAdds a phonebook entry to the group.
5Remove from groupRemoves the highlighted member from the group.
6Remove and deleteRemoves the highlighted member from the group and delete the phonebook entry at the
same time.
7Add desktop iconCreates a desktop icon of the phone number/Email address of the highlighted member.
No.Phonebook list Options menu
48
Phonebook (M4)
2Depending on the conditions, some options may be displayed in gray and not be available.
Making a call or creating a message from the phonebook list
☛
Highlight a desired personal data to display the stored numbers or Email addresses in the help area ➔ Use and to display the other stored
phone numbers or Email addresses, if any, in the help area.
☛to make a phone call to the displayed phone number, or SK1 to send a new message to the phone number or Email address
Adding a new personal data
☛
41 and the appropriate key for the desired directory, or until the required directory is displayed➔SK2➔ Select the directory to which
you wish to store the personal data ➔Enter the name and other necessary information ➔SK1 (see “Editing an existing personal data” on
page 49).
2You can also input phone numbers on the standby screen and to add a new personal data.
2It is best to store numbers using the international number format.
7SortSorts the personal data in the order of alphabets or location number.
2Sorting may take time depending on the number of personal data entries, the number of characters contained in
each entry and the type of language.
1AlphabeticSorts the personal data alphabetically.
2You can jump directly to a name beginning with specific characters by pressing the
appropriate key (e.g. press 5 once to jump to names beginning with J, or twice to
jump to names beginning with K).
2LocationSorts the personal data in memory location number.
8LocationSearches for the personal data by the location number.
☛ Key in the desired location number ➔SK1 to display the Phonebook list screen with the selected personal data
highlighted.
9ShowDisplays phonebook information.
1SummaryDisplays the summary of phonebook contents.
2Voice tag listDisplays the phonebook entry names with the voice recognition tags recorded.
0IR sendSends the currently highlighted personal data to another device through the IR port.
/See also: “IR send” on page 76.
Add desktop iconCreates a desktop icon of the highlighted personal data.
No.Phonebook list Options menu
▼
▼
49
Phonebook (M4)
Editing an existing personal data
☛
41 and the appropriate key for the desired directory or until the required directory is displayed ➔Highlight the required personal data
➔2
2For the phonebook (SIM) and FDN, only the name, phone number and the location number can be added or edited in the following procedures.
2For the own number and voice mail number settings, only the name and phone number can be added or edited in the following procedures.
Adding/editing phone numbers, Email addresses & personal information
☛ Highlight the field you wish to edit or add information to ➔
☛ Add the required number or information or make necessary changes to the selected field ➔
☛ Highlight another field to make further changes, if required
2You can edit the Name, Phone number, Email address and Info fields by the above method.
Allocating a group
☛ Highlight the Group field ➔➔Highlight the group you wish to add the current personal data to ➔
Voice recall functions
Adding a Voice recall recording
☛ Highlight the Voice tag field ➔➔1
☛ Say the name you wish to record as a voice tag ➔Say the name again for confirmation according to the displayed message.
Playing a Voice recall recording
☛ Highlight the Voice tag field ➔➔2
Deleting a Voice recall recording
☛ Highlight the Voice tag field ➔➔3
2Up to 10 voice tags can be stored.
2You can check the number of stored voice tag and list of those tags (see “Summary” and “Voice tag list” on page 48).
Allocating a LED colour
☛ Highlight the LED colour field ➔➔1➔Highlight the desired colour ➔
2The personal setting for the LED colour has priority over the Group setting and phone setting for the LED colour.
Allocating a picture as a CLI
You can set a picture to be displayed on the screen as a Calling Line Identification (CLI) for an incoming call.
☛ Highlight the Picture field ➔➔1 to display the picture list screen
☛ Highlight the desired picture ➔SK1 to preview the picture or to select the highlighted picture
2A✔is displayed on the icon for which the item is currently selected.
2See also: “Pictures (M63)” on page 59.
50
Phonebook (M4)
Allocating sound/video as a ringer
You can set a sound or video as a ringer for an incoming call. When a video is set, a movie is displayed on the screen with the sound.
☛ Highlight the Ringer field ➔➔1 to display the sound list screen or 2 to display the video list screen
☛ Highlight the desired sound or video ➔SK1 to preview the file or to select the highlighted file
2A✔is displayed on the icon for which the item is currently selected.
2If the video as a ringer is set, it will sound and will be displayed on the screen regardless of the CLI picture setting.
2See also: “Sounds (M62)” on page 58.
Allocating a location number
☛ Highlight the Location number field ➔➔Key in the desired location number ➔
Saving the edited personal data
☛ After editing the required fields, SK1 to save the edited data and return to the previous screen.
Copying and moving personal data
☛
41 and the appropriate key for the desired directory or until the required directory is displayed ➔Highlight the required personal data/
list of data ➔3 to copy or 4 to move
☛ For copying, 1 to copy the highlighted personal data or 2 to copy all the personal data in the current list
☛ Press the appropriate key for the desired destination (SIM, Phone, FDN, Own number or Voice mail number)
2If you copy or move from phonebook (Phone), the Origin number screen will be displayed to choose which phone number to copy or move.
☛ Key in the desired location number ➔
2If you copy or move to phonebook (Phone), the Number type screen will be displayed to choose the phone number type.
Personal data Options menu
☛41 and the appropriate key for the desired directory or until the required directory is displayed
☛ Highlight the required data ➔➔Highlight the required field ➔
No.Personal data Options menu
1CallCalls the highlighted phone number.
2Create messageCreates a new message to the highlighted phone number or Email address.
3IR sendSends the selected personal data to another device through the IR port.
4EditEdits the selected personal data.
51
Phonebook (M4)
/See also: “Phonebook list Options menu” on page 46 for the operation of 4 (Edit), 5 (Copy), 6 (Move) and 7 (Delete current).
Voice mail (M417)
Voice mail function enables you to forward received calls to the Voice mail centre, and the caller can leave voice messages in your voice mail mailbox.
You may be notified by an icon on the standby screen if the caller leaves a voice message.
,The voice mail service is network dependent. Contact your service provider for details on your voice mail number.
Setting the Voice mail number
2This function is available when the Voice mail number has not been set.
☛417➔Highlight the required line ➔ twice ➔➔key in the voice mail number ➔➔SK1 to save the change.
Forwarding a call to the Voice mail centre
☛
Set the voice mail centre number (see “Setting the Voice mail number” for details) ➔Set up Call diversion (see “Call diversion (M161)” on page12
for details). When you receive a call set to be diverted, the call will be diverted to the voice mail centre.
Retrieving a Voice mail
2
This function is available when the Voice mail number has been set.
☛417➔Highlight the required line ➔
2You can also retrieve a voice mail by pressing and holding 1 from the standby screen.
2To set up the line to call the voice mail centre, see “ALS setup” on page 20 for details.
5CopyCopies the selected phone number(s)/Email address(es).
☛ Press the appropriate key for the desired destination (SIM, Phone, FDN, Own number or Voice mail number)
➔Key in the desired location number ➔
6MoveMoves the currently highlighted personal data.
☛ Press the appropriate key for the desired destination (SIM, Phone, FDN, Own number or Voice mail number)
➔Key in the desired location number ➔
7Delete currentDeletes the selected personal data.
8Add desktop iconCreates a desktop icon of the selected personal data.
No.Personal data Options menu (Continued)
52
Camera (M5)
Camera (M5)
Camera function enables you to take pictures or record videos and save them as Joint Photographic Expert Group (JPEG) files and 3rd Generation
Partnership Project (3GPP) files respectively. You can enjoy the picture and video files in many ways: send them attached to an MMS or mail, set a
picture file as the wallpaper for your phone, etc.
Notes on using the camera
Handling the Camera
,The camera of your phone is manufactured using high-precision technology. However, there may be dots or lines on the screen that
appear darker or brighter than the others. Note also that when you are shooting or recording in dimly-lit places, the amount of noise
(such as red and blue dots or horizontal lines) may increase noticeably.
,Be careful not to apply force to the lens when closing your phone. This could damage the lens.
2Fingerprints or grease on the lens can result in focusing problems or dark images. Wipe the lens clean with a soft cloth before use.
2The image quality may be degraded after your phone has been left for a long period in a warm place.
2Exposing the camera to direct sunlight for a long period could discolour the camera’s internal colour filter and cause discoloured images.
2Camera mode is automatically cancelled if none of the phone’s keys are pressed for 3 minutes or longer.
Precautions when taking pictures/recording videos
2
You cannot switch the camera’s shutter sound off. The shutter makes a clicking sound when you take a picture or start/end a video recording,
even when the phone is in Meeting mode.
2Avoid camera shake. Moving the phone when you take a picture will result in a blurred image. Hold the camera firmly to keep it still when you take
a picture, or use the auto timer to take the shot.
2As there is a slight delay from the time you press or Side upuntil the picture is actually taken, do not move the camera until you hear the shutter sound.
2If taking a picture with not enough light, try to hold the phone still as much as possible, and for a longer period of time after the shutter sound: the
shutter speed may be slower in a darker environment.
2Note that if you attempt to shoot directly into a strong light source, such as the sun, another bright light or the high reflecting target with strong
light, the image may contain washed-out white highlights or be disrupted.
2While recording, be careful not to cover the mouthpiece of your phone as it is used as the microphone to record sound along with the video.
Copyright information
2Images and videos shot or recorded on your phone cannot be used in ways that infringe copyright laws without the consent of the copyright holder,
unless intended only for personal use. Note that some restrictions apply to the photographing of stage performances, entertainments and exhibits,
even when intended purely for personal use.
2Users are also asked to note that the transfer of images protected under copyright laws is only permissible within the restrictions imposed by those
copyright laws.
,Be considerate of other people’s privacy when you take a picture or record a video using the camera of your phone and send it to others.
53
Camera (M5)
Taking a picture (M51)
☛ To activate the camera function, press and hold Side up or 5 1
2When you highlight Camera on the Camera screen, pressing SK1 creates a desktop icon of the camera function on the standby screen.
☛ Look into the camera view finder screen and adjust the camera position to place the target on the screen.
2You can switch the camera view finder screen between the main-LCD and the 2nd-LCD by pressing .
2You can take a picture while the phone is closed.
☛ Hold the phone still ➔ To use the shutter, or Side up➔Check the picture ➔ If successfully taken, ➔Saved as a JPEG file in a folder in
Pictures
2After taking a picture, SK1 to send the taken picture attached to a message, and SK2 to discard the picture.
2The default file name for the picture saved in the folder is the date, month, year and sequence number. When you take pictures in burst mode,
the saved files will be named by the default file names plus a consecutive two-digit number at the end.
2If a call comes in while you are checking or saving a photographed image, image storage is cancelled. When this occurs, the next time you select
camera function a message appears to say that you have an image that was not stored, allowing you to check and store the image.
2Before taking a picture, you can switch to the video camera function by pressing SK2. This use of SK2, however, is invalid if the self-timer function
is activated.
Operations when taking a picture
☛
To turn the light on or off, SK1 or Side down
2Take care not to hold the light too close to your or other people’s eyes when the light is lit.
☛ To zoom in and out, ▲ or ▼
2You can also select 1x, 2x, 3x, 4x or 5x magnification from the Zoom setting on the Camera Options menu.
☛ To turn on/off the camera view finder on the full screen, #.
2Depending on the photo size, there may be parts not seen on the full screen view finder display in the saved picture.
☛ To control the brightness level of the picture, or
Camera Options menu (before taking a picture)
No.Camera Options menu (before taking a picture)
1Single mode/Burst modeSwitches the shooting mode to Single/Burst mode (serial shooting).
2Shoot environmentChanges the camera settings to suit the environment. Select from Standard, Person, Room or Darkness.
3EffectApplies special effect to the picture. Select from Off, Sepia, Monochrome, or Negative film.
▼
▼
54
Camera (M5)
2Depending on the conditions, some options may be displayed in gray and not be available.
4Photo sizeSets the picture size to Sub-QCIF (128x96), QCIF (176x144), Main-LCD (176x220), CIF (352x288),
VGA (640x480) or SXGA (1280x1024).
2You cannot use the Zoom function for VGA and SXGA, and you can select 1x to 2x magnification for Main-
LCD and CIF, 1x to 4x magnification for QCIF and 1x to 5x magnification for Sub-QCIF.
2You can use the Frame and Burst mode functions for Sub-QCIF, QCIF and Main-LCD.
2You cannot use the Full screen function for Sub-QCIF and QCIF.
2If you select Main-LCD, CIF, VGA or SXGA, the picture on the camera view finder screen will be displayed as
a smaller picture than the actual size. Also on the camera view finder screen, the picture size before shooting
differs from the size after shooting.
5Image qualitySets the image quality to Super fine, Fine, Normal, Economy or Super economy.
6FrameSelects whether to use a frame when taking pictures, and sets the desired frame with which a picture will be
taken.
7Self timer/Self timer cancelActivates or deactivates the self-timer function.
8Sound settingsSelects the Shutter sound and Self timer sound.
9PicturesOpens Pictures in My data.
0Other settingsAdd desktop icon: Creates a desktop icon of the camera function on the standby screen.
Automatic save: Selects whether to save taken pictures automatically or not.
Save in: Selects the folder (preset or created) where the taken picture will be saved.
Light: Turns the light on or off.
Brightness: Changes the brightness level of the picture between -2 and +2.
Zoom: Changes the zoom magnification from 1x, 2x, 3x, 4x or 5x.
Thumbnail view: Selects whether to display the pictures taken in the Burst mode as thumbnails or slides.
Video recorder: Activates the video function.
Flicker control: Selects 50Hz, 60Hz or Auto to prevent flickers when taking a picture under a fluorescent light.
Switch finderSelects whether to display the camera view finder on the main-LCD or the 2nd-LCD.
2On the 2nd-LCD view finder, the object appears as a mirrored image.
#Full screenTurns the Full screen on or off.
No.Camera Options menu (before taking a picture) (Continued)
55
Camera (M5)
Camera Options menu (after taking a picture)
2
Depending on the conditions, some options may be displayed in gray and not be available.
Recording a video (M52)
Recording a video
,To record a video, keep your phone open at all time. Unlike taking a picture, you cannot record a video while the phone is closed.
☛ Press and hold Side up then SK2,or 5 2 ➔ Look into the view finder screen and adjust the camera position.
2When you highlight Video on the Camera screen, pressing SK1 creates a desktop icon of the video function on the standby screen.
2You can switch the camera view finder screen between the main-LCD and the 2nd-LCD by pressing .
☛ To start recording, or Side up➔ The progress bar will show the ratio of how much you have recorded already.
2While recording, be careful not to cover the mouthpiece of your phone as it is used as the microphone to record sound along with the video.
2While recording, the key tones are deactivated.
☛ Move the camera to capture the scenes you want ➔To stop recording, or the Side up.
2After the set video file size is reached, the recording automatically stops.
2After recording, SK1 to replay the recorded video, and SK2 to send the video file attached to a message.
2While replaying, you can fast forward by pressing or rewind by pressing . Pressing SK1 orwill stop the fast forwarding/rewinding. Then,
pressing SK1 will restart and continue the replay.
No.Camera Options menu (after taking a picture)
1Save currentSaves the currently displayed picture in the folder selected as Save in setting.
2In Burst mode, only the highlighted picture is saved.
2Save allSaves all pictures taken in Burst mode.
3Create messageCreates a new message with the file attached.
4Set as wallpaperSets the picture to be the main-LCD or 2nd-LCD wallpaper.
5Display as normal image/
Display as mirror image
Selects whether to display the taken picture as a normal or mirror image on the main-LCD preview screen
when you select the 2nd-LCD as a camera view finder in Single mode.
6Save as mirror imageSaves the picture as a mirror image when you select the 2nd-LCD as a camera view finder in Single mode.
7Thumbnail viewSelects whether to display the pictures taken in the Burst mode as thumbnails or slides.
8Automatic saveSelects whether to save taken pictures automatically or not.
9Save inSelects the folder (preset or created) where the taken picture will be saved.
0PicturesOpens Pictures in My data.
▼
▼
56
Camera (M5)
2You can discard the recorded video by pressing or CLR.
☛ To save the recorded video, . The recorded video is saved as a 3GPP file in the Videos - My movies folder in My data (see page 58).
2Pressing #before/while playing a video file will enlarge the replay screen size, and pressing # will return the screen size to normal for Sub-QCIF
only.
2The default file name for the recorded video saved in the folder is the date, month, year and sequence number.
/For the operations while replaying the video, see “Videos (M61)” on page 58.
/For the operations while recording a video, see “Operations when taking a picture” on page 53.
2If a call comes in while you are checking or saving a video, video storage is cancelled. If this occurs, the next time you select camera function a
message appears to say that you have a video that was not stored, allowing you to check and store the video.
2Before recording a video, you can switch to the camera function by pressing SK2. This use of SK2, however, is invalid if the self-timer function is
activated.
Operations when recording a video
☛
To turn the light on or off, SK1 or Side down
2Take care not to hold the light too close to your or other people’s eyes when the light is lit.
☛ To zoom in and out, ▲ or ▼
☛ To control the brightness level of the picture, or
Video recorder Options menu (before recording a video)
No.Video recorder Options menu (before recording a video)
1Shoot environment Changes the camera settings to suit the conditions. Select from Standard, Person, Room or Darkness.
2EffectApplies special effect to the video. Select from Off, Sepia, Monochrome, or Negative film.
3Screen sizeSets the video screen size to Sub-QCIF (128x96) or QCIF (176x144).
4Video file sizeSets the video file size to Mail size or Normal size.
5QualitySets the video quality to High or Standard.
6Self timer/Self timer cancelActivates or deactivates the self-timer function.
7Self timer soundSelects the self timer sound from Sound1, Sound2 or Sound3.
8VideosOpens Videos in My data.
▼
▼
57
Camera (M5)
2Depending on the conditions, some options may be displayed in gray and not be available.
Video recorder Options menu (after recording a video)
2
Depending on the conditions, some options may be displayed in gray and not be available.
9Other settingsAdd desktop icon: Creates a desktop icon of the video function on the standby screen.
Save in: Selects the folder (preset or created) where the recorded video will be saved.
Light: Turns the light on or off.
Brightness: Changes the brightness level of the video between -2 and +2.
Zoom: Changes the zoom magnification from 1x to 5x for Sub-QCIF and from 1x to 4x for QCIF.
Camera: Activates the camera function.
Flicker control: Selects 50Hz, 60Hz or Auto to prevent flickers when taking a picture under a fluorescent light.
0Switch finderSelects whether to display the viewfinder on the Main-LCD or the 2nd-LCD.
No.Video recorder Options menu (after recording a video)
1SaveSaves the currently displayed video.
2Create messageCreates a new message with the file attached.
3Set as ring toneSets the video as the ringtone.
4Set as wallpaperSets the video to be the main-LCD wallpaper.
5Full screenSelects whether to enlarge the replay screen size.
2You cannot use the Full screen function for QCIF.
6View detailDisplays detailed information on the selected video.
7Save inSelects the folder (preset or created) where the recorded video will be saved.
8VideosOpens Videos in My data.
No.Video recorder Options menu (before recording a video)
58
My data (M6)
My data (M6)
Using My data, you can playback sound and MP3 files, or display pictures and videos downloaded from the Internet or captured with the camera function
of your phone.
Videos (M61)
In the following section, how to playback video files (videos) stored in your phone is described. You can either record videos using your phone, download
them from the Internet, receive them attached to messages. There are two pre-set folders: My Movies and Download.
Replaying the video files
☛
▼1 or 61 ➔ Highlight a folder➔➔ Highlight a video file you wish to replay➔ ➔ The video file will be replayed.
2When the flat view function is activated, the list of folders is not displayed. The list of all the stored video files is displayed.
2If you wish to move to another hierarchy folder, use and
2Pressing # on the video preview screen will enlarge the replay screen size, and pressing # again will return the screen size to normal for Sub-
QCIF only.
2For the definitions of the icons displayed while replaying, see “LCD and displayed icons” on page viii.
Operations while replaying video
☛
To stop, SK2
☛ To pause, SK1 ➔ While pausing, SK1 again to restart and continue the replay.
☛ To fast forward/rewind, or➔SK1 or will stop the fast forwarding/rewinding.
☛ To enlarge the replay screen size, # for Sub-QCIF only
☛ To adjust the volume, Side keys
☛ To display the previous/next file, ▲ or ▼
2You cannot fast forward, rewind or enlarge the screen for video files with only sound but no image.
Sounds (M62)
In the following section, how to playback sound files stored in your phone is described. There are three pre-set folders: Download, Preset and Voice memo.
Selecting and playing sound
☛
▼2 or 62 ➔ Highlight a folder➔➔ Highlight a sound file you wish to replay➔
2When the flat view function is activated, the list of folders is not displayed. The list of all the stored sounds files is displayed.
2If you wish to move to another hierarchy folder, use and
▼
▼
▼
▼
▼
▼
59
My data (M6)
Operations while playing sound
☛
To stop, SK2
☛ To adjust the volume, Side keys.
☛ To replay the previous/next file, ▲ or ▼
Pictures (M63)
The Pictures function allows you to display images and animations, which were obtained with the camera function of your phone, received as a file
attached to MMS messages, or downloaded from the Internet. The images can also be edited using this function. From the Pictures function you can
also attach images and animations to messages you compose. There are five pre-set folders: Photo, Download, Preset, Frame, and Stamp.
Displaying the Pictures view screen
☛ ▼3 or63 ➔Highlight a folder➔ ➔Highlight an image file you wish to display➔
☛ To display the previous/next image file, ▲ or ▼
2When the flat view function is activated, the list of folders is not displayed. The list of all the stored image file is displayed.
2If you wish to move to another hierarchy folder while the Thumbnail view is turned off, use and
Cutting the image
☛
Highlight or display the image file you wish to edit ➔13 ➔Select the image size➔A frame indicating the cut area appears on the preview
screen.
☛ Move the frame position➔➔ SK1 if the image is favorable
2When you select Free, a cross indicator appears on the preview screen. Move it to the point to start a frame and to confirm the position. Then,
expand the frame into the required size and to confirm.
Reducing the image size
☛
Highlight or display the image file you wish to edit ➔14 ➔Select the image size ➔ SK1 if the image is favorable
Rotating the image
☛ Highlight or display the image file you wish to edit ➔1 5 ➔ SK1 to rotate the image 90 degrees clockwise.
☛ Keep pressing SK1 until the image is at the required angle➔ to confirm
Decorating the image with stamps
☛ Highlight or display the image file you wish to edit ➔16
☛ To apply a marker stamp, 1 ➔ Highlight the required stamp➔➔The marker stamp position is displayed in centre
2If you wish to preview the highlighted stamp, SK1.To display the previous/next stamp, ▲ or ▼.
☛ To apply a text stamp, 2➔ Key in the text ➔➔The text stamp position is displayed in centre
▼
▼
60
My data (M6)
☛ Move the stamp position ➔ to confirm ➔ The stamp preview is displayed again. Repeat applying if necessary, or to select another stamp.
☛ SK1 when finished applying the stamp (the stamp preview will not be applied this time)
Adding a frame to the image
☛ Highlight or display the image file you wish to edit ➔17➔Highlight a frame➔ to preview the resulting image ➔Scroll through the
various frames by ▲ and ▼➔ to confirm.
Saving the edited image
☛
After any edition, SK1 or to save the edited image ➔Select the Save Quality
2SK1 to check the expected size of the image.
☛ Edit the name (if required) ➔
Printing an image using a printer
You can print an Exif format image file by connecting your phone to a PictBridge compatible printer using a USB cable (option).
2There may be PictBridge compatible printers that cannot be connected to your phone.
2Refer to the operation manual of the printer for details on the printing.
☛ ▼3 or6 3 ➔Highlight a folder➔➔Highlight an image file you wish to print ➔2 4
2“Print via USB” may be displayed in gray and unavailable, depending on the image file.
☛ Connect your phone and the printer with the USB cable➔Prepare the printer ready for printing, referring to its manual
☛ Check the print detail screen displayed
☛ To print as seen on the detail screen, SK1
☛ To edit the print detail and then print, on the print detail screen to display the Options menu➔Edit the detail using the Options menu
➔ SK1
2The Options menu may change depending on the connected printer.
2If any interruption or error occurs, or the printing is not completed normally, pull out the USB cable and start again from the first step.
2If you want to print multiple images on one sheet, set both the settings for Number of prints and N-up on Layout screen under Layout detail.
For example, 4 for Number of prints and 2 for N-up will print 2 sheets with 2 half-sized images per sheet.
No.Print via USB Options menu
1Number of printsSets the number of prints to output.
2Layout detailSelects the paper size, paper type and layout to print the image file.
3Print qualitySelects the required quality of printing.
4File nameSelects whether or not to print the file name on the paper.
5DateSelects whether or not to print the date on the paper.
61
My data (M6)
MP3 (M64)
In the following section, the procedures to display and play your MP3 files are described. There is one pre-set folder: Download.
Selecting and playing an MP3 file
☛
▼4 or 64 ➔ Highlight the MP3 file you want to play➔
2When the flat view function is activated, the list of folders is not displayed. The list of all the stored MP3 files is displayed.
2To create your own playlist, see “MP3 player (M81)” on page 64.
Operations while playing an MP3 file
☛ To stop, SK2
☛ To adjust the volume, Side keys.
☛ To replay the previous/next file, ▲ or ▼
File selector Options menu
☛ Display the Videos/Sounds/Pictures/MP3 list screen➔
No.File Selector Options menu
1Edit itemRename item:Edits the user title or name of the selected folder or file.
Set protection:Sets the protection settings of the selected folder or file on/off.
Cut:Cuts the selected picture into Sub-QCIF (128x96), QCIF (176x144), Main-LCD (176x220), 2nd-
LCD (128x128) or Free.
Reduce:Reduces the selected picture to fit within Sub-QCIF (128x96), QCIF (176x144), Main-LCD
(176x220) or 2nd-LCD (128x128).
Rotate:Rotates the selected picture.
Stamp tool:Adds a marker or text stamp on the selected picture.
Frame:Sets a frame to the selected picture.
2You cannot use the Cut and Rotate functions for SXGA.
2You can only use the Stamp tool and Frame functions for Sub-QCIF, QCIF and Main-LCD.
2Use item (Videos)Set as ring tone:Sets the selected video to be the ringer tone.
Set as wallpaper:Sets the selected video to be the main-LCD wallpaper.
IR send:Sends the selected video through the IR port to other devices or a cellphone.
2Use item (Sounds)Set as ring tone:Sets the selected sound to be the ring tone.
Set as SMS tone:Sets the selected sound to be the SMS tone.
Set as Mail tone:Sets the selected sound to be the Mail tone.
IR send:Sends the selected sound through the IR port to other devices or a cellphone.
62
My data (M6)
2Depending on the conditions, some options may be displayed in gray and not be available.
2Depending on the size of the data, file selector operation may take a long time.
2Neither protected data nor preset data and folders can be deleted or moved.
2Use item (Pictures)Set as wallpaper:Sets the selected image to be the main-LCD or 2nd-LCD wallpaper.
Add desktop icon:Creates a desktop icon for the selected image on the standby screen.
IR send:Sends the selected image through the IR port to other devices or a cellphone.
Print via USB:Prints the selected image file using a PictBridge printer via USB cable (option) (see page 60).
2Use item (MP3)IR send:Sends the selected MP3 through the IR port to other devices or a cellphone.
3Create messageCreates a new message with the file attached.
2This function is not available for the MP3 files.
4Delete itemDeletes the selected file and folder.
5Delete allDeletes all the files in the current list.
6Copy itemCopies the selected file or folder to the selected folder.
7Copy allCopies all the files in the current list to the selected folder.
8MoveMoves the selected file/folder or all the files in the current list to the selected folder.
9Create folderCreates a new folder under the current folder.
0Storage detailDisplays the current storage information of your phone memory.
View detailDisplays the details of the selected folder or file.
2You can also display the details on the highlighted folder or file by pressing without displaying the Options menu.
#OptionsSorting order:Sorts the files by date or alphabetically.
Info column:Sets whether to display the column on the list screen, and the information to be shown there.
None:No column showing
Size:Approximate size of thefile
Type:File type
2 You can also change the information on the column by pressing # without displaying the
Options menu.
Thumbnail view:Displays the files as thumbnails.
Flat view:Displays the list of all the stored files regardless of the folder hierarchy.
Save options:Saves the current option settings.
Reset options:Resets the option settings.
No.File Selector Options menu
63
Java™ (M7)
Java™ (M7)
You can download Java™ applications (games etc.) from i-mode sites and run them on your phone.
Programs (M71)
How to run software
To run a software (Java™ application), perform the following.
☛71 or press and hold SK2 ➔ Highlight an application containing the software you want to run ➔
2When you display the Java™ applications list screen for the first time after downloading a program(s), it may take a while for your phone to verify
the program(s). A message will be displayed during this process, and you may activate the program(s) after it is completed.
,After downloading the software, always make sure that you check the downloaded program is displayed in the Applications screen.
,Do not remove the battery while the software is running as data to that point may not be saved.
2While the software is active, the Java™ operation icon is displayed (see page viii).
Java™ System menu
☛
7 1 ➔ Highlight an application➔
2Depending on the conditions, some options may be displayed in gray and not be available.
Application menu
☛
7 1➔ Highlight an application you want to run ➔SK1
No.System menu
1Description settingSelects whether to display the information of the selected application.
2Delete allDeletes all the applications.
3Storage statusDisplays the status of Java™ applications currently stored in your phone.
4Trace info.Displays the trace information.
5AboutDisplays the information of the Java™ system.
No.Application menu
1PropertiesDisplays the information of the selected software.
2UpgradeMakes an enquiry on whether the selected software has an upgrade. If there is, starts downloading the data.
3DeleteDeletes the selected software.
64
Accessory (M8)
2Depending on the conditions, some options may be displayed in gray and not be available.
Prog backlight (M72)
You can set the backlight mode of your phone.
☛7 2 ➔1 to set your phone to follow the normal backlight setting, or 2 to let the backlight be controlled by the Java™ application.
2If you set your phone to follow the normal backlight setting, the current power save settings will be active (see “Power saving (M15)” on page 23).
2When the software is not running, the backlight operation depends on your phone’s backlight settings.
Accessory (M8)
MP3 player (M81)
This feature allows you to create a Playlist to play MP3 files in the order you desire. You can add MP3 files saved in your phone to the Playlist (see “MP3
(M64)” on page 61) or change the order of the MP3 files within the Playlist.
☛81➔SK1 to play ➔After playing, SK2 to stop.
☛ To change the volume, Sidekeys.
☛ To play the previous/next file, ▲or ▼.
2When there are no MP3 files saved in the Playlist, the Playlist screen will be displayed in stead of the MP3 player screen.
2When you use a wired headset, you can start or stop playing by pressing the button on it, and play the next file by pressing and holding it.
4Network connectionPermits/prohibits the selected software to connect to the network or displays the confirmation message every time you
start the selected software.
5Auto start settingEnables or disables the automatic start of a complying Java™ application.
No.Application menu
65
Accessory (M8)
MP3 player Options menu
☛
81
2Depending on the conditions, some options may be displayed in gray and not be available.
Calculator (M82)
You can perform addition, subtraction, multiplication and division with the calculator. It also has a memory function.
☛82
2The calculator can display a result of up to 9 digits. If a calculation results in a number exceeding the maximum, the screen displays error in the
calculation field.
No.MP3 player Options menu
1PlaylistDisplays a list of MP3 files in the order in which they are played.
2You can save up to 30 MP3 files in the Playlist depending on the size of each file.
2The MP3 files that are moved or deleted from MP3 of My data or erroneous MP3 files are displayed in gray and
cannot be played.
☛ to display the Playlist Options menu below, or SK1 to add an MP3 file.
1Add itemAdds an MP3 file in your phone to the Playlist.
2Move itemMoves the highlighted MP3 file in the Playlist.
3Delete itemDeletes the highlighted MP3 file from the Playlist.
4Delete allDeletes all the MP3 files from the Playlist.
5View detailDisplays the properties (file name, title, artist name and recording time) of the highlighted MP3 file.
2Play modeNormal:Plays all the MP3 files in order from top to bottom of the Playlist once.
Repeat all:Plays all the MP3 files in the Playlist repeatedly.
Repeat one:Plays the selected MP3 file repeatedly.
3EqualizerSelects from Rock, Jazz, Pop and Off to obtain the desired tone.
2The selected Equalizer setting applies to all the MP3 files in the Playlist.
4Add desktop iconCreates a desktop icon of the MP3 player function on the standby screen.
66
Accessory (M8)
Calculator Key Assignment
For calculator function, the keys are assigned different functions. The following shows the key assignment:
2Using the % function, you can calculate (100 + x) % of a figure (e.g. 200 + 5% = 210) and (100 - x) % of a figure (e.g. 200 - 5% = 190).
Clock alarm (M83)
This feature enables you to switch the clock alarm function on/off and to set the time, repetition and alarm tone.
Turning the alarm on/off
☛
83
☛ When all settings are done, SK1 to save the setting.
2The selected melody will be played when the alarm occurs if the ringer is turned on based on the current phone mode. If vibration is turned on, you
will be notified of the alarm by vibration.
2Even if the phone has been switched off, the phone automatically switches itself on and sounds the alarm or vibrates at the specified time.
2You can stop the alarm tone or vibration by pressing any key.
Decimal Point (.)CLRDelete digit (if held, all clear)
Clock alarm setting
On/OffTurns on or off the alarm.
Set timeSets the time and am/pm (for 12 hour format) at which the alarm will sound.
Set alarm toneSets the melody to be played when the alarm occurs (see “Sounds (M62)” on page 58).
Alarm repeatSelects alarm repeat for once, daily or day of the week.
2You can select more than one day of the week at the same time.
2You can remove the check by highlighting and pressing again.
Enter alarm textSets the message (e.g. Wake up!) which is displayed when the alarm occurs (optional).
▼
▼
67
Accessory (M8)
Scheduler (M84)
Scheduler enables you to enter reminders and appointments for particular time and date.
Adding a new event
☛
84➔Highlight the day ➔ to display the day’s schedule list screen (if any) ➔SK1
☛ When all settings are done, SK1 to save the setting.
2The selected melody will be played when the scheduled event occurs if the ringer is turned on based on the current phone mode. If vibration is turned
on, you will be notified of the event by vibration.
2If the phone has been switched off, the phone does not switch itself on to sound the reminder or vibrate at the specified time.
2You can stop the reminder tone or vibration by pressing any key.
2If the event is a private event, the reminder will sound at the specified time but the entered description will not be displayed. You are prompted to
enter the security code to view the details of the private event.
Viewing the scheduled events
☛
84➔Highlight a day (SK1 to display the previous monthly/weekly view screen or SK2 to display the next monthly/weekly view screen)
☛ to display the day’s schedule list screen (To display the previous/next day’s schedule list screen, or ).
☛ to display the detail screen of the highlighted schedule.
Setting the reminder again
☛
When the scheduler reminder is set off, or and SK2 to select the time to remind again.
Scheduler setting
Event date/timeSets the day, month, year, time and am/pm (for 12 hour format) of the event.
Event end date/timeSets the day, month, year, time and am/pm (for 12 hour format) of the end of event.
DescriptionSets the event description (optional).
RepeatSelects repeat for One time only, Daily, Weekly or Monthly.
ReminderTurns on or off the reminder.
Reminder timeSelects the time to set off the reminder prior to the event start time.
Reminder toneAssociates a reminder tone with an event.
2You can set the reminder tone only when the Reminder is turned on.
PrivateSets the event as a private event.
☛ Place a check mark to set the event as a private event. To set the event as a public event, do not place a check
mark.
▼
▼
▼
▼
68
Accessory (M8)
Scheduler Options menu
☛
84➔Highlight the day ➔ to display the day’s schedule list screen (if any) ➔Highlight the required scheduled event ➔
2Depending on the conditions, some options may be displayed in gray and not be available.
ToDo list (M85)
This feature allows you to set up to 100 ToDo tasks that should be finished by a certain date. You can choose to display either all ToDo tasks, or those
just finished or unfinished. Each task is identified by a description (of up to 256 characters) and its start/due date.
Adding a new ToDo task
☛
85➔Highlight the list ➔➔SK1
No.Scheduler Options menu
1Add newAdds a new entry.
2EditEdits the highlighted event.
3CopyCopies the highlighted event.
4DeleteDeletes event(s). Press the appropriate keys for the event category (the currently selected event, all the public/private
events on the day, all the past public/private events, all the public/private events or all the events) to delete.
5Go to dateDisplays the selected date.
6Monthly calendar/
Weekly calendar
Switches the weekly view screen to the monthly view screen, or the monthly view screen to the weekly view screen.
2You can select Sunday or Monday to start the week from “Set start day” on page 20.
7View summaryDisplays the number of used and available entries.
8View eventsDisplays the events. Press the appropriate keys for the event category (Public only, Private only or All) to display.
2You are required to key in the security code to display the private events or all events.
9IR sendSends the selected schedule through the IR port to other devices or a cellphone.
2The IR send function is not available during a call.
ToDo list setting
Start dateSets the day, month and year to start the ToDo task.
Due dateSets the date to end the ToDo task. Key in the date or press the appropriate key for the date.
2If you select to key in the date yourself, input the day, month and year of the date to end the ToDo task, then SK1.
DescriptionSets the ToDo task description (e.g. Pay the rent).
CategorySets the category (Business, Personal or Other).
69
Accessory (M8)
☛ When all settings are done, SK1 to save the setting.
When a ToDo task is completed
☛
85➔Highlight the list ➔➔Highlight the required ToDo task ➔➔1 and 1,orSK2 to save the task as completed.
Viewing ToDo task details
☛
85➔Highlight the list ➔➔Highlight the required ToDo task ➔➔To view the details of the previous or next ToDo task in the list,
or
☛ To edit the currently displayed task, SK1
ToDo Options menu
☛
To display the ToDo Options menu, 85➔Highlight the list ➔➔Highlight the required ToDo task ➔
☛ To display the ToDo detail Options menu, 85➔Highlight the list ➔➔Highlight the required ToDo task ➔➔
Column L shows the ToDo options menu, and column D shows the ToDo detail Options menu.
2Depending on the conditions, some options may be displayed in gray and not be available.
PrioritySets the priority (Normal, Low or High).
PrivateSets the ToDo task as private.
LDToDo Options menu
14Add newAdds a ToDo task (see “Adding a new ToDo task” on page 68).
–1StatusChanges the completion status of the highlighted ToDo task.
22EditEdits the highlighted ToDo task (see “Adding a new ToDo task” on page 68).
3–DeleteDeletes ToDo task(s). Press the appropriate keys for the ToDo task category (the currently selected ToDo task, all the
public/private ToDo tasks, all the completed public/private ToDo tasks or all the ToDo tasks) to delete.
–3Delete currentDeletes the current ToDo task.
4–Display filterSets the type(s) of ToDo tasks to be displayed by selecting the desired filter option (None, Incomplete or Completed).
5–Sort listDisplays a list of ToDo tasks rearranged according to the selected sort key (Due date, Category, Priority, or Status).
6–View summaryDisplays the number of Incomplete and Completed tasks and how many more tasks can be created.
75IR sendSends the selected ToDo task through IR port to other devices or a cellphone.
2The IR send function is not available during a call.
ToDo list setting (Continued)
▼
▼
70
Accessory (M8)
Notepad (M86)
Notepad function allows you to record and store a note as a text file.
Creating a new memo (M861)
☛
8 6 1➔Key in text ➔ to save the entry as a text file. The first few words are displayed on the text list screen.
Displaying a memo (M862)
☛
8 6 2 ➔Highlight a file ➔SK1 to preview, or to edit
Notepad Options menu
☛
86 2➔Highlight a file ➔
No.Notepad Options menu
1Edit itemChanges the protection settings of the selected file.
Rename item:Edits the user title or name of the selected folder or file.
Set protection:Sets the protection settings of the selected folder or file on/off.
2Use itemAdd desktop icon:Creates a desktop icon of the selected file on the standby screen.
IR send:Sends the selected file through IR port to other devices or a cellphone.
2The IR send function is not available during a call.
3Create messageCreates a new message with the highlighted text (note).
4Delete itemDeletes the selected file or folder if it is unprotected.
5Delete allDeletes all the notes unprotected from the list.
6Copy itemCopies the selected note.
7Copy allCopies all the notes.
8MoveMoves the selected note or all the notes in the current folder to a folder.
9Create folderCreates a new folder under the current folder.
0Storage detailDisplays the current storage information of your phone memory.
View detailDisplays the detail of the selected file.
2You can also display the details on the highlighted folder or file by pressing without displaying the Options menu.
71
Accessory (M8)
2Depending on the conditions, some options may be displayed in gray and not be available.
Voice memo (M87)
Voice memo function allows you to record up to 60 seconds of sound/voice, using your phone’s microphone.
Recording/playing voice memo or setting speaker
☛8 7
/See also: “Sounds (M62)” on page 58.
#OptionsSorting order:Sorts the files by date or alphabetically.
Info column:Sets whether to display the column on the list screen, and the information to be shown there.
None:No column showing
Size: Approximate size of the file
Type: File type
2You can also change the information on the column by pressing # without displaying the Options menu.
Flat view:Displays the list of all the stored files regardless of the folder hierarchy.
Save options:Saves the current option settings.
Reset options:Resets the option settings.
No.Voice memo setting
1RecordRecords a voice memo.
☛ SK1 to start recording.
2You can finish recording and save the data as a file by pressing SK2 even before the recording is completed.
/To record the conversation during a call, see “Recording a call” on page 10.
2PlayPlays a voice memo or recorded call.
☛ Highlight a voice memo ➔ to start playing and SK2 to stop playing.
3Speaker settingSelects between speaker and earpiece to play the voice memo.
☛ 1 for the Speaker, or 2 for the Earpiece.
No.Notepad Options menu (Continued)
72
Accessory (M8)
Currency (M88)
Currency function allows you to convert an amount of money in one currency to another.
Converting currency
☛
8 8
2If you have made a mistake in entering the exchange rate or amount, CLR to delete individual number or SK2 to cancel the entry and return to
the previous screen, and then start again.
Resetting the currencies
☛
8 8 and SK1
External connection (M89)
External connection allows you to communicate with other devices (PC, PDA, headset, etc.)
2You cannot use the Infrared and Bluetooth functions at the same time.
Bluetooth (M891)
Bluetooth function allows you to use your phone as a modem and to talk by using a Bluetooth headset.
☛8 9 1
/For details, see “Bluetooth (M891)” on page 73.
Infrared (M892)
☛
8 9 2
/For details, see “IR Data Exchange” on page 76.
Currency setting
FromSets the source currency code.
ToSets the destination currency code.
Exchange rateSets the exchange rate.
☛ If you wish to change the exchange rate, CLR to delete the displayed exchange rate and key in the required number (for
decimal point, SK1) ➔
AmountSets the amount of money you wish to convert (for decimal point, SK1).
73
Bluetooth (M891)
Synchronization (M80)
Synchronization function allows you to synchronize the data (phonebook, scheduler, ToDo list data) with PC application via the USB cable (option).
This function can update such data between your phone and PC.
2Data should comply with vCard 2.1/vCalendar 1.0 specification.
2You cannot synchronize the phonebook data stored in the SIM card.
☛ Connect your phone with your PC via a USB cable (option) ➔Activate the software on PC side and prepare for synchronization (for details, refer
to the manuals of the software)
☛8 0 ➔Select the data type (Phonebook, Scheduler or ToDo list)➔ SK1 or 1 to start synchronization
Bluetooth (M891)
Bluetooth function allows you to communicate with the external devices (PC, PDA, headset, hands-free kit, etc.).
This function provides the following service:
•Dial-up service - You can use your phone as a modem.
•Headset/hands-free service - You can make/receive a call using a Bluetooth headset or hands-free kit.
2When using Bluetooth devices, always refer to their operation manual.
2Depending on the connection status, a Bluetooth device may not function correctly. In such a case, retry operation from the device side, or switch
your phone off and on.
2There may be Bluetooth devices that cannot be connected to your phone.
Using Bluetooth connection
2To use the Bluetooth function, you must perform the Bluetooth settings on your external device beforehand. For details, refer to the operation manual
of the device.
2You cannot use the Bluetooth and Infrared functions at the same time.
Pairing a Bluetooth device and your phone
☛
8 9 1➔ 2 ➔ 1 to be searched by other Bluetooth devices or 2 to search other Bluetooth devices
☛ If the device is found, the list of found Bluetooth devices will be displayed
☛ Highlight the device from the list➔➔ Input passcode of the found Bluetooth device
2When pairing, you will be asked to enter a passcode specified by the Bluetooth device to your phone and the device. If no passcode is specified
by the device, enter the same arbitrary number to your phone and the device. A passcode is a number from 4 to 16 digits.
74
Bluetooth (M891)
Bluetooth setting
☛
8 9 1
2Depending on the conditions, some options may be displayed in gray and not be available.
Device list Option menu
☛ 8 9 1 ➔3
No.Bluetooth setting
1Bluetooth On/
Bluetooth Off
Activates or deactivates Bluetooth function.
2If you switch the phone off while Bluetooth On is set, the next time you switch on, the phone will be in Bluetooth On
status again.
2Pair new deviceRegisters the external Bluetooth devices.
1Wait for connectStandby your phone to wait for other devices to search for it.
2Other Bluetooth devices can only detect your phone while your phone is displaying Wait for
connect screen.
2Search deviceSearches for the nearby active Bluetooth devices.
3Device listDisplays and edits the list of paired devices.
4My phoneDisplays the terminal information of your phone.
☛ to display the Options menu
Rename: Edits the terminal name of your phone.
2You cannot edit the information during Bluetooth communication.
5Active deviceDisplays the information on the device in connection.
6DisconnectEnds the Bluetooth connection in progress.
No.Device list Option menu
1RenameEdits the name of the highlighted device.
2Protect/UnprotectProtects or unprotects the highlighted device.
3Delete deviceDeletes the highlighted device.
4Delete all devicesDeletes all the devices listed.
75
Bluetooth (M891)
Device list icons
The following icons will be displayed in the device list screen.
,While using the Bluetooth device, the following icons will be displayed in the status bar area of your phone.
Using your phone as Bluetooth modem
2For details of dial-up connection settings, consult your Internet service provider.
☛ Pair the Bluetooth device and your phone beforehand (see “Pairing a Bluetooth device and your phone” on page73).
☛8 9 1➔ 1 to toggle to Bluetooth On to activate Bluetooth ➔ Perform dial-up connection by your PC
☛ To end the dial-up connection, disconnect from the PC application
2You can also end the dial-up connection by pressing 8 9 1 6
Connecting Bluetooth headset/hands-free kit
2When connecting a wired headset and Bluetooth headset at the same time, the wired headset will not work.
2For some Bluetooth devices, the voice recall function may be activated when a paired headset/hands-free kit is turned on (see “Voice recall” on
page 8).
☛ Pair the Bluetooth device and your phone beforehand (see “Pairing a Bluetooth device and your phone” on page73).
☛8 9 1➔ 1 to toggle to Bluetooth On to activate Bluetooth
☛8 9 1➔ 3 to display the Device list screen ➔Highlight the headset/hands-free kit in the list ➔SK1
Using Bluetooth headset/hands-free kit
☛ To answer the incoming call, press the button on the headset/hands-free kit
☛ To switch the headset/hands-free kit call to your handset call during a call, 9
2You cannot deactivate Bluetooth during a call.
☛ To end the call, or end from the headset/hands-free kit
Indicates the device is not registered.Indicates the device is an audio (a headset
or handsfree device).
Indicates the device is a PC.
Indicates the device is a phoneIndicates the device is other than an audio,
PC, or phone.
Indicates the device is protected.
Indicates that Bluetooth device is set to on.Indicates that Bluetooth device is in operation.
76
IR Data Exchange
IR Data Exchange
Your phone is equipped with an InfraRed (IR) data port which enables you to send and receive picture/sound/MP3/video/ToDo list/scheduler/phonebook/
note data with cellphones or other devices equipped with IR ports.
,Do not aim or direct the IR data port towards your or other people’s eyes when using IR data exchange.
,Do not aim or direct the IR data port towards another IR device as this may cause the device to malfunction.
2Depending on the other party’s cellphone or device, the data may not be received correctly.
2You cannot use the Infrared and Bluetooth functions at the same time.
2While sending or receiving data through IR, or using your phone as an IR modem, your phone is automatically placed out of service, so phone call,
message and i-mode access are disabled.
Positioning of the phones
,Open both sending and receiving phones vertically and place them as
their IR ports face each other with less than 20cm of interval.
2Do not place anything between IR ports.
2The angle made of two IR ports must be within 30°.
2Do not move the phones until the data exchange is complete.
2The phones may not communicate successfully if they are placed under direct
sunlight or fluorescent light, or close to other infrared devices.
IR send
You can send picture/sound/MP3/video/ToDo list/scheduler/phonebook/note data as a file
through the IR port.
2This function is not available during a call.
2Before starting to send data, the other party must be ready to receive data.
Phonebook entry (M413...)
2You can only send Name, Home, Mobile, Work, Fax, 2 Email addresses and 2 pieces of descriptive information.
2Your phone sends data according to the vCard 2.1 specification.
☛ To display the phonebook (Phone), (for required number of times) or 4 13 ➔ Highlight a phonebook entry.
☛ 0 or 3➔ The phonebook entry will be sent through the IR port.
15° or less
20cm or less
77
IR Data Exchange
Video/Sound/Picture/MP3 (M6...)
☛
61 for Videos, 6 2 for Sounds, 6 3 for Pictures or 6 4 for MP3 ➔Highlight a folder ➔➔Highlight a file.
☛23 for Videos/Pictures, 2 4 for Sounds or 2 1 for MP3 ➔ The file will be sent through the IR port (see “My data (M6)” on
page 58 for details).
Schedule entry (M84...)
☛84➔Highlight a date ➔➔Highlight a schedule entry ➔➔9➔ The schedule entry will be sent through the IR port.
ToDo entry (M85...)
☛
85➔Highlight Public, Private or All ➔➔Highlight a ToDo entry ➔7➔ The ToDo entry will be sent through the IR port.
Note (M862...)
☛
862➔Highlight a note ➔2 and 2➔ The note entry will be sent through the IR port.
IR receive (M8921)
You can standby your phone to receive data (picture/sound/MP3/video/ToDo list/scheduler/phonebook/note) from other devices or a phone of the same model.
Receiving data through IR (M8921)
☛
89 2 1➔Start sending data from the other end.
2Once the transmission completes, your phone automatically judges the type of received data and stores the data accordingly.
2This function is not available during a call.
2If your phone does not have enough space to store the received data, a message will be displayed indicating lack of space. In such a case, delete
unnecessary data and try the data exchange again.
2Received picture/video/sound files are stored in the Download folder of My data (see “My data (M6)” on page 58).
IR modem (M8922)
You can use your phone as a modem for a PC via the IR port to establish a dial-up connection to an Internet service provider.
Activating the IR port for modem use (M8922)
☛89 2 2 ➔The phone will be in standby status for IR transmission from the external device.
2If the IR transmission is not established within a short while, the standby status will end.
2While on active call or connecting to the external device such as USB, IR modem is not available.
2While using your phone as an IR modem, you cannot use network related services, such as making/receiving calls and sending/receiving messages.
,Your phone consumes a lot of battery power when used as a modem. After using your phone as a modem, be sure to deactivate the
modem function from your PC or press (for the CSD connection only). When the modem function is deactivated, the idle screen will
be displayed without the Infrared icon and GPRS icon.
2Check with your service provider to use your phone as a modem to connect to the Internet.
Libble takes abuse of its services very seriously. We're committed to dealing with such abuse according to the laws in your country of residence. When you submit a report, we'll investigate it and take the appropriate action. We'll get back to you only if we require additional details or have more information to share.
Product:
Forumrules
To achieve meaningful questions, we apply the following rules:
First, read the manual;
Check if your question has been asked previously;
Try to ask your question as clearly as possible;
Did you already try to solve the problem? Please mention this;
Is your problem solved by a visitor then let him/her know in this forum;
To give a response to a question or answer, do not use this form but click on the button 'reply to this question';
Your question will be posted here and emailed to our subscribers. Therefore, avoid filling in personal details.
Register
Register getting emails for Nec n411i at:
new questions and answers
new manuals
You will receive an email to register for one or both of the options.
Get your user manual by e-mail
Enter your email address to receive the manual of Nec n411i in the language / languages: English as an attachment in your email.
The manual is 2,4 mb in size.
You will receive the manual in your email within minutes. If you have not received an email, then probably have entered the wrong email address or your mailbox is too full. In addition, it may be that your ISP may have a maximum size for emails to receive.
The manual is sent by email. Check your email
If you have not received an email with the manual within fifteen minutes, it may be that you have a entered a wrong email address or that your ISP has set a maximum size to receive email that is smaller than the size of the manual.
The email address you have provided is not correct.
Please check the email address and correct it.
Your question is posted on this page
Would you like to receive an email when new answers and questions are posted? Please enter your email address.