138934
149
Zoom out
Zoom in
Previous page
1/186
Next page
E
11
IDENTIFICACIÓN DE LOS CONTROLES
Introduccion
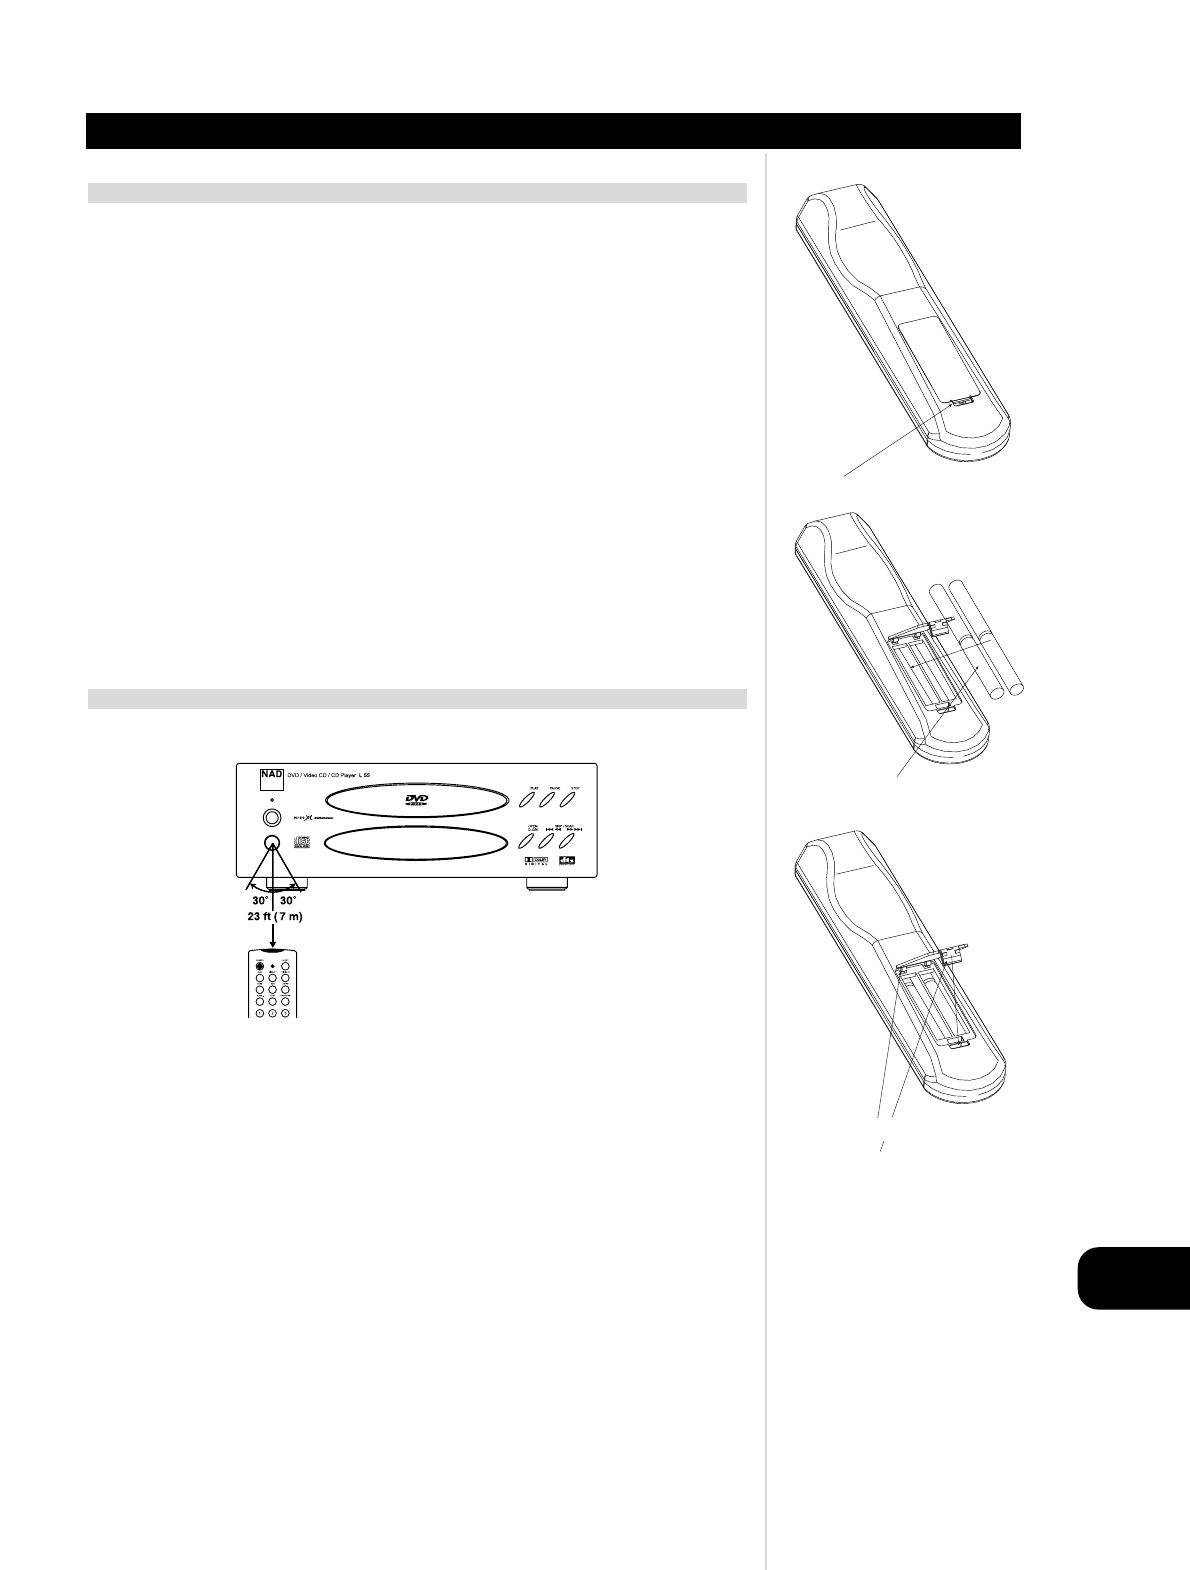
PREPARACIÓN DEL CONTROL REMOTO
Inserte las pilas en el control remoto para poder usarlo para hacer funcionar el aparato DVD.
1 Abra la cubierta de pila.
2 Inserte las pilas (tamaño AAA). Asegúrese de que coincidan el + y - de las pilas con las marcas del
interior del compartimento de pilas.
3 Cierre la cubierta.
NOTAS SOBRE LAS PILAS
El uso inapropiado de pilas puede producir fuga de pila y corrosión.
Para usar correctamente el control remoto, siga las instrucciones.
No inserte las pilas en el control remoto en la dirección incorrecta.
No cargue, caliente, abra, o cortocircuite las pilas. No eche las pilas al fuego.
No deje pilas descargadas o agotadas en el control remoto.
No use juntos tipos diferentes de pilas mezclando pilas viejas y nuevas..
Si no usa el control remoto durante largo tiempo, quite las pilas para evitar posibles daños por corrosión
de pila.
Si no funciona el control remoto correctamente, o si se reduce el alcance de funcionamiento, cambie
las pilas con pilas nuevas.
Si se produce fuga de pila, limpie el líquido de la pila en el compartimento de pilas, luego inserte pilas
nuevas.
Las pilas han de durar aproximadamente un año de uso normal.
FUNCIONAMIENTO CON EL CONTROL REMOTO
Esta sección le indica cómo usar el control remoto.
Apunte el control remoto al sensor remoto y pulse los pulsadores.
Distancia: Unos 7 m desde el frente del sensor remoto
Angulo: Unos 30° en cada dirección del frente del sensor remoto
No exponga el sensor remoto del aparato DVD a una fuente de luz fuerte como la luz directa del sol.
Si hace usted esto, tal vez no podrá hacer funcional el aparato DVD con el control remoto.
NOTAS SOBRE EL CONTROL REMOTO
Dirija el control remoto al sensor remoto del aparato DVD.
No deje caer ni golpee el control remoto.
No deje el control remoto en un lugar sumamente caliente ni en un lugar húmedo.
No derrame agua sobre el control remoto ni ponga sobre el mismo algo húmedo.
No abra el control remoto.
PLACE BATTERIES INTO OPENING.
INSURE THE CORRECT FITTING
IS OBSERVED
PRESS IN AND LIFT TAB TO REMOVE BATTERY COVER
OUT OF RECESS
PRESS BATTERY COVER INTO
PLACE UNTIL IT ‘CLICKS’ CLOSED
REPLACE BATTERY COVER BY ALIGNING
AND INSERTING THE TWO TABS INTO THE
HOLES.
149


Need help? Post your question in this forum.

Forumrules


Report abuse

Libble takes abuse of its services very seriously. We're committed to dealing with such abuse according to the laws in your country of residence. When you submit a report, we'll investigate it and take the appropriate action. We'll get back to you only if we require additional details or have more information to share.

Product:

For example, Anti-Semitic content, racist content, or material that could result in a violent physical act.

For example, a credit card number, a personal identification number, or an unlisted home address. Note that email addresses and full names are not considered private information.

Forumrules

To achieve meaningful questions, we apply the following rules:

Register

Register getting emails for NAD l 56 at:


You will receive an email to register for one or both of the options.


Get your user manual by e-mail

Enter your email address to receive the manual of NAD l 56 in the language / languages: English, German, French, Spanish as an attachment in your email.

The manual is 7,38 mb in size.


You will receive the manual in your email within minutes. If you have not received an email, then probably have entered the wrong email address or your mailbox is too full. In addition, it may be that your ISP may have a maximum size for emails to receive.

Others manual(s) of NAD l 56

NAD l 56 User Manual - Dutch - 46 pages


The manual is sent by email. Check your email

If you have not received an email with the manual within fifteen minutes, it may be that you have a entered a wrong email address or that your ISP has set a maximum size to receive email that is smaller than the size of the manual.

The email address you have provided is not correct.

Please check the email address and correct it.

Your question is posted on this page

Would you like to receive an email when new answers and questions are posted? Please enter your email address.


Info