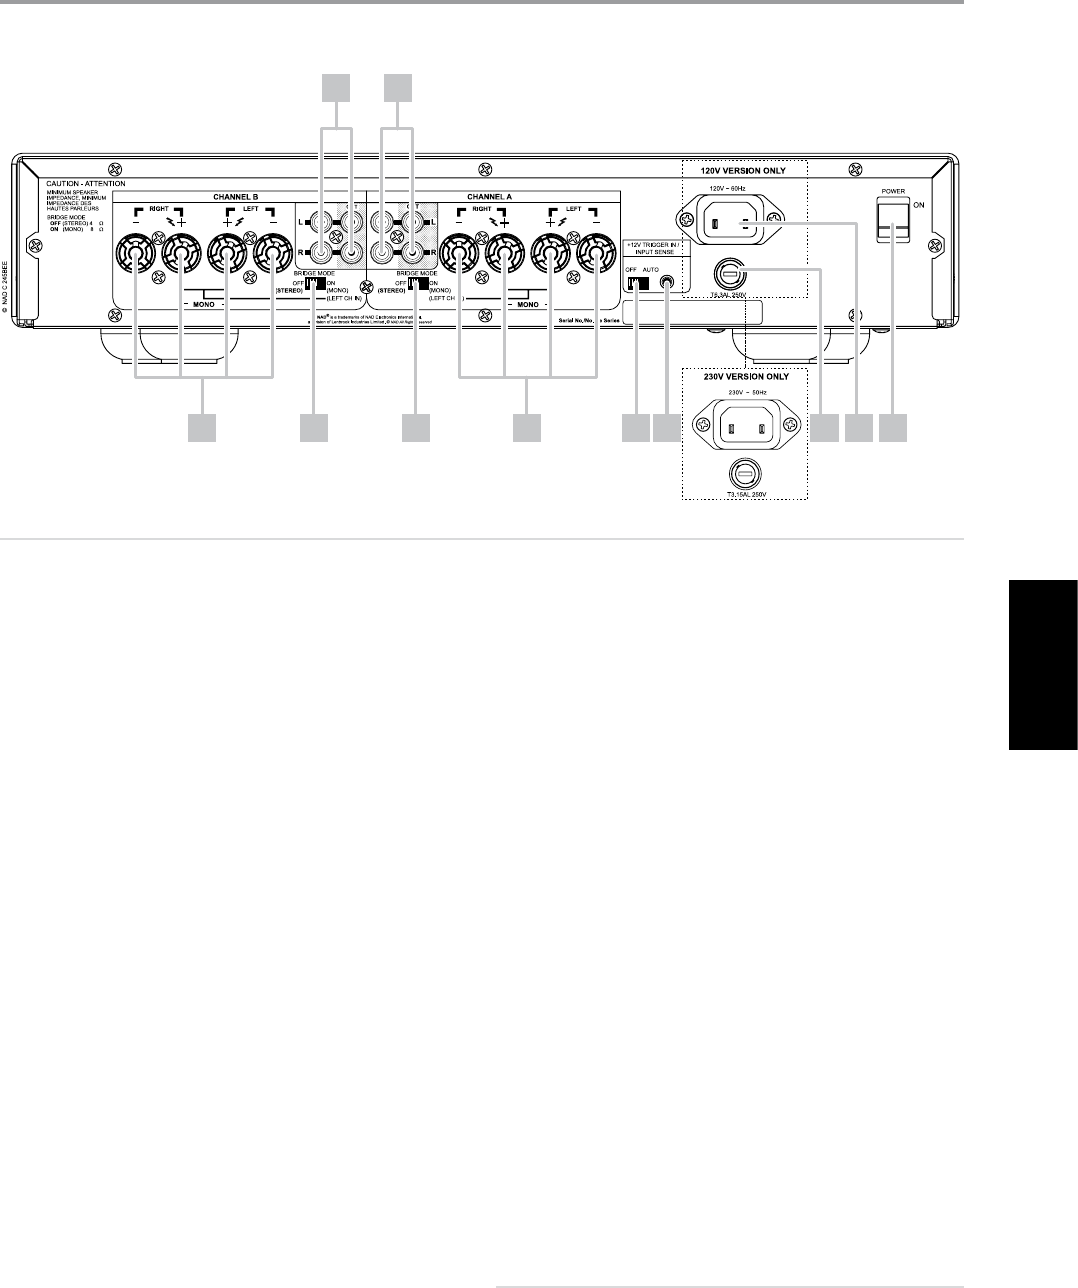
1 CHANNEL B SPEAKERS (ALTOPARLANTI CANALE B - applicabile
solo a CANALE B): collegare l’altoparlanti destro ai terminali CHANNEL
B SPEAKERS marcati “R +” e “R-”, assicurandosi che “R+” sia collegato al
terminale “+” sull’altoparlanti e “R-” al terminale “-”. Collegare i terminali
marcati “L+” e “L-” in pari modo all’altoparlanti sinistro.
Nel Modalità Ponte, collegare l’altoparlanti singolo ai terminali marcati
“R+” ed “L+”, accertandosi che “L+” sia connesso al terminale “+” del Vs.
altoparlanti, con “R+” connesso al terminale “-” dell’altoparlanti.
2 BRIDGE MODE (MODALITÀ PONTE - applicabile solo a
CHANNEL B): impostare l’interruttore BRIDGE MODE sulla posizione
“ON” e collegare l’altoparlanti ai terminali marcati “L +” ed “R +”,
assicurandosi che il terminale “L +” sia allacciato al terminale positivo
“+” dell’altoparlanti, con “R+” allacciato al terminale negativo “-”
dell’altoparlanti. Collegare la sorgente alle prese CHANNEL B IN del
pannello posteriore.
3 CHANNEL B (IN/OUT): collegare l’output dal preamplicatore o dal
processore, quale ad esempio un decodicatore Surround Sound.
Impiegare un doppio cavo RCA-RCA per collegare “Audio Output”
sinistro e destro del preamplicatore o al processore alle prese di
ingresso CHANNEL B del pannello posteriore.
CHANNEL B OUT è un’uscita “loop through” a livello di linea. In
corrispondenza delle prese CHANNEL B OUT è disponibile un segnale
dello stesso livello di quello in ingresso alle prese CHANNEL B IN; in tal
modo è possibile la condivisione o la trasmissione dello stesso segnale
a un altro amplicatore.
Prima di collegare o scollegare qualsiasi apparecchio alle prese
CHANNEL B del pannello posteriore, spegnere sempre C 245BEE e gli
altri componenti del sistema.
4 CHANNEL A (IN/OUT): collegare l’output dal preamplicatore o dal
processore, quale ad esempio un decodicatore Surround Sound.
Impiegare un doppio cavo RCA-RCA per collegare “Audio Output”
sinistro e destro del preamplicatore o al processore alle prese di
ingresso CHANNEL A del pannello posteriore.
CHANNEL A OUT è un’uscita “loop through” a livello di linea. In
corrispondenza delle prese CHANNEL A OUT è disponibile un segnale
dello stesso livello di quello in ingresso alle prese CHANNEL A IN; in tal
modo è possibile la condivisione o la trasmissione dello stesso segnale
a un altro amplicatore.
Prima di collegare o scollegare qualsiasi apparecchio alle prese
CHANNEL A del pannello posteriore, spegnere sempre C 245BEE e gli
altri componenti del sistema.
5 BRIDGE MODE (MODALITÀ PONTE - applicabile solo a CHANNEL A):
C 245BEE può essere impostato su mono (Modalità Ponte), raddoppiando
cosí di gran lunga la sua potenza. In questo modo, C 245BEE può essere
utilizzato quale parte di uno stereo ad alta potenza oppure sistema “teatro
in caso”, collegando amplicatori supplementari.
Nel modo ponticellato, C 245BEE darà circa 70 watt in un altoparlanti
da 8 ohm. In questo modo, le sezione dell’amplicatore reagiscono
come se l’impedenza dell’altoparlanti fosse sta dimezzata. Non si
raccomandano altoparlanti a bassa impedenza (meno di 8 ohm)
quando si impiega il Bridge Mode, poiché possono far sí che entri in
funzione il termodistacco dell’amplicatore se si ascolta ad alti livelli.
Impostare l’interruttore BRIDGE MODE sulla posizione “ON” e collegare
l’altoparlanti ai terminali marcati “L +” ed “R +”, assicurandosi che il
terminale “L +” sia allacciato al terminale positivo “+” dell’altoparlanti,
con “R+” allacciato al terminale negativo “-” dell’altoparlanti. Collegare la
sorgente alle prese CHANNEL A IN del pannello posteriore.
NOTA
Non collegare complessivi alle prese di destra CHANNEL A IN o CHANNEL
B IN quando si è selezionato Modalità Ponte.
IDENTIFICAZIONE DEI COMANDI
PANNELLO POSTERIORE
1256789
34
ATTENZIONE!
Prima di realizzare alcuna connessione, assicurarsi che il C 245BEE sia spento o scollegato dall’alimentazione. Si consiglia inoltre di spegnere o scollegare
dall’alimentazione tutti i componenti associati mentre si eettuano o si interrompono eventuali collegamenti di segnale o di alimentazione CA.
Libble takes abuse of its services very seriously. We're committed to dealing with such abuse according to the laws in your country of residence. When you submit a report, we'll investigate it and take the appropriate action. We'll get back to you only if we require additional details or have more information to share.
Product:
Forumrules
To achieve meaningful questions, we apply the following rules:
First, read the manual;
Check if your question has been asked previously;
Try to ask your question as clearly as possible;
Did you already try to solve the problem? Please mention this;
Is your problem solved by a visitor then let him/her know in this forum;
To give a response to a question or answer, do not use this form but click on the button 'reply to this question';
Your question will be posted here and emailed to our subscribers. Therefore, avoid filling in personal details.
Register
Register getting emails for NAD C 245 BEE at:
new questions and answers
new manuals
You will receive an email to register for one or both of the options.
Get your user manual by e-mail
Enter your email address to receive the manual of NAD C 245 BEE in the language / languages: Italian as an attachment in your email.
The manual is 0,56 mb in size.
You will receive the manual in your email within minutes. If you have not received an email, then probably have entered the wrong email address or your mailbox is too full. In addition, it may be that your ISP may have a maximum size for emails to receive.
If you have not received an email with the manual within fifteen minutes, it may be that you have a entered a wrong email address or that your ISP has set a maximum size to receive email that is smaller than the size of the manual.
The email address you have provided is not correct.
Please check the email address and correct it.
Your question is posted on this page
Would you like to receive an email when new answers and questions are posted? Please enter your email address.