To turn ON/OFF the unit
Press
(2/R1) button to turn on the unit. Press and hold
(2) button or press
(R1) to turn
off the unit.
Note: When the unit is off. Pressing any button except
REL
(14) can turn on the unit.
To open / close the touch screen
Press
OPEN
(1) button or press and hold
OPEN
(R2) button to open or close the touch
screen.
You can adjust the viewing angle of the screen with (R4) button.
To select function mode
- With front panel and remote buttons
* Press the
MODE
(3/R8) button to select RADIO, DISC (After inserting a disc), USB (After
inserting a USB device), CARD (After inserting a MMC or SD card), BT, AV IN (front), or AV
IN1 (rear).
- With the touch screen
* icon on touch screen to display the main menu as shown below.
Then tap the icon to select your desired function mode.
Press
MODE
(3/R8) button repeatedly to select RADIO mode. Tap the top direction icon
to turn to main menu. The icons in the radio interface
have the same function with the buttons
APS
(R26),
BAND
(R3),
EQ
(R2),
LOC
(R9),
LOUD
(R21),
MUTE
(R5),
TA
(R20),
AF
(R20),
ST
(R24) on the remote control. No
PTY button on remote control.
Region Management Information
Region Management Information: This unit is designed and manufactured to respond to the
Region Management Information that is encoded on DVD discs. If the Region number printed
on the DVD disc does not correspond to the Region number of this unit, this unit cannot play
that disc.
The region number of this unit is 2.
BASIC PLAYBACK
1. Press
(2/R1) button to turn on the unit.
2. Press
OPEN
(1) button or press and hold
OPEN
(R2) button to open the touch screen.
3. Insert a DVD disc with label facing up.
4.
bring you to the main menu of the DVD or start playing the DVD. If the unit does not
automatically start playing the DVD, press (7/R18).
Accelerated play
While the disc is playing, press and hold (R16) or (R19) one or more times to vary the
speed and direction of the accelerated play. Press (7/R18) to resume normal playback.
Frame advance (DVD)
1. While the disc is playing press
STEP
(R32) button once.
2. Press
STEP
(R32) a number of times to advance forward image by image.
3. Press (7/R18) to resume normal playback.
Variable slow motion (DVD)
1. While the disc is playing, press
SLOW
(R34) button.
2. Press the
SLOW
(R34) button repeatedly to change slow speed.
3. Press (7/R18) to resume normal playback.
Changing chapter/track
While the disc is playing, press (R16) or (R19) to go immediately to the next or
previous chapter (DVD), or to the next or previous track (CD).
Zoom (DVD)
While a disc is playing, press
ZOOM
(R27) until you reach the zoom size you want. The
button cycles through x2, x3, x4 and then zooms out to x1/2, x1/3, x1/4, then returns to
normal playback.
Playback in Different View-Angle
1. When playing VCD/MP3/WMA/CD sources, the
ANGLE
(R24) button is not available.
2.
ANGLE
(R24) button repeatedly to view in different
angle (This function is only for the DVD media with ANGLE function).
Selecting Band
In radio mode, repeatedly press
BND/BAND
(5/R3) button to select bands in following order:
FM1 FM2 FM3 MW1 MW2.
Manual tuning
Press (R16) or (R19) button to manually search up or down with step by step for your
desired station from the current frequency.
Automatic tuning
Press and hold (R16) or (R19) button to automatically search up or down for an
available station from the current frequency.
APS function
In radio mode
1)
APS
(6/R26) button, the radio searches on the current band
for the strongest signal stations and stores them automatically in memory. It can store up to
18 stations in FM (6x FM1, 6x FM2 and 6x FM3) and 12 in MW (6x MW1 and 6x MW2).
2)
APS
(6/R26) button, the radio plays each preset station for a few
seconds. When completed, it will remain on the 1st memory.
Manual preset
In RADIO mode:
1)
preset buttons
[1-6]
(7-12).
2)
[1-6]
(7-12).
FM Stereo
In FM radio mode, press
ST
(R24) button to turn on/off FM stereo mode.
LOC selector
During radio status, press
LOC
(R23) button to select strong or weak station reception. “LOC”
appears on the display and only local station is available. When "LOC" disappears, both
distance and local stations can be received.
• This function is only valid in FM.
RDS FUNCTION (Radio Data System)
Program type (PTY)
Tap the PTY icon in the Radio interface to pop up the PTY selecting interface, select one of
PTY by tapping the icon or .
After selecting one of the PTY programs, it will display “SEEK PTY” and automatically search
for the station of the PTY program. If the station of the PTY program does not exist, it will
display “PTY NONE” and then return back to the current station.
Alternative Frequency (AF)
When pressing the
AF
of the AF switching mode is displayed by AF segment in display.
Segment off: AF switching mode off.
Segment on: AF switching mode on, and receive RDS information.
Segment ashing: AF switching mode on, but RDS information is not received yet.
When the AF switching mode is selected, the radio checks the signal strength of alternative
frequencies. Every time that a new AF is stronger than the current station, it switches over to
that
RDS station. If AF and TP flash on LCD, it can only search for the traffic announcement
station).
Trafc Announcement (TA)
Press the
TA
(R20) button shortly to turn on TA search mode.
When trafc announcement is transmitted:
1) If the unit is in Disc mode, it will switch to radio mode temporarily.
2) If the unit is in radio mode, it will switch automatically to the trafc announcement.
*
TA
(R20)
button shortly.
*
only when trafc program identication code has been received.
ESP function
The ESP (Electronic Shock Protection) works for all formats of discs.
To do setup
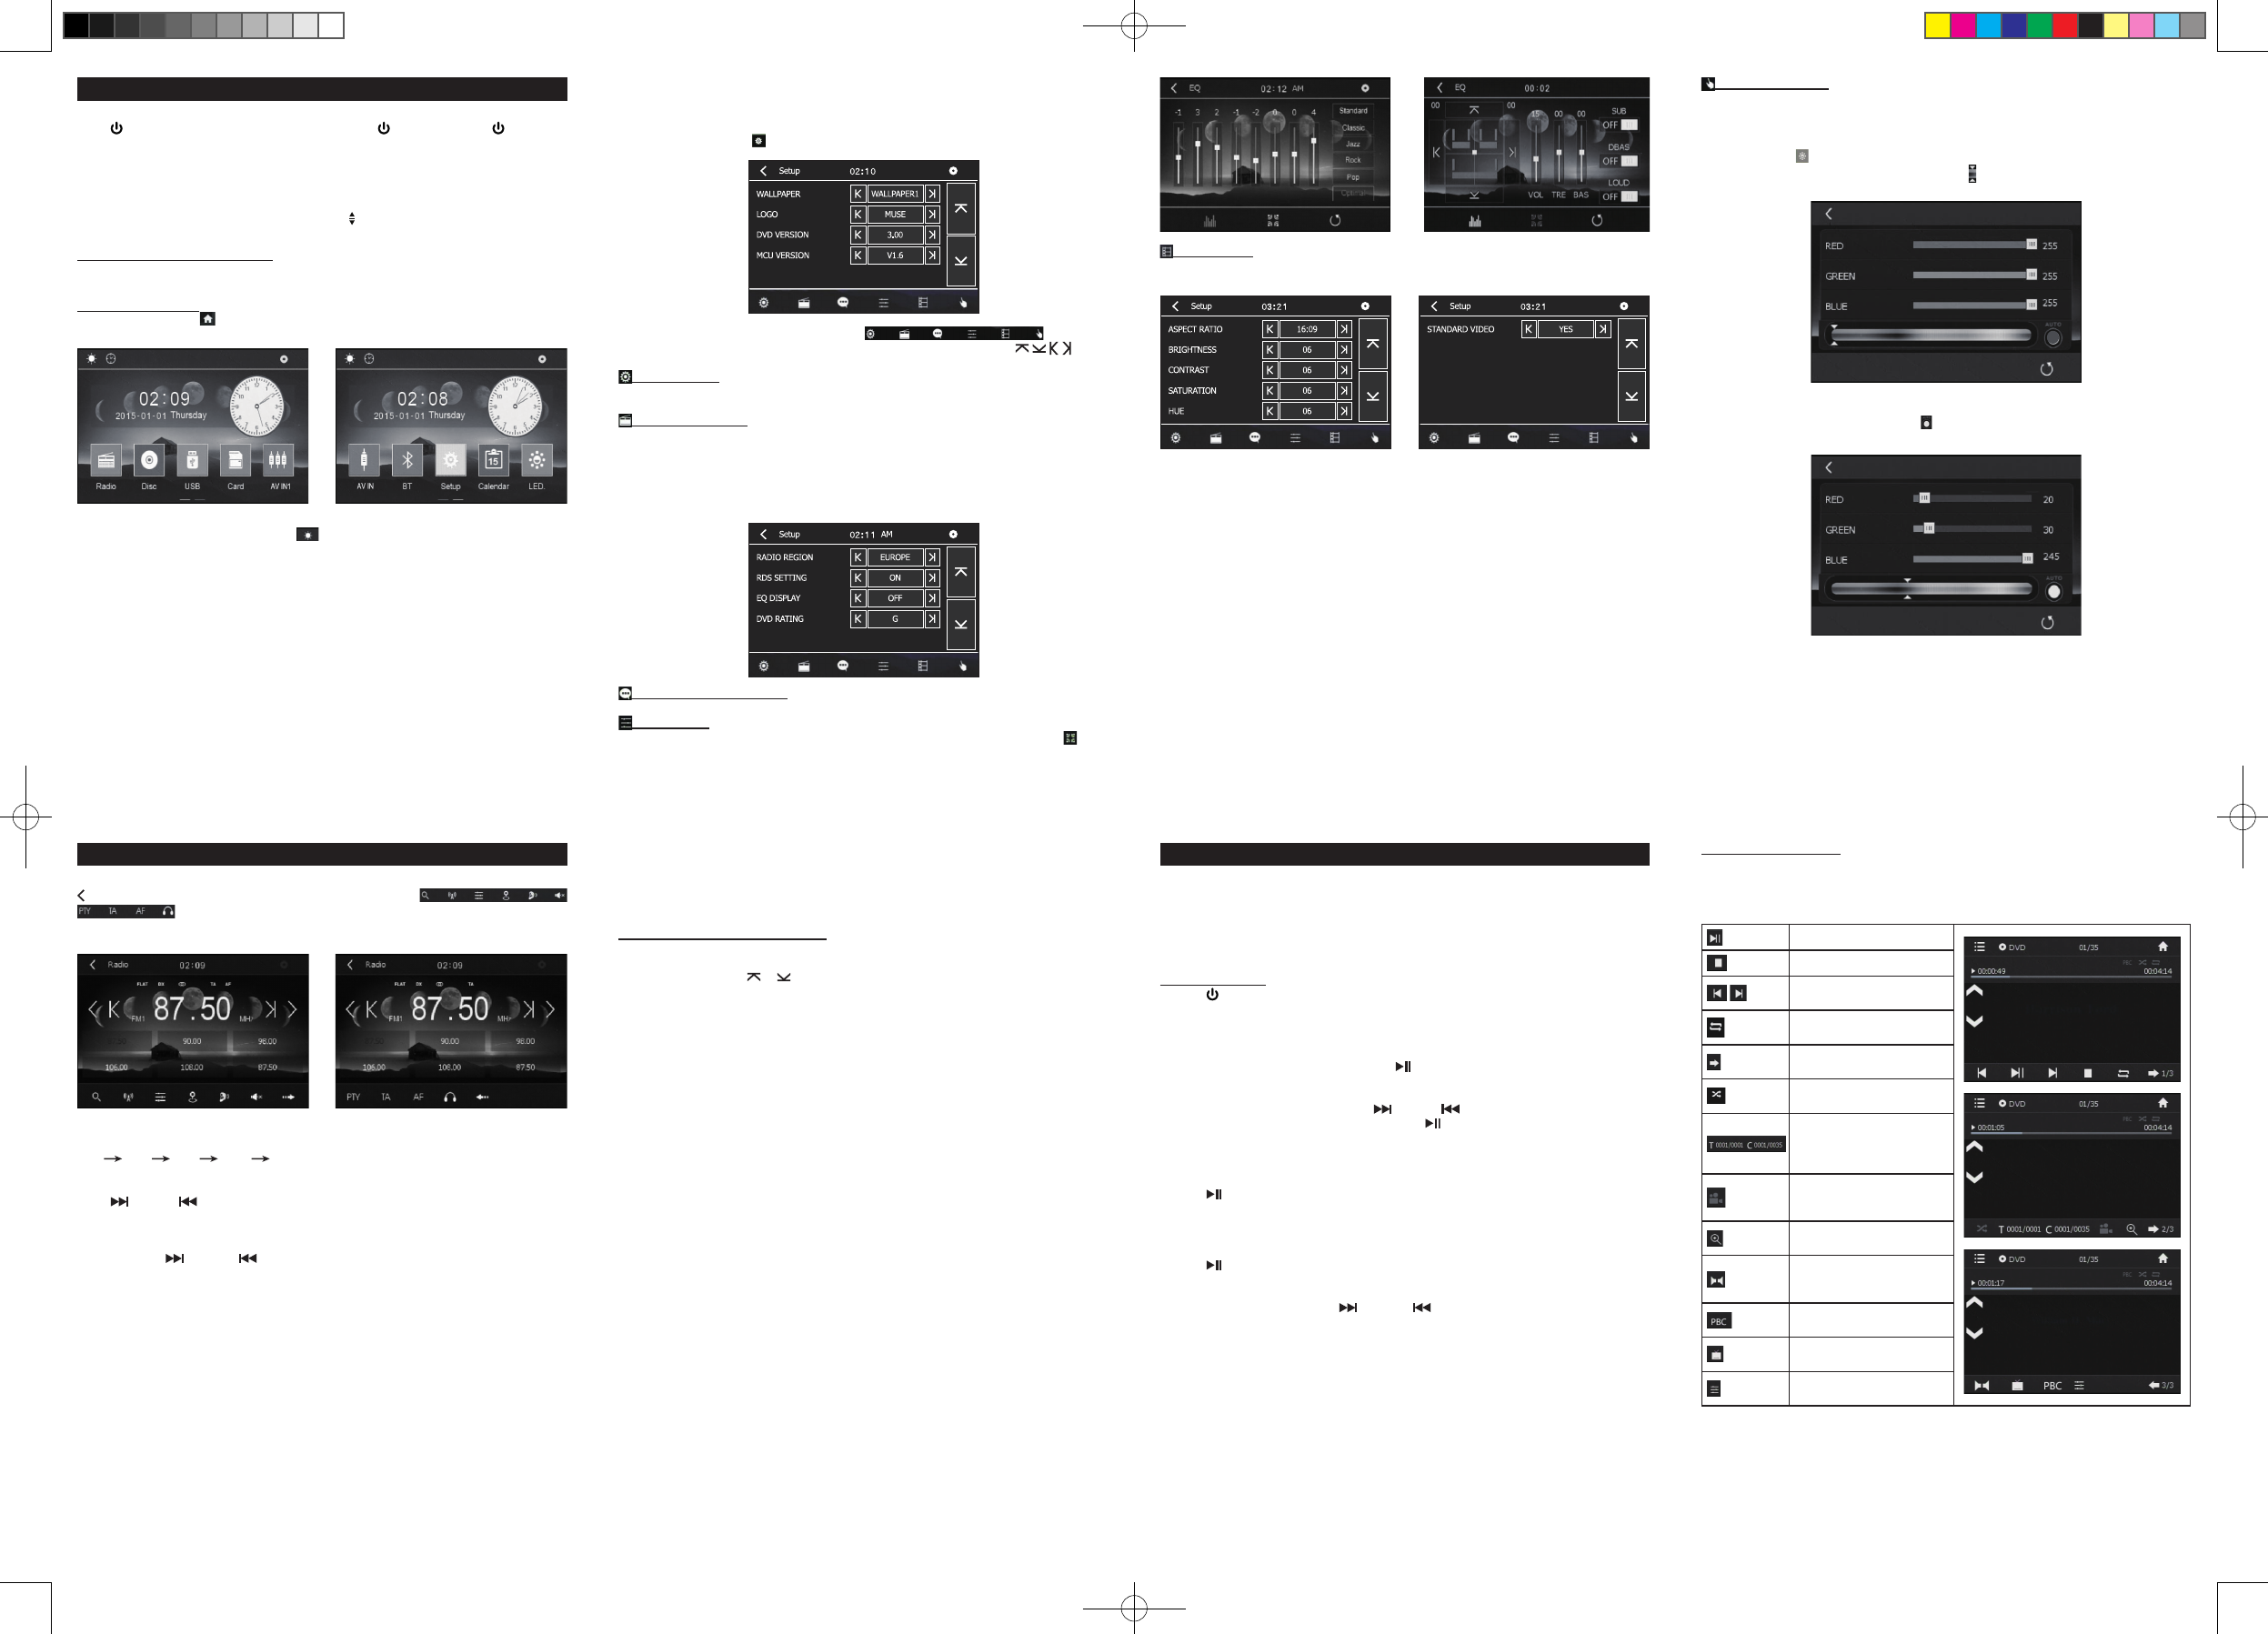
To do setup, tap the icon in the Mode Menu to turn to SETUP interface as below.
To turn on / off the display
In the Mode Menu interface, tap the icon to turn off the display, press any button on the
unit (except
REL
button) or touch the screen to turn it on.
To select a preset EQ mode
Press the
EQ
(R2) button to select the preset music equalizer curves: Standard, Classic,
Jazz, Rock, Pop, Optimal.
To turn on / off LOUDNESS mode
Press the
LOUD
(R21) button to turn on/off LOUDNESS mode. When turning on LOUDNESS
mode, it will enhance bass level immediately when the bass is not enough.
To reset the unit
Operating
Release
RESET
(23) button with a pointed object (such
as a ballpoint pen) to set the unit to initial status.
Not
RESET
(23) button to
resume to normal, and it will erase the clock setting and some memorized functions.
In the interface, select one of the icon to pop up
corresponding setup interface, then set them by tapping the direction icons on the
screen.
General setting
----WALLPAPER: There are three wallpapers for selection.
----Logo: the car logo of opening the unit.
Radio & DVD setting
----Radio region: select the region your desired to listen.
----RDS Setting: Set the RDS function on or off.
----EQ DISPLAY: Set the frequency spectrum on or off.
----
All rating levels of Parental Control are as follows: Kid Safe / G / PG / PG 13 / PG R / R /
NC17 / Adult.
CALIBRATE setting
After enter the mode, then calibrate the TFT display by tapping each center of the moving
cross cursor until back to the setup interface.
To change the color of the LED display in the front panel
Tap the LED icon in the Mode Menu interface to pop up the LED color changing interface.
Custom:
Off the icon AUTO rst, then tap the icon to select your desired color by yourself.
Automatic color change:
Tap the icon to enter into automatic color change mode, t
colors of the LED will be changing automatically.
Custom colors
Automatic color change
VIDEO setting
For adjusting the ASPECT RATIO, BRIGHTNESS, CONTRAST, SATURATION and HUE.
- ASPECT RATIO
4:3 PS (Panscan)
•
that it can be viewed on a conventional screen.
•
played in letterbox mode (black bands top and bottom).
4:3 LB
•
appear at the top and bottom of the screen.
16:09 (Wide screen)
• This is the correct mode for playing wide-screen videos on a wide-screen TV.
Notes:
•
DVD discs may not conform to the picture size you select.
•
appears in the 4:3 aspect ratio regardless of the TV shape setting in the function setup
menu.
- BRIGHTNESS:
To adjust the video brightness level on a scale of 0 to 12.
- CONTRAST:
To adjust the video contrast level on a scale of 0 to 12.
- SATURATION:
To adjust the color saturation level on a scale of 0 to 12.
- HUE:
To adjust the color hue level on a scale of 0 to 12.
Language & Subtitle setting
For adjusting the OSD, DVD MENU, DVD AUDIO, and DVD Subtitle language.
Audio setting
For setting the audio effect: Standard, Classic, Jazz, Rock, Pop, Optimal. Tap the icon to set
the SUB, DBAS, LOUD on or off and adjust the VOL, TRE and BAS.
GB - 8
GB - 12
GB - 9
GB - 13
GB - 10
GB - 14
GB - 11
GB - 15
BASI
LIST DIS
ADVANCED FUNCTIONS
On screen display
While the disc is playing, press
OSD
(R22) button to display the playback information.
Note: icons in playback information interface:
T
T
T
next or previous chapter/track.
Same as the
RPT
button on the
remote control.
T
up and down.
Same as the
RDM
button on
the Remote Control.
In video playback mode, tap
these icons to pop up a Number
Keyboard for inputting T
Chapter number you desire.
T
View-Angle if the DVD has
angle function.
Same as the
ZOOM
button on
the Remote Control.
T
during DVD playback(Depend
on the media used)
Same as the
PBC
button on the
remote control.
Same as the
SUB-T
button on
the remote control.
Same as the
EQ
button on the
Remote Control.
AR-3632A IB MUSE 001 REV0 GB.indd 2 2016/12/2 9:46:32