674781
43
Zoom out
Zoom in
Previous page
1/56
Next page
User Manual
Robot Cleaner
Ver 1.2
ME685 Series
Thank you for purchasing the ME685 series robot cleaner.
Before using the product, please read this User Manual carefully, and keep it for future reference.
Depending on your model, some contents of this User Manual may dier from the actual product.
The contents of this User Manual are subject to change without notice.
Downloaded from www.Manualslib.com manuals search engine
ME685 Series
Robot Cleaner
User Manual
Downloaded from www.Manualslib.com manuals search engine
Features
Mop Cleaning
Utilizing the attachable full sized mop, the mop cleaning mode is optimized for cleaning even
the nest dusts that are harmful to health.
Big Mop with Water Supply System
By Water Supply System, the Big Mop is continuously moistened to clean your hard oors
during the cleaning cycle.
Shadow Cleaning
This is a function that enables you to clean area where the light does not reach. In Shadow
Cleaning mode, you can intensively clean areas under the bed, sofa, etc. that are dicult
to clean with a conventional vacuum cleaner.
High Performance BLDC Motor
The cleaning performance is excellent due to the powerful BLDC (suction) motor. The BLDC
motor is 30% more powerful than a DC motor, and the lifetime is approximately 10 times as
long (estimated: 5,000 hours).
Various Cleaning Modes
The various cleaning modes provide dierent cleaning functions and levels of performance,
which are optimized for the user environment.
Hybrid Cleaning Intensive Cleaning
Mop Cleaning
Manual Cleaning Scheduled CleaningCorner Cleaning
Downloaded from www.Manualslib.com manuals search engine
8.6cm
8.6 cm Slim Design
With a slim design, the MONEUAL ME685 is just 8.6 cm high, enabling it to clean under the bed
and the sofa, where it is dicult to clean with a vacuum cleaner or by hand.
Eco-friendly Lithium Iron Phospate Battery
The MONEUAL ME685 uses an eco-friendly battery that does not contain any heavy metals or
acids that are harmful to the human body. The Lithium Iron Phospate Battery has a lifetime that
is approximately three times longer (1,000 cycles) than standard lithium-based or nickel-based
batteries. It provides higher levels of operational safety due to high resistance to heat and
explosion.
Auto Charging
After it is nished cleaning or when it detects that the battery is low, the robot cleaner auto-
matically returns to the charger and starts charging.
Obstacle Avoidance and Fall Protection
The obstacle detection sensors in the bumper help the MONEUAL ME685 avoid obstacles and
walls, and the cli detection sensors in the bottom detect height dierences and prevent it
from falling down stairs.
Downloaded from www.Manualslib.com manuals search engine
Contents
Before Use
Features
02
Safety Information
05
What’s in the Box
10
Overview
11
Installing
Installing the Charger
14
Installing the Side Brushes
15
Remote Control
16
Charging
17
Installing the Water Supply Big Mop Kit
18
Product
Operation
Before You Start
20
Starting & Stopping Cleaning
21
How to Recharge the Battery
23
Hybrid Cleaning
24
Vacuum Cleaning
25
Mop Cleaning
26
Other Cleaning Modes and Options
28
Maintenance
Language Setting
36
Cleaning the Dust Bin
37
Cleaning the Dust Filter
38
Cleaning Sensors and Wheels
39
Cleaning the Dust Inlet
40
Using and Managing the Battery
41
Voice Guidance
44
Error Message Description
45
Customer
Support
Troubleshooting
47
Specications
48
Product Warranty
51
Downloaded from www.Manualslib.com manuals search engine
5
Before Use
Safety Information
Please read and follow the instructions in this manual to ensure your safety and the safe use of your robot cleaner.
Safety symbols
In this manual, various Warnings, Cautions and Notes are provided to help you to avoid potential hazards that can hurt
you and/or damage your robot vacuum cleaner.
You may be killed or seriously injured
if you do not follow this instruction.
You may be injured or your appliance
may be damaged if you do not follow
this instruction.
You should refer to this
note when using your
robot cleaner.
Warning Caution Note
Before you use

Do not install or use the robot cleaner in a place where it will be exposed to direct sunlight.
Þ
If the power adapter becomes overheated during charging it may cause a re, short circuit, or electrical shock.
Þ
The robot cleaner may become discolored and deformed.

Do not install the charger on an inclined oor, and do not apply impact to the charger.
Þ
The charger may become damaged or broken.

Do not use the product in a room with an unattended child or an elderly person.
Þ
There is a risk that the child or elderly person may become frightened or injured.

This robot cleaner is not intended for use by children, or by persons with reduced physical, sensory or mental capabilities, unless
they have given supervision or instruction concerning the use of the robot cleaner by a person responsible for their safety.
Þ
This may cause injury or damage the robot cleaner.

Before you use the robot cleaner, remove any small objects, clothes, and fragile objects from the oor to be cleaned.
Þ
This may cause damage to the robot cleaner and obstruct the movement of the robot cleaner.
Þ
Make sure to remove fragile objects (glass, china, owerpot, etc.).
Þ
Small cloths, power cords, belts, towels, pads, and telephone cords can become entangled in the wheels or brushes.

Remove obstacles on the oor before cleaning.
Þ
The robot cleaner will not be able to move beyond obstacles of a certain height.
Downloaded from www.Manualslib.com manuals search engine
6
Robot Cleaner

Install the charger in a location that can be easily accessed by the robot cleaner.
Þ
If you install the charger in a corner or if there are many obstacles around the charger, it may prevent the robot cleaner
from automatically charging.

Make sure that the charger is always plugged into a power source.
Þ
If no power is supplied to the charger, you will not be able to use the automatic charge function.
When you use

Do not use the power adaptor with another appliance.
Þ
This may cause damage to the appliance and re by overheating.

Ensure that clothes or any part of the body (hair, nger, foot, etc.) do not get entangled in the brushes or wheels.
Þ
This may cause injury.

Do not use or store the robot cleaner near ammable materials (alcohol, gasoline, kerosene, thinner, etc.) or heating
sources (cigarettes, candles, stove, etc.).
Þ
This may cause re and damage to the robot cleaner.

If you notice smoke or a burning smell coming from the robot cleaner, immediately turn the power switch o and
contact your service center.

Do not stand or sit on the robot cleaner.
Þ
Movement of the robot cleaner may cause injury or the robot cleaner may be damaged.

Do not use the robot cleaner on a narrow high place such as a desk, table, etc.
Þ
The robot cleaner may fall o which could cause injury or damage to the product.

Do not let the robot cleaner pass over or sweep up liquids, oil, pet droppings, etc.
Þ
This may cause malfunction of the robot cleaner and damage.
Þ
Liquid on the wheels may cause stains in other places.
If the robot cleaner sucks a plastic bag in while operating, immediately remove it.
Þ
If you run the robot cleaner for a long time with the dust inlet covered with a plastic bag, the motor will be overheated
and the robot cleaner will be damaged.

Do not press strongly or impact the bumper.
Þ
This may cause damage to bumper sensors and malfunction.
Downloaded from www.Manualslib.com manuals search engine
7
Before Use

Do not use the robot cleaner in a place where the temperature is too low or too high (lower than -5°C and higher than 35°C).
Þ
This may cause damage to the product.

Do not use the robot cleaner when the dust bin is completely lled up.
Þ
This may reduce the suction power.

Never use the robot cleaner without the lters.
Þ
Doing so may cause a malfunction of the robot cleaner.

Remove objects (such as loose clothing, towels, cloths, belts, or hairs) scattered on the oor before cleaning.
Keep objects away from brushes and wheels to prevent entanglement.
Þ
This may cause noise, reduce the suction power, and damage the robot cleaner.

Do not use the robot cleaner in a place where the oor or wall is made of glass or mirrors.
Þ
The robot cleaner detect obstacles by using an IR sensor, so it may not detect glass and mirrors as obstacle.

Do not use the robot cleaner in a utility room, on a wet oor, on stairs, on a table or shelf, in an underground room, in
a warehouse, in a commercial building, or outdoors.

If you have dropped or given an impact to the robot cleaner, contact your service center.
Electrical instructions

Please use the power source and socket with the correct voltage and current.
Þ
If you use a power source or socket that does not t the power specications, there is the risk of re, electrical shock,
and damage to the robot cleaner.

Make sure the power cord is not bent or crushed by heavy objects.
Þ
A damaged power cord may cause re or electrical shock.
Þ
To repair or replace a damaged power cord, contact a qualied service agent to ensure your safety.

When plugging in or removing the power plug, always plug it in or remove it by holding the plug, not the cable.
Þ
Stress on the cable will damage the power cord, which may cause re or electrical shock.

Do not use a damaged power cord! To repair or replace a damaged power cord, contact a qualied service agent to
ensure safety.
Þ
If a non-qualied person repairs the power cord, there is a risk of re or electrical shock.
Downloaded from www.Manualslib.com manuals search engine
8
Robot Cleaner

Do not touch the plug or wall socket with wet hands.
Þ
Doing so may cause electric shock.

If you spill water into the robot cleaner, unplug the power cord and allow the unit to dry completely before use.
Þ
Water can bring the risk of re and electrical shock.
Þ
Immediately remove the power cord from the outlet and contact your service center.

Do not use chargers other than the charger that came with your robot cleaner.
Þ
Overvoltage brings the risk of re and electrical shock.

Do not install the charger in a location that is damp or wet, dusty, or near water.
Þ
This may cause a re or an electrical shock and damage to the unit.

Do not touch the terminal of the charger with any metallic object (such as a clip, pin, etc.).
Þ
This creates the risk of re and electrical shock.

If you do not plan to use the robot cleaner for an extended period of time, turn o the power switch at the bottom of
the back.
Þ
The battery may be discharged if you leave it switched on.
Management

To ensure safety, only a qualied service agent should repair or disassemble the product.
Þ
Repair by unqualied personnel may damage the robot cleaner, and brings the risk of re and electrical shock.

Dispose of the battery properly.
Þ
If you throw the battery into re or expose it to direct sunlight, there is the risk of re and explosion.
Þ
Dispose of your old batteries according to the local laws and regulations of your region.

Clean the obstacle and bottom sensors periodically.
Þ
If the sensor becomes covered by lint and dust, the robot cleaner may malfunction.

Please use the specied lter.
Þ
Use of a dierent lter will void your warranty.
Downloaded from www.Manualslib.com manuals search engine
9
Before Use

Please clean the robot cleaner after turning it o.
Þ
If you clean it when the power is on or it is operating, it may cause injury.

Clean the main brush, dust bin, dust lter, and dust inlet periodically.
Þ
If you use the robot cleaner for a long time without cleaning it, there is the risk of malfunction and damage.
Copyright and instructions
Þ
Copyright © 2014 MONEUAL Inc. All rights reserved.
Þ
Published March 5, 2014.
Þ
MONEUAL, MONCASO, MiNEW, RYDIS, and SONAMU are the trademarks or registered trademarks of MONEUAL Inc.
in the Republic of Korea and/or other countries.
Þ
This publication is protected by copyright and all rights are reserved. No part of it may be reproduced or transmitted by
any means or in any form, without the prior written consent of MONEUAL.
Þ
Depending on the model and type of your appliance, some of the contents in this manual may dier from your actual
product.
Þ
MONEUAL Inc. assumes no responsibility for technical or editorial errors or omissions contained herein, nor for any
incidental or consequential damages and failures of the appliance caused by not following the precautions and
instructions.
Þ
MONEUAL Inc. assumes no responsibility for damages resulting from the use of the product that is not approved by
the company.
Downloaded from www.Manualslib.com manuals search engine
10
Robot Cleaner
Whats in the Box
Robot cleaner
(1400mA built-in battery)
Charger Remote control
(included two AAA
batteries)
Power cordPower adaptor
Side brushes (1 set) User manual Quick start guideCleaning brush
Ver 1.0
Robot Cleaner
Quick Start Guide
ME685 Series
Ě
The appearance and specications may be changed without notice in order to improve functions or
performance.
Mop kits
Water Supply Big Mop Kit
1. Water Supply mop plate
for a big mop
2. Big mop
3. Mop cleaning brush
Downloaded from www.Manualslib.com manuals search engine
11
Before Use
Overview
Robot cleaner
ǘ
Top
ǘ
ǘ
Rear
ǘ
ǘ
Bottom
ǘ
2
3
4
8
7
6
5
10
11
9
11
15
9
12
13
11
14
9
12
1
Control buttons and indicators
2
Dust bin cover
3
Bumper
4

Obstacle and signal detection
sensors
5
Air outlet
6
Adaptor jack
7
Power switch
8
Signal receiving sensor
9
Cli detection sensors
10
Charging terminals
11
Wheels
12
Side brush installation pins
13
Dust inlet
14
Main brush
15
Mop plate installation holes
1
Downloaded from www.Manualslib.com manuals search engine
12
Robot Cleaner
Control buttons and indicators
1
Power/charging lamp
2

Guide signal transmission sensor
3
Charging terminals
4
Adaptor holder
5
Adaptor jack
6

Sensors signal distance
selection switch
Charger
ǘ
Front
ǘǘ
Back
ǘ
5
6
4
2
3
1
1
Start/stop button
2
Power button
3
Cleaning mode selection button
4
Vacuum Cleaning mode indicator
5
Charging mode indicator
6
Shadow cleaning mode indicator
7
Intensive Cleaning mode indicator
8
Hybrid Cleaning mode indicator
9
Mop cleaning mode indicator
10
Timer (every day) indicator
11
Timer (1 hour) indicator
12
Double Cleaning option indicator
13
Threshold option indicator
14
Battery level indicator
15
Turbo mode indicator
6
7
5
12
14
15
13
21 3
4
11
910 8
Downloaded from www.Manualslib.com manuals search engine
13
Before Use
1

Power button
Þ

Press to turn the power on/o.
Þ

Press to return the robot cleaner to operation mode when it has stopped due to
failure.
2
Mode button
Þ

Press to select the cleaning mode.
3
Start/Stop button
Þ

Press to start the selected operation.
Þ

Press to start/stop cleaning and driving.
4

Select/Manual button
Þ
Press to conrm your selection.
Þ

Press to start manual cleaning (see page 32).
5

Direction buttons
Þ
Press to drive the robot cleaner in manual mode
(forward, backward, left, and right).
6
Charge button
Þ

Press to move robot cleaner to charger.
7
Mop cleaning button
Þ

Press to start mop cleaning (see page 26).
8
Corner cleaning button
Þ
Press to start corner cleaning (see page 31).
9
Turbo button
Þ
Press to select Turbo option (see page 34).
10

Shadow cleaning button
Þ
Press to start under furniture cleaning (see page 30).
11
Double cleaning button
Þ
Press to select Double cleaning option (see page 35).
12
Reservation button
Þ

Press to set the timer (see page 33).
13
Mute button
Þ

Press to turn voice guidance on/o.
14
Threshold option button
Þ

Press to select Threshold option (see page 34).
Remote control
You can conveniently access the various functions of the robot cleaner with your remote control.
Þ

Functions that can be controlled through the control panel on the robot cleaner: Hybrid cleaning, Vacuum cleaning,
Mop cleaning, Intensive cleaning, Shadow cleaning, and Charging.
Þ

Functions that can be controlled through the remote control: Hybrid cleaning, Vacuum cleaning, Mop cleaning,
Intensive cleaning, Shadow cleaning, Corner cleaning, Manual cleaning, Charging, Reservation cleaning, Turbo option,
Threshold option, Double cleaning option, Mute, and Manual moving.
2
6
9
12
13
1
3
5
8
7
11
14
10
4
Downloaded from www.Manualslib.com manuals search engine
14
Robot Cleaner
Installing the Charger
2
1
Þ
Connect the power adaptor.
Þ

Set the robot cleaner detection distance (5 m or 8 m).
Þ

Place the power adaptor in the holder of the charger.
Þ
Check the power connection (blue lamp).
3
Þ

Check the location of the charger.

Clear all obstacles in the area within 1 m
in front, left, and right of the charger
Ě
If you install the robot cleaner in a place where it will be exposed to direct sunlight, the heat of the sun may
interfere with the auto charging, and the robot cleaner may become discolored over time.
Ě
If your robot cleaner can’t return to the charger, reset the detection distance.
In a narrow area, set it to 5 m, and in a wide area, set it to 8 m.
If you set the detection distance to 8 m in a narrow area, the auto charging may be interfered with.
Downloaded from www.Manualslib.com manuals search engine
15
Installing
Installing the Side Brushes
Þ

Check for the L mark
under the side brush.
Þ

Align with the L mark under the
robot cleaner and install the
L brush.
Þ

Check for the R mark
under the side brush.
Þ

Align with the R mark under the
robot cleaner and install the
R brush.
Downloaded from www.Manualslib.com manuals search engine
16
Robot Cleaner
Remote Control
Install the battery into the remote control.
Inserting batteries into the remote control
1
Þ
Remove the battery cover.
2
Þ
Insert the two AAA batteries that came with your robot cleaner.
Ě
Make sure to properly orient the + and – poles of the batteries when inserting the battery.
Ě
If you insert batteries incorrectly, there is a risk of re or damage to the remote control.
Be careful if you use non-standard 1.5V batteries, as this may cause damage to the product and its function.
If your battery has had a leakage, immediately replace it.
Dispose of batteries according to the local laws and regulations of your region.
3
Þ
Replace the battery cover.
Downloaded from www.Manualslib.com manuals search engine
17
Installing
Charging
If you have prepared the charger, main body, and remote control, you must then charge the battery of the robot
cleaner to use it. To charge the robot cleaner, follow these steps:
1
Þ
Turn the power switch on.
2
Þ
Hold the robot cleaner with both hands and put it on the charger.

Match the terminals of the robot cleaner with the terminals of the charger.

Put the robot cleaner in the front center of the charger and push the robot
cleaner toward the charger slowly until the status indicator turns red.
3
Þ
Use the robot cleaner after charging.

It takes about 1 hour to charge the battery fully.
(For 2800mAh battery models, it takes about 2 hours.)

After charging for 1 hour, you can use the robot cleaner in normal
suction mode for about 1 hour. (Depending on conditions,
the battery usage time may vary.)
Battery status indicator
Charging Blinking every second
Charging completed On
Low battery Blinking 4 times every second
Ě
You can charge the robot cleaner using connecting the power
adaptor directly to the power jack on the lower-rear side of
the robot cleaner.
Downloaded from www.Manualslib.com manuals search engine
18
Robot Cleaner
Installing the Water Supply Big Mop Kit
1
Þ
Supply water into the mop plate and attach
the mop to it.
2
Þ
Turn the power switch o
(on the lower rear side of the
robot cleaner).
3
Þ

Attach the mop plate.
Fit the joint parts well to the holes of
the robot cleaner.
󰦚
Ě
If you apply excessive force to the
mop plate when you install it on the
robot cleaner, the joint parts of the
mop plate may be damaged.
󰦚 󰦚
4
Þ

Flip it over and turn the system power switch on.
󰦚
Downloaded from www.Manualslib.com manuals search engine
19
Installing
Ě
After cleaning, remove the mop plate from the robot cleaner and the mop from the mop plate.
Ě
Remove water in the mop plate and let the cover open to dry the mop plate.
Ě
Wash and dry the mop for the next use.
Ě
You may use the included cleaning brush for cleaning the mop more thoroughly.
Downloaded from www.Manualslib.com manuals search engine
20
Robot Cleaner
Before You Start
Check the following before you start the robot cleaner.
1
Be careful not to break the robot cleaner when you pull the robot cleaner out of the box.
For information of installing the robot cleaner, see page 14.
2
Check the location (L/R) of the brushes and install them.
For information on installing the brushes, see page 15.
3
Pull the robot cleaner out and manually charge it rst.
When you start the robot cleaner for the rst time, it may not work, as the battery has probably been
discharged. For information on manual charging, see page 17.
4
Remove any obstacles on the oor.
Remove small objects, clothes, and fragile objects from the oor before cleaning. Fold up lengthy carpet/rug
tassels or keep the robot cleaner away from them.
5
If the dust bin is full, the cleaning performance will be reduced. Emptying the dust bin frequently is highly
recommended.
For information on cleaning the dust bin, see page 37.
6
If there is anything on cli detection sensors or wheels, remove it.
This may cause failure or malfunction of the robot cleaner. For information on cleaning cli detection sensors and
wheels, see page 39.
7
Children and seniors may be surprised at the sight of the robot cleaner in operation.
Please let children and seniors know about the operation of the robot cleaner.
8
Be careful not to drop the robot cleaner from a high place.
Do not use the robot cleaner on a narrow and a high place such as a desk, table, etc. If shoes are placed side by side
at the entrance to the living room, the robot cleaner may recognize them as the oor, which may cause falling.
9
The robot cleaner cannot climb over a threshold higher than 1cm.
10
After charging is complete, keep the robot cleaner docked in the charger, or turn the power switch o which
is located on the lower rear side of the robot cleaner.
Downloaded from www.Manualslib.com manuals search engine
21
Product Operation
Starting cleaning
Stopping cleaning
After cleaning, the robot cleaner returns to the
charger or stops on the spot according to the
cleaning mode.
If you press the Start/stop (
Ħ
) button when
the robot cleaner is operating, the cleaning will
be stopped.
or
2
or
3
4
Þ
If you are cleaning an area that is dicult to clean using auto cleaning mode, change to the proper cleaning mode.
󰦚
Starting & Stopping Cleaning
1
Þ
Turn the power switch on.
or
Downloaded from www.Manualslib.com manuals search engine
22
Robot Cleaner
Changing the cleaning mode
User can set the cleaning mode to match the cleaning environment.
Þ
Cleaning modes that you can select using the Mode (M) button on the robot cleaner:
Þ
Cleaning modes that you can select using the remote control:
Hybrid
Cleaning
Hybrid
Cleaning
Vacuum
Cleaning
Vacuum
Cleaning
Shadow
Cleaning
Shadow
Cleaning
Mop
Cleaning
Mop
Cleaning
Ě
You can’t change the cleaning mode during operation. Select the cleaning mode before starting the robot
cleaner, or select it after stopping the robot cleaner by pressing the Start/stop (
Ě
Ħ
) button on the robot
cleaner or the remote control, then selecting the cleaning mode.
Corner
Cleaning
Manual
Cleaning
Scheduled
Cleaning
Intensive
Cleaning
Intensive
Cleaning
Downloaded from www.Manualslib.com manuals search engine
23
Product Operation
Auto charging
Þ
When the robot cleaner has nished cleaning, it returns to the charger.
Þ
If the battery is low and the battery indicator is blinking rapidly,
the robot cleaner will stop cleaning and return to the charger to charge.
Manual charging
Þ
Hold the robot cleaner with both hands and put it on the charger.
Þ
Match the terminals of the robot cleaner with the terminals of the charger.
Þ
Put the robot cleaner in the front center of the charger and push the
robot cleaner toward the charger slowly until the status indicator
turns to red.
Battery status indicator
Þ
You can check the battery status by the battery status indicator.
Þ
It takes about 1 hour to charge the battery fully.
(For 2800mAh battery models, it takes about
2 hours.)
Þ

After charging for 1 hour, you can use the
robot cleaner in normal suction mode for about
1 hour. (Depending on conditions, the battery usage
time may vary.)
Battery status indicator Battery status
Blinking 4 times every second
Need to charge
Low
Middle
High or fully charged
Blinking 1 time every second
Charging
How to Recharge the Battery
Ě
You can charge the robot cleaner using connecting the power
adaptor directly to the power jack on the lower-rear side
of the robot cleaner.
Downloaded from www.Manualslib.com manuals search engine
24
Robot Cleaner
Hybrid Cleaning
In Hybrid Cleaning, the robot cleaner performs the Vacuum Cleaning and Mop Cleaning at the same time.
Hybrid Cleaning oers a comprehensive oor care solution because of the use of the twin side brushes, the main brush,
the BLDC suction, and the reusable microber Big Mop with the Water Supply System all together. The Hybrid Cleaning is
recommended for comprehensive cleaning on your hard oors.
or
1
Þ

Follow the directions on page 18 to attach the Big Mop
with the Water Supply Tank.
4
Ě
While in Hybrid Cleaning mode, you can also select
Double Cleaning Option and Threshold (climb over) Option.
Ě
To select these options, please refer to the pages that
reference each.
Ě
Please do not use Hybrid cleaning mode on the carpet or rug because the carpet or rug can be damaged by
the Hybrid cleaning mode. Use Hybrid cleaning mode only on the hard oor.
2
Þ

Turn the main power button on.
󰦚 󰦚
1
2
3
󰦚
󰦚󰦚
or
Downloaded from www.Manualslib.com manuals search engine
25
Product Operation
3
Vacuum Cleaning
Vacuum cleaning is used where the needs are vacuum suction only without mop cleaning. It can be used on hard oor or
carpet.
Ě
While in Vacuum Cleaning mode, you can also select Turbo Option, Double Cleaning Option and Threshold
(climb over) Option. To select these options, please refer to the pages that reference each.
21
Þ

Turn the system power switch on.
4
Þ

Turn the main power button on.
or
󰦚
󰦚󰦚
or
Downloaded from www.Manualslib.com manuals search engine
26
Robot Cleaner
Mop Cleaning
Mop Cleaning mode is used for when you need mopping only without vacuuming.
Ě
While in Mop Cleaning mode, you can also select Turbo Option, Double Cleaning Option and Threshold
(climb over) Option. To select these please refer to the pages that reference each.
Ě
If Mop cleaning mode is used on carpet or rug, the carpet or rug can be damaged. Therefore, please use the
Mop cleaning mode only on hard oor.
Ě
For Big Mop with Water Supply System, we recommend moistening the Big Mop before attaching it for longer
wet cleaning performance.
or
2
4
1
Þ

Follow the directions on page 18 to attach the Big Mop
with the Water Supply Tank.
󰦚
or
Þ

Turn the main power button on.
󰦚 󰦚
1
2
3
Downloaded from www.Manualslib.com manuals search engine
27
Product Operation
Selecting the mop cleaning mode
You can select the mop cleaning mode by pressing the Mode (M) button when it is cleaning in mop cleaning mode.
The mode will be changed as follows:
󰦚󰦚󰦚
Wave mode Wave mode
Zigzag mode Zigzag mode
or
Downloaded from www.Manualslib.com manuals search engine
28
Robot Cleaner
Other Cleaning Modes and Options
Cleaning Mode
Function For Where How to Select
Intensive
Clean in 1m x 1m area where
the robot cleaner located.
Heavy Dust
Particles or Heavy
Trac Area
Select Intensive with the Mode
button on the Control Panel or press
the Intensive button on the remote
control
Shadow
Clean in the hard to reach
areas
Under a bed or
furniture
Select Shadow with the Mode
button on the Control Panel or
press the Shadow button on the
remote control
Corner
The robot cleaner runs along
the walls of the current place
where it is.
Anywhere you
want to go
Press Corner cleaning button on
the remote control.
Manual
Control the robot vacuum
cleaner directly using the
remote control
Anywhere you
want to go
Press the Manual button on the
remote control and press the Arrow
button where you want to go
Reservation
Start cleaning after 1 hour or
at the same time every day
Anywhere you
want to go
Press the Reservation button and
press the Select button on the
remote control
Option Function Applicable cleaning mode How to Select
Turbo
Start cleaning with turbo
suction power
Except Hybrid cleaning and
Mop cleaning modes, other
cleaning modes.
Press the Turbo
button on the
remote control
Threshold
Set to be able to climb over a
threshold lower than 0.4 inch
(1 cm)
Except Manual cleaning mode,
other cleaning modes.
Press the Threshold
button on the
remote control
1 cm1 cm
Double
cleaning
Performs 2 cleaning sessions of
the selected cleaning mode.
Except Manual cleaning and
Scheduled cleaning modes,
other cleaning modes.
Press the Double
CL button on the
remote control
Downloaded from www.Manualslib.com manuals search engine
29
Product Operation
Intensive Cleaning
The robot cleaner intensively cleans the surrounding area relative to its current location.
Ě
In Intensive cleaning mode, the robot cleaner stops on the spot after it has nished the cleaning.
Ě
In the area in which there are many obstacles, the robot cleaner may not operate in normal cleaning modes.
21
Þ
Turn the power switch on.
4
3
󰦚
󰦚󰦚
or
or
Downloaded from www.Manualslib.com manuals search engine
30
Robot Cleaner
Shadow Cleaning
You can clean under your bed or furniture.
5
Ě
To use shadow cleaning mode, turn the room light on. In a dark room, the robot cleaner can’t detect the
space under the bed or furniture.
Ě
The robot cleaner moves to a place under the bed or furniture to start shadow cleaning. To reduce the time
spent moving through the room, put the robot cleaner in front of the bed or furniture under which you want to
perform shadow cleaning.
Ě
When shadow cleaning is completed, the robot cleaner
comes out under a furniture and stops.
4
󰦚
or
3
or
1
Þ
Turn the power switch on.
2
Þ

Put the robot cleaner in front of
a bed or furniture.
Downloaded from www.Manualslib.com manuals search engine
31
Product Operation
Corner Cleaning
The robot cleaner runs along the walls of the current place where it is.
If the robot cleaner takes a turn around the walls or detects the signal of the charger twice, it will nish cleaning.
Ě
If the robot cleaner nishes cleaning, it will return to the charger.
3 4
2
or
1
Þ
Turn the power switch on.
Downloaded from www.Manualslib.com manuals search engine
32
Robot Cleaner
Manual Cleaning
You can control the robot cleaner directly using the remote control.
1
Þ

Stop the robot cleaner that is operating by pressing the
Start/stop (
Ě
Ħ
) button.
2
Þ
Press the MANUAL button on the remote control.

Air suction will start in its current place.

If you press the MANUAL button again, air suction will be
stopped.
3
Þ
By pressing direction keys on the remote control, you can
move the robot cleaner where you want it to go.
Ě
During charging, you can’t move the robot cleaner manually.
Ě
You can use this mode when you want to move the robot cleaner without air suction.
or
Downloaded from www.Manualslib.com manuals search engine
33
Product Operation
Scheduled Cleaning (Reservation Cleaning)
For daily ecient hands free cleaning, the robot cleaner provides 2 Reservation Cleaning Modes. One starts cleaning after
1 hour from the time you set it and the other starts at the same time everyday.
3
Þ

Press the Reservation Mode
either 1 hour or Daily by
pressing the RESERVATION
button on the remote control.
5
Þ

The robot cleaner will be cleaning at the time
of your Reservation setting.
Ě
Reservation Cleaning only works from the charging station after you set the Reservation Cleaning.
You must put the robot cleaner on the charging station to begin at the scheduled time.
Ě
You can only set the Reservation Cleaning mode using your remote control.
Ě
If the robot cleaner is charging at the scheduled time, it will start the cleaning after nishing the charging.
Ě
If the cleaning time is scheduled to ˄1 hour˅, your setting will be cleared after completing the ˄1 hour˅
scheduled cleaning.
1
Þ

Turn the system power switch on.
2
Þ

Turn the main power button on.
4
Þ

Press the SELECT button
to conrm the Reservation
setting.
or
Downloaded from www.Manualslib.com manuals search engine
34
Robot Cleaner
Turbo Option
While you are using the Hybrid / Vacuum / Intensive / Shadow / Manual Cleaning, by pressing Turbo option on the remote
controller you can control Vacuum power.
For less than a 1cm threshold height, the user is able to choose threshold climbing over ON/OFF option by the remote
control.
or
󰦚
Power o
Threshold Option
2
1
3
or
󰦚
Climbing over Threshold Not climbing over Threshold
3
2
1
Ě
Turbo option is not available in Hybrid Cleaning mode and Mop Cleaning mode.
Ě
We recommend not to climb over while in Mop Cleaning mode and Hybrid Cleaning mode due to the Big Mop
with the Water Supply System. We also recommend that you select the Threshold Option (climb over) ON while
in Vacuum Cleaning mode. Factory default is set to not climb over for Hybrid, Vacuum and Mop Cleaning mode.
Power on
Power on Power o
Downloaded from www.Manualslib.com manuals search engine
35
Product Operation
Double Cleaning Option
The Double Cleaning Option performs 2 cleaning sessions of a selected cleaning mode.
Press the Double CL button on the remote control to choose a Double Cleaning option.
󰦚
Ě
Double Cleaning Option is not available in Manual Cleaning mode and Scheduled Cleaning mode.
Downloaded from www.Manualslib.com manuals search engine
36
Robot Cleaner
Language Setting
1 2
Turn the power switch o.
4
After hearing the language you
desire, press the power button to
complete the language setting.
Whenever you press the Start/Stop button,
you will hear the following sentence as a
different language.
-
ˈ
Starting automatic cleaning.
ˉ
-
ˈ
Cleaning is canceled.
ˉ
3
Keep pressing the Start/Stop button until you have
reached the language you desire.
Ě
You can select a language for voice guidance from the ones available in the system.
First, turn the power switch on.
Then press and hold the Mode
button for 2~3 seconds
until the display appears
with a beep sound.
Ě
Depending on the model, supported languages may vary.
Language English German French Russian Italian Spanish
No.123456
Downloaded from www.Manualslib.com manuals search engine
37
Maintenance
Cleaning the Dust Bin
1 2
Remove the dust bin cover.
7
Remove the dust bin.
Replace the dust lter.
Replace the dust bin in the robot cleaner.
Ě

Make sure to follow the directions
carefully when installing the dust bin.
5 6
Replace the dust bin cover.
Click
Empty the dust bin.
3 4
Remove the dust lter.
󰦚
Ě
To clean the dust lter and determine its lifetime,
see page 38.
Downloaded from www.Manualslib.com manuals search engine
38
Robot Cleaner
Cleaning the Dust Filter
1
2 3
Clean the dust lter.
(Remove dust from each of the four
lters by blowing.)
󰦚
Remove the dust lter.
Ě
The dust lter can be easily cleaned by gently scraping o the surface or compressed air.
The dust lter is reusable.
It is recommended not to clean with water.
Ě
We recommend that you clean the dust lter whenever the bin is more than 2/3 full.
If you do not clean the dust lter, the suction power of the robot cleaner can be reduced.
Ě
Replace the dust lter if you notice a tear or a hole.

The lifetime of a dust lter is about 3 months for normal use, but may vary depending on the frequency and
operating environment.
Ě
Applying excessive force will damage the dust lter cover while disassembling the dust lter.
Ě
If you assemble the lter incorrectly, the performance may be degraded or the suction power may be reduced.
Assemble the dust lter .
(Assemble four lters as described above)
Filter cover

󰦞
Filter case
󰦞
Pre lter
1
󰦞
Fine mesh lter
2
󰦞
Main lter
3
󰦞
Mesh lter
4
󰦞
Downloaded from www.Manualslib.com manuals search engine
39
Maintenance
Cleaning Sensors and Wheels
Cleaning sensors
Þ

Clean (blow or wipe) the three sensors with the included clean-
ing brush or a cotton swab.

If sensors are severely contaminated, wipe with a moistened
cotton swab.

Do not wipe directly with water, and do not use benzene or
alcohol to clean sensors.
Cleaning wheels
Þ

Clean wheels using the brush.

To clean the front wheel, remove the screws and remove the wheel, and clean it with the brush.
To clean the two main wheels, clean them with the brush while rotating slightly by hand.
Remove foreign objects such as hair that obstruct the wheel’s operation.
Downloaded from www.Manualslib.com manuals search engine
40
Robot Cleaner
Cleaning the Dust Inlet
1
To reinstall the dust inlet cover, insert the 2 tips to the
matching holes on the robot cleaner.
5
3
2
Clean the removed main brush
with the cleaning brush.
Remove the main brush.
Remove the dust inlet cover.
4
Check the groove’s shape and
insert the main brush into the
xing hole, and then secure
the wing of the xing pin to
the xing pin.
󰦚
󰦚
Downloaded from www.Manualslib.com manuals search engine
41
Maintenance
Using and Managing the Battery
Battery lifetime
Þ

We guarantee 6 months of use in a normal environment.
Þ

Always charge the battery for the best use experience.
Þ

The battery lifetime may vary depending on the use environment.
Charging battery
Þ

If you are using the robot cleaner for the rst time, please fully charge the battery rst.
Þ
It takes about 1 hour to charge the battery fully. (For 2800mAh battery models, it takes about 2 hours.)
The battery is a consumable item. The more you use the battery, the shorter the batterys lifetime.
To extend battery life
Þ

If you don’t intend to use the robot cleaner for an extended period of time, turn o the power switch after charging the
battery fully.
Þ

Clean the dust inlet, dust bin, main brush, and side brushes frequently. If you use the robot cleaner with the dust bin full,
the rotation of the internal motor will be increased, which may shorten the battery lifetime.
Þ

Always use the robot cleaner after charging.
Þ

Do not use the robot cleaner in a place where it will be exposed to direct sunlight or near the heating source.
Downloaded from www.Manualslib.com manuals search engine
42
Robot Cleaner
1 2
Remove four screws and remove
the battery cover.
󰦚
3
Disconnect the battery cable connector and remove the battery.
(Press and hold the lock clip to disconnect the battery cable connector.)
󰦚
Turn the power switch o.
Battery replacement
Þ

If you notice that the operating time has been signicantly reduced, you may need to replace the battery.
Þ

You must use a battery that is manufactured by Moneual.
Þ

Remove the battery from the robot cleaner when the system power is o.
Þ

Dispose of your old batteries according to the local laws and regulations of your region.
To purchase an extra battery, please contact our customer service.
Þ

If it is dicult to replace the battery by yourself, please contact our customer service.
Downloaded from www.Manualslib.com manuals search engine
43
Maintenance
4
Install the new battery
and connect the battery
cable connector.
Replace the battery cover and
tighten with four screws.
󰦚
Battery handling and safety information
Þ

If you leave the fully discharged battery for a long time, the battery may become damaged and you may not be able to
use it.
Þ

If you use a battery other than Moneual’s for use with the robot cleaner, the robot cleaner or the battery may be damaged.
Þ

Remove the battery before disposing of the robot cleaner.
Downloaded from www.Manualslib.com manuals search engine
44
Robot Cleaner
Voice Guidance
Following voices are the basic voice list. Depending on your model, some contents of these voices may dier from the actual voices.
Voice Guidance
Starting CORNER Cleaning. The robot cleaner will start corner cleaning.
Starting intensive cleaning.
The robot cleaner will start intensive cleaning.
Starting pre-set cleaning
The robot cleaner will start the scheduled cleaning.
Starting Shadow Cleaning. The robot cleaner will start shadow cleaning.
Cleaning is completed. The cleaning is completed.
Cleaning is cancelled. When you press the Start/stop (
Ě
Ħ
) button during operating.
Moving toward the charger.
When you press the CHARGE button or the robot cleaner is moving to the charger
for auto charging.
Starting to charge. The charger will start the charging process.
Starting Scheduled Cleaning after 1 Hour. The time setting is completed for 1 hour later cleaning.
Setting Daily Cleaning. The time setting is completed for every day cleaning.
Moving to shadowed area. When starting a shadow cleaning, the robot cleaning moves to the shadowed area.
Starting a Double cleaning.
When you select the double cleaning option and start secondary cleaning, voice guidance.
Please, detach the mop pad.
When starting Vacuum cleaning mode and attaching the mop plate to the robot
cleaner, voice guidance to detach the plate.
Starting Vacuum cleaning. When starting Vacuum cleaning mode.
Starting Hybrid cleaning. When starting Hybrid mode.
Starting Mop cleaning. When starting mop cleaning mode.
Maintenance Messages
Out of battery. The battery has been discharged.
Dust Bin is missing. The dust bin has been removed.
Please place the cleaner on the oor. The robot cleaner has been lifted from the oor.
Please check the wheels. The wheels are jammed.
Please check the main brush. The main brush is jammed with hairs or other obstacles.
Please check the side brush. The side brushes are jammed with hairs or obstacles.
Please, attach to the mop.
You have selected mop cleaning mode, but the mop plate is not attached to the robot cleaner.
There is an error. An error has occurred (refer to the error code).
Downloaded from www.Manualslib.com manuals search engine
45
Maintenance
Error Message Description
Ě
The cleaner will display combination of numbers and icons to inform users of what the issue is.
Using the information below, it is important to resolve the issue rst as pressing any button will clear the
error message.
Ě
If the problem has not been solved with one of the solutions below, please contact your customer service.
Ě
The error voice guidance comes only one time when the error has occurred. You can re-check the error status
by pressing the SELECT button on the remote control when the power is o.
Cause The battery is fully discharged, so the robot cleaner does not work.
Voice Out of battery.
Solution Charge the robot cleaner manually.
Cause The wheel motor has been overloaded. Some obstacles (hairs, wires, etc.) are
jammed on one or both wheels.
Voice Please check the wheels.
Solution Move the robot cleaner to another place. Remove obstacles on the wheel(s).
Cause The dust inlet fan is overloaded.
Voice There is an error.
Solution Remove obstacles in the dust inlet and empty the dust bin.
Cause The main brush is overloaded.
Voice Please check the main brush.
Solution Remove obstacles (hairs, wires, etc.) in the main brush.
Cause You tried to charge the robot cleaner without the battery.
Voice No Battery.
Solution Check if the battery is installed in the robot cleaner properly.
Cause The battery failure.
Voice There is an error.
Solution Contact your customer service.
Downloaded from www.Manualslib.com manuals search engine
46
Robot Cleaner
Cause You operated the robot cleaner without the dust bin.
Voice Dust bin is missing.
Solution Replace the dust bin.
Cause Both main wheels have been lifted.
Voice Please place the cleaner on the oor.
Solution Put the robot cleaner on the oor or move it to another place.
Cause Escape rough road mode continually occurred in excess of the limit while mov-
ing.
Voice Please check the front wheel.
Solution Remove obstacles from the front caster and empty the dust bin.
Cause Bumper crash continually occurred in excess of the limit while moving.
Voice Please check the bumper.
Solution Remove obstacles from the bumper and check if the bumper has been dented.
Cause The robot cleaner has continually detected the risk of falling more than limitation.
Voice Please check the bottom sensor.
Solution If the color of the oor is black, move the robot cleaner to another place. Clean or
wipe obstacles from the cli sensors (see page 39).
Cause Other error.
Voice There is an error.
Solution Contact your customer service.
Downloaded from www.Manualslib.com manuals search engine
47
Customer Support
Troubleshooting
Problem Solution
The robot cleaner does not work.
̞
Turn o the power switch on the lower-rear side.
̟
Check the battery. 󰥧 Charge the battery in the charger.
The robot cleaner does not charge.
̞
Remove any obstacles around the charger.
̟
Check if the power cord is connected to the charger.
̠
Turn on the power switch at the rear of the charger.
è
If you charge the robot cleaner aectedly, it may not be charged.
The remote control does not work. Replace the batteries.
Suction power is weak.
̞
Clear the dust bin.
̟
Clear the lter of the dust bin.
̠
Check if there is any obstacle in the dust inlet.
The power is not turned on.
̞
Turn o the power switch on the lower-rear side.
̟
Check the battery.
The brush does not rotate.
̞
Check if there is any obstacle in the brush.
̟
Check if the brush has been installed properly.
The operational noise is louder than
normal.
̞
Check if the dust lter is installed properly.
̟
Check if there is any obstacle in the brush.
The robot cleaner action is not
working normally during cleaning.
̞
Check if the mop plate is installed properly.
̟
Clean the sensor with a soft cloth.
The scheduled cleaning does not work. Press the SELECT button to conrm the time setting.
The robot cleaner does not respond
if you press the button.
When you are charging the robot cleaner by connecting the power adaptor
directly, the buttons will not be recognized. This is normal.
The operating time is short.
̞
If you do not properly connect the robot cleaner to the charger or the
adaptor for a long time, the battery may be discharged. In this case, the
battery usage time may be short.
̟
Do not disconnect the charger, even if the charge is completed.
̠
If you do not intend to use the robot cleaner for an extended period of time,
turn o the power switch on the lower-rear side.
I can’t control the suction power.
̞
If the mop plate is attached to the robot cleaner, you can’t control the
suction power.
̟
Clean the mop plate installation holes.
Downloaded from www.Manualslib.com manuals search engine
48
Robot Cleaner
Model ME685
Dimensions
348 mm (Diameter) x 86 mm (Height)
Weight
2.674 kg
Speed
Cleaning mode: 32 cm/sec., Driving mode: 30 cm/sec.
Operating noise
- Max. 68 dB (1400 mAh battery)
- Max. 70 dB (2800 mAh battery)
Power consumption
- Max. 20 W (1400 mAh battery)
- Max. 25 W (2800 mAh battery)
Battery
Lithium iron phosphate (LiFePO4) 12.8V DC
Dust bin capacity
600 ml
Charging time
- About 60 minutes (1400 mAh battery) - Max. 120 minutes (2800 mAh battery)
Operating time
- Vacuum Cleaning mode: Normal cleaning about 60 minutes,
Turbo cleaning about 40 minutes
- Hybrid Cleaning mode: about 60 minutes
(Cleaning time can dier depending on oor condition)
- Mop Cleaning mode: about 120 minutes
(Cleaning time can dier depending on oor condition)
Specications
Robot cleaner
Charger
Model MRD6500
Dimensions 264 mm (W) x 179 mm (H) x 134 mm (D)
Weight 606 g
Input Power 18V DC
Output Power 18V DC
Signal Transmission Distance (IR) 5 m / 8 m
Downloaded from www.Manualslib.com manuals search engine
49
Customer Support
Model MRC6500
Dimensions 139 mm (W) x 22 mm (H) x 50 mm (D)
Weight 66 g
Battery AAA size x2
Signal Transmission Distance (IR) 5 m
Remote control
Downloaded from www.Manualslib.com manuals search engine
3URGXFW:DUUDQW\
The warranty service we provide to our consumers is based on the customer compensation regulation. If you request warranty service, MONEUAL will
provide the service. The company will notify the customer of whether he or she will be compensated and the details of the compensation within seven (7)
business days after the day of the customer’s request, and offer the compensation within fourteen (14) business days after the day of notification.
We do not offer any paid/free service for parallel imports.
Free Service
ℓ
If products for general users are used for commercial purposes, free service may not be offered.
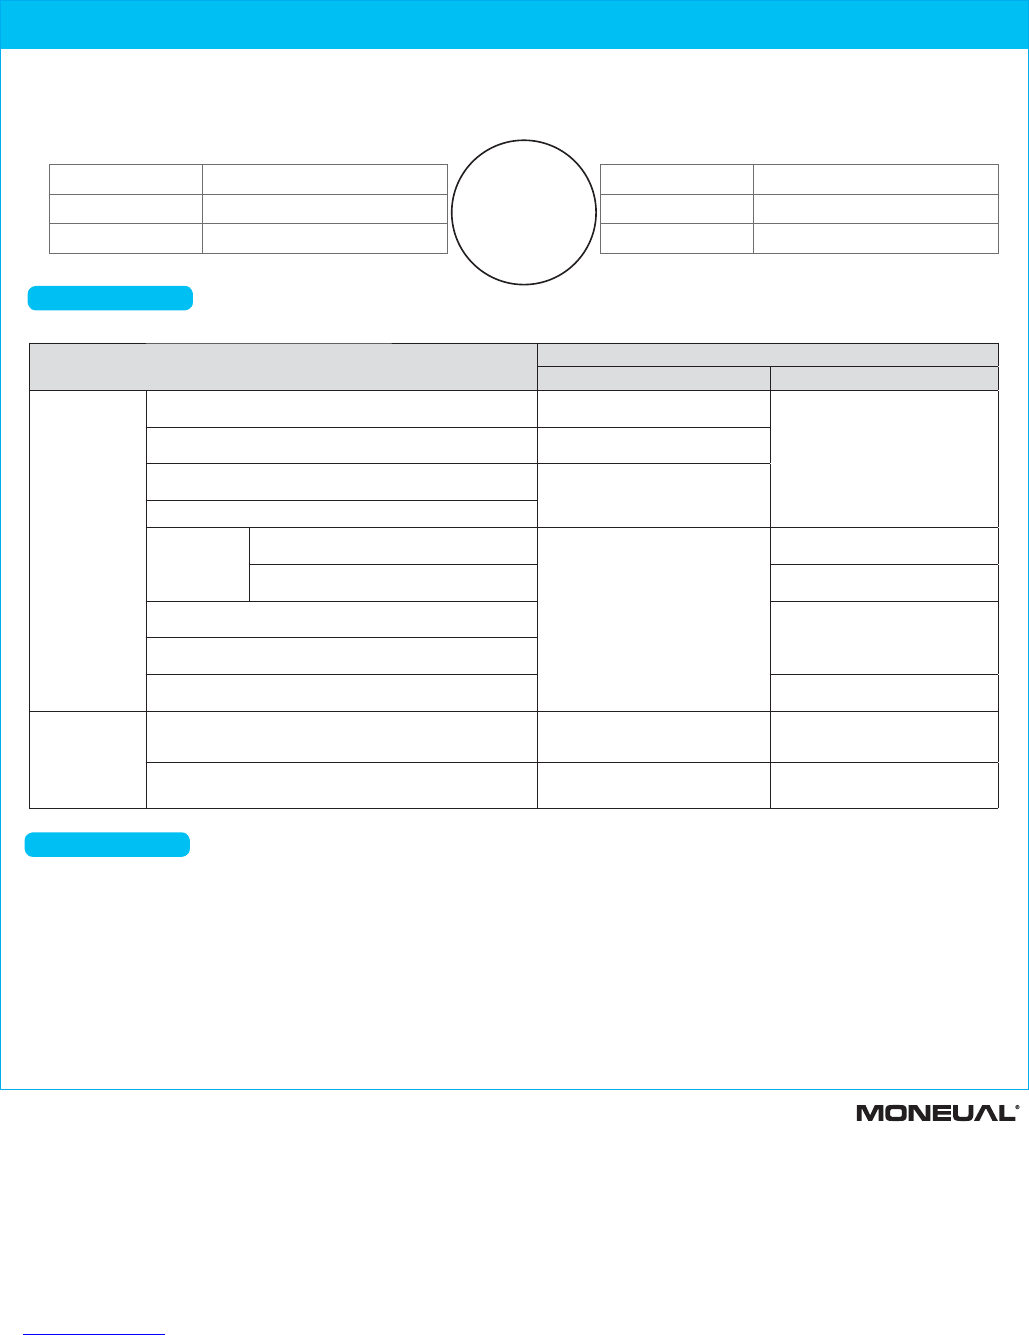
Type of damages to customers
Compensation details
Within the warranty period After the warranty period
Malfunctions in
performance and
functions during
normal use within
the holding period
of parts.
Essential repair is required within ten (10) days after the purchase.
Replace the product with a new one or
refund the product at the purchased price.
Not applicable
Essential repair is required within one (1) month after the purchase.
Replace the product with a new one or
oer free service.
A replaced product is faulty, requiring essential repair within one (1)
month after replacement.
Refund the product at the purchased price.
No replacement is available.
Repair is
available.
Malfunctions occur three (3) times due to the same
defects.
Replace the product with a new one
or refund the product at the
purchased price.
Paid repair
Malfunctions occur ve (5) times due to dierent
defects.
Paid repair
The repair company has lost the product for which a repair was
requested by the customer.
Refund the product at the xed
depreciated price after adding 10% of the
xed depreciated amount.
Repair is NOT available as no parts for repair are in stock within the
period in which related parts should be stored.
Repair is NOT available although parts for repairing are stored.
Refund the product after the xed
depreciation.
Malfunctions
due to intention
or negligence of
customers.
Repair is NOT available.
Replace the product after the amount
corresponding to the expenses for paid
repair has been paid.
Replace the product by applying xed
depreciation, after the expenses for paid
repair has been paid.
Repairs are available. Paid repair Paid repair
A/S info@moneual.eu l www.moneual.eu
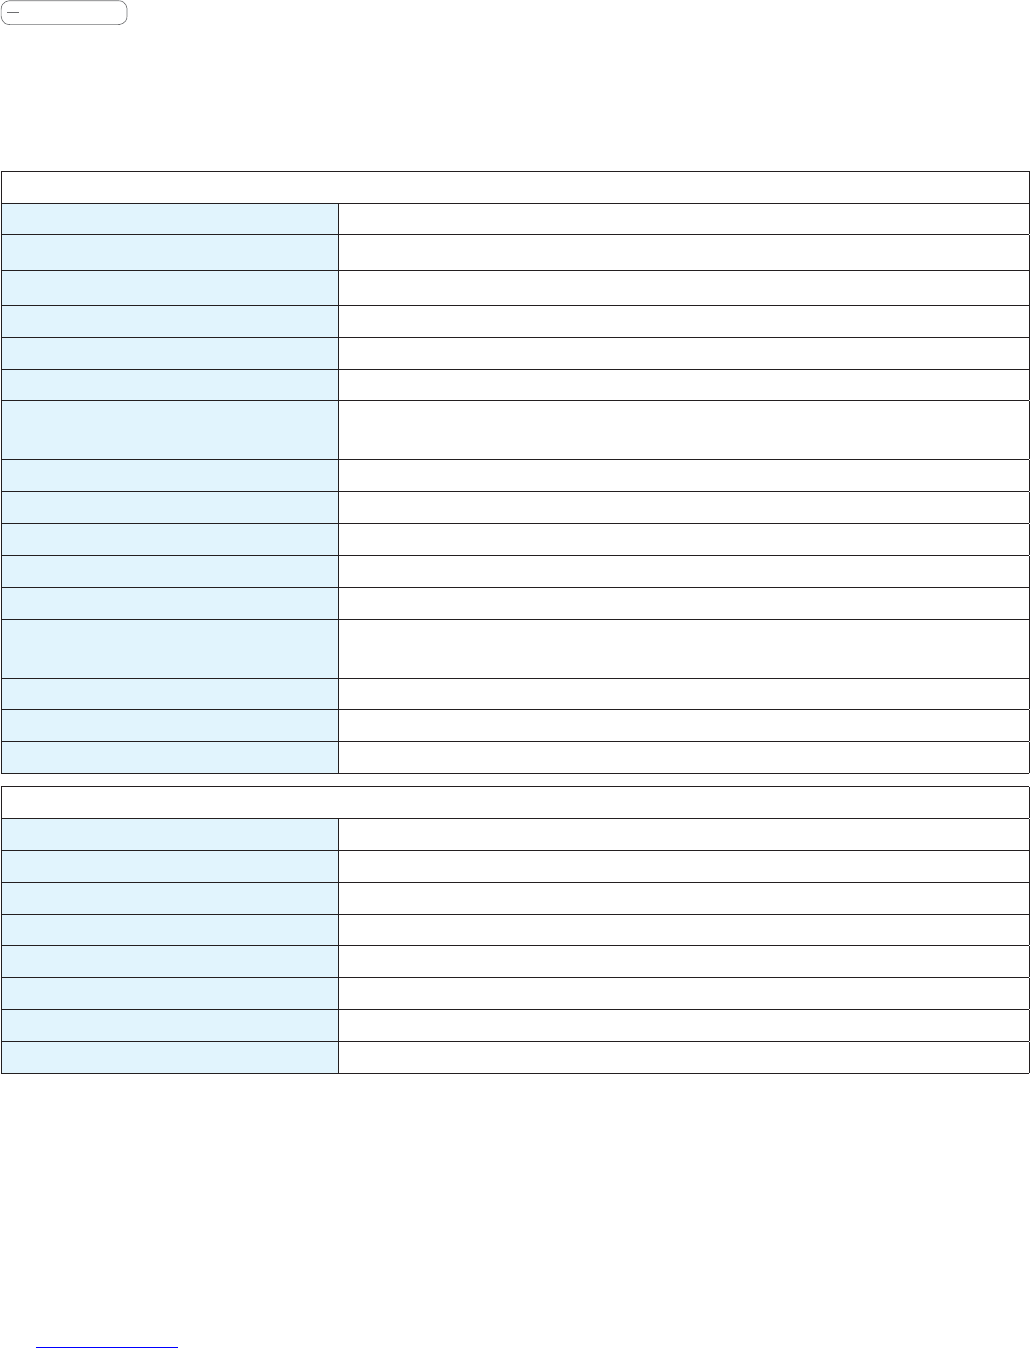
Product Name
Model Name
Purchased Date Month Date Year Serial No.
Dealer Price
The warranty
period for the
product is two (2)
years, and the
warranty for the
battery is six (6)
months.
Paid Service
ℓ
If you ask for after-sales service and the product is not found to be faulty, you will be responsible for the service fee. Please read through the User Manual before contacting the
service center.
Malfunctions due to customer negligence
ã
Malfunctions caused by incorrect power capacity.
ã
Malfunctions caused from external shock or fall.
ã

Malfunctions due to the use of consumables or optional devices not
specified by our company.
ã

Malfunctions caused by repair person who is not from the partner
companies specified by our company.
ã

Malfunctions caused by ignorance of the
ˈ
Safety Information
ˉ
described
in the User Manual.
Cases when the product is not faulty
ã
Users asking for warranty service before fully understanding the User Manual.
ã

Problems in external environment, including propagation of radio waves and wired signals.
ã
Errors in initial installation for the supplied product.
ã
Treatment of filtering and removal of foreign substances from accessories.
ã
Malfunctions caused by other companies’ products (including software).
Other cases
ã

Malfunctions caused by natural disasters (lightning, fire, salt damage and water damage).
ã
The life of consumables has expired.
Downloaded from www.Manualslib.com manuals search engine
Customer Service
JOGP!NPOFVBMFV
Before you call for service, please be ready to
provide the following information:
ˍ
G
Model name

ˍ
G
A description of your problem
ˍ
G
Phone no. & address
www.moneual.eu
Downloaded from www.Manualslib.com manuals search engine
43


Need help? Post your question in this forum.

Forumrules


Report abuse

Libble takes abuse of its services very seriously. We're committed to dealing with such abuse according to the laws in your country of residence. When you submit a report, we'll investigate it and take the appropriate action. We'll get back to you only if we require additional details or have more information to share.

Product:

For example, Anti-Semitic content, racist content, or material that could result in a violent physical act.

For example, a credit card number, a personal identification number, or an unlisted home address. Note that email addresses and full names are not considered private information.

Forumrules

To achieve meaningful questions, we apply the following rules:

Register

Register getting emails for Moneual ME685 Series at:


You will receive an email to register for one or both of the options.


Get your user manual by e-mail

Enter your email address to receive the manual of Moneual ME685 Series in the language / languages: English as an attachment in your email.

The manual is 8,39 mb in size.


You will receive the manual in your email within minutes. If you have not received an email, then probably have entered the wrong email address or your mailbox is too full. In addition, it may be that your ISP may have a maximum size for emails to receive.

The manual is sent by email. Check your email

If you have not received an email with the manual within fifteen minutes, it may be that you have a entered a wrong email address or that your ISP has set a maximum size to receive email that is smaller than the size of the manual.

The email address you have provided is not correct.

Please check the email address and correct it.

Your question is posted on this page

Would you like to receive an email when new answers and questions are posted? Please enter your email address.


Info