Before asking for repair of the projector, check the following. If the symptom persists, stop using the projector, be sure to unplug the power plug, and
then contact your dealer.
No image appears on the screen.
ProblemSolution
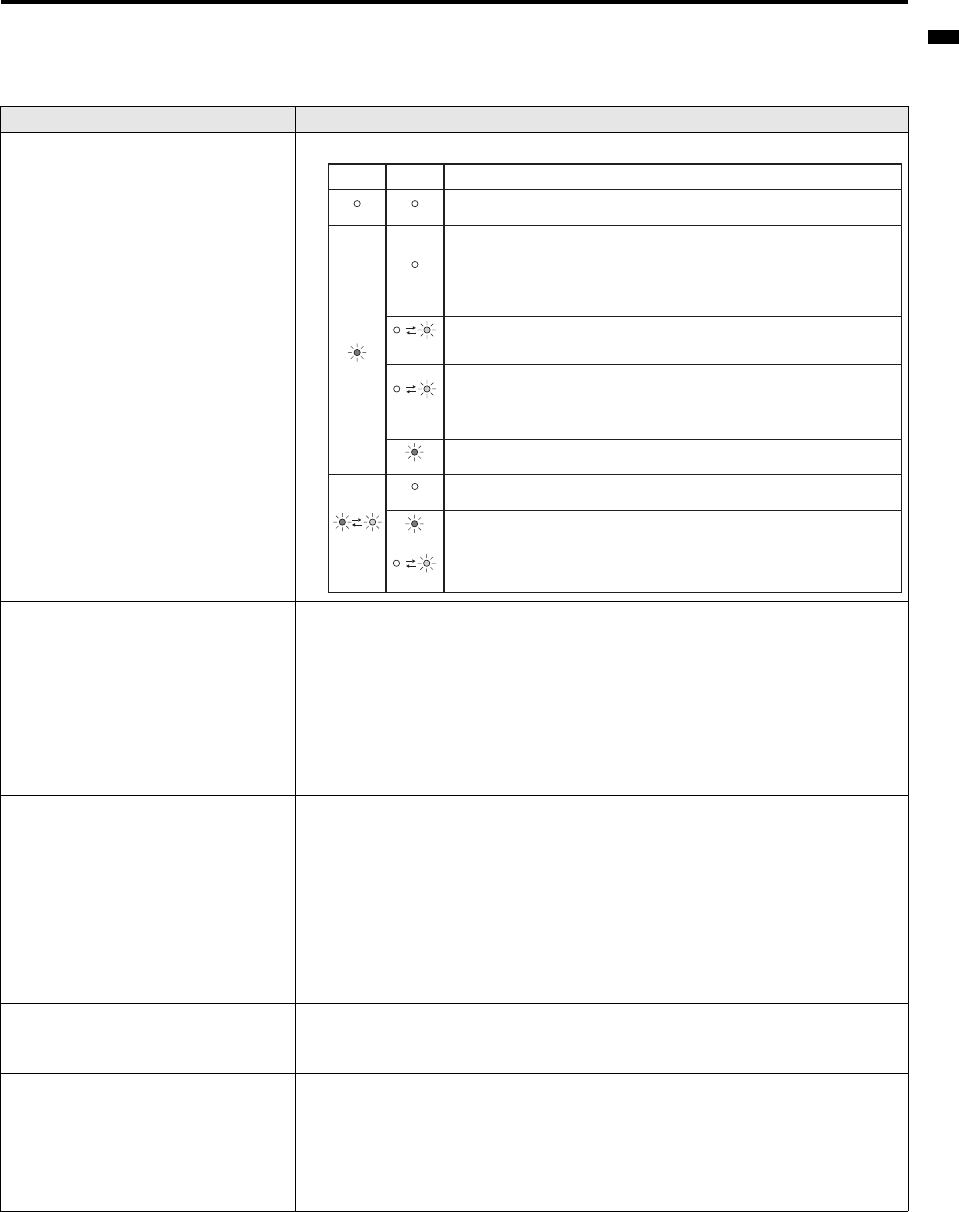
Power can not be turned on.
•Check whether the indicators are on or off and how they are lightning.
No image appears on the screen.
•Cancel the AV mute by pressing the AV MUTE button.
•Check that the lens cap is removed.
•It may take about 1 minute for the lamp to light up.
•The lamp fails to light up on rare occasions. In such a case, wait for a few minutes and then try again.
•If the projector was turned off before the lamp was cooled down sufficiently last time, the fan may start rotat-
ing and the POWER button may not work after the power cord is plugged. After the fan stops rotating, press
the POWER button to turn back on the POWER indicator.
•Set SCART INPUT in the FEATURE menu to OFF. (See page 19.)
•Check that the intake vent is clean.
•Check that the lamp cover is closed. (See page 26.)
•Check that the cables connected to the external devices are not broken.
•When an extension cable is being used, replace it with the supplied cable for check.
•When images are displayed correctly, add an RGB signal amplifier to the extension cable.
Power turns off.
•This problem may occur when the intake vent and/or exhaust vents are blocked. (In such a case, the STATUS
indicator brinks orange.)
JRemove the objects blocking the intake vent and/or exhaust vents and then carry out the following proce-
dure.
1.Wait for the intake fan and/or exhaust fan to stop. (Wait until the STATUS indicator goes out.)
2.Unplug the power cord from the wall outlet.
3.Wait about 10 minutes.
4.Plug the power cord into the wall outlet.
5.Press the POWER button.
•When the STATUS indicator is steady red, it is indicating that the lamp should be replaced. Replace the lamp
in this case.
•Check that AUTO POWER OFF has been set to OFF.
•If the lamp has deteriorated, it may go out after a while it illuminates.
The screen for entering the password appears.
•PASSWORD FUNCTION in the FEATURE menu has been set to DISPLAY INPUT to enable the password
lock.
JEnter the password or contact the person in charge of management of the projector.
(See page 23.)
"NO SIGNAL" is displayed.
•Turn on the power of the connected device, or check whether there is something wrong with the connected
device.
•Check whether the external device output signals. (Check this especially when the external device is a note-
book computer.)
•Check that the cable connected to the external device isn’t defective.
•Check that the projector is connected to the external device using the correct terminals.
•Check that the connected device is correctly selected as the input source.
•When an extension cord is being used, replace it with the supplied cable and check whether images are pro-
jected correctly. If images are projected correctly, use an RGB signal amplifier along with the extension cord.
Off
Blinking red
/ green
Steady red
Steady
or
Blinking
Blinking
orange
Blinking
green
Steady red
Off
Off
Off
POWERSTATUSSolution
Connect the power cord to the projector.
Plug the power cord into a wall outlet.
If any objects are blocking the air inlet or outlet grille, remove them and carry out
the following.
1. Unplug the power cord from the wall outlet.
2. Make sure that the projector has cooled off.
3. Plug the power cord into the wall outlet.
4. Press the POWER button.
If any objects are blocking the air inlet or outlet grille, remove them.
Don't expose the air outlet grilles to hot air emitted from a heating appliance.
After the STATUS indicator stops blinking, press the POWER button.
If you unplug the power cord while the fan is rotating, the lamp may not turn on about 1
minute when you plug the power cord next time.
The lamp can't turn on again for 1 minute after it goes out.
Press the POWER button several times.
Replace the lamp. (The lamp is at the end of its life.)
Attach the lamp cover on the top.
Unplug the power cord from the wall outlet and contact your dealer.
Libble takes abuse of its services very seriously. We're committed to dealing with such abuse according to the laws in your country of residence. When you submit a report, we'll investigate it and take the appropriate action. We'll get back to you only if we require additional details or have more information to share.
Product:
Forumrules
To achieve meaningful questions, we apply the following rules:
First, read the manual;
Check if your question has been asked previously;
Try to ask your question as clearly as possible;
Did you already try to solve the problem? Please mention this;
Is your problem solved by a visitor then let him/her know in this forum;
To give a response to a question or answer, do not use this form but click on the button 'reply to this question';
Your question will be posted here and emailed to our subscribers. Therefore, avoid filling in personal details.
Register
Register getting emails for Mitsubishi XD520U at:
new questions and answers
new manuals
You will receive an email to register for one or both of the options.
Get your user manual by e-mail
Enter your email address to receive the manual of Mitsubishi XD520U in the language / languages: English as an attachment in your email.
The manual is 1,16 mb in size.
You will receive the manual in your email within minutes. If you have not received an email, then probably have entered the wrong email address or your mailbox is too full. In addition, it may be that your ISP may have a maximum size for emails to receive.
The manual is sent by email. Check your email
If you have not received an email with the manual within fifteen minutes, it may be that you have a entered a wrong email address or that your ISP has set a maximum size to receive email that is smaller than the size of the manual.
The email address you have provided is not correct.
Please check the email address and correct it.
Your question is posted on this page
Would you like to receive an email when new answers and questions are posted? Please enter your email address.