2337
19
Zoom out
Zoom in
Previous page
1/164
Next page
19
ZONNEKAP PLAATSEN
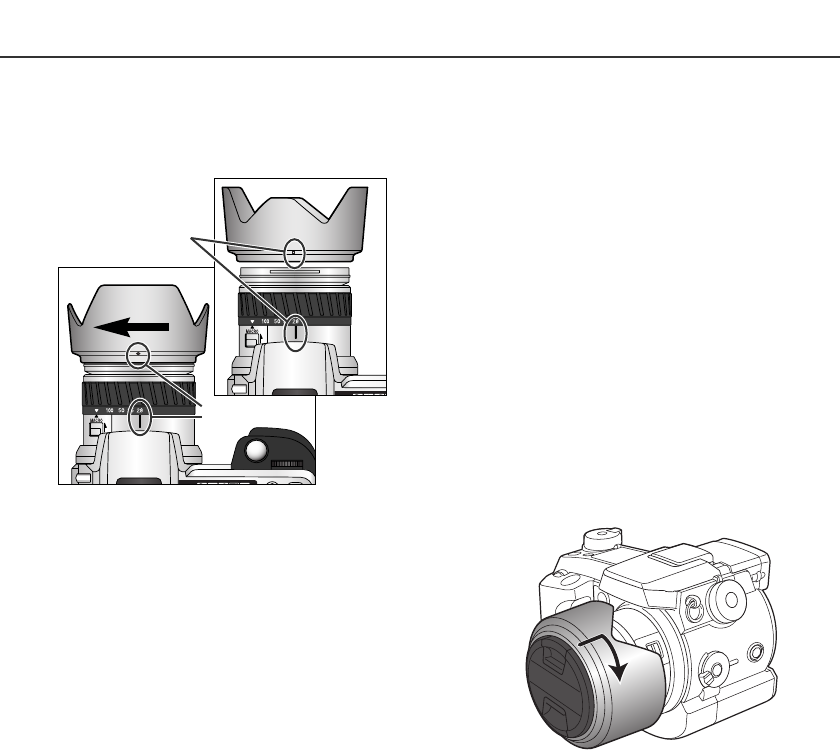
Om de zonnekap te bevestigen plaatst u de recht-
hoekige uitholling op de rand van de zonnekap
tegenover de index voor de brandpuntsafstand op
de bovenzijde van het objectief (1)
Schuif de zonnekap op het objectief en draai hem
90° graden met de klok mee totdat hij vastklikt, en de
ronde uitholling tegenover de index voor de brand-
puntsafstand zit (2).
Bij een juiste plaatsing zitten de grote bladen van de
zonnekap aan de onder- en bovenzijde.
•Forceer de zonnekap nooit. Past hij niet, plaats hem
dan rustig opnieuw.
•Voor verwijderen draait u de zonnekap 90° tegen de
klok in en neemT hem van het objectief af.
De zonnekap kan wanneer de camera niet wordt gebruikt in
omgekeerde stand op de camera worden geplaatst..
Houd een van de grote bladen aan de bovenzijde, schuif de
zonnekap op het objectief en draai hem 90° met de klok mee
tot hij stopt.
•U kunt de zonnekap plaatsen en verwijderen terwijl de lensdop
op het objectief zit.
•Voor verwijderen draait u de zonnekap 90° tegen de klok in
neem hem van het objectief af.
De zonnekap verhindert licht dat van buiten beeld komt de voorste lens te bereiken, zodat overstra-
ling wordt voorkomen. Bij sterke lichtbronnen is gebruik van de zonnekap sterk aan te bevelen.
Gebruik de zonnekap niet in combinatie met de ingebouwde flitser, anders ontstaat er een schaduw
onderin beeld.
2
1
19


Need help? Post your question in this forum.

Forumrules


Report abuse

Libble takes abuse of its services very seriously. We're committed to dealing with such abuse according to the laws in your country of residence. When you submit a report, we'll investigate it and take the appropriate action. We'll get back to you only if we require additional details or have more information to share.

Product:

For example, Anti-Semitic content, racist content, or material that could result in a violent physical act.

For example, a credit card number, a personal identification number, or an unlisted home address. Note that email addresses and full names are not considered private information.

Forumrules

To achieve meaningful questions, we apply the following rules:

Register

Register getting emails for Minolta Dimage 7i at:


You will receive an email to register for one or both of the options.


Get your user manual by e-mail

Enter your email address to receive the manual of Minolta Dimage 7i in the language / languages: Dutch as an attachment in your email.

The manual is 3,73 mb in size.


You will receive the manual in your email within minutes. If you have not received an email, then probably have entered the wrong email address or your mailbox is too full. In addition, it may be that your ISP may have a maximum size for emails to receive.

Others manual(s) of Minolta Dimage 7i

Minolta Dimage 7i User Manual - German - 164 pages


The manual is sent by email. Check your email

If you have not received an email with the manual within fifteen minutes, it may be that you have a entered a wrong email address or that your ISP has set a maximum size to receive email that is smaller than the size of the manual.

The email address you have provided is not correct.

Please check the email address and correct it.

Your question is posted on this page

Would you like to receive an email when new answers and questions are posted? Please enter your email address.


Info