19
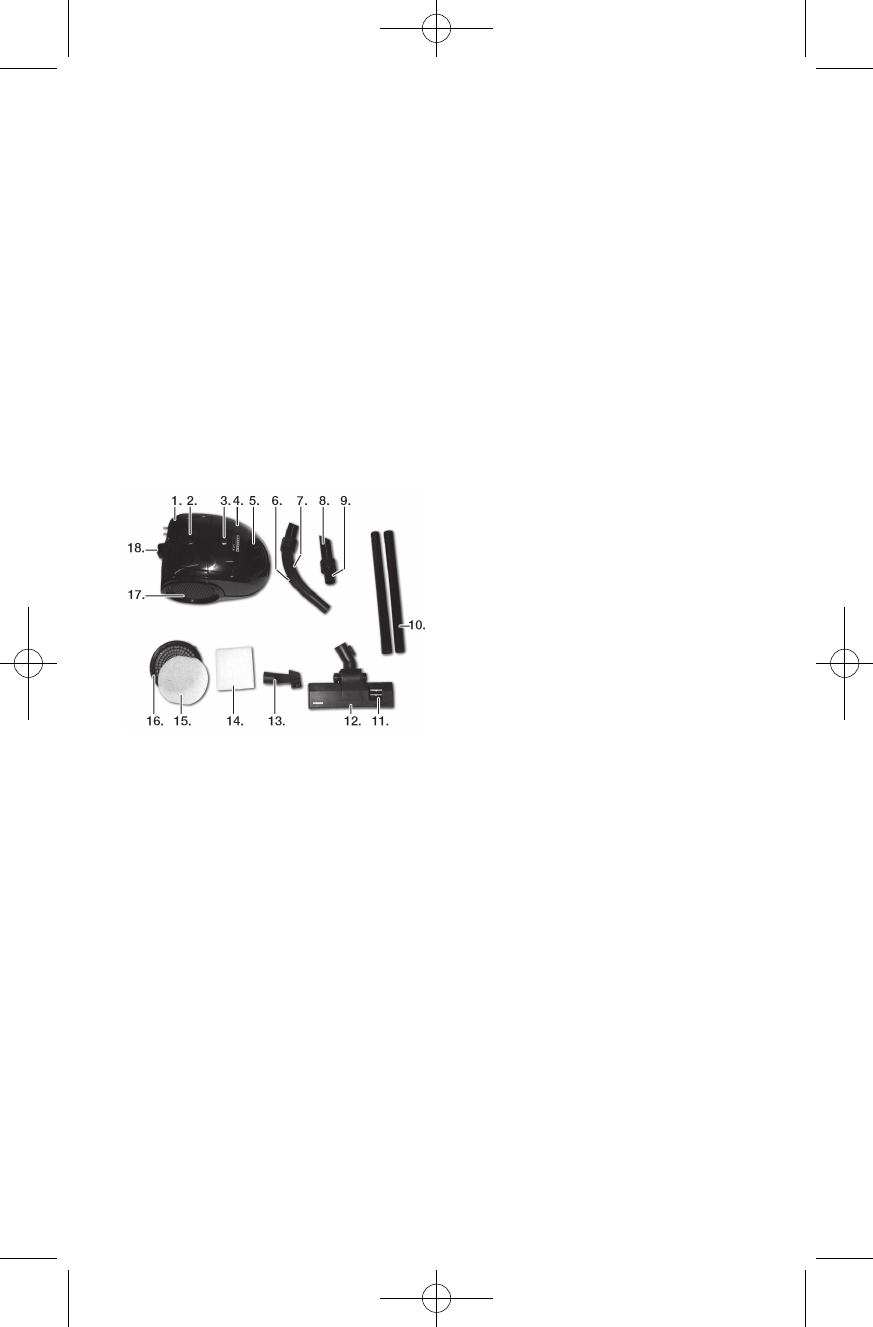
KEY TO THE MAIN COMPONENTS OF THE
APPLIANCE
Carrying handle and button for automatic 1.
cord rewind
ON/OFF button2.
Bag change indicator3.
Lid4.
Hose connector port5.
Air valve6.
Handle7.
Hose8.
Hose connector9.
Two-component tube10.
Brush function button11.
Floor nozzle12.
Crevice/brush nozzle13.
Motor lter14.
Exhaust lter15.
Exhaust grille16.
Exhaust (behind the grille)17.
Storage bracket18.
PREPARING THE APPLIANCE
IMPORTANT! Before using the appliance,
open the lid (4) and make sure the motor lter
(14) and the dust bag have been tted to the
appliance. Also check that the exhaust lter
(15) is in place in the exhaust port (17). See
Replacing lter and dust bag below.
Attach the hose (8) to the appliance by 1.
inserting the hose connector (9) in the hole
on the hose connector port (5) on the top
of the appliance, until you hear a click.
To remove the hose, press the buttons o
on the side of the hose connector and
pull the hose out.
Assemble the two-component tube (10), 2.
joining the two parts
Attach the handle of the hose (7) to one 3.
end of the tube and attach the oor nozzle
(12) to the opposite end of the tube
USING THE APPLIANCE
Pull the cord out of the appliance. The 1.
cord may not be pulled out further than
the yellow mark. Plug in and switch on the
power.
Press the On/Off button (2) to switch the 2.
appliance on and off.
Suction strength can also be adjusted by 3.
opening and closing the air vent (6) on the
handle.
When the valve is closed, full suction is o
achieved. This is the normal setting.
When the vent opens, more air is o
allowed in, reducing the suction power
at the oor nozzle. This function is
ideal for cleaning curtains and other
light items which can easily get sucked
into the nozzle at maximum suction
strength.
The oor nozzle brushes have two settings 4.
which can be selected using the brush
function button (11) on top of the nozzle.
When cleaning hard surfaces (stone o
ooring, tiles, etc.), the nozzle brushes
should be extended.
When cleaning carpets and rugs, the o
brushes should be retracted into the
nozzle.
If the bag change indicator (3) indicates 5.
that the bag is full or if suction force is
signicantly reduced, the bag must be
replaced (see section Replacing Dust
Bag, below). If the indicator continues to
indicate that the bag is full after you have
replaced it, this may be due to one of the
following:
The hose or nozzle is clogged. o
The exhaust lter is dirty. o
Investigate and resolve the problem. Do not
use the appliance if the indicator indicates
that the dust bag is full. This may cause
irreparable damage to the motor.
NOTE! Switch off the appliance on the 6.
On/Off button, disconnect the plug from
the mains socket and allow the appliance
to cool off for approx. 1 hour. Clean the
lters and replace the dust bag (see the
sections on replacement of lters and dust
bag below), before using the appliance
again.