MONTAJE
ATENCIÓN: Si la máquina se suministra ya
montada, repita todo el procedimiento para
cerciorarse de que el montaje es correcto y que
WRGRVORVFLHUUHVHVWiQD¿DQ]DGRV
&RPSUXHEHVLKD\SLH]DVGDxDGDV\QRXWLOLFH
SLH]DVTXHSUHVHQWHQGHVSHUIHFWRV
NOTA:
• Si necesita ayuda o nota que faltan piezas o están
dañadas, llame al servicio técnico.
• (VQRUPDOTXHHO¿OWURGHFRPEXVWLEOHSURGX]FD
ruidos en el depósito de combustible vacío.
• Es normal encontrar residuos de combustible o
aceite en el silenciador debido a los ajustes en el
carburador y pruebas realizadas por el fabricante.
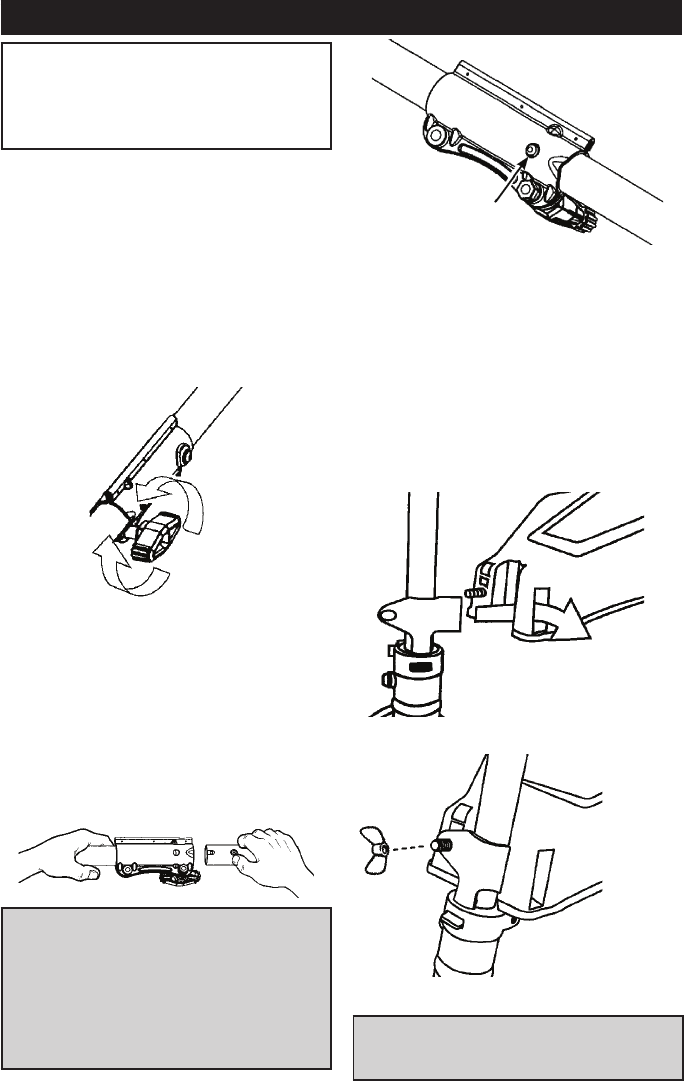
INSTALACIÓN DEL ACCESORIO
Al montar el accesorio, coloque la máquina en una
VXSHU¿FLHSODQD\HVWDEOH
1. $ÀRMHHODFRSODGRUJLUDQGRHOSRPRKDFLDOD
izquierda
2.
A
Retire el protector para transporte del acoplador
(si está presente).
3. Quite el capuchón de la barra del accesorio de
corte (si está instalado).
4. Coloque el botón de bloqueo/liberación del
accesorio en la muesca de referencia del
acoplador.
5. Empuje el accesorio hacia el interior del acoplador
hasta que el botón de bloqueo/liberación encaje en
HORUL¿FLRSULQFLSDO
127$6LHODFFHVRULRHVGLItFLOPRQWDUJLUHHO
accesorio de corte con la mano para permitir que
HOHMHLQWHUQRVHDOLQHH\HQJUDQHFRQHODFRSODGRU
6. Antes de utilizar la máquina, gire el pomo hacia la
derecha para apretarlo (B).
a $'9(57(1&,$$VHJ~UHVHGHTXHHO
botón de bloqueo/desconexión queda
LQPRYLOL]DGRHQHORUL¿FLRSULQFLSDO\
que el pomo está bien apretado antes de
XWLOL]DUODPiTXLQD7RGRVORVDFFHVRULRV
VHKDQGLVHxDGRSDUDVXXVRHQHORUL¿FLR
principal, salvo si se indica otra cosa en
el manual de instrucciones del accesorio
FRUUHVSRQGLHQWH(OXVRGHORUL¿FLR
LQFRUUHFWRSXHGHSURYRFDUOHVLRQHVJUDYHVR
GDxRVHQODPiTXLQD
Para el montaje de los accesorios opcionales,
consulte la sección de montaje del manual de
instrucciones del accesorio correspondiente.
INSTALACIÓN DE LA PROTECCIÓN
La protección debe instalarse de manera correcta. La
protección resguarda parcialmente al usuario y otras
personas frente a objetos que salen despedidos y
cuenta con una hoja limitadora de hilo que corta el hilo
sobrante para mantener la longitud adecuada.
La cuchilla limitadora del hilo (en la parte inferior de la
SURWHFFLyQHVD¿ODGD\SXHGHSURYRFDUKHULGDV
1. Retire la tuerca de mariposa de la protección.
2. Inserte el soporte en la ranura, tal y como se
muestra en la imagen.
3. Gire la protección hasta que el perno pase a
WUDYpVGHORUL¿FLRGHOVRSRUWH
4. Vuelva a instalar la tuerca de mariposa y apriétela
¿UPHPHQWH
INSTALACIÓN DEL MANGO CERRADO
a ADVERTENCIA: Utilice sólo cuchillas para
KLHUEDRFDEH]DOHVGHFRUWHFXDQGRHO
PDQJRFHUUDGRHVWiDFRSODGR1RXWLOLFH
QXQFDKRMDVGHVLHUUD