• When using Matrix Cycles, basic precautions should always be followed, including the following: Read all instructions before using this equipment. It is
the responsibility of the owner to ensure that all users of this equipment are adequately informed of all warnings and precautions.
• This equipment is intended for commercial use. To ensure your safety and protect the equipment, read all instructions before operating.
DANGER!
TO REDUCE THE RISK OF ELECTRICAL SHOCK:
• Always unplug the equipment from the electrical outlet before cleaning, performing maintenance and putting on or taking off parts.
CAUTION!
CONSULT A PHYSICIAN BEFORE USING THIS EQUIPMENT. READ OWNER’S MANUAL BEFORE USE.
• It is essential that this equipment is used only indoors, in a climate controlled room. If this equipment has been exposed to colder temperatures or high moisture climates,
it is strongly recommended that the equipment is warmed up to room temperature and allowed time to return to lower humidity levels before rst time use.
WARNING!
TO REDUCE THE RISK OF BURNS, FIRE, ELECTRICAL SHOCK OR INJURY TO PERSONS:
ENGLISH
• Use this exercise cycle for its intended
purpose as described in this manual.
• Never operate the exercise cycle if it is not working properly,
or if it has been damaged. Contact Customer Tech Support
or the authorized dealers for examination and repair.
• Do not use the exercise cycle without proper footwear.
NEVER operate the exercise cycle with bare feet.
• Do not wear any clothing that might catch on
any moving parts of this exercise cycle.
• Keep hands and feet clear at all times from moving parts
to avoid injury. Never turn the pedal cranks by hand.
• Do not dismount the exercise cycle until
the pedals are at a complete STOP.
• Do not attempt to ride the exercise
cycle in a standing position.
• Do not insert any object, hands or feet into any openings,
or expose hands, arms or feet to the drive mechanism
or other potentially moving part of the exercise cycle.
• Do not use any equipment that is damaged or has worn
or broken parts. Use only replacement parts supplied
by Customer Tech Support or the authorized dealers.
• Do not operate where aerosol (spray) products are
being used or when oxygen is being administered.
• Close supervision is necessary when used near children.
• This equipment is not intended for use by persons with
reduced physical, sensory or mental capabilities, or lack
of experience and knowledge, unless they have been
given supervision or instruction concerning use of the
equipment by a person responsible for their safety.
• Ensure that adjustment levers (seat and handlebar
fore-and-aft) are properly secured and do not
interfere with range of motion during exercise.
• Incorrect or excessive exercise may result in serious
injury or death. If you experience any kind of pain,
including but not limited to chest pains, nausea, dizziness,
or shortness of breath, stop exercising immediately
and consult your physician before continuing.
• Do not jump on the unit.
• At no time should more than one person
be on unit while in operation.
• This unit should not be used by persons weighing more
than specied in the OWNER’S MANUAL SPECIFICATIONS
SECTION. Failure to comply will void the warranty.
• Keep power cord away from heated surfaces. Do not carry
this unit by its supply cord or use the cord as a handle.
• Do not use other attachments that are not recommended
by the manufacturer. Attachments may cause injury.
• Use the unit only as described in the
unit guide and owner’s manual.
• Disconnect all power before servicing or moving
the equipment. To clean, wipe surfaces down
with soap and slightly damp cloth only; never
use solvents. (See MAINTENANCE)
• At NO time should pets or children under the
age of 14 be closer to the unit than 10 feet.
• At NO time should children under the age of 14 use the unit.
• Children over the age of 14 should not use
the unit without adult supervision.
• Never operate the unit if it has a damaged cord or
plug, if it is not working properly, if it has been dropped
or damaged, or immersed in water. Return the unit
to a service center for examination and repair.
• To avoid the risk of electric shock, this piece
of equipment must only be connected to a
circuit with non-looped (isolated) ground.
• To disconnect, turn all controls to the off
position, then remove plug from outlet.
• Do not remove the console covers unless instructed
by Customer Tech Support. Service should only
be done by an authorized service technician.
• Heart rate monitoring systems may be inaccurate.
4
DEDICATED CIRCUIT AND ELECTRICAL INFO
A “Dedicated Circuit” means that each outlet you plug into should not have anything else
running on that same circuit. The easiest way to verify this is to locate the main circuit breaker
box, and turn off the breaker(s) one at a time. Once a breaker has been turned off, the only
thing that should not have power to it are the units in question. No lamps, vending machines,
fans, sound systems, or any other item should lose power when you perform this test.
Non-looped (isolated) neutral/grounding means that each circuit must have an individual
neutral/ground connection coming from it, and terminating at an approved earth ground.
You cannot “jumper” a single neutral/ground from one circuit to the next.
ELECTRICAL REQUIREMENTS
For your safety and to ensure good unit performance, the ground on this circuit must
be non-looped (isolated). Please refer to NEC article 210-21 and 210-23. Any alterations
to the standard power cord provided could void all warranties of this product.
The 3x, 5x and 7xe cycles are designed to be self-powered and do not require an external power supply
source to operate. Without an external power supply, the console’s start-up time may be delayed.
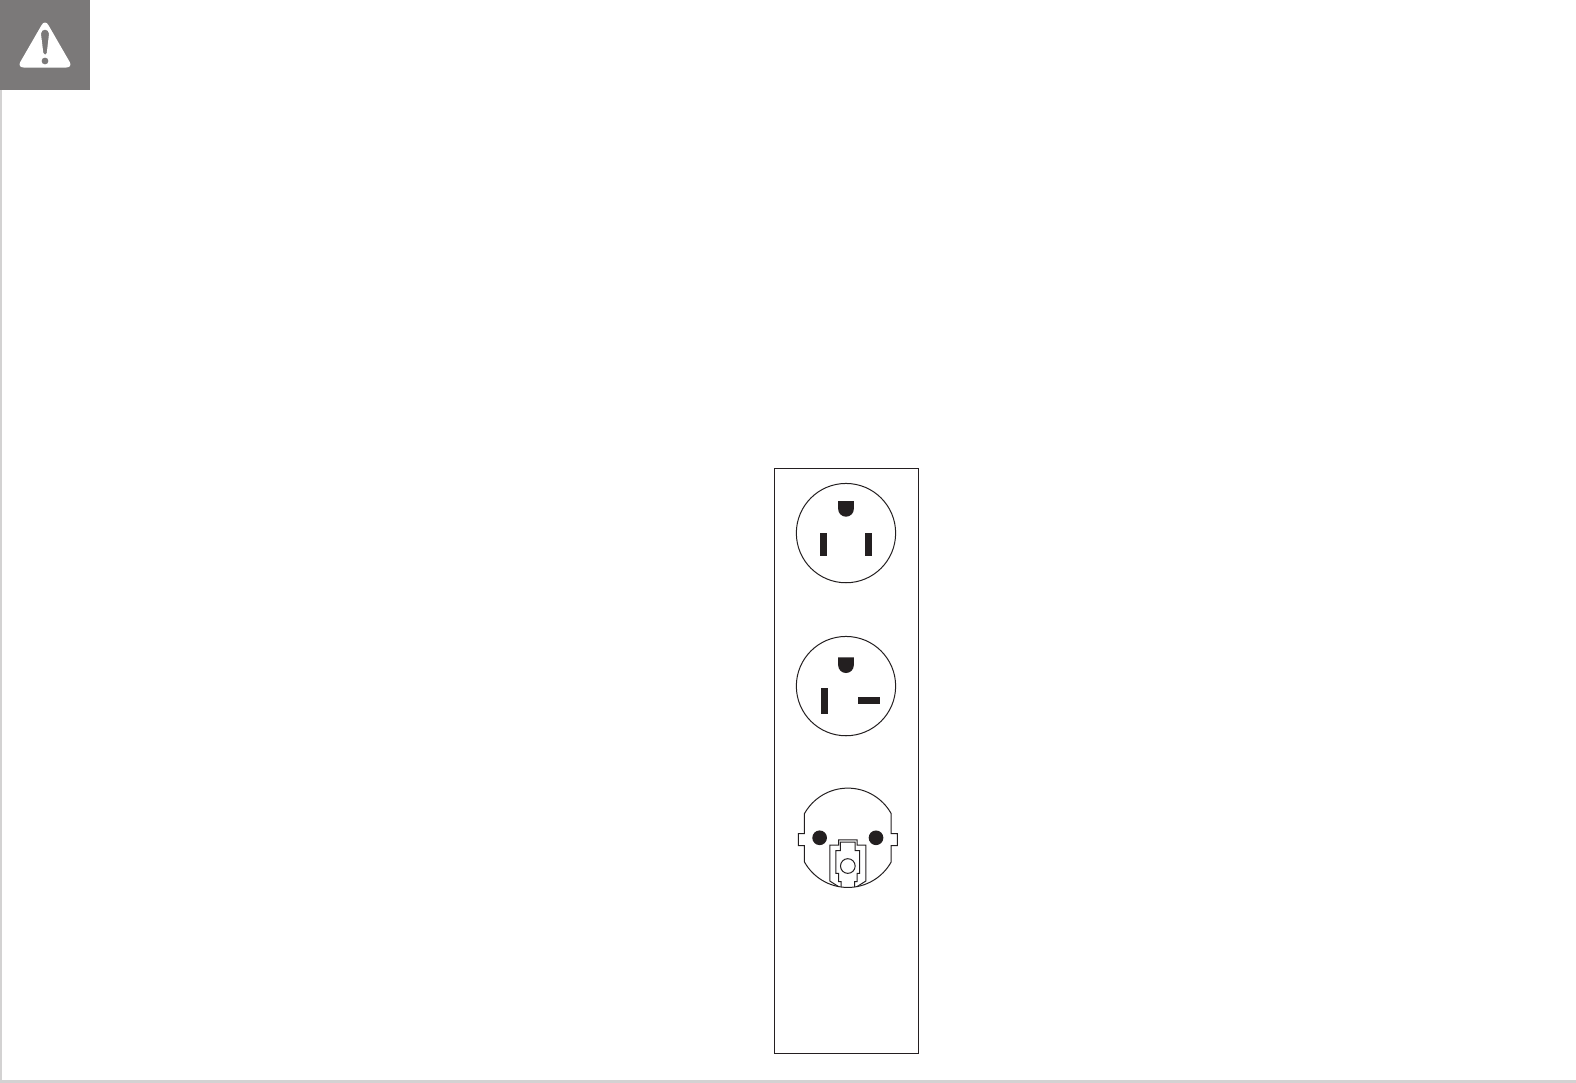
110 V UNITS
All Matrix 110 V cycles require the use of a 100-125 V, 60 Hz and a 15 A “Dedicated
Circuit”, with a non-looped (isolated) neutral/ground for power. These cycles can
be daisy-chained together with up to 4 units per 15 A circuit. This outlet should be
a NEMA 5-15R and have the same conguration as the plug. No adapter should be
used with this product. Matrix daisy-chain cord adapters are sold separately.
220 V UNITS
All Matrix 220 V cycles require the use of a 216-250 V, 50 Hz and a 15 A “Dedicated
Circuit”, with a non-looped (isolated) neutral/ground for power. These cycles can
be daisy-chained together with up to 4 units per 15 A circuit. This outlet should be
a NEMA 6-15R and have the same conguration as the plug. No adapter should be
used with this product. Matrix daisy-chain cord adapters are sold separately.
GROUNDING INSTRUCTIONS
The unit must be grounded if connected to a power supply source. If it should
malfunction or breakdown, grounding provides a path of least resistance for
electric current to reduce the risk of electric shock. The unit is equipped with a cord
having an equipment-grounding conductor and a grounding plug. The plug must
be plugged into an appropriate outlet that is properly installed and grounded in
accordance with all local codes and ordinances. If the user does not follow these
grounding instructions, the user could void the Matrix limited warranty.
ADDITIONAL ELECTRICAL INFO
In addition to the dedicated circuit requirement, the proper gauge wire
must be used from the circuit breaker box, to each outlet that will have
the maximum number of units running off of it. If the distance from the
circuit breaker box to each outlet, is 100 ft (30.5 m) or less, then 12 gauge
wire should be used. For distances greater than 100 ft (30.5 m) from the
circuit breaker box to the outlet, a 10 gauge wire should be used.
ENERGY SAVING / LOW-POWER MODE
All units are congured with the ability to enter into an energy saving / low-
power mode when the unit has not been in use for a specied period of
time. Additional time may be required to fully reactivate this unit once it has
entered the low-power mode. This energy saving feature may be enabled
or disabled from within the ‘Manager Mode’ or ‘Engineering Mode.’
WARNING!
• Connect this exercise product to a properly grounded outlet only.
• Never operate product with a damaged cord or plug even if it is working
properly. Never operate any product if it appears damaged, or has been
immersed in water. Contact Customer Tech Support for replacement or repair.
Failure to follow these specications can cause damage
to your product and can void the warranty:
• All video and power outlets must be functional the day of delivery
/ assembly of the product. The client is responsible for any
additional installation charges associated with return visits.
• Electrical supply may uctuate in your area. To ensure stable
performance of the product, use the proper gauge wire.
DANGER!
Improper connection of the equipment-grounding conductor can result in a risk
of electric shock. Disconnect the power cord from this equipment and check with
a qualied electrician or serviceman if you are in doubt as to whether the product
is properly grounded. Do not modify the plug provided with the product. If it
will not t the outlet, have a proper outlet installed by a qualied electrician.
POWER REQUIREMENTS
North American and
European power
cord plugs shown.
Depending on your
country, the plug
type may vary.
110 NEMA 5-15P
PLUG (N.A.)
220 NEMA 6-20P
PLUG (N.A.)
EURO PLUG
(EUROPE)
ENGLISH
5
NOTE:
Only Matrix Fitness service or certied assembly
personnel can assemble this equipment.
UNPACKING
Unpack the equipment where you will be using it. Place the carton
on a level at surface. It is recommended that you place a protective
covering on your oor. Never open box when it is on its side.
IMPORTANT NOTES
During each assembly step, ensure that ALL nuts
and bolts are in place and partially threaded.
Several parts have been pre-lubricated to aid in assembly
and usage. Please do not wipe this off. If you have diculty,
a light application of lithium grease is recommended.
WARNING!
There are several areas during the assembly process that
special attention must be paid. It is very important to follow
the assembly instructions correctly and to make sure all parts
are rmly tightened. If the assembly instructions are not
followed correctly, the equipment could have parts that are not
tightened and will seem loose and may cause irritating noises.
To prevent damage to the equipment, the assembly instructions
must be reviewed and corrective actions should be taken.
NEED HELP?
If you have questions or if there are any missing
parts, contact Customer Tech Support. Contact
information is located on the information card.
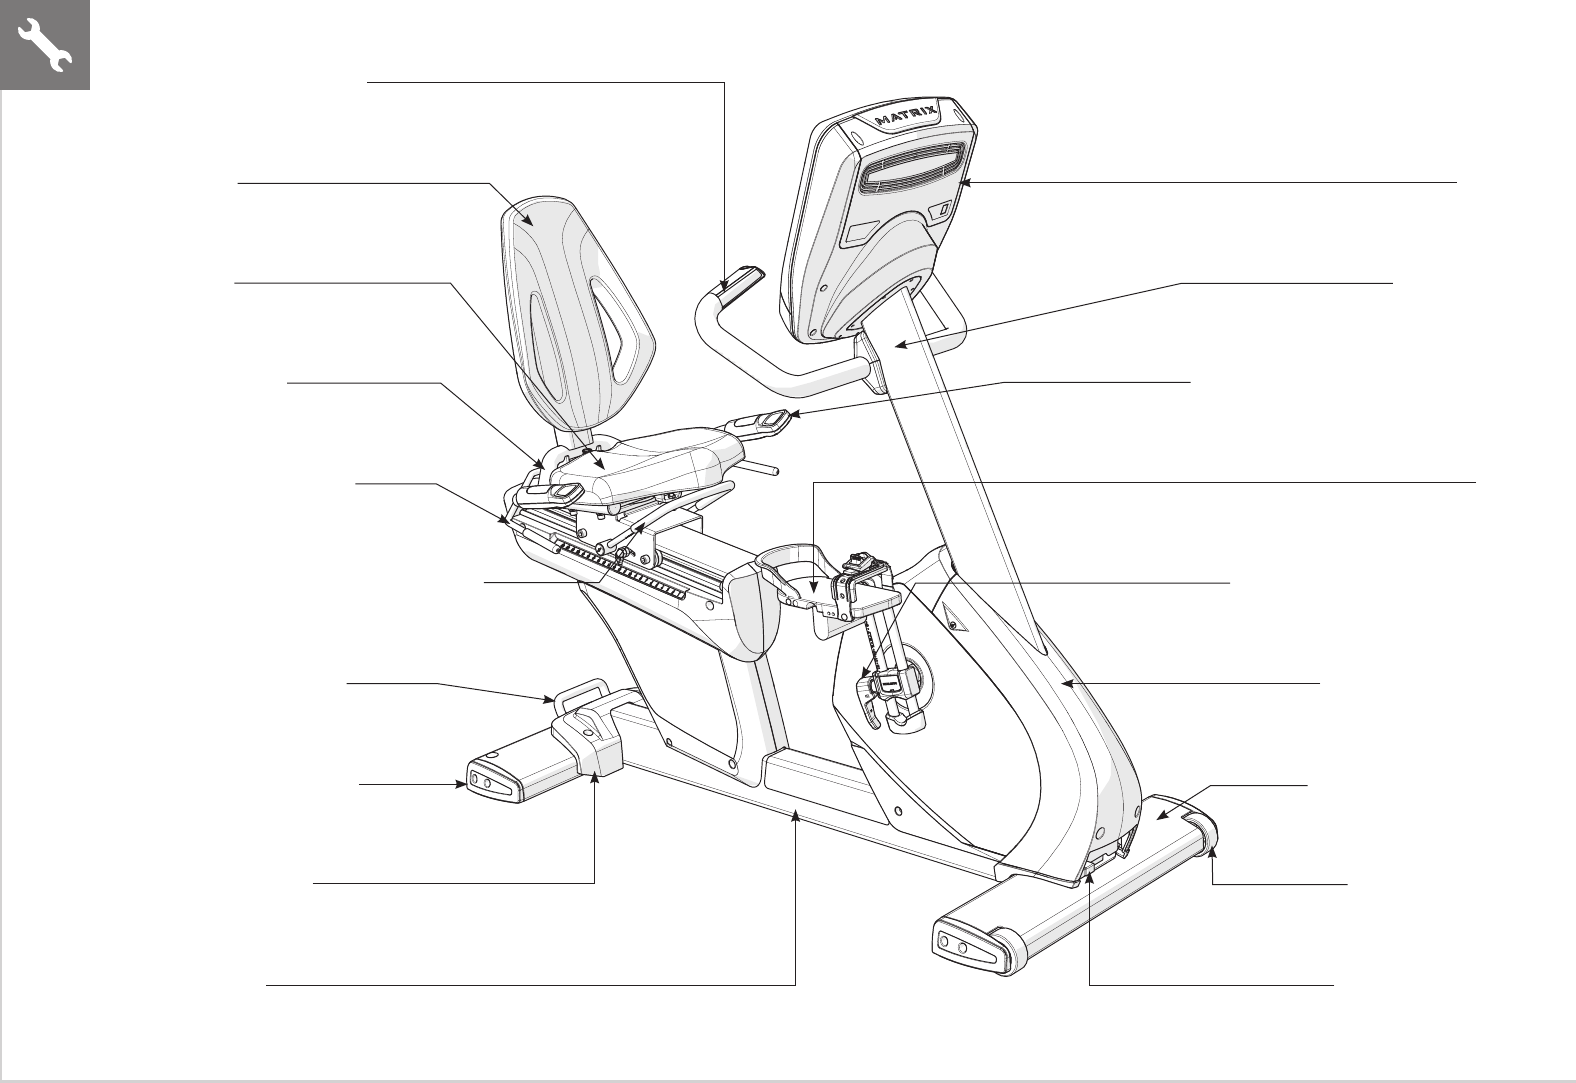
ASSEMBLY
TOOLS REQUIRED:
F4 mm Allen Wrench
F6 mm Allen Wrench
FPedal Wrench (15mm)
FPhillips Screwdriver
PARTS INCLUDED:
F1 Main Frame
F1 Rear Stabilizer Tube
F1 Front Stabilizer Tube
F1 Rear Frame Handle
F1 Rear Frame Cover
F1 Console Mast
F1 Console Handlebars
F1 Front Shroud Cover
F1 Seat Assembly
F1 Air Cylinder (for seat assembly)
F1 Seat Base
F1 Seat Back
F2 Pedals
F1 Hardware Kit
Console sold separately
ENGLISH
NOTE:
1. This equipment is designed as an auxiliary device to
assist medical personnel to improve their patients’
health.
2. This equipment is designed for uses in cardiovascular,
physical rehabilitations and recoveries under medical
personnel’s instructions and monitoring.
3. This equipment conforms to IEC60601-1-2 and its
classication is Class 2a.
4. The waterproof level of this equipment is IPXO.
5. This equipment has no sterilization.
6. This equipment is not suitable for uses in Oxygen rich
environments.
7. This equipment is designed for continous operation.
8. This equipment complies with WEEE directives for
disposal and recycling.
9. Ambient temperature for operating this equipment is
5°C - 40°C (with NO air-ow), nominal 25°C.
10. Relative Humidity for operating this equipment is 10% -
Libble takes abuse of its services very seriously. We're committed to dealing with such abuse according to the laws in your country of residence. When you submit a report, we'll investigate it and take the appropriate action. We'll get back to you only if we require additional details or have more information to share.
Product:
Forumrules
To achieve meaningful questions, we apply the following rules:
First, read the manual;
Check if your question has been asked previously;
Try to ask your question as clearly as possible;
Did you already try to solve the problem? Please mention this;
Is your problem solved by a visitor then let him/her know in this forum;
To give a response to a question or answer, do not use this form but click on the button 'reply to this question';
Your question will be posted here and emailed to our subscribers. Therefore, avoid filling in personal details.
Register
Register getting emails for Matrix R3XM at:
new questions and answers
new manuals
You will receive an email to register for one or both of the options.
Get your user manual by e-mail
Enter your email address to receive the manual of Matrix R3XM in the language / languages: English, German, Dutch, Danish, French, Italian, Polish, Portuguese, Spanish as an attachment in your email.
The manual is 30,8 mb in size.
You will receive the manual in your email within minutes. If you have not received an email, then probably have entered the wrong email address or your mailbox is too full. In addition, it may be that your ISP may have a maximum size for emails to receive.
If you have not received an email with the manual within fifteen minutes, it may be that you have a entered a wrong email address or that your ISP has set a maximum size to receive email that is smaller than the size of the manual.
The email address you have provided is not correct.
Please check the email address and correct it.
Your question is posted on this page
Would you like to receive an email when new answers and questions are posted? Please enter your email address.