448248
10
Zoom out
Zoom in
Previous page
1/20
Next page
GB
Angle Grinder Instruction Manual
F
Meuleuse d’Angle Manuel d’Instructions
D
Winkelschleifer Betriebsanleitung
I
Smerigliatrice Angolare Istruzioni d’Uso
NL
Haakse slijpmachine Gebruiksaanwijzing
E
Amoladora Manual de Instrucciones
P
Rebarbadora Manual de Instruço˜es
DK
Vinkelsliber Brugsanvisning
S
Vinkelslipmaskin Bruksanvisning
N
Vinkelsliper Bruksanvisning
SF
Kulmahiomakone Käyttöohje
GR
°ˆÓÈ·Îfi˜ §ÂÈ·ÓÙ‹Ú·˜ √‰ËÁ›Â˜ ÃÚ‹Ûˆ˜
180 mm (7’’) 9047/9047S
180 mm (7’’) 9057/9057S
230 mm (9’’) 9049/9049S
230 mm (9’’) 9059/9059S
9047F/9047SF
9057F/9057SF
9049F/9049SF
9059F/9059SF
9047(cover) (’100. 12. 15)
1 2
3
4
5 6
7
15°– 30°
2
9047 (illust) (’100. 12. 25)
Symbols
The following show the symbols used for the tool. Be sure that you understand their meaning before use.
Symboles
Nous donnons ci-dessous les symboles utilisés pour l’outil. Assurez-vous que vous en avez bien compris la
signification avant d’utiliser l’outil.
Symbole
Die folgenden Symbole werden für die Maschine verwendet. Machen Sie sich vor der Benutzung unbedingt mit
ihrer Bedeutung vertraut.
Symboli
Per questo utensile vengono usati i simboli seguenti. Bisogna capire il loro significato prima di usare l’utensile.
Symbolen
Voor dit gereedschap worden de volgende symbolen gebruikt. Zorg ervoor dat u de betekenis van deze
symbolen begrijpt alvorens het gereedschap te gebruiken.
Símbolos
A continuación se muestran los símbolos utilizados con esta herramienta. Asegúrese de que entiende su
significado antes de usarla.
Símbolos
O seguinte mostra os símbolos utilizados para a ferramenta. Certifique-se de que compreende o seu
significado antes da utilização.
Symboler
Nedenstående symboler er anvendt i forbindelse med denne maskine. Vær sikker på, at De har forstået
symbolernes betydning, før maskinen anvendes.
Symboler
Det följande visar de symboler som används för den här maskinen. Se noga till att du förstår deras innebörd
innan maskinen används.
Symbolene
Følgende viser de symblene som brukes for maskinen. Det er viktig å forstå betydningen av disse før maskinen
tas i bruk.
Symbolit
Alla on esitetty koneessa käytetyt symbolit. Opettele näiden merkitys, ennen kuin käytät konetta.
™‡Ì‚ÔÏ·
∆· ·ÎfiÏÔ˘ı· ‰Â›¯ÓÔ˘Ó Ù· ۇ̂ÔÏ· Ô˘ ¯ÚËÛÈÌÔÔÈÔ‡ÓÙ·È ÁÈ· ÙÔ Ì˯¿ÓËÌ·. µÂ‚·Èˆı›Ù fiÙÈ
ηٷϷ‚·›ÓÂÙ ÙË ÛËÌ·Û›· ÙÔ˘˜ ÚÈÓ ·fi ÙË ¯Ú‹ÛË.
[ Read instruction manual.
[ Lire le mode d’emploi.
[ Bitte Bedienungsanleitung lesen.
[ Leggete il manuale di istruzioni.
[ Lees de gebruiksaanwijzing.
[ Lea el manual de instrucciones.
[ Leia o manual de instruço˜es.
[ Læs brugsanvisningen.
[ Läs bruksanvisningen.
[ Les bruksanvisingen.
[ Katso käyttöohjeita.
[ ¢È·‚¿ÛÙ ÙȘ Ô‰ËÁ›Â˜ ¯Ú‹Û˘.
[ DOUBLE INSULATION
[ DOUBLE ISOLATION
[ DOPPELT SCHUTZISOLIERT
[ DOPPIO ISOLAMENTO
[ DUBBELE ISOLATIE
[ DOBLE AISLAMIENTO
[ DUPLO ISOLAMENTO
[ DOBBELT ISOLATION
[ DUBBEL ISOLERING
[ DOBBEL ISOLERING
[ KAKSINKERTAINEN ERISTYS
[ ¢π¶§∏ ª√¡ø™∏
[ Wear safety glasses.
[ Porter des lunettes de protection.
[ Schutzbrille tragen.
[ Indossare occhiali di protezione.
[ Draag een veiligheidsbril.
[ Póngase gafas de seguridad.
[ Utilize óculos de segurança.
[ Bær sikkerhedsbriller.
[ Bär skyddsglasögon.
[ Bruk vernebriller.
[ Käytä suojalaseja.
[ ºÔÚ¤ÛÙ Á˘·ÏÈ¿ ·Ûˇ·Ï›·˜.
9047 (illust) (’100. 12. 25)
3
ENGLISH
Explanation of general view
1 Wheel guard
2 Screw
3 Notch
4 Side grip
5 Lock nut
6 Depressed center wheel
7 Inner flange
8 Super flange
9 Lock nut wrench
0 Shaft lock
q Switch trigger
w Lock lever
e Brush holder cap
r Screwdriver
SPECIFICATIONS
Model 9047/9047S 9057/9057S 9049/9049S 9059/9059S
9047F/9047SF 9057F/9057SF 9049F/9049SF 9059F/9059SF
Depressed center wheel diameter ........................ 180 mm 180 mm 230 mm 230 mm
Spindle thread ....................................................... M14 M14 M14 M14
No load speed (min
–1
) .......................................... 8,500 8,500 6,600 6,600
Overall length ........................................................ 470 mm 470 mm 470 mm 470 mm
Net weight ............................................................. 4.8 kg 5.1 kg 4.8 kg 5.1 kg
Due to our continuing program of research and
development, the specifications herein are subject
to change without notice.
Note: Specifications may differ from country to
country.
Power supply
The tool should be connected only to a power supply
of the same voltage as indicated on the nameplate,
and can only be operated on single-phase AC supply.
They are double-insulated in accordance with Euro-
pean Standard and can, therefore, also be used from
sockets without earth wire.
For models 9047, 9049, 9057 and 9059, public
low-voltage distribution systems of between
220 V and 250 V
Switching operations of electric apparatus cause volt-
age fluctuations. The operation of this device under
unfavorable mains conditions can have adverse
effects to the operation of other equipment. With a
mains impedance equal or less than 0.22 (for 9047
and 9049) / 0.24 (for 9057 and 9059) Ohms it can be
presumed that there will be no negative effects.
The mains socket used for this device must be
protected with a fuse or protective circuit breaker
having slow tripping characteristics.
Safety hints
For your own safety, please refer to the enclosed
safety instructions.
ADDITIONAL SAFETY RULES ENB031-3
1. Always wear safety goggles and ear protec-
tors during operation.
2. Always be sure that the tool is switched off
and unplugged before carrying out any work
on the tool.
3. Keep guards in place.
4. Use only wheels with correct size and wheels
having a maximum operating speed at least as
high as the highest No Load Speed marked on
the tool’s nameplate.When using depressed
center wheels, be sure to use only fiberglass-
reinforced wheels.
5. Check the wheel carefully for cracks or dam-
age before operation. Replace cracked or
damaged wheel immediately.
6. Observe the instructions of the manufacturer
for correct mounting and use of wheels.
Handle and store wheels with care.
7. Do not use separate reducing bushings or
adaptors to adapt large hole abrasive wheels.
8. Use only flanges specified for this tool.
9. Do not damage the spindle, the flange (espe-
cially the installing surface) or the lock nut.
Damage to these parts could result in wheel
breakage.
10. For tools intended to be fitted with threaded
hole wheel, ensure that the thread in the wheel
is long enough to accept the spindle length.
11. Before using the tool on an actual workpiece,
test run the tool at the highest no load speed
for at least 30 seconds in a safe position. Stop
immediately if there is any vibration or wob-
bling that could indicate poor installation or a
poorly balanced wheel. Check the tool to
determine the cause.
12. Check that the workpiece is properly sup-
ported.
13. Hold the tool firmly.
14. Keep hands away from rotating parts.
15. Make sure the wheel is not contacting the
workpiece before the switch is turned on.
16. Use the specified surface of the wheel to
perform the grinding.
17. Do not use cutting off wheel for side grinding.
18. Watch out for flying sparks. Hold the tool so
that sparks fly away from you and other per-
sons or flammable materials.
19. Pay attention that the wheel continues to
rotate after the tool is switched off.
20. Do not touch the workpiece immediately after
operation; it may be extremely hot and could
burn your skin.
21. Position the tool so that the power cord
always stays behind the tool during operation.
22. If working place is extremely hot and humid, or
badly polluted by conductive dust, use a
short-circuit breaker (30 mA) to assure opera-
tor safety.
4
9047(E) (’100. 12. 26)
23. Do not use the tool on any materials contain-
ing asbestos.
24. Do not use water or grinding lubricant.
SAVE THESE INSTRUCTIONS.
OPERATING INSTRUCTIONS
Installing wheel guard (Fig. 1)
When installing a depressed center wheel or an
abrasive cut-off wheel, always use a wheel guard.
Mount the wheel guard with the tab on the wheel
guard band aligned with the notch on the bearing box.
Then rotate the wheel guard 160 degrees counter-
clockwise. Be sure to tighten the screw securely.
Installing side grip (auxiliary handle) (Fig. 2)
Always install the side grip on the tool securely before
operation. The side grip can be installed in any of
three positions on the sides of the tool, whichever is
convenient and keeps the guard properly positioned.
Always hold the tool’s switch handle and the side grip
firmly with both hands during operation.
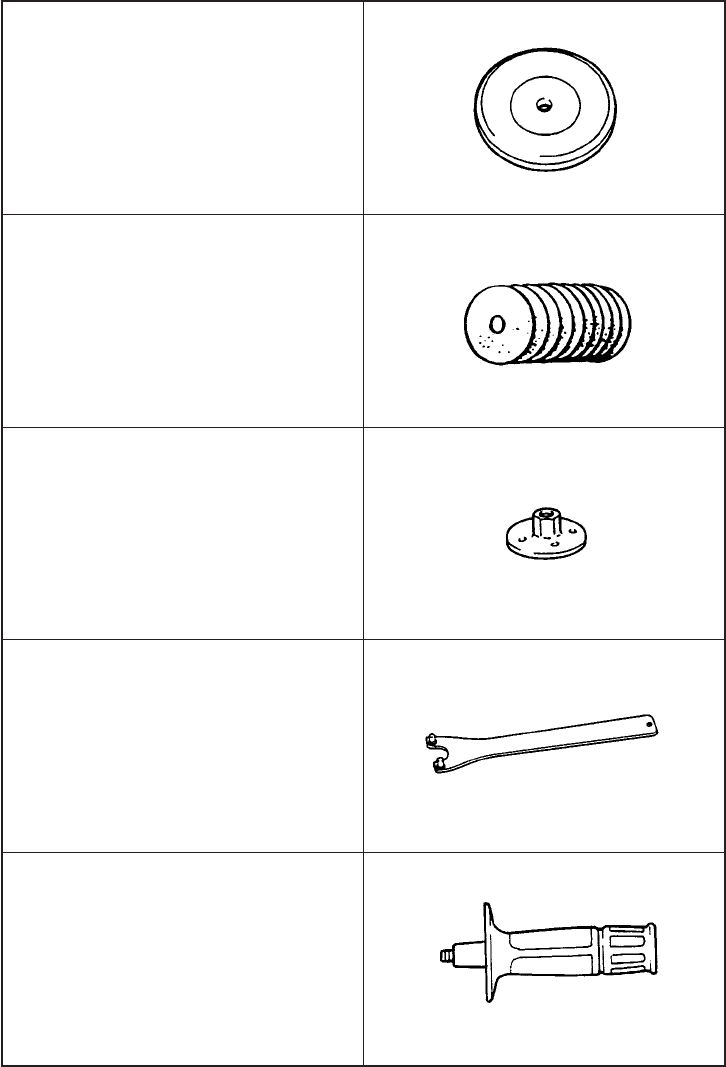
Installing or removing depressed center
wheel (Fig.3&4)
Important:
Always be sure that the tool is switched off and
unplugged before installing or removing the wheel.
Mount the inner flange onto the spindle. Fit the wheel
on over the inner flange and screw the lock nut onto
the spindle.
To tighten the lock nut, press the shaft lock firmly so
that the spindle cannot revolve, then use the lock nut
wrench and securely tighten clockwise.
To remove the wheel, follow the installation procedure
in reverse.
NOTE:
Super flange
Models 9047F, 9057F, 9049F, 9059F, 9047SF,
9057SF, 9049SF and 9059SF are standard-equipped
with a super flange.
Only 1/3 of efforts needed to undo lock nut, compared
with conventional type.
Switch action (Fig. 5)
CAUTION:
Before plugging the tool, always check to see that the
switch trigger actuates properly and returns to the
‘‘OFF’ position when released.
For U.K., Australia, France and Algeria
To prevent the trigger from being accidentally actu-
ated, a lock lever is provided. To start the tool, push
the lock lever in and then pull the trigger. Release the
trigger to stop.
For Germany, Austria, Italy, Netherlands, Belgium,
Spain, Portugal, Denmark, Sweden, Norway,
Finland and Greece
To prevent the trigger from being accidentally actu-
ated, a lock lever is provided. To start the tool, push
the lock lever in and then pull the trigger. Release the
trigger to stop. For continuous operation, push the
lock lever in, pull the trigger and then push the lock
lever further in. To stop the tool from the locked
position, pull the trigger fully, then release it.
For other countries than the above countries
To start the tool, simply pull the trigger. Release the
trigger to stop. For continuous operation, pull the
trigger and then push the lock lever. To stop the tool
from the locked position, pull the trigger fully, then
release it.
NOTE:
Models 9047S, 9057S, 9049S, 9059S, 9047SF,
9057SF, 9049SF and 9059SF begin to run slowly
when they are turned on. This soft start feature
assures smoother operation and less operator
fatigue.
Operation (Fig. 6)
Hold the tool firmly. Turn the tool on and then apply
the wheel or disc to the workpiece.
In general, keep the edge of the wheel or disc at an
angle of about 15° 30° to the workpiece surface.
During the break-in period with a new wheel, do not
work the tool in the B direction or it will cut into the
workpiece. Once the edge of the wheel has been
rounded off by use, the wheel may be worked in both
A and B directions.
WARNING:
It should never be necessary to force the tool. The
weight of the tool applies adequate pressure. Forc-
ing and excessive pressure could cause dangerous
wheel breakage.
Continued use of a worn-out wheel may result in
wheel explosion and serious personal injury.
Depressed center wheel should not be used after it
has been worn down to 115 mm in diameter. Use of
the wheel after this point is unsafe and it should be
removed from service and rendered unusable by
intentional destruction.
MAINTENANCE
CAUTION:
Always be sure that the tool is switched off and
unplugged before carrying out any work on the tool.
Replacement of carbon brushes (Fig. 7)
Whenever carbon brushes must be replaced, they cut
out the tool automatically. When this occurs, replace
the carbon brushes at the same time. Use only
identical carbon brushes.
To maintain product safety and reliability, repairs,
maintenance or adjustment should be carried out by a
Makita Authorized Service Center.
9047(E) (’100. 12. 25)
5
NEDERLANDS
Verklaring van algemene gegevens
1 Beschermkap
2 Schroef
3 Inkeping
4 Zijhandgreep
5 Sluitmoer
6 Afbraamschijf met verzonken
asgat
7 Binnenflens
8 Speciale flens
9 Nokkensleutel
0 Asblokkering
q Trekschakelaar
w Veiligheidspal
e Koolborsteldop
r Schroevendraaier
TECHNISCHE GEGEVENS
Model 9047/9047S 9057/9057S 9049/9049S 9059/9059S
9047F/9047SF 9057F/9057SF 9049F/9049SF 9059F/9059SF
Diameter slijpschijf ................................................ 180 mm 180 mm 230 mm 230 mm
Asschroefdraad ..................................................... M14 M14 M14 M14
Toerental onbelast/min. (min
–1
) ............................ 8 500 8 500 6 600 6 600
Totale lengte ......................................................... 470 mm 470 mm 470 mm 470 mm
Netto gewicht ........................................................ 4,8 kg 5,1 kg 4,8 kg 5,1 kg
In verband met ononderbroken research en ontwik-
keling behouden wij ons het recht voor bo-
venstaande technische gegevens te wijzigen zon-
der voorafgaande kennisgeving.
Opmerking: De technische gegevens kunnen van
land tot land verschillen.
Stroomvoorziening
De machine mag alleen worden aangesloten op een
stroombron van hetzelfde voltage als aangegeven op de
naamplaat, en kan alleen op enkel-fase wisselstroom
worden gebruikt. De machine is dubbel-geı¨soleerd vol-
gens de Europese standaard en kan derhalve ook op
een niet-geaard stopcontact worden aangesloten.
Voor de modellen 9047, 9049, 9057 en 9059, open-
bare laagspanningsverdeelsystemen van tussen
220 V en 250 V
Schakelbedieningen van elektrische toestellen ver-
oorzaken spanningsschommelingen. De bediening
van dit gereedschap onder ongunstige lichtnetom-
standigheden kan een nadelige invloed hebben op de
bediening van andere apparatuur. Het kan worden
aangenomen dat er geen negatieve effecten zullen
zijn wanneer de netimpedantie gelijk is aan of minder
is dan 0,22 (voor 9047 en 9049)/0,24 (voor 9057 en
9059) Ohm.
Het stopcontact dat voor dit gereedschap wordt
gebruikt, moet beveiligd zijn door een zekering of een
stroomonderbreker met trage afschakelkarakteristie-
ken.
Veiligheidswenken
Voor uw veiligheid dient u de bijgevoegde Veiligheids-
voorschriften nauwkeurig op te volgen.
AANVULLENDE
VEILIGHEIDSVOORSCHRIFTEN VOOR
HET GEREEDSCHAP
1. Draag tijdens het gebruik van het gereedschap
altijd een veiligheidsbril en oorbeschermers.
2. Schakel het gereedschap uit en haal zijn net-
snoer uit het stopcontact alvorens enig werk
aan het gereedschap uit te voeren.
3. Houd de beschermkappen op hun plaats.
4. Gebruik uitsluitend schijven van de juiste
grootte en met een maximaal bedrijfstoerental
dat minstens even hoog is als het hoogste ‘No
Load Speed’’ (toerental onbelast) dat op de
naamplaat van het gereedschap is opgegeven.
Wanneer u schijven met een verzonken asgat
gebruikt, gebruik dan uitsluitend schijven die
met glasvezel zijn versterkt.
5. Controleer de schijf vóór elk gebruik zorgvul-
dig op scheuren, barsten of beschadiging.
Vervang een gescheurd, gebarsten of bescha-
digd schijf onmiddellijk.
6. Volg de instructies van de fabrikant voor het
juist monteren en gebruiken van de schijven
zorgvuldig op. Behandel de schijven voorzich-
tig en berg deze met zorg op.
7. Gebruik geen afzonderlijke verloopmoffen of
adapters om schuurschijven met een groot
asgat aan dit gereedschap aan te passen.
8. Gebruik uitsluitend flenzen die voor dit
gereedschap zijn bestemd.
9. Pas op dat u de as, de flens (vooral het
montagevlak) of de klembout niet beschadigt.
Beschadiging van deze onderdelen kan leiden
tot schijfbreuk.
10. Voor gereedschap waarop schijven met een
geschroefd asgat dienen gemonteerd te
worden, moet u ervoor zorgen dat de
schroefdraad in de schijf lang genoeg zodat
de as helemaal erin gaat.
11. Laat het gereedschap tenminste 30 seconden
lang met het maximale onbelaste toerental
draaien op een veilige plaats alvorens het op
een werkstuk te gebruiken. Stop het gereed-
schap onmiddellijk als er sprake is van trilling
of beving die het gevolg kunnen zijn van
onjuiste installatie of een slecht uitgebalan-
ceerde schijf. Controleer het gereedschap om
de oorzaak van het probleem te bepalen.
12. Zorg ervoor dat het werkstuk goed onder-
steund is.
13. Houd het gereedschap stevig vast.
14. Houd uw handen uit de buurt van draaiende
onderdelen.
9047(Nl) (’100. 12. 26)
15
15. Zorg ervoor dat schuurschijf het werkstuk niet
raakt voordat het gereedschap is ingescha-
keld.
16. Voor slijpwerkzaamheden moet u het schijfop-
pervlak gebruiken dat daarvoor bestemd is.
17. Gebruik de doorslijpschijf niet voor zijdelings
slijpen.
18. Pas op voor rondvliegende vonken. Houd het
gereedschap zodanig vast dat er geen vonken
op uzelf, andere personen of ontvlambaar
materiaal terecht kunnen komen.
19. Houd er rekening mee dat de schijf nog een
tijdje blijft draaien nadat het gereedschap is
uitgeschakeld.
20. Raak het werkstuk niet aan onmiddellijk na het
werk; het werkstuk kan gloeiend heet zijn en
brandwonden veroorzaken.
21. Plaats het gereedschap zodanig dat zijn net-
snoer tijdens het gebruik altijd achter het
gereedschap blijft.
22. Indien de werkplaats uiterst warm en vochtig
is, of erg verontreinigd is door geleidend stof,
gebruik dan een stroomonderbreker (30 mA)
om de veiligheid van de gebruiker te verze-
keren.
23. Gebruik het gereedschap niet op materialen
die asbest bevatten.
24. Gebruik geen water of slijpolie.
BEWAAR DEZE VOORSCHRIFTEN.
BEDIENINGSVOORSCHRIFTEN
Monteren van de beschermkap (Fig. 1)
Wanneer u een afbraamschijf met een verzonken
asgat of een doorslijpschijf gebruikt, monteer dan
altijd een beschermkap. Monteer de beschermkap
zodanig dat de nok op de ring in de inkeping op het
tandwielhuis komt te zitten. Draai daarna de be-
schermkap 160 graden linksom. Zet de schroef goed
vast.
Monteren van de zijhandgreep
(hulphandgreep) (Fig. 2)
Monteer de zijhandgreep altijd vast op de machine
voordat u met het slijpen begint. De zijhandgreep kan
in een van de drie posities aan de zijkanten van de
machine worden bevestigd; kies de positie die voor u
het gemakkelijkst is en die de beschermkap op de
juiste plaats houdt. Houd tijdens het slijpen de
schakelaarhandgreep en de zijhandgreep altijd stevig
vast met beide handen.
Installeren en verwijderen van de
afbraamschijf (Fig. 3 en 4)
Belangrijk:
Zorg er altijd voor dat het apparaat uitgeschakeld is
en de aansluiting op de voedingsbron verbroken is,
alvorens de afbraamschijf te installeren of te verwij-
deren.
Monteer de binnenflens op de as. Plaats de schijf
over de binnenflens en bevestig het geheel stevig
door de sluitmoer op de as vast te draaien.
Voor het vastzetten van de sluitmoer, dient u stevig op
de asvergrendeling te drukken zodat de as niet rond
kan draaien en vervolgens met een nokkensleutel de
sluitmoer stevig naar rechts vast te draaien.
Om de schijf te verwijderen dient u in omgekeerde
volgorde van installatie te werk te gaan.
OPMERKING:
Speciale flens
De modellen 9047F, 9057F, 9049F, 9059F, 9047SF,
9057SF, 9049SF en 9059SF zijn standaard-uitgerust
met een speciale flens.
De sluitmoter kan worden losgedraaid met slechts 1/3
van de kracht die nodig is voor het conventionele
type.
Trekschakelaar (Fig. 5)
LET OP:
Alvorens de machine op het stopkontakt aan te
sluiten, dient u altijd te kontroleren of de trekschake-
laar behoorlijk werkt en bij loslaten onmiddelijk naar
de ‘OFF’’ positie terugkeert.
Voor het Verenigd Koninkrijk, Australië, Frankrijk
en Algerije
Een veiligheidspal is voorzien om te voorkomen dat
de trekschakelaar per toeval wordt ingedrukt. Om de
machine te starten, eerst de veiligheidspal indrukken
en daarna de trekschakelaar indrukken. Om de
machine te stoppen, de trekschakelaar loslaten.
Voor Duitsland, Oostenrijk, Italië, Nederland,
België, Spanje, Portugal, Denemarken,
Zweden, Noorwegen, Finland en Griekenland
Een veiligheidspal is voorzien om te voorkomen dat
de trekschakelaar per toeval wordt ingedrukt. Om de
machine te starten, eerst de veiligheidspal indrukken
en daarna de trekschakelaar indrukken. Om de
machine te stoppen, de trekschakelaar loslaten. Voor
continu gebruik, eerst de veiligheidspal indrukken,
daarna de trekschakelaar indrukken en daarna de
veiligheidspal verder indrukken. Om de machine
vanuit deze vergrendelde stand te stoppen, de trek-
schakelaar volledig indrukken en deze dan loslaten.
Voor andere dan de bovenvermelde landen
Om de machine te starten, gewoon de trekschakelaar
indruken. Om de machine te stoppen, de trekschake-
laar loslaten. Voor continu gebruik, de trekschakelaar
indrukken en dan de veiligheidspal indrukken. Om de
machine vanuit deze vergrendelde stand te stoppen,
de trekschakelaar volledig indrukken en deze dan
loslaten.
16
9047(Nl) (’100. 12. 25)
OPMERKING:
Bij Modellen 9047S, 9057S, 9049S, 9059S, 9047SF,
9057SF, 9049SF en 9059SF zal de schijf na het
inschakelen aanvankelijk langzaam draaien. Deze
langzame start verzekert een soepele werking en
voorkomt vermoeidheid van de gebruiker.
Bediening (Fig. 6)
Houd het gereedschap stevig vast. Schakel het appa-
raat in en breng vervolgens de schijf op het werkstuk.
In het algemeen dient u de rand van de schijf in een
hoek van 15° 30° ten opzichte van het werkstukop-
pervlakte houden.
Bij gebruik van een nieuwe schijf dient u deze niet in
de richting van B te gebruiken, aangezien deze
hierdoor in het werkstuk kan snijden. Wanneer de
rand van de schijf door gebruik ronder geworden is,
kunt u de schijf zowel in de A als de B richting
gebruiken.
WAARSCHUWING:
U dient nooit kracht op het apparaat uit te oefenen.
Het eigen gewicht van het gereedschap levert vol-
doende druk op. Krachtzetten en overmatig druk
kan resulteren in het breken van de schijf, hetgeen
gevaarlijk is.
Continu gebruik van een versleten schijf kan er
oorzaak van zijn dat de schijf explodeert met ernstig
persoonlijk letsel als gevolg. Afbraamschijven met
een verzonken asgat mogen niet verder worden
gebruikt wanneer ze tot 115 mm in diameter zijn
afgesleten. Voortgezet gebruik van een dergelijke
schijf is onveilig; verwijder de schijf en maak deze
onbruikbaar door opzettelijke vernietiging.
ONDERHOUD
LET OP:
Zorg er altijd voor dat de machine is uitgeschakeld en
de stekker uit het stopcontact is verwijderd alvorens
onderhoud aan de machine uit te voeren.
Vervangen van de koolborstels (Fig. 7)
Wanneer de koolborstels dienen te worden vervan-
gen, zal de machine automatisch worden uitge-
schakeld. Wanneer dit gebeurt, dient u beide koolbor-
stels tegelijkertijd te vervangen. Gebruik uitsluitend
identieke koolborstels.
Opdat het gereedschap veilig en betrouwbaar blijft,
dienen alle reparaties, onderhoud of afstellingen te
worden uitgevoerd bij een erkend Makita service
centrum.
9047(Nl) (’100. 12. 25)
17
GB
ACCESSORIES
CAUTION:
These accessories or attachments are recommended for use with your Makita tool specified in this manual. The
use of any other accessories or attachments might present a risk of injury to persons. The accessories or
attachments should be used only in the proper and intended manner.
F
ACCESSOIRES
ATTENTION :
Ces accessoires ou ces fixations sont recommandés pour l’utilisation de l’outil Makita spécifié dans ce manuel.
L’utilisation d’autres accessoires ou fixations peut présenter un risque de blessures. Les accessoires ou les
fixations ne devront être utilisés que dans le but et de la manière prévus.
D
ZUBEHÖR
VORSICHT:
Das mitgelieferte Zubehör ist speziell für den Gebrauch mit dem in dieser Betriebsanleitung angegebenen
Makita-Elektrowerkzeug vorgesehen. Bei Verwendung von Fremdzubehör in Verbindung mit dieser Maschine
besteht Verletzungsgefahr.
I
ACCESSORI
ATTENZIONE:
Gli accessori o raccordi seguenti sono raccomandati per l’uso con l’utensile Makita specificato in questo
manuale. L’uso di qualsiasi altro accessorio o raccordo potrebbe causare pericoli di ferite alle persone. Gli
accessori o raccordi devono essere usati soltanto nel modo corretto e specificato.
NL
ACCESSOIRES
LET OP:
Deze accessoires of hulpstukken zijn aanbevolen voor gebruik met het Makita gereedschap dat in deze
gebruiksaanwijzing is beschreven. Het gebruik van andere accessoires of hulpstukken kan gevaar voor
persoonlijke verwondingen opleveren. De accessoires of hulpstukken dienen alleen op de juiste en voorge-
schreven manier te worden gebruikt.
E
ACCESORIOS
PRECAUCIÓN:
Estos accesorios o acoplamientos están recomendados para usar con la herramienta Makita especificada en
este manual. Con el uso de cualquier otro accesorio o acoplamiento se podría correr el riesgo de producir
heridas a personas. Los accesorios o acoplamientos deberán usarse solamente de la manera apropiada y para
la que ha sido designados.
9047 (Accessories) (’100. 12. 25)
37
P
ACESSÓRIOS
PRECAUÇÃO:
Estes acessórios ou acoplamentos são os recomendados para utilização na ferramenta Makita especificada
neste manual. A utilização de quaisquer outros acessórios ou acoplamentos poderá ser perigosa para o
operador. Os acessórios ou acoplamentos deverão ser utilizados de maneira adequada e apenas para os fins
a que se destinam.
DK
TILBEHØR
ADVARSEL:
Dette udstyr og tilbehør bør anvendes sammen med Deres Makita maskine, sådan som det er beskrevet i
denne vejledning. Anvendelse af andet udstyr eller tilbehør kan medføre personskade. Tilbehøret bør kun
anvendes til det, det er beregnet til.
S
TILLBEHÖR
FÖRSIKTIGHET:
Dessa tillbehör eller tillsatser rekommenderas endast för användning tillsammans med din Makita maskin som
specifieras i denna bruksanvisning. Användning av andra tillbehör eller tillsatser kan medföra risk för
personskador. Tillbehören och tillsatserna får endast användas lämpligt och där för avsett sätt.
N
TILBEHØR
NB!
Dette tilbehøret eller utstyret anbefales til å brukes sammen med din Makita maskin som er spesifisert i denne
bruksanvisningen. Bruk av annet tilbehør eller utstyr kan medføre en risiko for personskader. Tilbehør og utstyr
bare brukes som spesifisert og bare til det det er beregnet til.
SF
LISÄVARUSTEET
VARO:
Tässä käyttöohjeessa mainitun Makita-koneen kanssa suositellaan seuraavien lisälaitteiden ja -varusteiden
käyttöä. Minkä tahansa muun lisälaitteen tai -varusteen käyttäminen saattaa aiheuttaa loukkaantumisvaaran.
Lisälaitteita ja -varusteita tulee käyttää ainoastaan niille sopivalla tavalla.
GR
∂•∞ƒ∆∏ª∞∆∞
¶ƒ√™√Ã∏:
∞˘Ù¿ Ù· ÂÍ·ÚÙ‹Ì·Ù· ÚÔÛ·ÚÙ‹Ì·Ù· Û˘ÓÈÛÙÒÓÙ·È ÁÈ· ¯Ú‹ÛË Ì ÙÔ Ì˯¿ÓËÌ· Ù˘ ª¿ÎÈÙ· Ô˘
ÂÚÈÁÚ¿ˇÂÙ·È ÛÙÔ ÂÁ¯ÂÈÚ›‰ÈÔ ·˘ÙÔ. ¯Ú‹ÛË ¿ÏÏˆÓ ÂÍ·ÚÙËÌ¿ÙˆÓ ÚÔÛ·ÚÙËÌ¿ÙˆÓ ÌÔÚ› Ó· ›ӷÈ
ÂÈΛӉ˘ÓË ÁÈ· ÙÚ·˘Ì·ÙÈÛÌfi ·ÙfïÓ. ∆· ÂÍ·ÚÙ‹Ì·Ù· ÚÔÛ·ÚÙ‹Ì·Ù· Ú¤ÂÈ Ó· ¯ÚËÛÈÌÔÔÈÔ‡ÓÙ·È
ÌfiÓÔ Ì ÙÔ ÛˆÛÙfi Î·È ÚÔÙÈı¤ÌÂÓÔ ÙÚfiÔ.
38
9047 (Accessories) (’100. 12. 25)
Wheel guard
Carter de protection
Schutzhaube
Protezione mola
Beschermkap
Protector de disco
Protector do disco
Slibeskiveafskærmning
Rondellskydd
Skivevern
Laikan suojus
¶ÚÔÛٷ٢ÙÈÎfi ÙÚÔ¯Ô‡
Depressed center wheel
Meule à centre concave
Schleifscheibe
Mola con centro depresso
Afbraamschijf
Disco de centro deprimido
Forkrøppet slibeskive
Sliprondell med försänkt nav
Skive med senket nav
Keskeltä ohennettu laikka
∆ÚÔ¯fi˜ ¯·ÌËψ̤ÓÔ˘ ΤÓÙÚÔ˘
Inner flange (For depressed center wheel)
Flasque intérieure (meule à centre concave)
Innenflansch (Schleifscheibe)
Flangia interna (mola con centro depresso)
Binnenflens (afbraamschijf)
Collarín interior (disco de centro deprimido)
Flange interior (disco de centro deprimido)
Indvendig flange (forkrøppet slibeskive)
Inre fläns (sliprondell med försänkt nav)
Innerflens (skive med senket nav)
Sisälaippa (keskeltä ohennettu laikka)
∂ÛˆÙÂÚÈ΋ ˇÏ¿ÓÙ˙· (ÙÚÔ¯fi˜ ¯·ÌËψ̤ÓÔ˘
ΤÓÙÚÔ˘)
Lock nut (For depressed center wheel)
Ecrou de blocage (meule à centre concave)
Sicherungsmutter (Schleifscheibe)
Controdado (mola con centro depresso)
Borgmoer (afbraamschijf)
Tuerca de fijación (disco de centro deprimido)
Porca de bloqueio (disco de centro deprimido)
Flangemøtrik (forkrøppet slibeskive)
Låsmutter (sliprondell med försänkt nav)
Låsemutter (skive med senket nav)
Lukkomutteri (keskeltä ohennettu laikka)
∞Ûˇ·ÏÈÛÙÈÎfi ÂÚÈÎfi¯ÏÈÔ
(ÙÚÔ¯fi˜ ¯·ÌËψ̤ÓÔ˘ ΤÓÙÚÔ˘)
9047 (Accessories) (’100. 12. 26)
39
Rubber pad
Plateau caoutchouc
Elastischer Schleifteller
Platorello di gomma
Rubberen steunschijf
Almohadilla de goma
Disco de borracha
Gummibagskive
Gummiplatta
Gummipute
Kumilevy
∂Ï·ÛÙÈÎfi ˘fiıÂÌ·
Abrasive disc
Disque abrasif
Fiberscheibe
Disco abrasivo
Schuurschijf
Disco abrasivo
Disco abrasivo
Slibeskive
Sliprondell
Slipeskive
Hiomalaikka
§ÂÈ·ÓÙÈÎfi˜ ‰›ÛÎÔ˜
Lock nut (For abrasive disc)
Ecrou de blocage (disque abrasif)
Sicherungsmutter (Fiberscheibe)
Controdado (disco abrasivo)
Borgmoer (schuurschijf)
Tuerca de fijación (disco abrasivo)
Porca de bloqueio (disco abrasivo)
Flangemøtrik (slibeskive)
Låsmutter (sliprondell)
Låsemutter (slipeskive)
Lukkomutteri (hiomalaikka)
∞Ûˇ·ÏÈÛÙÈÎfi ÂÚÈÎfi¯ÏÈÔ (ÏÂÈ·ÓÙÈÎfi˜ ‰›ÛÎÔ˜)
Lock nut wrench
Clé à ergots
Stirnlochschlüssel
Chiave per controdadi
Borgmoersleutel
Llave para la tuerca de fijación
Chave de porcas
Nøgle til flangemøtrik
Tappnyckel till låsmuttern
Skrunøkkel til låsemutter
Lukkomutteriavain
∫ÏÂȉ› ·Ûˇ·ÏÈÛÙÈÎÔ‡ ÂÚÈÎÔ¯Ï›Ô˘
Grip
Poignée
Bügelgriff
Impugnatura
Handvat
Empuñadura
Punho
Håndtag
Bygelhandtag
Grep
Kädensija
§·‚‹
40
9047 (Accessories) (’100. 12. 26)
ENGLISH
EC-DECLARATION OF CONFORMITY
The undersigned, Yasuhiko Kanzaki, authorized by Makita
Corporation, 3-11-8 Sumiyoshi-Cho, Anjo, Aichi 446-8502
Japan declares that this product
(Serial No. : series production)
manufactured by Makita Corporation in Japan is in compli-
ance with the following standards or standardized docu-
ments,
HD400, EN50144, EN55014, EN61000
in accordance with Council Directives, 73/23/EEC,
89/336/EEC and 98/37/EC.
FRANÇAISE
DÉCLARATION DE CONFORMITÉ CE
Je soussigné, Yasuhiko Kanzaki, mandaté par Makita
Corporation, 3-11-8 Sumiyoshi-Cho, Anjo, Aichi 446-8502
Japan, déclare que ce produit
(No. de série: production en série)
fabriqué par Makita Corporation au Japon, est conformes
aux normes ou aux documents normalisés suivants,
HD400, EN50144, EN55014, EN61000
conformément aux Directives du Conseil, 73/23/CEE,
89/336/CEE et 98/37/EG.
DEUTSCH
CE-KONFORMITÄTSERKLÄRUNG
Hiermit erklärt der Unterzeichnete, Yasuhiko Kanzaki,
Bevollmächtigter von Makita Corporation, 3-11-8
Sumiyoshi-Cho, Anjo, Aichi 446-8502 Japan, daß dieses
von der Firma Makita Corporation in Japan hergestellte
Produkt
(Serien-Nr.: Serienproduktion)
gemäß den Ratsdirektiven 73/23/EWG, 89/336/EWG und
98/37/EG mit den folgenden Normen bzw. Normendoku-
menten übereinstimmen:
HD400, EN50144, EN55014, EN61000.
ITALIANO
DICHIARAZIONE DI CONFORMITÀ CON
LE NORME DELLA COMUNITÀ EUROPEA
Il sottoscritto Yasuhiko Kanzaki, con l’autorizzazione della
Makita Corporation, 3-11-8 Sumiyoshi-Cho, Anjo, Aichi
446-8502 Japan, dichiara che questo prodotto
(Numero di serie: Produzione in serie)
fabbricato dalla Makita Corporation in Giappone è conformi
alle direttive europee riportate di seguito:
HD400, EN50144, EN55014, EN61000
secondo le direttive del Consiglio 73/23/CEE, 89/336/CEE
e 98/37/CE.
NEDERLANDS
EG-VERKLARING VAN CONFORMITEIT
De ondergetekende, Yasuhiko Kanzaki, gevolmachtigd
door Makita Corporation, 3-11-8 Sumiyoshi-Cho, Anjo,
Aichi 446-8502 Japan verklaart dat dit produkt
(Serienr. : serieproduktie)
vervaardigd door Makita Corporation in Japan voldoet aan
de volgende normen of genormaliseerde documenten,
HD400, EN50144, EN55014, EN61000
in overeenstemming met de richtlijnen van de Raad
73/23/EEC, 89/336/EEC en 98/37/EC.
ESPAÑOL
DECLARACIÓN DE CONFORMIDAD DE LA CE
El abajo firmante, Yasuhiko Kanzaki, autorizado por Makita
Corporation, 3-11-8 Sumiyoshi-Cho, Anjo, Aichi 446-8502
Japan, declara que este producto
(Número de serie: producción en serie)
fabricado por Makita Corporation en Japón cumple las
siguientes normas o documentos normalizados,
HD400, EN50144, EN55014, EN61000
de acuerdo con las directivas comunitarias, 73/23/EEC,
89/336/EEC y 98/37/CE.
Yasuhiko Kanzaki
CE 96
Director Amministratore
Directeur Directeur
Direktor Director
MAKITA INTERNATIONAL EUROPE LTD.
Michigan Drive, Tongwell, Milton Keynes,
Bucks MK15 8JD, ENGLAND
9047 (back) (’100. 12. 25)
41
PORTUGUÊS
DECLARAÇÃO DE CONFORMIDADE DA CE
O abaixo assinado, Yasuhiko Kanzaki, autorizado pela
Makita Corporation, 3-11-8 Sumiyoshi-Cho, Anjo, Aichi
446-8502 Japan, declara que este produto
(N. de série: produção em série)
fabricado pela Makita Corporation no Japão obedece às
seguintes normas ou documentos normalizados,
HD400, EN50144, EN55014, EN61000
de acordo com as directivas 73/23/CEE, 89/336/CEE e
98/37/CE do Conselho.
DANSK
EU-DEKLARATION OM KONFORMITET
Undertegnede, Yasuhiko Kanzaki, med fuldmagt fra Makita
Corporation, 3-11-8 Sumiyoshi-Cho, Anjo, Aichi 446-8502
Japan, erklærer hermed, at dette produkt
(Løbenummer: serieproduktion)
fremstillet af Makita Corporation i Japan, er i overensstem-
melse med de følgende standarder eller normsættende
dokumenter,
HD400, EN50144, EN55014, EN61000
i overensstemmelse med Rådets Direktiver 73/23/EEC,
89/336/EEC og 98/37/EC.
SVENSKA
EG-DEKLARATION OM
ÖVERENSSTÄMMELSE
Undertecknad, Yasuhiko Kanzaki, auktoriserad av Makita
Corporation, 3-11-8 Sumiyoshi-Cho, Anjo, Aichi 446-8502
Japan deklarerar att denna produkt
(serienummer: serieproduktion)
tillverkad av Makita Corporation i Japan, uppfyller kraven i
följande standard eller standardiserade dokument,
HD400, EN50144, EN55014, EN61000
i enlighet med EG-direktiven 73/23/EEC, 89/336/EEC och
98/37/EC.
NORSK
EUs SAMSVARS-ERKLÆRING
Undertegnede, Yasuhiko Kanzaki, med fullmakt fra Makita
Corporation, 3-11-8 Sumiyoshi-Cho, Anjo, Aichi 446-8502
Japan bekrefter herved at dette produktet
(Serienr. : serieproduksjon)
fabrikert av Makita Corporation, Japan, er i overensstem-
melse med følgende standarder eller standardiserte doku-
menter:
HD400, EN50144, EN55014, EN61000,
i samsvar med Råds-direktivene, 73/23/EEC, 89/336/EEC
og 98/37/EC.
SUOMI
VAKUUTUS EC-VASTAAVUUDESTA
Makita Corporation, 3-11-8 Sumiyoshi-Cho, Anjo, Aichi
446-8502 Japan valtuuttamana allekirjoittanut,
Yasuhiko Kanzaki, vakuuttaa että tämä tämä tuote
(Sarja nro : sarjan tuotantoa)
valmistanut Makita Corporation Japanissa vastaa seuraa-
via standardeja tai stardardoituja asiakirjoja
HD400, EN50144, EN55014, EN61000
neuvoston direktiivien 73/23/EEC, 89/336/EEC ja 98/37/EC
mukaisesti.
∂§§∏¡π∫∞
¢∏§ø™∏ ™Àªª√ƒºø™∏™ ∂∫
˘ÔÁڿʈÓ, Yasuhiko Kanzaki, ÂÍÔ˘ÛÈÔ‰ÔÙË̤ÓÔ˜
·fi ÙËÓ ÂÙ·ÈÚ›· MakitaCorporation, 3-11-8
Sumiyoshi-Cho, Anjo, Aichi 446-8502 Japan, ‰ËÏÒÓÂÈ
fiÙÈ ·˘Ùfi ÙÔ ÚÔ˚fiÓ
(∞‡ÍˆÓ ∞Ú.: ·Ú·ÁˆÁ‹ ÛÂÈÚ¿˜)
ηٷÛ΢·Ṳ̂ÓÔ ·fi ÙËÓ ∂Ù·ÈÚ›· Makita ÛÙËÓ
π·ˆÓ›·, ‚Ú›ÛÎÂÙ·È ÛÂ Û˘Ìʈӛ· Ì ٷ ·ÎfiÏÔ˘ı·
ÚfiÙ˘· ‹ Ù˘ÔÔÈË̤ӷ ¤ÁÁÚ·Ê·,
HD400, EN50144, EN55014, EN61000
Û‡Ìʈӷ Ì ÙȘ √‰ËÁ›Â˜ ÙÔ˘ ™˘Ì‚Ô˘Ï›Ô˘, 73/23/EEC,
89/336/EEC Î·È 98/37/∫E.
Yasuhiko Kanzaki
CE 96
Director Direktor
Direktør Johtaja
Direktör ¢È¢ı˘ÓÙ‹˜
MAKITA INTERNATIONAL EUROPE LTD.
Michigan Drive, Tongwell, Milton Keynes,
Bucks MK15 8JD, ENGLAND
42
9047 (back) (’100. 12. 25)
ENGLISH
Noise And Vibration Of Model 9047, 9047S
The typical A-weighted noise levels are
sound pressure level: 89 dB (A)
sound power level: 102 dB (A)
Wear ear protection.
The typical weighted root mean square acceleration value
is 4 m/s
2
.
FRANÇAISE
Bruit et vibrations du modèle 9047, 9047S
Les niveaux de bruit pondérés A types sont:
niveau de pression sonore: 89 dB (A)
niveau de puissance du son: 102 dB (A)
Porter des protecteurs anti-bruit.
L’accélération pondérée est de 4 m/s
2
.
DEUTSCH
Geräusch- und Vibrationsentwicklung des
Modells 9047, 9047S
Die typischen A-bewerteten Geräuschpegel betragen:
Schalldruckpegel: 89 dB (A)
Schalleistungspegel: 102 dB (A)
Gehörschutz tragen.
Der gewichtete Effektivwert der Beschleunigung beträgt
4 m/s
2
.
ITALIANO
Rumore e vibrazione del modello 9047, 9047S
I livelli del rumore pesati secondo la curva A sono:
Livello pressione sonora: 89 dB (A)
Livello potenza sonora: 102 dB (A)
Indossare i paraorecchi.
Il valore quadratico medio di accellerazione è di 4 m/s
2
.
NEDERLANDS
Geluidsniveau en trilling van het model
9047, 9047S
De typische A-gewogen geluidsniveau’s zijn
geluidsdrukniveau: 89 dB (A)
geluidsenergie-niveau: 102 dB (A)
Draag oorbeschermers.
De typische gewogen effectieve versnellingswaarde is
4 m/s
2
.
ESPAÑOL
Ruido y vibración del modelo 9047, 9047S
Los niveles típicos de ruido ponderados A son
presión sonora: 89 dB (A)
nivel de potencia sonora: 102 dB (A)
Póngase protectores en los oídos.
El valor ponderado de la aceleración es de 4 m/s
2
.
PORTUGUÊS
Ruído e Vibração do Modelo 9047, 9047S
Os níveis normais de ruído A são
nível de pressão de som: 89 dB (A)
nível do sum: 102 dB (A)
Utilize protectores para os ouvidos
O valor médio da aceleração é 4 m/s
2
.
DANSK
Lyd og vibration fra model 9047, 9047S
De typiske A-vægtede lydniveauer er
lydtryksniveau: 89 dB (A)
lydeffektniveau: 102 dB (A)
Bær høreværn.
Den vægtede effektive accelerationsværdi er 4 m/s
2
.
SVENSKA
Buller och vibration hos modell 9047, 9047S
De typiska A-vägda bullernivåerna är
ljudtrycksnivå: 89 dB (A)
ljudeffektnivå: 102 dB (A)
Använd hörselskydd
Det typiskt vägda effektivvärdet för acceleration är 4 m/s
2
.
NORSK
Støy og vibrasjon fra modell9047, 9047S
De vanlige A-belastede støynivå er
lydtrykksnivå: 89 dB (A)
lydstyrkenivå: 102 dB (A)
Benytt hørselvern.
Den vanlig belastede effektiv-verdi for akselerasjon er
4 m/s
2
.
SUOMI
Mallin 9047, 9047S melutaso ja tärinä
Tyypilliset A-painotetut melutasot ovat
äänenpainetaso: 89 dB (A)
äänen tehotaso: 102 dB (A)
Käytä kuulosuojaimia.
Tyypillinen kiihtyvyyden painotettu tehollisarvo on 4 m/s
2
.
∂§§∏¡π∫∞
£fiÚ˘‚Ô˜ Î·È ÎÚ·‰·ÛÌfi˜ ÙÔ˘ ÌÔÓÙ¤ÏÔ˘
9047, 9047S
√È Ù˘ÈΤ˜ A-ÌÂÙÚÔ‡ÌÂÓ˜ ÂÓÙ¿ÛÂȘ ‹¯Ô˘ ›ӷÈ
›ÂÛË ‹¯Ô˘: 89 dB (A)
‰‡Ó·ÌË ÙÔ˘ ‹¯Ô˘: 102 dB (A)
– ºÔÚ¿Ù ˆÙÔ·Û›‰Â˜. –
Ù˘È΋ ·Í›· Ù˘ ÌÂÙÚÔ‡ÌÂÓ˘ Ú›˙·˜ ÙÔ˘ ̤ÛÔ˘
ÙÂÙÚ·ÁÒÓÔ˘ Ù˘ ÂÈÙ¿¯˘ÓÛ˘ Â›Ó·È 4 m/s
2
.
9047 (back) (’100. 12. 25)
43
ENGLISH
Noise And Vibration Of Model 9057, 9057S
The typical A-weighted noise levels are
sound pressure level: 90 dB (A)
sound power level: 103 dB (A)
Wear ear protection.
The typical weighted root mean square acceleration value
is 4 m/s
2
.
FRANÇAISE
Bruit et vibrations du modèle 9057, 9057S
Les niveaux de bruit pondérés A types sont:
niveau de pression sonore: 90 dB (A)
niveau de puissance du son: 103 dB (A)
Porter des protecteurs anti-bruit.
L’accélération pondérée est de 4 m/s
2
.
DEUTSCH
Geräusch- und Vibrationsentwicklung des
Modells 9057, 9057S
Die typischen A-bewerteten Geräuschpegel betragen:
Schalldruckpegel: 90 dB (A)
Schalleistungspegel: 103 dB (A)
Gehörschutz tragen.
Der gewichtete Effektivwert der Beschleunigung beträgt
4 m/s
2
.
ITALIANO
Rumore e vibrazione del modello 9057, 9057S
I livelli del rumore pesati secondo la curva A sono:
Livello pressione sonora: 90 dB (A)
Livello potenza sonora: 103 dB (A)
Indossare i paraorecchi.
Il valore quadratico medio di accellerazione è di 4 m/s
2
.
NEDERLANDS
Geluidsniveau en trilling van het model
9057, 9057S
De typische A-gewogen geluidsniveau’s zijn
geluidsdrukniveau: 90 dB (A)
geluidsenergie-niveau: 103 dB (A)
Draag oorbeschermers.
De typische gewogen effectieve versnellingswaarde is
4 m/s
2
.
ESPAÑOL
Ruido y vibración del modelo 9057, 9057S
Los niveles típicos de ruido ponderados A son
presión sonora: 90 dB (A)
nivel de potencia sonora: 103 dB (A)
Póngase protectores en los oídos.
El valor ponderado de la aceleración es de 4 m/s
2
.
PORTUGUÊS
Ruído e Vibração do Modelo 9057, 9057S
Os níveis normais de ruído A são
nível de pressão de som: 90 dB (A)
nível do sum: 103 dB (A)
Utilize protectores para os ouvidos
O valor médio da aceleração é 4 m/s
2
.
DANSK
Lyd og vibration fra model 9057, 9057S
De typiske A-vægtede lydniveauer er
lydtryksniveau: 90 dB (A)
lydeffektniveau: 103 dB (A)
Bær høreværn.
Den vægtede effektive accelerationsværdi er 4 m/s
2
.
SVENSKA
Buller och vibration hos modell 9057, 9057S
De typiska A-vägda bullernivåerna är
ljudtrycksnivå: 90 dB (A)
ljudeffektnivå: 103 dB (A)
Använd hörselskydd
Det typiskt vägda effektivvärdet för acceleration är 4 m/s
2
.
NORSK
Støy og vibrasjon fra modell 9057, 9057S
De vanlige A-belastede støynivå er
lydtrykksnivå: 90 dB (A)
lydstyrkenivå: 103 dB (A)
Benytt hørselvern.
Den vanlig belastede effektiv-verdi for akselerasjon er
4 m/s
2
.
SUOMI
Mallin 9057, 9057S melutaso ja tärinä
Tyypilliset A-painotetut melutasot ovat
äänenpainetaso: 90 dB (A)
äänen tehotaso: 103 dB (A)
Käytä kuulosuojaimia.
Tyypillinen kiihtyvyyden painotettu tehollisarvo on 4 m/s
2
.
∂§§∏¡π∫∞
£fiÚ˘‚Ô˜ Î·È ÎÚ·‰·ÛÌfi˜ ÙÔ˘ ÌÔÓÙ¤ÏÔ˘
9057, 9057S
√È Ù˘ÈΤ˜ A-ÌÂÙÚÔ‡ÌÂÓ˜ ÂÓÙ¿ÛÂȘ ‹¯Ô˘ ›ӷÈ
›ÂÛË ‹¯Ô˘: 90 dB (A)
‰‡Ó·ÌË ÙÔ˘ ‹¯Ô˘: 103 dB (A)
– ºÔÚ¿Ù ˆÙÔ·Û›‰Â˜. –
Ù˘È΋ ·Í›· Ù˘ ÌÂÙÚÔ‡ÌÂÓ˘ Ú›˙·˜ ÙÔ˘ ̤ÛÔ˘
ÙÂÙÚ·ÁÒÓÔ˘ Ù˘ ÂÈÙ¿¯˘ÓÛ˘ Â›Ó·È 4 m/s
2
.
44
9047 (back) (’100. 12. 25)
ENGLISH
Noise And Vibration Of Model
9049, 9049S, 9059, 9059S
The typical A-weighted noise levels are
sound pressure level: 90 dB (A)
sound power level: 103 dB (A)
Wear ear protection.
The typical weighted root mean square acceleration value
is 3 m/s
2
.
FRANÇAISE
Bruit et vibrations du modèle
9049, 9049S, 9059, 9059S
Les niveaux de bruit pondérés A types sont:
niveau de pression sonore: 90 dB (A)
niveau de puissance du son: 103 dB (A)
Porter des protecteurs anti-bruit.
L’accélération pondérée est de 3 m/s
2
.
DEUTSCH
Geräusch- und Vibrationsentwicklung des
Modells 9049, 9049S, 9059, 9059S
Die typischen A-bewerteten Geräuschpegel betragen:
Schalldruckpegel: 90 dB (A)
Schalleistungspegel: 103 dB (A)
Gehörschutz tragen.
Der gewichtete Effektivwert der Beschleunigung beträgt
3 m/s
2
.
ITALIANO
Rumore e vibrazione del modello
9049, 9049S, 9059, 9059S
I livelli del rumore pesati secondo la curva A sono:
Livello pressione sonora: 90 dB (A)
Livello potenza sonora: 103 dB (A)
Indossare i paraorecchi.
Il valore quadratico medio di accellerazione è di 3 m/s
2
.
NEDERLANDS
Geluidsniveau en trilling van het model
9049, 9049S, 9059, 9059S
De typische A-gewogen geluidsniveau’s zijn
geluidsdrukniveau: 90 dB (A)
geluidsenergie-niveau: 103 dB (A)
Draag oorbeschermers.
De typische gewogen effectieve versnellingswaarde is
3 m/s
2
.
ESPAÑOL
Ruido y vibración del modelo
9049, 9049S, 9059, 9059S
Los niveles típicos de ruido ponderados A son
presión sonora: 90 dB (A)
nivel de potencia sonora: 103 dB (A)
Póngase protectores en los oídos.
El valor ponderado de la aceleración es de 3 m/s
2
.
PORTUGUÊS
Ruído e Vibração do Modelo
9049, 9049S, 9059, 9059S
Os níveis normais de ruído A são
nível de pressão de som: 90 dB (A)
nível do sum: 103 dB (A)
Utilize protectores para os ouvidos
O valor médio da aceleração é 3 m/s
2
.
DANSK
Lyd og vibration fra model
9049, 9049S, 9059, 9059S
De typiske A-vægtede lydniveauer er
lydtryksniveau: 90 dB (A)
lydeffektniveau: 103 dB (A)
Bær høreværn.
Den vægtede effektive accelerationsværdi er 3 m/s
2
.
SVENSKA
Buller och vibration hos modell
9049, 9049S, 9059, 9059S
De typiska A-vägda bullernivåerna är
ljudtrycksnivå: 90 dB (A)
ljudeffektnivå: 103 dB (A)
Använd hörselskydd
Det typiskt vägda effektivvärdet för acceleration är 3 m/s
2
.
NORSK
Støy og vibrasjon fra modell
9049, 9049S, 9059, 9059S
De vanlige A-belastede støynivå er
lydtrykksnivå: 90 dB (A)
lydstyrkenivå: 103 dB (A)
Benytt hørselvern.
Den vanlig belastede effektiv-verdi for akselerasjon er
3 m/s
2
.
SUOMI
Mallin 9049, 9049S, 9059, 9059S
melutaso ja tärinä
Tyypilliset A-painotetut melutasot ovat
äänenpainetaso: 90 dB (A)
äänen tehotaso: 103 dB (A)
Käytä kuulosuojaimia.
Tyypillinen kiihtyvyyden painotettu tehollisarvo on 3 m/s
2
.
∂§§∏¡π∫∞
£fiÚ˘‚Ô˜ Î·È ÎÚ·‰·ÛÌfi˜ ÙÔ˘ ÌÔÓÙ¤ÏÔ˘
9049, 9049S, 9059, 9059S
√È Ù˘ÈΤ˜ A-ÌÂÙÚÔ‡ÌÂÓ˜ ÂÓÙ¿ÛÂȘ ‹¯Ô˘ ›ӷÈ
›ÂÛË ‹¯Ô˘: 90 dB (A)
‰‡Ó·ÌË ÙÔ˘ ‹¯Ô˘: 103 dB (A)
– ºÔÚ¿Ù ˆÙÔ·Û›‰Â˜. –
Ù˘È΋ ·Í›· Ù˘ ÌÂÙÚÔ‡ÌÂÓ˘ Ú›˙·˜ ÙÔ˘ ̤ÛÔ˘
ÙÂÙÚ·ÁÒÓÔ˘ Ù˘ ÂÈÙ¿¯˘ÓÛ˘ Â›Ó·È 3 m/s
2
.
9047 (back) (’100. 12. 25)
45
46
9047 (back) (’100. 12. 25)
47
Makita Corporation
Anjo, Aichi, Japan
Made in Japan
884062F991
10


Need help? Post your question in this forum.

Forumrules


Report abuse

Libble takes abuse of its services very seriously. We're committed to dealing with such abuse according to the laws in your country of residence. When you submit a report, we'll investigate it and take the appropriate action. We'll get back to you only if we require additional details or have more information to share.

Product:

For example, Anti-Semitic content, racist content, or material that could result in a violent physical act.

For example, a credit card number, a personal identification number, or an unlisted home address. Note that email addresses and full names are not considered private information.

Forumrules

To achieve meaningful questions, we apply the following rules:

Register

Register getting emails for Makita 9049 at:


You will receive an email to register for one or both of the options.


Get your user manual by e-mail

Enter your email address to receive the manual of Makita 9049 in the language / languages: English, German, Dutch, Danish, French, Italian, Portuguese, Swedish, Spanish, Norwegian, Finnish as an attachment in your email.

The manual is 0,17 mb in size.


You will receive the manual in your email within minutes. If you have not received an email, then probably have entered the wrong email address or your mailbox is too full. In addition, it may be that your ISP may have a maximum size for emails to receive.

The manual is sent by email. Check your email

If you have not received an email with the manual within fifteen minutes, it may be that you have a entered a wrong email address or that your ISP has set a maximum size to receive email that is smaller than the size of the manual.

The email address you have provided is not correct.

Please check the email address and correct it.

Your question is posted on this page

Would you like to receive an email when new answers and questions are posted? Please enter your email address.


Info