494860
4
Zoom out
Zoom in
Previous page
1/23
Next page
Robot Café
NL GebruiksaanwijzingF Mode d’emploi
UK Instructions for use
46
Please read these instructions carefully before using
your Robot Café and keep them in a safe place.
With the entirely automatic Robot Café, you will rapidly master the art of
making genuine espresso, cappuccino or filter coffee.
Your Robot Café
Is equipped with :
a powerful 15-bar pump : for creamy coffee.
an in-built grinder : for freshly-ground coffee every time.
a system for pre-brewing the ground coffee : to bring out the full flavour.
It also allows you to adjust the following :
the amount of water per cup : for a large or small coffee (p.54).
the fineness of the grind : according to the degree of roasting (p.54).
the amount of ground coffee per cup : according to how strong you like
your coffee (p.55).
Golden rules
Try out several different types of coffee (vary the origins and degrees of
roasting).
Always use freshly-drawn water with a low mineral content (e.g. filtered
water). Clean your water tank once a week.
It is well worth taking a little trouble over the presentation : an espresso
should be served in a small, thick cup - conical, if possible -, so that all
the cream rises to the surface.
Preheat the cups.
English
47
CONTENTS Pages
Description 48
Before you use your appliance for the first time 50
- Installing your appliance 50
- Selecting the water hardness level 51
- Rinsing 52
How to make an espresso ? 53
- Preparing the machine 53
- A large or small espresso ? 54
- A fine or coarse grind ? 54
- One or two cups ? 55
- A strong or extra-strong espresso ? 55
- Ground coffee 55
Using the nozzle 56
- Steam 56
- Cappuccino 57
- Hot water 57
Switching off your appliance 58
- Manual 58
- Automatic 58
Aftercare 59
- Day-to-day care 59
- Cleaning programme 60
- Descaling programme 60
Troubleshooting 63
- What should you do if...? 63
- Transporting your appliance 65
Safety instructions / Electrical instructions 66
48
Removable water
tank (2 litres)
Delivered with a spoon for measuring out the ground coffee
(1 level spoonful = 7 g = 1 cup).
Cup tray
Hot water /
steam selector
Pivoting hot water
/ steam nozzle
Drip tray grid
Control
panel
Drip tray
Height-adjustable
flow head
visible =
time to
empty
the tray !
Grounds tray
Grounds
drawer
Ground coffee compartment
Max. 2 spoonfuls
Drip tray float
Coffee bean com-
partment (250 g)
with grind adjuster
Description
49
English
CONTROL PANEL
On / Off
Strong espresso
Expresso
1 cup
2 cups
Ground coffee
Rinse
Cleaning
Descaling
Water tank
Drip tray and
grounds tray
Water
volume adjuster
Machine ready…
Common warning signals
Fill the water tank !
p.50
Rinse !
p.54
Ground coffee function activated
p.55
Empty the trays !
p.59
Trays incorrectly positioned !
p.59
Indicator light on
Indicator light flashing
Before you use your appliance for the first time
Installing your appliance
Unwind the length of power cord you require.
NB : Your appliance has an in-built cord storage (= no trailing
flexes !).
Remove the paper strip from the coffee bean compartment and
the documents from the water tank.
Open the left-hand lid, lift up the tank by its handle and fill it with
freshly-drawn water.
Never put hot water in the tank.
Never fill it with water above the “MAX.” level.
When you put the water tank back, push it right down in order
to free the valve at the bottom.
NB : You can also fill the tank directly, without removing it from
the machine.
Close the lid.
Plug the machine into an earthed socket.
50
2
1
English
Selecting the water hardness level
When ? The first time you use the appliance or if there is a change in the quality of your water.
As limescale is the main reason for machines failing to work properly, you must descale your
appliance to ensure that it has a long life span and remains in perfect working order. Your
Robot Café automatically warns you ( ) when it needs descaling. But first, you need to
select the level which corresponds to the hardness of your water.
Measuring the hardness of your water
Use the tester supplied with your machine.
Immerse it in cold water for one second, shake off any excess water and compare the result
with the table below.
Selecting the hardness level on your Robot Café
The Robot Café has five levels.
Making sure your appliance is plugged in but not turned on, press the approx. 3- 4 seconds
.
Then press the same button briefly for as many times as it takes to reach the right
hardness level. The hardness level is determined by the number of indicator lights that come
on (cf. table below).
To enter your hardness setting, press the button.
All the indicator lights will go out.
NB : if 30 seconds elapse without any button being activated, the process will be
automatically discontinued (the lights will go out), without any modification to the previous
setting.
Test result your water is…
Very soft
soft
Quite
hard
Hard
Very hard
Level Standard indicators Level indicators
00
11
22
33
44
51
NB : When the appliance is delivered, it is programmed at level 3.
Selecting the level on your Robot Café
Measuring the hardness of your water
52
Rinsing
Before you use your appliance for the first time, you must rinse out the water circuit to
eliminate any residual water in the system.
1. Switch the appliance on, pressing the button.
.
2. Place an empty cup under the nozzle.
3. Turn the hot water / steam selector in an anticlockwise direction
as far as it will go. Hot water will flow through the circuits
and come out of the nozzle. The flow will stop of its
own accord and the 4 green indicator lights will start flashing
again.
4. Turn the hot water / steam selector back to its initial position.
5. If necessary, repeat steps 3 and 4 until only the indicator
continues to flash.
NB : The indicator will continue to flash until the appliance
has reached the right temperature.
6. When the indicator comes on, press the button. Water
will come out of the flow head and then stop of its own
accord.
7. When the rinsing process has been completed, remove the
water tank and clean it with a non-abrasive washing-up liquid.
Fill the tank again with freshly-drawn water and put it back in
place. Your appliance is now ready.
53
English
Preparing the machine
Fill the tank with freshly-drawn water (left-hand lid).
NB : if the tank has not been put back or is not sufficiently full,
the indicator will come on and the machine will not be able
to brew any coffee.
NB : the indicator always comes on before the tank is completely
empty, to avoid all interruptions once the brewing is underway.
Fill the coffee bean compartment (right-hand lid).
Check that there are no foreign bodies in the coffee, to
avoid damaging the grinder.
Check that the Hot water / steam selector is at 0.
Press the button to switch on your appliance.
.
NB : the indicator will flash until the appliance has reached
the right temperature.
How to make an espresso
An espresso is a strong coffee with an extremely rich aroma, characterized by
its “chamois”-coloured cream.
To bring out the very best of its flavour, it is vital to have :
good-quality water : use fresh, chlorine-free water with a low mineral
content.
good-quality coffee : be it a subtle blend or a pure “vintage”, coffee offers
an infinite palette of flavours. Ask your coffee retailer’s advice and adjust
the grind according to the degree of roasting
p.54.
the right temperature : preheat the cups using the hot water nozzle
p.57.
According to your preferences / the time of day…. you can :
adjust the amount of water per cup to obtain a large or small coffee
p.54.
adjust the amount of coffee per cup for a strong or extra-strong coffee
p.55.
use ground coffee if you wish to brew another variety of coffee
(e.g. decaffeinated)
p.55.
54
Rinsing :
you must now briefly rinse out the
machine. This process enables you both to preheat your cup and
to eliminate any residual water in the circuits so that your coffee
is brewed with fresh water at the correct temperature.
NB : if the appliance has only been switched off for a brief
period, the indicator will stay on (not flashing), in which case
you do not need to carry out this rinsing process.
Place an empty cup under the flow head.
Press the button. Hot water will flow through the circuits and
out into the cup. The process will stop of its own accord.
= machine ready.
Place one or two cups under the flow head.
NB : the small holes in the grid make it easier to position them
correctly.
Adjust the height of the flow head according to the size of your cups.
The pipes protruding from the flow head may be scalding hot.
A large or small espresso ? Setting the water volume adjuster
Your appliance boasts an automatic stop mechanism, which means that the flow of coffee
automatically comes to a halt once the preselected volume has been reached.
Turn the water volume adjuster to select the quantity of coffee
you wish to brew :
- Position
small, strong coffee.
- Position
large coffee.
NB : when you select two cups, the amount of water is
automatically doubled.
A fine or coarse grind ?
The lighter the colour of the beans (lightly roasted), the finer the grind should be.
Adjust the fineness of the grind according to the degree of
roasting.
- In a clockwise direction = coarser.
- In an anticlockwise direction = finer.
You must only adjust the grind when the grinder is actually
working.
NB : Experiment a few times to find the ideal setting.
R
E
A
D
Y
One or two cups ?
Check that the machine is ready ( ).
Press the button for 1 cup or the button for 2 cups. The cof-
fee will start to flow and automatically stop once it has reached the
preselected volume
while the coffee is flowing.
However, you can stop it at any time by pressing the or
button again.
NB : the coffee will flow in two stages, as your Robot Café is
equipped with a pre-brewing system designed to bring out the
full flavour of the coffee.
A strong or extra-strong espresso ?
If you are just making one cup of espresso, you can vary its
strength.
Check that the machine is ready ( ).
Press the button (the grinder will start up)
and keep pressing it :
- Approx. 1 sec.
1 cup of espresso.
- Approx. 2 sec.
1 cup of strong espresso.
- Approx. 3 sec.
➣➣
1 cup of extra-strong espresso.
NB : if you wish to make another cup of strong or extra-strong
espresso, you must repeat these steps.
NB : You cannot make 2 cups of strong or extra-strong espresso
at the same time.
Ground coffee
Check that the machine is ready ( ).
Press the button
.
NB : Once the button for Ground coffee has been pressed, it is
unchangeable.
Open the lid of the ground coffee compartment and put the
ground coffee in, using the measuring spoon.
1 level spoonful = 1 cup, 2 level spoonfuls = 2 cups.
NB : level = full but not heaped.
Never put in more than two spoonfuls.
Never put in anything other than ground coffee.
Close the lid.
Press the = button for 1 cup or the = button for 2 cups.
The coffee will start to flow and automatically stop at the
preselected volume
while the coffee is flowing.
1 cup
2 sec. 3 sec.
2 cups
55
English
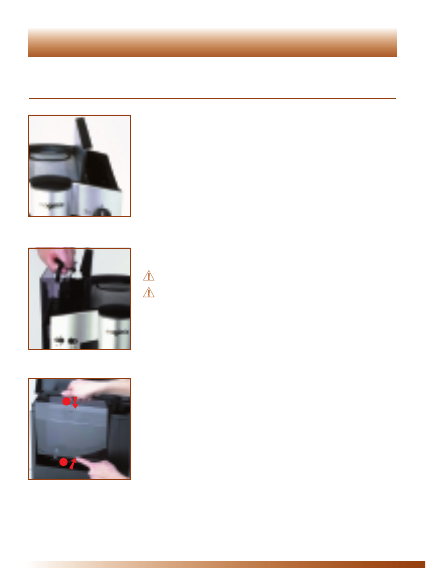
The nozzle is used to froth milk for cappuccinos and hot chocolate, as well as to heat liquids.
You can also make hot water for teas and infusions or preheat your cups.
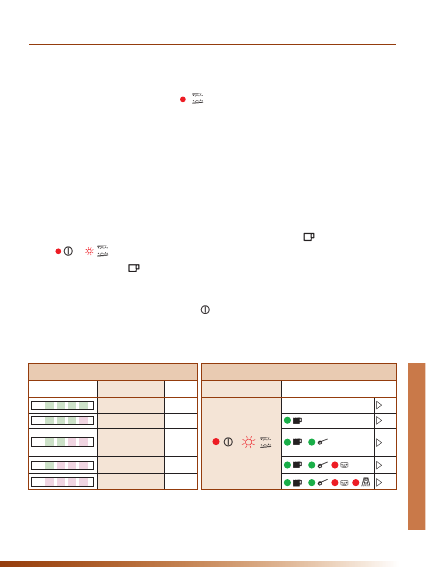
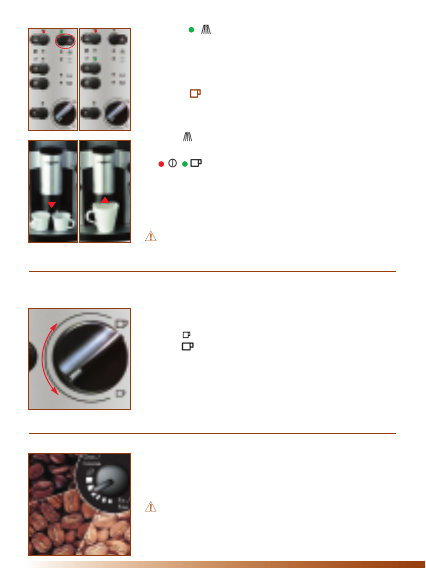
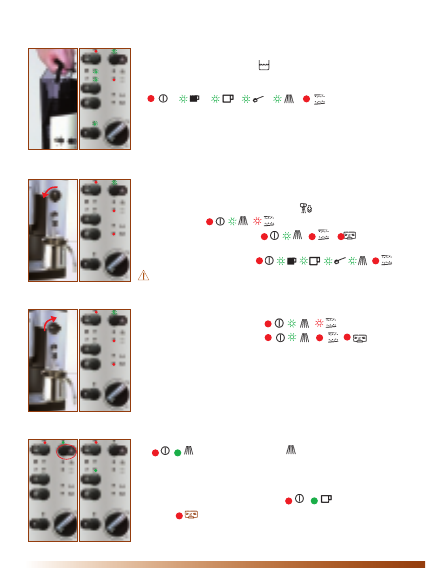
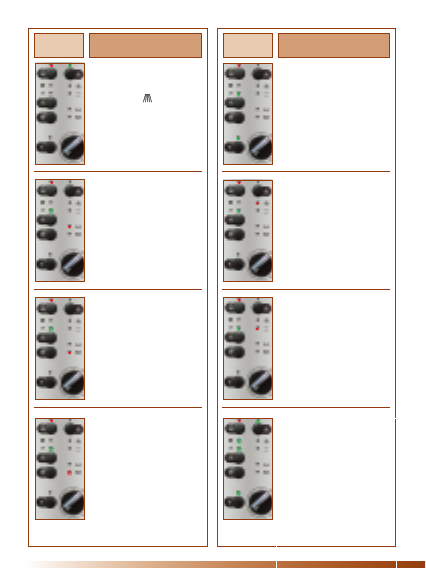
Steam
Check that the machine is ready ( )
.
Slide the steam pipe :
- Up : to heat liquids.
- Down : to froth milk.
Partly fill a tall, narrow container (e.g. a small jug) with the
liquid you wish to heat (
1
/
3
full for milk and
2
/
3
full for other
liquids) and place it under the nozzle.
Do not touch the nozzle, as it becomes extremely hot. When
handling the nozzle, always hold it by the plastic ring.
Warning, the steam is scalding hot.
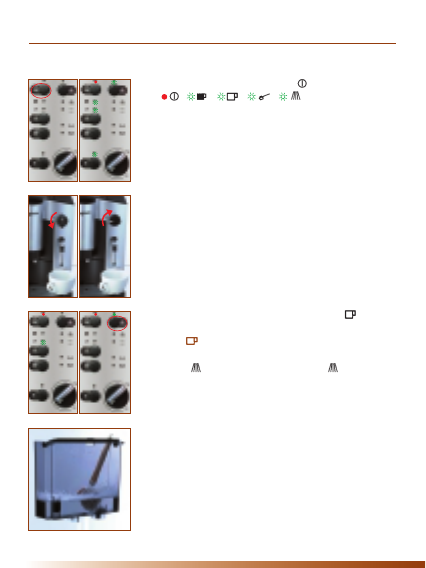
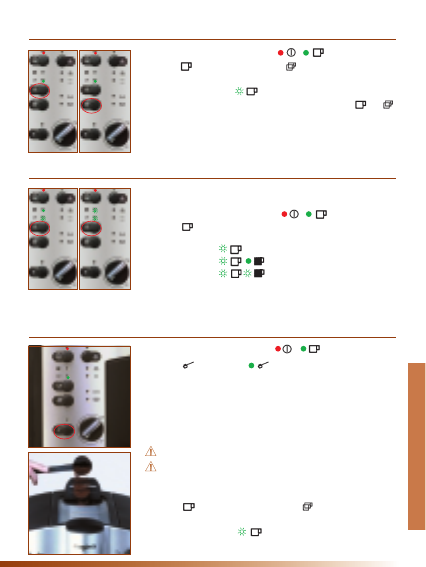
Lower the steam nozzle into the container and turn the hot water
/steam selector towards as far as it will go. Some water
will be dispersed before the steam appears. This is quite normal
and does not affect the end result.
Lower the nozzle halfway down into the liquid, making sure that
it does not touch the bottom of the container, so as not to prevent
the inflow of air. Make gentle circular movements downwards.
NB : It takes a few seconds for the temperature to rise sufficiently
for steam to be produced. The pump is triggered at regular
intervals (staccato noise).
To stop the production of steam, turn the button back to 0
= fill the system with water.
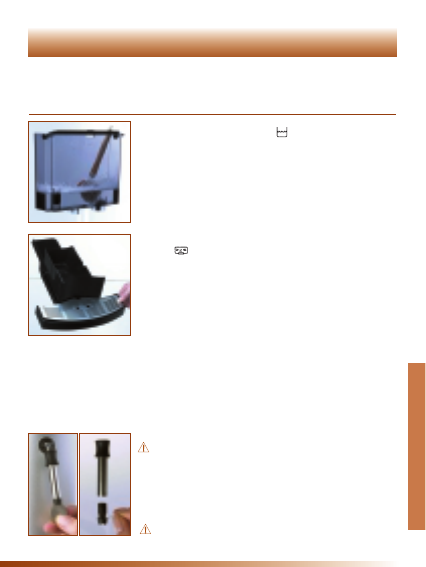
Filling the system with water :
- Place an empty container under the nozzle, turn the selector
towards as far as it will go
and immediately press the
button : the water will flow from the nozzle and then stop of its
own accord.
.
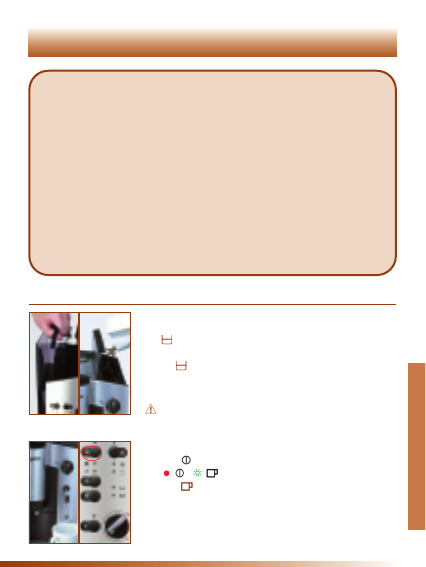
NB : to limit any splashing, choose a fairly tall, narrow
container.
- Turn the selector back to 0
machine ready.
Wipe the nozzle clean immediately after use with a damp sponge, sliding the pipe up and
down to remove any traces of milk. The nozzle will get stuck if not cleaned regularly.
56
Using the nozzle
Cappuccino
“Cappuccino” is the Italian name for espresso coffee served with a little milk and covered
with a rich, thick layer of froth.
First of all, make an espresso in a large cup, filling it
2
/
3
full.
Fill a tall, narrow container
1
/
3
full with cold whole or
semi-skimmed milk. Froth the milk (sec. paragraph p. 56).
Spoon the milk froth onto your espresso, sprinkle with cocoa
powder and enjoy.
Hot water
Check that the machine is ready ( )
.
Place a container under the nozzle.
Turn the Hot water/steam selector towards as far as it will
go
and immediately press the button.
The hot water will flow out of the nozzle.
To stop the flow, turn the selector back to 0
machine ready.
57
English
58
Manual
Press the on / off button
all the indicator lights will go out.
Automatic
For safety reasons and in order to save energy, your Robot Café is equipped with an
automatic switching-off mechanism. If you activate this function, your appliance will
automatically switch itself off 2 or 5 hours after it was last used.
Making sure that your appliance is plugged in but turned off,
press the button for approx. 3 sec.
.
Then press the same button briefly for as many times as it
takes to set the time delay. This is determined by the number of
indicator lights that come on.
To enter your setting, press the button
all the lights will go
out.
NB : if 30 sec. elapse without any button being activated, the
process will be automatically discontinued (all the indicator lights
will go out), without any modification to the previous setting.
NB : When your appliance is delivered, it is programmed for 2 hours.
Switching off your appliance
Time delay Standard indicators Level indicators
Deactivated function
After 2 hours.
After 5 hours.
ex : 2 h
You must look after your machine carefully and regularly if you want it to have a long life
span and remain in perfect working order.
Day-to-day care
The water tank :
- Every day, and each time the indicator light comes on,
discard the remaining water and fill the tank with freshly-drawn
water.
- Once a week, empty the tank and clean it with a non-abrasive
washing-up liquid.
The drip tray :
- When comes on and / or the tray’s red float becomes visible,
you must empty the grounds tray and the drip tray :
1. If necessary, raise the flow head as high as possible. Left the
drip tray up slightly before pulling it out.
2. Remove the grounds tray and empty it.
3. Remove the grid by pressing down on one side. Empty the drip tray.
- Once a week : clean those elements with a non-abrasive washing-
up liquid. Wipe the inside (accessible once the grid has been
removed) with a damp sponge.
4. When replacing the drip tray back into the base of the coffee
machine, ensure that the tray feet are inside the drip tray, not the
out side.
The machine housing : Regularly clean the outer surfaces of the appliance with a damp sponge.
The ground coffee compartment : Regularly clean it with a damp cloth and then dry it thoroughly.
The coffee bean compartment : Regularly clean it with a dry cloth.
The nozzle :
Never handle the nozzle when it is hot.
- Always wipe the nozzle after use with a damp sponge.
- Regularly, or if the nozzle is clogged :
1. Unscrew it using a coin.
2. Remove the lower section of the pipe and unblock the small air
vent with a needle.
3. Put the parts back together as shown in the photo.
Never use alcohol, solvents or aggressive cleaning fluids.
Aftercare
59
English
Cleaning programme
When ? If (the indicator comes on after approx. 250 preparations)
With what ? Solely with Magimix cleaning tablets
you can obtain these tablets from
your retailer (or FOR UK AND REPUBLIC OF IRELAND ONLY : directly from
Magimix, using the order form enclosed with your appliance).
NB : two samples are supplied with your appliance.
How long ? Approx. 15 min.
How ? By following these few simple steps…
NB : You can keep on using your appliance even if this indicator light is on, but
we advise you to carry out the cleaning programme as soon as possible.
(machine ready) and (machine needs cleaning) :
NB : If your appliance is switched off, turn to p.53-54
1. Fill the tank with fresh water up to the “MAX.” level.
2. Press for approx. 3 sec. until : .
3. Empty the grounds tray and the drip tray
the indicator
will go out.
4. Put a Magimix cleaning tablet in the ground coffee compartment.
5. Press the button
the indicator will go out and will
start flashing to show that the cleaning programme has begun. The
water is pumped through at brief intervals and flows through the
circuits to dissolve the coffee residues with the help of the tablet.
6. If
appears
empty the drip tray
and the grounds tray.
7. Press the button to repeat the programme.
Repeat steps 6 and 7 until stops appearing (4 x max.).
8. When
rinse by pressing the button.
9. Clean the drip tray and the grounds tray with a non-abrasive
washing-up liquid and put them back in place. The machine is
now ready again
.
Descaling programme
When ? If
With what ? Use a descaler intended for coffeemakers.
Never use vinegar.
How long ? Approx. 45 min.
How ? By following these few simple steps…
NB : You can still use your machine even after this indicator has come on, but we
advise you to carry out the descaling programme as soon as possible.
Repeat
4 x max.
60
English
61
The appliance must have been switched off and left to cool down at least 2 hours
beforehand.
1
st
phase : descaling
1. Fill the tank
1
/
3
full with fresh water and then add the descaler
(never in the reverse order), according to the instructions on the
packet.
2. Without switching the appliance on, press the button for
approx. 3 sec.
The following lights will appear : .
3. Empty the grounds tray and the drip tray, then replace them.
The following lights will appear :
.
4. Descaling the nozzle side :
- Place a fairly large container under the nozzle.
- Turn the Hot water/steam selector to , the following lights
will appear :
.
The descaling liquid will be pumped through the circuits at
short intervals to dissolve the limescale.
After a number of minutes, the following lights will appear :
.
- Empty the container, remove and then replace the trays,
therefore the following lights will appear :
.
5. Descaling the flow head side :
- Turn the selector back to 0 : .
After a number of minutes :
.
NB : the water will flow directly into the drip tray.
1
/
3
62
2
nd
phase : rinsing
1. Rinse out the water tank thoroughly and fill it with fresh water
up to the “MAX.” level. The indicator light will go out.
2. Empty and replace the trays, the following lights will appear :
.
3. Rinsing the nozzle side :
- Place a fairly large container under the nozzle.
- Turn the Hot water/steam selector to , the following lights
will appear :
.
After a number of minutes :
.
- Empty the container. Remove and then replace the trays, the
following lights will appear :
.
The nozzle and the water may be scalding hot.
4. Rinsing the flow head side :
- Turn the selector back to 0 : .
After a number of minutes : .
NB : the water will flow directly into the drip tray.
- Empty and replace the trays, the following lights will appear :
= last rinse : press the button.
5. Clean the water tank, the drip tray and the grounds tray with a
non-abrasive washing-up liquid and then replace them.
The machine is now ready again :
.
NB : If , empty the tray and replace it.
English
63
Troubleshooting
What should you do if ?
Solutions
Possible causes
Problems
Problem with the water tank
Trays incorrectly positioned
No coffee is
coming out of the
flow head
Your espresso has
an unpleasant taste
The nozzle is blocked or clogged up
with limescale
The container is unsuitable
You are not using the right milk
You cannot froth
the milk
Coffee bean compartment empty :
the cycle has been interrupted
Only some of the cof-
fee has been brewed
Insufficient preheating time
The cups are cold
The coffee is not
hot enough
Unsuitable grind settingThe coffee only
comes out in drips
The grinder is
making an abnormal
noise
Coffee bean compartment empty
A foreign body has found its way
into the grinder
You cannot replace
the trays and/or the
grounds tray is
wedged in the
machine
The trays were removed before the
completion of a cycle
Try a different batch of coffee
Use filtered or bottled water
Your coffee is stale or too acidic
Your water contains chlorine
Check that the tank is correctly
positioned
Fill the tank with water
Check the position of the trays
Change the setting to a coarser
grind
Clean the nozzle (p.59) and/or
descale your appliance (p.61)
Use a tall, narrow container
(e.g. small jug)
Use cold whole or semi-skimmed
milk
The * indicator must be continuously
on and not flashing
Preheat them using the hot water
nozzle (p.57)
Fill the coffee bean compartment
Fill the compartment
Take the appliance to an approved
repair service
1)
Remove the drip tray and the
grounds drawer. Gently lift out the
grounds tray
2)
Put the drip tray and the grounds drawer
(minus the grounds tray) back in the
appliance and wait
3)
Now put the grounds tray back
Possible causes
The indicator
lights
You must carry out the rinsing
programm
Press the button
64
The indicator
lights
The water tank is not full
enough
Add some water
The drip tray and grounds
tray are full
Empty the trays
The trays (or one of the trays)
are missing or not shut
properly
Put them back properly
Possible causes
The ground coffee button has
been activated
(p.55)
You have carried out 250
preparations and it is now
time to carry out the cleaning
programme
(p.60)
You must carry out the
descaling programme
(p.60)
After using the steam / hot
water function
Fill the system with water
(p.56)
The first time you use your
appliance
Rinsing (p.52)
Other reason
Switch off your appliance
and wait for
1
/
2
hour, then
switch it back on .
English
Possible causes
The indicator
lights
Possible causes
The indicator
lights
65
The appliance is too cold
Switch it off and wait for
approx. 1 hr before switching
it back on again
If you cannot identify the cause of a problem, seek the advice of your retailer or contact our
customer service department which will give you the address of a Magimix-approved after-sales
service.
You must never dismantle your appliance.
Transporting the machine
- Keep the original packaging and use it to protect the appliance during transport.
- Flush out all the steam in the heating system :
Switch your appliance off, pressing the
button
.
Place a container under the nozzle and turn the hot water/steam selector towards as far
as it will go.
Switch the appliance back on, by pressing again, the following lights will appear :
.
Press the button and do not release it until the indicator is the only light still flashing.
Shortly afterwards, steam will come out of the appliance and then automatically stop.
Warning, take care to avoid being splashed, as the steam can be scalding hot.
Turn the selector back to its initial position (0).
Unplug the appliance.
- Empty the water tank and the trays.
- Remove as many coffee beans as possible from the coffee bean compartment.
Switch your appliance off,
then unplug it. Plug it back in,
then switch it on again. If the
problem persists, take your
appliance to an approved
repair service.
are flashing
in turn
are flashing
in turn
66
Make sure that the voltage of your mains supply corresponds to
that shown on the identification plate of your appliance.
Your appliance must always be plugged into an earthed socket,
using the power cord supplied by the manufacturer. If you use an
extension lead, this must be fitted with an earthed plug.
Never use the appliance if the power cord has been damaged.
Any damaged cord must be replaced either by the manufacturer,
by a Magimix-approved repair service or by a similarly qualified
person, in order to avoid all danger.
Always unplug your appliance when filling the water tank,
moving the machine, cleaning it or in the event of an anomaly.
Do not tug on the power cord to unplug it.
Never leave your appliance and / or its power cord near a heat
source.
Avoid all contact with any parts of the machine that may become
extremely hot during use (flow head, nozzle, etc.).
Never leave children near the appliance unattended.
Never allow liquid to enter the appliance via the holes in the cup
tray.
Never immerse your appliance in water.
Never heat flammable liquids with the steam.
Only pour cold water into the water tank and never pour any
other sort of liquid into it.
Make sure there are no foreign bodies among the coffee beans.
Never use your appliance out of doors.
This appliance is intended exclusively for use in the home and
has not been designed for professional/commercial use.
Safety instructions
English
67
Electrical Instructions for UK and Republic of Ireland only
WARNING: Always replace the fuse cover of the fitted plug, never use the plug
with the fuse cover omitted. If a replacement fuse cover is required, ensure it is the
same as the one visible on the pin face of the plug (i.e. RED or ORANGE).
Fuse covers are available from:
BBS Ltd
Po Box 110
Farnham Surrey GU104PL
Phone : 01252 727755
Use a 3A fuse approved by ASTA to BS1362, marked thus
WARNING: a plug with a bared flexible cord is hazardous if engaged in a
live socket. If the fitted plug has been cut from the power supply cord, it should be
destroyed and replaced with a three pin plug in accordance with the following
code:
BLUE: neutral
BROWN: live
GREEN/YELLOW: earth
The wire which is coloured BLUE must be connected to the terminal in the plug
which is marked with the letter “N” or coloured BLUE or BLACK.
The wire which is coloured BROWN must be connected to the terminal in the plug
which is marked with the letter “L” or coloured BROWN or RED which is connected
to the fuse.
The wire which is coloured GREEN/YELLOW should be connected to the terminal
marked with the letter “E”, or by the earth symbol or coloured GREEN or
GREEN/YELLOW.
T
ASA
Should you have any problems with your Robot Café, please contact the Magimix
Customer Care Department, who are experts and will be able to discuss any problems or
queries. In the unlikely event that this product fails, Magimix offers a Gold Seal Service.
Again please call Magimix Customer Care Depatment for more details.
UNITED KINGDOM AND REPUBLIC OF IRELAND
19, Bridge Street
GODALMING SURREY GU7 1HY
TELEPHONE : 01 483 427 411
FAX : 01 483 427 414
We reserve the right to alter at any time without notice the technical specifications of this appliance.
None of the information contained in this document is of a contractual nature. Modifications may be made at any time.
© All rights reserved for all countries by : Magimix.
4


Need help? Post your question in this forum.

Forumrules


Report abuse

Libble takes abuse of its services very seriously. We're committed to dealing with such abuse according to the laws in your country of residence. When you submit a report, we'll investigate it and take the appropriate action. We'll get back to you only if we require additional details or have more information to share.

Product:

For example, Anti-Semitic content, racist content, or material that could result in a violent physical act.

For example, a credit card number, a personal identification number, or an unlisted home address. Note that email addresses and full names are not considered private information.

Forumrules

To achieve meaningful questions, we apply the following rules:

Register

Register getting emails for Magimix Robot Cafe at:


You will receive an email to register for one or both of the options.


Get your user manual by e-mail

Enter your email address to receive the manual of Magimix Robot Cafe in the language / languages: English as an attachment in your email.

The manual is 1,1 mb in size.


You will receive the manual in your email within minutes. If you have not received an email, then probably have entered the wrong email address or your mailbox is too full. In addition, it may be that your ISP may have a maximum size for emails to receive.

Others manual(s) of Magimix Robot Cafe

Magimix Robot Cafe User Manual - Dutch, French - 60 pages


The manual is sent by email. Check your email

If you have not received an email with the manual within fifteen minutes, it may be that you have a entered a wrong email address or that your ISP has set a maximum size to receive email that is smaller than the size of the manual.

The email address you have provided is not correct.

Please check the email address and correct it.

Your question is posted on this page

Would you like to receive an email when new answers and questions are posted? Please enter your email address.


Info