*.AAC, *.DLF, *.M3U, *.PLS, MP3 PRO les and les with DRM.
Open session discs.
18
Audio/Video/Picture File Playback
When AUDIO/PICTURE/VIDEO le is played, Category/Folder/File
list will be displayed on the screen, and file/folder name being
played will be displayed on top. Current selected item will be
highlighted.
Category Select
Use / to select AUDIO
PICTURE
VIDEO
Press ENTER to conrm.
Folder Select
Use / to enter folder list and use / to select desired folder,
press ENTER to conrm.
File Select
Use / to enter le list and use / to select desired le, press
ENTER to play back, press to return.
For PICTURE, press to slide show the pictures, press PROG to
select picture showing style.
For MUSIC, press will enter intro logo, then press to return.
[ \ ]:MP3 SOND: FOLDER
USB
OK
On the panelOn the remote control
19
REPEAT
During playback, press RPT once or more.
- RPT icon will appear on the display.
- For VCD/CD: Display appears RPT ONE RPT ALL RPT OFF
- For DVD: Display appears RPT CHAPTER RPT TITLE RPT
OFF
- For File disc: Display appears RPT ONE RPT DIR RPT ALL
RPT OFF
Note: If you do not select RPT on, when the entire
disc or TITLE playback has nished, the system will
stop . If no other control, after 5 minutes the unit will
into standby mode.
REPEAT A
B
Select desired passage to repeat playback.
- Press A B once to select starting point. Display shows REPEAT A.
- Press A B again to select ending point.
Display shows REPEAT A B, and selected
passage start to replay.
- Press A B once again to exit. Display shows
A B CANCELLED.
Track Playback
Select desired track
- Press or to skip to the next track.
- Use 1-9 and 0, 10+ buttons on the remote control to select
desired track number.
Fast forward / backward during playback
Press or for more than 2 seconds once or more to select X2,
X4, X8, X20 to fast backward or forward track during playback.
- During the fast forward or backward operation, press briey to
playback again.
- During the fast forward or backward operation, the volume will be
muted.
INTRO (for CD/VCD only)
You can play the beginning of every track for 15 seconds in
sequence.
1. During playback, press INT once.
- INT ON/OFF will appear on the display.
2. Press INT again to select the current track.
Random track playback (for CD/VCD/MP3 Only)
You can play all the tracks in random order.
1. During playback, press RDM once or more.
- RDM icon will appear on the display.
2. Press RDM again to select normal playback.
20
Track Playback
DVD and Files disc
MP3, VCD and CD
PAUSE
- During playback, press to pause playback.
- The sound will be muted.
- Display "PAUSE" in the TV screen, display and blink
"PAUSE" on the panel display.
Press again to continue playback.
PBC - Playback Control (for VCD only)
1. If you insert a VCD with PBC, playback starts from the beginning
of the 1st track automatically.
2. Press PBC to show menu, use / or digit button to select
desired track. Press to return to menu. Press PBC again to exit
menu.
GO TO
Goto desired track/chapter or time point directly.
Press GOTO button on the remote control, track or DVD Title/
Chapter and time display on top of the screen. Current item is
highlighted. Use / to select desired item. Use digit button to
select number. Press ENTER to conrm.
Program
- Press PROG to enter program list. Use / or / cursor and
digit button to enter number.
For DVD and File disc, select title and chapter number.
For VCD and CD, select track number.
- Press to play, or move the cursor to select "PLAY" and press
ENTER to play.
- If you want to delete the list, move the cursor to "CLEAR", press
ENTER to delete all the list set before.
- Press PROG again to exit program play.
21
DVD Playback
L R Stereo
DVD Audio Select
Press AUDIO or R/L to select audio language to listen if the DVD
has multiple audio languages.
VCD Audio Select
Press R/L to select audio channel to listen.
DVD Subtitle Select
Press SUB.T to select the subtitle language to show if the DVD has
multiple language subtitles.
DVD TITLE Select
Press TITLE to display title or chapter list, use / or / cursor
or digit number to select, press ENTER to play.
DVD Angle Select
Press ANGLEto select different angle to view if the DVD has
multiple-angle views.
ZOOM
Press ZOOM button, the picture will be zoomed accordingly.
X2 X3 X4 X1/2 X1/3 X1/4 OFF
22
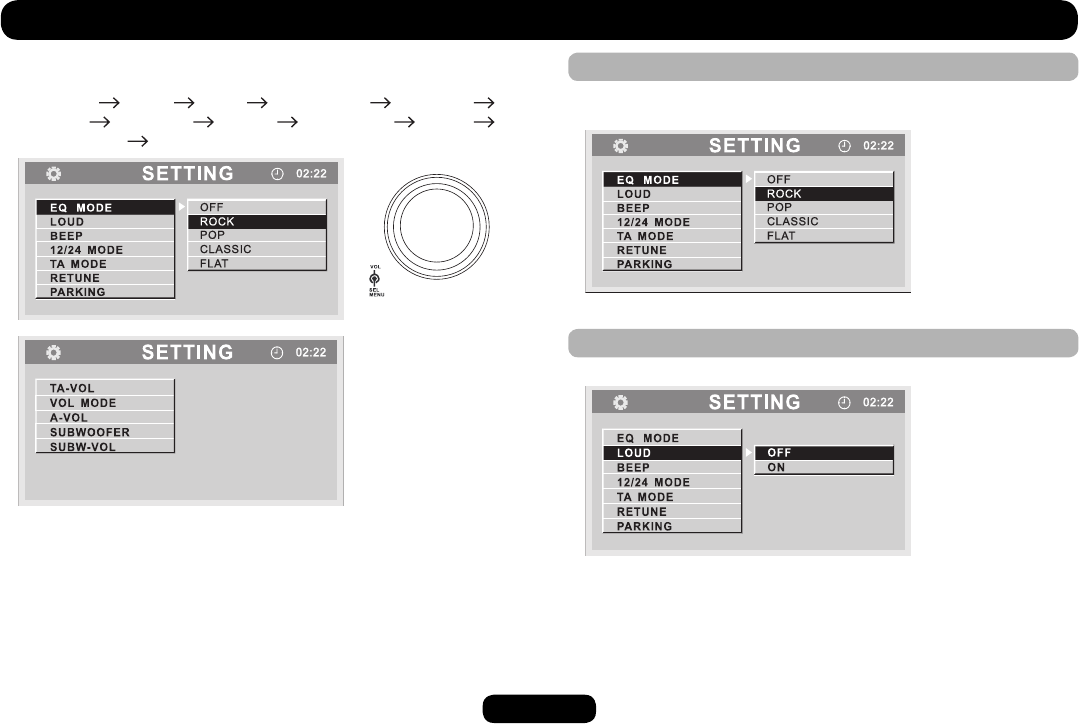
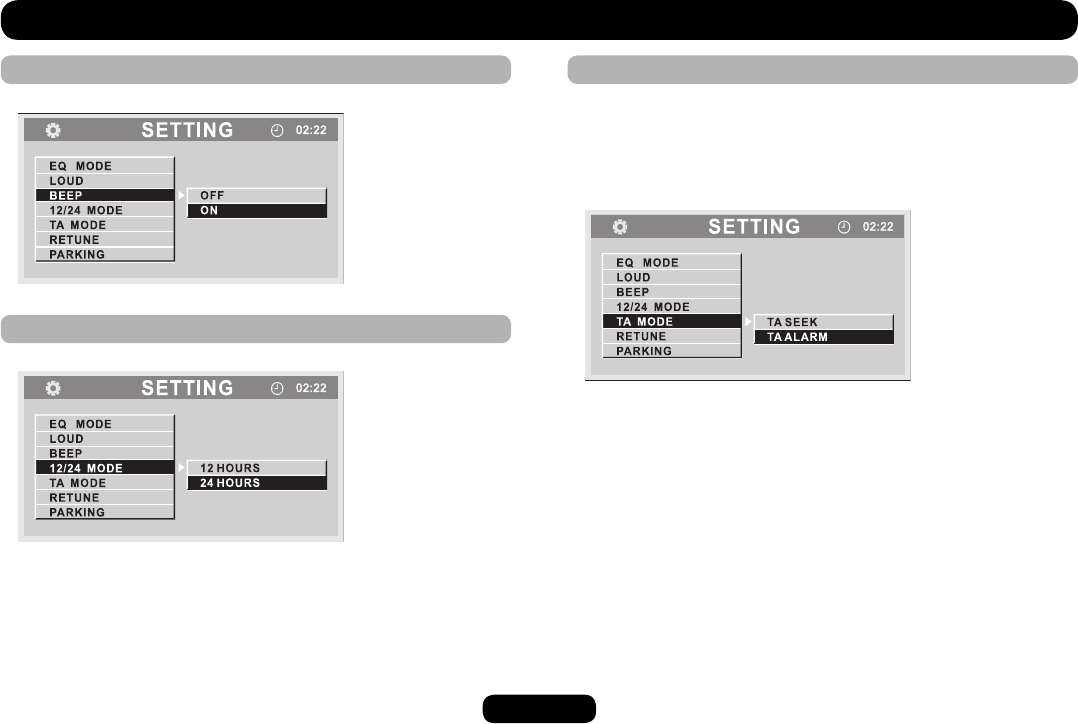
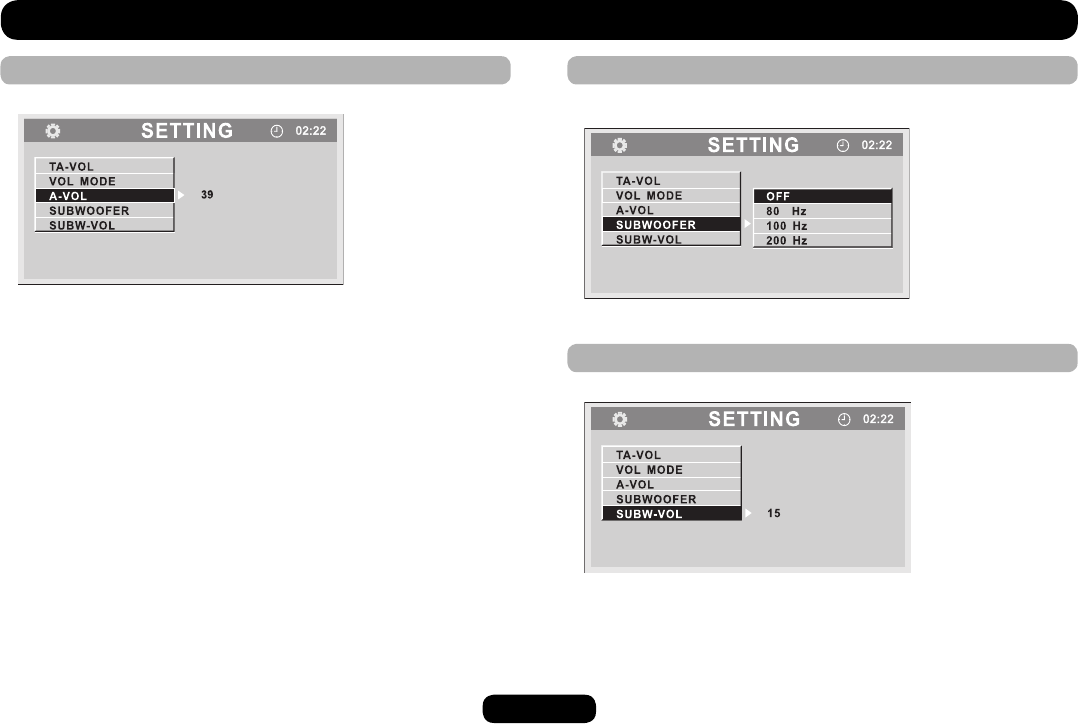
DVD Setup
Press SETUP to display setup menu on the screen.
Use / to select setup items:
Use / , / to select and ENTER to conrm.
DVD System Setup
Video Output Mode
Original setting: INTERLACE-YUV.
SYSTEM LANGUAGE AUDIO VIDEO DIGITAL
SYSTEMLANGUAGEAUDIOVIDEODIGITAL
TV System
Select the TV system in the setting menu.
Screen Saver
The screen saver appears if disc stop last more than 3 minutes.
Original setting: ON.
23
DVD System Setup
Setting TV type
Select TV type to watch wide screen movies.
4:3 Pan Scan: For 4:3 TV, left and right edges will be cut.
4:3 Letter Box: For 4:3 TV, black bars will appear on top and
bottom.
16:9: For 16:9 wide screen TV.
Setting Password
Original password is 0000.
Setting Rating
The rating of the disc is from 1 to 8:
(1) with the most limit when playing.
(8) with the least limit when playing.
Original setting: 8
Note: The rating can be selected only under the password unlocked
status, and the limit can be worked only under the password locked
status.
Load Default
If this item is selected, the unit will return to original setting.
24
DVD Language Setup
OSD Language
Select on screen display language of the DVD .
HUNGARIAN
CZECH
HUNGARIAN
CZECH
HUNGARIAN
CZECH
HUNGARIAN
CZECH
Audio Language
Select audio language of the DVD from which are contained in the
DVD.
Subtitle Language
Select subtitle language of the DVD from which are contained in
the DVD.
Menu Language
Select menu language of the DVD from which are contained in the
DVD.
25
DVD Audio Setup
Setting Volume
Setup the volume with the / buttons.
26
DVD Video Setup
Brightness
Set the brightness of the video output with / .
Contrast
Set the contrast of the video output with / .
Hue
Set the hue of the video output with / .
Saturation
Set the saturation of the video output with / .
Sharpness
Set the sharpness of the video output with / .
27
DVD Digital Setup
Output Mode
Select the output mode:
LINE OUT: Compress the input signal. The volume is small.
RF REMOD: The volume is large.
Dynamic Range
When you select the compressed mode as "line out", select it to
adjust the compression proportion and get the different compressed
effect.
When select FULL, the audio signal is minimum; when select OFF,
the audio signal is maximum.
Dual Mono
Select the audio channel from STEREO, MONO L, MONO R and
MIX MONO.
28
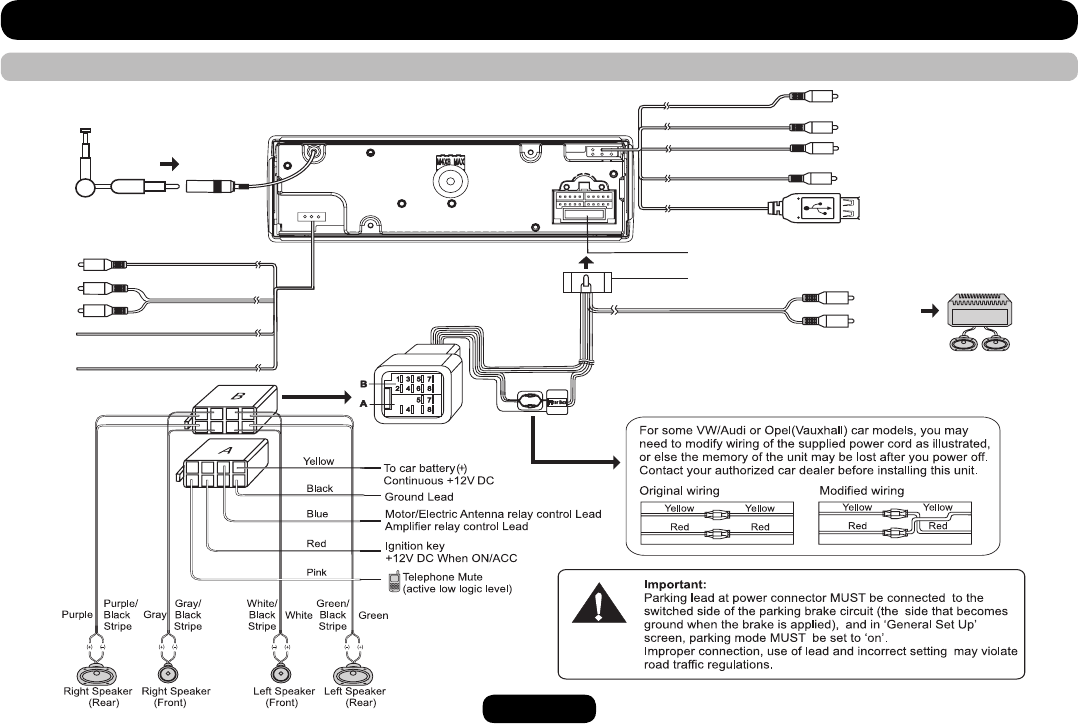
Electrical Connections
ISO Connector
Video-out 1
Video-out 2
(Yellow)
(Yellow)
(Black)
(Yellow)
(Yellow)
Camera-in
USB slot
Fuse 15A
Connector
Video-in
(Blue)
Subwoofer out
Antenna
(Pink)
Reverse
(Active high level input)
Rear Line-out(Gray)
Amplifier
L(White)
R(Red)
Aux-in
L(White)
R(Red)
(Green/
White)
Parking SW
(Active low level input)
Wiring Diagram
29
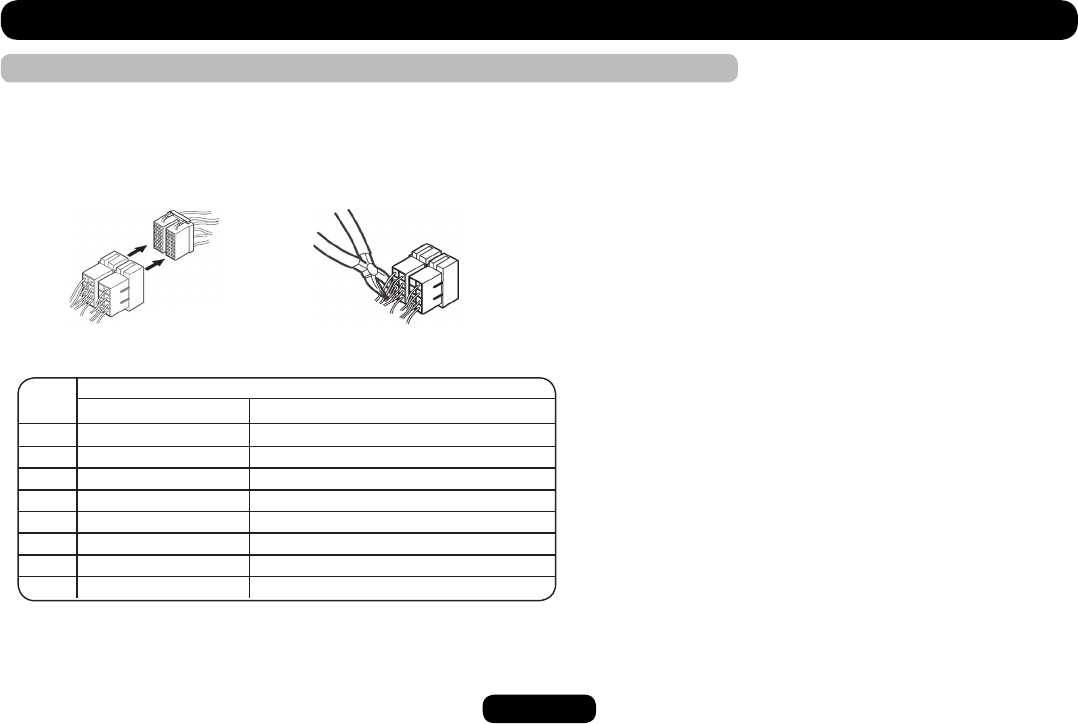
Electrical Connections
Using the ISO Connector
1. If your car is equipped with the ISO connector, then connect the ISO connectors as illustrated.
2. For connections without the ISO connectors, check the wiring in the vehicle carefully before
connecting, incorrect connection may cause serious damage to this unit. Cut the connector,
connect the colored leads of the power cord to the car battery, as shown in the colour code table
below for speaker and power cable connections.
Location
Function
Connector AConnector B
1Rear Right (+) - Purple
2Telephone-mute/pinkRear Right (-) - Purple / Black Stripe
3Front Right (+) - Gray
4ACC+/redFront Right (-) - Gray / Black Stripe
5ANT/Amp control/blueFront Left(+) - White
6Front Left(-) - White / Black Stripe
7Battery 12V(+)/yellowRear Left (+) - Green
8Ground/blackRear Left (-) - Green / Black Stripe
30
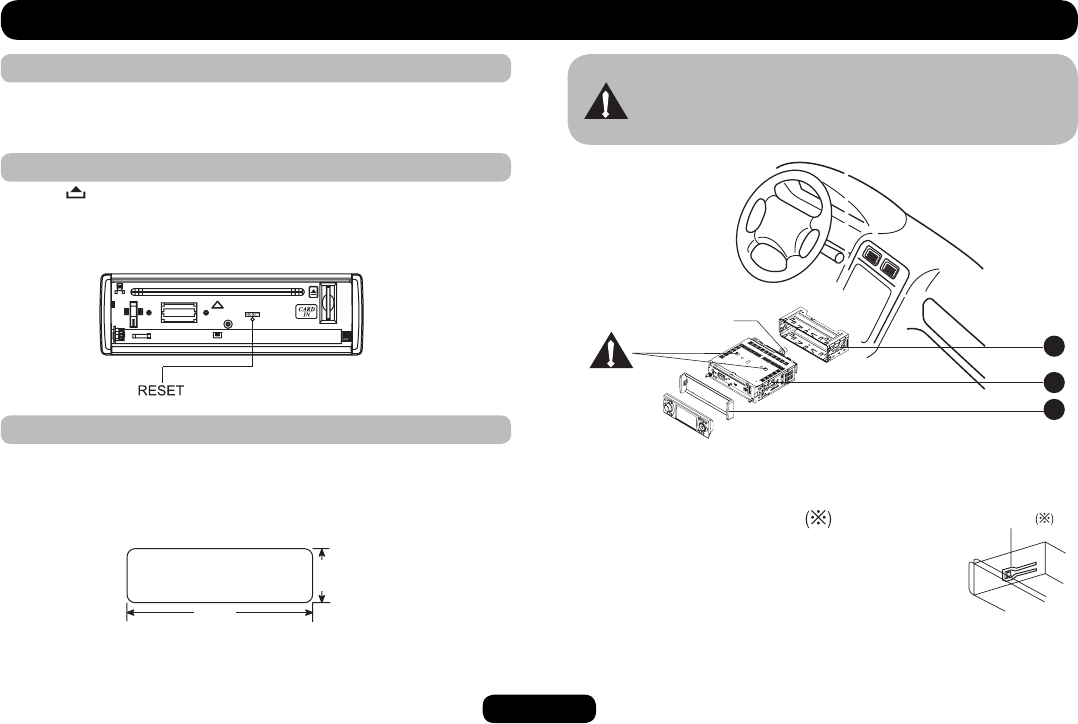
1. Inset mounting collar into the dashboard, and
bend the mounting tabs out with a screwdriver.
Make sure that lock leveris flush with the
mounting collar (not projecting outward).
2. Secure the rear of the unit.
After xing mounting bolt and power connector,
x the rear of the unit to the car body by rubber
cushion.
3. Insert trim plate.
Installation Guide
Installation Procedures
First complete the electrical connections, and then check for
correctness.
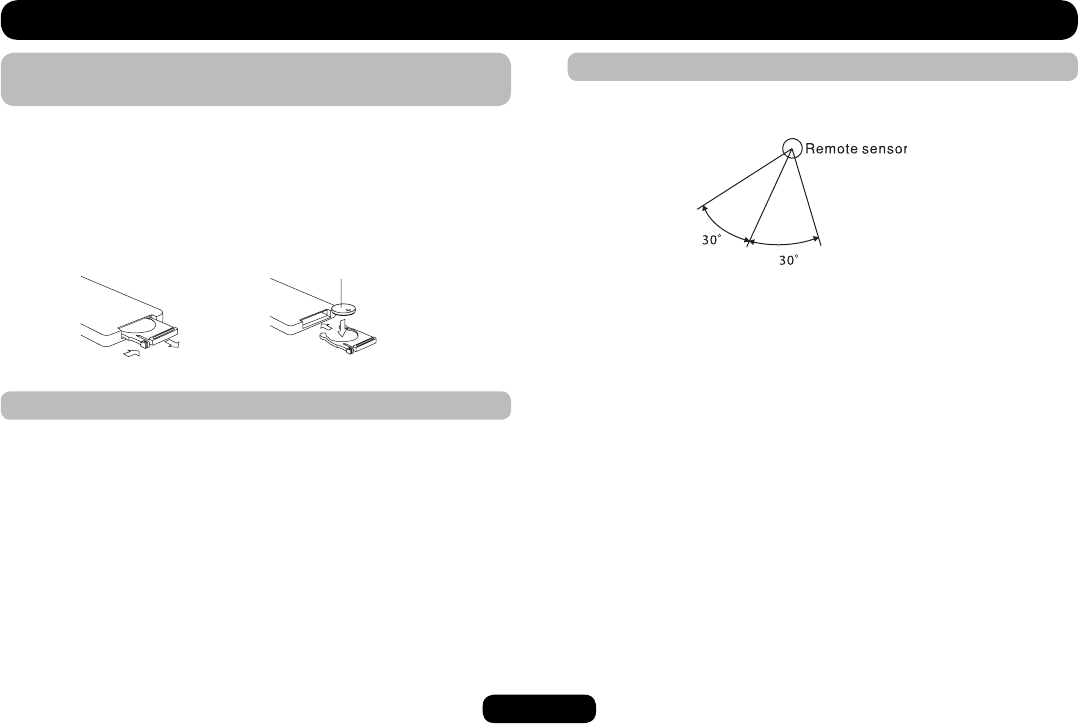
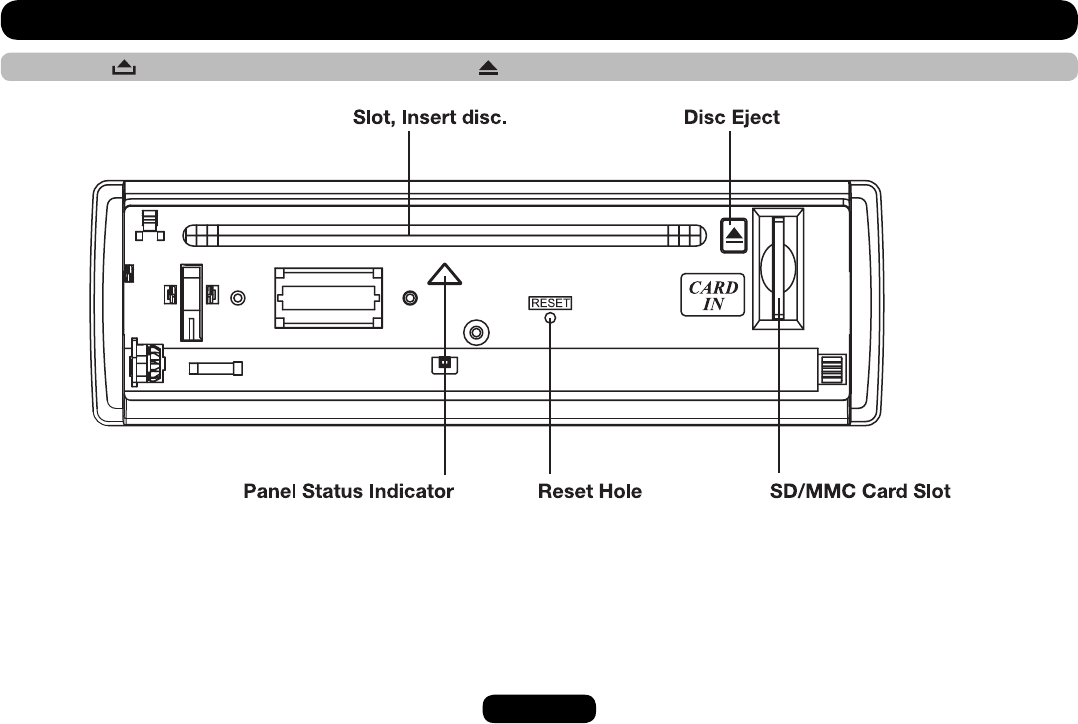
Reset
Press button to flip down the panel. Then press the RESET
button with a pointed object to reset the unit to the original status.
Note: Press the RESET button will erase the clock and stored
stations.
Installation Opening
This unit can be installed in any dashboard having an opening as
shown below.
The dashboard should be 4.75mm - 5.56mm thick in order to be
able to support the unit.
Lock lever
Important:
Remove these two screws before installation. Otherwise,
the DVD player will not work.
183mm
52mm
Mounting bolt
rubber cushion.
1
2
3
31
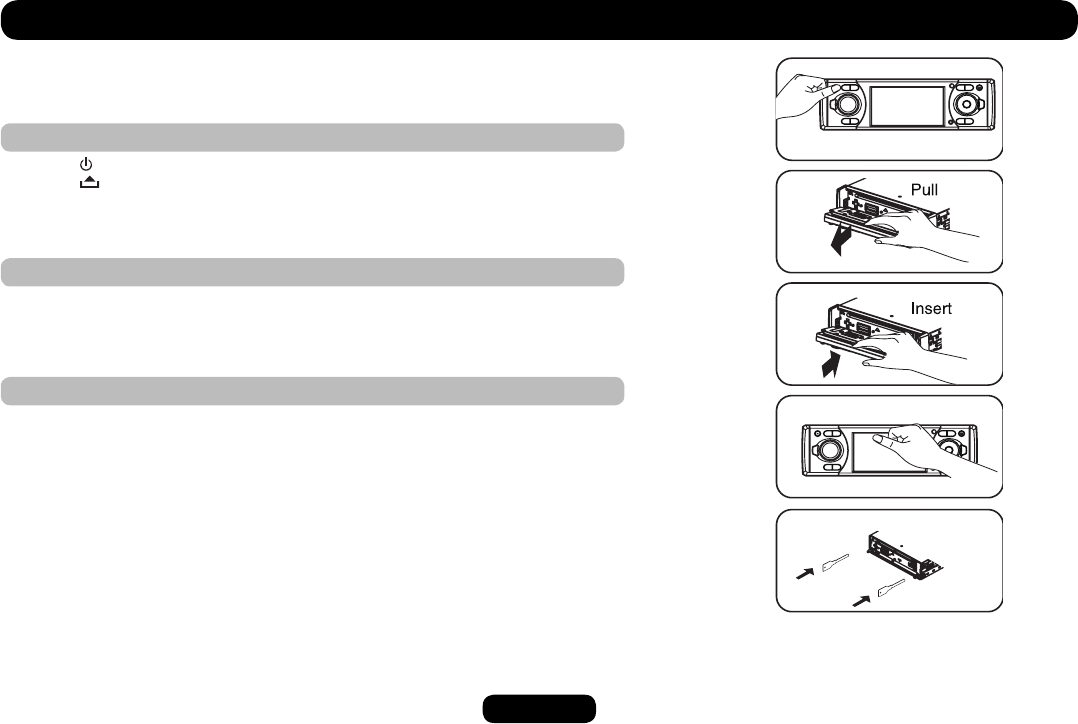
Anti-Theft System
This unit is equipped with a ip-down detachable panel.
Panel can be detached and taken with you, helping to deter theft.
Removing the panel
1. Press button to switch off the power of the unit.
2. Press button to ip down the panel.
3. Hold the right of the panel. Take off right end, and then take off the left end.
4. Place the panel into the case and take it with you when you leave the car.
Install the panel
1. Hold the panel and ensure the panel faces downwards, and set the left side of
the panel in the panel bracket.
2. Press the right side of the panel until it locks.
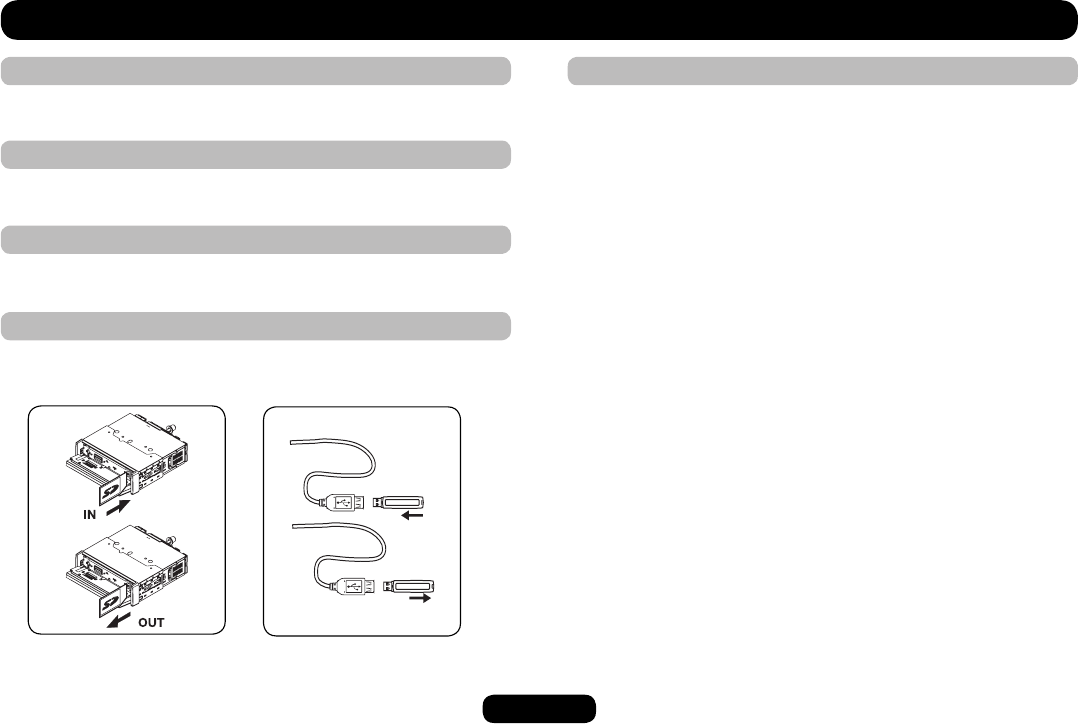
Remove the unit
1. Remove the panel and the trim plate.
2. Insert both T-Keys into hole on the front of the set until they lock.
3. Pull out the unit.
32
Troubleshooting
If you suspect something is wrong, immediately switch power off. Do not use the unit in abnormal condition, for example without sound, or with
smoke or foul smell, can cause re or electric shock. Immediately stop using it and call the store where you purchased it. Never try to repair the unit
yourself because it is dangerous to do so.
General
No power or no sound.
Car's engine switch is not on. Turn your car's key to ACC or ON.
Cable is not correctly connected. Check connection.
Fuse is blown. Replace fuse.
Check volume or mute on / off.
If the above solutions cannot help. Press the RESET button.
Check that telephone mute input cable is not been trapped
and grounded during installation.
Disc
Disc is inside but no sound.
Disc is upside down.
Place disc in the correct direction, and the label side up.
Disc is dirty or damaged. Clean disc or change another disc.
Disc sound skips, tone quality is low.
Disc is dirty or damaged. Clean CD or change another CD.
Sound skips due to vibration.
Mounting angle is over 30
o
.
Adjust mounting angle to less than 30
o
.
Unstable mounting.
Mount the unit securely with the mounting parts.
Radio
Noise in broadcasts.
Station is too far, or signals are too weak.
Select other stations of higher signal level.
Preset station lost.
Battery cable is not correctly connected.
Connect the battery cable to the terminal that is always live.
Error Display Messages
Display shows ERROR.
Disc is dirty, damaged or upside down.
Press to eject the disc.
When video le initializing time is too long.
File read error or le type not supported.
Press SRC to exit. Then press SRC to play disc again.
33
Specications
General
Power supply 12 VDC(11 V-16 V)
Test voltage 14.4V, negative ground
Maximum power output 50 Wx4 channels
Continuous power output 25 Wx4 channels (4 10% T.H.D.)
Suitable speaker impedance 4-8 ohm
Pre-Amp output voltage 4.0 V(CD play mode: 1 KHz, 0 dB,
10 K load)
Fuse 15A
Dimensions(WxHxD) 178x50x166 mm
Weight 2.2 kg
Sub-out 4.0 V
Aux-in level 300 mV
3.5 INCH TFT LCD
Display Resolution(dot) 320×(RGB)×234
Active area(mm) 76.32(H)×42.822(V)
Screen size(inch) 3.5(16:9l)
Dot pitch(mm) 0.2385(H)×0.183(V)
Contrast ratio 350
Brightness 350 nits
FM Stereo Radio
Frequency range 87.5-108.0 MHz(Europe)
87.5-107.9 MHz(America)
Usable sensitivity 8 dBμ
Frequency response 30 Hz-15 KHz
Stereo separation 30 dB(1KHz)
Image response ratio 50 dB
IF response ratio 70 dB
Signal/noise ratio >55 dB
AM(MW) Radio
Frequency range 522-1620 KHz(Europe)
530-1710 KHz(America)
Usable sensitivity(S/N=20dB) 30 dBμ
Disc Player
System Disc digital audio system
Frequency response 20 Hz - 20 KHz
Signal/noise ratio >80 dB
Total harmonic distortion Less than 0.20%(1 KHz)
Channel separation >60dB
Video signal format system PAL/NTSC/AUTO
Video
Video output 1 0.2 V
Horizontal nesowtiou 500 lines
Components
Mounting collar 1
Machine screws M5x6 mm 4
M4x6 mm 4
Mounting bolt (50mm) 1
Wire connector 1
Removable face plate case 1
Trim plate 1
T-key 2
Operating Instructions 1
Rubber cushion 1
Remote control 1
Note: Specications and the design are subject to change without
Libble takes abuse of its services very seriously. We're committed to dealing with such abuse according to the laws in your country of residence. When you submit a report, we'll investigate it and take the appropriate action. We'll get back to you only if we require additional details or have more information to share.
Product:
Forumrules
To achieve meaningful questions, we apply the following rules:
First, read the manual;
Check if your question has been asked previously;
Try to ask your question as clearly as possible;
Did you already try to solve the problem? Please mention this;
Is your problem solved by a visitor then let him/her know in this forum;
To give a response to a question or answer, do not use this form but click on the button 'reply to this question';
Your question will be posted here and emailed to our subscribers. Therefore, avoid filling in personal details.
Register
Register getting emails for Macrom m dvd4660r at:
new questions and answers
new manuals
You will receive an email to register for one or both of the options.
Get your user manual by e-mail
Enter your email address to receive the manual of Macrom m dvd4660r in the language / languages: English as an attachment in your email.
The manual is 4,07 mb in size.
You will receive the manual in your email within minutes. If you have not received an email, then probably have entered the wrong email address or your mailbox is too full. In addition, it may be that your ISP may have a maximum size for emails to receive.
If you have not received an email with the manual within fifteen minutes, it may be that you have a entered a wrong email address or that your ISP has set a maximum size to receive email that is smaller than the size of the manual.
The email address you have provided is not correct.
Please check the email address and correct it.
Your question is posted on this page
Would you like to receive an email when new answers and questions are posted? Please enter your email address.