Index ....................................................................................................106
Service ..................................................................................................108
Contents
7 -
english
Thank you!
Loewe stands for the highest demands in technology, design and user
friendliness. This applies equally for TV, video and accessories.
In addition to the elegant design and the many different possible colour
combinations and installation possibilities, your Loewe TV set also offers
many technological options.
Loewe Image
+
State-of-the-art Full-HD-LCD-displays with LED-Backlight Technology. The
advantage of the LED-Backlight is in the reduced energy consumption and
high contrast values.
24p films played by a connected HDMI unit can be displayed optimally.
Loewe Media
+
You can reach the MediaPortal via the MEDIA button on your remote control,
giving you access to all multimedia functions of your TV set.
Loewe Connectivity
+
Diverse connection options for your TV set allow you to set up system solu-
tions that are easy and convenient to operate.
Loewe Digital
+
The TV set is equipped for digital reception. You can use the anywhere
TV (DVB-T) already being broadcast widely as well as cable digital (DVB-C)
and digital satellite reception
(1
(DVB-S / DVB-S2).
The TV set is equipped for Standard CI Plus for the reception of coded
stations. Coded digital programmes can be used by buying the decoder
modules (CA module) obtainable from dealers.
Loewe Assist
+
The TV set is designed so that it is easy to use with the help of wizards and
menus. Information on settings in the menus will be shown automatically.
All functions are arranged clearly and logically.
Scope of delivery
nLCD TV set
nAntenna cable
nRemote control Assist with two batteries
nThis operating manual
About this operating manual
For best results regarding safety and the longevity of the set, we recom-
mend you read the chapter For your Safety (page 8) before switching it
on for the first time.
For many questions concerning the technology you will find an answer
in the index of your TV set. If your question concerns TV set operation,
you can access a function directly from the index of the TV set.
Owing to this possibility, this operating manual only explains the most
important operating steps.
The index/glossary from page 101onwards gives explanations of certain
terms used in the TV set and the operating manual.
Paragraphs which begin with the symbol ➠ indicate important instruc-
tions, tips or conditions for the following settings.
Terms which you will find in the menus or printed on the remote control
or TV set are written in bold type.
The necessary control elements are shown in the descriptions to the left
of the text containing the instructions for action.
Depending on the connected accessory equipment the menus in the TV
set can differ from those described here.
All the station names, programme contents, the illustrated photos, titles,
albums and album covers in this operating manual are examples.
In some countries, the stations also transmit interactive data services with
their programmes (see page 50, Digital Teletext/MHEG-5), whereby the
functions of individual keys are not available or only so to a limited extent.
InterActive
The symbol indicates which functions can differ for a loaded
application.
Welcome
(1
Equipment and upgrade options, see page 97.
- 8
english
For your own safety and to prevent unnecessary damage to your device,
read and comply with the following safety instructions:
Proper use and environmental conditions
This TV set is designed exclusively for reception and reproduction of
video and audio signals and is designed for living rooms or office facilities,
and should not be operated in rooms with high humidity, such as a
bathroom, or sauna, or where there is a high concentration of dust (e.g.
workshops). The manufacturer‘s warranty is only valid for use in the specified
permissible environment.
If the set is used outdoors ensure that it is protected against moisture
(rain, splashing water, or dew). High humidity and dust concentrations
cause leak currents in the device, which can cause a shock hazard if the
device is touched, or a fire.
If you have brought the set into a
warm environment from the cold,
then wait for about 1 hour before
switching it on to avoid formation of
condensation.
Do not place any objects filled with
liquids on top of the appliance. Pro-
tect the appliance against dripping
and splashing water.
Candles or naked flames must be kept
away from the appliance at all times
to prevent it from catching fire.
Never place the TV set in a position where it is exposed to vibrations. This
can lead to material overload.
Transporting
Only transport the device in vertical position. Grasp the device on the
upper and lower edges of the housing.
If the set has to be put down during packing/unpacking, place the TV
set with the entire front surface lying flat on a soft underlay such as a
blanket or the felt from the packing material.
The LCD screen is made of glass or plastic and can break if not handled
properly.
Always wear rubber gloves to carry the TV set if the LCD screen is dam-
aged and liquid crystal might be leaking out. In the case of skin contact
immediately wash thoroughly with water.
Power supply
The wrong voltage can damage the set. This equipment must only be
connected to a mains power supply which has the same voltage and
frequency as that specified on the rating plate. The mains plug of the TV
set must be easily accessible so that the device can be disconnected from
the mains at any time. When you unplug the mains plug, do not pull on
the cable rather pull on the plug housing. The cable in the mains plug
could be damaged and cause a short circuit the next time it is plugged
in.
Lay out the mains cable in such a manner that it cannot be damaged.
The mains cable must not be kinked or laid over sharp edges, stepped
on or exposed to chemicals; The latter also applies for the entire equip-
ment. A mains cable with damaged insulation can cause electrical shock
and is a fire hazard.
Air circulation and high temperatures
The vent slots on the rear panel of the set must always be kept free.
Please do not place newspapers or cloths on/over the TV.
Ensure that there is at least 10
cm free space on the sides and
above the set for air circulation,
if the set is placed in a cabinet
or on a shelf.
Like any electronic device, your
TV set requires air for cooling.
Obstruction of the air circula-
tion can cause fires.
The set is suitable for different
installation solutions. See the
instructions for assembly for the different installation solutions.
Stand the TV set with the table or floor stand only on a level, sturdy,
horizontal base. Particularly ensure that the set does not protrude to the
front when placed in or on pieces of furniture.
Set up the device where it is not exposed to direct sunlight
and where it
is not exposed to additional warming through heating elements.
Prevent metal items, needles, paper clips, liquids, wax, or similar items,
from getting into the interior of the device through the vent slots in the
rear panel. Such objects can cause short circuits in the set, which could
possibly cause a fire.
If something should get into the interior of the set then immediately
unplug the mains plug of the device and contact customer service for
more information
For your safety
10 cm
10 cm
10 cm
9 -
english
Cleaning and care
➠ Switch off the TV set at the main switch before cleaning.
Clean the TV set, the screen, and the remote control unit with a soft,
moist, and clean cloth only, without any aggressive or scouring cleaning
agents.
Repairs and accessories
Never remove the back of the TV set yourself. Only have your TV device
repaired or serviced by authorised television technicians.
Only use original accessories such as Loewe stands if possible (see Acces-
sories on pages 95 and 98).
Supervision
Do not allow children to use the TV set without supervision or to play in
the immediate vicinity of the TV set. The set could tip over, be pushed
off or pulled down from the stand surface and injure someone.
Do not allow the switched-on TV set to run unattended.
Volume
Loud music can lead to ear damage. Avoid extreme volume especially
over long periods and when using headphones.
Thunder storms
Pull out the mains plug and all connected antenna cables from the TV
set in a thunderstorm. Overvoltage caused by lightning can damage the
set via the antenna system, as well as via the mains. The mains plug and
all connected antenna cables should also be pulled out during long pe-
riods of absence.
Note on the LCD screen
The TV set you have purchased with LCD screen satisfies the most rigor-
ous quality requirements and has been inspected relative to pixel errors.
In spite of the utmost care in manufacturing the display, for technical
reasons the possibility that some pixels will have defects cannot be 100%
excluded. Please understand that these types of effects, as long as they
are within the standard of specified limits, cannot be considered as a
device defect in terms of the guarantee.
Avoid displaying still images for long periods of time. It is possible that
a copy of the image may remain.
For your safety
- 10
english
(1
Radio only for DVB reception, provided the station broadcasts this.
Otherwise switch over to an audio input.
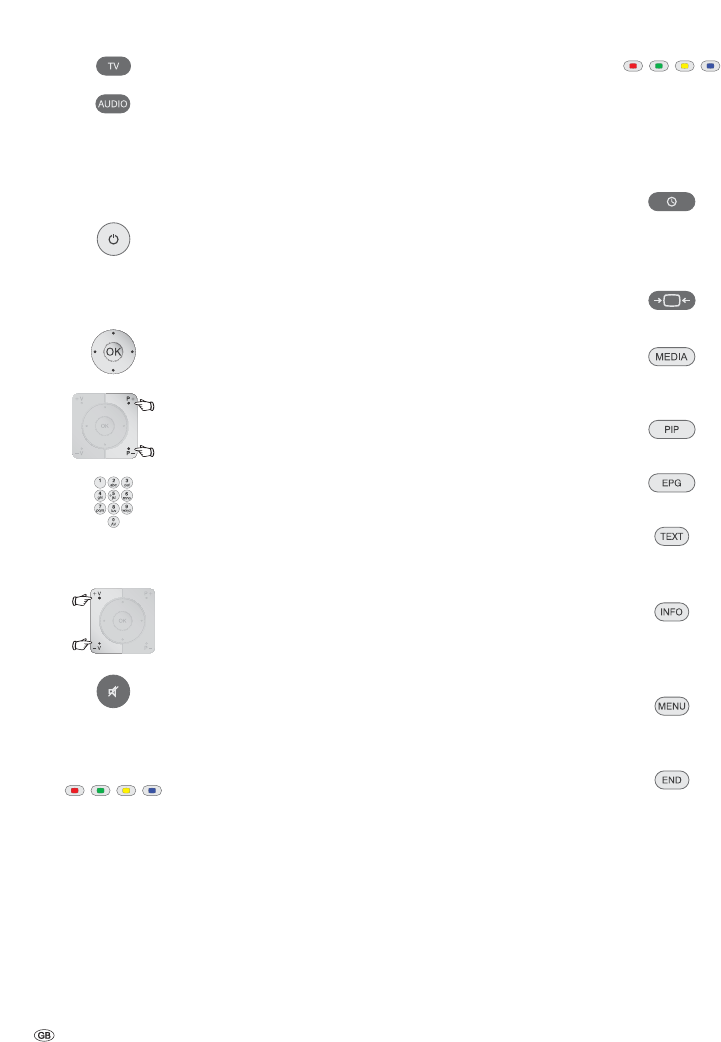
Functions of the operating elements
1
Mains switch:
The mains switch is located on the bottom of the set.
2
On/Off button:
Switch on from the standby mode
Switch off to the standby mode
3
Display:
red = Standby
green = Operation
orange = Operation without on-screen display
(Radio, EPG data capture or timer recording)
4
Button M:
Call the menu
in the menu: up/down
5
Button R:
Radio on/off
(1
(back to TV mode)
Switch on the radio from the standby mode
in the menu: down
6
Button +:
Station up
in the menu: to the right
7
Button – :
Station down
in the menu: to the left
Control unit front side of the device
M
R
+
-
3
1
5
7
2
4
6
11 -
english
1
Mains cable
2
HDMI 1 - HDMI input 1
3
HDMI 2 - HDMI input 2
4
PC IN - VGA/XGA input
5
AV - Euro-AV socket
6
LAN - Network connection
7
AUDIO IN - Audio input (analogue)
8
AUDIO DIGITAL OUT - Digital audio output
9
AUDIO DIGITAL IN - Digital audio input
10
CENTER IN - Centre audio input (analogue)
11
SERVICE - Service socket
12
ANT-TV - Antenna/cable analogue/digital
13
ANT SAT - Satellite antenna (Sat tuner)
(1
14
RS-232C - Serial interface
(1
15
CI-COMMON INTERFACE - Common Interface (CI slot)
16
USB - USB connection
17
- Headphones connection
18
AUDIO IN L - Audio in left (AVS)
19
AUDIO IN R - Audio in right (AVS)
20
VIDEO IN - Video in (AVS)
21
AVS - S-Video connection (AVS)
(1
Equipment and upgrade options, see page 97.
Connections rear side of the device
12
11
9
10
12
13
15
4
5
3
8
19
20
21
18
6 7
14
17
16
- 12
english
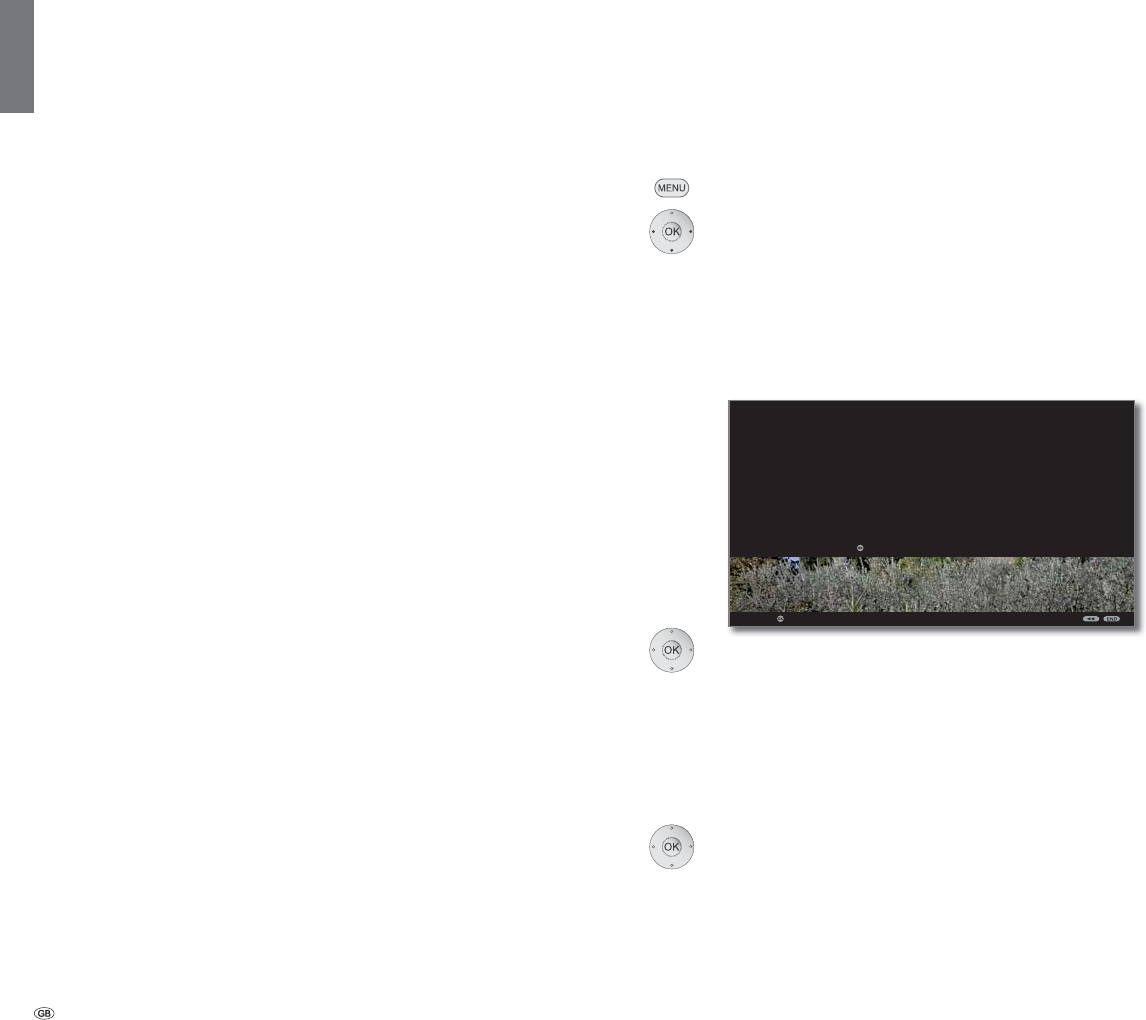
Example: Select and perform functions in the TV menu
Menus for the individual modes (TV, Radio, PIP, EPG, Teletext and Me-
diaPortal) are called with the MENU button.
The menus are displayed at the bottom of the screen. At the top you get
additional information about the selected menu item (see info display on
page 15).
➠ In normal TV mode, without other displays.
MENU: Call TV menu.
Select Picture,
go to the menu line below.
Select Brightness,
go to the menu line below.
Set Brightness.
Return to the Brightness menu line
to make other picture settings.
Select more ... ,
OK call more ... functions.
Select Auto format,
go to the menu line below.
Select on / off.
END: Conclude the settings.
General information on menu operation
The operation can be divided basically into two areas: The operation of
dropdown lists (e.g. station list, favourites list, EPG etc.) and the menu
operation (TV menu etc.) for configuring your TV set.
How to use the appropriate buttons is explained by example of a drop-
down list (station list). Navigation through the menus is described by the
example of the TV menu which is used for many explanations.
Explanation of the buttons for a dropdown list (e.g. station list):
You move the cursor by pressing the ring (up,
down, left, right).
P+/P– If more selection options are available than will fit
on one screen page page is displayed. You can
scroll the pages with P+/P–.
OKThe OK button calls the selection or confirms the
setting.
With the coloured buttons you can select different op-
tions depending on the application. The assignment of
the coloured keys is shown at the bottom of the screen.
INFO: Additional information about the screen page.
END: Close/exit dropdown list.
Inputs with the numeric buttons
Letters have to be entered for specific functions. Like using
a mobile phone keypad (0 to 9), press a numeric button
until the desired character appears.
The available letters are printed on the individual numeric
buttons.
OK
a
z
-
P+
P–
21:00-21:45 Urlaubsparadies - Toskana
HDMI2
HDMI1
PC IN
AVS
AV
0 VIDEO
OK
STATION LIST
PIP scan
Change stations
Sort alphabetically
Switch to ...
Select station
Favourites
Sound Recording Connections Settings Geometry
PICTURE
Here you can adjust among other things: Contrast, colour, brightness,
picture adjustment, sharpness, picture format.
TV MENU
Picture
Picture adjustment ...
Operating convenience
13 -
english
Operating convenience with wizards
For many settings your TV set has user guidance with wizards which
guide you through the settings step by step.
Overview of wizards
Initial installation
The initial installation wizard helps you with the initial installation and
connection of any existing equipment (see page 22).
Setting up the antenna
You enter in the antenna wizard which antenna signals are available to
you. The antenna wizard is called in initial installation (see page 22). You
can also call the antenna wizard in the TV menu under Connections
Antenna DVBAntenna DVB-S
(1
or Antenna DVB-T.
Search wizard
If you want to search for new stations after the initial installation, or if you
have set up your antenna for the first time, then you can handle this task
with the help of the search wizard (see page 40).
You will find the search
wizard in the TV menu under Settings
StationsSearch wizard.
Connecting sound components
The sound component wizard ensures that the components which re-
produce the TV sound are correctly registered, connected and set. It is
started automatically at the end of the initial installation wizard but can
also be called separately (see page 79). You will find the sound components
wizard in the TV menu under ConnectionsSound components.
Programming and managing recordings
The recording wizard helps you to programme a recoring with a VCR or DVD
recorder (see page 82).
Software update
You can download the latest software for your TV set from the Loewe
Service site and update using a USB stick (see page 86).
Operating convenience
(1
Equipment and upgrade options, see page 97.
- 14
english
MediaPortal
This portal offers you accesses to central media, functions and contents
of your TV set. From all these you can save your own personal favourites
on this page to help you to call them simply and directly again later.
Call MediaPortal
MEDIA: Call MediaPortal.
The individual media and the various functions are dis-
played at the top of the MediaPortal.
The number of selectable items varies depending on the
TV equipment, network connection, available media/
media servers and connected appliances.
The lower part of the MediaPortal contains the selectable
recommendations.
Select menu item,
OK call.
Description of the individual functions:
TV: Here you call the TV mode of your TV set.
See page 30 for further information.
Radio digital: Here you call the DVB radio mode of your TV set.
See page 50 for further information.
MediaHome: Here you have access to your personal memory
media, e.g. to all memory media connected via USB
or to networks with which your TV set is connected.
See page 56 onwards for further information.
MediaNet: Here you have access to music and video sources
from the Internet. The menu item only appears if a
network link is available.
See page 56 onwards for further information.
Index: Here you have access to the index integrated in the
TV set.
See page 15 for further information.
MEDIA PORTAL
Classic FmTalkSportChillCapital FM
Filmtrailer.comPhilharmonia O..BBC World Ser..Discovery Ch..
TV
MediaNet
Index
Radio digitalMediaHome
RECOMMENDATIONS
Operating convenience
15 -
english
Operating convenience
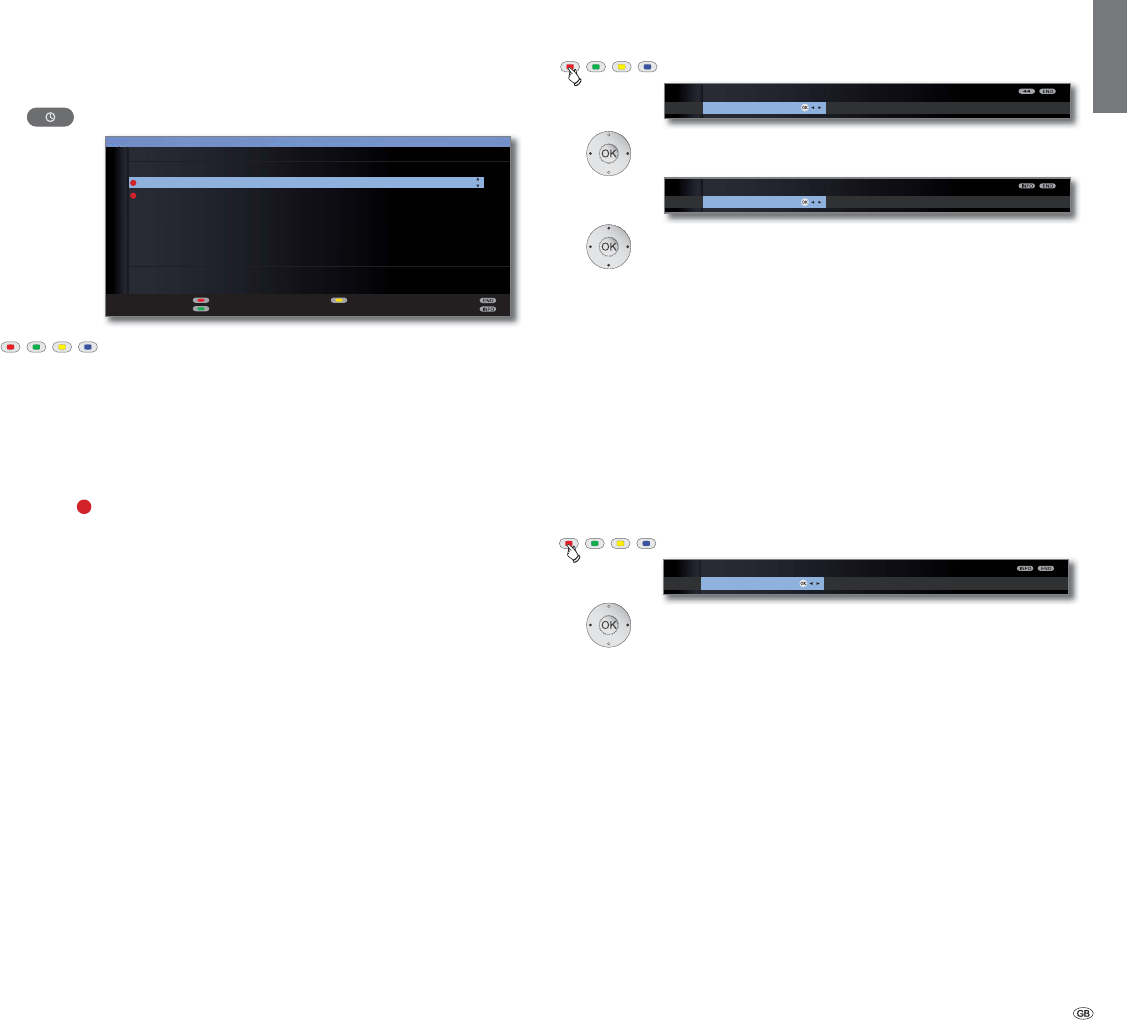
The index in the TV set
You can start all wizards and many operating functions directly from
this point. The complete function scope of the TV set can thus be easily
understood.
Alphabetic sorting is preceded by the items Language, Energy efficiency,
Integrated features and Repeat initial installation.
Call index
MEDIA: Call MediaPortal.
Select Index,
OK call.
You will see an info text for the highlighted keyword in
the info display.
If an OK symbol appears in the marked line, this function
can be called directly with OK.
Selecting a keyword
Enter initial letters with the numeric buttons like with a
mobile phone keypad (see page 12).
or go with:
to the preceding / next letters,
from line to line,
P+/P– scroll backwards or forwards in whole pages.
Example: You want to have the TV set switch off automatically at
a specific time:
Select the keyword Switch off Automatic, with OK you
will go to the setting.
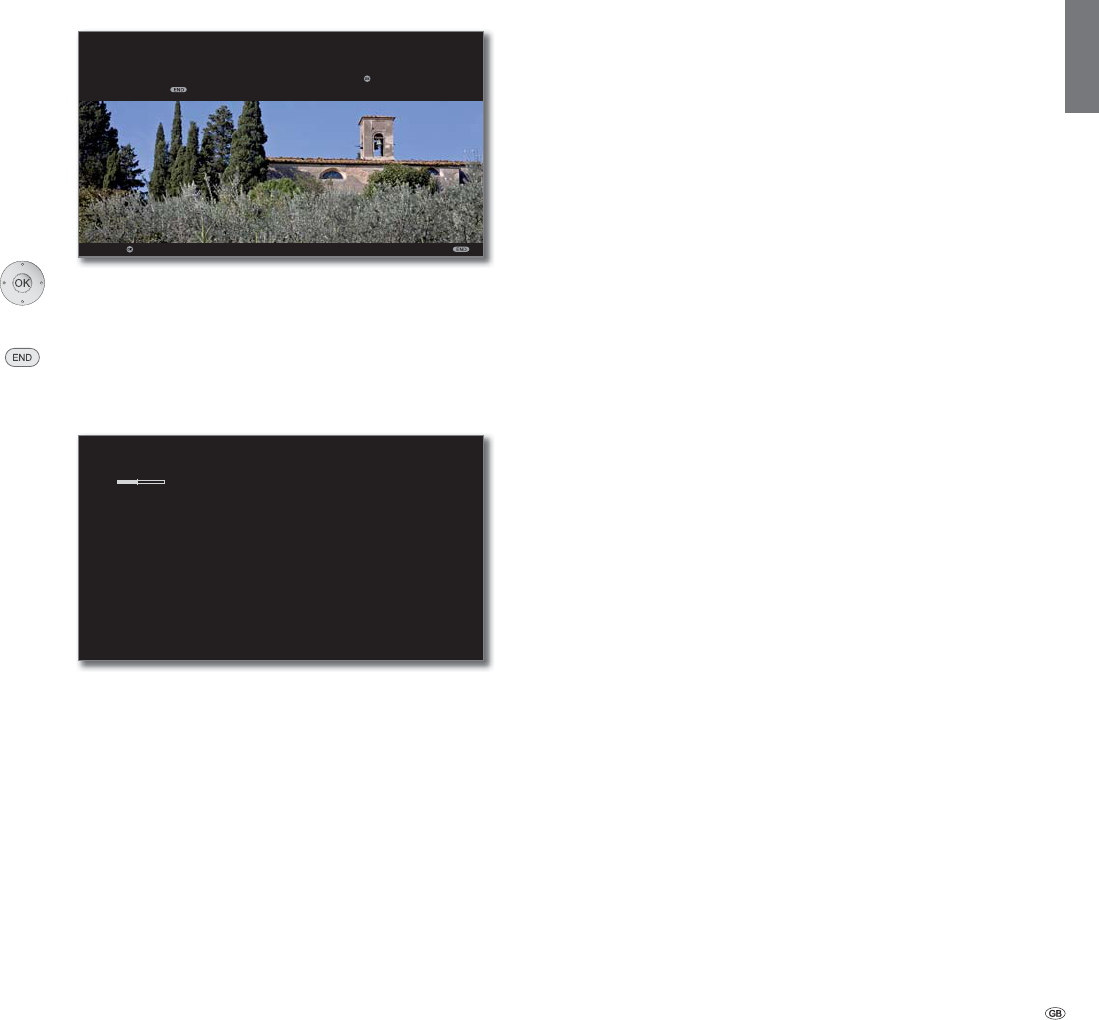
The info display
The info display shows a content-based info text for each menu item at
the top edge of the screen to aid you in making the settings. In conjunc-
tion with the index it makes a convenient control system.
➠ A menu is displayed.
The factory setting is that the info display is shown auto-
matically for each menu item. In this case you can tempo-
rarily hide the info texts with the INFO button.
The automatic info display can be hidden via a menu
setting. Then it can be displayed temporarily by pressing
the INFO button.
An INFO icon at the bottom right above the menu bar
also tells you that an info text is available.
If an info text over several pages is available the number
of available pages and P+P– Page is displayed in the
Info window. You can scroll through the individual info
pages with P+ and P–.
Permanently display or hide the automatic info display
Once you have become familiar with how to operate the TV set, you can
switch off the automatic info display.
➠ In normal TV mode, without other displays.
MENU: Call TV menu.
Select Settings,
go to the menu line below.
Select Miscellaneous,
go to the menu line below.
Select On-screen displays,
go to the menu line below.
Select Automatic info,
go to the menu line below: yes / no.
OK
a
z
-
OK
P+
P–
Activate Previous/next letter
INDEX
Language
Energy efficiency
Integrated features
Repeat initial installation
*
Access code
Automatic dimming - Room
Automatic station programming
You can select your language for operating the TV set.
Picture Sound Recording
SETTINGS
Here, you can search for stations automatically or manually as well as set
the menu language, timer functions, parental lock,
on-screen displays, etc.
TV MENU
Settings
Station ...
t
ions
- 16
english
Settings
TV menu
PictureSound
Connections
Recording
Recording wizard
Timer list
Pre-record time
Post record time
Sound components
Antenna DVB
AV connecting settings
Miscellaneous
Picture adjustment
Contrast
Colour intensity
Colour temperature
Brightness
Sharpness
Digital Noise Control (DNC)
more...
Image
+
Active
Auto format
Picture format
Move picture up/down
(1
PC IN / HDMI display
(2
Search wizard
Manual adjustment
Change stations
Select/change favourites
Sound effects
Sound adjustment
Headphone volume
Loudness
Sound-picture synchronisation
more...
Loudspeaker sound
(1
Headphone sound
(1
Auto volume
AV output signal
Maximum volume
max. switch on volume
Volume adjustment for
current station
Balance
Auto speech detection
On-screen displays
Time and date
Software update
CA module: xxx
(1
DVB settings
Menu language
Subtitles (DVB)
Audio (DVB)
Energy efficiency
Stations
Parental lock
Timer functions
Language
Eco standard
Premium mode
Shop mode
Miscellaneous
Signal type at PC IN
(2
Digital Link Plus
Decoder stations
(3
Remote TV switch on
via Digital Link
Assign digital audio input
Switch off today only
Switch off daily
One-time reminder
Wake up Mon-Fri
Wake up Sat
Wake up Sun
Wake up with
Wake up signal volume
TV menu – Overview diagram
(1
Menu items appear depending on the signal source currently selected (DVB or analogue) and/or at definite presettings in the relevant menus. For individual details,
see the corresponding chapter of the operating instructions.
(2
Menu item can only be selected if a valid signal is present at the PC IN/HDMI input.
(3
Menu item only available if a Decoder has been selected as Device at connection AV (see page 72).
Operating convenience
17 -
english
Radio menu
Sound
Stations
Timer functions
Search wizard
Manual adjustment
Change stations
Select/change favourites
Switch off today only
Switch off daily
One-time reminder
Wake up Mon-Fri
Wake up Sat
Wake up Sun
Wake up with
Wake up signal volume
Switch on TV when marked
off
on (only for DVB)
on (for DVB + analogue)
Select provider
(1
Station selection
Data capture
no
yes
EPG menu
Teletext menu
Preview pages
Sub-title pages
Personal text pages
Character set
HiText
Page format
Station selection
Newsflash
Reveal
Recording wizard
Settings
Sorting
corresponding to station list
chronologically
Sound effects
Sound adjustment
Headphone volume
Loudness
more...
Auto volume
Maximum volume
max. switch on volume
Volume adjustment for
current station
Balance
Auto speech detection
Photo settings
Music settings
Video settings
Network access
Adapters
more...
Network settings
Media menu
Operating convenience
Radio menu – Overview diagram
Other menus– Overview diagram
- 18
english
Installing the TV set
Installation notes
Choose a place for installing your TV where no bright light or sunlight
shines directly onto the screen. This could cause reflections which impair
the picture.
3 times the screen diagonal can be taken as a guide value or the viewing
distance (for 26-inch set approx. 2m for SD signal). The viewing distance
can be reduced with an HD signal.
Set covers
Covers for rear and side connections
To remove the rear cable cover, pull the two recessed handles at the
bottom and drop down the cover.
To fit the cover, insert the lugs at the top edge of the cover into the corre-
sponding cut-outs in the rear panel and push up the cover until it snaps in.
The side cover of the TV set can also be completely removed. For this,
open it as far as it will go and gently pull on the open cover.
The cover detaches from the holder and gives free access to the con-
nection area. To replace the cover, simply push it until it latches back
into place.
Initial installation
19 -
english
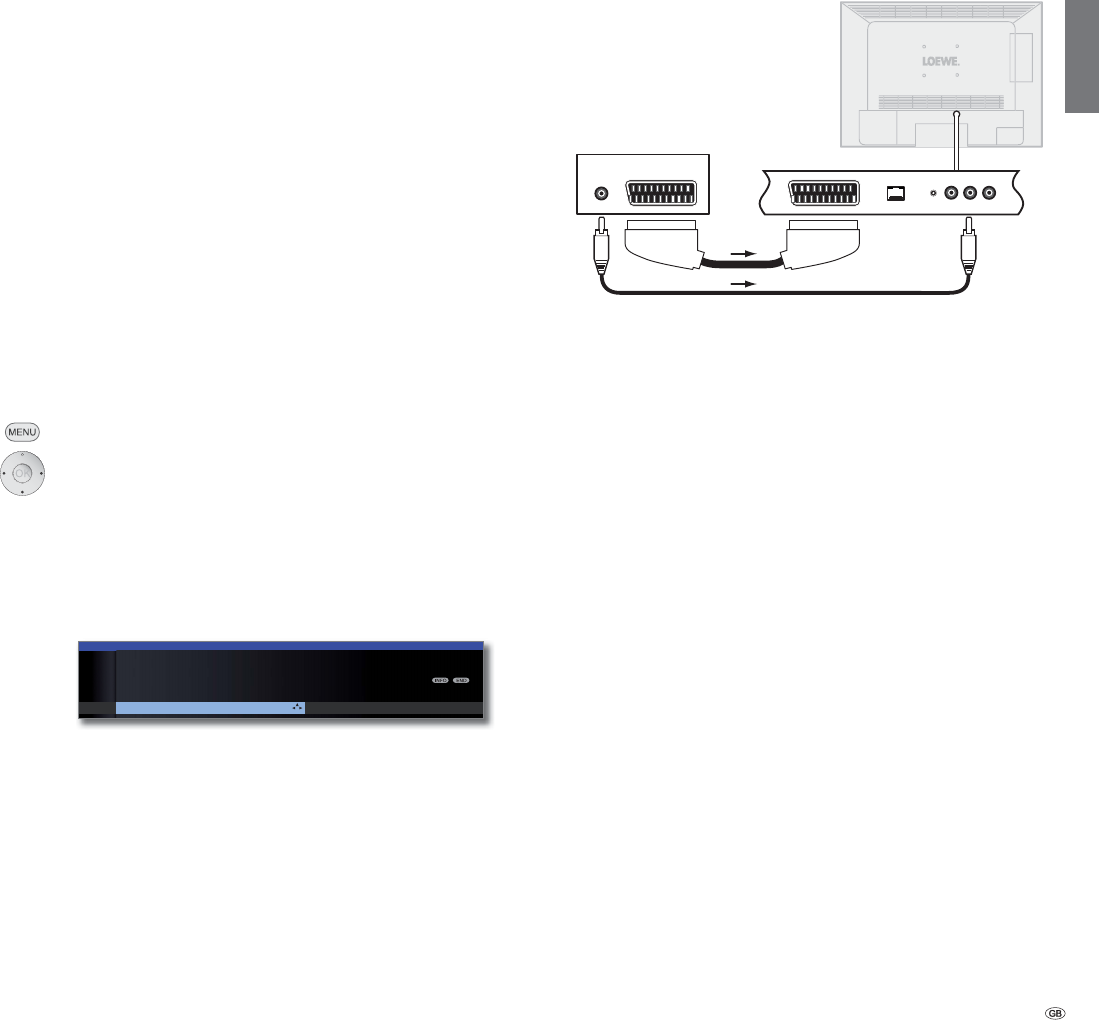
Connecting the TV set to the Home network
You can connect your TV set to the home network by a wired connection
(Ethernet, Powerline). Please contact your specialist dealer for more
information on Powerline.
Example for a wired connection
Connect the LAN socket of your TV set to the LAN switch/router of your
home network with a network cable (available from your dealer).
Connecting the TV Set
Connecting to the mains
Remove the cover for the connections.
Connect the TV set to a 220-240V mains socket:
Plug the mains plug into a mains socket.
Connecting antennas
Cable (analogue) / DVB-C / DVB-T antenna:
Plug the antenna cable of antenna, cable system or room antenna into
the ANT TV socket.
If you want to use analogue cables / DVB-C connection and a DVB-T
antenna together, use an external antenna switch (available from your
dealer).
Satellite antenna DVB-S:
If the TV set is equipped with a satellite tuner (retrofit kit), the ANT-SAT
socket is available.
Depending on the used satellite system, connect a connecting cable from
the multi-switch or directly from the LNC to the ANT-SAT socket of the TV.
When connecting the TV set to a single cable community antenna, con-
nect the ANT-SAT socket directly to the appropriate SAT antenna socket.
Ask your dealer if required.
R TV
DVB-T
DVB-S
an. cable /
DVB-C
Initial installation
LAN switch/router
Homeserver,
e.g. PC
TV set
- 20
english
AAA LR03
AAA LR03
Initial installation
Preparing the remote control unit
Inserting or replacing batteries
Press on the embossed arrow whilst pushing the battery cover down.
Only use leak-proof micro-cells of the LR 03 (AAA) Alkali-Manganese type.
Do not use different types of batteries and old and new batteries together.
Pay attention to the correct polarity of + and – when inserting the bat-
teries.
If the batteries are too weak after longer use, the TV set prompts you
to change the batteries.
Dispose of used batteries in an environmentally friendly way (see page 99).
Push the cover back on from below after inserting the batteries.
Adjusting the remote control for operating the TV set
Press the TV button.
See page 85 for how to operate other Loewe appliances
and how to reprogramme the remote control buttons.
21 -
english
Turning the set on/off
Switching the TV set to standby mode
Press the mains switch on the bottom right of the set.
The display in the control panel on the front lights up first orange and
then red. The set is now in standby mode.
Switching the TV on/off on the control unit
To switch the TV set into Operating mode or switch it off into Standby
mode, press the middle of the On/Off button for about 2 seconds.
Meaning of the display colour of the LEDs in the On/Off
button:
Red:Standby mode
Green:TV set is switched on
Orange:Radio mode, TV set receives EPG data or timer
recording active
Switching the set on with the remote control
Press theon/offbutton
or
numeric buttons
or
TV button
or
OK button – station list is called
or
MEDIA button – MediaPortal is called.
Switching the set off with the remote control
Press the on/offbutton.
➠ Before switching off the set with the mains switch, we
recommend you to switch it to standby mode.
Switch on in Radio mode
PressR on the TV control unit.
or:
Press the AUDIO button on the remote control
(radio mode, see page 50).
Display
Initial installation
Mains switch
Control unit
M
R
+
-
- 22
english
Eco standard:
The emphasis for home use is on low energy consump-
tion.
Premium mode:
This mode optimises the settings to a brighter environ-
ment at a higher energy consumption.
Shop mode:
The picture settings are aligned to operation in the pres-
entation room.
The presetting can be changed later in the TV menu under
Picture Picture adjustment Presettings (see page 34)
or under Settings Energy efficiency.
OKproceed.
Select Location of TV set (national defaults are
adopted).
OKProceed.
Select antenna cable.
Yellow button: Connect/disconnect antenna cable.
Antenna/cable (analogue):
analogue stations via
cable/antenna
DVB-T:digital terrestrial stations
DVB-C:digital stations via cable
DVB-S: digital stations via satellite
Energy
efficiency
(continued)
Location of
TV set
Selecting
antennas
First installation wizard
Initial installation after switching on for the first time
This wizard starts automatically after the set is switched on for the first
time, however it can also be called later manually in the TV index, see
Repeat initial installation on page 15.
➠
If at least one station is locked the access code must be entered before
repeating initial installation (see Parental lock on page 52).
First installation wizard routine
The routine of the first installation wizard depend on the selected settings.
Select language.
Selecting the language of the user guidance is the
wizard’s first step. Then you simply follow the instructions
on your TV screen.
OKProceed.
Select Energy efficiency.
Decide how energy efficiently you want to operate
your TV set. The value for the contrast (and thus the
brightness of the background lighting) is adapted.
Initial installation
OK
OK
FIRST INSTALLATION WIZARD
Which language do you want to use for operation?
INITIAL INSTALLATION
Language
Sprache D Kieli FIN
Language GB Jezik SLO
Langue F Jazyk SK
Lingua I Lisan TR
Idioma E Språk S
Taal NL Sprog DK
Jazyk CZ Idioma P
Nyelv H
Proceed
OK
Premium mode Shop mode
INITIAL INSTALLATION
Energy efficiency
Eco standard
Proceed Back
OK
OK
OK
INITIAL INSTALLATION
Location of TV set (1/2)
A Austria I Italy
B Belgium NL Netherlands
CH Switzerland P Portugal
CZ Czech Republic PL Poland
D Germany S Sweden
DK Denmark H Hungary
E Spain SLO Slovenia
F France FIN Finland
GB United Kingdom AUS Australia
IRL Ireland NZ New Zealand
Proceed Back
Language
Energy
efficiency
OK
INITIAL INSTALLATION
Connect antenna cable(s)
Antenna cable(s) for: to antenna socket(s):
Antenna/cable (analogue) ANT TV
DVB-T ANT TV
DVB-C ANT TV
DVB-S ANT SAT
Proceed Connect/disconnect
Back
continued on next page
p
23 -
english
DVB-S can only be selected if the set is equipped with
a satellite tuner. Depending on which antenna(s) was
(were) selected, the appropriate settings are called later
during the routine.
OKproceed.
Select desired languages and alternative
languages for subtitles and audio for DVB
programmes (see page 53).
OKProceed.
Accept Logical Channel Number no / yes.
In various countries, digital stations (DVB-T, DVB-C,
DVB-S) are transmitted with a preset channel
number per station, known as “Logical Channel
Numbers“ – “LCN“.
If you indicate yes here, the specified programme
numbers will be adopted as station memory loca-
tions and the stations of the preferred signal
sources sorted by LCN. There may be gaps in the
numbering of the station list depending on the LCN.
OKProceed.
Depending on which antennas (DVB-T, DVB-C, DVB-S)
were selected, the appropriate settings appear
below.
Selecting
antennas
(continued)
Subtitle and
audio
languages
(DVB)
Logical
Channel
Number
Settings
Encrypted
stations
Search
method
Supply voltage
Setting options for DVB-T reception:
If you have not selected a DVB-T antenna in the antenna
selection: Continue with setting options for DVB-C recep-
tion on page 24.
Select and adapt settings for DVB-T reception.
You can state whether coded stations are to be searched
for in the search/update.
Select yes to save all found
scrambled stations. However, these stations can only
be received in connection with a CA module and the
appropriate Smart Card.
Handling of the CA module is
described on page 55.
If a CA module with a SmartCard is already plugged in for
the station search, all the stations which this module can
descramble are also saved when no is preset.
If you want to run the station search independently of
the channel grid, select frequency search for the search
method.
OKProceed.
Select supply voltage no / yes.
Use a DVB-T antenna that requires a supply voltage
(active antenna) and which is not already supplied
via a power adapter, then select yes (5V) for the
antenna’s power supply.
How to align your DVB-T antenna is described on
page 29.
OKProceed.
OK
no yes
INITIAL INSTALLATION
Logical Channel Number
Accept Logical Channel Number
Proceed Back
OK
OK
INITIAL INSTALLATION
Subtitle and audio languages (DVB)
Favoured subtitle language English ...
Alternative subtitle language German
Favoured audio language English
Alternative audio language German
Proceed Back
OK
Initial installation
OK
INITIAL INSTALLATION (DVB-T)
Scrambled stations no yes
Search method Channel search
Proceed
OK
yes (5V)
INITIAL INSTALLATION (DVB-T)
Antenna
Supply voltage
no (0V)
Proceed Back
OK
- 24
english
Setting options for DVB-C reception:
If you have not selected a DVB-C antenna in the antenna
selection: Continue with Setting options for DVB-S recep-
tion (see right hand column).
The normal DVB-C settings are derived from the selection
of the location and do not need to be changed.
Select and adapt settings for DVB-C reception.
You can state whether coded stations are to be searched
for in the search/update.
Select yes to save all found
scrambled stations. However, these stations can only be
received in connection with a CA module and the appro-
priate Smart Card.
Handling of the CA module is described
on page 55.
If a CA module with a SmartCard is already plugged in for
the station search, all the stations which this module can
descramble are also saved when no is preset.
If you want to run the station search independently of
the channel grid, select frequency search for the search
method.
The DVB stations are only searched for in the frequency
range above the start frequency.
Only change these defaults if you are familiar with other
symbol rates and types of modulation or if you have to
specify the network ID for your cable network. In the
case of small cable networks fed directly from the satel-
lite, the rate of 6900 might have to be replaced by 6111.
Your cable provider has the information you need.
OKProceed.
Setting options for DVB-S reception:
If you have not selected a DVB-S antenna in the antenna
selection: Continue with Setting options for all types of
reception on page 28.
The normal DVB-S settings are derived from the selection
of the location and do not need to be changed in most
cases.
Selecting the satellite system.
Specify how you receive which satellite(s) (single
satellite or type of satellite system). Ask your dealer
if required.
Reception of a single satellite via a connected LNC (LNB).
See page 25 for settings.
Reception of two different satellites with two LNCs (LNBs)
which are connected to the TV set by a 22 kHz switchbox.
See page 25 for settings.
Reception of two different satellites with two LNCs (LNBs)
which are connected to the TV set by a toneburst switch.
See page 25 for settings.
The TV set controls a DiSEqC multiswitch to which up to
four LNCs (LNBs) for different satellites are connected.
See page 26 for settings.
Select setting if the TV set is connected to a DiSEqC
single-cable system (according to EN 50494). Several Sat
receivers can be connected to one Sat cable. See page 26
for settings.
Select setting if the TV set is connected to a single-cable
system (without DiSEqC). Several Sat receivers can be
connected to one Sat cable. Unlike a DiSEqC single-cable
system there are restrictions in the range of certain recep-
tion frequencies in single-cable community systems. See
page 27 for settings.
OKProceed
(to the appropriate page of the satellite system).
OK
INITIAL INSTALLATION (DVB-C)
Scrambled stations no yes
Search method Channel search
Start frequency 047.0 MHz
Network ID none
Symbol rate 1 (DVB-C) 6875
Symbol rate 2 (DVB-C) 6900
QAM modulation 1 64
QAM modulation 2 256
Proceed
Settings
Encrypted
stations
Search
method
Start
frequency
Network ID
Symbol rate
QAM
modulation
OK
OK
INITIAL INSTALLATION (DVB-S)
Select satellite installation
Single satellite
2 satellites on 22 kHz switchbox
2 satellites on toneburst switch
Max. 4 satellites on DiSEqC multiswitch
DiSEqC one cable communal system
other communal installation
Proceed Back
Select
satellite
installation
Single
satellite
2 satellites
on 22 kHz
switchbox
2 satellites
on toneburst
switch
Max. 4
satellites
on DiSEqC
multiswitch
DiSEqC
one cable
communal
system
other
communal
installation
Initial installation
25 -
english
Setting options for the satellite system (2 satellites on 22 kHz switchbox
/ 2 satellites on toneburst switch):
Select Satellite 1 / Satellite 2,
select satellites from list,
OKProceed.
Set LNB frequencies.
Normally, you do not need to change the values for
high and low band, unless the LNC (LNB) of your
satellite system uses a different oscillator frequency
(important for the frequency display).
OKProceed.
(with Setting options for DVB-S reception (continued)
on page 27).
Setting options for the satellite system (single satellite):
Select satellite,
OKProceed.
High band no / yes.
Specify here whether the high band of the selected
satellite is to be searched in addition to the low
band.
OKProceed.
Set LNB frequencies.
Normally, you do not need to change the values for
high and low band, unless the LNC (LNB) of your
satellite system uses a different oscillator frequency
(important for the frequency display).
OKProceed.
(with Setting options for DVB-S reception (continued)
on page 27).
Select single
satellite
High band
LNB
frequencies
Satellite
selection
LNB
frequencies
(22 kHz
switchbox)
LNB
frequencies
(toneburst
switch)
Initial installation
OK
Proceed Back
INITIAL INSTALLATION (DVB-S)
LNB frequencies
Low band 9750 MHz
High band 10600 MHz
OK
OK
INITIAL INSTALLATION (DVB-S)
Select single satellite
Astra1 19,2°E Hellas Sat2 39°E
Hot Bird 13°E Hispasat 30°W
Astra2 28,2°E Intelsat10 02 1°W
Astra3 23,5°E Intelsat901 18°W
Atlantic Bird1 12,5 °W Nilesat 7°W
Atlantic Bird2 8°W Pan Am Sat 43°W
Atlantic Bird3 5°W Sirius2/3 5°E
Eurobird1 28,5°E
Telekom2C 5°W
Eurobird 9A 9°E
Telekom2D 8°W
Eutelsat W2 16°E Telestar12 12,5°W
Eutelsat W3A 7°E Thor2/3 0,8°W
Eutelsat W4 36°E Türksat 42°E
Proceed
OK
no
INITIAL INSTALLATION (DVB-S)
High band
yes (with 0/22 kHz)
Proceed Back
OK
OK
INITIAL INSTALLATION (DVB-S)
Satellite selection
Satellite 1 Astra1 19,2°E ...
Satellite 2 Hot Bird 13°E
Proceed Back
OK
INITIAL INSTALLATION (DVB-S)
LNB frequencies
ASTRA1 19,2°E 9750 MHz
Hot Bird 13°E 9750 MHz
Proceed Back
OK
INITIAL INSTALLATION (DVB-S)
LNB frequencies
ASTRA1 19,2°E Low band 9750 MHz
ASTRA1 19,2°E High band 10600 MHz
Hot Bird 13°E Low band 9750 MHz
Hot Bird 13°E High band 10600 MHz
Proceed Back
- 26
english
DiSEqC one
cable
communal
system
Satellite
selection
LNB
frequencies
Manual
registration
(for socket
ANT SAT)
Transmission
channel /frequency
PIN protection
Setting options for the satellite system
(max. 4 satellites on DiSEqC multiswitch):
Select and adapt settings for the DiSEqC
multiswitch.
The refresh rate determines how often a DiSEqC
command is output. A refresh is only necessary with
cascaded systems.
The control voltage controls the switching of the
polarisation level (horizontal/vertical) in non-DiSEqC
capable components (e.g. control of single LNBs via
DiSEqC multiswitch).
The 22kHz signal controls the switching between high
and low band in the Band setting. The Position setting
controls the selection of the satellites in non-DiSEqC
capable components.
The Toneburst controls the selection of the satellites in
non-DiSEqC but toneburst capable components with the
Position and Option settings.
OKProceed
Select Satellite 1 ... Satellite 4,
select satellites from list,
OKProceed.
Set LNB frequencies.
You do not normally need to change the values.
OKProceed.
(with Setting options for DVB-S reception (continued)
on page 27).
Setting options for the satellite system
(DiSEqC one cable communal system):
Select DiSEqC single cable communal installation.
OKProceed.
Select satellites from list,
OKProceed.
Set LNB frequencies.
Normally, you do not need to change the values for
high and low band, unless the LNC (LNB) of your
satellite system uses a different oscillator frequency
(important for the frequency display).
OKProceed.
Select and adjust settings for the DiSEqC single
cable communal installation.
Select the desired transmission channel and the corre-
sponding transmission frequency.
If your system is designed for it, it is possible to protect
your used transmission data from use by other subscrib-
ers with a PIN.
OKProceed.
(with Setting options for DVB-S reception (continued)
on page 27).
Initial installation
Settings
DiSEqC
multiswitch
Repeat rate
Control
voltage
22kHz signal
Toneburst
Satellite
selection
LNB
frequencies
OK
INITIAL INSTALLATION (DVB-S)
Repeat rate none 1 2
Control voltage 13/18V on
22kHz signal Band
Toneburst off
Proceed Back
OK
INITIAL INSTALLATION (DVB-S)
Satellite selection
Satellite 1 Astra1 19,2°E ...
Satellite 2 Hot Bird 13°E
Satellite 3 Eutelsat W2 16°E
Satellite 4 none
Proceed Back
OK
INITIAL INSTALLATION (DVB-S)
LNB frequencies
ASTRA1 19,2°E Low band 9750 MHz
ASTRA1 19,2°E High band 10600 MHz
Hot Bird 13°E Low band 9750 MHz
Hot Bird 13°E High band 10600 MHz
Eutelsat W2 16°E Low band 9750 MHz
Eutelsat W2 16°E High band 10600 MHz
Proceed Back
OK
OK
INITIAL INSTALLATION (DVB-S)
Select DiSEqC single cable communal installation
DELTA SUM-514
DELTA SUM-516
DELTA SUM-518
DELTA SUM-918
DELTA SUM-928
KATHREIN EXR-551
KATHREIN EXR-552
KATHREIN EXR-501
Proceed
OK
INITIAL INSTALLATION (DVB-S)
Satellite selection
Satellite 1 Astra1 19,2°E ...
Proceed Back
OK
Proceed Back
INITIAL INSTALLATION (DVB-S)
LNB frequencies
Low band 9750 MHz
High band 10600 MHz
OK
INITIAL INSTALLATION (DVB-S)
Manual registration (for socket ANT SAT)
Transmission channel 1 2 3 4 5 6
Transmission frequency 1284
PIN protection no
Define/change PIN 0000
Proceed
OK
27 -
english
Setting options for the satellite system
(other communal installation):
Select satellite,
OKProceed.
Select and adapt settings.
Normally, you do not need to change the values for high
and low band, unless the LNC (LNB) of your satellite
system uses a different oscillator frequency (important
for the frequency display).
If your set is connected to a single-cable system without
external voltage supply, you can connect the antenna
supply (13V or 18V / max. 450mA).
OKProceed.
(with Setting options for all types of reception on
page 28).
Setting options for DVB-S reception (continued):
After you have made the previous settings, you should
receive picture and sound of the selected satellites (only
possible for Astra1 and HOTBIRD).
OKProceed.
Select and adapt settings.
If several satellites are received, the following settings
must be made for every satellite. The scope of the settings
may differ depending on the selected satellite.
You can state whether coded stations are to be searched
for in the search/update.
Select yes to save all found
scrambled stations. However, these stations can only be
received in connection with a CA module and the appro-
priate Smart Card.
Handling of the CA module is described
on page 55.
If a CA module with a SmartCard is already plugged in for
the station search, all the stations which this module can
descramble are also saved when no is preset.
If you want to run the station search independently of
the channel grid, select frequency search for the search
method.
The symbol rates are specified by the satellite provider
and do not normally need to be changed.
OKProceed.
Initial installation
Select single
satellite
LNB
settings
LNC
frequency
Supply voltage
Test reception
Settings
Encrypted
stations
Search
method
Symbol rates
OK
FIRST INSTALLATION WIZARD
You should now receive a picture and sound from the following satellite:
ASTRA1 19,2°E C/N Level
If not, please align your dish correctly. If however it is correctly aligned and
you have an older version you can proceed with .
Proceed Back
OK
OK
yes
INITIAL INSTALLATION (ASTRA1 19,2°E)
Scrambled stations no
Search method Channel search
Symbol rate 1 (DVB-S) 27500
Symbol rate 2 (DVB-S) 22000
Proceed Back
OK
OK
OK
INITIAL INSTALLATION (DVB-S)
Select single satellite
Astra1 19,2°E Hellas Sat2 39°E
Hot Bird 13°E Hispasat 30°W
Astra2 28,2°E Intelsat10 02 1°W
Astra3 23,5°E Intelsat901 18°W
Atlantic Bird1 12,5 °W Nilesat 7°W
Atlantic Bird2 8°W Pan Am Sat 43°W
Atlantic Bird3 5°W Sirius2/3 5°E
Eurobird1 28,5°E
Telekom2C 5°W
Eurobird 9A 9°E
Telekom2D 8°W
Eutelsat W2 16°E Telestar12 12,5°W
Eutelsat W3A 7°E Thor2/3 0,8°W
Eutelsat W4 36°E Türksat 42°E
Proceed
OK
INITIAL INSTALLATION (DVB-S)
LNB frequency 9750 MHz
Supply voltage off
Proceed Back
- 28
english
Setting options for all types of reception:
Select favoured signal source.
Select the signal source from a list, the station of
which is to be at the top of your station list (starting
with station slot 1).
The listed signal sources depend on the selected
antennas and, if the set is equipped with a satellite
tuner, the type of satellite system used and the
received satellites.
OKProceed.
You will see a list of the selected settings. You can go
back in steps with the button to make any changes
to the settings.
OKStart automatic search.
The set now searches for TV and radio stations.
The stations found in the automatic search are divided
into the appropriate station blocks depending on the
Libble takes abuse of its services very seriously. We're committed to dealing with such abuse according to the laws in your country of residence. When you submit a report, we'll investigate it and take the appropriate action. We'll get back to you only if we require additional details or have more information to share.
Product:
Forumrules
To achieve meaningful questions, we apply the following rules:
First, read the manual;
Check if your question has been asked previously;
Try to ask your question as clearly as possible;
Did you already try to solve the problem? Please mention this;
Is your problem solved by a visitor then let him/her know in this forum;
To give a response to a question or answer, do not use this form but click on the button 'reply to this question';
Your question will be posted here and emailed to our subscribers. Therefore, avoid filling in personal details.
Register
Register getting emails for Loewe Connect 26 LED at:
new questions and answers
new manuals
You will receive an email to register for one or both of the options.
Get your user manual by e-mail
Enter your email address to receive the manual of Loewe Connect 26 LED in the language / languages: English as an attachment in your email.
The manual is 2,97 mb in size.
You will receive the manual in your email within minutes. If you have not received an email, then probably have entered the wrong email address or your mailbox is too full. In addition, it may be that your ISP may have a maximum size for emails to receive.
If you have not received an email with the manual within fifteen minutes, it may be that you have a entered a wrong email address or that your ISP has set a maximum size to receive email that is smaller than the size of the manual.
The email address you have provided is not correct.
Please check the email address and correct it.
Your question is posted on this page
Would you like to receive an email when new answers and questions are posted? Please enter your email address.