Little tikes 485138M Tikes Kitchen and Restaurant Manual
2
Zoom out
Zoom in
Previous page
1/14
Next page
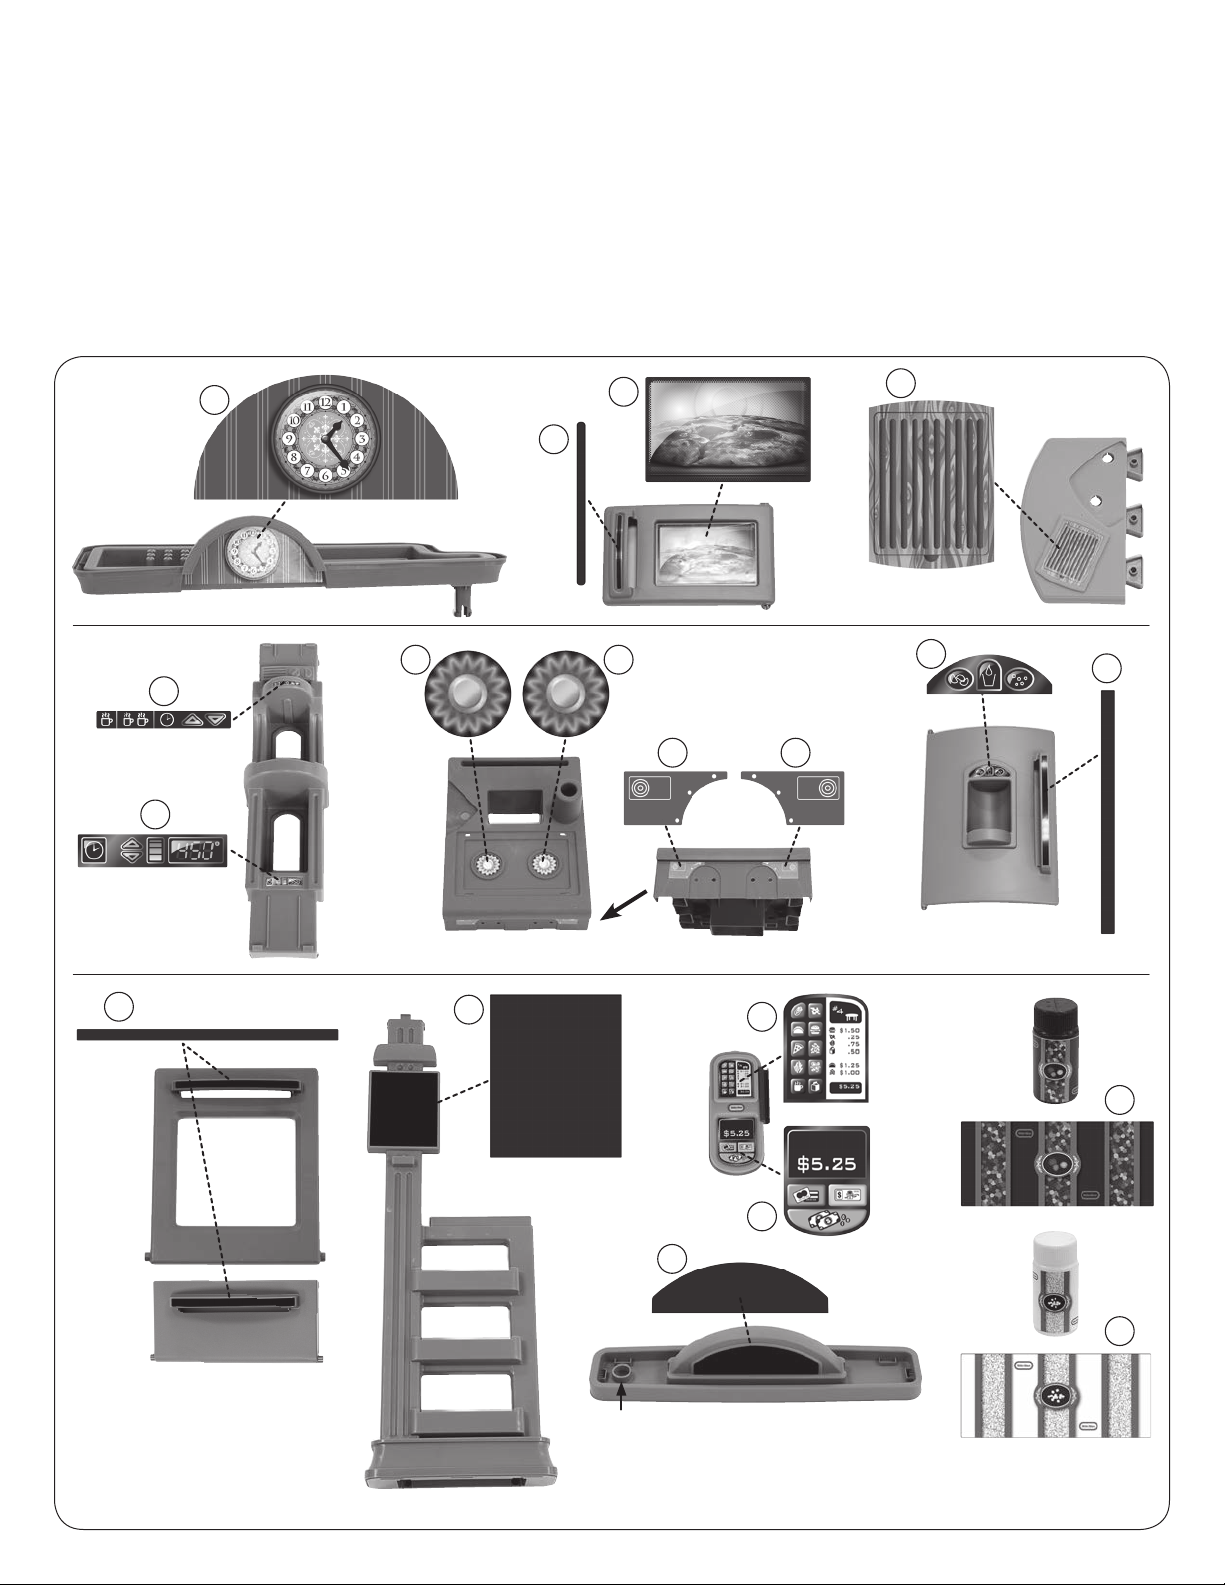
1. Decals
1. Aufkleber
1. Naklejki
1. Stickers
1. Autocollants
1. Calcomanías
Decals must be applied to a clean, dry surface. Wipe clean with a dry rag before application. Remove air from under decals by applying pressure to the decals
starting from the center, and work towards edges. NOTE: If decals bubble, prick with a pin to remove the air.
Les autocollants doivent être appliqués sur une surface propre et sèche. Essuyez avec un chion sec avant l’application. Pour retirer l’air sous les autocollants, ap-
pliquez-leur de la pression, en partant du centre et en allant vers les bords. REMARQUE : si des bulles se forment sous les autocollants, percez-les avec une aiguille
pour éliminer l’air.
Las calcomanías deben aplicarse en una supercie limpia y seca. Limpie la supercie con un trapo seco antes de colocarlas. Quite el aire atrapado debajo de las
calcomanías haciendo presión desde el centro hacia los bordes. NOTA: Si se forman burbujas en las calcomanías, pínchelas con un aller para quitarles el aire.
Die Aufkleber müssen auf sauberem, trockenem Untergrund angebracht werden. Reinigen Sie den Untergrund vor dem Anbringen der Aufkleber mit einem
trockenen Tuch. Lufteinschlüsse unter den Aufklebern lassen sich entfernen, indem Sie diese von der Mitte zu den Rändern hin herausdrücken. HINWEIS: Stechen
Sie Blasen in Aufklebern mit einer Nadel an, um die Luft austreten zu lassen.
Naklejki należy naklejać na czystą, suchą powierzchni ę. Przed naklejeniem należy wytrzeć powierzchnię suchą szmatką. Usunąć powietrze spod naklejek, dociska-
jąc je od środka w stronę krawędzi. UWAGA: Jeżeli pod naklejkami znajdują się pęcherzyki powietrza, należy nakłuć je za pomocą szpilki w celu ich usunięcia.
Stickers moeten worden aangebracht op een schoon en droog oppervlak. Veeg het oppervlak voor het aanbrengen schoon met een droge doek. Verwijder lucht-
bellen onder de stickers door eerst op het midden te drukken en dan naar de rand toe te werken. OPMERKING: Prik bij luchtbellen met een naald in de sticker zodat
de lucht kan ontsnappen.
1
2
3
9
4
10
66
1314
7
8
5
18
17
11
12
15
16
Note: opening should be on left side.
Remarque : à ouvrir en partant de la gauche.
Nota: La abertura debe quedar en el lado izquierdo.
Hinweis: Die oene Stelle sollte sich auf der linken Seite benden.
Uwaga: Otwarcie powinno znajdywać się po lewej stronie.
Opmerking: de opening moet aan de linkerzijde worden geplaatst.
Libble takes abuse of its services very seriously. We're committed to dealing with such abuse according to the laws in your country of residence. When you submit a report, we'll investigate it and take the appropriate action. We'll get back to you only if we require additional details or have more information to share.
Product:
Forumrules
To achieve meaningful questions, we apply the following rules:
First, read the manual;
Check if your question has been asked previously;
Try to ask your question as clearly as possible;
Did you already try to solve the problem? Please mention this;
Is your problem solved by a visitor then let him/her know in this forum;
To give a response to a question or answer, do not use this form but click on the button 'reply to this question';
Your question will be posted here and emailed to our subscribers. Therefore, avoid filling in personal details.
Register
Register getting emails for Little tikes 485138M Tikes Kitchen and Restaurant at:
new questions and answers
new manuals
You will receive an email to register for one or both of the options.
Get your user manual by e-mail
Enter your email address to receive the manual of Little tikes 485138M Tikes Kitchen and Restaurant in the language / languages: English, German, Dutch, French, Polish, Spanish as an attachment in your email.
The manual is 1.99 mb in size.
You will receive the manual in your email within minutes. If you have not received an email, then probably have entered the wrong email address or your mailbox is too full. In addition, it may be that your ISP may have a maximum size for emails to receive.
The manual is sent by email. Check your email
If you have not received an email with the manual within fifteen minutes, it may be that you have a entered a wrong email address or that your ISP has set a maximum size to receive email that is smaller than the size of the manual.
The email address you have provided is not correct.
Please check the email address and correct it.
Your question is posted on this page
Would you like to receive an email when new answers and questions are posted? Please enter your email address.