- Institute of Radio Engineers (IRE) is the unit indicating the size
of a video signal and can be set to 5, 10, 15, ... 100. You can
fine-tune for each setting as shown below.
- Luminance: If you set up luminance for 100 IRE, a luminance
value satisfying each gamma is automatically
calculated for each step from 10 IRE to 90 IRE.
- Red/Green/Blue: The adjustment range is -50 - +50.
Color
Management
system
Adjusts Red/Green/Blue/Cyan/Magenta/Yellow colors. Allows an
expert to adjust the tint using a test pattern. Six colors (Red/Green/
Blue/Cyan/Magenta/Yellow) can be selectively adjusted without
affecting other colors.
You may not see colors change on a normal picture even after adjustment.
- Chroma Red/Green/Blue/Yellow/Cyan/Magenta,
Tone Red/Green/Blue/Yellow/Cyan/Magenta:
The adjustment range is -30 - +30 each.
* Available options may differ depending on input signal or video mode, etc.
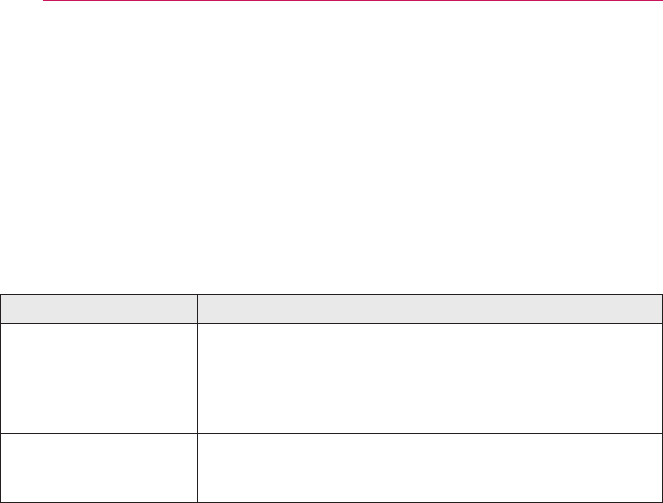
Picture Option
ItemDescription
Noise
Reduction
Removes noise in the picture.
MPEG Noise
Reduction
Reduces the noise produced while creating digital video signals.
Black LevelCompensates the brightness and contrast of a screen to balance with
the black level of the video input.
Real Cinema
Provides optimal picture quality for watching a movie.
TruMotionMakes the picture look smooth by compensating it.
Mode
SmoothThe De-Judder value is set to 3.
ClearThe De-Judder value is set to 6.
Clear plusThe De-Judder value is set to 7.
User
y
You can set this function manually.
De-Judder: Adjusts the juddering on a screen.
y
If the video signal is 60 Hz, TruMotion may not work.
59
CUSTOMIZING SETTINGS
SOUND Settings
1 Press the MENU button.
2 Use the , , or button to select SOUND
and press the OK button.
3 Use the , , or button to set up the
desired item and press the OK button.
- To return to the previous menu, press
the ꕣbutton.
The available sound settings are described as follows.
ItemDescription
Sound ModeSets the sound mode.
Mode
StandardSuitable for all types of video.
Music / Cinema /
Sport / Game
Sets audio optimized for a specific genre.
VividDelivers distinct voices with rich bass and
clear, high-pitched sounds.
User SettingAdjusts the volume to a level of your choice
using the User EQ.
User EQAllows you to adjust the treble and bass sound.
* It is activated when User Setting is selected in Sound Mode.
Mode
100 Hz / 300 Hz /
1 kHz / 3 kHz / 10 kHz
Sets EQ by manual adjustment of sound
bands.
Reset
Resets the equalizer value changed by the user.
Volume ModeSets the projector volume.
Virtual
Surround
Provides realistic stereo sound.
Clear Voice IIMakes the voice from the projector crisp and clear.
AV Sync.
Allows you to manually adjust picture and audio when they are not
synced.
Sound
Setting
Adjusts left/right audio balance.
?
SOUND
︿
• Sound Mode : Standard
• User EQ
• Volume Mode
• Virtual Surround : Off
• Clear Voice II : Off ꕅ 2
• AV Sync. : Off
• Sound Setting
﹀
60
CUSTOMIZING SETTINGS
ItemDescription
Mic Setting
Allows you to connect and use a microphone.
* When using a microphone, it is normal to only hear sound from the
microphone.
* You can adjust the microphone volume using the volume key.
* The microphone function is only available for external inputs
(RGB, HDMI, AV, or Component).
TIME Settings
1 Press the MENU button.
2 Use the , , or button to select TIME and
press the OK button.
3 Use the , , or button to set up the
desired item and press the OK button.
- To return to the previous menu, press
the ꕣbutton.
The available time settings are described as follows.
ItemDescription
Sleep TimerThe projector is turned off at the preset time.
Auto OffIf there is no signal, the projector automatically turns off after the
preset time has elapsed.
Automatic
Standby
Turns off the projector automatically if there is no input for the
given time.
Presentation
Timer
Time AlarmDisplays an alarm at the specied time.
* If you set the time to 5 minutes, the time is dis- If you set the time to 5 minutes, the time is dis-If you set the time to 5 minutes, the time is dis-
played on the screen at a 1 minute interval. If you
set the time to 10 minutes or more, the time is
displayed at a 5 minute interval. If the remaining
time is less than 5 minutes, it is displayed at a 1
minute interval.
* You can set the time to 5, 10, ..., 60 minutes in 5-minute
increments.
Time KeeperDisplays the time remaining until the time specied
on the screen.
* For between 1 and 10 minutes, the time can be set in
increments of 1 minute; and for between 10 and 60
minutes, in increments of 5 minutes.
?
TIME
• Sleep Timer : Off
• Auto Off : 60 min.
• Automatic Standby : 4 hours
• Presentation Timer
61
CUSTOMIZING SETTINGS
OPTION Settings
1 Press the MENU button.
2 Use the , , or button to select OPTION
and press the OK button.
3 Use the , , or button to set up the
desired item and press the OK button.
- To return to the previous menu, press
the ꕣbutton.
The available option settings are described below.
ItemDescription
LanguageSelects the desired language.
CaptionIf the language for the AV input is set to Korean, captions can be
turned on or off.
Set IDSets the unique number of a projector when it is being remotely
controlled by PC.
PJT ModeTurns the projected image upside down or ips it horizontally.
KeystoneCompensates for the trapezoidal image shape created when projecting
an image from an angle not perpendicular to the screen.
Blank ImageSelects the background for blank image.
Auto Power
Makes the projector turn on automatically when the power cord is
connected.
Item
OnWhen the power cord is connected to the projector, it turns
on automatically.
OffWhen the power cord is connected to the projector, it goes
into standby mode.
Interactive
Sets the Interactive mode. (For SA565)
y
Operate only in RGB/HDMI input mode.
y
Only Full Screen, 16:9 and 4:3 are available for Aspect Ratio when
the Interactive function is enabled.
y
If you enable the Interactive function when Aspect Ratio is set to
either Just Scan, Set By Program, Zoom or Cinema Zoom, Aspect
Ratio will be changed to Full Screen.
High
Altitude
If the projector is used at an altitude higher than 1,200 meters, turn this
option on. When High Altitude is not enabled, the projector may over-
heat or its protection function may be activated. If this happens, turn
the projector off and then on again after waiting for several minutes.
?
OPTION
︿
• Language
• Caption : Off
• Set ID : 1
• PJT Mode : Front
• KeyStone 1
-+
• Blank Image : Blue
• Auto Power : Off
﹀
62
CUSTOMIZING SETTINGS
ItemDescription
Monitor Out
You can select one of the two RGB inputs connected as an output
of the RGB OUT port.
When Auto is selected, the current input you are watching is dis-
played, among RGB1 and RGB2 inputs.
Auto Input
Search
Automatically searches for and displays the input signal type when it is
received. It is available only with external inputs (RGB, HDMI, AV, and
Component).
Balloon Help
Enables/disables the balloon help.
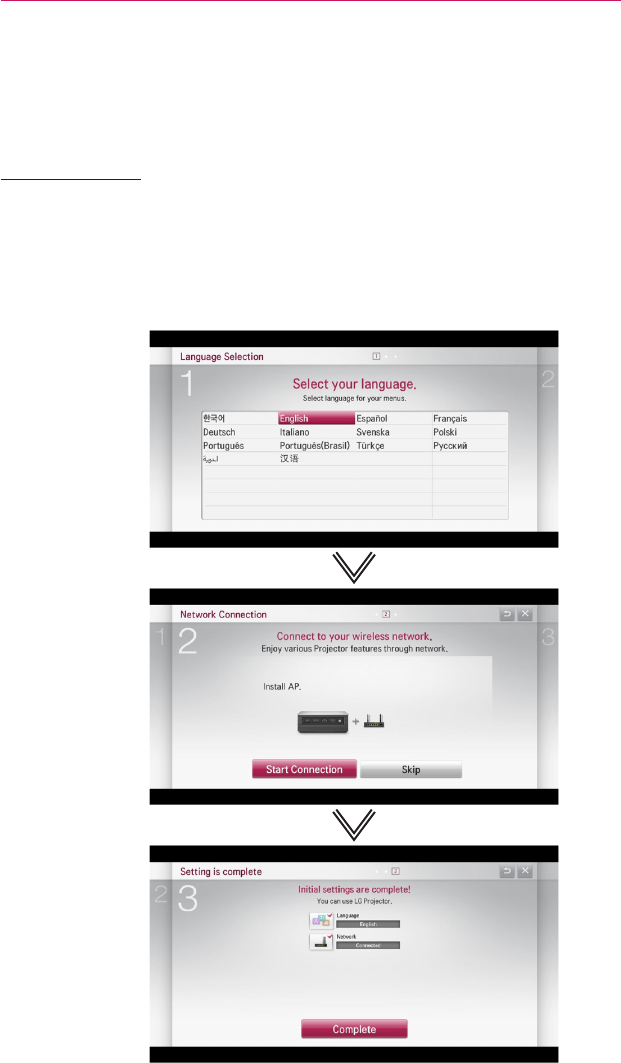
Initial
Setting
Resets all projector settings to the factory default.
63
CUSTOMIZING SETTINGS
NETWORK Settings
1 Press the MENU button.
2 Use the , , or button to select
NETWORK and press the OK button.
3 Use the , , or button to set up the
desired item and press the OK button.
- To return to the previous menu, press
the ꕣbutton.
The available network settings are described below.
ItemDescription
Network
Connection
Connects a wireless network.
Network StatusDisplays the connection status of the wireless network.
Wi-Fi Screen
Share
Wi-Fi Screen Share supports wireless connection technology, such
as Wi-Fi Direct and WiDi. You can share the le and screen of the
devices connected by the Wi-Fi Screen Share on the SmartShare.
Smart Share
Setting
Changes the settings for SmartShare.
Item
Projector Name
Changes the name that appears when searching
for the Projector from other devices.
Share My
Projector
Allows / prevents connection to the
Projector
from other devices. Turns DMR (Digital
Media Renderer) connection on/off.
Auto Play on
Receive
Accepts / rejects content transferred from
other devices.
DivX(R) VODRegisters or releases DivX.
Checks DivX Registration Code for playing
DivX-protected videos. Register at http://vod.
divx.com.
Uses Registration Code to rent or purchase
movies at www.divx.com/vod.
y
Rented/purchased DivX files cannot be
played if the DivX Registration Code of a
different device is used. Use only the DivX
Registration Code granted to this device.
y
Converted files not conforming to the DivX
Codec Standard may not play or may
produce abnormal images and sound.
?
NETWORK
• Network Connection
• Network Status
• Wi-Fi Screen Share
• Smart Share Setting
• Magical Mirroring
• eZ-Net Manager
64
CUSTOMIZING SETTINGS
ItemDescription
Magical MirroringTransmits wirelessly and projects the screen of a network-con-
nected laptop (PC) to a projector.
eZ-Net ManagerAllows you to control one or more projectors in an easier way
through a local area network.
*
For more information about how to install and set the eZ-Net Manager
program, refer to the owner's manual for eZ-Net Manager.
SUPPORT
1 Press the MENU button.
2 Use the , , or button to select SUP-
PORT and press the OK button.
3 Use the , , or button to set up the
desired item and press the OK button.
- To return to the previous menu, press
the ꕣbutton.
The available support settings are described below.
ItemDescription
Software UpdateUpdates to the latest software.
Product/Service
Info.
Shows the product/service information.
Self Diagnosis
Troubleshoots functional problems that can arise while using
the product.
Ͱ
Ͱ
SUPPORT
• Software Update
• Product/Service Info.
• Self Diagnosis
65
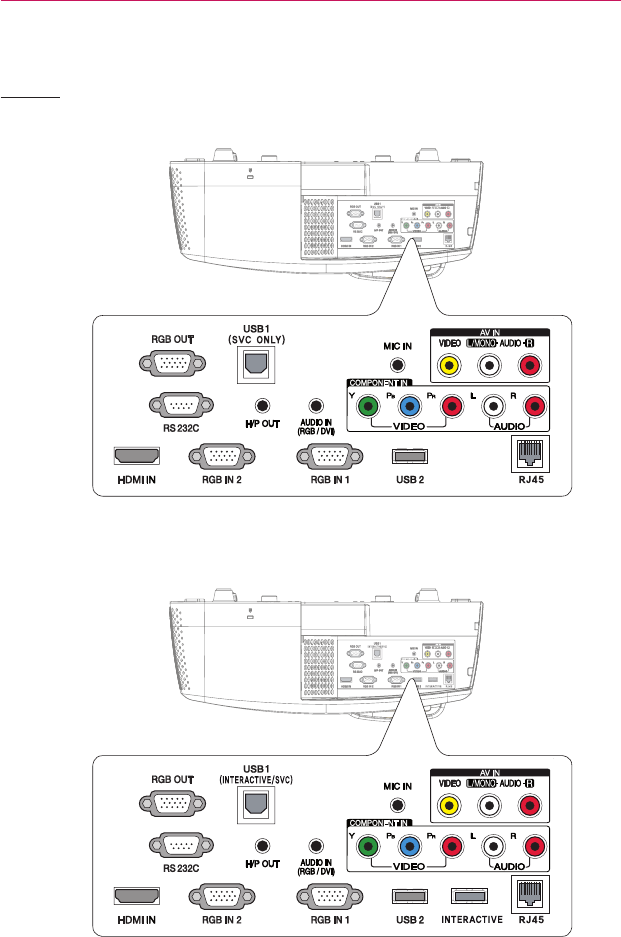
CONNECTING DEVICES
CONNECTING DEVICES
You can connect various external devices to the projector.
Computer/NotebookVideoDVD
Digital Device
USB
Headphones
Game Console
Microphone
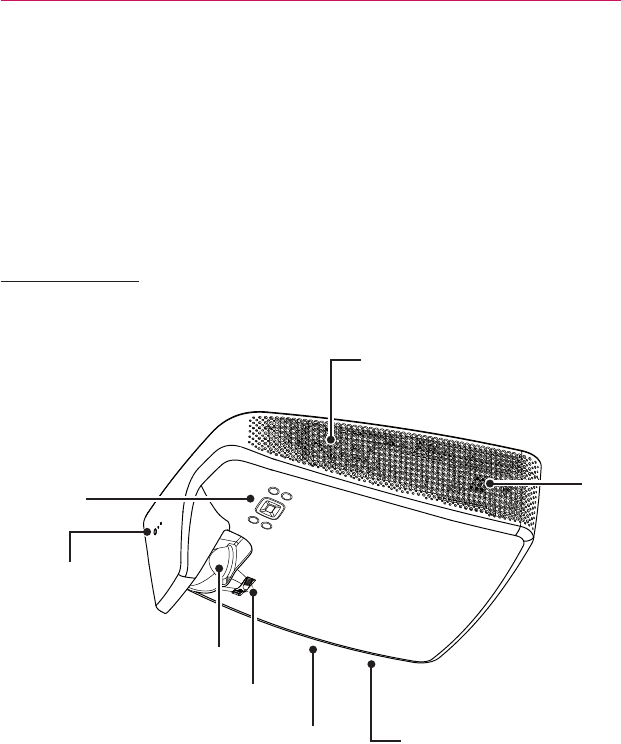
y
The ports on the back of the projector are designed for the ceiling installation, so
their label is printed upside down for your convenience.
y
The picture may be different from the actual product.
HDMI - Page 66
Component - page 69
Composite (AV) - page 69
RGB - page 67
USB Devices - page 35
Microphone - page 70
Headphones - page 70
66
CONNECTING DEVICES
Connecting to HD
Receiver, DVD, or VCR
Player
Connect an HD receiver, DVD, or VCR
player to the projector and select an
appropriate input mode.
HDMI Connection
With an HDMI cable, you can enjoy
high quality picture and sound
. Connect
the projector's HDMI IN port to the
HDMI
output port.
Press the INPUT button on the remote
control to select HDMI.
* Optional Extras
+'0,
HDMI to DVI Connection
Using an HDMI to DVI cable,
connect the projector's HDMI IN port to
the DVI OUT port. To output audio,
use an audio cable for connection.
Press the INPUT button on the remote
control to select HDMI.
* Optional
Extras
(Video)
* Optional
Extras
(Audio)
DVI OUTAUDIO OUT
67
CONNECTING DEVICES
PC Connection
The projector supports Plug & Play. Your
PC will automatically detect the projector
and requires no driver installation.
RGB Connection
Connect the PC output and the PC video
input port of the projector with the RGB
cable.
Connect the projector's RGB IN 1 or
RGB IN 2 port to the RGB out port.
To output the audio, connect the PC to
the projector
using an audio cable.
* Accessories
(Video)
* Optional
Extras
(Audio)
AUDIO OUTRGB OUT (PC)
HDMI to DVI Connection
Using an HDMI to DVI cable,
connect the projector's HDMI IN port to
the DVI OUT port.
To output audio,
use an audio cable to connect the PC
to the projector.
* Optional
Extras
(Video)
* Optional
Extras
(Audio)
DVI OUTAUDIO OUT
68
CONNECTING DEVICES
HDMI Connection
With an HDMI cable, you can enjoy
high quality picture and sound
. Connect
the projector's HDMI IN port to the
HDMI
output port.
Press the INPUT button on the remote
control to select HDMI.
* Optional Extras
+'0,
RGB to DVI Connection
Connect the projector's RGB IN 1 or
RGB IN 2 port to the DVI OUT port.
To output the audio, connect the PC to
the projector using an audio cable.
* Optional
Extras
(Video)
* Optional
Extras
(Audio)
DVI OUTAUDIO OUT
69
CONNECTING DEVICES
Connecting to
External Devices
AV Connection
Connect the output ports of an external
device and the AV INPUT ports of the
projector. Press the INPUT button
to select the AV.
* Optional Extras
$9287
/HIW5LJKW
$8',2287
GREEN
RED
BLUE
RED
WHITE
YELLOW
GREEN
RED
BLUE
RED
WHITE
YELLOW
GREEN
RED
BLUE
RED
WHITE
YELLOW
YELLOW
WHITE
RED
GREEN
RED
BLUE
RED
WHITE
YELLOW
GREEN
RED
BLUE
RED
WHITE
YELLOW
GREEN
RED
BLUE
RED
WHITE
YELLOW
YELLOW
WHITE
RED
Component Connection
You can enjoy vivid images when you
connect an external device with a
component port to the COMPONENT IN
port of the projector. Press the INPUT
button on the remote control to select
Component.
The output jack Y, PB or, PR of
the DVD player may be marked as Y,
B-Y, R-Y/Y,
Cb, Cr/Y, Pb, or Pr depending
on the model.
* Optional
Extras
(Video)
* Optional
Extras
(Audio)
$9287
/HIW<3
%355LJKW
$8',2287
GREEN
RED
BLUE
RED
WHITE
YELLOW
GREEN
RED
BLUE
RED
WHITE
YELLOW
GREEN
RED
BLUE
RED
WHITE
YELLOW
GREEN
RED
BLUE
RED
WHITE
YELLOW
GREEN
RED
BLUE
RED
WHITE
YELLOW
GREEN
RED
BLUE
RED
WHITE
YELLOW
GREEN
RED
BLUE
RED
WHITE
YELLOW
GREEN
RED
BLUE
RED
WHITE
YELLOW
GREEN
RED
BLUE
RED
WHITE
YELLOW
GREEN
RED
BLUE
RED
WHITE
YELLOW
GREEN
BLUE
RED
WHITE
RED
GREEN
BLUE
RED
WHITE
RED
70
CONNECTING DEVICES
Connecting to
Headphones
Headphone Connection
You can listen to the audio through a
headphone.
* Optional
Extras
Connecting to a
Microphone
Microphone Connection
You can connect a microphone to the
MIC IN port of the projector.
* Optional
Extras
71
CONNECTING DEVICES
Connecting to a Laptop
You can connect the projector to a
laptop to use various functions.
RGB Connection
You can connect your laptop to the
RGB IN 1 or RGB IN 2 port of the
projector.
* Accessories
HDMI Connection
Connect the projector's HDMI IN port to
the HDMI output port.
* Optional
Extras
72
CONNECTING DEVICES
The table below shows examples of
switching the output. For more infor-
mation, refer to the External Output,
Connecting to an External Monitor, or
similar sections of the owner's manual of
your computer.
BrandSwitching Output
NEC[Fn]+[F3]
Panasonic[Fn]+[F3]
Toshiba[Fn]+[F5]
IBM[Fn]+[F7]
Sony[Fn]+[F7]
Fujitsu[Fn]+[F10]
LG[Fn]+[F7]
Samsung[Fn]+[F4]
MacintoshAdjust the control panel
to
enable mirroring after
start-up.
73
INTERACTIVE FUNCTION
INTERACTIVE FUNCTION
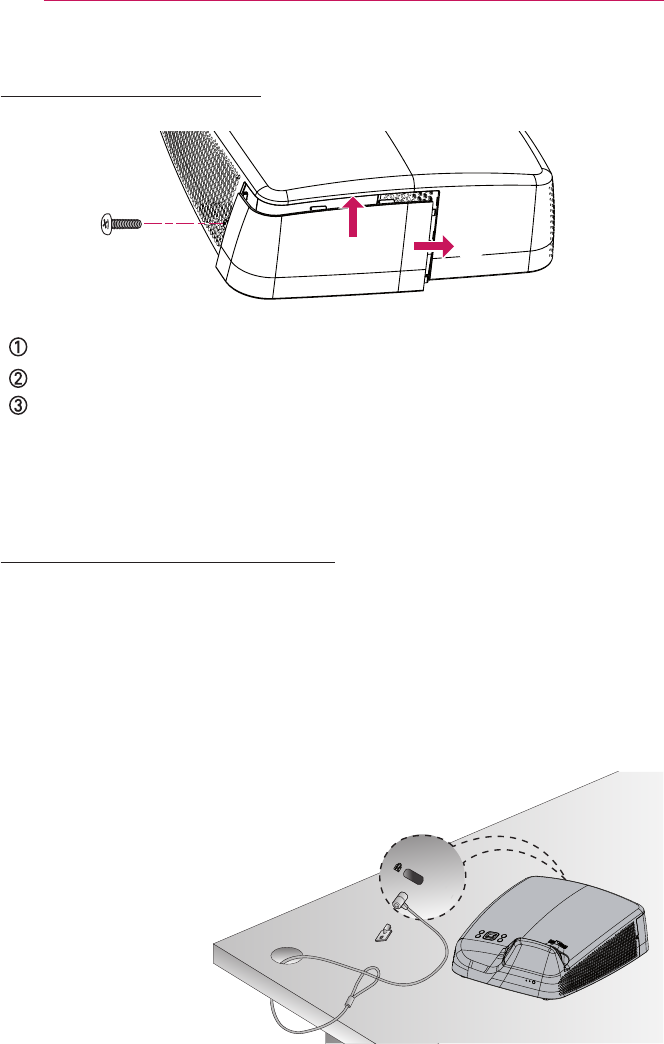
To Connect the Interactive Pen to the PC
Connect the USB A to B cable from the projector's
USB 1 (INTERACTIVE/SVC)
port
and a PC USB port.
CAUTION
y
Up to two pens can be used at the same time.
y
Pairing is not available when one of the paired pens is in use.
y
In the Fixed Pairing mode, up to 10 pens can be paired one at a time.
y
You must install the WizTeach program in the CD provided with the accessories
on your PC before using the Annotation Software. The product key required to
install the WizTeach program is attached to the back of the enclosed WizTeach
software CD case. Make sure that you do not lose the product key.
y
If the interactive pen is not used for more than 30 seconds, it will switch to low
power mode. Press any button to return the pen to normal mode.
y
Use the remote control within the specified range (see Operating Range with
Interactive Pen). You may experience communication failures when using the
device outside the coverage area or if there are obstacles within the coverage area.
y
You may experience communication failures depending on the accessories. Devices
such as a microwave oven and wireless LAN operate in the same frequency band
(2.4 GHz) as the interactive pen. This may cause communication failures.
y
Make sure not to block the image when using the interactive pen.
Connect the interactive dongle to the projector's INTERACTIVE port.
(For SA565 only)
Pairing
74
INTERACTIVE FUNCTION
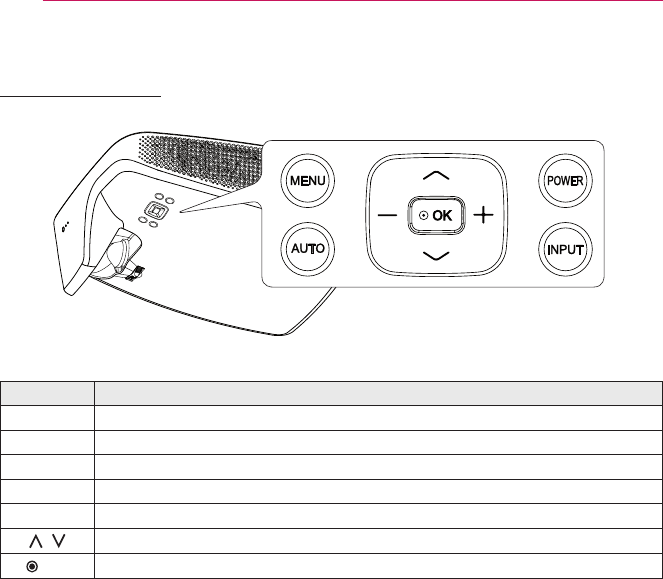
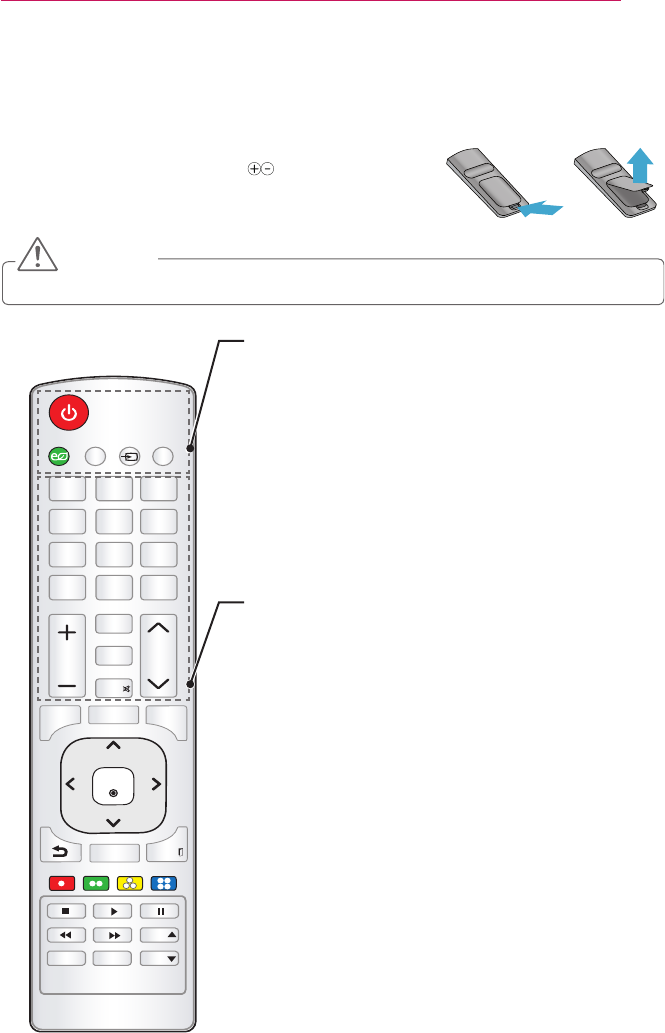
Function/ ButtonDescription
❶
Power ButtonTurns the interactive pen on/off.
❷
Used for pairing.
❸
Functions the same as a right mouse button.
❹
Functions the same as a left mouse button.
❺
USB charging portCharges the product using the charging cable.
❻
Eyelet for strapConnects the strap to the interactive pen.
❼
LED
Indicators
Shows the battery status.
Shows the pen status.
❽
Firmware upgrade
port
Used to upgrade the interactive pen rmware for
maintenance.
❾
Pen tip
You can write text or draw gures using the Pen tip.
❺
❻
❽
❾
❼
Back
❶
❷
❸
❹
Front
Using The Interactive Pen
Interactive Pen and Button
(For SA565 only)
75
INTERACTIVE FUNCTION
Using the Interactive Pen Button
FunctionDescription
Left Mouse Click
Press the button or push the Pen tip.
Right Mouse Click
Press the button.
Enter Fixed mode
Go to Interactive and set Pairing Mode to Fixed. Then,
press and hold the button more than three seconds within
ten seconds.
Enter Open mode
Press both the pen's button and button simultaneously
for 3 seconds.
Wake Up
Press any one of the button, button, or button.
Or, push the pen tip.
y
Make sure that the interactive pen is not pointing toward the screen when entering
each mode.
y
If the interactive pen is not used for more than 30 seconds and is not pointing
toward the screen, it will automatically enter Energy Saving mode.
y
The projector operates in Open mode by default, while Fixed mode is only used
for pairing the pen with the projector. The projector automatically returns to Open
mode from Fixed mode after 10 seconds regardless of whether the pairing is
successful or not.
(For SA565 only)
76
INTERACTIVE FUNCTION
WARNING
y
Do not replace or repair the battery yourself.
y
To charge the interactive pen, use the charging cable provided to connect the pen
to USB port of the PC.
To Charge the Interactive Pen
To charge the battery, connect the interactive pen to the PC with the charging cable.
(Check that the PC is turned on before connection.)
The battery light stays on during charging and will turn off when charging is complete.
When charging is complete, disconnect the charging cable in order to use the pen. Alternatively,
use the interactive pen while connected by the charging cable if charging is not complete.
y
Warning message (low battery)
- When the battery voltage is 3.6 V or
lower, the low battery warning message
is displayed. The interactive pen will
work for about 10 minute after this
message is displayed.
- The interactive pen may not work
when the battery level is 3.4 V or lower.
y
When you use the pen for the first time,
charge the battery for at least 3 hours.
The fully charged battery lasts 20 hours
when it is continuously used, or four
weeks in standby mode.
(For SA565 only)
77
INTERACTIVE FUNCTION
(For SA565 only)
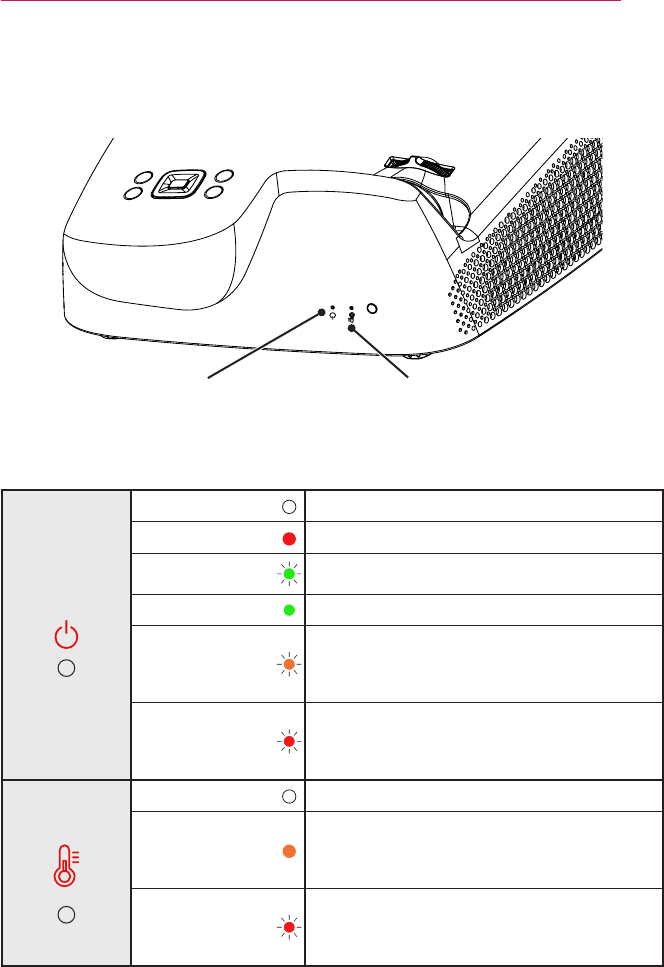
Description of LED Interactive Pen Indicators
LED 1LED 2
Pen Operation
LED Indicators
(LED 1)(LED 2)
Charging batteryThe green light is on-
Battery charging
required
The red LED ashes once
every four seconds.
-
Open Mode
- Searching a projector
to connect
-
The green light quickly
ashes twice per second.
Fixed Mode
- Searching a projector
to connect
-
The green light ashes
twice at xed intervals every
second.
Attempting to pair-
The green light ashes very
quickly.
Enter Open mode, or
pairing is complete
-
The green light slowly ashes
three times.
Pairing failed-
The red light slowly ashes
ve times.
The pen is connected to
the projector
-
The green light ashes every
three seconds.
When the pen is pointing
the projector screen
-
The red light is on or ashing
quickly.
Entering low power
mode
The red light has ashed
once.
The red light has ashed
once.
y
LED 1 relates to the battery for the interactive pen and LED 2 relates to the operation status
of the interactive pen.
78
INTERACTIVE FUNCTION
(For SA565 only)
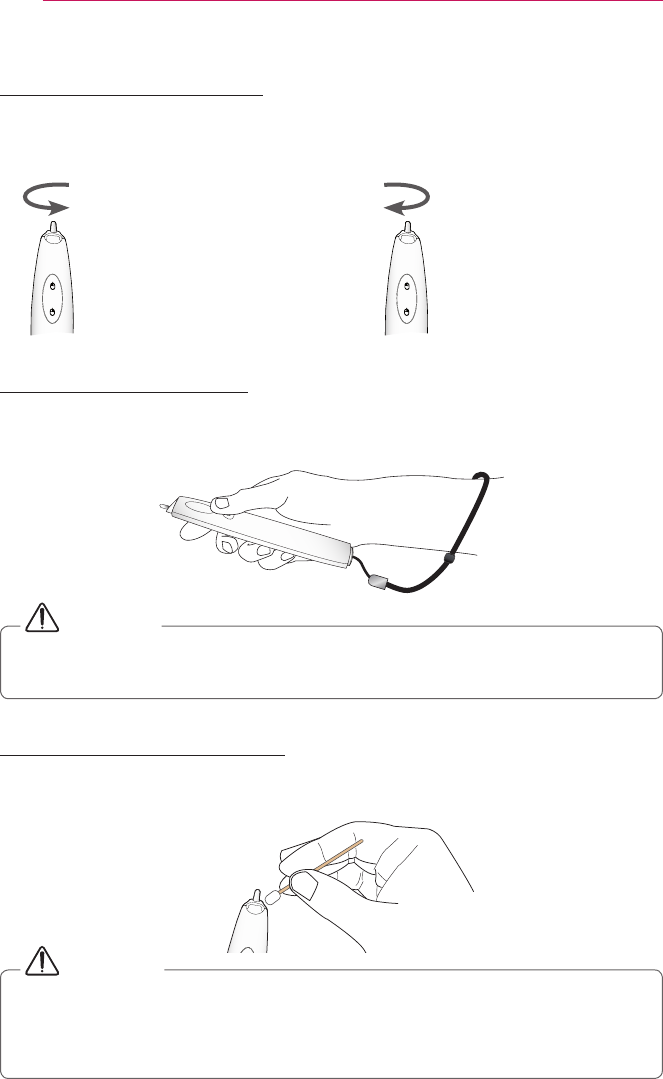
To Replace the Pen tip
When the pen tip is worn out, replace it as shown in the gure below.
Turn the pen tip to the right to
remove it from the interactive
pen, as shown in the figure
below.
Turn the pen tip to the left to
install it onto the interactive
pen, as shown in the figure
below.
OpenClose
How to Use the Strap
Use the strap to prevent dropping the interactive pen. Use the pen safely so as not to cause
injury or damage to nearby objects.
CAUTION
y
Be sure to wear the strap on your wrist when using the interactive pen.
y
Store the interactive pen in the hard case.
To Clean Interactive Pen
If the lens of the interactive pen does not work properly, clean it as shown in the picture below.
CAUTION
y
If there are foreign objects or dust on the lens at the tip of the interactive pen,
gently wipe with a cotton swab.
y
Foreign objects or dust on the lens surface may cause malfunction of the
interactive pen.
79
INTERACTIVE FUNCTION
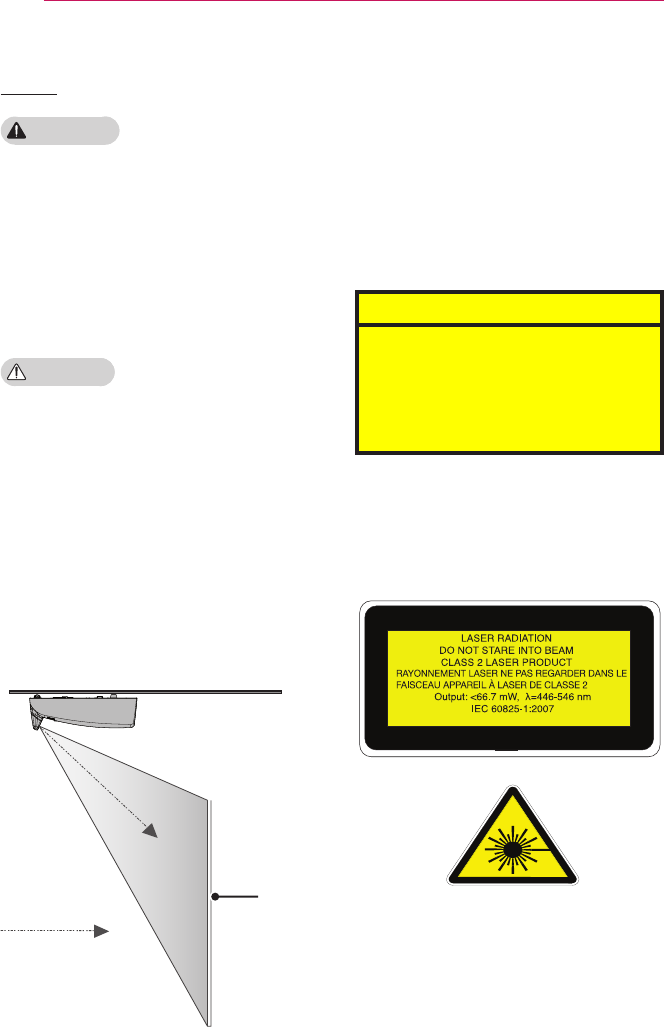
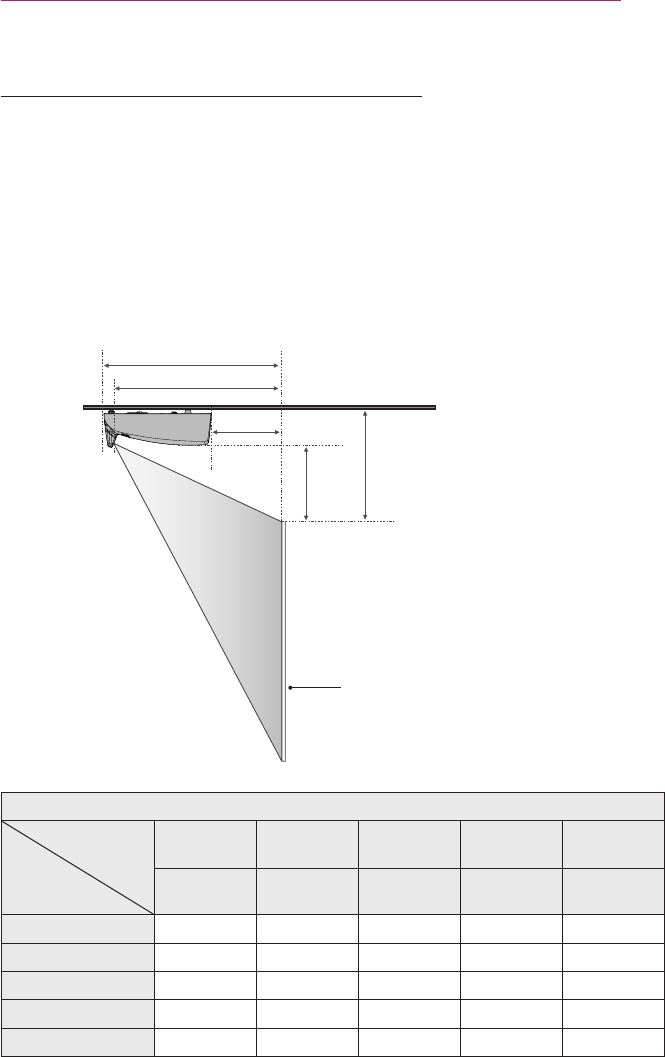
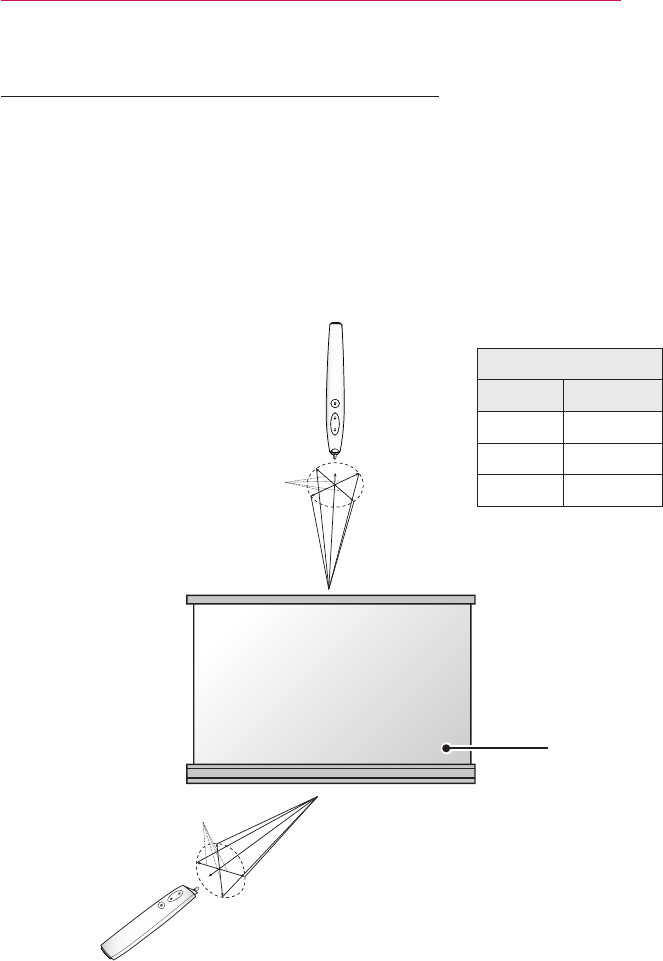
Operating Range with Interactive Pen
y
It is designed to work on the screen with the size of 1778 mm - 2540 mm.
y
You can use two Interactive pens at the same time.
y
Actual operating range may slightly differ from the diagram.
y
If the projector screen darkens due to the surrounding environment, the operating
range of the interactive pen may be affected.
y
The screen's gain rate is in the range of 1 to 1.5.
(For SA565 only)
Operating range
AngleDistance
0 °9 m
20 °7 m
45 °5 m
Screen
Angle
Distance
Angle
Distance
80
INTERACTIVE FUNCTION
(For SA565 only)
To Use the Interactive Pen Functions
y
Make sure that the Computer/Laptop screen is displayed on the projector screen.
Ͱ
OPTION
• Caption
• Set ID
• PJT mode
• KeyStone
• Blank Image
• Auto Power
• Interactive
Interactive
Single Pen
Channel
Auto
• Set Channel
0
Pen Setting
• Pairing Mode
Open
Close
1 Press the MENU button.
2 Select OPTION using the
, ,
, and
buttons, and press the OK
button.
3
Select Interactive using the , , ,
and buttons, and press the OK button.
- To return to the previous screen,
press the ꕣbutton.
4 Select which item you want using the
, ,
, and
buttons, and press
the OK button.
-
After the settings have been
changed, press the Close button to
close the window.
The interactive function settings are as follows:
ItemDescription
Interactive
There are four function modes: Off, Single, Double Pen, or Multi Touch.
y
Off: Disables the interactive pen function.
y
Single Pen: Use one interactive pen.
y
Double Pen: Use two interactive pens at the same time.
(It is recommended to install the
WizTeach program
provided on your PC prior to use.)
y
Multi Touch:
Use the Multi Touch function with two interactive pens.
The Multi Touch function does not work on any PC,
operating system or program that does not support it.
channel
You can select a channel in Auto or Manual mode.
y
Auto: A channel is automatically selected.
y
Manual: Select a channel manually.
Set ChannelA maximum of 29 channels (0 - 28) are available.
Pairing
Mode
Set the Pairing mode to either Open or Fixed.
y
Open: Follow the on-screen instructions to set the interactive pen to
Open mode.(While the interactive pen is pointing at a screen,
the pen can be used with any projector.)
y
Fixed: Follow the on-screen instructions to set the interactive pen to
Fixed mode.
(The interactive pen can be used only with a
paired projector.)
- Up to 10 pens can be paired to one projector.
81
INTERACTIVE FUNCTION
Troubleshooting the Interactive Pen Function
ProblemTroubleshooting
I can't use or connect
the interactive pen.
Check that the interactive pen function is turned on.
Check that the interactive dongle is connected to the
projector.
Press the interactive pen's power button to check that the
power is turned on.
Check that the Interactive pen is paired.
Make sure that the computer screen is displayed on the
projector screen.
The interactive pen
does not work from
time to time.
Connect the interactive USB cable to another USB port
and try to use the interactive pen again.
The projector screen
looks abnormal when
the interactive pen
function is enabled.
Check that the projector and computer are connected
properly.
The interactive pen is
showing in a different
position.
Make sure that the computer screen is displayed on the
projector screen.
The interactive pen does
not work smoothly.
Check whether the projector is too far away from the
computer or if there are too many obstacles between them.
Check whether too many applications are running on the
PC.(It is not recommended to run other applications while
running the interactive program (WizTeach software).)
The LED is not
working.
Check whether the battery is dead.
The red LED indicating
low battery level
ashes once every four
seconds.
The battery is low.
Charge the interactive pen.
(For SA565 only)
82
SERIAL COMMUNICATION FUNCTION
SERIAL COMMUNICATION FUNCTION
Using Serial Communication
If the projector is connected to a PC through an RS-232C cable, you can use the
PC to control functions of the projector such as power On/Off or input selection, etc.
It cannot be used with the eZ-Net Manager concurrently. For serial communication,
use RJ45Off in the eZ-Net Manager.
This function may not be available for a particular menu or input mode.
Establishing Serial Communication
Connect the RS-232C (serial connector) of the PC to the RS-232C connector at the
back of the projector.
You need to purchase a cable to connect the RS-232C connectors as it is not pro-
vided as an accessory.
(PC )
(TV)
PCProjector
* A RS-232C cable is necessary for the remote control of the projector (see Figure 1).
Libble takes abuse of its services very seriously. We're committed to dealing with such abuse according to the laws in your country of residence. When you submit a report, we'll investigate it and take the appropriate action. We'll get back to you only if we require additional details or have more information to share.
Product:
Forumrules
To achieve meaningful questions, we apply the following rules:
First, read the manual;
Check if your question has been asked previously;
Try to ask your question as clearly as possible;
Did you already try to solve the problem? Please mention this;
Is your problem solved by a visitor then let him/her know in this forum;
To give a response to a question or answer, do not use this form but click on the button 'reply to this question';
Your question will be posted here and emailed to our subscribers. Therefore, avoid filling in personal details.
Register
Register getting emails for LG SA565 at:
new questions and answers
new manuals
You will receive an email to register for one or both of the options.
Get your user manual by e-mail
Enter your email address to receive the manual of LG SA565 in the language / languages: English as an attachment in your email.
The manual is 26,01 mb in size.
You will receive the manual in your email within minutes. If you have not received an email, then probably have entered the wrong email address or your mailbox is too full. In addition, it may be that your ISP may have a maximum size for emails to receive.
The manual is sent by email. Check your email
If you have not received an email with the manual within fifteen minutes, it may be that you have a entered a wrong email address or that your ISP has set a maximum size to receive email that is smaller than the size of the manual.
The email address you have provided is not correct.
Please check the email address and correct it.
Your question is posted on this page
Would you like to receive an email when new answers and questions are posted? Please enter your email address.