574648
20
Zoom out
Zoom in
Previous page
1/45
Next page
Read the safety notices and important tips in the
included manuals before using your computer.
Lenovo IdeaPad
User Guide
First Edition (June 2013)
© Copyright Lenovo 2013.
Before using the product, be sure to read Lenovo Safety and General
Information Guide first.
The features described in this guide are common to most models.
Some features may not be available on your computer and/or your
computer may include features that are not described in this user
guide.
Some instructions in this guide may assume that you are using
Windows
®
8. If you are using other Windows operating systems, some
operations may be slightly different. If you are using other operating
systems, some operations may not apply to you.
LIMITED AND RESTRICTED RIGHTS NOTICE: If data or software is delivered pursuant a General
Services Administration “GSA” contract, use, reproduction, or disclosure is subject to restrictions set
forth in Contract No. GS-35F-05925.
Notes
The illustrations in this manual may differ from the actual product.
Please refer to the actual product.
The illustrations used in this manual are for Lenovo IdeaPad S510p
unless otherwise stated.
For details, refer to Guides & Manuals at http://support.lenovo.com.
Regulatory Notice
Lenovo IdeaPad
User Guide
Instructions and technical information in this manual are applicable to the following
Lenovo notebook computers unless otherwise stated.
Model name MT
Lenovo IdeaPad S410p 20296 80BK
Lenovo IdeaPad S410p Touch 20297 80BM
Lenovo IdeaPad S510p 20298 80BN
Lenovo IdeaPad S510p Touch 20299 80BQ
i
Chapter 1. Getting to know your computer ..........................................1
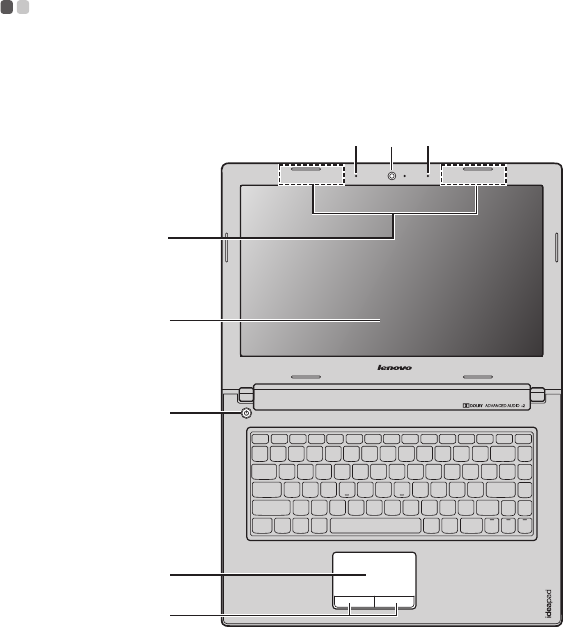
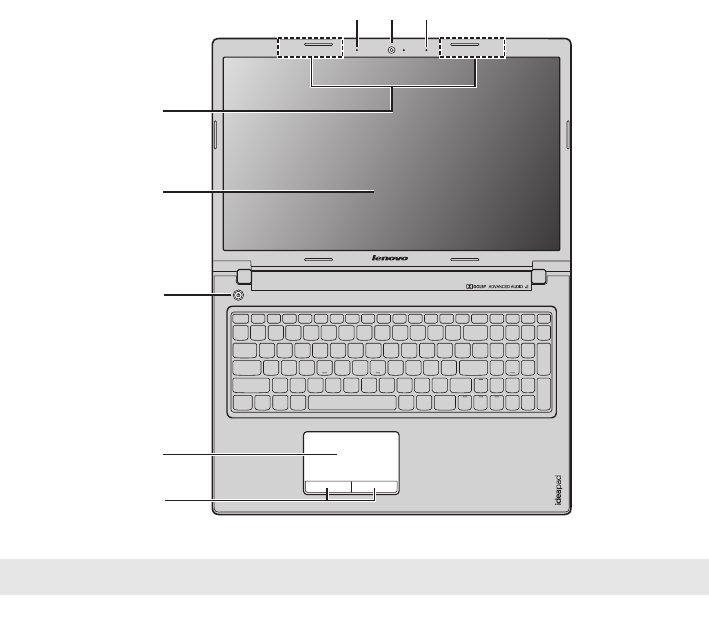
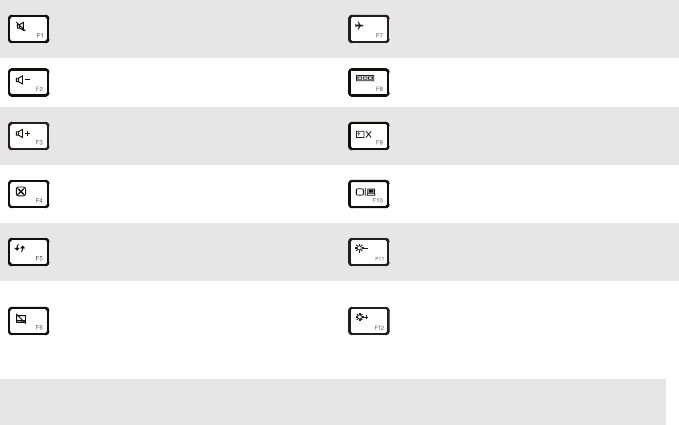
Top view.......................................................................................................................1
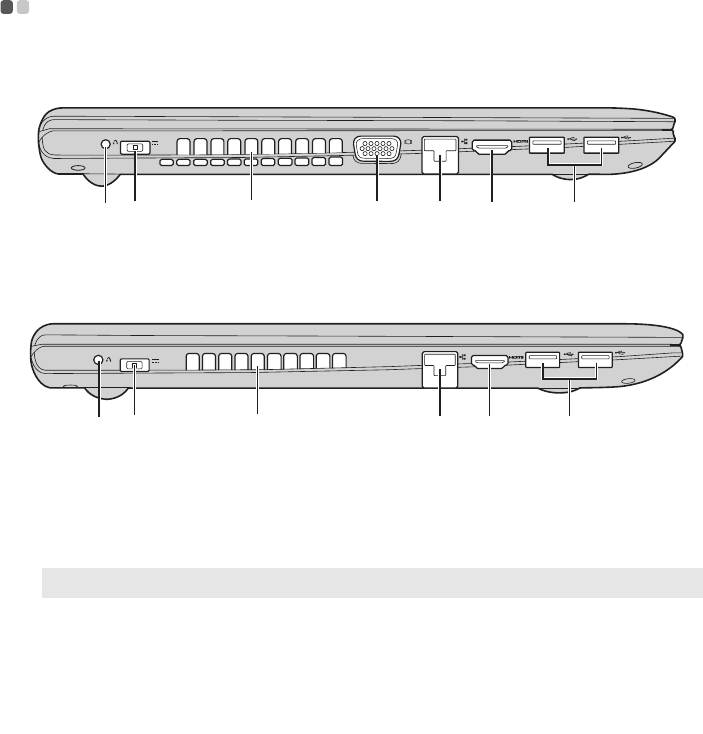
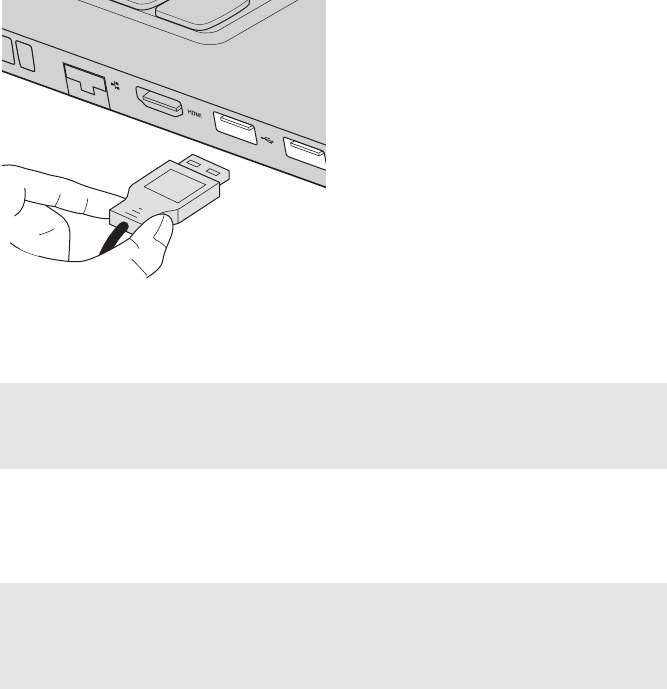
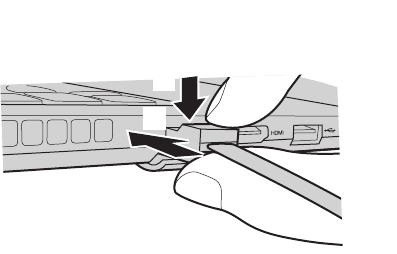
Left-side view ..............................................................................................................5
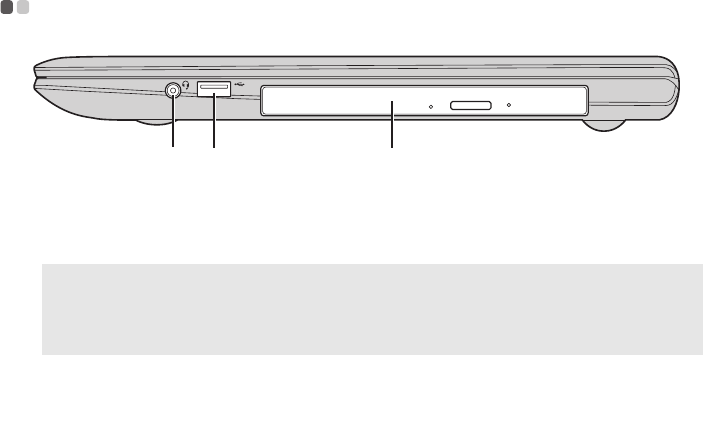
Right-side view............................................................................................................9
Front view ..................................................................................................................10
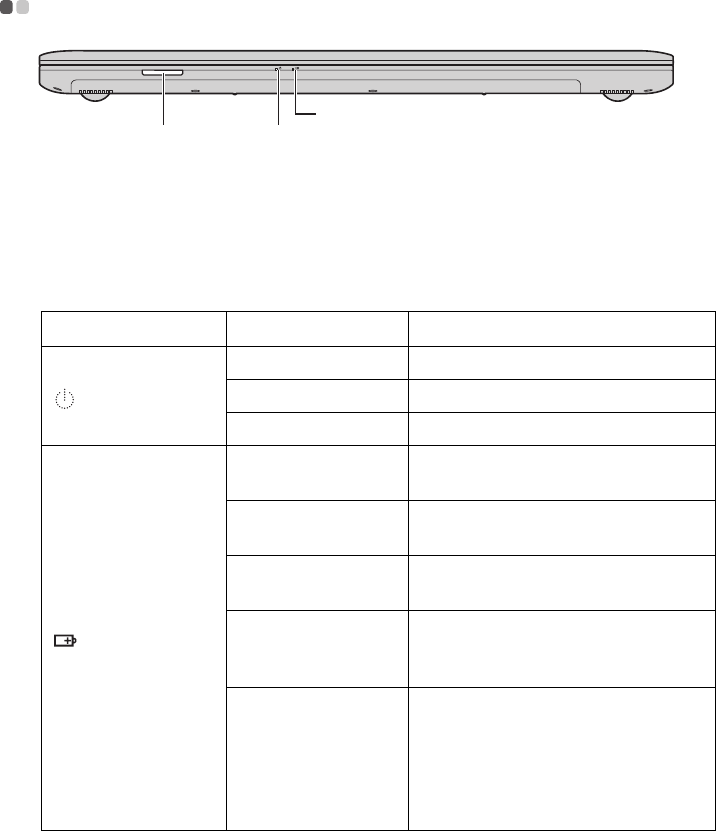
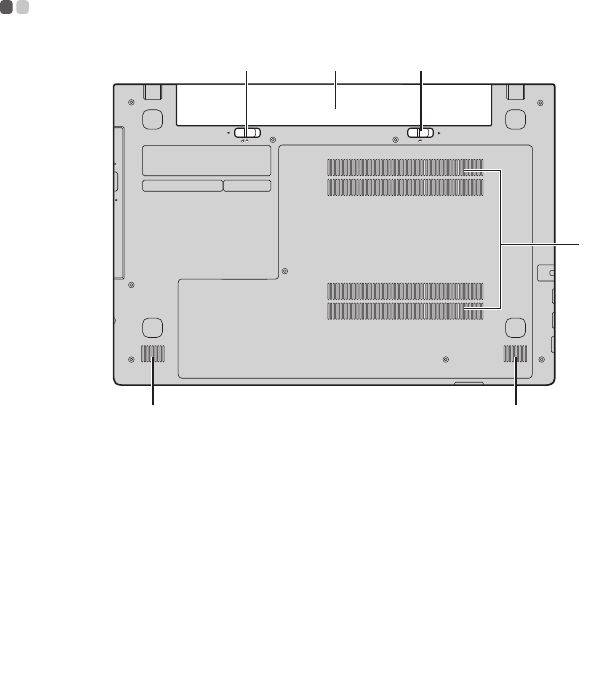
Bottom view ...............................................................................................................12
Chapter 2. Starting to use Windows 8 ................................................13
Configuring the operating system for the first time ............................................13
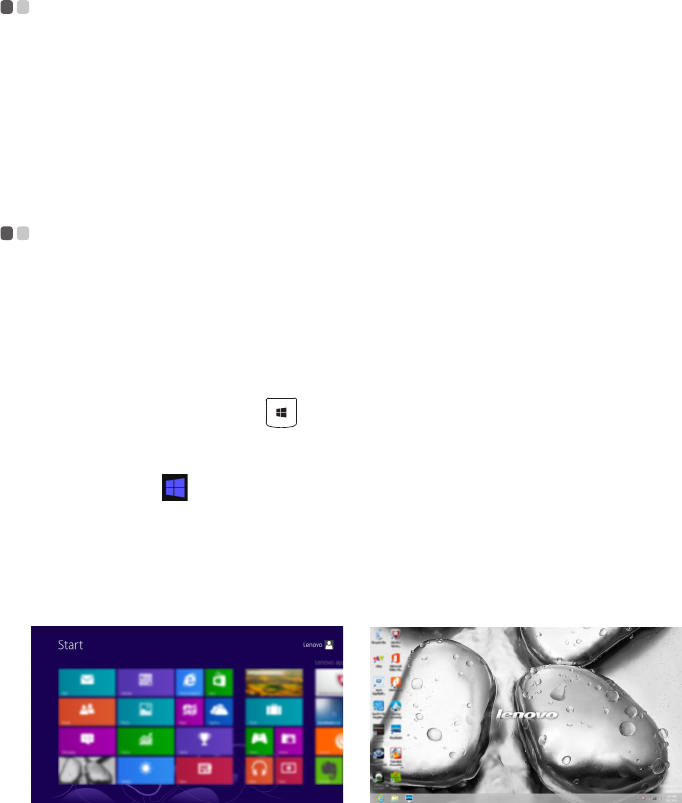
Operating system interfaces ....................................................................................13
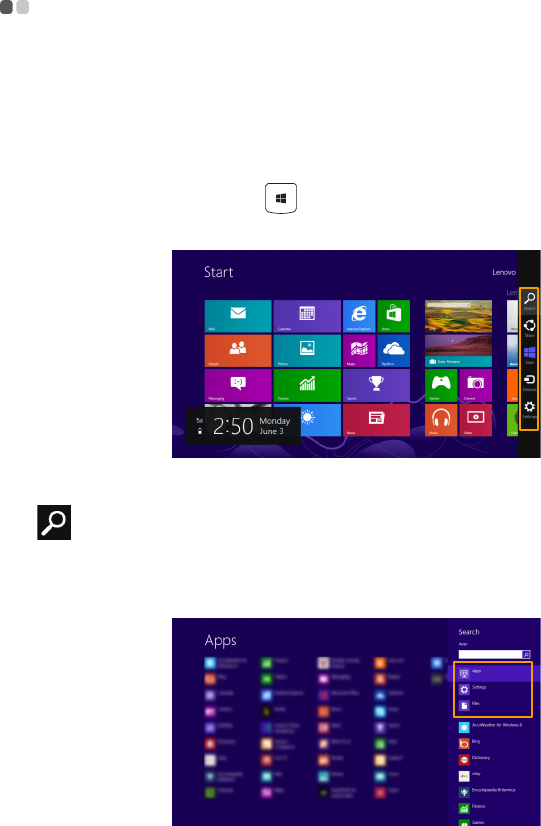
Charms and the charms bar.....................................................................................14
Putting the computer to sleep or shutting it down ..............................................16
Connecting to a wireless network ..........................................................................18
Help and support ......................................................................................................19
Chapter 3. Lenovo OneKey Recovery system ...................................20
Chapter 4. Troubleshooting ................................................................. 22
Frequently asked questions .....................................................................................22
Troubleshooting ........................................................................................................25
Appendix A. Replacing components .................................................. 29
Replacing the hard disk drive .................................................................................29
Replacing a memory module ..................................................................................32
Replacing the wireless LAN card ...........................................................................34
Removing the optical drive .....................................................................................36
Trademarks............................................................................................ 38
Contents
1
Chapter 1. Getting to know your computer
Top view - - - - - - - - - - - - - - - - - - - - - - - - - - - - - - - - - - - - - - - - - - - - - - - - - - - - - - - - - - - - - - - - - - - - - - - - - - - - - - - - - - - - - - - - - - - - - - - - - - - - -
S410p/S410p Touch
a
f
d
g
c c
b
e
2
Chapter 1. Getting to know your computer
S510p/S510p Touch
Note: The dashed areas indicate parts that are invisible from outside.
Attention:
Do not open the display panel beyond 130 degrees. When closing the display panel, be
careful not to leave pens or any other objects in between the display panel and the
keyboard. Otherwise, the display panel may be damaged.
f
d
g
ac c
b
e
Chapter 1. Getting to know your computer
3
Integrated
camera
Use the camera for video communication.
Wireless
antennas
Connect to the wireless adapter to receive and send
wireless radio.
Built-in
microphone
Captures sound which can be used for video
conferencing, voice narration, or audio recording.
Display
Provides brilliant visual output.
Power button
Press this button to turn on the computer.
Touchpad
The touchpad functions as a conventional mouse.
To move the cursor on the screen, slide your fingertip over
the pad in the direction in which you want the cursor to
move.
Touchpad
buttons
The functions of the left and right buttons correspond to
those of the left and right buttons on a conventional
mouse.
Note: Yo u can enable or disable the touchpad and the touchpad buttons by pressing F6 ( ).
a
b
c
d
e
f
g
4
Chapter 1. Getting to know your computer
Hotkeys
You can access certain system settings quickly by pressing the appropriate
hotkeys.
:
Mutes/unmutes the sound.
:
Enables/disables airplane
mode.
:
Decreases the volume level.
:
Switches the active program.
:
Increases the volume level.
:
Turns on/off the backlight of
the display.
:
Closes the currently active
window.
:
Projects to a connected
display.
:
Refreshes the desktop or the
currently active window.
:
Decreases display
brightness.
:
Enables/disables the
touchpad and the touchpad
buttons.
:
Increases display brightness.
Note: If you changed the HotKey Mode from Enabled to Disabled in the BIOS setup utility,
you will need to press the Fn key in combination with the appropriate hotkey.
Chapter 1. Getting to know your computer
5
Left-side view - - - - - - - - - - - - - - - - - - - - - - - - - - - - - - - - - - - - - - - - - - - - - - - - - - - - - - - - - - - - - - - - - - - - - - - - - - - - - - - - - - - - - - - - - -
S410p/S410p Touch
S510p/S510p Touch
Novo button
When the computer is off, press this button to start the
Lenovo OneKey Recovery system or the BIOS setup
utility, or to enter the boot menu.
Note: For details, see “Chapter 3. Lenovo OneKey Recovery system” on page 20.
AC power
adapter jack
Connect the AC power adapter here.
Ventilation slots
Dissipate internal heat.
Attention:
Make sure that none of the ventilation slots are blocked or else overheating of the
computer may occur.
54 6 7ca b
5 6 7ca b
a
b
c
6
Chapter 1. Getting to know your computer
VGA port
Connects to external display devices.
RJ-45 port
Connects the computer to an Ethernet network.
HDMI port
Connects to devices with HDMI input such as a TV or a
display.
USB 3.0 ports
Connect to USB devices.
Note: For details, see “Connecting USB devices” on page 7.
d
e
f
g
Chapter 1. Getting to know your computer
7
Connecting USB devices
You can connect a USB device to your computer by inserting its USB plug
(Type A) into the USB port on your computer.
The first time you plug a USB device into a particular USB port on your
computer, Windows automatically installs a driver for that device. After the
driver is
installed, you can disconnect and reconnect the device without
performing any additional steps.
Before disconnecting a USB storage device, make sure your computer has
finished transferring data with that device. Click the Safely Remove
Hardware and Eject Media icon in the notification area of the Windows
desktop screen to remove
the device before disconnecting.
Note: Typically, Windows detects a new device after connecting it, and then installs the
driver automatically. However, some devices may require you to install the driver
before connecting. Check the documentation provided by the device’s manufacturer
before connecting the device.
Notes:
If your USB device uses a power cord, connect the device to a power source before
connecting it. Otherwise, the device may not be recognized.
When in sleep mode, you can only use the keyboard instead of the mouse to wake up the
computer.
8
Chapter 1. Getting to know your computer
Connecting network cables
To insert a network cable, do the following:
1
Hold one connector of the network cable to press the RJ-45 cover down
gently .
2
Insert the connector into the RJ-45 port .
Software configuration
Consult your Internet Service Provider (ISP) for details on how to configure
your computer.
a
b
a
b
Chapter 1. Getting to know your computer
9
Right-side view - - - - - - - - - - - - - - - - - - - - - - - - - - - - - - - - - - - - - - - - - - - - - - - - - - - - - - - - - - - - - - - - - - - - - - - - - - - - - - - - - - - - - - -
Combo audio
jack
Connects to headsets.
Notes:
The combo audio jack does not support conventional microphones.
The recording fu nction may not be supported if third-party headphones or headsets are
connected, due to different industry standards.
USB 2.0 port
Connects to USB devices. For details, see “Connecting
USB devices” on page 7.
Optical drive (on
select models)
Reads/Burns optical discs.
a b 3
a
b
c
10
Chapter 1. Getting to know your computer
Front view - - - - - - - - - - - - - - - - - - - - - - - - - - - - - - - - - - - - - - - - - - - - - - - - - - - - - - - - - - - - - - - - - - - - - - - - - - - - - - - - - - - - - - - - - - - - - - - - - -
Memory card slot
Insert memory cards (not supplied) here. For details, see
“Using memory cards (not supplied)” on page 11.
Power indicator
Battery indicator
Symbol Indicator status Meaning
On (solid white) The computer is powered on.
Blinking The computer is in sleep mode.
Off The computer is powered off.
On (solid white) The battery has more than 20%
charge.
Solid amber The battery has between 5% and
20% charge.
Fast blinking amber There is a problem with the battery
or the battery connection.
Slow blinking amber The battery is being charged. When
the battery charge reaches 20%, the
bl
inking color changes to white.
Slow blinking whiteThe battery has between 20% and
80% charge and is still charging.
When the battery reaches 80%
charge, the light will stop blinking,
but charging will continue until the
battery is fully charged.
a b
3
a
b
c
Chapter 1. Getting to know your computer
11
Using memory cards (not supplied)
Your computer supports the following types of memory card:
Secure Digital (SD) card
•MultiMediaCard (MMC)
Inserting a memory card
Slide a memory card in until it clicks into place.
Removing a memory card
1
Push the memory card in until you hear a click.
2
Gently pull the memory card out of the memory card slot.
Attention:
Insert only one card in the slot at a time.
This card reader does not support SDIO devices (e.g., SDIO Bluetooth, etc.).
Note: If a dummy card is shipped with the computer, push the dummy card and then
remove it before inserting a memory card.
Attention:
Before removing a memory card, disable it through Safely Remove Hardware and
Eject Media to avoid data corruption.
12
Chapter 1. Getting to know your computer
Bottom view - - - - - - - - - - - - - - - - - - - - - - - - - - - - - - - - - - - - - - - - - - - - - - - - - - - - - - - - - - - - - - - - - - - - - - - - - - - - - - - - - - - - - - - - - - - - -
Battery latch -
manual
Keeps the battery pack secured i n place.
Battery pack
Battery latch -
spring loaded
Keeps the battery pack secured i n place.
Ventilation slots
Allow air to enter the computer for cooling.
Speakers
Provide audio output.
2
2
abc
4
e e
a
b
c
d
e
13
Chapter 2. Starting to use Windows 8
Configuring the operating system for the first time - - - - - - - -
You need to configure the operating system when it is first used. The
configuration process may include the procedures below:
• Accepting the end user license agreement
•Configuring the Internet connection
•Registering the operating system
•Creating a user account
Operating system interfaces - - - - - - - - - - - - - - - - - - - - - - - - - - - - - - - - - - - - - - - - - - - - - - - - - - - - - - - - - -
Windows 8 comes with two main user interfaces: the Start screen and the
Windows desktop.
To switch from the Start screen to the Windows desktop, do one of the
following:
Select the Desktop tile on the Start screen.
•Press the Windows key + D.
To switch from the desktop to the Start screen, do one of the following:
Select Start
from the charms bar.
•Move the cursor to the lower-left corner, then select the Start screen
thumbnail when it is displayed.
Start screen Desktop
14
Chapter 2. Starting to use Windows 8
Charms and the charms bar - - - - - - - - - - - - - - - - - - - - - - - - - - - - - - - - - - - - - - - - - - - - - - - - - - - - - - - - - - -
Charms are navigation buttons that let you access basic tasks quickly.
Charms include: Search, Share, Start, Devices, and Settings. The charms bar
is the menu that contains the charms. To display the charms bar, do one of
the following:
•Move the cursor to the upper-right or lower-right corner until the charms
bar is displayed.
• Press the Windows key + C.
Search charm
The Search charm is a powerful new way to find what you are looking for,
including apps, settings and files.
20


Need help? Post your question in this forum.

Forumrules


Report abuse

Libble takes abuse of its services very seriously. We're committed to dealing with such abuse according to the laws in your country of residence. When you submit a report, we'll investigate it and take the appropriate action. We'll get back to you only if we require additional details or have more information to share.

Product:

For example, Anti-Semitic content, racist content, or material that could result in a violent physical act.

For example, a credit card number, a personal identification number, or an unlisted home address. Note that email addresses and full names are not considered private information.

Forumrules

To achieve meaningful questions, we apply the following rules:

Register

Register getting emails for Lenovo IdeaPad S510p Touch at:


You will receive an email to register for one or both of the options.


Get your user manual by e-mail

Enter your email address to receive the manual of Lenovo IdeaPad S510p Touch in the language / languages: English as an attachment in your email.

The manual is 4,62 mb in size.


You will receive the manual in your email within minutes. If you have not received an email, then probably have entered the wrong email address or your mailbox is too full. In addition, it may be that your ISP may have a maximum size for emails to receive.

Others manual(s) of Lenovo IdeaPad S510p Touch

Lenovo IdeaPad S510p Touch User Manual - German - 45 pages

Lenovo IdeaPad S510p Touch User Manual - Dutch - 45 pages

Lenovo IdeaPad S510p Touch User Manual - French - 45 pages


The manual is sent by email. Check your email

If you have not received an email with the manual within fifteen minutes, it may be that you have a entered a wrong email address or that your ISP has set a maximum size to receive email that is smaller than the size of the manual.

The email address you have provided is not correct.

Please check the email address and correct it.

Your question is posted on this page

Would you like to receive an email when new answers and questions are posted? Please enter your email address.


Info