Detailed guide / Record mode/ 153
Taking photographs with the self-timer -
A
The automatic shutter release button allows you to
take a picture with a delay of either 2 or 10 s. This is
particularly useful for group photographs, where you
want to appear in the picture yourself or if you want to
avoid the picture being out of focus due to camera
shake when releasing the shutter. In such cases, we
recommend that you mount the camera on a tripod.
Notes:
• Self-timer operation is not possible in conjunction
with video recording
ü
.
• When the self-timer is activated, only single
pictures are possible, i.e. exposure series
7
and
automatic exposure bracketing
k
cannot be
combined with self-timer mode. If exposure series
are activated, the corresponding display appears
crossed out
t
(2.1.35).
Setting and using the function
1. By repeatedly pressing up on the direction pad
A
(1.30), you can set the different function types.
They scroll through in an endless loop as follows:
–
Z
Self-timer mode with 10 s delay
–
Ä
Self-timer mode with 2 s delay
– Self-timer off (= default setting)
• In the viewfinder/monitor (1.19/32) the relevant
symbol appears (2.1.32 a/b).
2. Press the shutter release button all the way down
to take the photograph.
• Progress – with 10 s delay – is indicated by flash-
ing of the self-timer LED (1.4), first of all slowly
(at 1Hz) and more quickly (at 2Hz) in the last 2 s.
The display in the viewfinder/monitor flashes in
blue during the delay (at 1.6 Hz).
With a 2 s delay, the displays flash as described
above for the last 2s.
The function can be cancelled at any time during self-
timer delay by pressing the
MENU
button (1.25).
Note: Pressing the
MENU
button cancels the activated
as well as any already running self-timer function.
Important: In self-timer mode, focus and exposure
are not set when the shutter release button reaches
its pressure point, but immediately before the picture
is taken.
Calling up menu functions with the quick set
button -
FUNCTION
Some of the functions in the menus are used more
often in practice than others, in particular with chang-
ing subjects and situations, or because the pictures
are intended for different uses, etc.. With the LEICA
DIGILUX 2 you can specify the four most important
functions of the record menu to you and then always
call them up directly with the
FUNCTION
button
(1.24) for quick operation.
Setting the functions that should be called up
with the quick selection button -
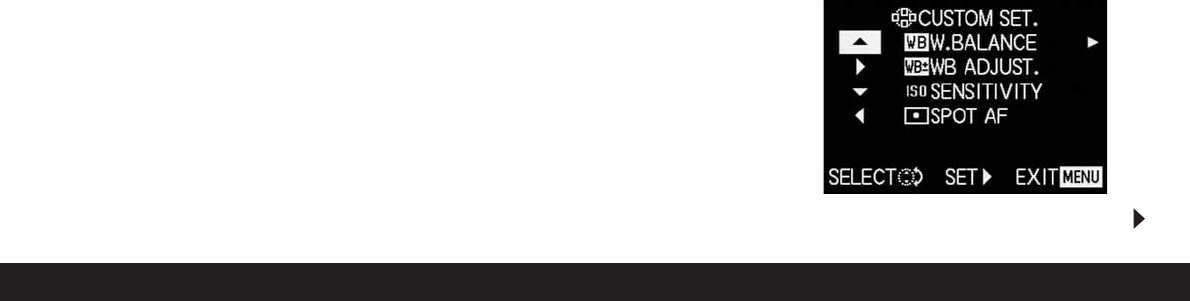
i
CUSTOM SET.
1. In the record setup menu
k
SETUP
2
/
3
(see pp. 112/122) select the menu item
i
CUSTOM SET (3.19).
2. Open the corresponding sub-menu by pressing
right on the direction pad (1.30).
• The sub-menu appears. It contains four lines for
assigning the four edges of the direction pad. In
every line it is indicated which function of the
edge concerned is assigned – indicated by the
relevant arrow.