cutting threads. The use of machine taps is recommended.
The tap is clamped into the chuck. The electronics are
sensitive and should be handled with utmost care to avoid
breaking the tap – particularly when cutting threads into
blind holes.
Important! When cutting threads, use low speeds only.
Important note for machines with clockwise and anti-
clockwise rotation.
Reassembly of drill chuck:
Caution!
Before disassembling and reassembling the drill chuck,
disconnect the machine from the power supply, or re-
move the mains cable module (5) from the grip using
the locking device button (4).
Caution!
Before disassembling and reassembling the drill chuck,
always move the reversing switch (3) to the LOCK posi-
tion. By doing so, you eliminate the risk of accidentally
triggering the full wave switch (1).
If a faulty chuck has to be replaced, please check whether
the chuck is secured to the drill spindle with a safety
screw. This screw must be removed first (Caution! Left-
handed screw! Turn clockwise!).
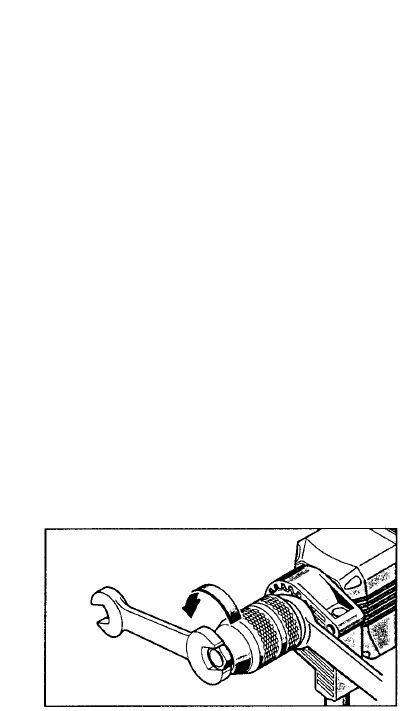
Screw off the drill chuck as shown in the picture (with an
open-end wrench).
For reassembly, proceed in the opposite direction.
Caution: Before fitting a new chuck please clean the end
faces on the chuck and drill spindle.
Tighten the new chuck securely (30 Nm). Secure the chuck
with the safety screw is there is one (Tighten the safety
screw in anti-clockwise direction).
Caution!
It is still possible, especially when there is no safety
screw, that the chuck comes off the drill spindle when
it is turning in the anticlockwise direction. For this rea-
son, when changing the chuck ensure that it is fitted
onto the spindle perfectly.
Caution!
Put the reversing switch (3) in the LOCK position be-
fore disassembling and reassembling the drill chuck,
disconnect the machine from the power supply, or re-
move the mains cable module (5) from the grip using
the locking device button (4).
Always make sure that the chosen speed is correct for
the purpose for which you are using the machine.
When drilling match speed with type of material and drill.
Use tool steel twist drills for soft materials such as wood
and plastics; high speed twist drills for steel and iron.
When drilling match speed to material and the diameter of
the drill.
Use tool steel twist drills for soft materials such as wood
and plastics; high speed twist drills for steel and iron.
Also make sure that, using a gear-rim-chuck, the drill
chuck key is never fastened to the drill with chains,
strings or by similar means. Be sure that the workpiece
cannot be taken along by the drill.
Maintenance
The machine's motor has life-time lubrication and requires
no special maintenance. However, should you operate the
machine on a continuous basis over long periods of time
we recommend that you send us the machine for thorough
cleaning and an inspection. This will spare you unneces-
sary repair expenses and increase the machine's service
life. If you always clean the ventilator of dust after each
operation, the motor will enjoy an ever longer service life.
Uniform ventilation is essential for a long service life.
Replacing carbon brushes
Our service personnel will do this and all other servicing
work fast and professionally.
Mains cable
Replace damaged mains cables immediately. This is an
uncomplicated procedure thanks to the latest cable mo-
dule (5). Press both locking buttons (4) and pull the cable
module (5) out of the grip. Insert and lock the new mains
cable module. Cables with different lengths are available
as optional accessories.
Only use the mains cable module for KRESS power
tools! Do not attempt to operate other electrical ap-
pliances with it!
Auxiliary handle
For safety reasons the side handle should always be used
when working with the drill. It guarantees safe, wander-free
guidance of the drill, and at the same time precise adjust-
ment of the drilling depth with the depth stop.
Tighten the draw spindle on the auxiliary handle properly.
This is the only way to ensure that the auxiliary handle
cannot turn on the collar or come off the appliance.
Standard accessories
Side handle with depth stop
Noise/vibration information
Measured values correspond with EN 50144.
Sound pressure level: 73
+
3
dB (A)
Sound power level: 86
+
3
dB (A)
Work place emission value: 76
+
3
dB (A)
Operators require noise protection equipment.
The weighted acceleration ist typically smaller than 2,5 m/s
2
.
Environmental protection
Kress takes back used machines for resource saving recyc-
ling. Due to their modular construction Kress machines can
be very easily broken down into their recyclable basic ma-
terials. Hand in your old Kress machine at a dealer or send
them directly to Kress.
Subject to change without notice.